Revolutionizing Document Archiving for SharePoint Online
How to Create a Hyper-V Template for Deployment
If you ever need to deploy Virtual Machines often a great time saving way is to create a VM Template for quick and easy deployment.
The main reason for creating a Hyper-V Template is to save time and effort when deploying Virtual Machines. By having a standardised and consistent configuration, deploying a new VM becomes a streamlined process that can be accomplished quickly and easily. This also reduces the chances of human error and helps ensure that all VMs deployed from the template have the same configuration, reducing the need for manual intervention and troubleshooting. Additionally, using a template helps enforce best practices and promotes standardisation across an organisation, improving the overall management and efficiency of the virtual infrastructure.
VM templates give you the advantage of a consistent configuration that is standardised format that is reusable.
To create a Hyper-V VM Template follow these steps;
What Are Hyper-V Templates?
A Hyper-V template is a pre-configured virtual machine (VM) that can be used to quickly create new VMs with identical configurations. Templates can include operating systems, applications, settings, and configurations. This means that you can deploy new VMs with just a few clicks, without having to manually install and configure each one.
Why Use Hyper-V Templates?
Using Hyper-V templates can save time and effort when deploying new VMs. Instead of creating each VM manually, you can simply select a pre-configured template that meets your needs. This can be especially useful for creating multiple VMs with identical configurations, such as in a test environment or for a specific application.
Templates also ensure consistency and standardization across your virtual infrastructure. By using the same template for each new VM, you can ensure that each VM has the same configuration and settings. This can make it easier to manage and troubleshoot your virtual infrastructure.
Hyper-V Template Benefits
There are several benefits to creating a Hyper-V template, including:
- Consistency and Standardization: By creating a Hyper-V template, administrators can ensure that all virtual machines (VMs) created from the template have a consistent configuration and operating system setup. This can help to reduce administrative overhead and minimize the risk of configuration errors.
- Faster Deployment: Creating a Hyper-V template allows administrators to deploy new VMs much faster compared to manually installing the operating system and configuring the necessary software on each individual VM.
- Reduced Storage Requirements: Hyper-V templates are stored as a single VHD (virtual hard disk) file, which can be much more efficient in terms of storage compared to storing multiple VMs each with their own VHD file.
- Increased Scalability: By using a Hyper-V template, administrators can quickly and easily create new VMs as needed to support business growth and changing requirements.
- Improved Disaster Recovery: With a Hyper-V template in place, administrators can quickly recreate VMs in the event of a disaster, reducing downtime and minimizing the impact on the business.
- Enhanced Security: By using a Hyper-V template, administrators can enforce security policies and configuration standards for all VMs created from the template, helping to maintain a secure computing environment.
- Improved Compliance: For organizations that must comply with industry or regulatory standards, using a Hyper-V template can help ensure that all VMs meet the necessary requirements.
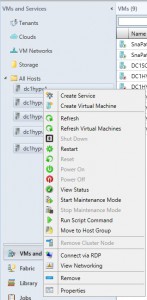
Open System Centre Virtual Machine Manager
Open your SCVMM (Microsoft System Centre Virtual Machine Manager) console, click Hosts then Right Click and choose Create Virtual Machine.
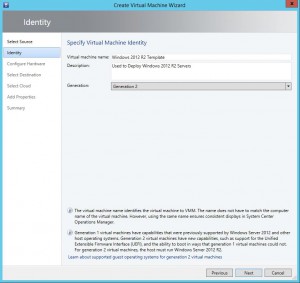
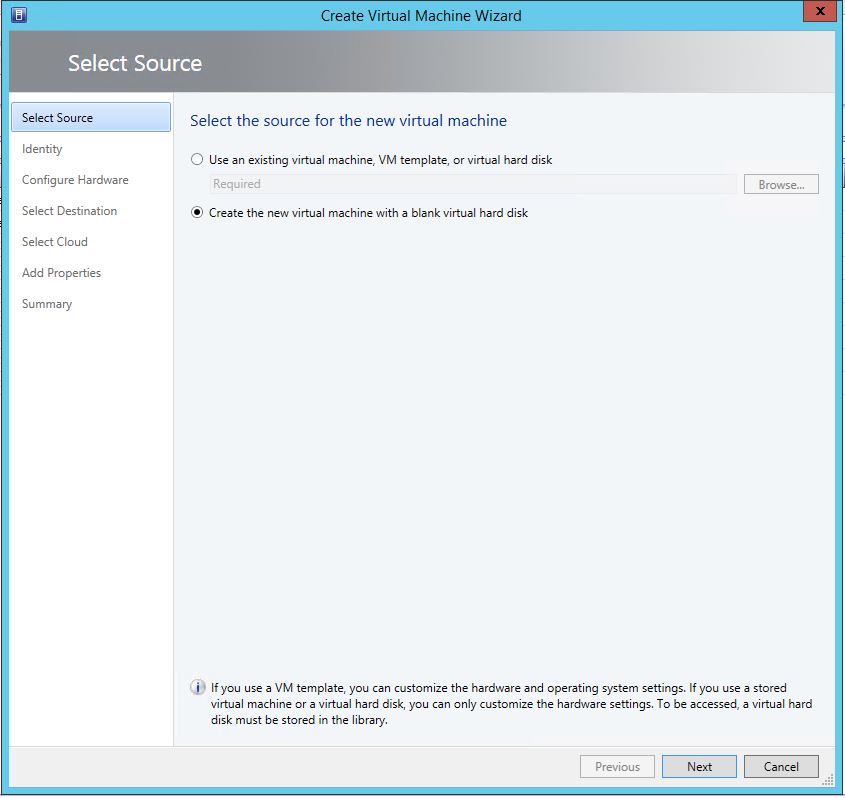
Create Virtual Machine Wizard
Next, the Create Virtual Machine Wizard will start up. Choose Create the new virtual machine with a blank virtual hard disk and click Next.

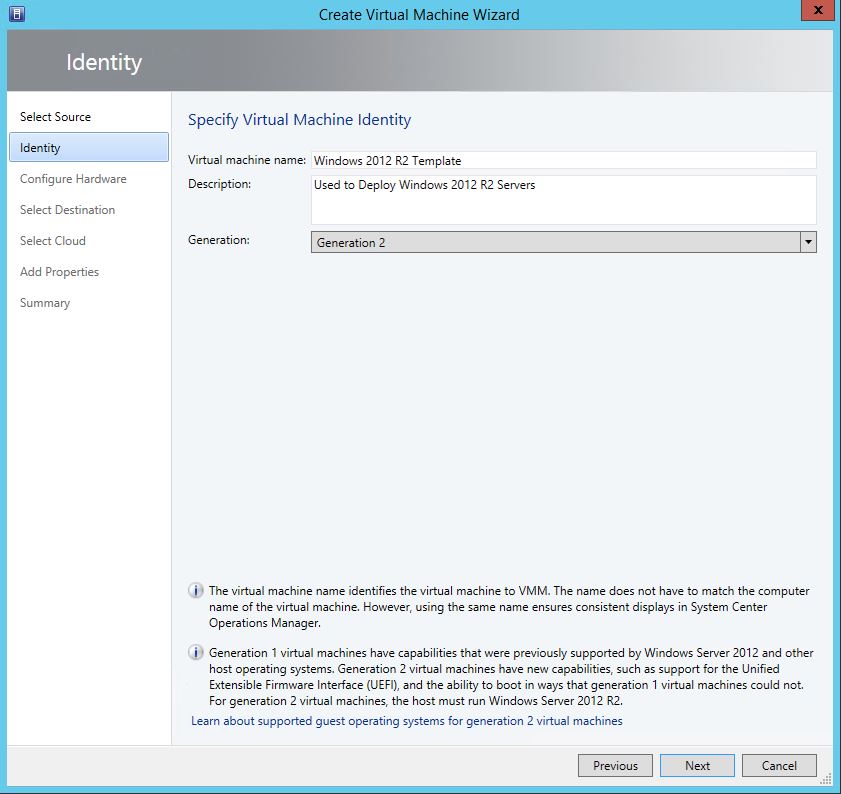
Create Virtual Machine Wizard
Now we need to give the VM a name and description. In this example I am using the Windows 2012 R2 operating system so the name and description are shown as such. As the Hyper-V host is Windows 2012 R2 as well, I can choose either Generation 1 or Generation 2 VM. Generation 2 VMs add the following new functionality;
- PXE boot by using a standard network adapter
- Boot from a SCSI virtual hard disk
- Boot from a SCSI virtual DVD
- Secure Boot (enabled by default)
- UEFI firmware support
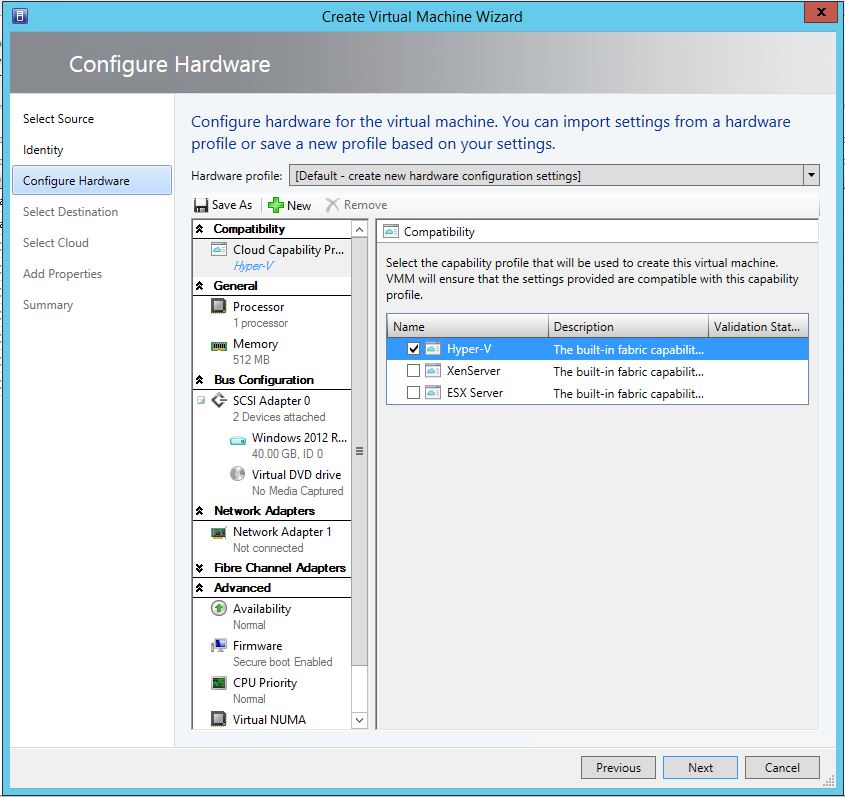
Edit Virtual Machine Hardware Configuration
We can now edit the VMs hardware configuration. Choose the appropriate hardware settings you wish, make sure to have selected your installation media and then selected Hyper-V for compatibility and click on Next

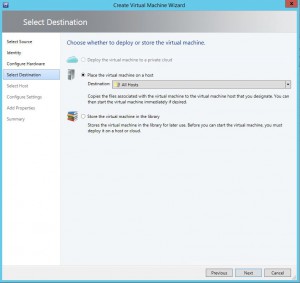
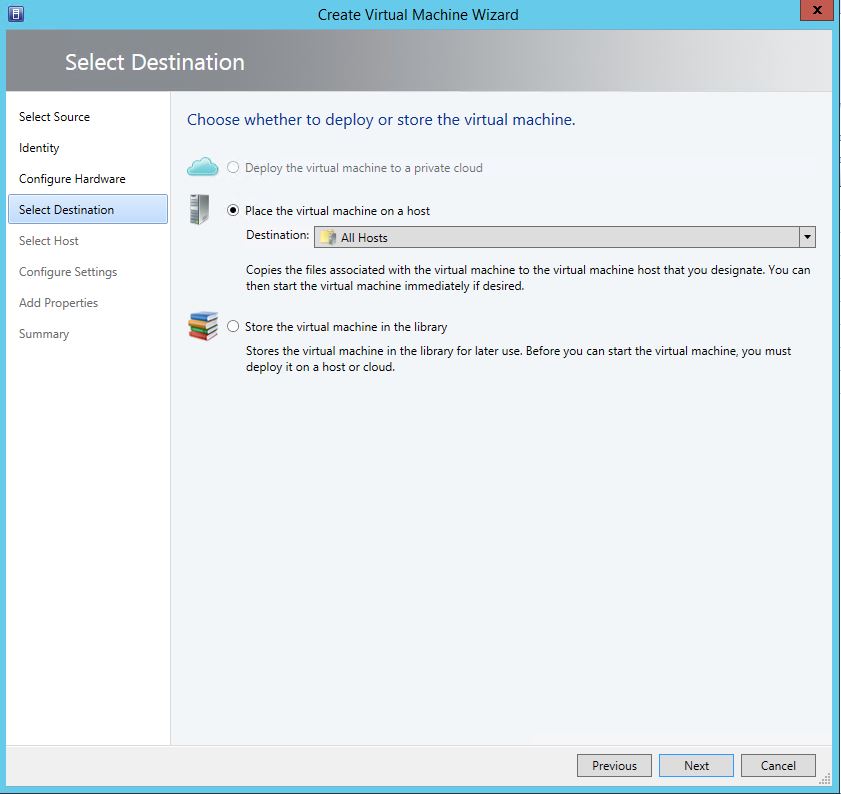
Choose where your Hyper-V VM Destination
Select the Destination where the VM will reside.
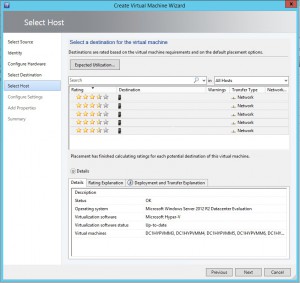
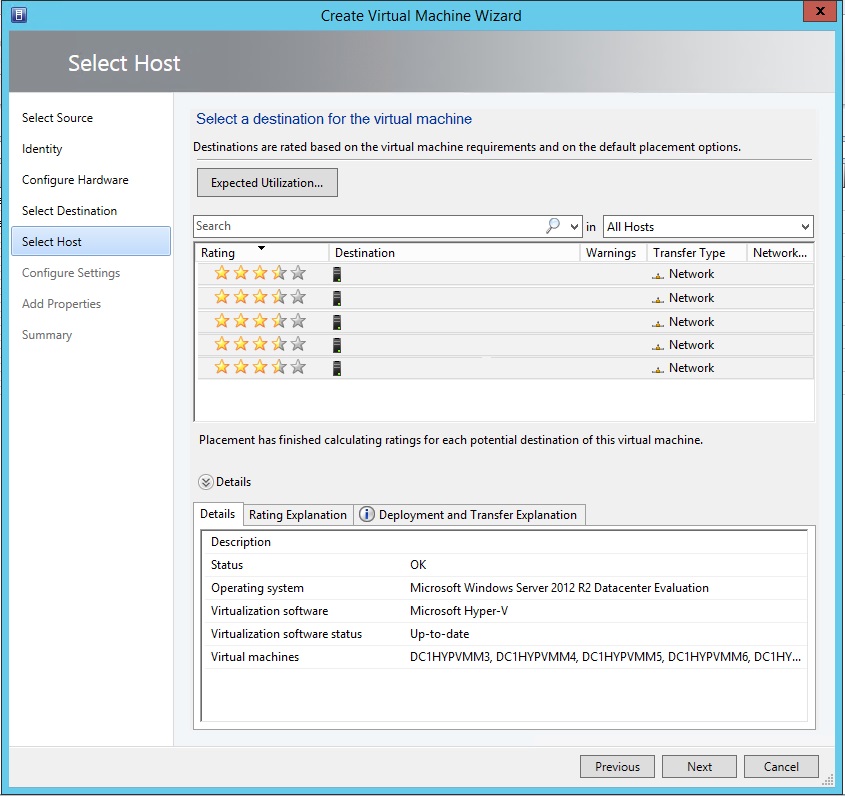
Select your Hyper-V Host
Now Select the Host to deploy to and then click Next.
Select your Hyper-V Host
On the Configure Settings tab, choose the location where the VM will keep its virtual hard disk and then click Next.

Configure your Hyper-V Template Settings
On the Configure Settings tab, choose the location where the VM will keep its virtual hard disk and then click Next.
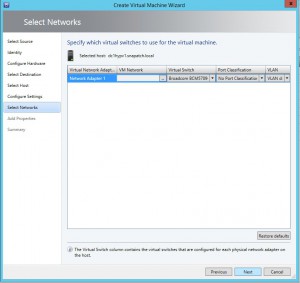
Choose your network adapter
Select the appropriate network, adapter and virtual switch then click Next.
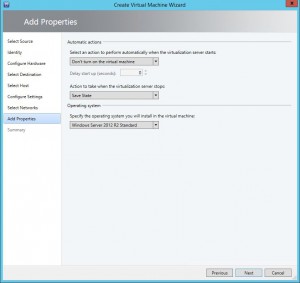
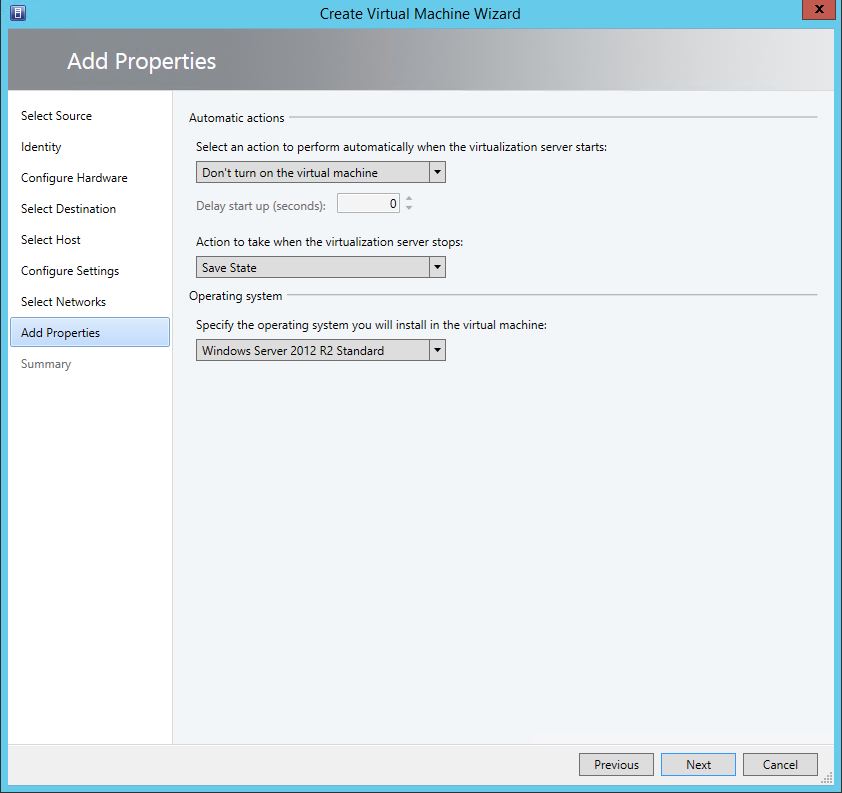
Template Hardware Options
You can now choose a few options including if you wish to Turn the machine on automatically and specify the operating system that you will install.
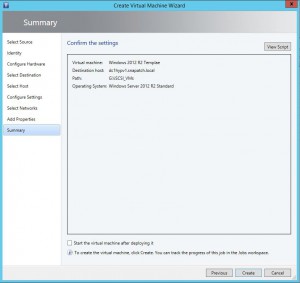
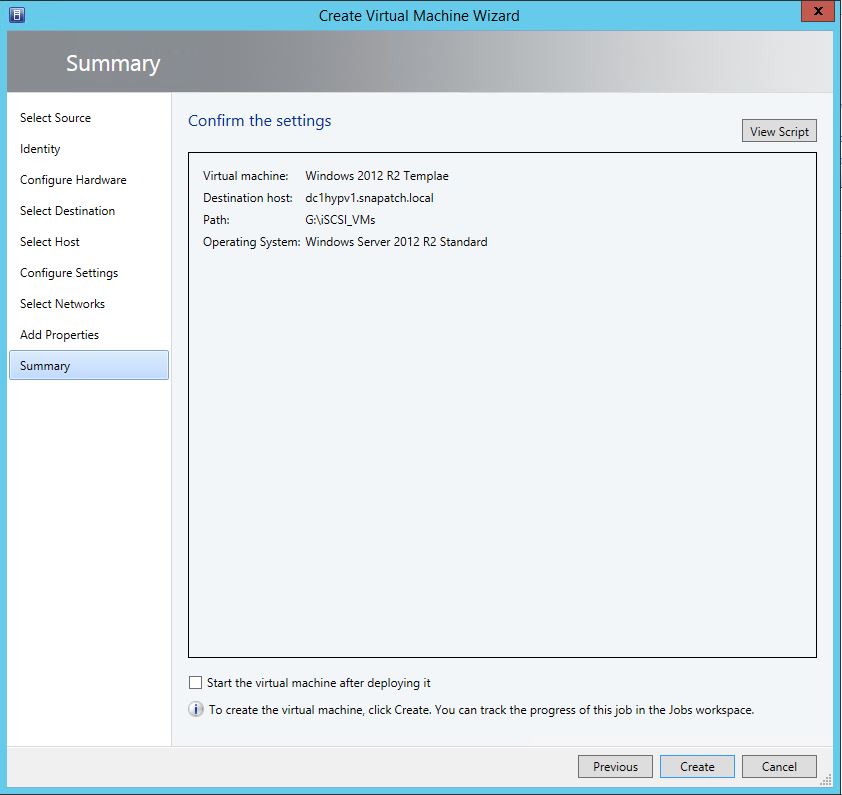
Ready to create the Hyper-V Template
Check that the settings are correct, and when you are ready to, click Create.
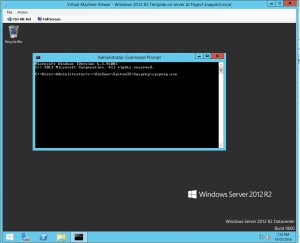
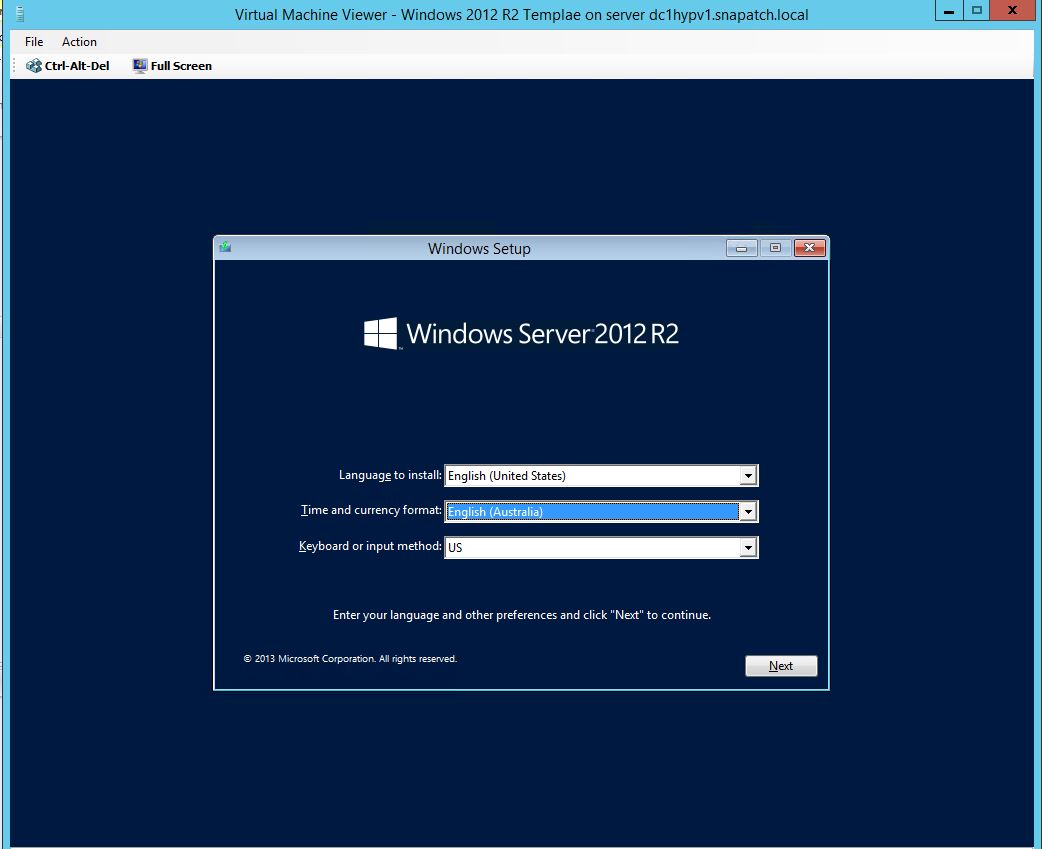
Power On the Hyper-V Template
Now power on the VM if you have done so already, and install the operating system of your choice

Power On the Hyper-V Template
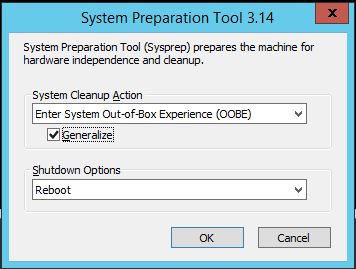
Now once you have installed the Windows Operating System, do not join the domain. Log on to the VM, open a command prompt and go to the Windows, System32, Sysprep folders then run sysprep.exe
Sysprep (System Preparation) is a Microsoft utility tool designed for system administrators to automate the deployment of Windows operating systems. It is used to prepare an operating system for disk cloning or for delivery to end-users.
Sysprep performs several key tasks, including:
- Generalizing the system: Sysprep removes specific information from the Windows installation that is unique to the system, such as the security identifier (SID), computer name, and drivers.
- Configuring the Windows Security settings: Sysprep can reset security settings to default settings, ensuring that all new installations of the operating system will have the same security settings.
- Removing the activation files: Sysprep can remove activation files, allowing the cloned operating system to be activated on a new computer.
- Shutting down the system: After preparing the operating system, Sysprep shuts down the computer, making it ready for disk imaging or delivery to an end-user.
Sysprep is a critical component in the deployment of Windows operating systems and is an essential tool for system administrators. It enables them to efficiently and easily deploy operating systems to multiple computers, ensuring that each installation is fully configured and ready to use.
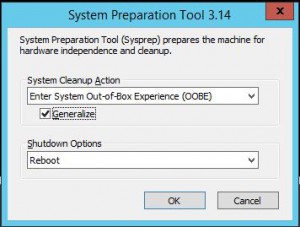
Power On the Hyper-V Template
You will now be presented with the System Preparation tool. Make sure to check the Generalize checkbox as well as Shutdown in the shutdown options dropdown then click OK.
Once the system has been prepared, the VM will power off.
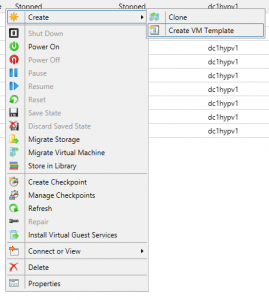
Power On the Hyper-V Template
Now that the VM has powered off, we need to convert it to a template. Highlight the powered off VM, right click and then Create and Create VM template to start the wizard.
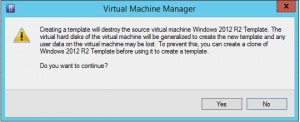
Hyper-V Template Creation Warning
Next a warning is shown that you are about to convert this VM to a template. “Creating a template will destroy the source virtual machine “vm name”. The virtual hard disk of the virtual machine will be generalized to create the new template and any user data of the virtual machine may be lost. To prevent this, you can create a clone of “vm name” before using it to create a template.
Make sure you understand what you are committing this VM to and click Yes to continue.
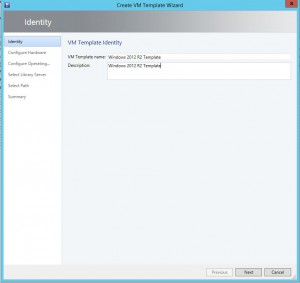
Create Hyper-V Template Wizard Starts
Now the Create VM Template Wizard starts. Give the template a name and description then click Next.
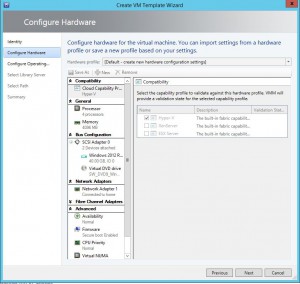
Confirm Template Hardware Configuration
Check you are happy with the hardware configuration then click Next.
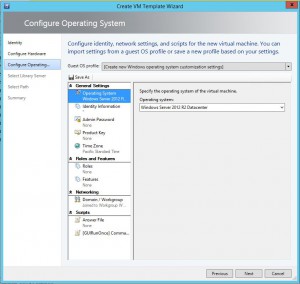
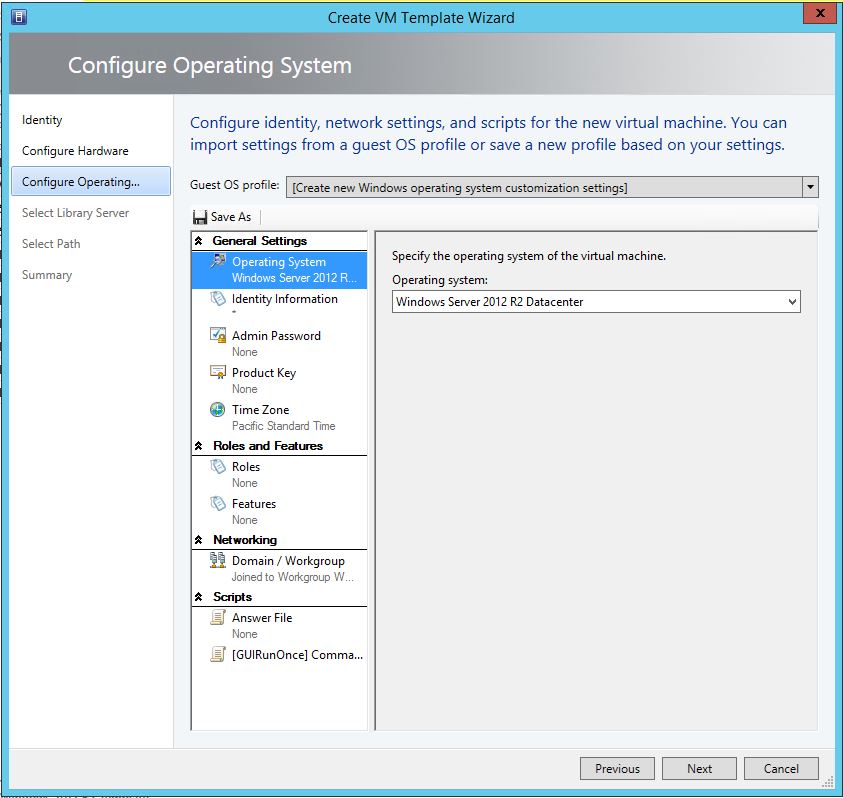
Configure Operating System Settings
The Configure Operating System Tab we can change settings for the OS. Time Zones, whether you wish it to join a domain automatically or not, and any additional Operating System Roles or Features you wish can be configured here. Change what you need and then click Next.
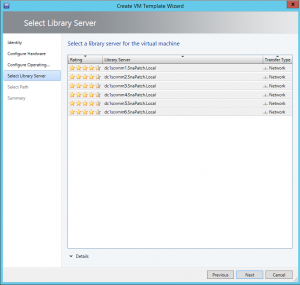
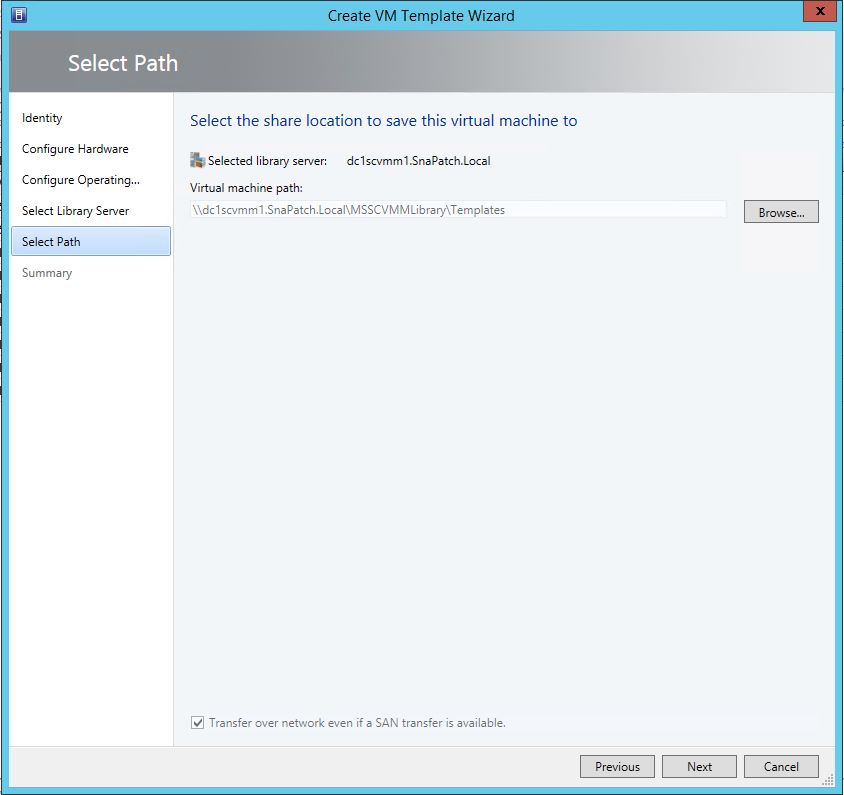
Choose a Server Library
On the Select Library Server tab, choose one of your library servers and choose Next.
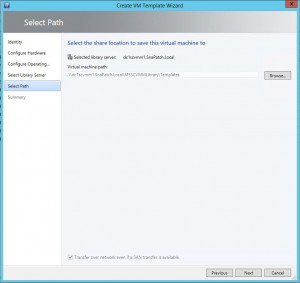
Choose a Server Library
Select the UNC Path location for the files to save to. Be mindful that other Hyper-V servers within your environment will require access to this folder.
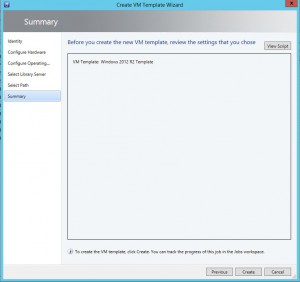
Choose a Server Library
Finally, on the Summary Tab, you can view the script details to see the settings you have chosen. Confirm you are happy with the settings then click on Create.
Thats all there is to it. Your SCVMM and Hyper-V environment should now be preparing the selected VM and converting it to a template for consistent deployment to your virtual environment.
Hyper-V templates can be a valuable tool for businesses looking to streamline their virtual infrastructure. By creating pre-configured templates, you can save time and effort when deploying new VMs, ensure consistency and standardization, and make it easier to manage your virtual infrastructure. By following best practices for managing templates, you can ensure that your virtual infrastructure is efficient, reliable, and scalable.
FAQ about Hyper-V templates
- What is a Hyper-V template?
A Hyper-V template is a pre-configured virtual machine image used as a starting point for creating new virtual machines. It allows administrators to standardize virtual machine configurations, reducing the time and effort required to deploy new virtual machines.
- How do I create a Hyper-V template?
To create a Hyper-V template, you need to create a new virtual machine and configure it as desired. Then, shut down the virtual machine and convert it to a template. This can be done through the Hyper-V Manager or through PowerShell.
- What are the benefits of using a Hyper-V template?
The benefits of using a Hyper-V template include reduced deployment time, standardization of virtual machine configurations, and the ability to easily update virtual machines. Templates also allow administrators to quickly deploy new virtual machines, reducing the risk of human error.
- What should I include in my Hyper-V template?
Your Hyper-V template should include all of the necessary software and configurations for your virtual machines. This might include operating systems, applications, security updates, and network configurations.
- Can I use a Hyper-V template for different types of virtual machines?
Yes, Hyper-V templates can be used for different types of virtual machines, including domain controllers, file servers, and web servers.
- How do I update a Hyper-V template?
To update a Hyper-V template, you need to update the virtual machine that the template is based on. After making the desired updates, shut down the virtual machine and then update the template.
- What are the limitations of using a Hyper-V template?
The main limitation of using a Hyper-V template is that it only provides a starting point for virtual machines. Administrators still need to configure each virtual machine individually, as the template does not automatically configure unique settings such as IP addresses.
- What are some best practices for creating Hyper-V templates?
Some best practices for creating Hyper-V templates include ensuring that all software and configurations are up-to-date, including only necessary software, and testing the template before deploying it to production. Additionally, it is important to regularly update templates to ensure that virtual machines are always running the latest software and configurations.


