SharePoint and Microsoft Information Protection

SharePoint and Microsoft Information Protection

Handling Microsoft Information Protection (MIP) in Archived SharePoint Documents

Managing sensitive information within an organization is no easy task, particularly when it involves archiving documents that are protected by Microsoft Information Protection (MIP). The challenge lies not only in the act of archiving but in ensuring that these documents remain secure, compliant, and accessible when needed. In this article, we’ll explore the intricacies of handling MIP-protected documents in SharePoint, especially when archiving them using Squirrel. Whether you’re new to MIP or an experienced professional, you’ll find valuable insights on how to navigate the complexities of this essential process.

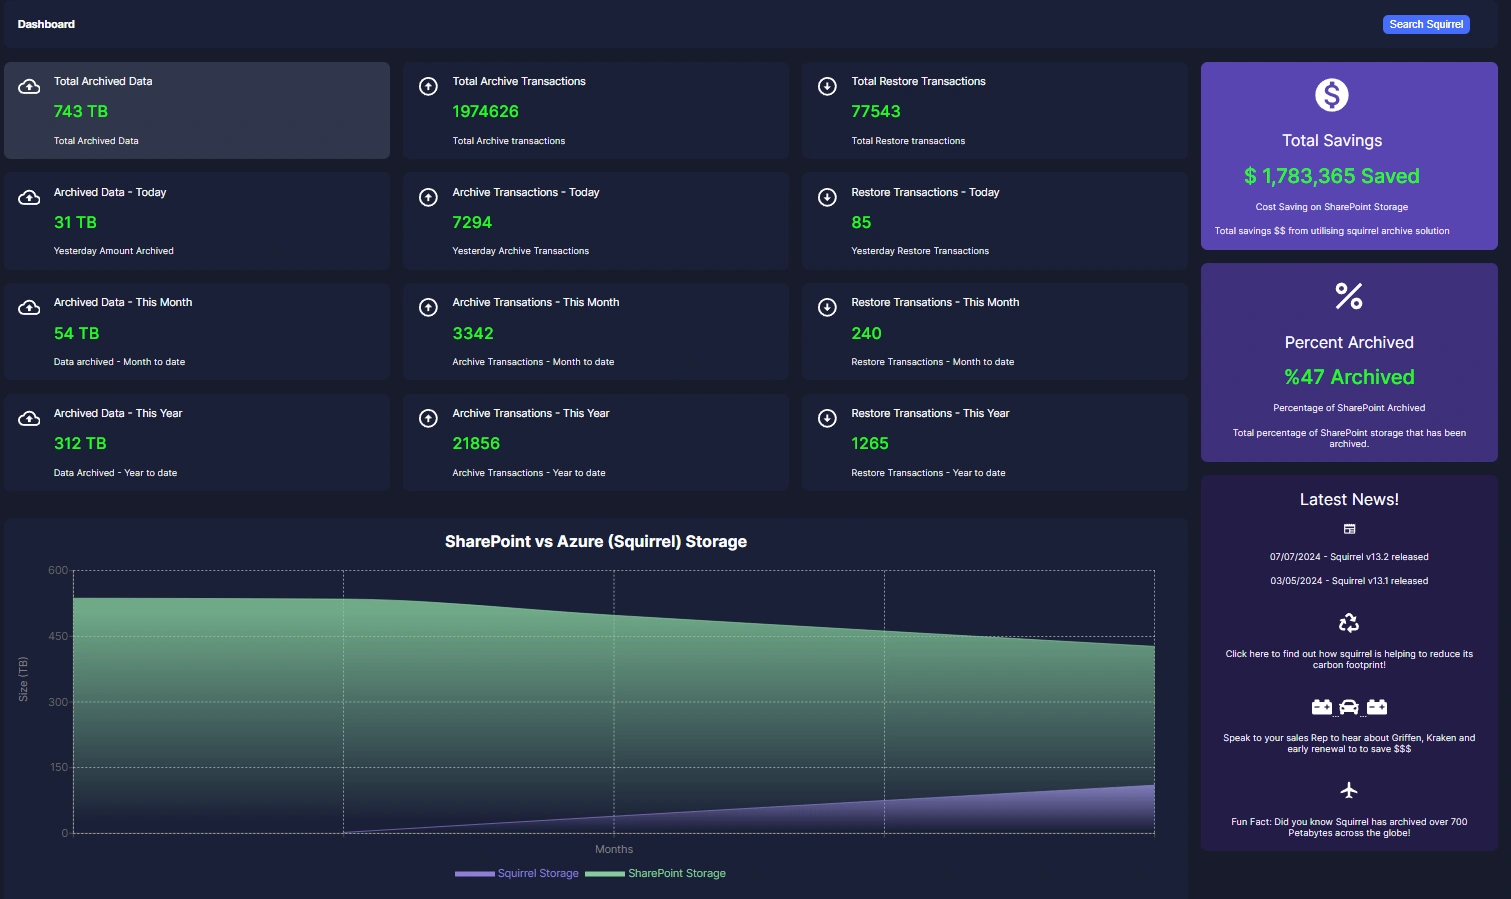
Squirrel Main Dashboard

Introduction to Microsoft Information Protection (MIP)

Let’s start by getting a clear understanding of what Microsoft Information Protection, or MIP, really is. MIP is a comprehensive suite of tools and services designed to help organizations protect their sensitive data. It works across Microsoft 365 and other environments to ensure that critical information is labeled, encrypted, and governed according to your company’s policies. But why is MIP so important, especially when it comes to archiving? To answer that, we need to delve deeper into how MIP works and the challenges it presents when integrating with archiving solutions like Squirrel.

What is Microsoft Information Protection (MIP)?

At its core, MIP is all about safeguarding information. It allows organizations to classify, label, and protect data based on its sensitivity. For instance, a document containing personal data might be labeled as “Confidential,” while financial records might receive a “Highly Confidential” label. These labels dictate how the data can be accessed, shared, and stored. More importantly, MIP applies encryption to ensure that sensitive information remains secure, even if it falls into the wrong hands.

This dual function of labeling and encryption is what makes MIP such a powerful tool. However, it also adds a layer of complexity when it comes to archiving. Archiving MIP-protected documents requires careful handling to ensure that the protection remains intact and that the documents can be restored when needed.

Why is MIP Important for Your Organization?

In today’s digital landscape, data breaches and compliance violations are not just hypothetical risks—they’re very real threats that can have severe consequences. MIP helps mitigate these threats by applying protection at the data level. This means that even if a file is accessed by an unauthorized party, the encryption and labeling applied by MIP can prevent sensitive information from being exposed.

For organizations that handle large volumes of data, MIP is an indispensable tool for maintaining both security and compliance. Whether it’s meeting regulatory requirements like GDPR or protecting intellectual property, MIP ensures that your data remains secure at all times.

Understanding the Challenges of Archiving MIP-Protected Documents

Now that we have a grasp of what MIP is and why it’s important, let’s delve into the specific challenges it presents when archiving documents. Archiving is a crucial part of data management, ensuring that information is stored securely for future reference. However, when documents are protected by MIP, archiving them becomes significantly more complex. This complexity arises primarily from the encryption and labeling that MIP applies to documents.

The Role of Encryption and Labels in MIP

MIP uses labels to classify data and encryption to protect it. When a document is labeled as “Confidential” or “Highly Confidential,” it isn’t just tagged with a label—it’s also encrypted to prevent unauthorized access. While this is excellent for security, it can pose significant challenges when it’s time to archive these documents.

One of the primary challenges is ensuring that the encryption keys associated with MIP are preserved over time. These keys are crucial for decrypting the data when it needs to be accessed in the future. Without the correct encryption keys, even authorized users won’t be able to access the archived documents. This is why it’s essential to maintain a historical record of MIP encryption keys—ensuring they are stored securely and are accessible when needed.

Common Issues When Archiving MIP-Protected Documents

One of the most common issues that organizations face during the archiving process is the potential loss of encryption keys over time. MIP keys can be rotated or expire, and if these keys are not properly managed, accessing archived documents can become a major problem. Imagine needing to access a critical document years after it was archived, only to find that the encryption key needed to decrypt it is no longer available. This scenario can lead to data loss, compliance violations, and even legal issues.

Another challenge is the potential for conflicts between the labels applied by MIP and the policies of the archiving system. For instance, an archiving system might have its own set of rules for how documents are stored and accessed. If these rules conflict with the MIP labels, it could result in errors during the archiving process or even lead to the accidental exposure of sensitive information.

Potential Risks of Inadequate Archiving Practices

Failing to properly archive MIP-protected documents can lead to several significant risks. One of the most serious is the potential for data loss. If encryption keys are not maintained or managed correctly, you might find that certain documents are effectively locked forever, with no way to access the information they contain. This can have severe consequences, especially if the data is needed for compliance, legal proceedings, or business operations.

Inadequate archiving practices can also result in compliance violations. Many regulations require organizations to maintain access to their data for a specified period. If you’re unable to access archived documents because the encryption keys are no longer available, you could be found in violation of these regulations, leading to fines, legal action, or damage to your organization’s reputation.

Lastly, there’s the risk of security breaches. If archived documents are not properly protected—either because the encryption is compromised or because they’re stored in an insecure environment—they could be accessed by unauthorized parties. This not only compromises the security of your data but also undermines the trust that clients, partners, and regulators have in your organization.

How Squirrel Handles MIP-Protected Documents During Archiving

This is where Squirrel comes into play as a robust solution for archiving SharePoint documents, including those protected by MIP. Squirrel is designed to seamlessly integrate with Microsoft 365, ensuring that your documents are archived securely and in compliance with your organization’s policies. But how exactly does Squirrel handle MIP-protected documents? Let’s break it down.

Squirrel’s Integration with Microsoft 365

Squirrel is fully integrated with Microsoft 365, which means it can directly interact with MIP-protected documents. This integration is crucial because it allows Squirrel to recognize and preserve the MIP labels and encryption applied to documents. When a document is archived, Squirrel ensures that the MIP protection remains intact, making sure that the document is stored securely and that its integrity is preserved.

This seamless integration also means that the archiving process is efficient and does not disrupt your organization’s workflows. Squirrel handles the complexities of archiving MIP-protected documents behind the scenes, allowing you to focus on your core business activities.

Ensuring Compliance with MIP Policies

Compliance is a major concern when it comes to data protection, and Squirrel is designed with this in mind. By preserving the MIP labels and encryption during the archiving process, Squirrel ensures that your documents remain compliant with regulatory requirements. Whether it’s GDPR, HIPAA, or any other standard, Squirrel helps you meet your obligations without compromising on security.

Security Measures for Archived Data

Security is at the heart of Squirrel’s design. When MIP-protected documents are archived, Squirrel not only preserves the encryption but also adds additional layers of security. This includes encryption in transit and at rest, as well as regular security audits to ensure that your data remains safe from unauthorized access.

Managing Encryption Keys and Access to Archived Documents

When it comes to archiving MIP-protected documents, managing encryption keys is arguably the most critical aspect. These keys are the linchpin of MIP’s security model, and without them, accessing your archived documents could become impossible. Therefore, having a robust strategy for encryption key management is not just recommended—it’s essential.

Best Practices for Encryption Key Management

Effective encryption key management is all about maintaining control over your keys throughout their lifecycle. Here are some best practices to ensure that your encryption keys are managed securely and efficiently:

  • Regular Key Rotation: Regularly rotating encryption keys is a standard practice that helps mitigate the risk of key compromise. However, when dealing with archived documents, it’s crucial to ensure that old keys are retained for as long as the data they protect is needed. This means that even if keys are rotated, previous versions must be securely stored and accessible.
  • Secure Key Storage: Encryption keys should be stored in a highly secure environment. Many organizations use Hardware Security Modules (HSMs) or dedicated key management services (KMS) for this purpose. These tools provide a secure repository for keys, ensuring that they are protected against unauthorized access.
  • Access Control: Only authorized personnel should have access to encryption keys. Implementing strict access controls and regularly auditing access logs can help prevent unauthorized use of keys.
  • Backup and Redundancy: Ensuring that encryption keys are backed up in multiple secure locations is critical. This redundancy helps protect against the loss of keys due to hardware failures, data corruption, or other unforeseen events.
  • Historical Key Retention: Perhaps the most crucial point in the context of archiving is the need to retain historical keys. Since archived documents may need to be accessed years after they’ve been stored, it’s essential that the encryption keys used to protect them are available for the entire retention period. Losing these keys could render the archived documents inaccessible, leading to significant data loss.

By following these best practices, organizations can ensure that their encryption keys are managed effectively, minimizing the risk of losing access to archived MIP-protected documents.

Challenges in Restoring MIP-Protected Documents

Restoring MIP-protected documents can be a complex process, particularly if the encryption keys have been rotated, expired, or lost. The challenges associated with restoring these documents often stem from the need to maintain the integrity of the original MIP labels and encryption.

One common challenge is ensuring that the restored document retains its original security properties. This includes not just the encryption but also the metadata, such as the MIP labels, version history, and any other associated tags. If these elements are not properly managed during the restoration process, the document could lose its classification, potentially exposing sensitive information or leading to compliance issues.

Another challenge arises when the encryption keys are no longer valid. If the keys have been rotated or retired, and the old keys were not retained, restoring the document might be impossible. This underscores the importance of historical key retention, as mentioned earlier.

Additionally, there is the issue of compatibility. Over time, the software and systems used to encrypt and store documents may evolve. Ensuring that older, archived documents can still be decrypted and accessed using current technology is essential for a smooth restoration process.

Squirrel’s Approach to Secure Document Restoration

Squirrel is designed to make the restoration of archived documents as secure and seamless as possible. Here’s how it handles the restoration process for MIP-protected documents:

  • Preservation of MIP Labels and Metadata: Squirrel ensures that all MIP labels and associated metadata are preserved during the restoration process. This means that when a document is restored, it retains its classification, version history, and any other important metadata.
  • Squirrel’s Encryption Management: Squirrel applies its own encryption to archived documents when they are stored in Azure Blob Storage. This encryption is independent of MIP and ensures that the documents remain secure while archived. Upon restoration, Squirrel decrypts its own encryption to restore the document to its original state in SharePoint, without interfering with the MIP encryption applied by the customer.
  • Seamless Restoration Process: The restoration process is designed to be seamless for users. Squirrel ensures that the document is returned to its original location in SharePoint with all its associated metadata intact. The process is transparent, so users can continue to work with their documents without disruption.
  • Automated Key Management: While Squirrel manages its own encryption keys, it does not interfere with the customer’s MIP encryption. The customer’s responsibility is to ensure that MIP encryption keys are managed properly so that they can access the documents when needed.

By following this meticulous approach, Squirrel ensures that restoring MIP-protected documents is not only secure but also straightforward, allowing organizations to focus on their core activities without worrying about data access issues.

Best Practices for Handling MIP-Protected Documents in Squirrel

To fully leverage the capabilities of Squirrel and ensure that MIP-protected documents are handled correctly, it’s important to follow a set of best practices. These practices will help ensure that your archiving and restoration processes are both secure and compliant.

Long-Term Archiving Strategies for MIP-Protected Documents

When planning for the long-term archiving of MIP-protected documents, there are several strategies that organizations should consider:

  • Data Classification and Labeling: Ensure that all documents are correctly classified and labeled before they are archived. This will help streamline the archiving process and ensure that each document is handled according to its sensitivity level.
  • Regular Policy Reviews: Archiving policies should be reviewed regularly to ensure they remain aligned with organizational goals and regulatory requirements. This includes reviewing how MIP labels and encryption are applied and managed.
  • Retention of Historical Encryption Keys: As emphasized earlier, it’s crucial to retain historical encryption keys for as long as the documents they protect are archived. Ensure that these keys are securely stored and accessible when needed.
  • Documentation of Archiving Processes: Document your archiving processes, including how MIP-protected documents are handled. This documentation will be invaluable in the event of an audit or if key personnel changes occur within your organization.

Regular Reviews and Policy Updates

Keeping your archiving and encryption policies up to date is essential for ensuring ongoing compliance and security. Here’s how to approach this:

  • Quarterly Audits: Conduct quarterly audits of your archiving processes to ensure they are functioning as expected. These audits should include checks on encryption key management, document labeling, and the integrity of archived documents.
  • Policy Revisions: Update your policies regularly to reflect changes in technology, regulations, or organizational needs. For example, if your organization adopts a new version of SharePoint or a new encryption standard, your archiving policies should be revised accordingly.
  • Training and Awareness: Ensure that your IT and compliance teams are trained on the latest policies and best practices for handling MIP-protected documents. Regular training sessions can help prevent errors and ensure that everyone involved in the archiving process understands their responsibilities.
  • Feedback Loop: Establish a feedback loop where team members can report issues or suggest improvements to the archiving process. This will help you continually refine your strategies and ensure that they remain effective.

Ensuring Compliance Over Time

Maintaining compliance over time requires a proactive approach. Here are some strategies to help:

  • Automated Compliance Checks: Use automated tools to regularly check that your archived documents meet compliance requirements. These tools can scan for issues like expired encryption keys, missing MIP labels, or improperly stored documents.
  • Regular Communication with Stakeholders: Keep stakeholders informed about the status of your archiving processes and any changes to compliance requirements. Regular communication ensures that everyone is on the same page and that potential issues are addressed promptly.
  • Disaster Recovery Planning: Include archived MIP-protected documents in your disaster recovery plans. This ensures that in the event of a system failure or other disaster, your critical data can be recovered quickly and securely.
  • Continuous Improvement: Make continuous improvement a core part of your archiving strategy. Regularly review your processes, tools, and technologies to ensure they remain effective in protecting and managing MIP-protected documents.


Additional Best Practices for Handling MIP-Protected Documents in Squirrel

Handling MIP-protected documents effectively requires a combination of careful planning, ongoing management, and adherence to best practices. Beyond the basics, there are several additional strategies that can help ensure your archiving processes are both secure and efficient.

Integrating Archiving with Data Lifecycle Management

One of the key ways to manage MIP-protected documents is to integrate archiving into your broader data lifecycle management strategy. Here’s how:

  • Data Lifecycle Policies: Establish clear policies that define the lifecycle of your data, from creation to archival and eventual deletion. Ensure that these policies align with your MIP classifications and the corresponding protection levels.
  • Automated Archiving Triggers: Use automated triggers within Squirrel to archive documents based on specific criteria, such as age, inactivity, or MIP classification. This not only helps in managing storage but also ensures that sensitive documents are archived in a timely manner.
  • Retention Policies: Align your archiving processes with your organization’s retention policies. For example, documents labeled as “Highly Confidential” may require longer retention periods and stricter access controls during archiving and after restoration.

Ensuring Accessibility of Archived Documents

While security is paramount, accessibility is equally important, especially when dealing with archived documents that might be needed years after they were stored. Here are some strategies to ensure accessibility:

  • Metadata Preservation: Ensure that all relevant metadata, including MIP labels, version history, and access permissions, are preserved when archiving and restoring documents. This metadata is critical for understanding the context and classification of the document.
  • User Training and Documentation: Provide training to users on how to access archived documents, particularly those protected by MIP. Make sure there is clear documentation available that outlines the process for restoring and accessing these documents.
  • Search and Retrieval Tools: Leverage Squirrel’s advanced search capabilities to make it easier for users to locate and retrieve archived documents. Ensure that search tools are optimized for handling MIP-protected documents, including filtering by classification or other metadata.

Regular Testing and Validation

To ensure that your archiving processes are working as intended, it’s crucial to regularly test and validate your systems:

  • Scheduled Restore Tests: Conduct regular tests to restore MIP-protected documents from the archive. This helps verify that encryption keys are properly managed, and that the restoration process preserves all necessary security and compliance features.
  • Compliance Audits: Perform periodic compliance audits to ensure that your archiving and restoration processes meet all relevant regulatory requirements. These audits should include checks on encryption, access controls, and data retention policies.
  • Backup Verification: Regularly verify that backups of your archived documents are intact and accessible. This includes ensuring that the encryption keys needed to access these backups are also securely stored and accessible.

Responding to Regulatory Changes

Regulatory requirements for data protection and archiving can change over time. Staying informed and adapting your processes to meet these changes is critical:

  • Stay Informed: Keep up to date with changes in regulations that impact data protection and archiving, such as GDPR, HIPAA, or industry-specific guidelines. Understanding these changes will allow you to adjust your policies and procedures accordingly.
  • Policy Updates: When regulations change, update your archiving and encryption policies to ensure continued compliance. This might involve revising how MIP labels are applied or altering retention periods for certain types of documents.
  • Engage with Legal and Compliance Teams: Work closely with your organization’s legal and compliance teams to interpret regulatory changes and determine the best course of action for your archiving strategy.

Conclusion

Managing Microsoft Information Protection (MIP) in the context of archiving SharePoint documents is a complex but essential task. With the increasing importance of data protection and regulatory compliance, organizations must ensure that their archiving processes are not only secure but also capable of preserving access to critical information over time.

Squirrel provides a powerful solution for managing these challenges, with robust features designed to handle MIP-protected documents securely. However, it’s crucial for organizations to complement these tools with strong encryption key management, regular policy reviews, and ongoing compliance efforts.

By following the best practices outlined in this article, you can ensure that your organization’s archived documents remain protected, accessible, and compliant with all relevant regulations. In doing so, you’ll safeguard your organization’s most valuable assets while minimizing the risks associated with data archiving.

FAQs

    • How Does Squirrel Ensure MIP Compliance?
      Squirrel ensures MIP compliance by preserving the MIP labels and metadata associated with documents during the archiving process. It integrates seamlessly with Microsoft 365, maintaining the protection levels set by MIP and ensuring that archived documents remain secure and compliant.
    • Can Archived MIP-Protected Documents Be Accessed Easily?
      Yes, archived MIP-protected documents can be accessed easily if the proper encryption keys are maintained. Squirrel provides tools to restore these documents while preserving their original security properties, making them accessible to authorized users.
    • What Happens if Encryption Keys Are Lost?
      If encryption keys are lost, accessing the encrypted documents can become impossible. This underscores the importance of retaining historical encryption keys for the entire duration that documents are archived. Without these keys, the data may be irretrievable.
    • Is Squirrel Suitable for Large Organizations?
      Absolutely. Squirrel is designed to scale, making it suitable for large organizations with complex data protection needs. It supports advanced features like automated archiving, secure restoration, and compliance auditing, all of which are essential for managing large volumes of data.
    • How Often Should We Review Our Archiving Policies?
      It’s recommended to review archiving policies at least quarterly, or whenever there are significant changes in regulations, technology, or organizational needs. Regular reviews help ensure that your policies remain effective and aligned with current best practices.

Squirrel: Your Ultimate Document Guardian

Keep your SharePoint documents safe, secure, and compliant with Squirrel’s automated archiving solution.

Squirrel Main Dashboard

Unlock Effortless Document Archiving with Squirrel

Ready To Get Started?

Microsoft Teams vs. SharePoint. The Ultimate Guide

Microsoft Teams vs. SharePoint. The Ultimate Guide

Unraveling the Collaboration Conundrum

In today’s fast-paced, digitally-driven work environment, effective collaboration and content management are crucial for success. Microsoft offers two powerful tools to help you achieve these goals: Microsoft Teams and SharePoint. While both platforms are designed to enhance productivity, they serve distinct purposes. In this in-depth comparison, we’ll explore the strengths of each tool, examine real-world scenarios, and provide actionable tips to help you make informed decisions.

Squirrel for SharePoint Site Size Reporting

Key Takeaways Table:

Aspect SharePoint Microsoft Teams
Primary Use Document Management and Collaboration Real-Time Communication and Collaboration
Key Features – Document Libraries, Version Control, Workflows, Metadata – Chat, Video Calls, File Sharing, App Integrations, Channels
Advanced Capabilities – Content Types, Search Functionality, Web Parts – Integrated Office 365 Services, Secure Guest Access, Teams Templates
Best Use Cases – Document Repository, Long-Term Storage, Workflow Automation – Real-Time Communication, Quick File Access, App Integrations
Strengths – Structured Document Management, Governance Policies – Real-Time Collaboration, Seamless Communication
Weaknesses – Steeper Learning Curve, Less Real-Time Interaction – Limited Document Management Features, Dependence on SharePoint for Long-Term Storage
Integration – Integrates with Office 365 Services, Power Automate – Integrates with Apps and Services via Microsoft Store
Governance and Compliance – Advanced Governance Policies, Audit Logs – Team-Level Permissions, Guest Access Control
Monitoring Tools – Analytics for Site Usage, Storage Consumption – Reports for Team Activity, Meeting Participation
Combined Use – SharePoint for Document Management, Teams for Communication and Quick Access – Both for a Comprehensive Collaboration Solution

SharePoint Overview:

History and Evolution:

SharePoint has been a cornerstone of Microsoft’s ecosystem since its inception in 2001. It started as a document management system but has evolved into a powerful collaboration platform. With continuous updates and new features, SharePoint remains one of the most versatile tools for managing documents and workflows.

Key Features:

Document Libraries: Organize files with custom metadata, views, and filters.
Lists: Create and manage lists to track data and tasks.
Workflows: Automate business processes using SharePoint Designer or Power Automate.
Content Types and Metadata: Define reusable content types and use metadata for enhanced search and filtering.
Permissions Management: Granular control over who can access and edit documents.
Version History: Track changes made to documents, including who made the changes and when.

Advanced Capabilities:

Content Approval Workflows: Set up workflows to approve or reject content submissions.
Search Functionality: Leverage powerful search capabilities to quickly find documents across sites.
Web Parts: Use pre-built components (like calendars, tasks, and announcements) to enhance site functionality.
Integration with Microsoft 365 Services: Seamlessly integrate with other services like Power BI, OneDrive, and Excel.

Microsoft Teams Overview:

A New Era in Communication:

Microsoft Teams was launched in 2017 as a unified communication and collaboration platform. It combines chat, video meetings, file storage, and app integration, making it an essential tool for modern workplaces.

Key Features:

Chat and Collaboration: Real-time messaging with threaded conversations and inline replies.
Meetings and Calls: Schedule and join video or audio calls, and share screens.
Integrated Apps: Add apps from Microsoft Store or third-party services to enhance functionality.
Channels: Create channels within teams for focused discussions on specific topics or projects.
Files Tab Integration: Direct access to SharePoint files and OneDrive documents.
Security Contexts: Leverage Microsoft 365 Groups for streamlined permission management.


Final Verdict: Which One Do I Need? Teams or SharePoint?

When to Use SharePoint:

Document Repository: If you need a structured repository with advanced document management features like version control and approval workflows.
Long-Term Storage: Ideal for documents that require long-term storage with compliance and governance policies.
Workflow Automation: For automating business processes using custom workflows.
Content Management: Perfect for managing content with metadata, content types, and search functionality.

When to Use Microsoft Teams:

Real-Time Collaboration: Best suited for teams that need real-time communication, chat, and video meetings.
Quick Access: For quick access to documents and files within specific channels or projects.
App Integration: To integrate with various apps and services for enhanced functionality.
Centralized Communication: As a central hub for all communications, including emails, chats, files, and meetings.

Why Not Both?

Combining Strengths:

In many cases, one tool isn’t enough to cover all collaboration needs. By using both SharePoint and Microsoft Teams, you can create a comprehensive solution that caters to various aspects of modern workflows.

Document Management in SharePoint: Utilize SharePoint’s advanced document management features for structured storage and permission control.
Communication and Collaboration in Teams: Use Teams for real-time communication, quick file access, and integrated app functionality.

Conclusion:

SharePoint and Microsoft Teams are powerful tools designed to enhance modern collaboration. By understanding their strengths and use cases, you can make informed decisions about which tool to use or how to leverage both effectively. Whether it’s document management, real-time communication, or workflow automation, these platforms offer comprehensive solutions tailored to your needs.

FAQs:

Q: When should I use SharePoint? A: You should use SharePoint when you need structured document management, version control, and advanced governance policies. It is ideal for long-term storage and workflow automation.


Q: What are the key features of Microsoft Teams? A: Key features of Microsoft Teams include real-time chat, video calls, file sharing, channels for focused discussions, and integration with various apps and services.


Q: Can I use SharePoint and Teams together? A: Yes, you can use both SharePoint and Teams together. SharePoint is excellent for document management, while Teams excels in real-time communication. Combining the two creates a comprehensive collaboration solution.


Q: Which tool is better for quick file access? A: Microsoft Teams provides quicker access to files within specific channels or projects, making it more suitable for quick file sharing and collaborative work.


Q: How does SharePoint help with document version control? A: SharePoint offers robust version control features that allow you to track changes to documents over time, maintain different versions, and restore previous versions if needed.


Q: What are some best practices for setting up a SharePoint site? A: Best practices include planning your site structure, using metadata for enhanced search and filter capabilities, enabling version control, and managing permissions effectively.


Q: Can I integrate third-party apps with Teams? A: Yes, Microsoft Teams allows you to integrate various third-party apps via the Microsoft Store, enhancing its functionality and streamlining workflows.


Q: How can Power Automate help with integration between SharePoint and Teams? A: Power Automate (formerly Microsoft Flow) enables you to create automated workflows between SharePoint and Teams, ensuring seamless data flow and process automation.


Q: What kind of analytics tools are available for monitoring SharePoint usage? A: SharePoint offers various analytics tools that help monitor site usage, storage consumption, and compliance with governance policies. These insights can inform your governance strategies.


Q: How does Microsoft Teams enhance real-time collaboration? A: Microsoft Teams enhances real-time collaboration through features like chat, video calls, screen sharing, and collaborative editing of documents within the platform. This makes it ideal for teams that need to communicate and work together in real time.

Reducing SharePoint Online Costs Doesnt Have to be Hard

See how Squirrel automates the archiving of your SharePoint Online documents to Azure Blob Storage saving you money, while also allowing your users to still access those files with just a click.

Squirrel Main Dashboard

Save $$$$$ on SharePoint Online storage with Squirrel

Start reducing your SharePoint Storage Costs Now.

Moving SharePoint Online Documents to Azure Blob Storage

Moving SharePoint Online Documents to Azure Blob Storage

SharePoint Online Documents to Azure Blob Storage

Managing large volumes of documents in SharePoint Online can become challenging as storage needs grow.

Squirrel for SharePoint Dashboard

With rising storage costs and limits, organizations often look for efficient ways to offload files. One highly scalable and cost-effective solution is moving documents from SharePoint Online to Azure Blob Storage. In this article, we’ll explore why this migration is beneficial, methods to move your data—including automated archiving with Squirrel—and best practices for managing the process.

Why Move Documents from SharePoint Online to Azure Blob Storage?

Cost Efficiency:

SharePoint Online storage can become expensive, especially as organizations scale up and accumulate terabytes of data. SharePoint’s storage costs are higher because it’s designed for frequent access and collaboration, but not all files need to stay in this high-cost environment. Azure Blob Storage, on the other hand, offers a much more cost-efficient solution by providing tiered pricing based on access frequency (hot, cool, or archive tiers). Archiving older, unused documents to Azure Blob Storage significantly reduces storage expenses by moving infrequently accessed data to cheaper, scalable cloud storage, allowing businesses to free up expensive SharePoint storage for more active documents.

Scalability:

One of the challenges with SharePoint Online is its storage limits, which, while flexible, may require purchasing additional capacity as your organization grows. Azure Blob Storage offers virtually unlimited scalability, allowing you to store vast amounts of data without worrying about reaching storage caps. This makes it a seamless option for large enterprises or growing businesses that anticipate exponential data growth. By offloading older documents from SharePoint to Azure Blob Storage, you can ensure that your SharePoint environment remains manageable, while your archived files are stored securely without the need for costly storage upgrades.

Data Management:

As document libraries expand over time, it becomes increasingly difficult to manage, search, and retrieve important files. The clutter of older, less frequently accessed documents can slow down performance and impact productivity. Offloading these older files to Azure Blob Storage not only helps streamline SharePoint libraries by keeping them more organized and optimized for daily use, but also ensures that important files remain easy to access. By reducing the volume of files in SharePoint, organizations can improve overall data management, enabling teams to locate key documents more efficiently while still maintaining access to archived data when necessary.

Compliance and Archiving:

In many industries, regulatory compliance requires organizations to retain records for specific periods, even if they are no longer actively used. Moving older, unused files to Azure Blob Storage helps organizations meet these compliance requirements by securely storing data in a cost-effective and highly durable environment. Azure Blob Storage offers features like encryption and access control, ensuring that archived data remains protected. Additionally, offloading documents from SharePoint to Azure Blob Storage reduces the risk of non-compliance by ensuring only essential and current documents are retained in SharePoint, while archived files remain accessible for audits or future retrieval.

Methods for Moving Documents

There are multiple ways to move documents from SharePoint Online to Azure Blob Storage, depending on your organization’s needs, the size of your data, and the level of automation required. These methods range from using manual workflows to fully automated, hands-off solutions that can handle large-scale document migrations. Below, we explore three primary methods: Power Automate for smaller, rule-based transfers, Azure Data Factory for large-scale data pipelines, and Squirrel for automated archiving with minimal manual intervention.

Power Automate:

Power Automate (formerly known as Microsoft Flow) is a cloud-based service that enables users to create automated workflows between various applications and services. This is a relatively simple solution to move files from SharePoint Online to Azure Blob Storage. It’s particularly useful for small-scale operations where you want to automate repetitive tasks, such as moving specific files based on certain criteria (e.g., when a file is created or modified).

However, Power Automate comes with some limitations, such as restrictions on file size (typically 100-250MB per file), making it less suitable for large datasets or frequent large file transfers. Additionally, Power Automate workflows can become complex to manage if your data needs grow, but it’s a good starting point for smaller or selective migrations. It’s ideal for scenarios where you need quick, one-off solutions or for businesses that need to move specific documents based on custom rules.

When to use Power Automate:

  • Small-to-medium file sizes and datasets.
  • Selective transfers, such as specific document types, categories, or time-based rules.
  • Minimal complexity with a limited number of workflows.

Azure Data Factory:

Azure Data Factory (ADF) is a robust cloud-based data integration service designed for building complex data pipelines. It allows organizations to move large-scale data between systems, including SharePoint Online and Azure Blob Storage. Unlike Power Automate, Azure Data Factory is highly scalable and can handle the transfer of large datasets, including terabytes of data. It supports advanced workflows, including data transformation, monitoring, and scheduling.

With Azure Data Factory, you can create data pipelines that automatically retrieve files from SharePoint Online using connectors, apply transformations if necessary, and then store the data in Azure Blob Storage. While it requires more technical expertise than Power Automate, ADF offers far greater flexibility and scalability, making it ideal for enterprises handling large volumes of documents or organizations looking for a more automated and hands-off solution.

Using Azure Data Factory also provides more control over how data is processed, with features like data integration from multiple sources, real-time data monitoring, and built-in security. However, the setup can be more complex, requiring knowledge of data engineering and pipeline configuration, which may require dedicated resources.

When to use Azure Data Factory:

  • Large-scale datasets and frequent transfers.
  • Complex data integration requirements, including file transformation and multiple data sources.
  • Advanced scheduling, monitoring, and automation capabilities.
  • Organizations with technical resources for managing complex workflows.

Squirrel for Automated Archiving:

For organizations that need an easy-to-implement, fully automated solution, Squirrel offers the ideal tool for moving SharePoint Online documents to Azure Blob Storage. Squirrel is designed to automate the process of archiving documents from SharePoint to Azure Blob Storage based on pre-configured lifecycle policies. This reduces the need for manual workflows or the creation of complex pipelines, making it a hands-off solution for busy IT teams and large organizations.

Squirrel simplifies the archival process by allowing you to set rules that determine when and how documents are moved from SharePoint to Azure Blob Storage. For instance, you can configure Squirrel to archive documents that haven’t been accessed or modified within a certain timeframe, ensuring that only active and relevant data remains in SharePoint while older files are securely stored in Azure. This allows you to free up SharePoint storage space without having to constantly monitor and manually manage the archiving process.

Unlike Power Automate and Azure Data Factory, Squirrel requires little to no ongoing management. It runs automatically in the background, reducing storage costs and improving the performance of your SharePoint environment without disrupting user workflows. Additionally, Squirrel offers built-in security features, ensuring that sensitive data is securely transferred and stored in Azure Blob Storage, fully compliant with industry standards.

When to use Squirrel:

  • Large organizations that require a fully automated, hands-off solution.
  • Frequent need for archiving based on lifecycle policies, such as last modified or last accessed dates.
  • IT teams looking to reduce manual oversight and administrative workload.
  • Businesses wanting to optimize SharePoint storage while securely archiving documents to Azure Blob Storage.

Methods for Moving Documents

There are several methods for moving documents from SharePoint to Azure Blob Storage, ranging from manual workflows to fully automated solutions like Squirrel. Below, we’ll cover Power Automate, Azure Data Factory, and how Squirrel can simplify the entire process.

How to Guide for Power Automate:

Power Automate allows you to create workflows that can automate tasks like moving files from SharePoint to Azure Blob Storage. However, it comes with limitations, such as a file size limit (typically 100-250MB per file), which can restrict its use for larger datasets.

Step 1: Create a New Flow in Power Automate

Sign in to Power Automate: Go to Power Automate and sign in with your Microsoft account.

Create a New Flow: On the homepage, click Create and select Automated Cloud Flow. 

Choose a Trigger: Set a trigger for when a file will be moved. For example, select the When a file is created (SharePoint) trigger to start the flow when a new file is added to a document library.

powerautomate create automated cloud flow
build an automated cloud flow
when a file is created

Step 2: Configure the SharePoint Action

Select SharePoint Site: In the trigger settings, choose your SharePoint Site Address from the dropdown or enter the site URL.
Select Library Name: Choose the Library Name where files will be monitored for movement.

Powerautomate action

Step 3: Add a SharePoint ‘Get File Content’ Action

Get the File Content: After the trigger, click + New Step and search for the Get File Content action under SharePoint.

Configure the “Get file content” Action

  • Site AddressSelect your SharePoint site
    https://XXXXXXX.sharepoint.com/sites/Finance
    This points Power Automate to the correct SharePoint site where the document library is located. 
  • File IdentifierNow you can browse through our SharePoint site, and choose the file you want to move to blob storage.
    /Doclib1/ActionItems SlideShow.pptx
    This means that the file you’re retrieving is located in the Doclib1 document library within the Finance site, and the file is named “ActionItems SlideShow.pptx.”
powerautomate add action
file selection
powerautomate add action

Step 4: Add an Azure Blob Storage Action

Add ‘Create Blob’ Action: Click + New Step and search for Azure Blob Storage. Select the Create blob action.

Provide the following;

  • Connection Name: Give the azure blob storage connection a name
  • Authentication Type: You can choose how to authentice, either Service Principal Authentication, Access Key or Microsoft Entra ID integrated
  • Azure Storage account name or blob endpoint: Here is where you input the storage account name, or endpoint name
  • Since I chose to use Access Key for authentication, you simply copy that from your blob storage account and paste it here

Set Blob Storage Parameters:

  • Folder Path: Enter the container path where the file will be stored in Azure Blob.
  • File Name: Define the file name for the uploaded file (you can use dynamic content like File Name from the previous step).
  • File Content: Select the File Content dynamic content from the previous Get File Content action.


add blob storage action
create blob
azure blob storage connection

Step 5: Test and Monitor the Flow

Test the Flow: Click Save and run a test by uploading a file to the SharePoint document library. The flow should automatically upload the file to Azure Blob Storage.

Monitor Flow Performance: Under the Monitor section of Power Automate, check the flow history to see if the flow runs successfully and inspect any errors.

powerautomate save

PowerAutomate Use Case:

Power Automate works well for smaller files and selective transfers but may not be suitable for organizations dealing with very large datasets or needing more complex migrations. The above example will move a single file from the SharePoint site to Azure Blob Storage.

How to Guide using Azure Data Factory:

Azure Data Factory is a cloud-based data integration service that allows you to create data pipelines for moving data between SharePoint and Azure Blob Storage. It’s more scalable than Power Automate, making it ideal for larger datasets, though it requires more setup and configuration.

Step 1: Create a Data Factory in the Azure Portal

Sign in to the Azure Portal: Go to Azure Portal and log in with your Azure account.

Create a New Data FactorySearch for Data Factory in the search bar.

Click Create and fill in the required details like Subscription, Resource Group, and Region.

Click Review + Create to deploy the Data Factory.

create new azure data factory

Step 2: Set Up a New Pipeline

Navigate to the Data Factory Resource: Once your Data Factory is created, go to the resource and click on Launch Studio.

Now you are in the Data Factory Page.

Create a Linked Service for SharePoint Online

Click on “Author & Monitor” to open the ADF studio.

In the left menu, click on the “Manage” icon (toolbox).

Under “Linked services”, click “Create New“.

Search for and select “SharePoint Online List“.

Click “Continue“.

Fill in the details:

  1. Name: Give your linked service a name
  2. Description: (Optional)
  3. Connect via integration runtime: AutoResolveIntegrationRuntime
  4. Authentication method: Choose “OAuth2” for modern authentication
  5. SharePoint Online site URL: Enter your SharePoint site URL
  6. Tenant: Enter your Azure AD tenant ID
  7. Service Principal ID: Enter your Azure AD application ID
  8. Service Principal Key: Enter your Azure AD application key

Click “Test connection” to verify.

If successful, click “Create”.


launch azure data factory
azure data factory linked service
azure data factory sharepoint list

Step 3: Create a Linked Service for Azure Blob Storage

Still in the “Manage” section, click “New” under “Linked services”.

Search for and select “Azure Blob Storage”.

Click “Continue”.

Fill in the details:

  • Name: Give your linked service a name
  • Description: (Optional)
  • Connect via integration runtime: AutoResolveIntegrationRuntime
  • Authentication method: Choose “Account key”
  • Account selection method: “From Azure subscription”
  • Azure subscription: Select your subscription
  • Storage account name: Select the storage account you created earlier

Click “Test connection” to verify.

If successful, click “Create”.


azure data factory blob storage link
azure data factory blob details
azure data factory settings

Step 4: Create a Dataset for SharePoint Online

In ADF studio, click on the “Author” icon (pencil) in the left menu.

Click the “+” button and select “Dataset“.

Search for and select “SharePoint Online List“.

Click “Continue“.

Configure the dataset:

  • Name: Give your dataset a name
  • Linked service: Select the SharePoint Online linked service you created
  • List name: Enter the name of your SharePoint list or document library

Click “OK“.

In the dataset settings, specify any additional parameters if needed.

azure data factory new sharepoint dataset
azure data factory blob dataset settings

Step 4: Create a Dataset for Azure Blob Storage

Still in the “Author” section, click the “+” button and select “Dataset“.

Search for and select “Azure Blob Storage“.

Click “Continue”.

Choose “Binary” in the “Select Format” section.

Configure the dataset:

  • Name: Give your dataset a name
  • Linked service: Select the Azure Blob Storage linked service you created
  • File path: Browse to select your container and specify a folder path if needed
  • File Name: You can leave file name blank to keep the files original name.

Click “OK”.

azure data factory azure blob dataset
choose data type
dataset set properties

Step 5: Create a Pipeline

In the “Author” view, click the “+” button and select “Pipeline”.

Give your pipeline a name.

azure data factory pipeline

Step 6: Add and Configure a Copy Activity

In the pipeline canvas, expand “Move & transform” in the Activities pane.

Drag and drop “Copy data” onto the canvas.

In the bottom pane, configure the Copy activity:

General tab:

  • Name: Give your copy activity a name
  • Source tab:
    • Source dataset: Select your SharePoint Online dataset
    • File path type: Wildcard file path (“”)
    • Wildcard file name: Enter a pattern to match files (“*”)
  • Sink tab:
    • Sink dataset: Select your Azure Blob Storage dataset
    • Copy behavior: Choose appropriate option (e.g., “Preserve hierarchy”)
  • Settings tab:
    • Enable staging: Leave unchecked unless you need it
    • Enable incremental copy: Configure if needed for incremental loads
pipeline canvas
source tab
data sink tab
settings tab

Step 7: Validate and Publish

Click “Validate” in the pipeline toolbar to check for errors.

If validation passes, click “Publish all” to save your changes.

validate data factory pipeline

Step 7: Trigger the Pipeline

In your pipeline view, click “Add trigger” in the toolbar.

Select “Trigger now” for a manual run, or set up a schedule.

Click “OK” to run the pipeline.


Azure Data Factory Use Case:

Azure Data Factory is highly flexible and scalable, making it ideal for moving larger datasets, but it requires more technical expertise than Power Automate. 

The above steps will copy all files from the SharePoint site to your Azure Blob Storage Account.

Squirrel for Automated Archiving:

For organizations looking for a more automated solution that eliminates manual intervention, Squirrel is the ideal tool. Squirrel automatically archives SharePoint documents to Azure Blob Storage based on lifecycle policies, freeing up valuable SharePoint storage space and minimizing administrative overhead.

How Squirrel Works:

Lifecycle Policies: Squirrel allows you to set lifecycle policies based on file properties like last modified or last accessed date, ensuring only older, unused files are archived.

Squirrel Administrators can set a Global lifecycle policy which will be applied to all their SharePoint Online Document Libraries, or individual lifecycle policies if required. These policies can be based on either when files where last accessed, or last modified, or even a combination of the two.

Squirrel Site Archive Settings

Automated Archiving: Once configured, Squirrel runs in the background, automatically moving files to Azure Blob Storage without manual oversight.

When a file becomes of age and triggers a lifecycle policy, the file will be copied, compressed, obfuscated and encrypted in a squirrel native format. The file will then be moved to your Azure Blob Storage Account, and once compete the file is deleted from your SharePoint Online site, and replaced with a stub file.

Squirrel Archived Files

Secure Archiving: Squirrel ensures that all data is securely transferred and encrypted when stored in Azure Blob Storage, maintaining compliance with data protection standards.

Each file is hash checked to ensure it is correct, then encrypted and secured in your Azure Blob Storage. 

Squirrel Main Dashboard

Squirrel SharePoint Online Archiving Use Case:

Squirrel is perfect for organizations that need an automated, hands-off solution to efficiently archive large volumes of SharePoint documents to Azure Blob Storage.a

Conclusion

Moving SharePoint documents to Azure Blob Storage offers significant advantages in terms of cost savings, scalability, and data management. While Power Automate and Azure Data Factory are viable options for moving files, Squirrel offers a comprehensive automated solution that simplifies the process, reduces manual effort, and improves SharePoint storage management. By automating the archival process with Squirrel, organizations can focus on managing active data while ensuring that older files are securely stored in Azure.

Reducing SharePoint Costs Doesn’t Have to Be Hard.

With Squirrel, automate your document archiving and save on SharePoint storage—without lifting a finger!

Squirrel for SharePoint Site Size Reporting

Cutting SharePoint Costs is Simpler Than You Think. Request a Demo of Squirrel today, and see the savings for yourself.

Ready To Start Saving on SharePoint Storage?

How to Change SharePoint Document Versioning

How to Change SharePoint Document Versioning

Change SharePoint Default Versioning

For SharePoint Online administrators managing large environments, keeping track of storage usage is crucial to maintaining performance and controlling costs. One key factor contributing to storage consumption is document versioning. By default, SharePoint Online keeps up to 500 major versions of each document, and with frequent updates, this can quickly add up.


Squirrel Main Dashboard

In this guide, we will explain why it’s essential to limit document versioning across your entire SharePoint Online environment and provide a step-by-step walkthrough on how to apply these limits using SharePoint Online Management Shell or PowerShell. This will help you ensure optimal performance and reduce storage costs across all your sites.

Why Limit Document Versioning Across the Entire Environment?

As a SharePoint Administrator, managing document versioning across the entire environment provides several benefits:

Reducing Storage Costs

  • Storage Allocation: SharePoint Online comes with limited storage based on your Microsoft 365 subscription. Versions of documents count towards your storage quota, so limiting them can help avoid additional storage purchases.
  • Cost Efficiency: By controlling the number of versions stored, you reduce the need for extra storage, keeping costs manageable.

Consistent Governance

  • Version Limits Across Sites: Applying a standard versioning limit across all sites ensures a consistent governance approach to data management.
  • Compliance: Certain regulations and organizational policies may require limiting the number of versions stored to comply with retention policies.

Simplifying Document Management

  • Fewer Versions to Manage: Limiting versions makes document management easier for users and admins, ensuring that only relevant changes are kept.
  • Performance Improvement: Fewer versions per document reduce the load on document libraries, improving performance and retrieval speeds.

Default Versioning Settings in SharePoint Online

By default, SharePoint Online automatically enables versioning in every document library, with the system set to retain up to 500 major versions of each document. Each time a document is edited and saved, SharePoint creates a new major version, and these versions are stored indefinitely unless a limit is manually set.

While this can be extremely helpful for tracking changes, restoring older versions, and collaborating on documents, it can also lead to rapid storage consumption, especially in environments with many active users, frequent edits, or large file sizes. In organizations with hundreds or thousands of users, the storage of 500 versions per document across multiple sites and libraries can quickly add up, causing storage to balloon unexpectedly.

Without intervention, this default setting can exhaust your SharePoint Online storage allocation, forcing organizations to purchase additional storage from Microsoft at a premium. For businesses focused on cost-efficiency, managing versioning settings is a critical task to ensure that storage usage remains under control while still maintaining an appropriate version history for documents.

How to Limit Versioning for All Sites in SharePoint Online

As an admin, you can set versioning limits across your SharePoint Online tenant using PowerShell. This will apply the changes globally to all existing document libraries, ensuring consistency and helping reduce storage costs.

Prerequisites

  • Permissions: You must be a SharePoint Online Admin or Global Admin to make changes across your environment.
  • Tools Needed: You’ll need to have SharePoint Online Management Shell or PowerShell installed.

Step-by-Step Guide to reduce SharePoint Online Document Versions

Step 1: Install and Connect to SharePoint Online PowerShell

  1. Open PowerShell on your machine.
  2. Install the SharePoint Online Management Shell (if you haven’t already):
    powershell

    Install-Module -Name Microsoft.Online.SharePoint.PowerShell


  3. Connect to SharePoint Online:
    powershell

    Connect-SPOService -Url https://<your-domain>-admin.sharepoint.com


    Replace <your-domain> with your actual domain.

Step 2: Get All Sites in Your Tenant

To make changes across all document libraries in SharePoint Online, first retrieve a list of all site collections in your tenant:

$sites = Get-SPOSite -Limit All


Step 3: Iterate Through Each Site and Set Versioning Limits

You can loop through each site and set versioning limits for each document library. In this example, we’ll limit the number of major versions to 10 across all document libraries.

foreach ($site in $sites) {

# Get all document libraries in the site

$libraries = Get-PnPList -Web $site.Url | Where-Object {$_.BaseTemplate -eq 101}

foreach ($library in $libraries) {

# Set the version limit to 10 major versions

Set-PnPList -Identity $library -MajorVersions 10

Write-Host “Versioning set to 10 for library $($library.Title) in site $($site.Url)”

}

}


  • Explanation: The script loops through each site, retrieves the document libraries, and sets the number of major versions to 10.
  • 101: This refers to document libraries specifically.

Step 4: Run the Script

Once your script is ready, run it in PowerShell. The script will apply the new versioning settings to all document libraries across your SharePoint Online environment.

Step 5: Verify the Changes

You can verify that the versioning settings were applied by visiting any document library and checking the versioning settings:

  1. Go to any site collection in SharePoint.
  2. Navigate to Site Contents > Library Settings > Versioning Settings.
  3. Ensure that the version limit is set to 10.

Alternative Solution:


Use Squirrel for Archiving Documents and Versions


Another alternative for managing document versions across a SharePoint Online environment is to use Squirrel, a document archiving solution that moves documents (along with their versions) to more cost-effective Azure Blob Storage. Squirrel retains the full version history and metadata without consuming SharePoint storage, reducing both costs and complexity.


With Squirrel, you don’t need to worry about storage limitations in SharePoint Online. The system allows users to rehydrate files on demand, making document restoration easy while keeping all versions intact. This provides a scalable solution for organizations with extensive document histories that need to maintain large archives efficiently.


Conclusion


For SharePoint Online administrators, managing versioning limits across the entire environment is critical to controlling storage costs, improving performance, and ensuring governance consistency. By using SharePoint Online Management Shell or PowerShell, you can efficiently apply versioning limits to all sites and document libraries.


Alternatively, solutions like Squirrel can help you archive documents and their versions outside of SharePoint, providing cost-effective, long-term storage while keeping all version histories intact.


Additional Resources


Reducing SharePoint Storage Costs Doesnt Have to be Hard

Reducing SharePoint storage costs is easy with Squirrel, which seamlessly archives documents and versions to cost-effective Azure storage.

Squirrel for SharePoint File Type Reporting

Save on SharePoint storage costs with Squirrel, the seamless solution for archiving documents and retaining version history in Azure.

Want to Reduce SharePoint Costs?

What Does Archiving Mean?

What Does Archiving Mean?

What is Archiving?

Archiving is a crucial concept in both personal and business data management, ensuring that important information is preserved for future use without cluttering up active systems. In today’s digital world, where vast amounts of data are generated every second, understanding the value of archiving and how it works can help organisations stay efficient, compliant, and secure.

Squirrel for SharePoint Dashboard
Key Takeaway Description
Archiving vs. Backup Archiving is for long-term storage of inactive data, while backups are for quick recovery in case of data loss. They serve different purposes but complement each other in data management strategies.
Benefits of Archiving Archiving helps reduce storage costs, improve system performance, and ensure compliance with legal and regulatory requirements by preserving important but inactive data.
Types of Archiving There are two main types of archiving: Digital (cloud or external storage for files and documents) and Physical (traditional storage of paper documents).
Squirrel for SharePoint Archiving Squirrel automates the archiving of SharePoint Online files to Azure Blob Storage, leaving stub files for easy restoration and ensuring all archived data is encrypted and securely stored.
Access to Archived Data Archived data is still accessible when needed, though it may take longer to retrieve. Systems like Squirrel allow quick rehydration of files with a single click, bringing back all versions and metadata.
Compliance and Legal Protection Archiving supports compliance with regulations like GDPR and HIPAA by ensuring data is securely stored for the required retention periods. Squirrel’s automated archiving features help businesses stay compliant effortlessly.
Security of Archived Data Modern archiving solutions encrypt archived data to ensure it is protected from unauthorised access. Squirrel encrypts all archived data in transit and at rest, ensuring compliance with security best practices.
Automated Archiving Archiving systems like Squirrel can automatically identify and move inactive files based on preset rules, making the process efficient and requiring minimal manual intervention.
Data Retrieval after Archiving Even if a company stops using an archiving solution, data can still be retrieved. Squirrel ensures that data can be rehydrated back to SharePoint, and manual scripts are available for decrypting data if necessary.

Types of Archiving

There are two primary types of archiving: digital archiving and physical archiving.

Digital Archiving: This is the most common form today, where digital files are stored in secure cloud platforms or external storage drives. These archives include emails, documents, databases, and more, all of which can be retrieved when needed. Digital archiving often comes with advanced features like encryption, versioning, and searchability to ensure secure and efficient data management.

Physical Archiving: Though becoming less common, physical archiving still exists in many industries. This refers to the storage of paper documents, files, and records in a dedicated space or off-site facility. It is particularly prevalent in industries where physical copies of documents, such as contracts or signed agreements, are legally required to be maintained.

Both digital and physical archiving serve the same core purpose: preserving data that is no longer in active use but may be required in the future for legal, historical, or reference purposes.

Why Archive Data?

There are several compelling reasons why both individuals and organisations choose to archive data. It’s not just about freeing up space but about ensuring long-term access to important information in a cost-effective and organised way. Below are some of the primary reasons for archiving data:

Data Retention and Compliance: Many industries are governed by strict regulations regarding data retention. Laws like the General Data Protection Regulation (GDPR) in Europe or the Health Insurance Portability and Accountability Act (HIPAA) in the U.S. require businesses to keep certain records for a specified period. Archiving helps organisations meet these compliance standards without keeping rarely used data in high-cost storage locations.

Storage Efficiency: As businesses grow, so does their data. Storing everything in high-performance systems quickly becomes expensive and inefficient. By moving infrequently accessed files to an archive, organisations can free up space on primary systems, improving performance and reducing storage costs. This is especially beneficial in environments like SharePoint or cloud-based systems where storage limits or high costs are a concern.

Data Backup Isn’t Enough: It’s a common misconception that backup systems alone can manage long-term data retention. While backups are critical for recovering data quickly after a disaster or system failure, they are not designed for long-term storage of inactive data. Archives, on the other hand, are optimised for long-term storage and can hold years or even decades of information in a secure, low-cost environment.

Benefits of Archiving

Archiving provides several key benefits, especially in a world where data continues to grow exponentially. Here’s a closer look at the advantages:

Cost Efficiency: By moving inactive data to cheaper, slower storage solutions, organisations can reduce the overall cost of managing their data. This is particularly true in cloud environments where high-performance storage can be costly. Archiving frees up space on expensive primary systems while preserving data for future use.

Improved Organisation: When unused data piles up in active storage systems, it becomes harder to manage and search for current files. Archiving old or infrequently used files creates a cleaner and more organised environment, improving overall productivity. This is especially useful for businesses that handle large amounts of data, such as law firms, financial institutions, or healthcare providers.

Compliance and Legal Protection: Many businesses must adhere to specific regulatory requirements around data retention and protection. By archiving critical files, organisations can ensure they meet these compliance standards. Archiving also offers legal protection by preserving data that may be needed for audits

How Archiving Works

The process of archiving, especially in digital systems, involves several key steps to ensure data is properly stored, managed, and retrievable when needed. Let’s break down how modern digital archiving typically works:

Identification of Inactive Data: The first step in the archiving process is identifying which files or data are no longer in active use but still need to be retained. This might involve setting rules based on file age, access frequency, or business relevance. For example, documents older than two years or files that haven’t been accessed in a year might be automatically flagged for archiving.

Transfer to Archive Storage: Once the files are identified, they are transferred from the active storage system to an archival solution, such as cloud storage or a dedicated archival server. During this process, data may be compressed or encrypted to ensure security and efficiency in storage.

Metadata Preservation: A key part of the archiving process is preserving the metadata of the archived files. Metadata includes details like the file name, creation date, author, and other important information that helps maintain the context and integrity of the archived data. In systems like Squirrel, metadata preservation is crucial for accurate retrieval and compliance.

Data Encryption and Protection: Archival data is often encrypted to ensure its security, especially when using cloud storage. Encryption ensures that only authorised users can access the files, protecting them from unauthorised access or breaches.

Retrieval When Needed: Although archived files are rarely accessed, they must remain easily retrievable when required. Good archiving systems allow users to search for and retrieve specific files based on metadata or keywords, ensuring that even old data can be accessed quickly when needed.

Key Use Cases for Archiving

Archiving plays a crucial role in various industries and sectors, each of which has specific reasons for needing a reliable and efficient archiving system. Here are a few key use cases:

Businesses and Enterprises: In most businesses, archiving is a standard practice to ensure long-term data retention, compliance with legal standards, and efficient use of storage. Files such as emails, financial records, contracts, and client data are often archived to avoid cluttering up active systems while keeping the data accessible for audits or legal purposes.

Healthcare: In the healthcare industry, patient records, billing information, and clinical data are subject to strict regulations regarding retention and privacy. Healthcare providers must ensure that medical records are archived securely and remain accessible for years after they are created. Archiving also helps organisations manage large volumes of data while remaining compliant with laws like HIPAA.

Legal and Financial Sectors: Both the legal and financial industries rely heavily on accurate and accessible records for everything from contracts and transactions to case files and tax records. Archiving helps these organisations meet regulatory requirements while keeping their primary systems efficient and well-organised.

Education: In the education sector, archiving is used to store historical student records, academic publications, and research data. With the ever-increasing volume of digital content being generated, universities and schools archive old materials to maintain system performance and comply with data retention policies.

Government and Public Sector: Governments often have long-term data retention requirements for historical, legal, or regulatory reasons. Archiving allows them to securely store records while ensuring that sensitive information is protected and can be accessed when needed, whether for audits, legal cases, or historical research.

Common Misconceptions About Archiving

There are several misconceptions about what archiving entails and how it differs from other data management practices. Let’s clarify a few:

Archiving Is Not the Same as Backup: Many people confuse archiving with data backups, but they serve different purposes. A backup is meant to restore data quickly in the event of a failure, while archiving is intended for long-term storage of inactive data. Archived data is typically less accessible but securely preserved for future use.

Archived Data Isn’t Lost or Deleted: A common fear is that once data is archived, it’s “gone” or no longer accessible. In reality, archived data is fully retrievable when needed. Modern archiving systems, like Squirrel, allow users to search, locate, and restore archived files easily, often with just a few clicks.

Archiving Doesn’t Mean Data Loses Its Value: Some might think that archived data is obsolete or irrelevant. However, just because data is no longer active doesn’t mean it has lost its value. In many industries, historical data is vital for audits, legal cases, business insights, or future projects. Archiving ensures that data is safely stored but still available for when it’s needed.

Conclusion

Archiving is an essential practice for both organisations and individuals, allowing for the efficient management of data by preserving files and documents that are no longer in active use but may be needed in the future. Whether for compliance, cost-efficiency, or simply to declutter your systems, archiving plays a vital role in modern data management.

By understanding what archiving means, how it works, and its benefits, businesses can make more informed decisions about how to manage their data in the long term. Whether through traditional physical archiving or modern digital solutions like Squirrel, the practice ensures that your data is secure, accessible, and cost-effective, making it a critical component of any data strategy.

FAQs About Archiving and Squirrel

What is archiving, and how is it different from backing up data?
Archiving is the process of moving inactive or infrequently accessed data to long-term storage, while keeping it accessible for future use. Backups, on the other hand, are primarily used for disaster recovery, ensuring that data can be quickly restored in the event of system failures or data loss. Archiving is more about long-term storage, while backups focus on quick restoration.

Squirrel: Squirrel provides an automated solution for archiving documents from SharePoint Online, ensuring that inactive files are securely moved to Azure Blob Storage while remaining accessible when needed.

Why should I archive my data?
Archiving improves storage efficiency by freeing up space on your active systems, reducing costs associated with high-performance storage, and helping to meet legal or regulatory compliance requirements. It also preserves historical data that may be valuable for audits, legal cases, or future reference.

Squirrel: Squirrel’s archiving solution helps businesses reduce costs by moving SharePoint documents to cheaper storage, while also ensuring compliance with data retention policies through automated archiving workflows.

How does Squirrel help with archiving?
Squirrel automates the archiving process for SharePoint Online, moving files to Azure Blob Storage based on lifecycle policies. It leaves stub files in SharePoint, allowing users to easily rehydrate or restore files with a single click. Squirrel also ensures that all archived data is encrypted and securely stored.

Can I still access my archived data easily?
Yes, archived data is still accessible, though it may take longer to retrieve than actively stored files. Good archiving systems provide search and retrieval functions, so you can easily locate and restore archived files.

Squirrel: With Squirrel, archived documents can be rehydrated by clicking on the stub file left in SharePoint. Squirrel retrieves all versions of the file, along with its metadata, ensuring a seamless restoration process.

How does archiving help with compliance and legal regulations?
Archiving allows businesses to meet data retention policies set by laws like GDPR or HIPAA. By securely storing old or inactive data, organisations can ensure that they comply with industry regulations without cluttering active systems.

Squirrel: Squirrel helps ensure compliance by automatically archiving documents in SharePoint according to retention policies. It also maintains metadata and versions, making it easier to manage and track compliance across archived files.

Is my archived data secure?
Yes, most modern archiving systems use encryption and other security measures to protect archived data from unauthorised access. Encryption ensures that even if the data is stored in the cloud, it remains protected.

Squirrel: All data archived by Squirrel is encrypted and stored securely in Azure Blob Storage. Squirrel’s architecture ensures data protection both in transit and at rest.

What types of data can be archived?
Any type of digital data can be archived, including emails, documents, databases, images, videos, and more. Physical documents can also be archived in the form of digital scans or paper storage.

Squirrel: Squirrel specifically archives documents from SharePoint Online, including all file types and versions, while retaining important metadata. It supports both individual files and complete site archives.

How long should data be archived for?
The length of time data should be archived depends on your industry, legal requirements, and business needs. Some data must be kept for a specified number of years, while other data may be archived indefinitely for future reference.

Squirrel: Squirrel can be configured to archive documents according to your organisation’s lifecycle policies, whether that means archiving after a certain period of inactivity or based on custom retention rules.

Can I automate the archiving process?
Yes, many archiving solutions, including Squirrel, offer automation features that automatically identify and archive files based on preset rules like file age, modification date, or access frequency.

Squirrel: Squirrel automates the archiving of SharePoint documents by identifying files based on your organisation’s policies and lifecycle rules, making it a hands-off process for administrators.

What happens if I stop using Squirrel – can I still access my archived data?
If you stop using Squirrel, you need to rehydrate your archived data before removing the system. Squirrel allows admins to restore data easily, ensuring that no documents are lost during the transition.

Squirrel: Squirrel’s system ensures that, even if you discontinue the service, your archived data can still be accessed, but it requires Squirrel to decrypt and restore files. Without Squirrel, the data remains encrypted, but SmiKar can provide a script to help manually decrypt the data if needed.

Archiving Doesn’t Have to Be Hard.

With Squirrel, easily archive SharePoint Online files based on lifecycle policies, while making it easy for Users to still access the files.

Squirrel Site Archive Settings

Archive SharePoint, Save Costs with Squirrel

Want to Start Archiving?