by Mark | Dec 7, 2016 | AVMS, Azure, Cloud Computing, Errors, Fixes, How To, Schedule
Troubleshooting Azure VM Scheduler (AVMS) Task Issues
If your scheduled AVMS tasks aren’t running as expected, don’t worry — this guide will walk you through common issues and how to resolve them quickly.
Error 1: Proxy Authentication Required
Check the AVMS log file located at:
C:\Program Files (x86)\SMIKAR Software\AVMS\avms.log
Look for entries similar to the following:
01/11/2016 11:23:46 AM Attempting to ADD-azureaccount using account [email protected]
01/11/2016 11:23:46 AM Failed to ADD-azureaccount using account [email protected] - error user_realm_discovery_failed: User realm discovery failed: The remote server returned an error: (407) Proxy Authentication Required.
This typically means your on-site proxy server requires authentication. The AVMS console works under your domain account (which has proxy access), but the scheduled task runs under the system account — which usually doesn’t.
To fix this:
- Open Control Panel → Task Scheduler
- Find the AVMS task, right-click, and choose Properties
- Change the user from System to a domain account with proxy permissions
Your scheduled task should now run successfully using this authenticated user.
Error 2: Email Notification Hang
Check the log again for an incomplete sequence like this:
01/11/2016 12:46:56 PM Started code block to Stop VMs
01/11/2016 12:46:56 PM Adding servers to array for email
01/11/2016 12:46:56 PM email form created notifying task has started
If the log halts here, it’s likely due to an issue with your email notification settings. Confirm that:
- Your SMTP server address, port, and credentials are correctly configured in AVMS
- Firewall or outbound rules aren’t blocking mail traffic
Alternatively, you can disable email notifications if you don’t need them — but note that you won’t receive job start/complete alerts.
Need More Help?
Still having issues? Contact [email protected] or visit our AVMS page for more resources.

by Mark | Aug 26, 2016 | Errors, Patch Management, Patch Releases, Risk, Security
Windows 10 has been a reliable operating system for many users, but recently, some patches released by Microsoft have caused various issues. One of the latest problems is caused by KB3176934, which appears to break Windows 10 PowerShell. In particular, it affects the Desired State Configuration (DSC) functionality in PowerShell, rendering it useless.
What is KB3176934?
KB3176934 is a security update released by Microsoft in August. The patch was meant to fix some security issues with the operating system, but instead, it caused a problem with PowerShell. The issue is related to a missing .MOF file in the build package, causing the update to break DSC.
The Consequences of the Issue
The missing .MOF file leads to all DSC operations resulting in an “Invalid Property” error. This means that if you are using DSC on any Windows client, or from any Windows client, you should uninstall the update. The PowerShell function will be completely unusable until the KB3176934 update is removed.

Other Issues Caused by Recent Patches
This isn’t the only issue caused by the August releases of patches by Microsoft. Two other known issues were caused by security patches, namely Microsoft patches KB3177725 and KB3176493 causing printing issues, and Microsoft Patch KB3179575 causing authentication issues with Windows 2012 servers. Fortunately, a fix for the printing issue problem (KB3187022) has been released. Still, there has been no correspondence regarding the authentication issues, making it unclear whether a fix is coming soon.
How to Fix the PowerShell Issue
If you have experienced this issue on your Windows 10 machine, don’t worry. There is a solution, and it’s relatively easy to implement. The only way to fix this problem is to uninstall KB3176934 from the affected machine. Once you have removed the update, DSC functionality should be restored to PowerShell
Conclusion
If you use PowerShell for DSC, KB3176934 is a patch you need to avoid. While it’s essential to keep your operating system up to date, this update is not worth the trouble. The missing .MOF file breaks DSC functionality, leading to an “Invalid Property” error, rendering it useless. It’s crucial to stay aware of the latest updates from Microsoft and to remove any problematic ones as soon as possible.

by Mark | Aug 23, 2016 | Errors, Fixes, How To, Patch Releases
Microsoft Patch KB3179575 causing authentication issues with Windows 2012 servers
Seems yet another Microsoft security patch is causing issues this month. KB3179575 which was in the August Patch Tuesday deployment is to fix issues with the Windows 2012 (not R2) operating system.

Taken directly from the Microsoft site, this update includes quality improvements but no new operating system features are being introduced.
The key changes include:
- Addressed issue that required users to wait up to 30 seconds after booting-up, before the device was available and ready for use.
- Addressed issue that prevents the automatic deletion of old Dynamic Host Configuration Protocol (DHCP) backup files—Extensible Storage Engine (ESE) transaction logs.
- Addressed issue that caused Cluster service on remaining nodes to stop unexpectedly when a failover cluster node experiences a power outage.
- Addressed issue that causes a NFS service to stop responding on a two-node Windows cluster deployment, affecting clients to not be able reach an NFS share.
- Addressed issue after installing KB3146706 that causes Office 2010 to stop responding when Enhanced Mitigation Experience Toolkit (EMET) is enabled.
At this stage it seems to be only affecting logons (authentication) to Windows 2012 Domain Controllers, again at this stage the only fix is to uninstall this update, or if you deployed this security update using Microsoft’s SCCM and SnaPatch, you can roll this update deployment back. There is no known fix at this stage.
You may also be interested in some other Microsoft patches KB3177725 & KB3176493 which are known to cause printing issues. These two security patches were also released this month as well as KB3176934 breaks Windows 10 Powershell.

by Mark | Aug 18, 2016 | Deployment, Errors, Fixes, Security
Microsoft August Patch Tuesday Release Causes Printing Issues: How to Fix it
Are you experiencing printing problems on your Windows PC after installing the latest security updates from Microsoft? If yes, then you are not alone. Two recent patches released by Microsoft, KB3177725 and KB3176493, seem to be causing printing issues on multiple Windows versions. In this article, we will discuss the details of this issue and how to fix it.
What are KB3177725 and KB3176493?
KB3177725 and KB3176493 are two security updates released by Microsoft in its August Patch Tuesday Release. These updates were designed to patch security vulnerabilities that could allow remote code execution on Windows 7, 8, 8.1, 10, and server editions of their software, including Windows server 2008, 2008 R2, 2012, and 2012 R2.

What is the issue caused by these updates?
The issue caused by these updates is the inability to print more than one page at a time. Some users have reported that it corrupts all print jobs with an error. Initially, Microsoft claimed that the problem was due to incompatibility issues between Windows and Printer Drivers. However, the company later acknowledged that the issue was caused by these two updates.

What is the fix for this issue?
UPDATE: Previously we mentioned the only work around is to uninstall either or both KB3177725 and KB3176493.
Well Microsoft have come through and have released another patch that will fix the issues caused by these two security updates. KB3187022 – Print functionality is broken after any of the MS16-098 security updates are installed
Patch is available to download from the Microsoft site https://support.microsoft.com/en-us/kb/3187022
There has been other issues this month, caused by the August Security Patches. Microsoft Patch KB3179575 causing authentication issues with Windows 2012 servers and KB3176934 breaks Windows 10 Powershell
If you are a SnaPatch customer, you are in luck. SnaPatch allows you to quickly and easily roll back your virtual machines to the prior security update deployment snapshot, thereby avoiding further issues. To learn more about what SnaPatch offers and how it can help you avoid similar issues, click the link provided.
In conclusion, if you are experiencing printing issues on your Windows PC after installing the latest security updates from Microsoft, then you are not alone. The patches causing these problems are KB3177725 and KB3176493. However, Microsoft has released a fix for this issue in the form of KB3187022. We recommend that you download and install this patch to resolve the issue.


by Mark | Jul 12, 2016 | Errors, Fixes, How To, VMWare
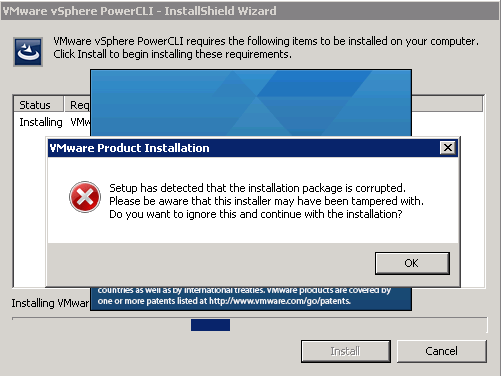
VMWare PowerCLI Installation Failed
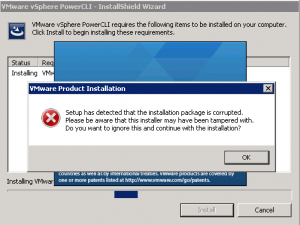
If you are installing VMWare’s PowerCLI for remote administration of your VMWare farm, or for SnaPatch or Snapshot Master you may at times receive the following error, “Setup has detected that the installation package is corrupted. Please be aware that this installer may have been tampered with.” One of the possible causes for this is that the root certificate for VeriSign isnt installed on your computer. There are a few ways to fix this issue, one is to download the root certificate from VeriSign themselves and then to install it to the local computer account under Third-Party Root Certification Authorities-Certificates, or to export it from the VMWare PowerCLI installation package.
VMWare PowerCLI setup error
These screenshots show the error you would receive while trying to install the VMWare PowerCLI installer.

How to Manually install the root certificate
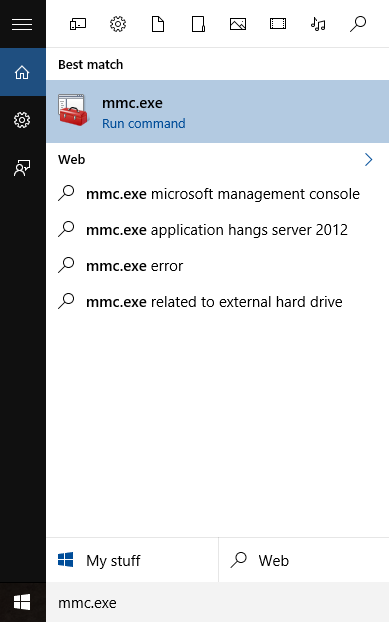
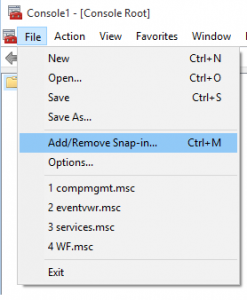
First off we will see if the root certificate is in fact already installed or not. From a command prompt type mmc.exe to open up the Microsoft Management Console.

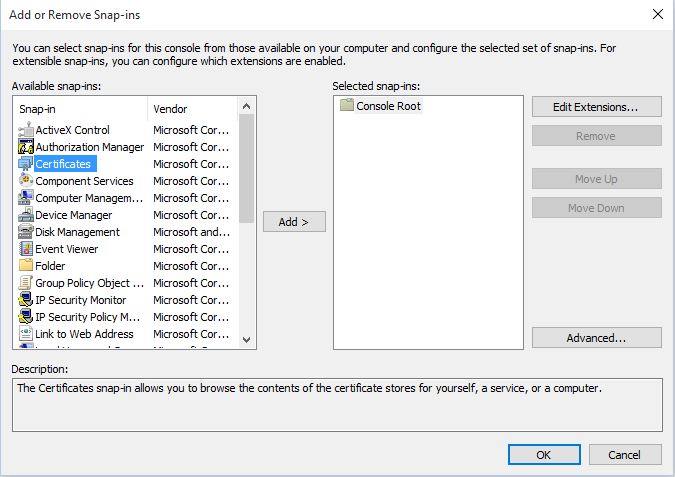
Now go to File, then Add/Remove Snap-in
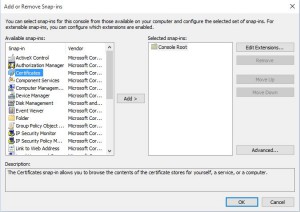
Next we have to choose the Certificates addin. Highlight Certificates then click on Add.
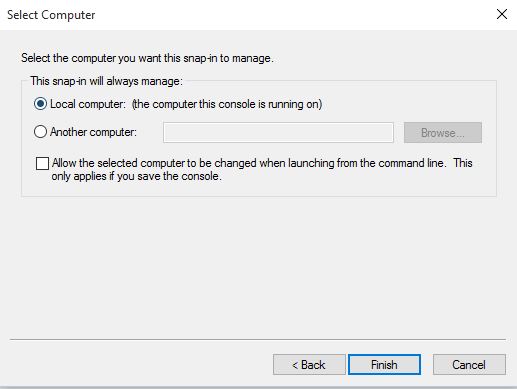
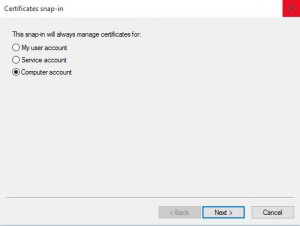
You will now need to select Computer Account and then click Next.
Choose Local Computer for the location that this snap-in will manage then click Next.
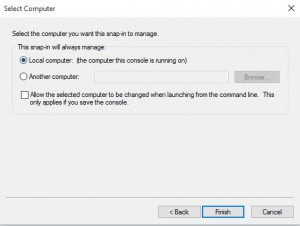
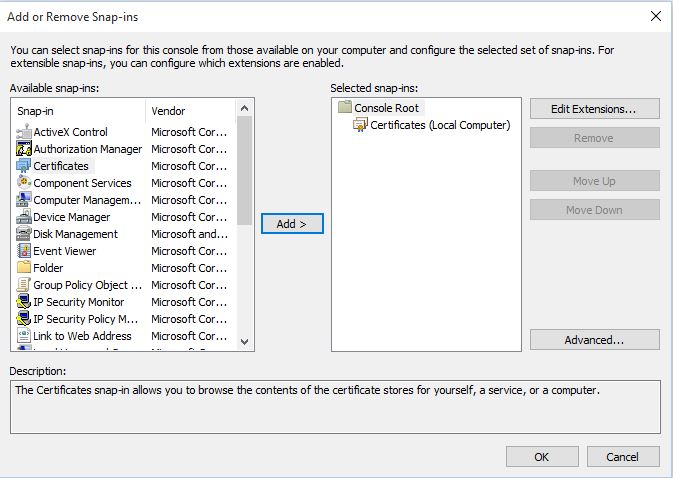
Now click OK and the Certificates Snap-in will be available.
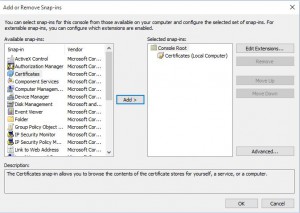
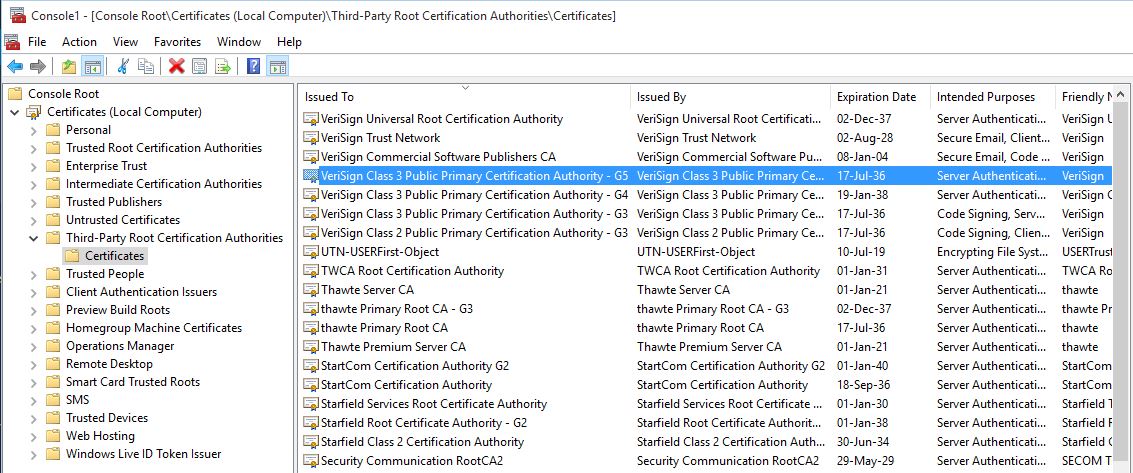
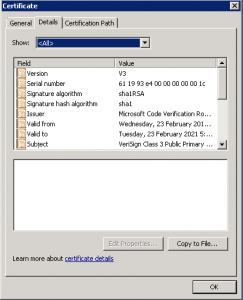
Expand Certificates, then Third-Party Root Certification Authorities and finally Certificates. You will now need to look for the Root Certificate, VeriSign Class 3 Public Primary Certification Authority – G5. In this example you can see that the certificate is installed. If it isnt installed you can download and install the certificate to the shown location. If you cannot download the root certificate it is possible to import the certificate from the VMWare PowerCLI installation package, as shown in further steps.

How to import the certificate from the VMWare package
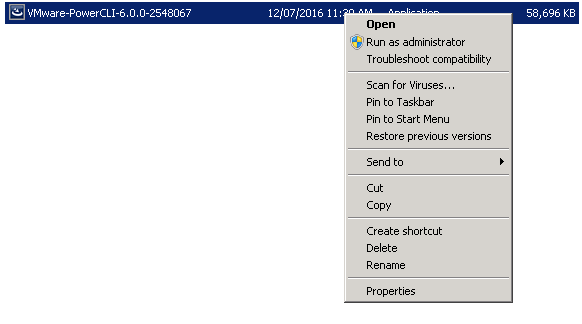
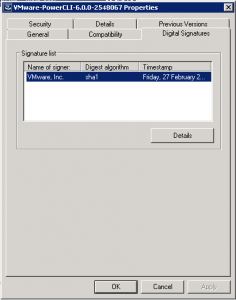
Now you will need to export the Root Certificate from the VMWare PowerCLI installation package. To do so, locate the EXE file and right click it then choose properties.

Change the tab to Digital Signatures then click Details.
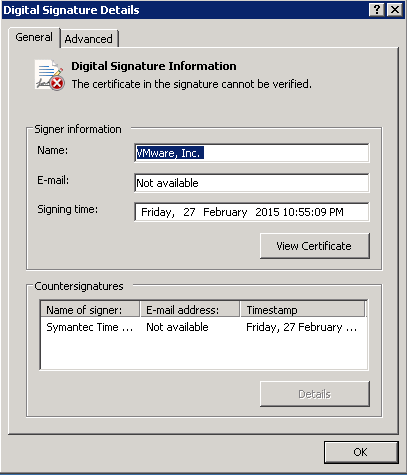
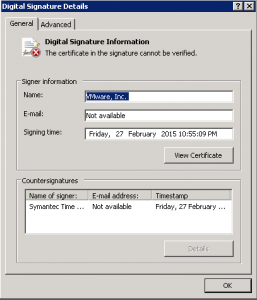
As you can see in this example, “the certificate in the signature cannot be verified”. Click View Certificate to proceed.
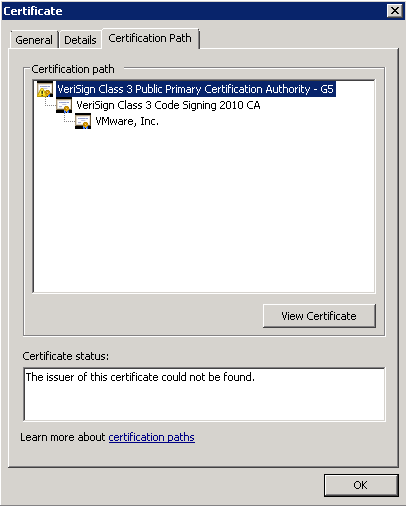
Change to the Certification Path tab and make sure you select the top of the certification path. In this example, you can see it highlighted as VeriSign Class 3 Public Primary Certification Authority – G5. Once selected click View Certificate.

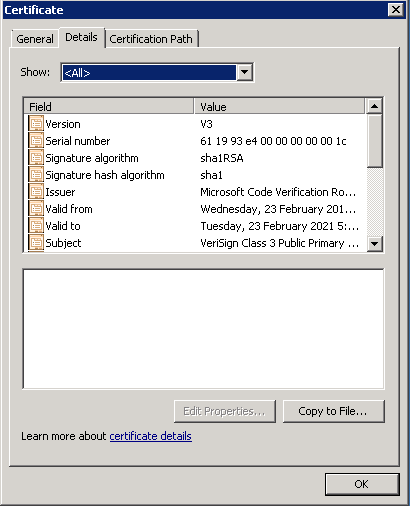
Again, in the next window go to the Details tab then click Copy to File.
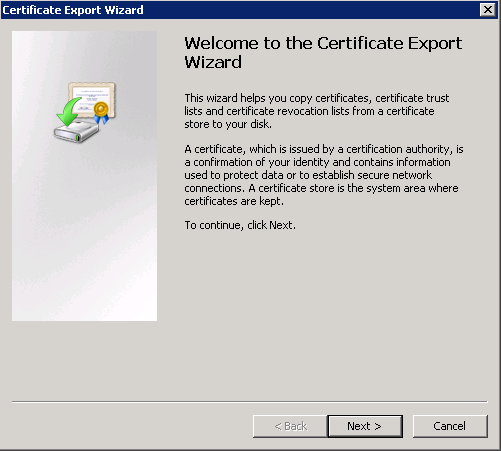
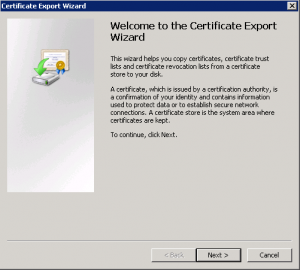
The Certificate Export Wizard starts next. Click on Next to proceed with the Wizard.
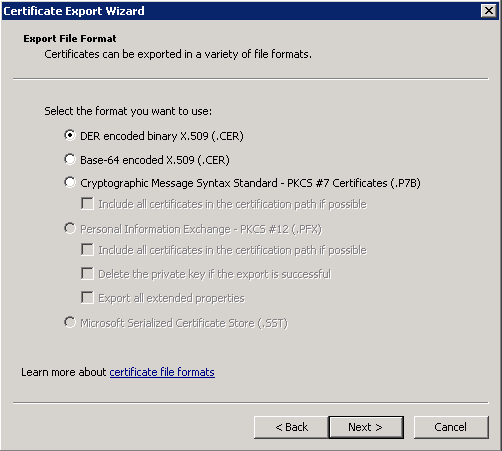
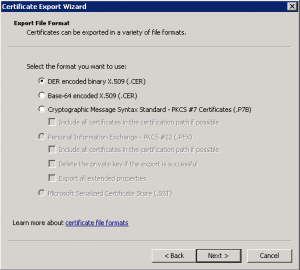
Leave the Format as DER and then click on Next.
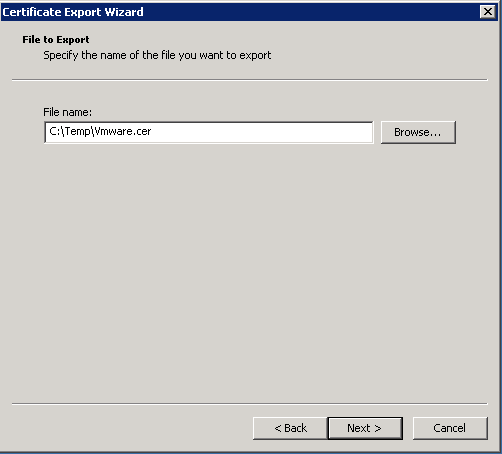
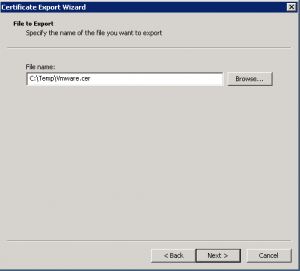
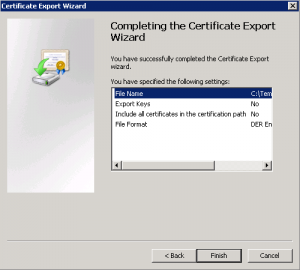
Choose the location and filename where you want to save the exported certificate and then click Next.
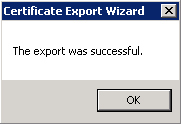
You can now click Finished and the Certificate Export Wizard will then close.
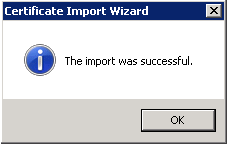
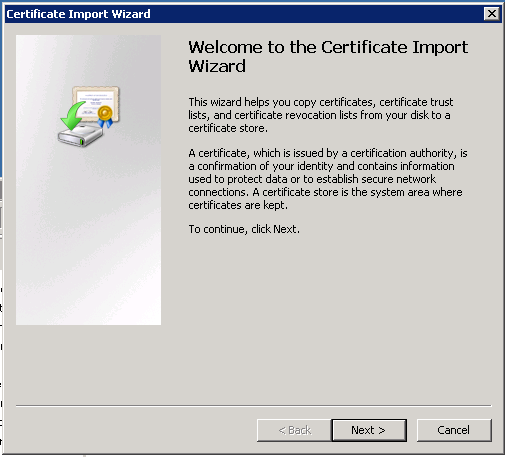
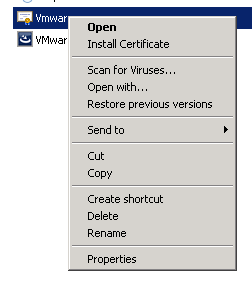
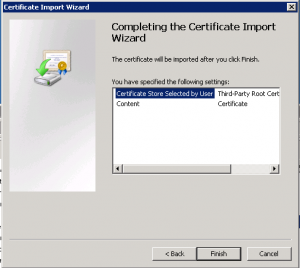
Next we need to import the VeriSign Root Certificate to the correct location. Right click the exported certificate and select Install Certificate.
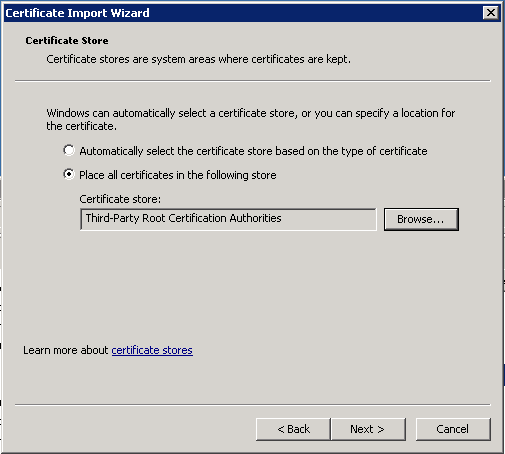
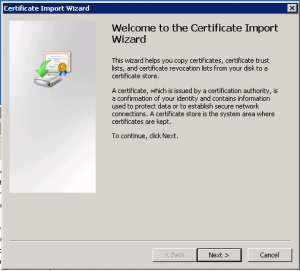
The Certificate Import Wizard now starts. Click Next.
Select Place all certificates in the following store and then choose Third-Party Root Certification Authorities. Click Next when ready to do so.

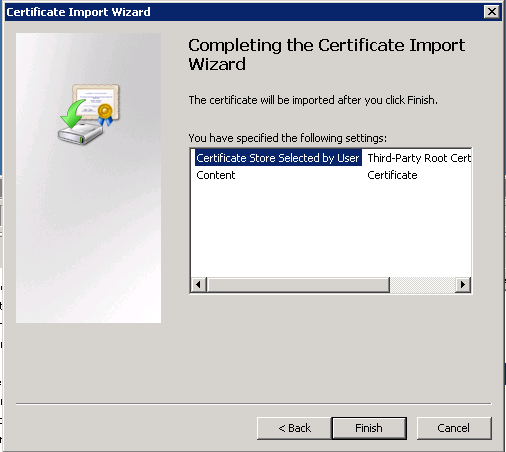
Now click Finish.
The Root Certificate from VeriSign should now have installed in to the correct location and you can then restart the installation of VMWare PowerCLI.