by Mark | Feb 28, 2023 | Azure, Azure Blobs, Blob Storage, How To
Blob Storage is a highly scalable and secure cloud storage solution offered by Microsoft Azure. It allows users to store unstructured data like text, images, videos, and audio files. Accessing Blob Storage is crucial for developers, IT professionals, and business owners who want to manage their data and applications in the cloud. In this article, we will discuss how to access Blob Storage using different methods and tools.
Azure Blob Storage Use Cases
| Use Case |
Description |
Backup and Archive
|
Blob storage can be used as a low-cost, durable backup and archive solution for data that is infrequently accessed. |
Media Storage and Streaming
|
Blob storage can be used to store and serve media files such as images, videos, and audio. Blob storage also supports streaming of large media files. |
Web Content Storage
|
Blob storage can be used to store and serve web content such as HTML, CSS, and JavaScript files. |
Big Data Analytics
|
Blob storage can be used to store large amounts of data for big data analytics. Blob storage integrates with many big data services, such as Azure HDInsight and Azure Databricks. |
IoT Data Storage
|
Blob storage can be used to store data from IoT devices such as sensors, cameras, and smart meters. |
Disaster Recovery
|
Blob storage can be used as a disaster recovery solution for critical data. |
Machine Learning
|
Blob storage can be used to store and manage large datasets used for machine learning, and can integrate with Azure Machine Learning services. |
Distributed File System
|
Blob storage can be used as a distributed file system for applications running in Azure, such as Hadoop and Spark. |
These are just a few examples of the many use cases for accessing Blob storage.
Accessing Blob Storage using Azure Portal
If you are new to Azure and Blob Storage, the easiest way to access Blob Storage is by using the Azure Portal. Follow these steps:
Log in to the Azure Portal
To access the Azure Portal, log in to your Azure account using your credentials.
Navigate to the Blob Storage Account
Once you are logged in, navigate to the Blob Storage account you want to access.
Access the Blob Container
Select the Blob container you want to access from the list of available containers.
Accessing Blob Storage using Azure Storage Explorer
Azure Storage Explorer is a free, cross-platform tool that allows you to manage your Azure Storage accounts. Follow these steps to access Blob Storage using Azure Storage Explorer:
Download and Install Azure Storage Explorer
Download and install Azure Storage Explorer on your computer.
Log in to Azure Storage Explorer
Log in to Azure Storage Explorer using your Azure account credentials.
Connect to Blob Storage
Once you are logged in, connect to your Blob Storage account using the connection string or the account name and key.
Access the Blob Container
Select the Blob container you want to access from the list of available containers.
Access the Blob Files
Once you have selected the Blob container, you can access the Blob files by clicking on the file name.
Accessing Blob Storage using Azure Blob Storage REST API
The Azure Blob Storage REST API allows developers to programmatically access Blob Storage using HTTP/HTTPS requests. Follow these steps to access Blob Storage using the REST API:
Get the Account Name and Account Key
To access Blob Storage using the REST API, you need to get the Account Name and Account Key from your Azure Portal.
Construct the Request URL
Construct the request URL by combining the Account Name, Container Name, and Blob Name.
Authenticate the Request
Authenticate the request by including the Account Key in the request header.
Send the Request
Send the HTTP/HTTPS request using the appropriate method (GET, PUT, POST, DELETE).
Accessing Azure Blob Storage FAQs
| Question |
Answer |
How do I access Azure Blob storage?
|
You can access Azure Blob Storage through the Azure Portal, Azure Storage Explorer, and the Azure Blob Storage REST API. |
How do I access Azure Blob storage via URL?
|
To access Azure Blob Storage via URL, you need to create a shared access signature (SAS) and use it to access the Blob Storage URL. |
How do I access Azure Blob storage using the access key?
|
To access Azure Blob Storage using the access key, you need to create a storage account and obtain the account access key. You can then use the key to authenticate your access to Blob Storage. |
How do I check my BLOB data?
|
You can check your BLOB data by accessing it through the Azure Portal, Azure Storage Explorer, or the Azure Blob Storage REST API. |
How do I access Azure Blob storage from SQL Server?
|
You can access Azure Blob Storage from SQL Server by using SQL Server Integration Services (SSIS) or by using the OPENROWSET function. |
How do I access Azure Blob storage from a VM?
|
You can access Azure Blob Storage from a VM by using the Azure Blob Storage REST API, Azure PowerShell, or Azure CLI. |
How do I access private Blob container in Azure?
|
You can access private Blob Container in Azure by using the Shared Access Signature (SAS) and setting the permission of the container to private. |
How do I access Azure Blob storage with managed identity?
|
You can access Azure Blob Storage with a managed identity by assigning the identity to the Azure VM or Azure Function and then using the identity to authenticate your access to Blob Storage. |
What is the difference between Azure Blob and Azure VM?
|
Azure Blob Storage is a cloud-based storage solution that is used to store unstructured data, while Azure VM is a virtual machine that runs on the Azure platform. |
How do I map Azure Blob storage?
|
You can map Azure Blob Storage to your local machine using the Azure Storage Explorer. |
How do I access Azure Blob storage with PowerShell?
|
You can access Azure Blob Storage with PowerShell by installing the Azure PowerShell module and using the cmdlets provided by the module. |
How does Azure Blob storage work?
|
Azure Blob Storage works by storing unstructured data as blobs in a storage account. The blobs can be accessed through the Azure Portal, Azure Storage Explorer, or the Azure Blob Storage REST API. |
What is the difference between Azure storage and Blob storage?
|
Azure storage is a general term used to describe different storage solutions provided by Azure, including Blob, File, Queue, and Table storage. Azure Blob Storage, on the other hand, is a specific type of Azure storage used to store unstructured data. |
What is the difference between Blob and object storage?
|
Blob storage is a type of object storage used to store unstructured data, while object storage is a more general term used to describe different types of storage solutions that store data as objects, including S3 and Azure Blob Storage. |
Is Azure Blob storage a data lake?
|
Azure Blob Storage can be used to store data in a data lake architecture, but it is not a data lake solution on its own. |
What does Azure Blob stand for?
|
Azure Blob stands for Azure Binary Large Object. |
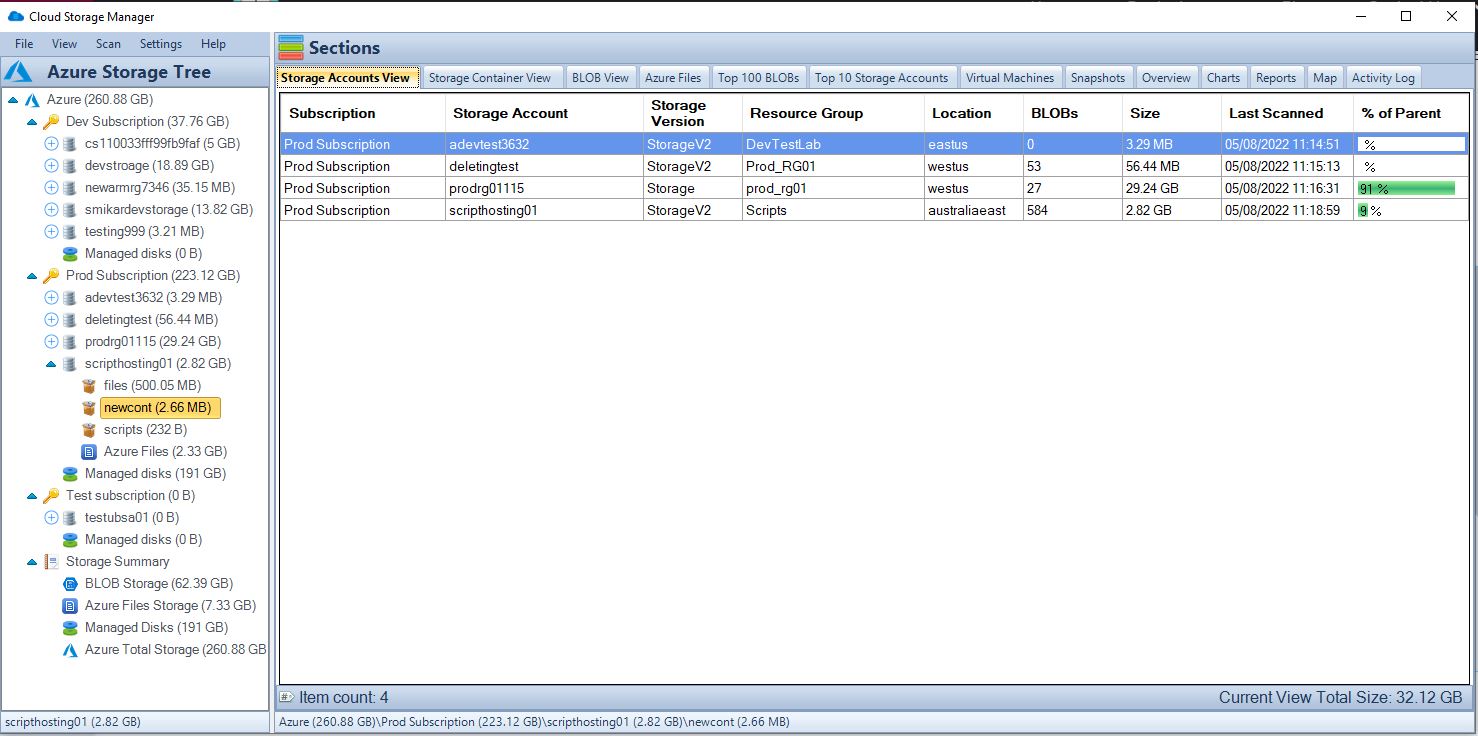
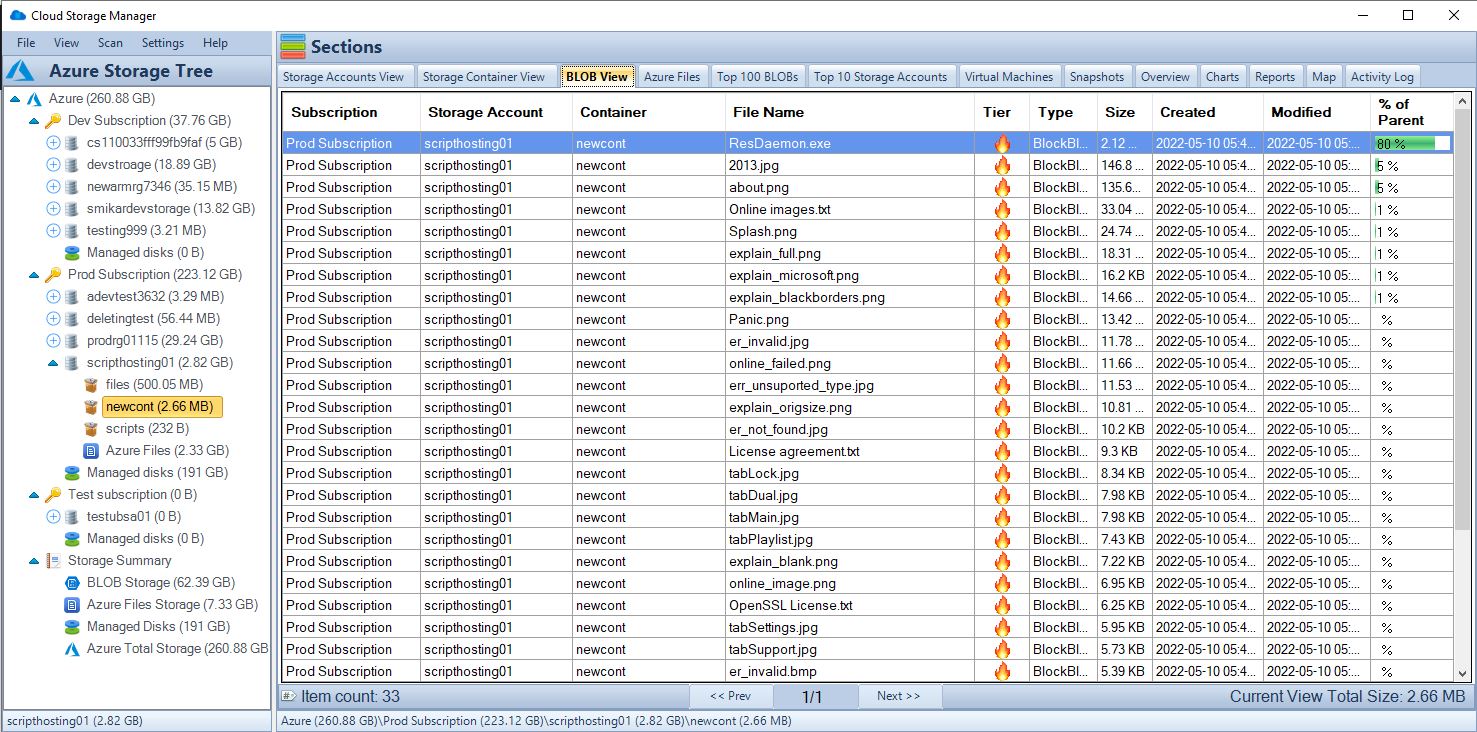
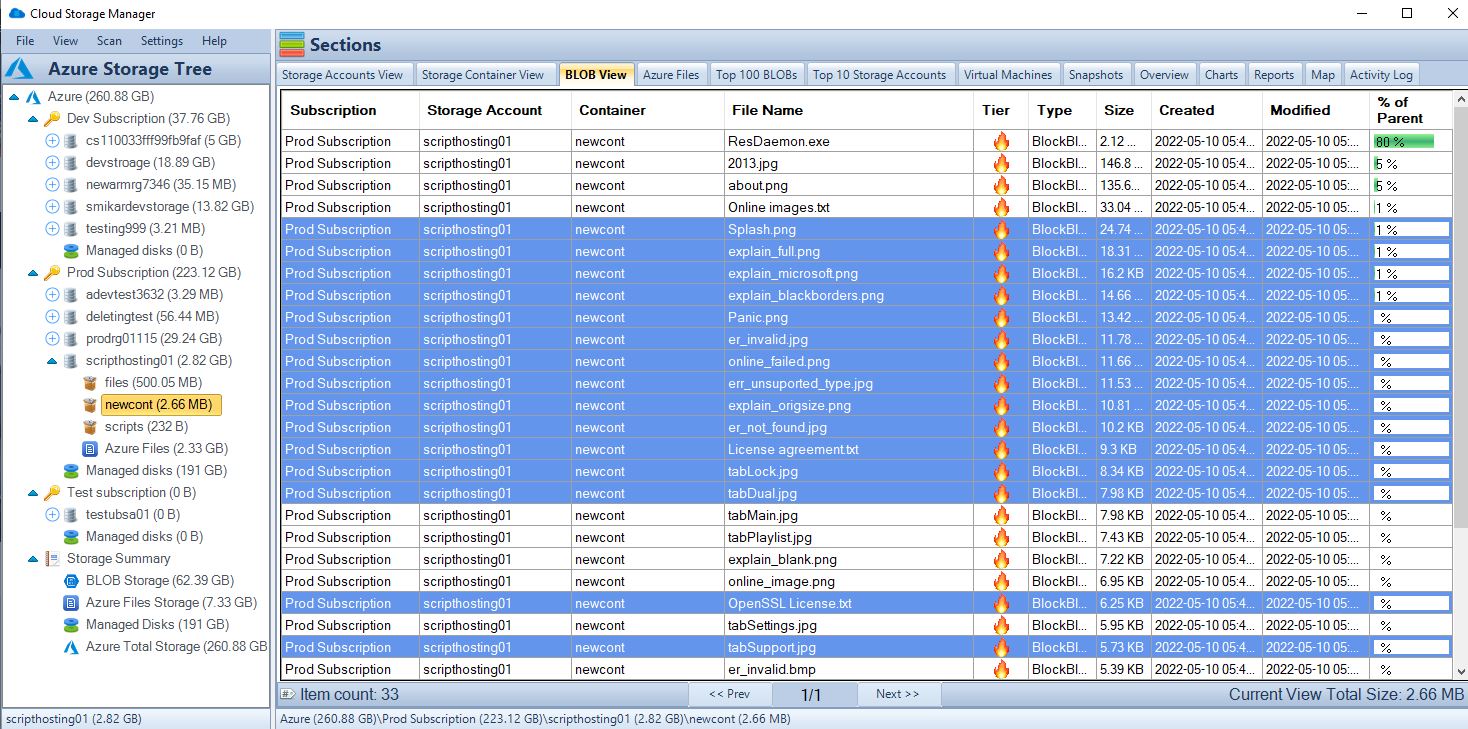
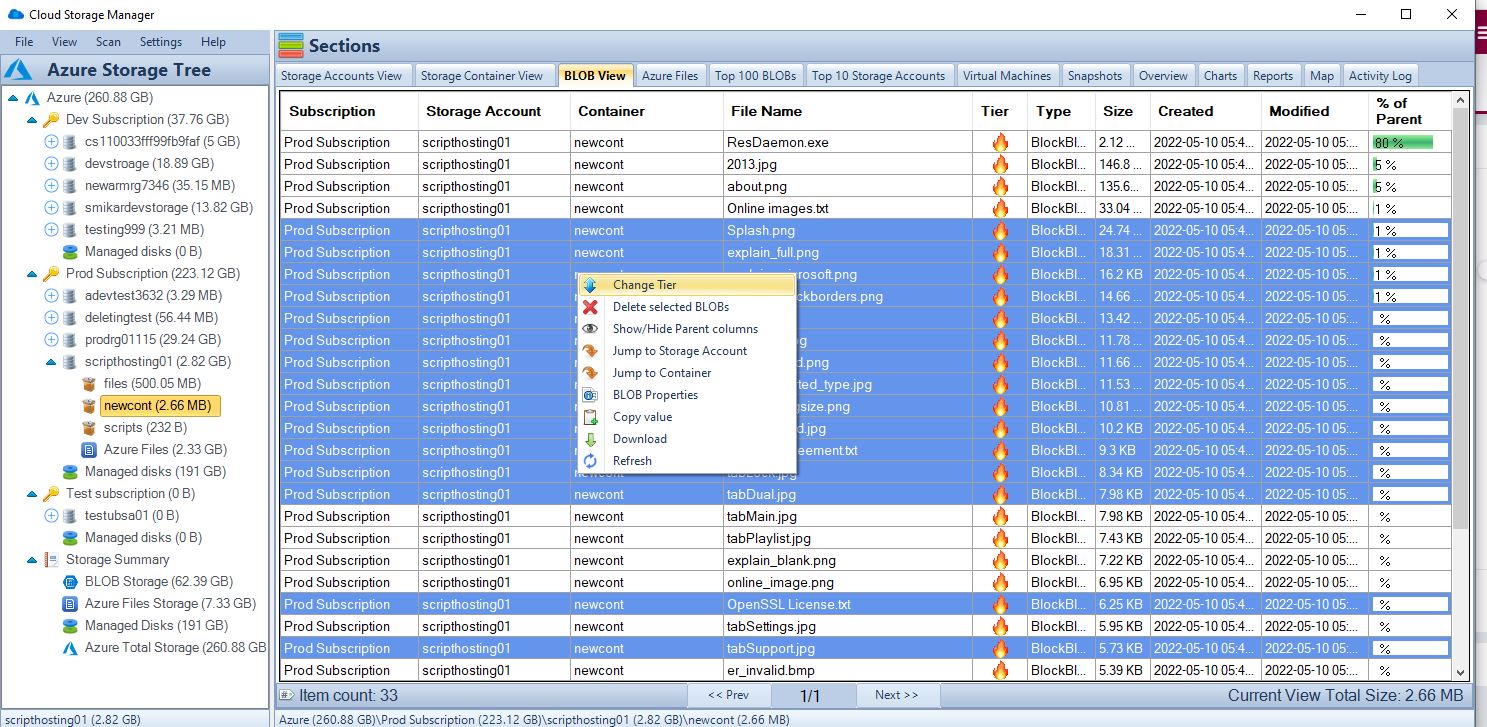
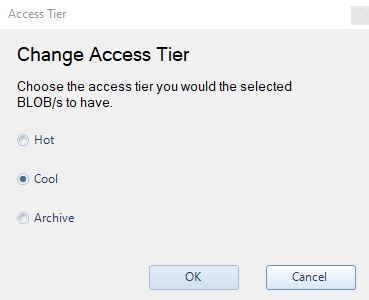
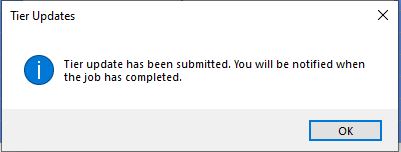
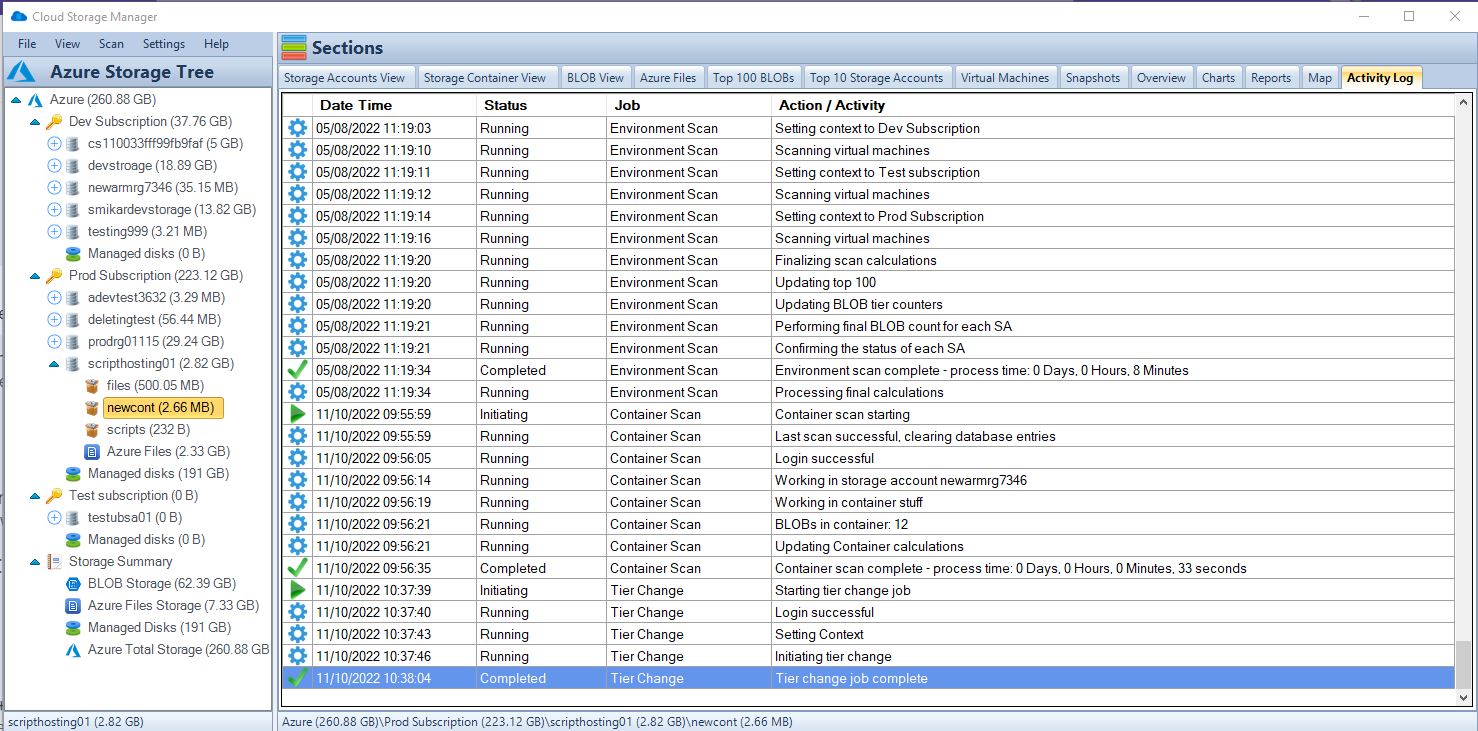
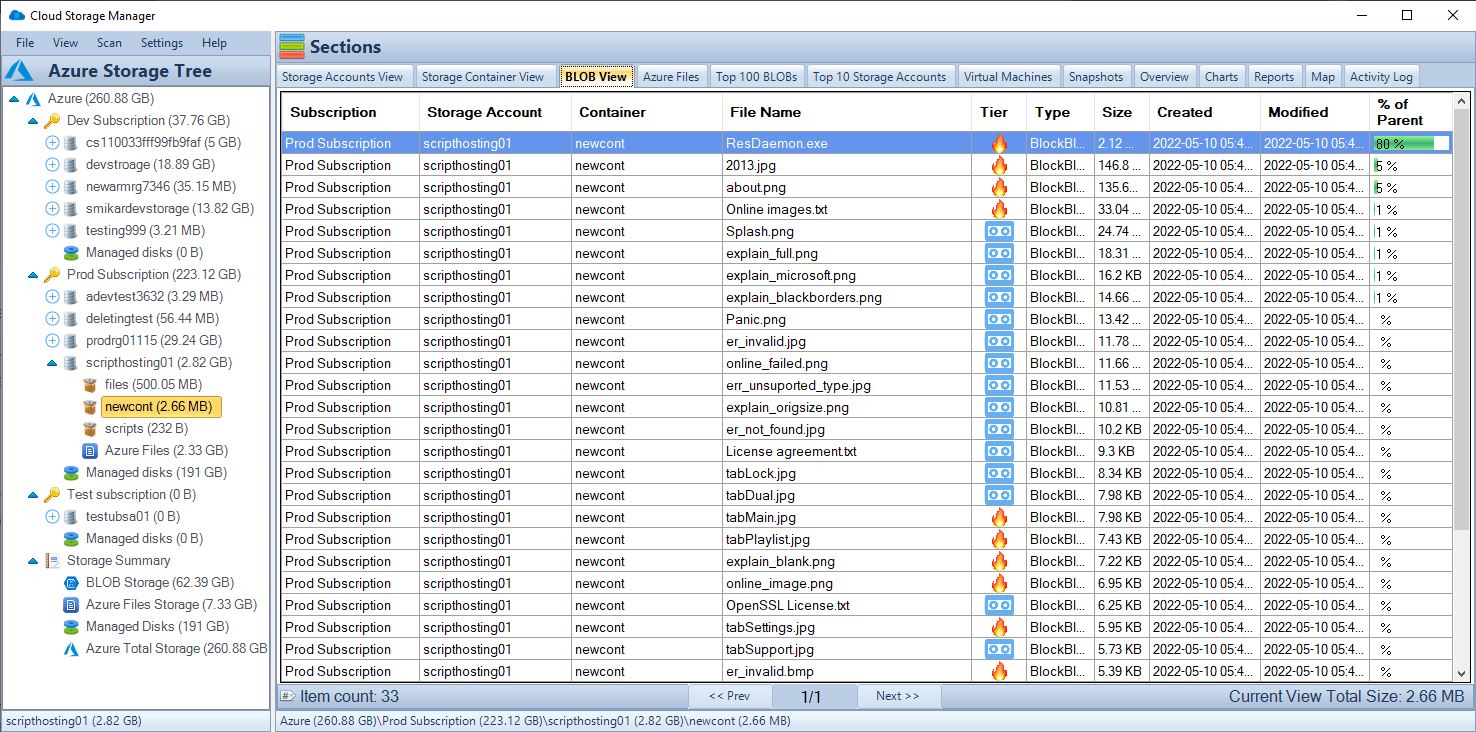
In conclusion, Cloud Storage Manager is a powerful tool that can help you track and manage your Azure Blob and Azure File storage consumption. With its unique features, you can easily visualize your Azure storage locations, view your Azure storage growth over time, browse through your Azure storage tree, and gain insights into your Azure Blob storage usage and consumption through its reporting feature.
You can search your Azure storage accounts across your complete Azure Tenancy, scan and report on your Azure Files usage, change the tiering of multiple Azure Blobs, delete the blob, as well as gather the Azure Blobs properties all with just a right-click. With Cloud Storage Manager, you can take back control of your Azure storage and reduce your costs, which often occur due to data residing in your Storage Accounts, and that continuously costs you money.
Azure Storage Unlocked
Please fill out the form below to get our free Ebook "Azure Storage Unlocked" emailed to you
FREE DOWNLOAD

by Mark | Jan 18, 2023 | Azure Blobs, Blob Storage, Cloud Computing, How To, Storage Accounts
Azure Storage Authentication Options
Azure Storage Authentication is the process of verifying the identity of a client that is requesting access to an Azure storage account. Azure Storage supports several authentication options that can be used to secure access to storage accounts, such as:
- Shared Key Authentication: This method of authentication uses a shared key that is known to both the client and the storage account to sign request headers.
- Shared Access Signature (SAS) Authentication: This method of authentication uses a shared access signature (SAS) token to provide restricted access to a storage account. A SAS token can be generated for a specific resource or set of resources within a storage account and can be used to grant read, write, or delete access to that resource.
- Azure Active Directory (AAD) Authentication: This method of authentication allows you to secure access to a storage account using Azure AD. By connecting a storage account to Azure AD, you can use Azure AD authentication to grant access to specific users or applications that are already authenticated with Azure AD.
- OAuth Authentication: This method of authentication allows you to authenticate with Azure Storage using an OAuth 2.0 Bearer Token. The token is passed in the Authorization header and is verified by Azure Storage.
- Token-based Authentication: This method of authentication is an advanced authentication method and includes authentication with SAS, OAuth 2.0 bearer tokens and JSON Web Tokens (JWT)
Choosing the best authentication option depends on your requirements such as security, ease of use and ease of integration with existing systems or platforms. For example, for testing or development purposes, Shared Key authentication can be sufficient and easier to implement, but for production environments that requires high level of security or integration with enterprise environments you may prefer to use Azure AD or OAuth.
How to connect your Azure Storage Accounts to your On-Premise Active Directory
Connecting a storage account to an on-premises Active Directory (AD) allows you to secure access to the storage account using on-premises AD authentication. This can be useful in scenarios where you want to provide access to the storage account to a specific group of users or applications that are already authenticated with your on-premises AD.
Here’s an overview of the process for connecting a storage account to an on-premises AD:
- Create a Domain Name System (DNS) alias: To connect to the on-premises AD, you will need to create a DNS alias that points to the on-premises AD. This can be done by creating a CNAME record in your DNS server.
- Configure the storage account to use AD authentication: In the Azure portal, go to the storage account settings and enable AD authentication for the storage account. You will need to provide the DNS alias that you created earlier and specify the domain name of your on-premises AD.
- Create a group in the on-premises AD: To grant access to the storage account, you will need to create a group in your on-premises AD. This group will be used to manage access to the storage account.
- Assign the storage Blob Data Contributor role to the group: To grant access to the storage account, you will need to assign the storage Blob Data Contributor role to the group. This role allows the members of the group to manage blobs in the storage account
- Add users or computer to the group: To grant access to storage account you should add users or computer to the group you created in step 3
It’s worth to mention that this process requires that you have your own domain controller and DNS server, and that your azure storage account and your on-premise network should be connected through a VPN or ExpressRoute.
Also, it would require an ADFS or other third party solution to facilitate the integration and trust relationship between on-premises AD and Azure AD.

by Mark | Jan 18, 2022 | Azure, Azure Blobs, How To
In today’s digital world, data storage has become an essential aspect of businesses of all sizes. As data continues to grow exponentially, the need for reliable, scalable, and cost-effective storage solutions has become more critical than ever. Microsoft Azure is a popular cloud computing platform that provides a wide range of storage solutions. In this article, we will guide you through the process of creating an Azure Storage account step-by-step.
What is Azure Storage?
Azure Storage is a cloud-based storage solution that provides scalable, durable, and highly available storage for your applications and data. It offers a range of storage types, including Blob, File, Queue, and Table storage, which are designed to meet different storage needs. Azure Storage provides a high degree of flexibility and enables you to easily scale up or down as your storage needs change.
Azure Storage Account Use Cases
| Use Case |
Description |
| Data Backup and Recovery |
Azure Storage Account is an ideal solution for data backup and recovery purposes. It allows users to store backup data in a secure and scalable manner, and retrieve it as needed. This use case is particularly useful for businesses that need to store and retrieve large amounts of data quickly and efficiently. |
| Media Storage and Streaming |
Azure Storage Account is also an excellent option for storing and streaming media files, such as videos and music. It provides a high level of performance and scalability, making it easy to store and retrieve media files as needed. This use case is particularly useful for businesses that need to stream videos or other media content to their customers. |
| Application Data Storage |
Azure Storage Account is a reliable and cost-effective solution for storing application data. It provides flexible options for storing and retrieving data, making it easy to manage application data as needed. This use case is particularly useful for businesses that need to store and manage large amounts of application data. |
| Archival Storage |
Azure Storage Account also provides an excellent option for archival storage. This use case involves storing data that is infrequently accessed, but still needs to be retained for compliance or other reasons. Azure Storage Account offers cost-effective options for storing archival data over long periods of time, while still providing easy access to the data when needed. |
| Disaster Recovery |
Azure Storage Account can also be used for disaster recovery purposes. It allows businesses to store backup data in a separate location, providing an added layer of protection in case of a disaster. This use case is particularly useful for businesses that need to ensure that their data is protected and accessible at all times, even in the event of a disaster. |
STEP BY STEP GUIDE ON HOW TO CREATE AN AZURE STORAGE ACCOUNT.
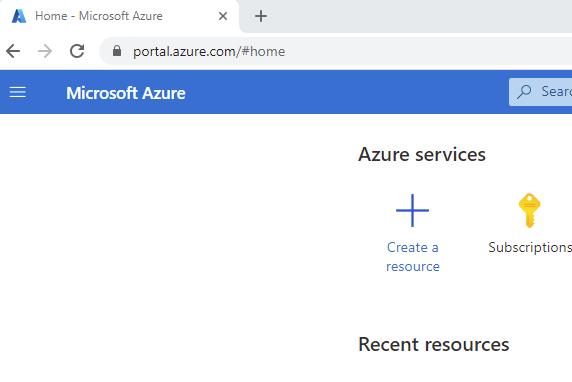
Open the Azure Portal
First thing to do is to open the browser of your choice and into your Azure Subscription at https://portal.azure.com
New Azure Storage Account
Now navigate to the top left of the browser, click the three dashes and scroll down to Storage Accounts, then choose create.
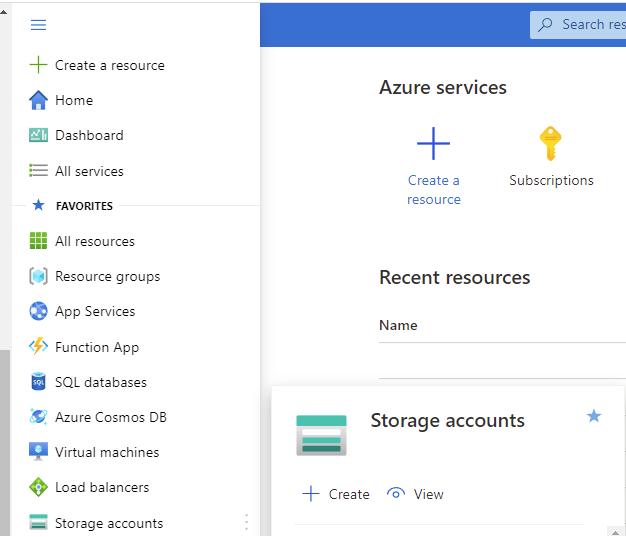
Create an Azure Storage Account
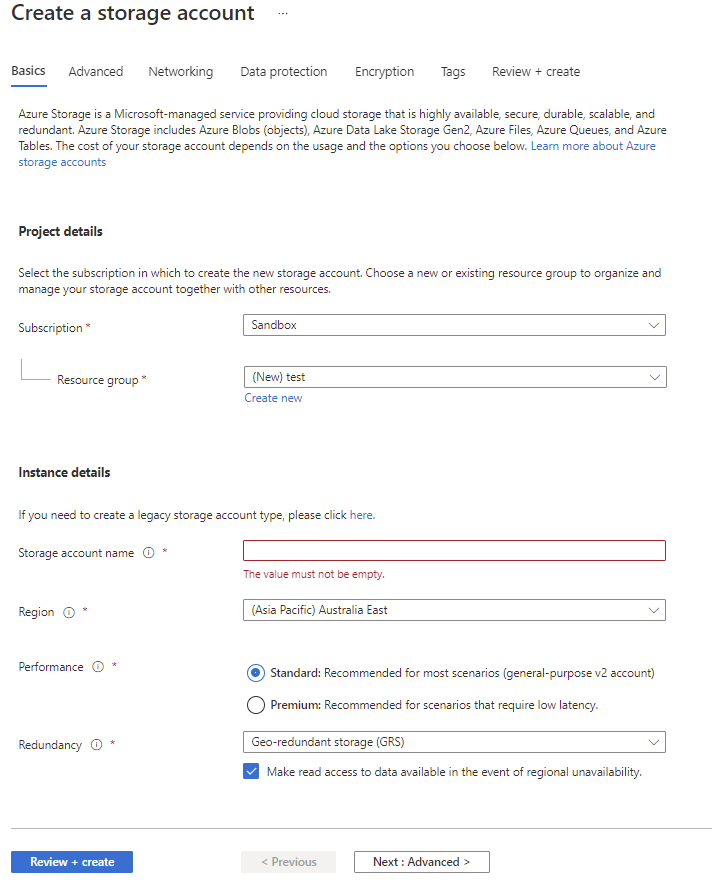
The Browser will now open into the Create a Storage Account Wizard.
Here you will need to know and set a few things so your storage account can be created.
SUBSCRIPTION – First thing is which of your Azure Subscriptions the Storage Account should reside in.
RESOURCE GROUP – Next is the Resource Group, you can either choose an existing Resource Group or create a new one.
STORAGE ACCOUNT NAME – This is the name that you want the Storage Account to be called. It must be unique.
REGION – The Azure datacentre you want the Storage Account to reside.
PERFORMANCE – You can choose Standard or Premium for the performance of the Storage Account.
REDUNDANCY – Choose what sort of redundancy you want for the Storage Account. (More info on this and more about Azure Blob Storage at this link)
Choose from;
-
- Locally Redundant Storage – (LRS)
- Geo Redundant Storage – (GRS)
- Zone Redundant Storage – (ZRS)
- Geo Zone Redundant Storage – (GZRS)
When you are ready to progress, you can skip the next few steps by clicking Review + Create or click Next : Advanced to proceed to the next steps.
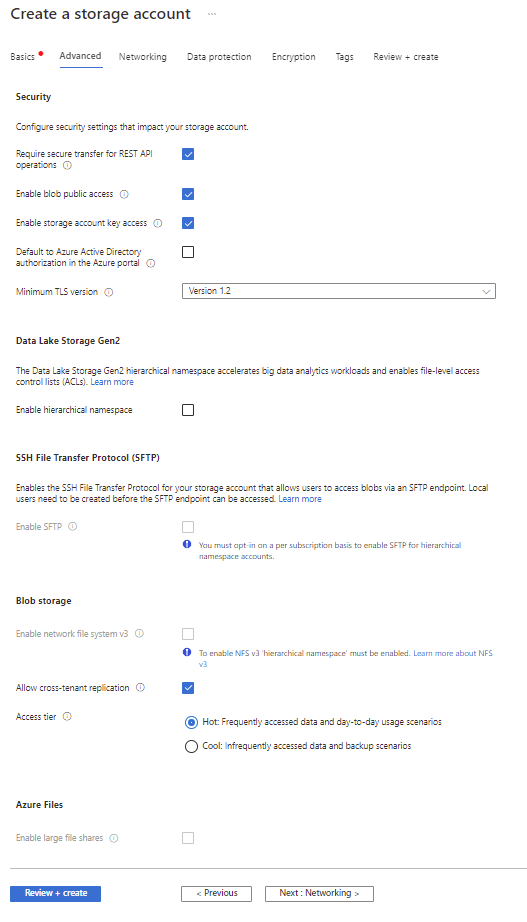
Azure Storage Account Advanced Page
If you clicked on Review + Create on the previous page, you can skip these steps. However, if you click on Next : Advanced you will be on the further settings page in the Storage Account Creation wizard.
On this page you configure some further settings;
SECURITY
SECURE TRANSFER FOR REST API – This setting will only allow communication to the Storage Account using HTTPS. HTTP will be rejected when this setting is enabled.
ENABLE BLOB PUBLIC ACCESS – Choose if you want this storage account to be accessed externally, or only via your internal network.
ENABLE STORAGE ACCOUNT KEY ACCESS – Choose whether you want to enable access using an Azure Shared Storage Key.
AZURE ACTIVE DIRECTORY– If you have Azure Active Directory you can set this to allow access to the Storage Account using Azure AD.
MINIMUM TLS VERSION – This sets the minimum TLS version that any applications accessing the Storage Account can use.
-
- TLS version 1.2
- TLS version 1.1
- TLS version 1.0
DATA LAKE STORAGE GEN2
ENABLE HIERARCHICAL NAMESPACE – The Data Lake Storage Gen2 hierarchical namespace accelerates big data analytics workloads and enables file-level access control lists
SSH FILE TRANSFER PROTOCOL (SFTP)
ENABLE SFTP – Enables the SSH File Transfer Protocol for your storage account that allows users to access blobs via an SFTP endpoint.
BLOB STORAGE
ENABLE NETWORK FILE SYSTEM v3 – This will allow the Network File System Protocol so that users can access their files across the network.
ALLOW CROSS-TENANT REPLICATION – This allows object replication from this storage account to another storage account within a Different Azure tenant. Not enabling this setting will limit this replication only within the same Azure tenant.
ACCESS TIER – Sets the default access tier for the storage account.
-
- HOT – For frequently accessed data
- COOL – For less frequently accessed data
AZURE FILES
ENABLE LARGE FILE SHARES – Provides support for file shares up to 100 TiB.
When you are ready to progress, click Next : Networking to proceed to the next steps.5
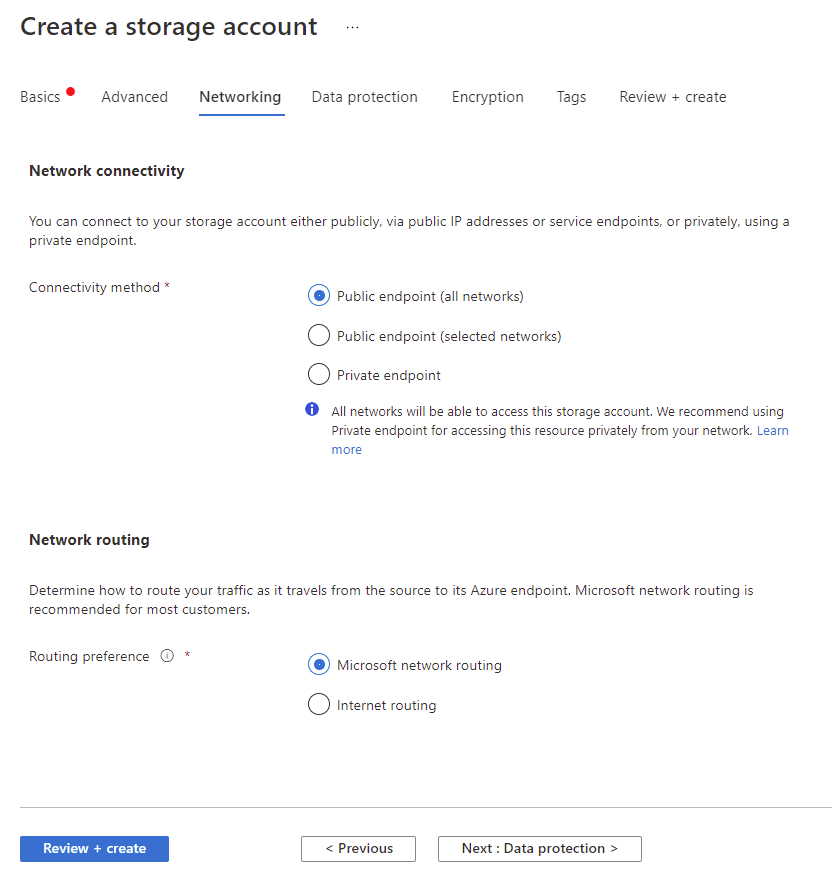
Azure Storage Account Network Connectivity
If you clicked on Review + Create on the previous page, you can skip these steps. However if you click on Next : Advanced you will be on the further settings page in the Storage Account Creation wizard.
On this page you configure some further settings;
NETWORK CONNECTIVITY
CONNECTIVITY METHOD – This setting will only allow communication to the Storage Account using HTTPS. HTTP will be rejected when this setting is enabled.
-
- PUBLIC ENDPOINTS (ALL NETWORKS) – All networks will be able to access this storage account.
- PUBLIC ENDPOINTS (SELECTED NETWORKS) – Selected networks will be able to access this storage account.
- PRIVATE ENDPOINT – Only allow access from your internal network.
NOTE: The remaining options on this page will change depending on which of the connectivity methods you chose above.
PUBLIC ENDPOINTS (ALL NETWORKS) OPTION
ROUTING PREFERENCE– Chose how to route the traffic to your storage account endpoint.
-
- MICROSOFT NETWORK ROUTING
- INTERNET ROUTING
PUBLIC ENDPOINTS (SELECTED NETWORKS) OPTION
VIRTUAL NETWORKS – Only the selected networks will be able to access this Storage Account.
VIRTUAL NETWORK SUBSCRIPTION – Which Azure Subscription the network will be provisioned.
VIRTUAL NETWORK – You can create or use an existing virtual network to allow access to this storage account.
NETWORK ROUTING – Determine how to route your traffic as it travels from the source to its Azure endpoint. Microsoft network routing is recommended for most customers.
ROUTING PREFERENCE – Two options here, Microsoft Routing or Internet Routing. Microsoft Network Routing will direct your traffic to enter the Microsoft cloud as quickly as possible from the source. Internet Routing will direct your traffic to enter the Microsoft Cloud closer to the Azure Endpoint.
-
- MICROSOFT NETWORK ROUTING
- INTERNET ROUTING
PRIVATE ENDPOINT
CREATE A PRIVATE ENDPOINT – Here you can create a Private Endpoint for connectivity to the Storage Account.
NETWORK ROUTING – Determine how to route your traffic as it travels from the source to its Azure endpoint. Microsoft network routing is recommended for most customers.
ROUTING PREFERENCE – Two options here, Microsoft Routing or Internet Routing. Microsoft Network Routing will direct your traffic to enter the Microsoft cloud as quickly as possible from the source. Internet Routing will direct your traffic to enter the Microsoft Cloud closer to the Azure Endpoint.
-
- MICROSOFT NETWORK ROUTING
- INTERNET ROUTING
When you are ready to progress, click Next : Data Protection to proceed to the next steps

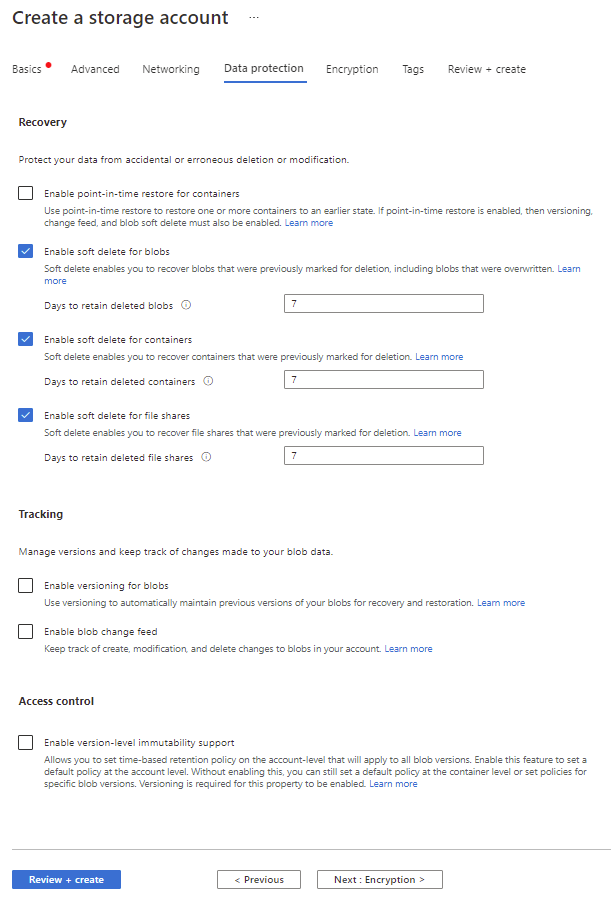
Azure Storage Account Recovery
Now you should be presented with the Data Protection Page.
On this page you configure these settings;
RECOVERY – Protects your data from accidental deletion and erroneous deletion or modification.
Choose which of these options you want to protect the data within your Storage Account, and how many days you wish to retain the deleted Blobs.
-
- POINT IN TIME RESTORES FOR CONTAINERS
- ENABLE SOFT DELETE FOR BLOBS
- ENABLE SOFT DELETE FOR CONTAINERS
- ENABLE SOFT DELETE FOR FILE SHARES
TRACKING
Provides versioning and monitors and logs changes made to your Blob data.
- ENABLE VERSIONING FOR BLOBS
- ENABLE BLOB CHANGE FEED
ACCESS CONTROL
ENABLE VERSION LEVEL IMMUTABILITY SUPPORT– Allows you to set time-based retention policy on the account-level that will apply to all blob versions. Enable this feature to set a default policy at the account level. Without enabling this, you can still set a default policy at the container level or set policies for specific blob versions. Versioning is required for this property to be enabled.
When you are ready to progress, click Next : Encryption to proceed to the next steps
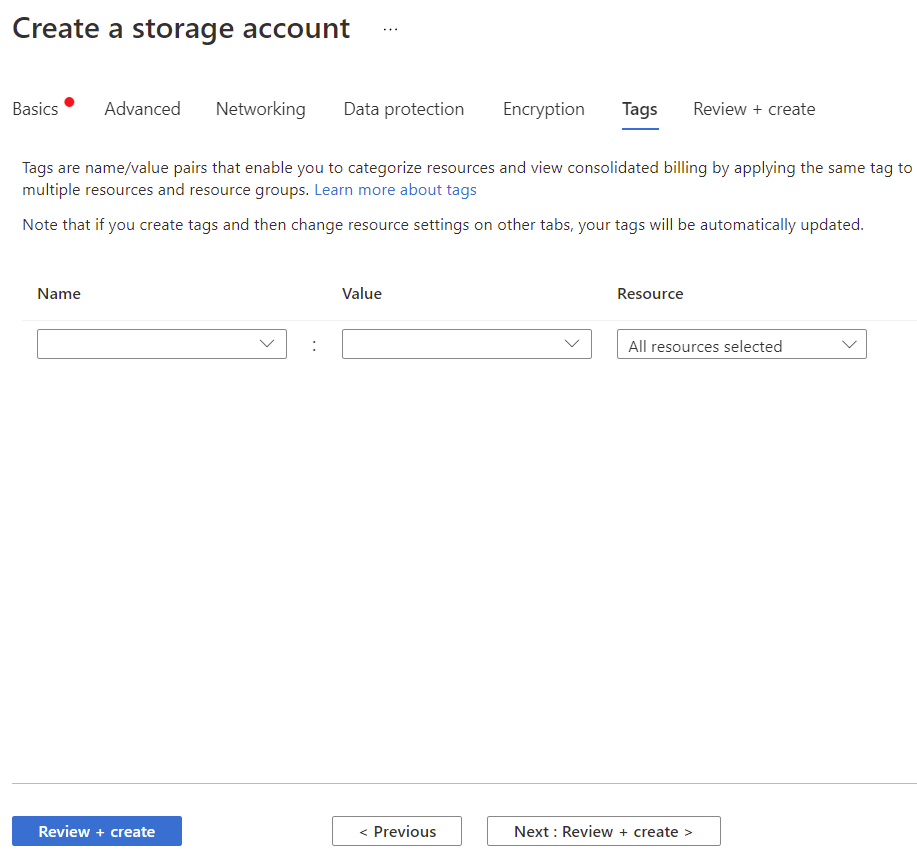
Azure Storage Account Tagging
Almost there, now on the TAGS Page.
On this page, you configure any TAGS you want to be applied to the Storage Account.
When you are ready to progress, the last step is to click on Next : Review + Create to proceed to the final step

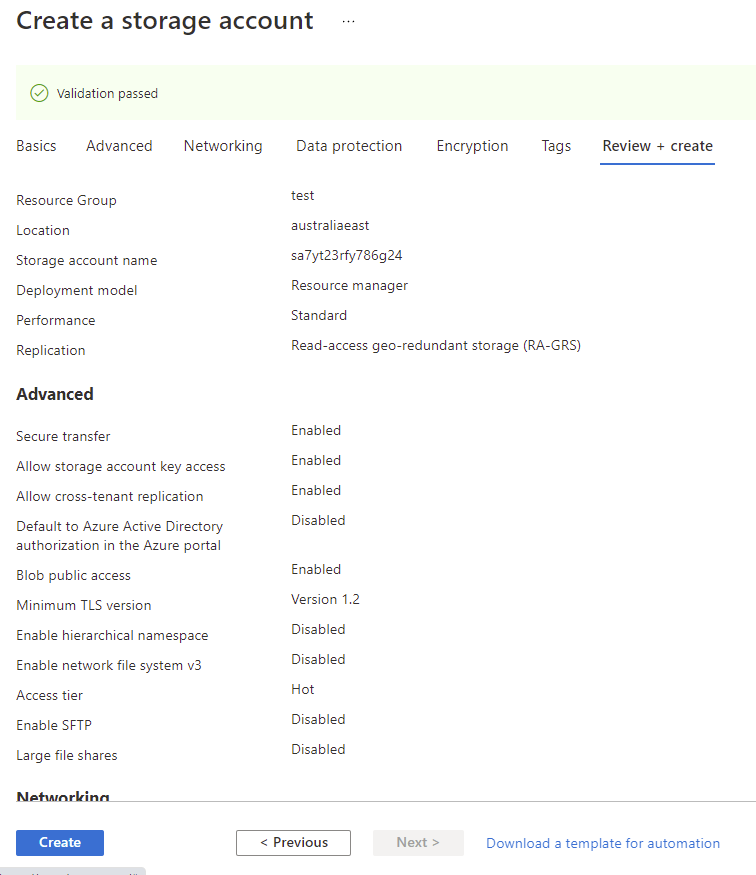
Azure Storage Account Created
Finally, we are there (Well if you did skip all options in Step 3, you were here a lot sooner)
Confirm all the settings here match the options you want and when you are finally ready to create your Azure Storage Account, click on Create.
And that’s all there is to it, you have created a Storage Account within Azure that you can now start to access and use all the benefits that Azure’s Storage has to offer.
Now once you start using it and want to gain some insights into your Azure Storage Consumption and Usage, you can trial our software for free, Cloud Storage Manager.
Azure Storage Account FAQs
What is a storage account?
A storage account is a secure and scalable cloud storage solution provided by cloud service providers like Microsoft Azure, Amazon Web Services, and Google Cloud Platform.
What are the benefits of using a storage account?
Storage accounts offer several benefits such as high availability, scalability, durability, security, and cost-effectiveness.
What types of data can be stored in a storage account?
Storage accounts can store various types of data such as files, blobs, tables, and queues.
Can multiple applications access the same storage account simultaneously?
Yes, multiple applications can access the same storage account simultaneously.
What is the pricing model for a storage account?
The pricing model for a storage account depends on the cloud service provider and the type of storage account. Generally, users are charged based on the amount of data stored, the number of transactions performed, and the amount of data transferred.
In today’s world, where data is one of the most valuable assets of any organization, having a reliable and scalable storage solution is crucial. Storage accounts offered by cloud service providers are an excellent option for storing, managing, and accessing data in a secure and cost-effective way. With the flexibility to store various types of data and the ability to scale up or down based on the requirements, storage accounts have become a popular choice among organizations of all sizes. Whether you’re a small startup or a large enterprise, a storage account can help you manage your data more efficiently and effectively.