SnaPatch - Support
See how SnaPatch interfaces with your SCCM and VMWare or HyperV environment and start deploying updates with a quick and easy roll back position now.
SnaPatch Requirements
If you are looking for a way to automate patch management for your VMware, HyperV, Microsoft Azure, and SCCM infrastructure, SnaPatch can help you achieve that. SnaPatch is an agentless patch management tool that automates the snapshot and patching process across your servers. This guide outlines the hardware and software requirements for SnaPatch, and provides a detailed guide on how to configure SnaPatch for your environment.
| Component | Requirement |
|---|---|
| Hardware | 2 vCPU, 4GB RAM, 10GB free space |
| Software | Windows Server 2008R2 SP1 or above, Microsoft .NET Framework 4.5, Powershell 4, Microsoft Database Engine, VMware vSphere PowerCLI |
| Domain Membership | The server on which SnaPatch is installed must be a member of the same domain as the Configuration Manager server. |
| SQL Database Requirements | SnaPatch requires read-only access to SCCM database, SQL Server running at least SQL 2005 |
| VMware Requirements | VMware vCenter 5.0 or above, account used for connection must have “Virtual Machine Power User” role, permissions to create and remove snapshots |
| Configuration Manager Requirements | |
| System Center Configuration Manager 2012 R2 or above, account used for connection must be a member of the local administrators group on the SCCM server and “Application Administrator” and “Software Update Manager” roles within SCCM. |
System Center Configuration Manager 2012 R2 is required as a minimum. The account used to connect to SCCM must be a member of the local administrators group on the SCCM server. The account must also be a member of the “Application Administrator” and “Software Update Manager” roles within SCCM.
The SCCM server must also have the following configured/enabled:
- Remote Powershell enabled
- WinRM Enabled
- Powershell execution policies set to “remote signed” for both x64 and x86
- Powershell 4.0 Note: The installer will automatically attempt to confirm the above settings. | | Remote Management | Remote Powershell enabled, WinRM enabled, Powershell execution policies set to “remote signed” for both x64 and x86, Powershell 4.0 | | Service Account Requirements | The service account must be a member of the local administrators group on all target computers to be able to execute remote WMI commands. | | Email Requirements | Access to an SMTP server and an account that is allowed to relay through the service. |
SnaPatch Installation
If you’re looking for a hassle-free way to update your Windows servers, SnaPatch is the tool for you. With its easy-to-use interface, you can snapshot and update all your servers in just a few clicks. Here’s a step-by-step guide to help you install SnaPatch.
Meeting the Minimum Requirements
Before you begin the installation process, make sure your computer meets the minimum hardware and software requirements to run SnaPatch. The minimum requirements are as follows:
- Operating System: Windows Server 2008 R2 SP1 or higher
- CPU: 64-bit processor
- Memory: 4 GB RAM
- Disk Space: 50 GB free space
- .NET Framework: Version 4.7.2 or higher
Launch the SnaPatch Executable
Ensure that you meet the minimum OS requirements and that you’re a local administrator. Then, launch the executable file to start the installation process.
Confirm SnaPatch Prerequisites
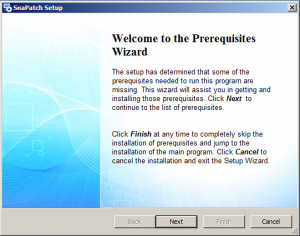
The Prerequisites Wizard will appear and confirm whether all the necessary requirements are installed. Click “Next” to continue.
Install SnaPatch Prerequisites
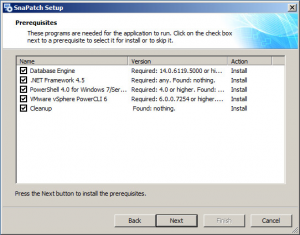
The installation process may take some time, depending on how many prerequisites need to be installed. The wizard will determine which prerequisites are required and prompt you to install them. Follow the prompts to install the prerequisites.
Install SnaPatch
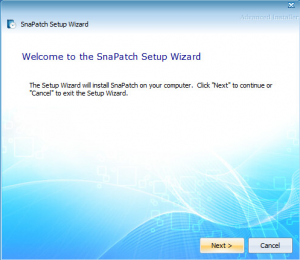
Once all the prerequisites have been installed, and the server has rebooted, the SnaPatch installation wizard will appear. Click “Next” to begin the installation and follow the prompts.
Launch SnaPatch

Once the installation is complete, double-click the SnaPatch shortcut on the desktop to launch the application.
Configure SnaPatch
As this is the first time you’re launching SnaPatch, the configuration wizard will appear. Click “Next” to begin.
Enter Service Account Details
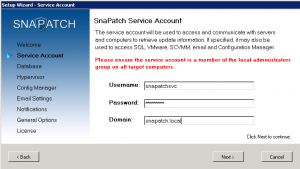
Enter the username, password, and domain of the service account. This account will be used to access, communicate, and retrieve update information from remote servers. You may also use this account to access SQL, VMware, and Configuration Manager.
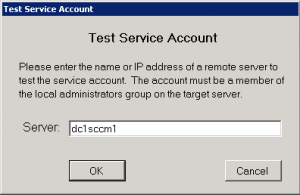 Enter your SCCM server name and SnaPatch will now check the connection
Connect to SQL Database
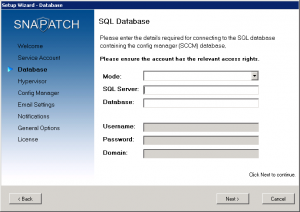
Enter the details required to connect to the SQL database containing the Configuration Manager database. The account only requires read access.
Connect to vCenter and/or SCVMM Server
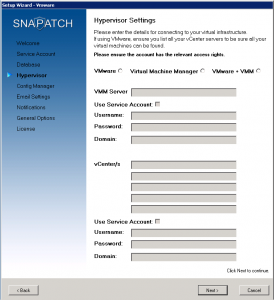
Enter the names or IP addresses of your vCenter and/or System Centre Virtual Machine Manager (SCVMM server for HyperV) servers, and an account that has at least “Snapshot Management” permissions.
Enter Configuration Manager Details
Enter your Configuration Manager details and a user account that is a member of at least the “Application Manager” and “Software Update Manager” roles. The account must also be a member of the local administrators group.
Connect to Email Notifications
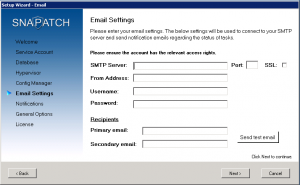
Enter connection details to send email notifications. We recommend that you send a test email before proceeding.
Select Notification Preferences

Select which tasks you would like to be notified of and whether or not you want to be notified before snapshots are deleted – and if so, how many days prior.
Review SnaPatch Options
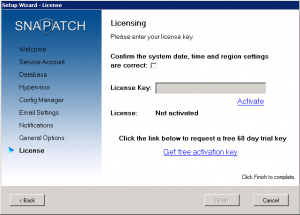
Tick the checkbox to confirm that the system date, time, and regional settings are correct. Enter your license key and click “Activate” to enable the license. Click “Finish” to complete the configuration process.
Monitoring SnaPatch Jobs
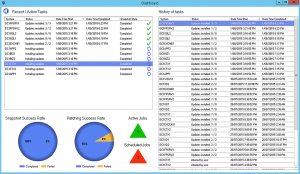
The Dashboard is the central hub of SnaPatch, providing a real-time view of all your currently running jobs and their status. It also displays a list of all the previously executed jobs along with their results. At the bottom of the dashboard, you’ll find charts that provide an overview of success rates for snapshots and patching. Additionally, the number of active and scheduled jobs are displayed within the green and orange triangles.
How to create a SnaPatch Job
Creating a SnaPatch Job
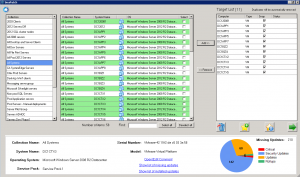
To create a new SnaPatch job, click on the SnaPatch action from the home screen. This will open the main SnaPatch window where you can see a list of all the collections and servers within those collections. To add servers to your target list, simply tick the checkbox next to each server and press the “Add >> ” button. Any servers you add will be highlighted green.

Note: If you change collections, any previously selected servers will be unticked, so be sure to add them to the target list before switching collections
Creating a new computer group
To create a new computer group, add all the computers to the target list and click on

A new window will appear with all the computers from your target list. Provide a name for the computer group and a description. Press Create Group to complete the group creation.

Or Use an existing computer group
To use a computer group you created previously, click on

Note: If you have already added computers to the target list, recalling a computer group will replace any computers currently in the target list.
Create and deploy an Update Group
The next step after adding your computers to the target list is to decide which updates you want to deploy. You may create a new update group or use an existing update group created from SCCM. This section details how to create and deploy a new update group.
To begin, select the updates you want to deploy by placing a tick in the checkbox against the update. Once you have selected all the updates, press the “Create & Deploy Update Group” button.
You will be prompted to provide a name and description for the new Update Group.
Note: All the updates must be downloaded for an Update Group to be created. If you have selected an update that has not yet been downloaded you will be allowed to create the Update Group but not deploy it.
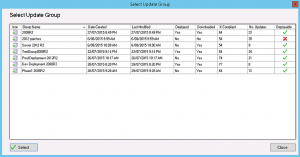
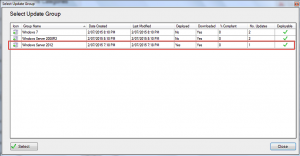
Deploy an existing Update Group
If you have already created an update group from within SCCM that you want to deploy, click the “Deploy existing Update Group” button. You will be presented with a list of update groups that currently exist.
Note: You may only select an update group if all the updates within that group have been downloaded. Any group containing updates still to be downloaded will have a red mark against them and you will not be able to select it.
Schedule the SnaPatch Job
Once you’ve selected to create a new update group or use an existing update group, the next step will be to schedule the job. You will be presented with the task scheduler window to create a new “trigger”. Click the “New” button.
The new trigger window will appear allowing you to set a schedule.
Note: We strongly advise that you do not schedule multiple jobs to run at the exact same time. To avoid any possible contention issues, we recommend that you schedule jobs to run a mimimum of 5 minutes apart.
Set a Maintenance Window
A maintenance window determines when the updates can be installed. The maintenance window also allows the servers to restart to complete the patching process. The start date and time are taken from the schedule, so all you need to determine is how much time to allow for the patches to be installed.
Note: Setting too short a window may not provide enough time for all the patches to get installed.
Press “Finish” to complete the process. The job will execute as per the schedule set.
Create an auto-deploy, set and forget SnaPatch Job
SCCM allows you to create “automatic deployment rules” which download and deploy patches based on a schedule and criteria you specify. The steps below will go through the process of creating a rule and having it deployed through SnaPatch. This will allow you to automatically deploy updates on a regular basis while having SnaPatch protect your servers.
Note: The steps below only include screenshots of the areas that are required to create the SnaPatch auto-deploy job.
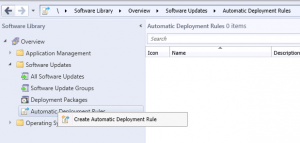
Step 1.
Launch the Configuration Manager console and create a new Automatic Deployment Rule.
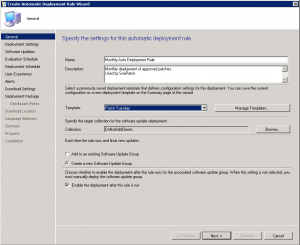
Provide a name and description.
Select “Add to an existing Software Update Group” Untick “Enable the deployment after this rule is run” Click Browse and select a collection – although this collection will not be used by SnaPatch to deploy updates, we suggest that you select an empty collection. This will ensure that SCCM or an administrator does not inadvertently deploy updates to machines.
Press Next to continue
Step 2.
Ensure “Automatically deploy all software updates found by this rule, and approve any license agreements” is checked and press Next.
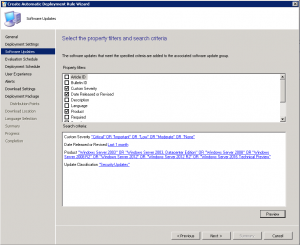
Step 3.
Specify the criteria that will be used to add updates to the Update Group. In the below example the Product selected is “Windows Server 2012” and the Update Classifications selected are “Critical Updates” or “Security Updates”. Press Next to proceed
Step 4.
Set the evaluation schedule to “Run the rule after any software update point synchronization” and press Next
Step 5.
Leave the default settings for the “Deployment Schedule”, “User Experience”, “Alerts” and “Download Settings” as they will not be used. SnaPatch will recreate these settings based on your deployment schedule.
Step 6.
Create a deployment package. You may choose to deploy to an to existing package or create a new deployment package. In the below example we have created a new package
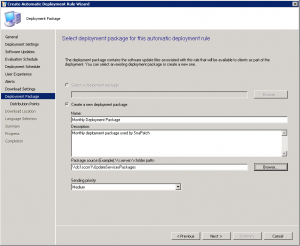
Step 7.
Configure deployment to all the distribution points (or as per your company policy)
Step 8.
Set the Download Location to “Download software updates from the internet” (or as per your company policy)
Step 9.
Specify the languages for the software update files that you want to download and press Next.
Step 10.
Review the Summary and press Next to create the auto deployment rule.
Step 11.
From the Automatic Deployment Rules window, find and right click the newly create rule. Select Run Now.
You will be shown a message stating that the rule has now been initiated and new updates found by the rule will be added to the Software Update Group Allow some time for the system to process the request and create the Update Group.

Step 12.
Confirm the Update Group has been created by selecting “Software Update Groups” from the Config Manager console. Look for the name of the update group specified in Step1. You can tell which is the update group by viewing the “Created By” column and looking for “AutoUpdateRuleEngine” If the update group has been created we are now ready to create the job from within SnaPatch.
Step 13.
Launch SnaPatch and select the computers you want to target. Add them to the target list or recall an existing computer group. Proceed to the Update selection window and click on the “Deploy existing Update Group” button. If you are not sure on how to get to this step please click here and follow the step by step guide on creating a SnaPatch job
From the existing update groups window, select the Update Group created earlier. In this example, it’s Windows Server 2012.
Set a schedule and maintenance window and SnaPatch will deploy any updates in the Update Group to the servers in the target list.
Manage Scheduled Jobs
SnaPatch jobs can be managed by clicking on the “Scheduled Jobs” action from the home window.
All the jobs that SnaPatch has scheduled, whether they have already been run, or are scheduled to run will appear here.
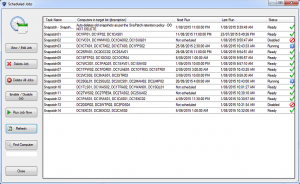
From this window you may;
- View and edit jobs – This lets you reschedule jobs if required
- Delete a single job
- Delete all the jobs – it will confirm that you want to delete ALL the jobs
- Enable or disable a job – this is useful if you want to keep the job but not execute it
- Abort a running job – do this by right clickin on the job and select Abort
- Manage the snapshot auto-delete job – this job is set to run at 11pm every day and will remove any snapshots older than the retention period specified.
Create an Update Group
An Update Group is a container for a list of updates. Update Groups are deployed to collections for installation onto the members of those collections. Update Groups are typically created from within SCCM, however SnaPatch allows you to create them during a job creation or directly from the home screen.
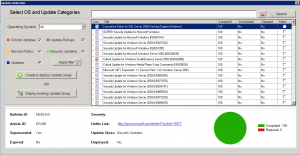
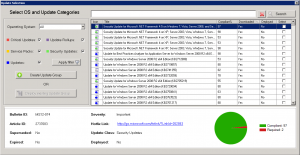
Click on the Windows Update action to view all the available updates.
You may apply a filter to display only the updates and operating system you specify. By default all available updates are displayed.
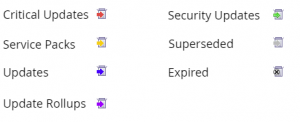
Updates are colour coded to make it easier to determine their class.
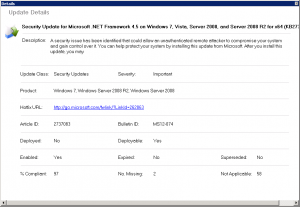
To view more details for any update, right click on the update and select “Details”. A new window will appear providing more information regarding that update.
Place a tick in the checkbox of the updates you want to include in the Update Group and press the “Create Update Group”. A window will appear asking you to give the Update Group a name and description.
Note: You will not be able to deploy an update group that includes an update which has not yet been downloaded. Only update groups where all the updates have already been downloaded will be available for deployment.
Configure SQL / Database Settings
SnaPatch requires a connection to the SQL database containing the configuration manager database. You can access the SQL settings from the home window.
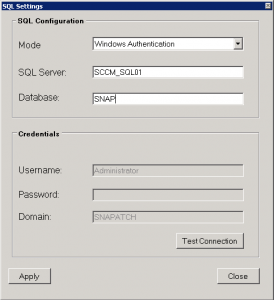
From this window you may configure your connection to the SQL database.
- Select which authentication mode to use, Windows Authentication or SQL Authentication using the drop down option.
- Enter the SQL server name and the database name.
- Enter the user account to use when accessing the database – the account requires read-only access as it does not make any changes to the database.
- You may also use the Service Account to access the database
- Click on the Test Connection button to ensure you are able to connect and read the database. If the test passes, press Apply to store the settings.
Configure Hypervisor Settings
You may view, update or change your vCenter server and or your Microsoft System Centre Virtual Machine Manager (SCVMM for HyperV)settings by clicking on the VMware action from the home screen. You must list all your vCenter servers to allow SnaPatch to communicate with and access all your virtual machines. The user account must have at least “Snapshot Management” permissions.
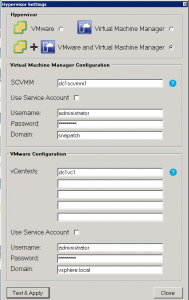
Press Apply when complete.
SnaPatch will attempt to communicate with the vCenter servers you have listed to ensure it can access them.
Configure SCCM Settings
You may view, update or change your Config Manager server settings by clicking on the Config Manager action from the home screen. You must provide the server name or IP address of your config manager server along with the site code. The account must also be part of the “Application Manager” and “Software Update Manager” roles within SCCM.
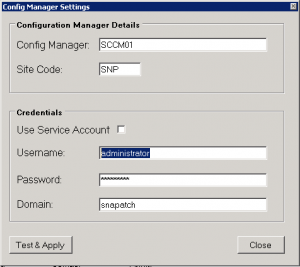
Press Apply when complete.
SnaPatch will attempt to communicate with the server to ensure it has access.
Configure Service Account Settings
The Service Account is used to access, communicate and retrieve update information from remote servers. This is the account that will interrogate servers to determine if patches have been installed.
You may also use this account to access SQL, VMware, SCVMM and Config Manager.
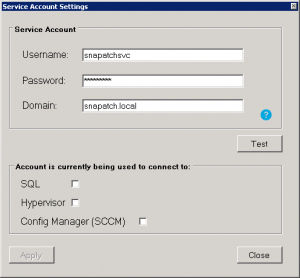
The service account used by SnaPatch must be a member of the local administrators group on all target computers to be able to execute remote WMI commands. Without this access SnaPatch will not be able to determine that status of patches installed.
Once you have provided the account details, press the Test button to confirm the account has the required level of permissions. You will not be able to apply the settings without testing the account.
Configure Email Settings
The email settings can be accessed from the main home screen. You may configure the SMTP server, ports and SSL settings. Along with a source address, credentials and two recipient email addresses. The recipient email addresses will receive email notifications on the status of running jobs, any scheduled tasks and reminder emails (such as snapshots to be deleted).
We recommend you send a test email to confirm the settings are correct.

General Settings
Include computers running non-server operating systems The default scan setting is to only include computers running Server operating systems such as Windows Server 2008, 2012, etc. You may however change this setting so that the scan also searches for computers running non-server operating systems, such as Windows 7, Windows 8, etc.
This setting can be managed by clicking on the General action from the home screen.
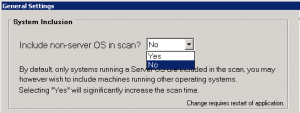
Note: Changing this setting requires a restart of the application.
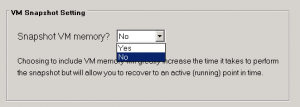
Configure VM snapshot settings
The default snapshot setting is not to include VM memory as part of the snapshot. Choosing not to include VM memory results in a much faster snapshot process, however restoring the snapshot will return to a VM to a powered off state. You may change this setting, however the snapshot process will take significantly longer. Choosing to include VM memory as part of the snapshot will allow you to restore to an active, running point in time.
Snapshot Timeout
The snapshot timeout period sets the maximum amount of time in minutes that a snapshot can take. The default settings is 30 minutes but you may set this anywhere between 15 – 120 minutes. Any virtual machines that have not had snapshots taken within this period will be marked as “snapshots failed” and will not be patched.
Note: Be cautious not to set the timeout too low as you may not give the system enough time to take the snapshot.

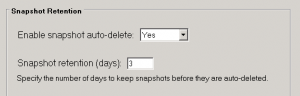
Configure Snapshot auto-delete settings
The Snapshot auto-delete setting is enabled by default. This setting combines with the snapshot retention period in days to determine when and if to delete snapshots. If the auto-delete function is enabled it will delete any snapshots older than the snapshot retention period.
Note: You may configure the system to notify you a set number of days before snapshots are deleted. This setting can be found under “Notifications”.
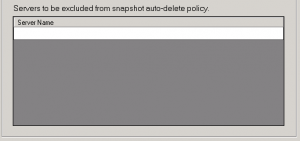
Exclude Servers from the snapshot auto-delete policy
By default no servers are part of the exclusion policy, however you may have a need to manually control when snapshots are deleted for some sensitive servers. The exclusion list is under the General actions window, directly beneath the “Snapshot Retention” section.
Click on an empty row and enter the name of a server you wish to exclude from the snapshot auto-delete policy and click Apply to save the changes.
Notifications
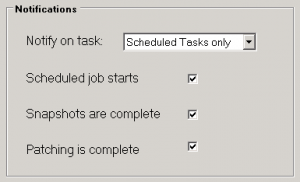
Configure Notifications
The notifications settings are access from the main home screen. You may disable task notifications or enable it and specify which tasks to be notified on.
The options for notifications are:
- Scheduled jobs starts – enabling this option will send an email to the recipients specified in the email settings stating that a scheduled job has started and listing all the servers which are part of the job.
- Snapshots are completed – enabling this option will send an email to the recipients specified in the email settings stating the result of the snapshots for each of the servers that are part of the job.
- Patching is completed – enabling this option will send an email to the recipients specified in the email settings stating the result of the patching process for each of the servers that are part of the job.
Snapshot Retention Notifications
You may enable or disable notifications around snapshots being automatically deleted. If you enable this setting an email will be sent to the recipients specified in the email settings informing them about which servers and which snapshots will be deleted. You may also specify the number of days to be notified before the snapshots are deleted.

Administration
Applying a license key License keys are applied and managed using the licensing action from the main home screen. Selecting it brings up the license manager where you can view your current key information along with its limitations. If you are using a trial key, the expiration date will be displayed. If you are using a production license, it will display the server limit. The server limit stipulates the amount of servers the application will accept during the initial scan, any servers above the license limit will not be displayed and therefore will not be available from the patch window.
Before applying the key you must confirm that the system date, time and regional settings are all correct. If they are not correct the key may become invalid or function incorrectly. It is very important that these settings are correct. Only once you confirm these settings are correct will you be able to enter and apply a key.
Find current version
The About action from the main home screen will display the current version you have installed.
Troubleshooting
Below you will find some troubleshooting tips if you come across any issues, but please feel free to contact us if you need any help.
Jobs are not starting
If jobs are not starting, go into the Scheduled Jobs and ensure the jobs are not disabled and that they have a valid start date and time.
A timeout error has appeared
If the SQL server does not respond quickly enough to SnaPatch’s request, a timeout error may appear. It may be that the SQL server is too busy to respond. Close SnaPatch and try launching it again.
Jobs fail after snapshots are taken
Check that nothing has changed on the config manager server. Ensure the powershell execution policies haven’t changed and that the account still has access. Open the Config Manager settings and attempt to re-apply the connection settings. SnaPatch will reconnect to the config manager server and ensure all the permissions and settings are still valid.
Check the log file
The log file can be found in the snapatch.log file.