Azure VM Remover
Do you ever need to quickly and easily remove all traces of your Azure VMs? Download our FREE tool, the Azure VM remover and start using it today.
Azure VM Remover.
Are you struggling to manage your Azure VMs? Do you find yourself spending too much time deleting old and unused VMs? Look no further than Azure VM Remover – the ultimate tool for simplifying your VM management.
What is Azure VM Remover?
Azure VM Remover is a free, easy-to-use tool that helps you manage your Azure VMs more efficiently. With Azure VM Remover, you can easily delete old and unused VMs, without having to go through the cumbersome process of manual deletion. This tool simplifies the process of VM management, so you can focus on more important tasks.
Why Use Azure VM Remover?
If you’re a regular Azure user, you know that VM management can be a tedious and time-consuming process. Azure VM Remover simplifies this process by providing an automated solution to delete unused VMs. By using Azure VM Remover, you can save time and resources that would otherwise be spent on manual deletion.
Key Features of Azure VM Remover
- Free of Cost: Azure VM Remover is completely free to use. You don’t have to pay a dime to use this tool.
- Easy to Use: Azure VM Remover has a simple and intuitive interface, making it easy for anyone to use. You don’t need any technical expertise to use this tool.
- Automates VM Deletion: Azure VM Remover automates the process of VM deletion. This means you don’t have to spend time manually deleting old and unused VMs.
- Saves Time and Resources: By automating VM deletion, Azure VM Remover saves you time and resources that would otherwise be spent on manual deletion.
How Does Azure VM Remover Work?
Azure VM Remover works by scanning your Azure account for unused VMs. It then provides a list of unused VMs for you to review. You can select the VMs you want to delete and click the “delete” button. Azure VM Remover will then automate the process of VM deletion, saving you time and resources.
Scan you Azure Subscription for VMs.
The Azure VM Remover will first log in to your Azure Subscription and Scan for all your Azure Virtual Machines.

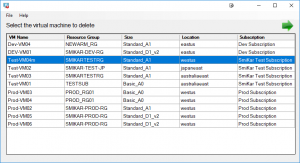
Select the Azure VMs
From this Window, you simply select any Azure VMs you wish to delete.
From here you can see the Azure Datacentre Location, Azure Subscription, Azure Resource Group and lastly the Azure VM Size.
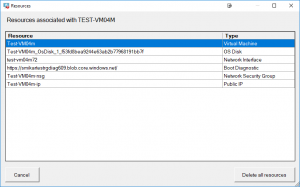
List all the components of the Azure VMs
The next Window, will lists all the components the Azure VM Remover has found of the Azure VMs you selected to delete. From the Virtual Machine itself, to its OS and other disks, VM Network Card, any security groups tied to the VM and Public IP if there was one.
When ready to proceed click Delete all Resources.
List all the components of the Azure VMs
Once you clicked on Delete all Resources on the previous screen, the Azure VM Remover will go through each one of those components on the Azure VMs you selected to delete.
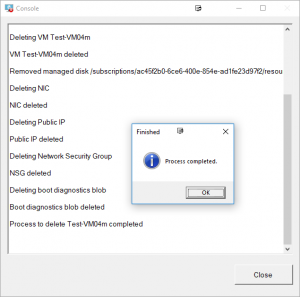
Thats all there is to it. Easily removes and deletes your virtual machine within Azure.
Download Azure VM Remover today
Azure VM Remover is completely free**.**
FREE DOWNLOAD Send download link to:
Azure VM Remover is a free, easy-to-use tool that simplifies the process of Azure VM management. With its intuitive interface and automated VM deletion, you can save time and resources, and focus on more important tasks. So, if you’re struggling with VM management, give Azure VM Remover a try and simplify your Azure VM management today!