Azure Blob Storage
Blobs, Blobs and more Blobs.
If you have ever had the need to store large amounts of files and data, then Azure’s Blob Storage is made for you.
Microsoft’s Azure Cloud provides huge benefits with not only their fantastic services, locations, availability and support, but also in their almost seemingly infinite capacity.
Azure Blob Storage is not only scalable, durable and almost always available it also provides flexibility to scale as your business requirements need.
A huge benefit to using Azure services is the pay as you go service model, that allows you to only pay for the services you consume. No more need to over provision local file servers hard drives for expected capacity, with Azure Blob Storage you upload your files to Azure and only pay for the space you need.

What is Azure Blob Storage?
Azure Blob Storage Overview
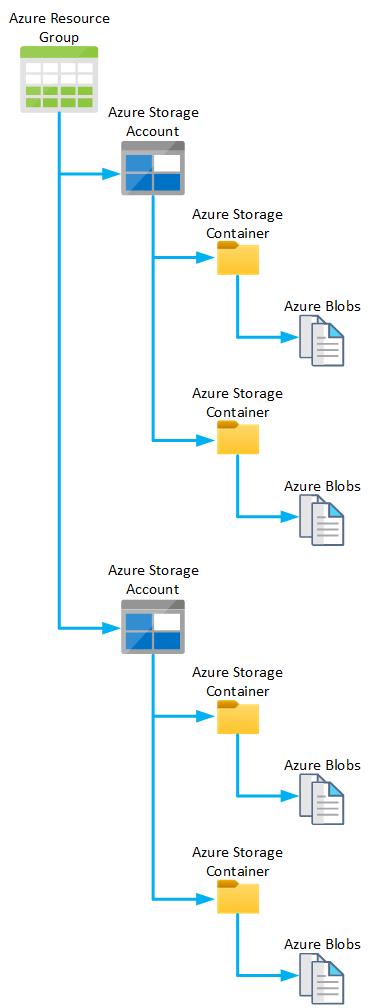
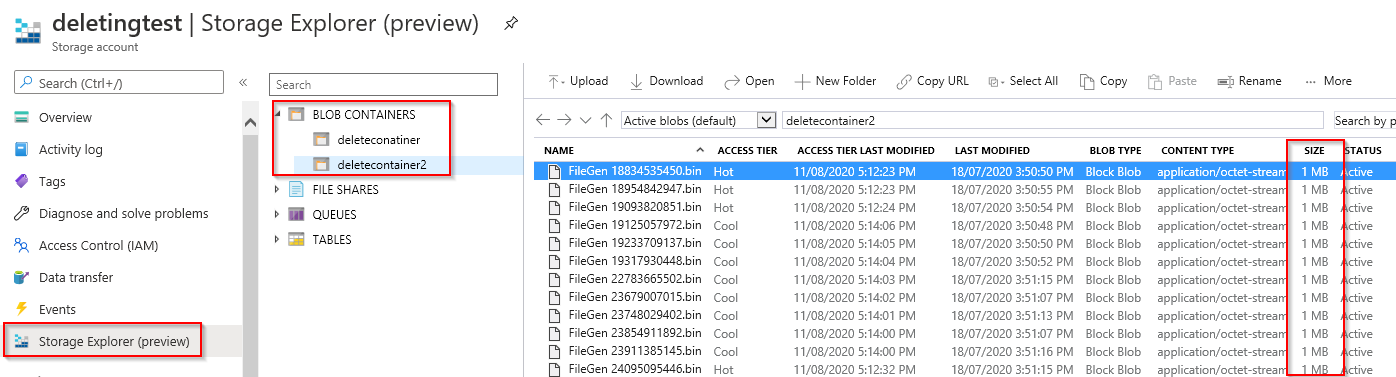
Azure Blob Storage (Blob stands for Binary Large Object) is storage provided by Microsoft’s Azure for unstructured data. Perfect for massive amounts of data. Example use cases are as a target for your log or analytics data, or Blob Storage can be used as a backup and archival location, and even things like files, pictures and music files. Basically Azure Blob Storage is a great dumping ground for huge amounts of your data. A Blob is actually a file which is stored in a directory like structure called a Container, then within an Azure Storage Account, and an Azure Resource Group and finally an Azure Subscription.
Access to each Azure Blob is provided by a HTTPS link directly to the Blob itself, meaning you can access the file from anywhere in the world with an internet connection. Obviously if you dont want the data exposed to the whole world, you can lock this down to meet your security needs.
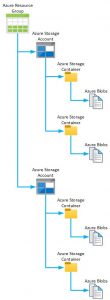
Azure Blob Storage Hierachy
| Concept |
Description |
Azure Resource Group
|
Used to contain related resources together for a solution. Logical collection of configuration items within Azure. Can contain Virtual Machines, Virtual Networks, and other items. |
Azure Storage Accounts
|
Top level of Storage Services within Azure. Contains Blobs, Queue Tables, File Shares and Virtual Machine disks. Can be accessed from anywhere in the world with an internet connection. Default limit of 250 Storage Accounts per region and per subscription, with no limits on the number of Azure Storage Containers or Blobs contained within. |
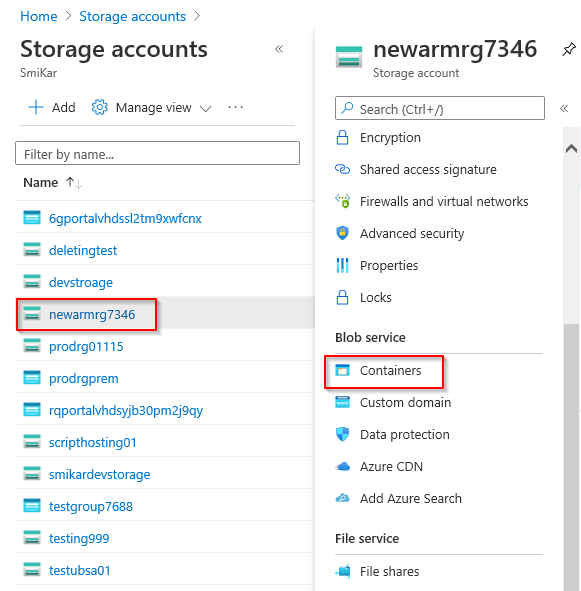
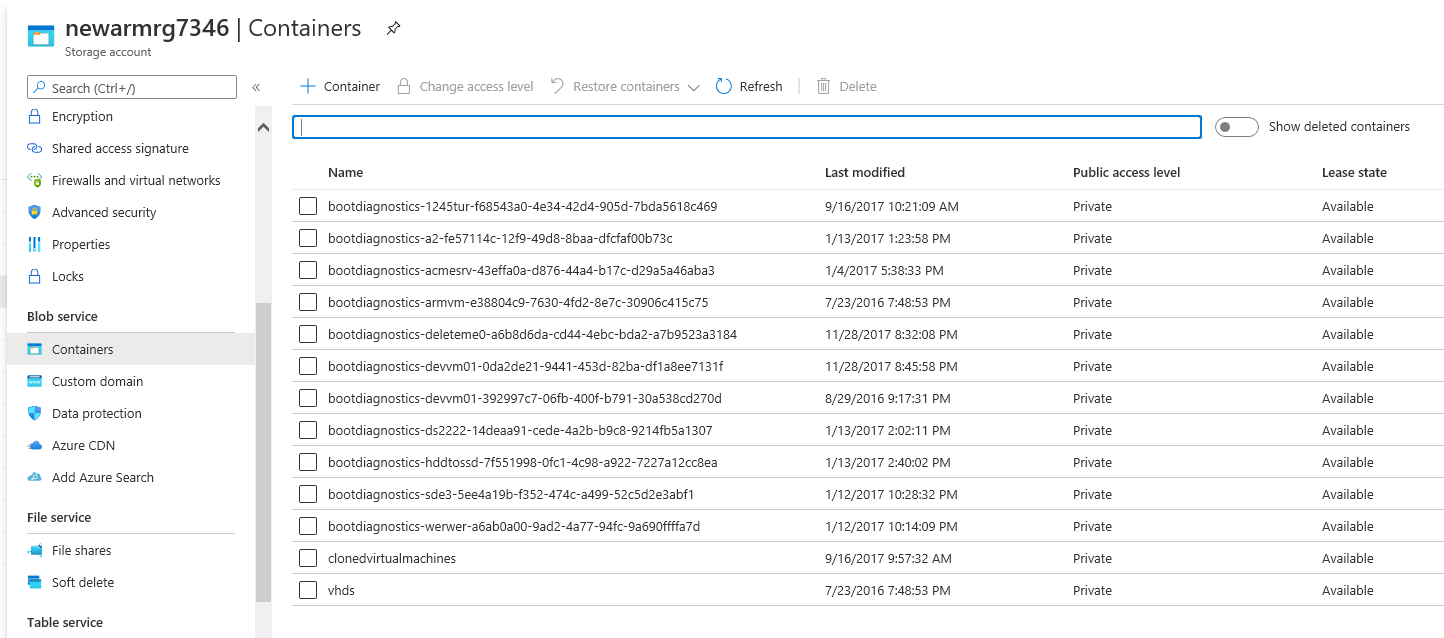
Azure Storage Containers
|
Used like a folder that contains all your blobs. Unlimited amount of Storage Containers per Storage Account. |
Azure Blobs
|
Any type of file that is unstructured and stored within an Azure Storage Container. Can store large amounts of Blobs within each container, and these could be things like document files, images, and other multimedia.
|
Azure Blob Storage Availability
Additionally when creating your Azure Storage Account you can choose how much redundancy / availability for your Azure Blob Storage. While Microsoft provides an SLA on the uptime of your storage, choosing the correct availability of your Azure Storage Account will ensure your Azure Blobs are accessible in the event of failure.
- LRS – Locally Redundant Storage – Keeps a synchronous copy of your Azure Blobs three times within the same Azure Datacentre. This is the least cost option
- ZRS – Zone Redundant Storage – Replicates your Azure Blobs synchronous across three Azure Availability Zones in the primary region.
- GRS – Geo-Redundant Storage– Copies your Azure Blobs synchronous three times within the same Azure Datacentre, then copies the same Azure Blobs asynchronously across to one other single location in another secondary Azure Region.
- GZRS – Geo-Zone-Redundant Storage– Copies your Azure Blobs synchronous across three Azure Availability Zones in the primary region, then copies the same Azure Blobs asynchronously across to one other single location in another secondary Azure Region.
Azure Blob Storage Tiering
Microsoft provides different storage tiering models for the storing of your data.
Each one has a different storage pricing model in Azure (per GB) and access requirements.
- Hot – Best for data that is accessed frequently. (most expensive per GB)
- Cool – Great for data that is accessed infrequently. (not as expensive as Hot, but no where as cheap as the Archive Tier)
- Archive – Perfect for data that is very rarely accessed. (cheapest per GB)
Azure Blob Storage Types
Azure Blob Storage has three different types
These are;
- Block Blobs – Perfect for storing documents, text files or even your media files
- Append Blobs – cannot be modified and requires you to upload a new blob.
- Page Blobs – are used for storing Azure Virtual Machine disks.
Azure Blob Storage Limitations
Although Azure Blob Storage seems limitless, there are always some technical limitations that you should be aware of.
Some of these limitations are;
- Service Level Agreement – Microsoft provides an uptime 99.99% on Azure Blob Storage
- Maximum size of Storage Account – 500TB
- Maximum size of a Single Blob – 5TB
- Number of Blocks in a Blob – 50,000 blocks
- Maximum size of a block – 100MB
- Minimum size of a block – 64KB
- Maximum Storage Account Capacity – 5PB
- Number of Storage Accounts per Subscription – 200
- Tiering – Only the Hot and Cool Access Tiers can be set at the root of the Storage Container. Archive Tier is per individual Blob. (you can select multiple files using Cloud Storage Manager to change to the Archive Tier. This isnt possible using the Azure Portal)
- Archive Tier stores the data offline. This requires time to retrieve the Blob from the offline storage. There is additional cost to retrieve this data and the retrieval time can take several hours.
- Archive Tier Rehydration – When a Blob is in the Archive Tier the data cannot be modified as it is actually offline. To modify a Blob in this Tier you would first need to rehydrate the Blob to an Online Tier (Hot or Cool)

Azure Blob Storage Configurations and Options
Azure Blob Storage Pricing
As with anything cloud-based, be careful which options you select as there will be cost impacts. As an example, Locally Redundant Storage is the cheapest availability option for Microsoft’s Azure Blob Storage, whereas Geo Zone Redundant Storage provides the highest Availability, but costs significantly more.
For Azure Blob Tiering, the Archive Tier is the cheapest at almost a tenth of the cost of Cool and Hot Tiers..
| Tiering |
LRS – Locally Redundant Storage |
ZRS – Zone Redundant Storage |
GRS – Geo-Redundant Storage |
RA-GRS – Read Access Geo-Redundant Storage |
GZRS – Geo Zone Redundant Storage |
RA-GZRS – Read Access Geo Zone Redundant Storage |
| Blob Storage – Archive Tier |
0.03 cents for 10GB |
Option not available for Archive Tier |
0.07 cents for 10GB |
0.07 cents for 10GB |
Option not available for Archive Tier |
Option not available for Archive Tier |
| Blob Storage – Cool Tier |
0.21 cents for 10GB |
0.26 cents for 10GB |
0.41 cents for 10GB |
0.53 cents for 10GB |
0.48 cents for 10GB |
0.60 cents for 10GB |
| Blob Storage – Hot Tier |
0.28 cents for 10GB |
0.35 cents for 10GB |
0.56 cents for 10GB |
0.70 cents for 10GB |
0.66 cents for 10GB |
0.82 cents for 10GB |
Now while the price does fluctutate at times, and even differentiates between the different Microsoft Azure Datacentres, the pricing table above has been given as a reference to the differences in costs and options on your Azure Storage.
To work out how much the cost differences, you can use the Microsoft Azure Pricing Calculator to work out the cost impacts to your solution
Azure Blob Storage Best Practices
Azure Blob Storage is a highly scalable, durable, and cost-effective object storage solution from Microsoft Azure. It is a great option for storing unstructured data, such as text and binary data, in the cloud. To get the most out of Azure Blob Storage, it’s important to follow some best practices. In this article, we will discuss the key best practices for Azure Blob Storage.
Use appropriate storage tiers:
Azure Blob Storage offers three storage tiers: Hot, Cool, and Archive. Hot storage is optimized for frequent access to data, Cool storage is optimized for infrequent access, and Archive storage is optimized for long-term data retention. Choose the right storage tier based on your data access patterns and the costs associated with each tier.
Enable versioning:
Versioning allows you to keep multiple versions of the same blob, so you can easily recover from accidental deletions or updates. To enable versioning, you can use the Azure portal, Azure CLI, or Azure Storage REST API.
Use a content delivery network (CDN):
A CDN can help distribute your blobs globally and improve the performance and responsiveness of your applications. You can configure a CDN for your Blob Storage account by using the Azure portal or Azure CLI.
Use shared access signatures (SAS) wisely:
SAS is a secure way to grant access to your blobs without exposing your storage account key. However, it’s important to limit the scope of access granted by the SAS and to set an appropriate expiration time.
Enable encryption:
Azure Blob Storage supports encryption of data at rest using Azure Storage Service Encryption. This feature encrypts your data before it is written to disk and automatically decrypts it when you access it.
Use Azure Blob Storage events:
Azure Blob Storage events allow you to trigger serverless functions or logic apps when specific events occur in your storage account. You can use events to implement complex workflows or integrate with other Azure services.
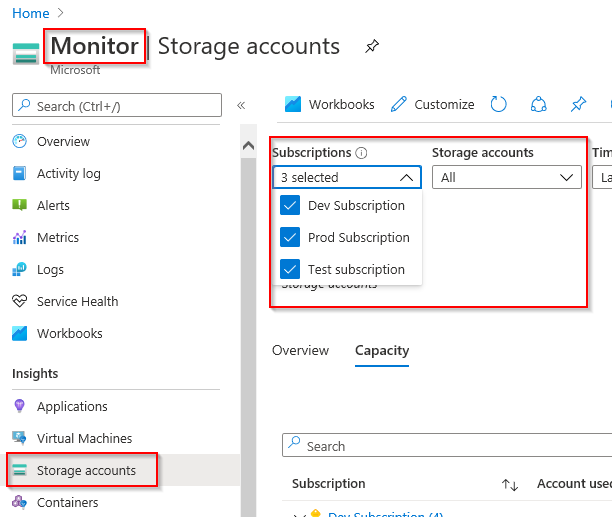
Monitor and manage your storage account:
Regularly monitor the usage and performance of your storage account using Azure Monitor. You can set up alerts to receive notifications when certain thresholds are met, and you can also use Azure Policy to enforce policies and control access to your storage account.
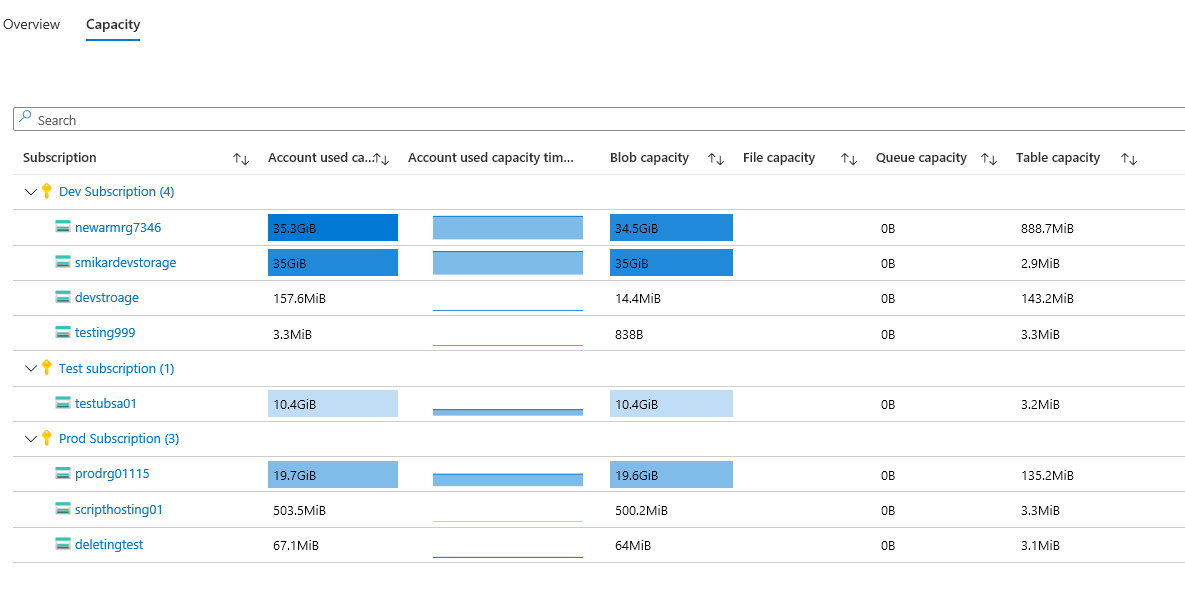
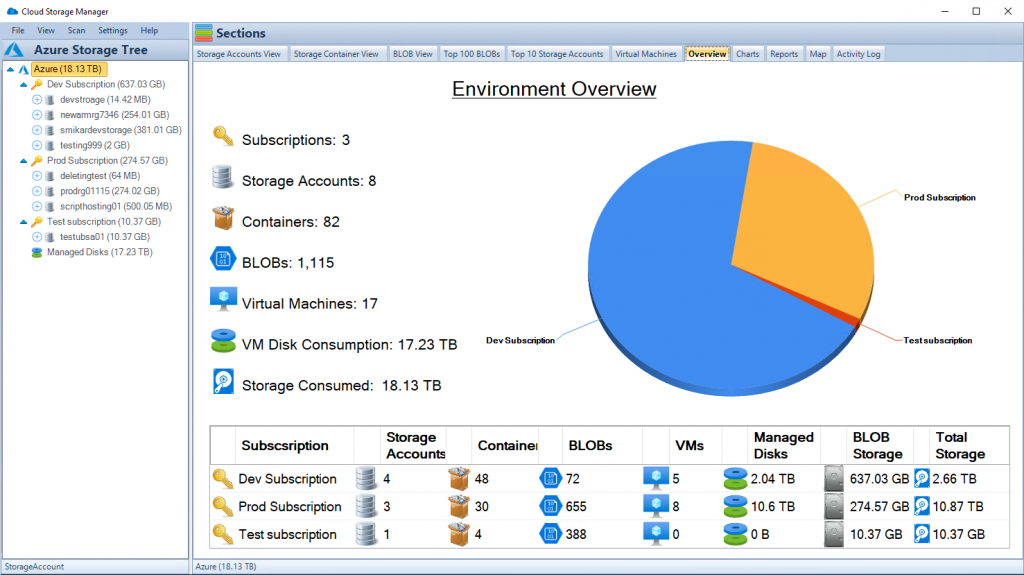
Monitor usage and storage consumption:
Reduce cost by using Cloud Storage Manager to gain insights in to your cloud storage consumption.
Use the right tools for the job:
Azure Blob Storage provides a number of tools and SDKs for working with your blobs, including Azure Portal, Azure CLI, and Azure Storage REST API as well as our own Cloud Storage Manager. Choose the tool that best fits your needs and make sure to follow the best practices for each tool.
In conclusion, following these best practices can help you get the most out of Azure Blob Storage and ensure that your data is secure, scalable, and accessible. Whether you’re storing unstructured data or building applications that rely on Blob Storage, following these best practices can help you maximize your investment and minimize risks.
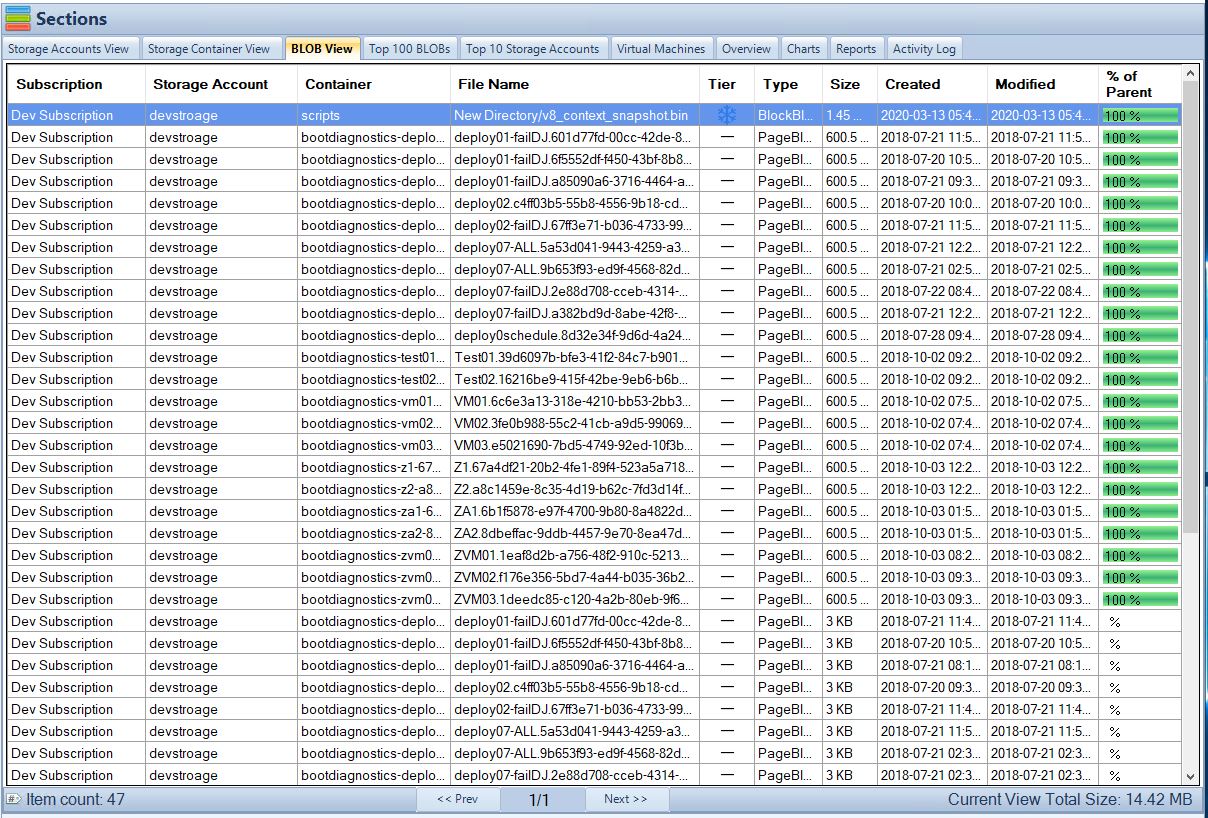
Do you want information on all your Blobs in Azure?
Azure Blob Storage Insights
Now that you have some background in to what Azure Blob Storage can do for you and are ready to take the jump and start uploading huge amounts of data to your Azure Storage Containers.
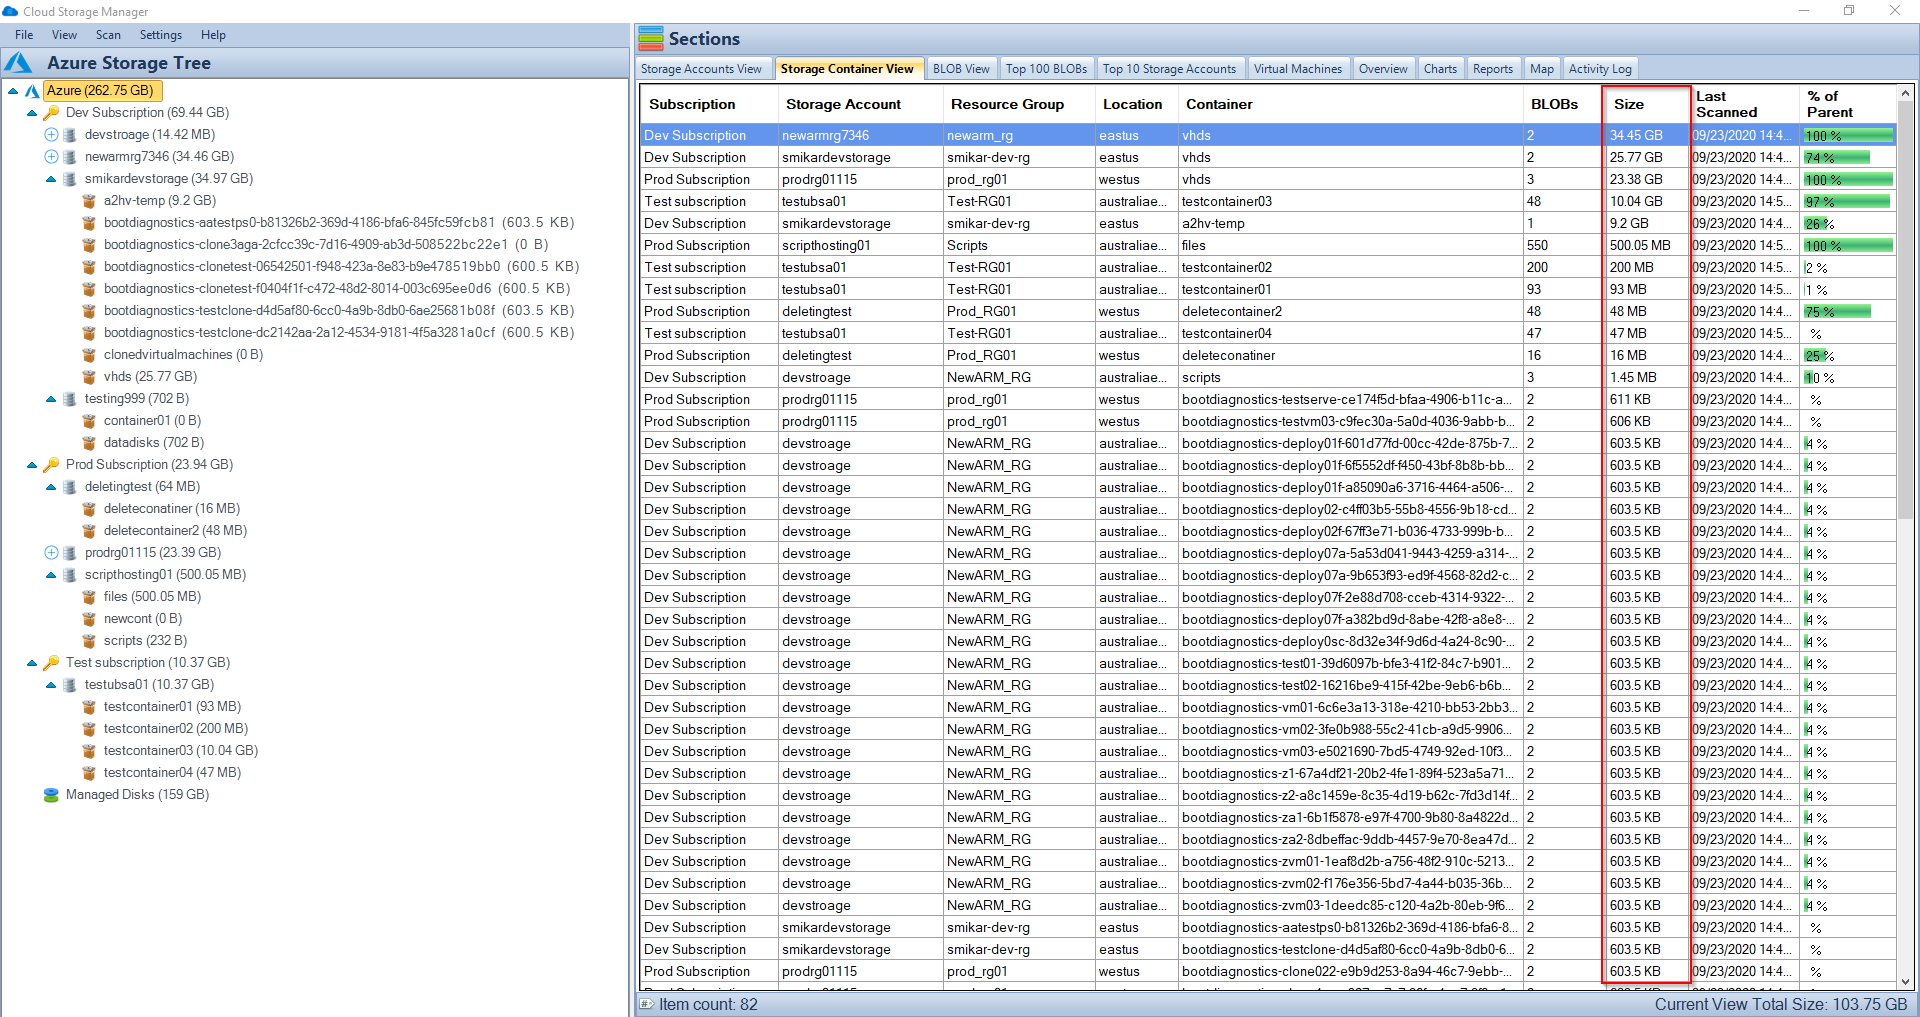
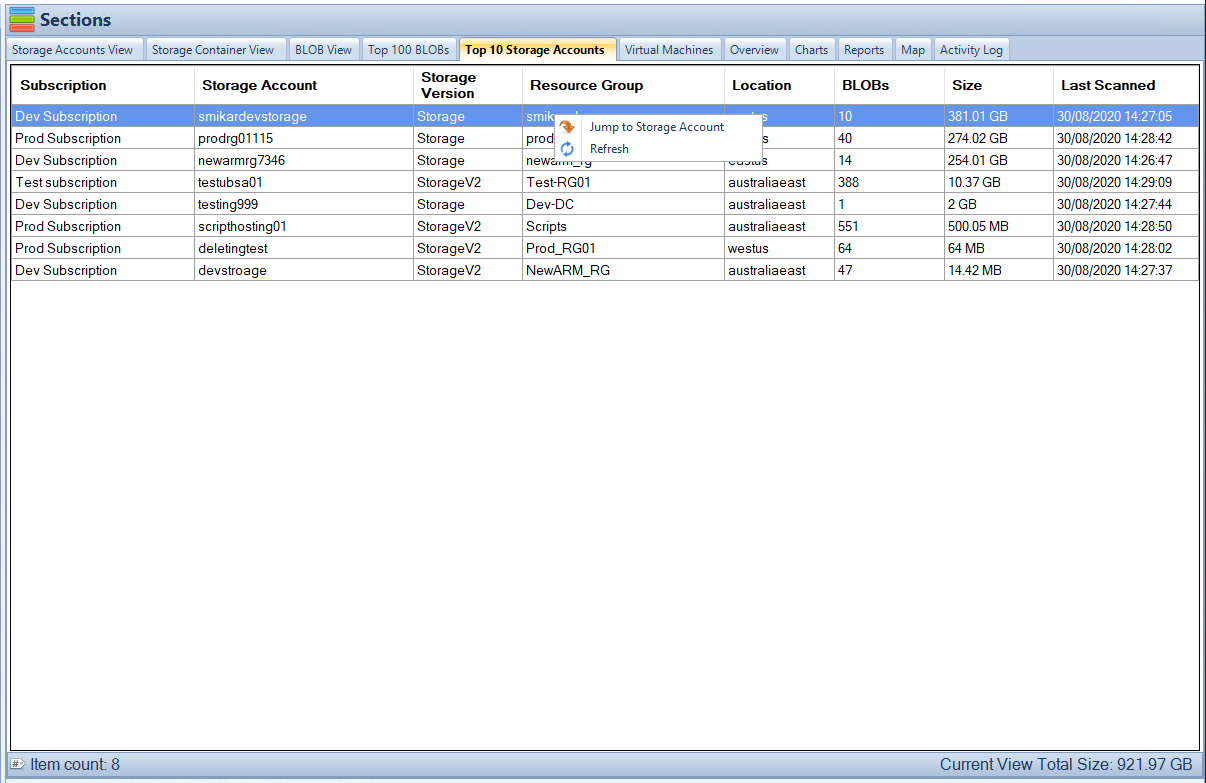
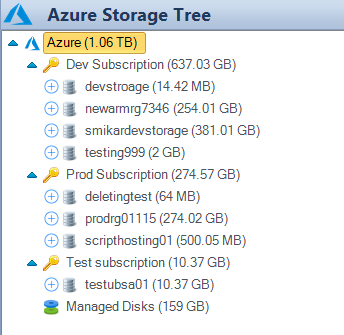
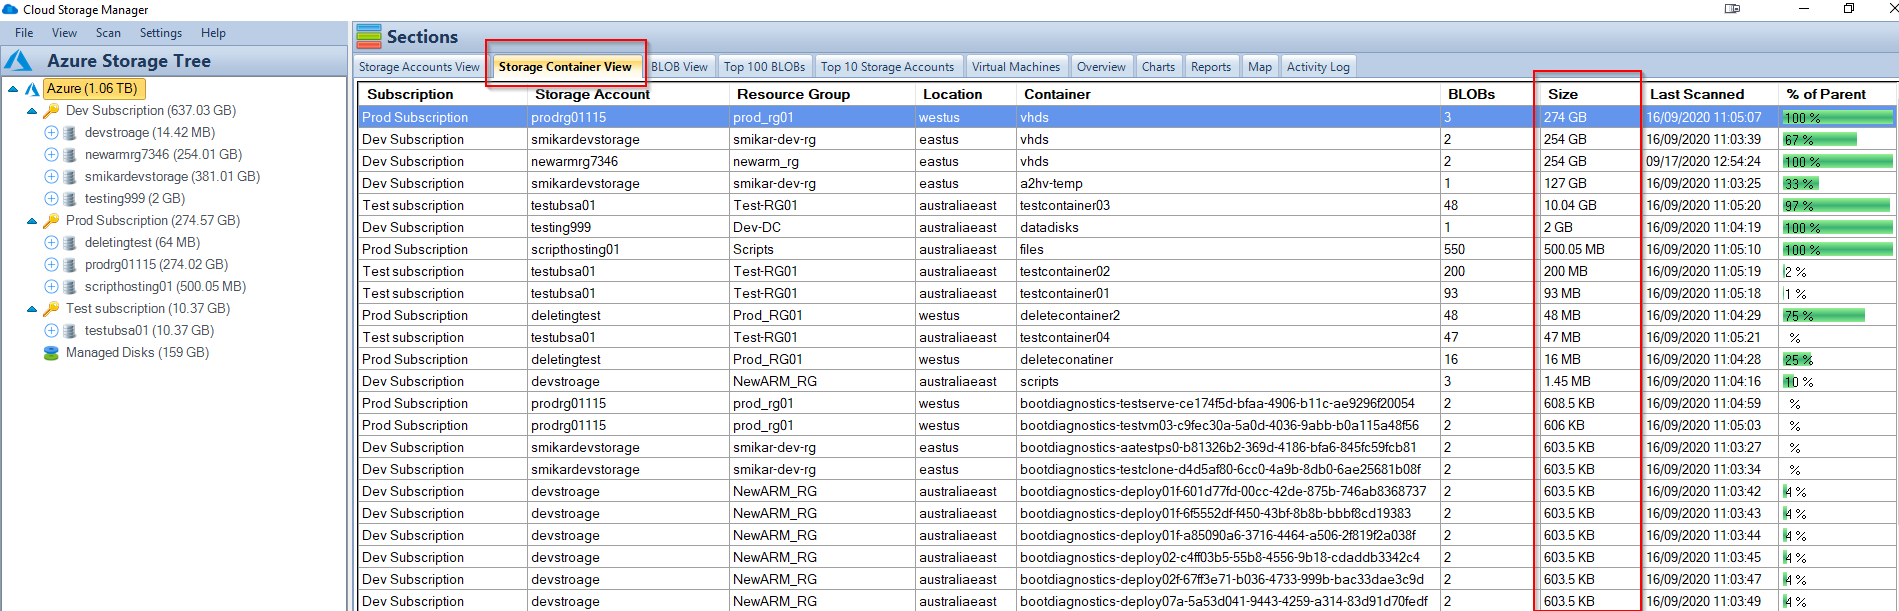
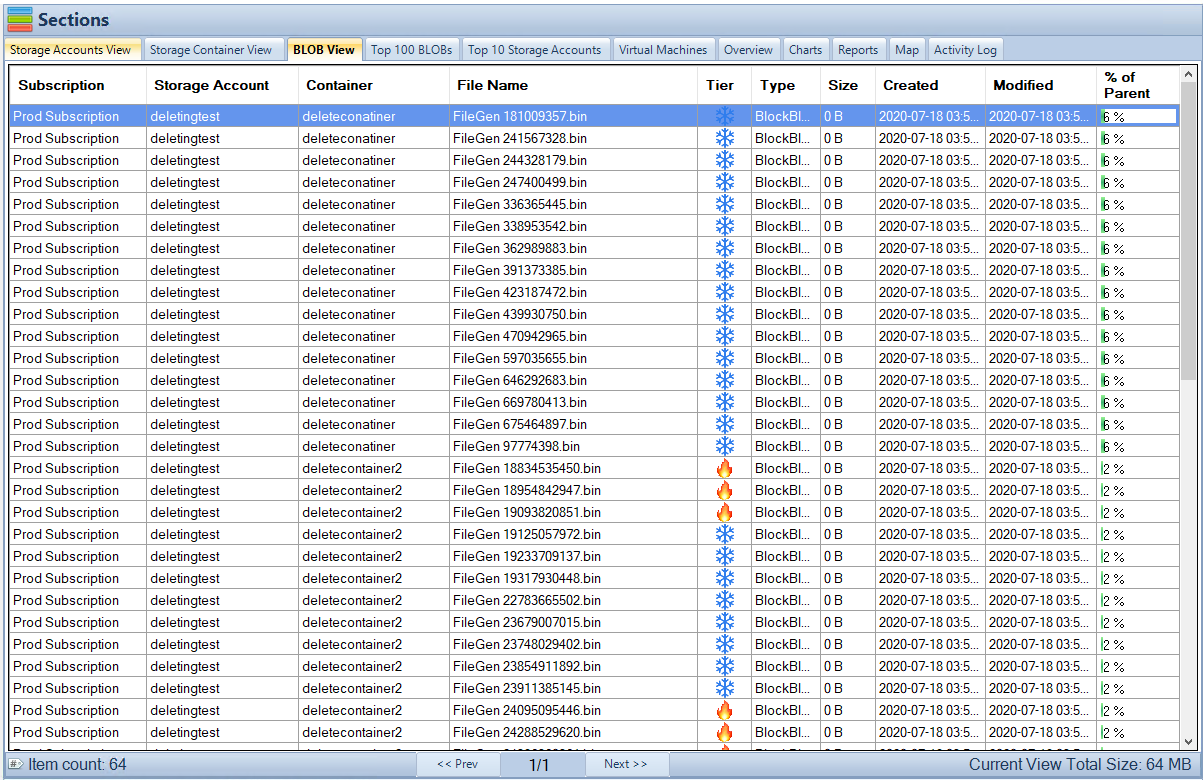
Cloud Storage Manager provides you with further insights in to your Azure consumption. Providing you with quick to see capacity information, searching through all your Blob Storage, as well as historical reporting of your Azure Storage Accounts consumption.
If you want to see exactly what is in your Azure Storage Accounts, download Cloud Storage Manager and test it for yourself for free.
Azure Blob Storage Architecture
Azure Blob Storage is designed with a distributed architecture that provides high availability, durability, and scalability. The architecture comprises three layers:
Front-End Layer
The front-end layer handles incoming requests from clients and routes them to the appropriate back-end nodes.
Back-End Layer
The back-end layer consists of multiple storage nodes that store the data in a distributed manner. The data is stored in a redundant manner to ensure high availability and durability.
Blob Service Layer
The Blob Service Layer provides the APIs and SDKs for accessing the Blob Storage service. It also provides features such as authentication and authorization, metadata, and access control for Blob Storage.