Flexible, with hot, cool, and archive access tiers
Management Tools
Integrated with Office 365 tools
Requires external management tools
Scalability
Limited by subscription plan
Highly scalable with pay-as-you-go pricing
In today’s data-driven world, the choice of data storage solution is crucial for businesses of all sizes. Microsoft SharePoint and Azure Blob Storage are two powerful services that cater to the diverse needs of storing, managing, and accessing data. But with different pricing models and features, deciding which service offers better value for money can be challenging. This post explores the cost structures of SharePoint and Azure Blob Storage, and provides a cost comparison calculator to help you make an informed decision.
SharePoint vs Azure Blob Storage
When deciding between SharePoint Online and Azure Blob Storage for your organization’s data storage needs, it’s essential to consider the nature of the data you’re handling and the specific requirements of your projects. SharePoint Online excels in structured data management, collaboration, and document management, making it ideal for businesses that rely heavily on Office 365 tools and need an integrated platform for team collaboration and document sharing. On the other hand, Azure Blob Storage offers a more flexible, scalable solution for storing large volumes of unstructured data, such as media files, backups, and archives. Its pay-as-you-go pricing model and high scalability make it suitable for businesses with extensive data storage needs that vary over time.
Ultimately, the choice between SharePoint Online and Azure Blob Storage depends on your organization’s size, budget, and specific use cases, with each platform offering unique strengths to support different aspects of digital business operations.
SharePoint Online vs Azure Blob Storage Functionality Comparison
Feature / Capability
SharePoint Online
Azure Blob Storage
Data Type
Primarily structured data for collaboration.
Unstructured data such as text, images, and videos.
Before diving into cost comparison, it’s essential to assess your storage needs. SharePoint is often favored for its collaborative features integrated with Office 365, making it ideal for document management and intranet sites. On the other hand, Azure Blob Storage is designed for scalable, secure cloud storage, suitable for storing vast amounts of unstructured data.
Cost Structures Explained:
SharePoint: Pricing is generally based on the number of users and the level of functionality required. It offers a per-user subscription model, which includes a base amount of storage plus additional storage per user.
Azure Blob Storage: Costs depend on the amount of data stored, the storage tier (Hot, Cool, Archive), and additional factors like data transfer and access frequencies. Azure provides more flexibility in managing costs according to data access patterns and longevity.
Comparing Costs:
To compare costs effectively, consider both the immediate and long-term storage requirements of your organization. SharePoint might be more cost-effective for smaller teams needing collaborative tools and document management. In contrast, Azure Blob Storage can be more economical for large-scale, long-term storage, especially when using the Cool or Archive tiers for less frequently accessed data.
Making an Informed Decision:
Evaluate Your Data Access Needs: Frequent access to data suggests SharePoint or Azure’s Hot tier, while infrequent access aligns with Azure’s Cool and Archive tiers.
Consider Collaboration Requirements: If your organization relies heavily on collaboration, SharePoint’s integrated tools may offer additional value beyond storage.
Look Beyond Costs: While pricing is important, also assess other factors such as security, compliance, and scalability offered by each service.
Optimizing SharePoint Storage with Squirrel
As organizations grow and data accumulates, managing SharePoint Online storage effectively becomes crucial to maintaining system performance and managing costs. Squirrel emerges as a strategic solution to enhance your SharePoint storage strategy.
Automated Document Archiving
Squirrel automates the archiving of documents from SharePoint Online to Azure Blob Storage. This process targets older or less frequently accessed documents, moving them to a more cost-effective storage solution without sacrificing data accessibility or security. The automation of this process ensures that your SharePoint environment is continuously optimized, focusing storage resources on active, frequently accessed documents.
Cost Reduction
By implementing Squirrel, organizations can see a significant reduction in their SharePoint storage costs. Azure Blob Storage offers a cheaper alternative for storing large volumes of data, particularly data that isn’t accessed regularly but needs to be retained for compliance or historical reasons. This transition not only frees up valuable space within SharePoint but also reduces the need for purchasing additional SharePoint storage, which can be considerably more expensive.
Enhanced Compliance and Security
With Squirrel, compliance and security are at the forefront. As documents are archived to Azure Blob Storage, they are encrypted in transit and at rest, meeting stringent security standards. Squirrel also supports regulatory compliance by managing the lifecycle of documents according to predefined retention policies, ensuring that documents are retained and deleted in accordance with legal and policy requirements.
Streamlining SharePoint Performance
An overloaded SharePoint site can lead to slow performance and reduced user satisfaction. By archiving older documents, Squirrel helps maintain a leaner, more efficient SharePoint environment. This not only improves site load times and search performance but also enhances the overall user experience, making SharePoint a more effective tool for daily operations.
To see exactly how much you can save by integrating Squirrel with your SharePoint Online, check out the Squirrel Savings Calculator. This tool helps you estimate the potential cost savings by considering factors such as the volume of documents you archive, the frequency of access, and current storage costs. It’s an invaluable resource for any organization looking to quantify the benefits of automated document archiving.
Incorporating Squirrel into your SharePoint strategy is not just about reducing costs—it’s about enhancing the efficiency and functionality of your SharePoint environment. Organizations looking to optimize their SharePoint storage should consider how Squirrel can be part of a comprehensive approach to data management, ensuring that storage resources are used judiciously and effectively.
Free SharePoint Online Storage (TB):Set the amount of free SharePoint Online storage you get as part of your Microsoft O365 licensing.
0 TB
Current SharePoint Online Storage (TB):Adjust this slider to reflect your current total storage usage in SharePoint Online. If you are unsure, contact us and we can show you how.
0 TB
Monthly SharePoint Growth (TB):Estimate the monthly growth rate of your SharePoint Online storage.
0 TB
Percentage of Storage to Archive with Squirrel (%):Specify the percentage of your current storage that you would like to archive using Squirrel. Our insights show on average most companies at a minimum can archive around 47%
47%
Cost per TB ($):Enter the cost per terabyte of your SharePoint Online storage. This is how much you pay Microsoft per TB for SharePoint Online Storage.
$
Current Annual SharePoint Online Cost
Annual SharePoint Online with Squirrel
Estimated Annual Savings
$0.00
$0.00
$0.00
Discovering Efficient Storage Management with Free Tools:
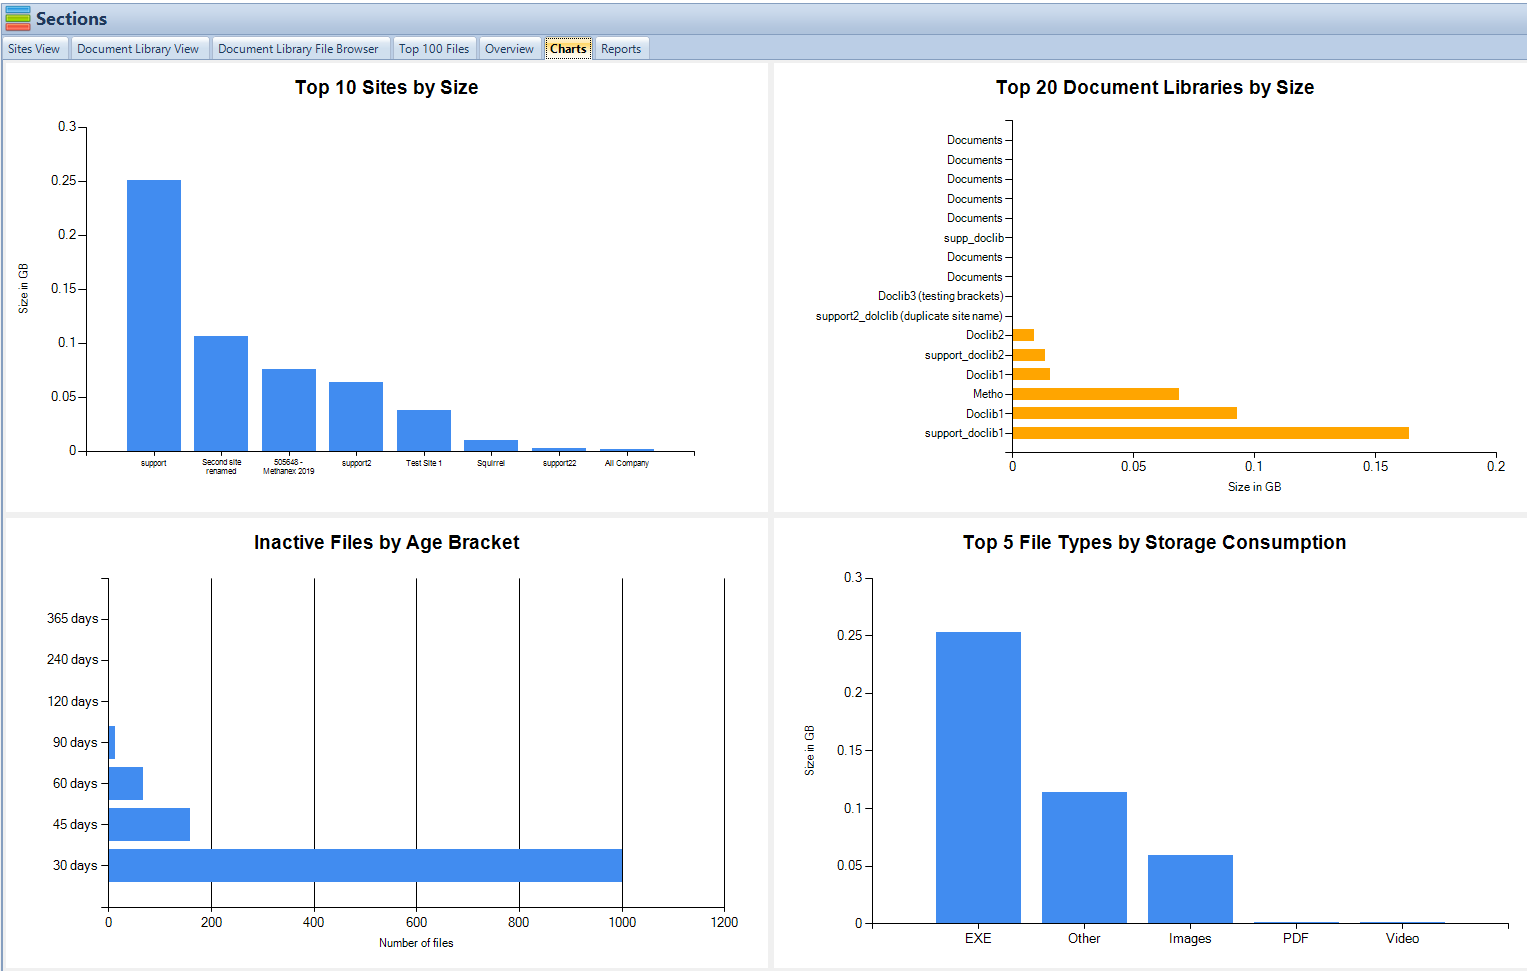
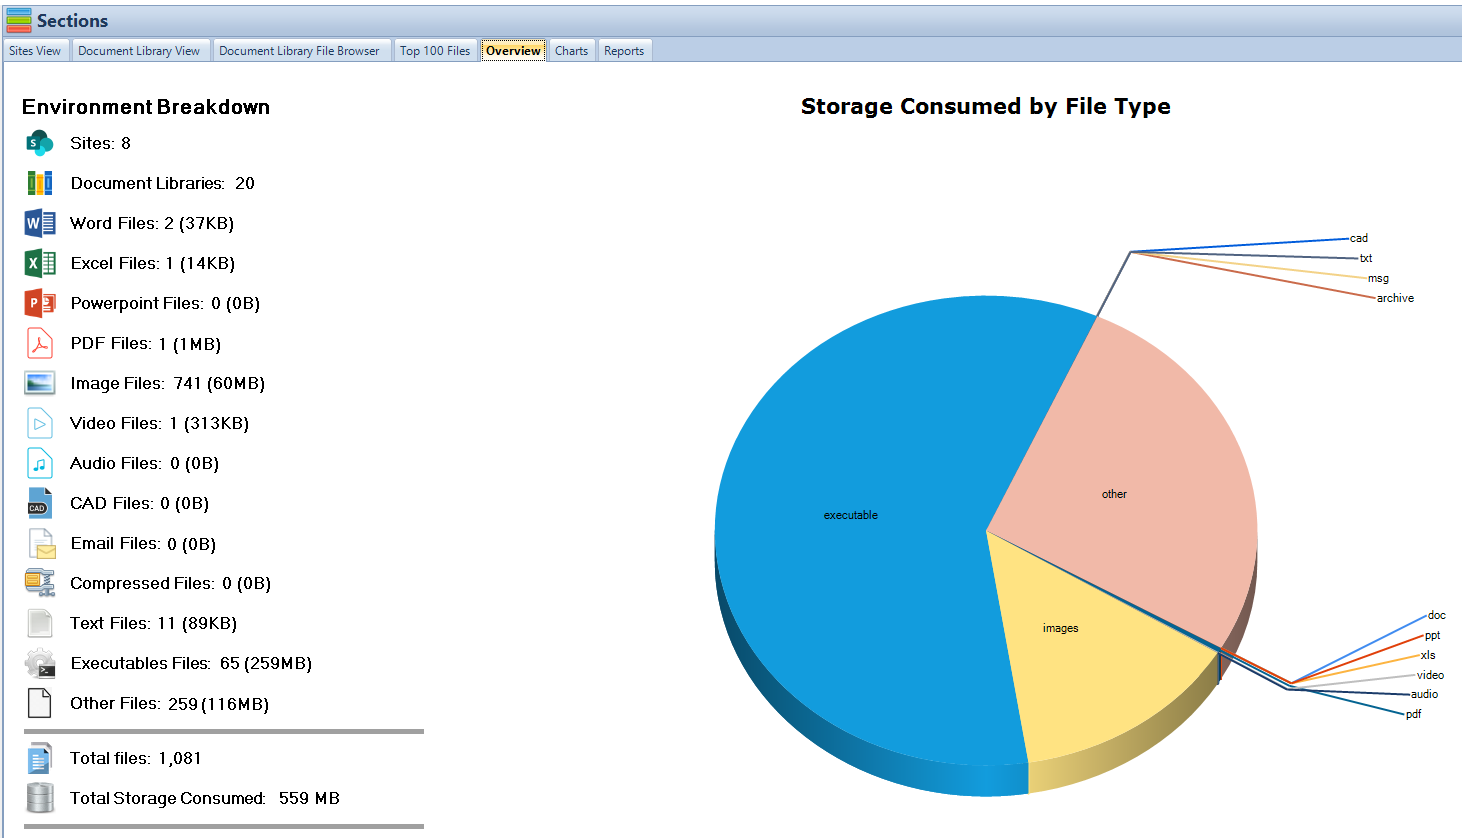
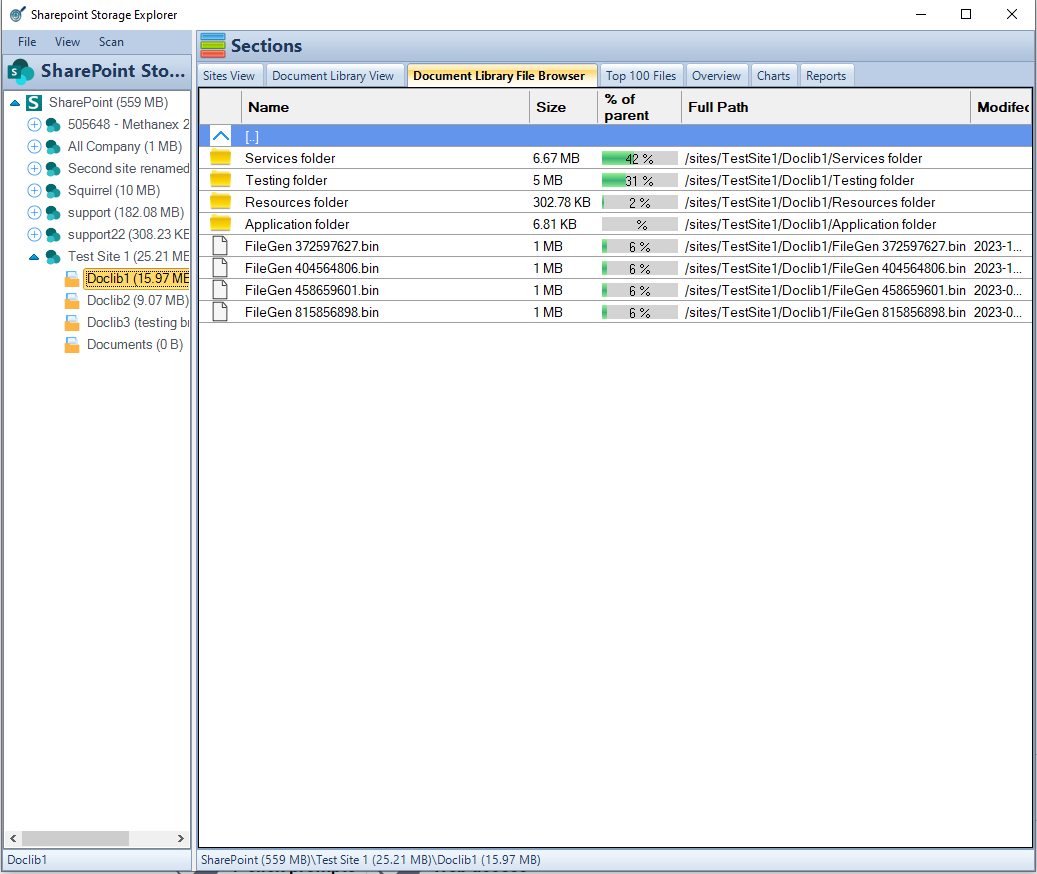
In the quest to manage data storage costs effectively, tools like the SharePoint Storage Explorer become invaluable. This free software offers a comprehensive view of your SharePoint storage, allowing you to explore and analyze where and how your storage space is being utilized.
Why Consider SharePoint Storage Explorer?
Visibility: Gain clear insights into your SharePoint storage distribution, identifying large files, old documents, and unused items that could be archived or deleted to save costs.
Management: Simplify the process of SharePoint storage management with user-friendly interfaces, making it easier to keep track of your storage needs and optimization opportunities.
Cost Control: By identifying and eliminating unnecessary storage usage, you can significantly reduce your SharePoint storage costs, making this tool an essential part of your cost-saving strategy.
Incorporating SharePoint Storage Explorer into Your Strategy:
Understanding your current storage usage is the first step towards making informed decisions about your data management and storage options. Here’s how you can incorporate SharePoint Storage Explorer into your evaluation process:
Perform a Storage Audit: Use the tool to conduct a thorough audit of your SharePoint environment. Identify high-usage areas and potential redundancies.
Analyze and Plan: Based on the insights gained, develop a plan to optimize your storage. This might involve cleaning up old files, restructuring your data, or considering alternative storage solutions for long-term archives.
Monitor Regularly: Storage needs change over time. Regularly use SharePoint Storage Explorer to monitor your storage usage and adjust your strategies as needed to ensure cost-effectiveness and efficiency.
Conclusion
Choosing the right storage solution for your business involves careful consideration of your data access needs, collaboration requirements, and cost constraints. Tools like SharePoint Storage Explorer provide valuable insights into your storage patterns, helping you make informed decisions that align with your business objectives. By leveraging such tools, businesses can optimize their storage solutions, ensuring they choose the most cost-effective and functional option available.
SharePoint Online vs Azure Blob Storage Cost Calculator
The calculator is designed to provide a straightforward comparison between the costs of using SharePoint Online and Azure Blob Storage for your data storage needs. By inputting your required storage amount, it calculates and displays the indicative monthly costs for each service, helping you make an informed decision based on current pricing models
SharePoint vs Azure Storage Calculator
Storage Service
Cost per GB per Month
SharePoint Online
$0.20
Azure Hot Storage
$0.0184
Azure Cool Storage
$0.01
Azure Archive Storage
$0.002
Indicative Storage Costs
The costs for SharePoint Online and Azure Blob Storage calculator are outlined in the table above and are indicative and may vary depending on your region and the specific agreement your organization has with Microsoft. Always consult the latest pricing information directly from Microsoft to ensure accuracy for your specific situation
FAQs
What is SharePoint?
SharePoint is a Microsoft platform designed for collaboration, document management, and as a secure place to store, organize, share, and access information from any device.
What is Azure Blob Storage?
Azure Blob Storage is Microsoft’s object storage solution for the cloud. It is optimized for storing massive amounts of unstructured data, such as text or binary data.
How are costs calculated for SharePoint and Azure Blob Storage?
SharePoint costs are typically subscription-based, per user, including a base amount of storage. Azure Blob Storage costs are based on the amount of data stored, the data transfer rates, and the storage tier (Hot, Cool, Archive).
Can I use SharePoint for free?
SharePoint offers a free trial through Microsoft 365, but ongoing use requires a subscription.
What makes Azure Blob Storage cost-effective?
Its pay-as-you-go model and tiered storage options (Hot, Cool, Archive) make Azure Blob Storage cost-effective for varying data access needs and large-scale storage requirements.
Is SharePoint suitable for storing large amounts of data?
While SharePoint can store a significant amount of data, its primary function is collaboration and document management rather than large-scale data storage.
Can I automate data transfer between SharePoint and Azure Blob Storage? Yes, data transfer can be automated using various tools and services like Azure Data Factory or custom scripts.
What is the maximum file size that SharePoint and Azure Blob Storage can store? SharePoint Online has a maximum file size limit of 250 GB per file. Azure Blob Storage also supports uploading large blobs that can be up to 4.75 TB in size.
How secure are SharePoint and Azure Blob Storage? Both platforms offer robust security features, including data encryption in transit and at rest, compliance certifications, and advanced access controls.
Can I access Azure Blob Storage data from SharePoint? Yes, you can integrate Azure Blob Storage with SharePoint to access and manage your data across both platforms, utilizing Azure’s storage capabilities and SharePoint’s collaboration tools.
Automate SharePoint Online Document Archiving with Ease.
Request more information or a demo of Squirrel to see how much it can save you with your SharePoint Online costs.
Ever had a migraine thinking about how to ensure compliance for your Azure Storage Accounts? You’re not alone. Companies worldwide struggle to maintain consistency, especially when it comes to cloud storage. That’s where Azure Policy comes into play. This article is a comprehensive guide that will walk you through everything you need to know about using Azure Policy to enforce compliance on your Azure Storage Accounts.
What is Azure Policy?
Azure Policy is a service in Azure that you use to create, assign, and manage policies. These policies enforce different rules over your resources, ensuring they comply with corporate standards and service level agreements (SLAs). But what exactly does that mean? It means you can prevent users from making mistakes that could lead to security vulnerabilities. For instance, you can enforce rules like geo-redundancy to prevent data loss. This ensures that your data is duplicated in more than one geographical location Learn more about Azure Geo-redundancy.
What is Azure Storage Account?
An Azure Storage Account provides a unique namespace to store and manage Azure Storage data objects. Whether you’re dealing with blob storage, file storage, queues, or tables, everything resides in an Azure Storage Account. To understand how Azure Policy can enforce rules over these storage accounts, it’s essential to comprehend the various types of Azure Storage Accounts and their functionalities.
Types of Azure Storage Accounts
Azure offers several types of storage accounts, each with different features and pricing. Standard storage accounts are ideal for most scenarios, but there are also premium accounts that offer high-performance tiers suitable for specific workloads Learn more about Premium Block Blob Accounts.
Why is Compliance Important?
In a world where data breaches and compliance failures can cost millions, ensuring the integrity and security of your Azure Storage Account is not something to be taken lightly. Utilizing encryption methods and setting up private endpoints are crucial aspects that can’t be ignored. Find out more about Azure Storage Data Encryption.
How Azure Policy Works
Before you dive into setting up an Azure Policy, understanding its core components is crucial. Essentially, Azure Policy works on evaluation logic and enforcement actions.
Evaluation Logic
The evaluation logic of Azure Policy scrutinizes your resources under specific conditions. These conditions are defined in the policy definition, making it easier to categorize and identify non-compliant resources.
Enforcement Actions
The enforcement actions are the steps that Azure Policy takes when a non-compliant resource is detected. These actions can range from simple alerts to automatically modifying resources to become compliant.
Setting Up Azure Policy
Prerequisites
Azure Account Setup
Before embarking on this policy-making journey, it’s crucial to set up your Azure account. If you’re a newcomer to Azure, you’re in luck! Azure offers a generous free trial with a credit line, providing you ample room to experiment. For businesses and seasoned cloud engineers, ensure that your existing Azure account has appropriate permissions to modify or assign policies. Don’t overlook this; you wouldn’t want to realize halfway through that you’re stuck due to insufficient permissions.
The Essentials: Azure CLI and PowerShell
Depending on your preference for graphical interfaces or command lines, you might choose between Azure Portal, Azure CLI, or PowerShell for your activities. Azure CLI and PowerShell are essential tools that offer robust features for users who prefer scripting or want to automate tasks. Installation is straightforward: CLI is a simple download and install operation, and PowerShell modules can be installed directly from the PowerShell console. But remember, these are not just add-ons. These tools are your gateway to Azure’s powerful suite of services, enabling you to execute complex operations with simple commands.
Navigating Azure Policy: Where Do You Start?
The Azure Portal Route
So you’re all set with your Azure account and your toolkit of CLI and PowerShell. What’s the next step? Well, if you’re someone who loves the convenience of a graphical interface, Azure Portal should be your starting point. Once logged in, simply navigate to “Policies” in the left-hand side menu. This is your control center for all things related to Azure Policy. You’ll find options to create, assign, and monitor policies here. Is it beginner-friendly? Absolutely. Is it less powerful than command-line options? Not at all. The Azure Portal is an all-in-one package for both newbies and seasoned cloud engineers.
The Command-Line Aficionados: Azure CLI
For those who lean more towards command-line interfaces, Azure CLI is your playground. Why choose CLI over the Portal? Automation, scripting capabilities, and because nothing beats the granularity of control offered by a good old command-line interface. To get started, launch your terminal and simply type az policy definition list to get a list of all available policy definitions. You’ll be surprised at how much you can do with just a few key commands.
The ABCs of Policy Definitions
Anatomy of a Policy Definition
Here’s where the rubber meets the road. A policy definition describes what your policy is going to do. It’s the DNA, the essential genetic code that specifies what resources will be affected and what actions will be taken. Intricately designed in JSON format, it comprises several key fields: “if,” “then,” and “parameters” to name a few. The “if” field specifies the conditions under which the policy is triggered, and the “then” field lays down the law, outlining what happens when those conditions are met. Understanding these fields is fundamental in crafting effective policies.
The Fields That Make Up a Definition
Confused by the JSON jargon? Don’t be. A policy definition essentially has four major parts:
Mode: Determines what resources are targeted by the policy.
Parameters: Allows for policy customization.
Policy Rule: The crux of your policy, contains “if-then” conditions.
Description and Metadata: Optional but highly recommended for clarity.
Think of these fields like the components of a car engine; each plays a unique role, but together, they power your policy.
Crafting Your Custom Policy: The Art and Science
The Language of JSON
JSON isn’t just a format; it’s the language your policy speaks. The better you are at JSON, the more articulate your policies will be. Imagine JSON as the paintbrush you use to create your policy masterpiece. Don’t fret if you’re not a JSON pro. Azure has tons of templates and examples to guide you. The key to mastering JSON lies in understanding its structure and syntax—objects, arrays, key-value pairs, and so on. The power of JSON comes from its flexibility; you can create intricate conditions and detailed rules that govern your resources just the way you want.
Parameters: The Building Blocks of Flexibility
Parameters in Azure Policy are akin to variables in programming. Why are they so great? Because they make your policies flexible and reusable. Instead of hardcoding values, you can use parameters to make your policy applicable in different contexts. Consider them as the user-defined options in the software of Azure governance. Parameters can range from simple values like strings or integers to complex objects and arrays. Their inclusion makes a policy versatile and dynamic, capable of serving varied operational needs.
The Act of Assigning: Where Policies Meet Resources
Understanding Scope: The When and Where
So, you’ve got your policy defined and ready to go. The next logical step is assigning it, but don’t rush this phase. Understanding the scope of a policy is like knowing where to cast your fishing net; you want to target the right resources without causing collateral damage. In Azure, scope can range from a management group to a single resource. It’s not just about what you’re targeting, but also where in the hierarchy these resources reside. Get the scope wrong, and you might end up applying policies to resources you didn’t intend to affect. In other words, setting the correct scope is like setting the stage before the play begins.
The How-To of Policy Assignment
If you’re a Portal person, go to the “Assignments” tab under “Policies,” select your defined policy, choose the scope, and hit assign. For CLI wizards, the az policy assignment create command will be your best friend. It takes in several parameters like --policy, --name, and --scope to precisely craft your assignment. Whatever route you choose, remember that a policy without an assignment is like a car without fuel; it’s not going anywhere.
Monitoring: The Eyes and Ears of Compliance
Setting Up Alerts: Be in the Know
In the grand theatre of Azure governance, monitoring is like the stage manager who keeps tabs on everything. Once your policies are up and running, you’ll want to know how effective they are. Azure provides built-in compliance data under the “Compliance” tab in the Policy service. If you’re keen on real-time monitoring, consider setting up alerts. Alerts function as your notifications, chiming in whenever there’s a compliance issue. It’s like having a watchdog that barks only when needed, saving you from sifting through endless logs.
Dive Deeper with Azure Monitor
For those who want a more in-depth understanding of their policy landscape, Azure Monitor is a powerful tool. It’s not just about looking at compliance data but diving deep into resource logs to understand the ‘why’ behind the ‘what’. Imagine it like an investigative reporter who digs up the hidden stories in your Azure environment. With Azure Monitor, you get granular data, which can be extremely useful for debugging and auditing.
The ABCs of Policy Definitions
Anatomy of a Policy Definition
Here’s where the rubber meets the road. A policy definition describes what your policy is going to do. It’s the DNA, the essential genetic code that specifies what resources will be affected and what actions will be taken. Intricately designed in JSON format, it comprises several key fields: “if,” “then,” and “parameters” to name a few. The “if” field specifies the conditions under which the policy is triggered, and the “then” field lays down the law, outlining what happens when those conditions are met. Understanding these fields is fundamental in crafting effective policies.
The Fields That Make Up a Definition
Confused by the JSON jargon? Don’t be. A policy definition essentially has four major parts:
Mode: Determines what resources are targeted by the policy.
Parameters: Allows for policy customization.
Policy Rule: The crux of your policy, contains “if-then” conditions.
Description and Metadata: Optional but highly recommended for clarity.
Think of these fields like the components of a car engine; each plays a unique role, but together, they power your policy.
Best Practices: The Dos and Don’ts
Documentation: The Unsung Hero
If you’ve followed through this far, give yourself a pat on the back! However, one last but crucial step remains—documentation. Always document what each policy does, its scope, and any parameters it uses. This is like writing a user manual for someone else who might be navigating your Azure governance landscape. Remember, well-documented policies are as vital as well-crafted ones.
Conclusion
Setting up Azure Policy for storage is not just a one-off task; it’s an ongoing process of fine-tuning your governance strategies. Whether you’re a beginner or a seasoned Azure user, understanding the intricacies of policy definitions, assignments, and monitoring will set you on a path toward a more secure, efficient, and compliant Azure environment. Happy governing!
FAQs
What is Azure Policy?
Azure Policy is a service in Azure that allows you to manage and enforce your organization’s specific requirements, from naming conventions to resource locations.
How do I create a custom policy?
You can create a custom policy by defining it in JSON format and then assigning it to the appropriate scope.
What is scope in Azure Policy?
Scope is the range within your Azure environment where the policy will be applied, ranging from management groups to individual resources.
How can I monitor policy compliance?
You can monitor compliance via the Azure Portal under the “Compliance” tab in the Policy service. For more detailed analysis, Azure Monitor is recommended.
Can I undo a policy assignment?
Yes, you can remove or modify a policy assignment through the Azure Portal or via CLI commands.
Is there anything else you’d like to know? Feel free to ask!
AzCopy is a command-line utility designed for copying data to and from Microsoft Azure Blob and File storage. It is a very powerful tool provided by Microsoft that helps users to copy and transfer data efficiently and securely. One of the key features of AzCopy is the ability to schedule transfers. Scheduled transfers can be extremely useful in managing data and ensuring that data is moved or backed up at the most appropriate times. AzCopy is particularly useful for businesses and individuals who handle large volumes of data and need a reliable and efficient way to manage data transfers. The ability to schedule transfers allows users to plan ahead and ensure that important data is transferred at the right times, without having to manually initiate the transfer each time.
Why Schedule Transfers?
Scheduling transfers can be incredibly beneficial for a number of reasons.
Importance of Scheduling
Firstly, scheduling transfers can help manage the load on your network. Transferring large amounts of data can be very resource-intensive and can impact the performance of other applications and services. By scheduling transfers for off-peak times, you can reduce the impact on your network and ensure that other services continue to run smoothly. This is particularly important for businesses that rely on their network for critical operations and cannot afford any downtime or reduced performance. Additionally, scheduling transfers can also help in managing costs. Many cloud providers charge based on the amount of data transferred and the time at which the transfer occurs. By scheduling transfers for off-peak times, you may be able to take advantage of lower rates and save on costs.
Use Cases
Another use case for scheduling transfers is for regular backups or data synchronizations. For example, if you have a database that needs to be backed up daily, you can schedule a transfer to occur every night at a specific time. This ensures that your data is always backed up and protected. Regular backups are essential for protecting against data loss due to hardware failure, data corruption, or other unforeseen events. By scheduling transfers, you can automate the backup process and ensure that it is always completed on time. Another common use case is for data synchronization between different systems or locations. For example, you may have a production environment and a backup environment that need to be kept in sync. By scheduling transfers, you can ensure that any changes made in the production environment are automatically replicated to the backup environment.
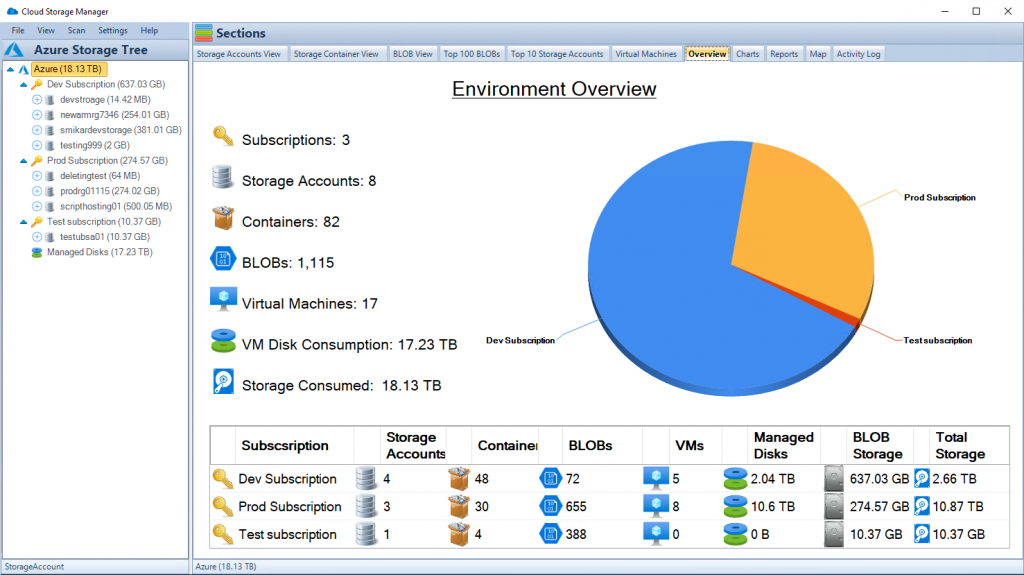
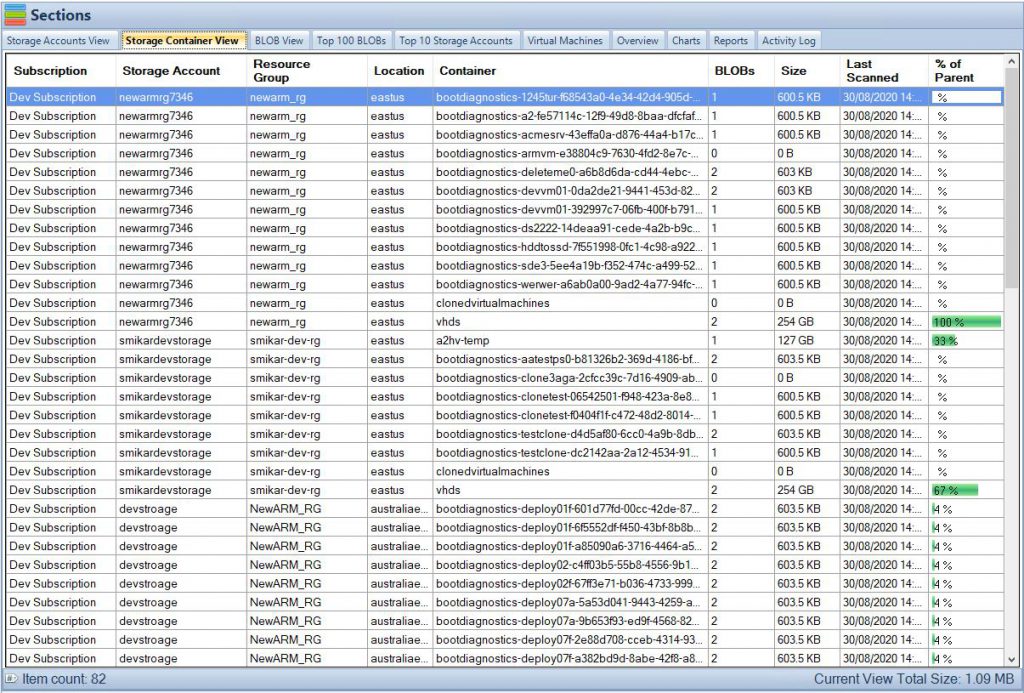
Cloud Storage Manager Main Window
How to Schedule Transfers
Scheduling transfers in AzCopy involves a few steps.
Installation and Setup
Before you can schedule transfers, you need to ensure that AzCopy is installed on your machine. The installation process is straightforward and involves downloading the AzCopy executable file from the Microsoft website and configuring it on your machine. It is important to ensure that you have the appropriate permissions to install software on your machine and to access the source and destination locations for the transfer. Additionally, you may need to configure your firewall or network settings to allow AzCopy to access the internet or other network resources.
Using the Command Line
AzCopy is a command-line tool, so you will need to use the command line to schedule transfers. The basic syntax for scheduling a transfer with AzCopy is as follows:
In this example, C:\source is the source directory, and https://destination.blob.core.windows.net/container is the destination URL. The --schedule parameter specifies the schedule for the transfer using a cron expression. The cron expression 0 2 * * * specifies that the transfer should occur at 2 AM every day.
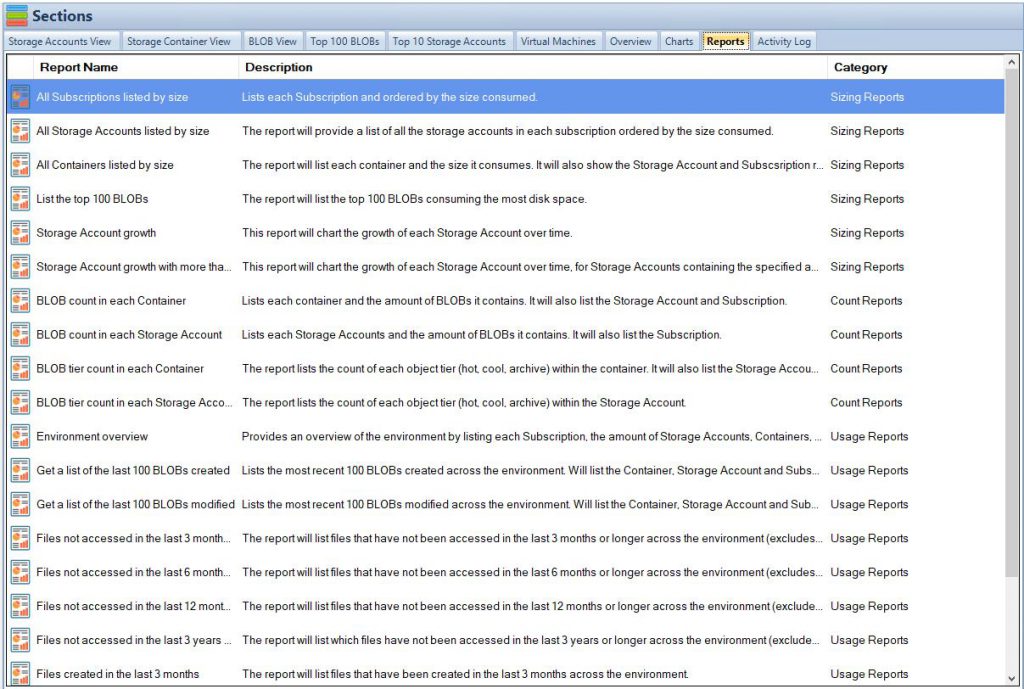
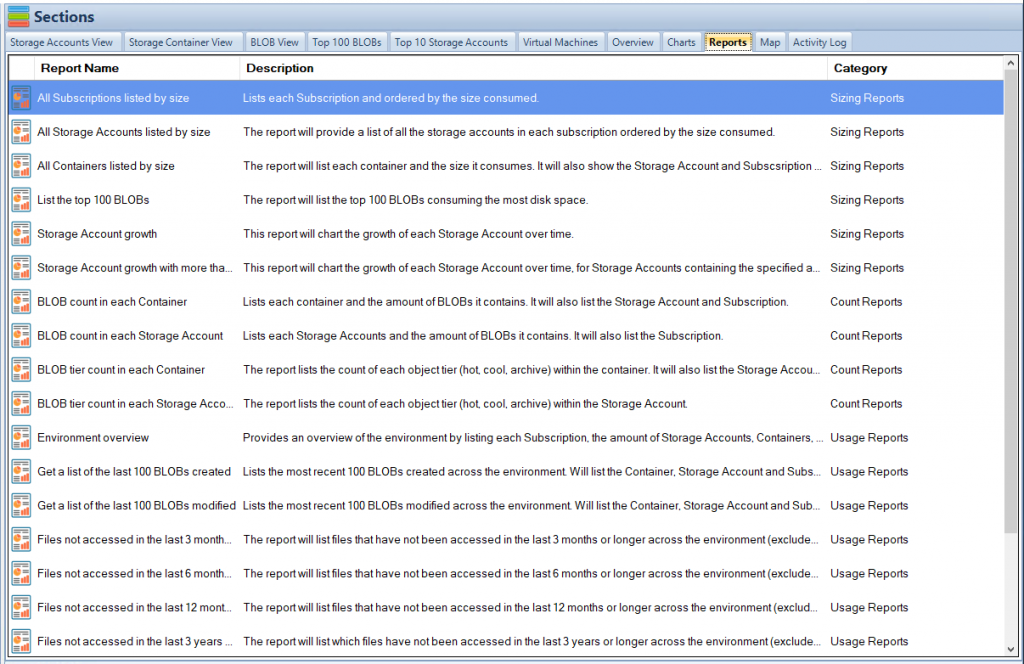
Cloud Storage Manager Reports Tab
Tips and Best Practices
It’s important to consider a few things when scheduling transfers with AzCopy.
Handling Errors
Errors can occur during the transfer process, and it’s important to handle them appropriately. AzCopy provides several options for handling errors, such as retrying the transfer, logging the error, or stopping the transfer completely. It is recommended to review the documentation for AzCopy and configure the appropriate error handling options for your use case. For example, you may want to configure AzCopy to retry the transfer a certain number of times before logging an error and stopping the transfer. Additionally, you may want to configure AzCopy to generate a log file that you can review after the transfer is completed to identify any issues or errors that occurred during the transfer.
Monitoring Transfers
Monitoring transfers is also important to ensure that they are completed successfully. AzCopy provides several options for monitoring transfers, such as generating a log file or displaying the status of the transfer in the command line. It is recommended to review the documentation for AzCopy and configure the appropriate monitoring options for your use case. For example, you may want to configure AzCopy to generate a log file that you can review after the transfer is completed to confirm that all files were transferred successfully. Additionally, you may want to monitor the status of the transfer in the command line to identify any issues or errors that occur during the transfer.
Automating Transfer Schedules
Automating transfer schedules can help streamline the process and ensure that transfers occur as planned.
Using Scripting
Scripting can be a powerful way to automate transfer schedules. You can create a script that contains the AzCopy command with the appropriate parameters for your transfer and then schedule the script to run at the desired times. There are several scripting languages available, such as PowerShell or Bash, that you can use to create your script. It is recommended to review the documentation for your preferred scripting language and the AzCopy command-line reference to create your script.
Using Task Scheduler
Another way to automate transfer schedules is by using the Task Scheduler on Windows. You can create a task that runs the AzCopy command at the desired times. The Task Scheduler provides a user-friendly interface for configuring tasks and allows you to specify various options, such as the start time, recurrence, and actions to take if the task fails. It is recommended to review the documentation for the Task Scheduler and the AzCopy command-line reference to create your task.
Conclusion
Scheduling transfers with AzCopy can be incredibly useful for managing data and ensuring that data is moved or backed up at the most appropriate times. By using the command line, scripting, or the Task Scheduler, you can automate transfer schedules and streamline the process. Remember to handle errors appropriately and monitor transfers to ensure they are completed successfully. Additionally, it is important to test your scheduled transfers thoroughly before relying on them in a production environment. By following these best practices, you can take full advantage of the scheduling capabilities of AzCopy and ensure that your data is always transferred on time and securely.
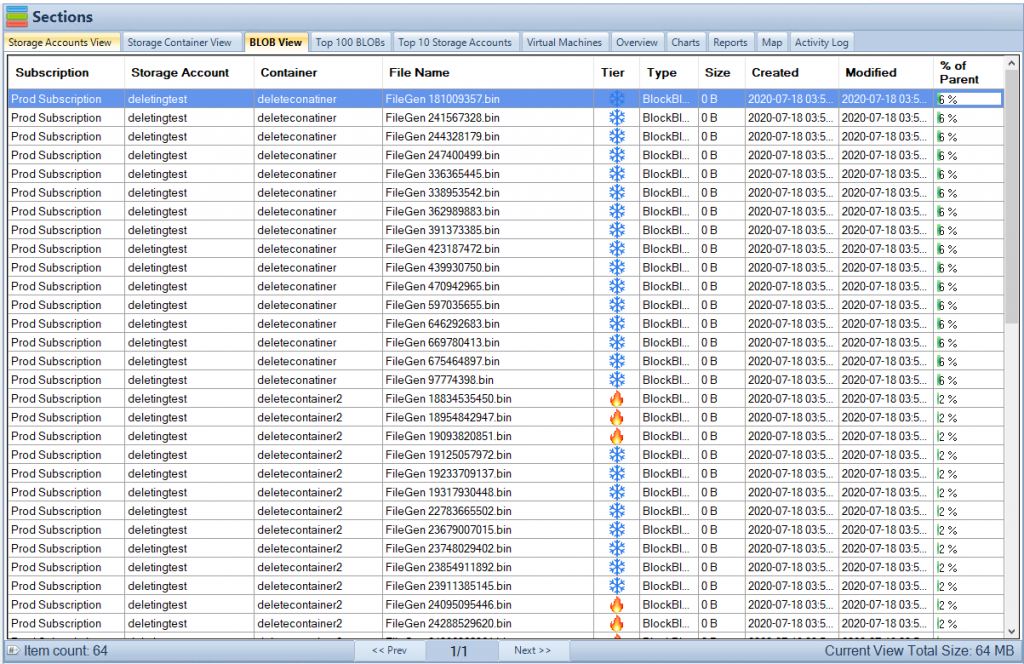
Cloud Storage Manager Blobs Tab
Frequently Asked Questions
Can I schedule transfers to occur at multiple times throughout the day? Yes, you can schedule transfers to occur at multiple times throughout the day by specifying multiple cron expressions in the --schedule parameter. For example, if you want to schedule a transfer to occur at 2 AM and 2 PM every day, you would use the following command: azcopy copy "C:\source" "https://destination.blob.core.windows.net/container" --schedule="0 2 * * *,0 14 * * * In this example, the cron expression 0 2 * * * specifies that the transfer should occur at 2 AM every day, and the cron expression 0 14 * * * specifies that the transfer should occur at 2 PM every day.
Can I schedule transfers from multiple sources to a single destination? Yes, you can schedule transfers from multiple sources to a single destination by running multiple AzCopy commands with different source and destination parameters. Each command will create a separate transfer, and you can schedule them to occur at the same time or at different times. For example, you may have two directories that you want to back up to the same destination, but at different times. You can create two separate AzCopy commands with the appropriate source and destination parameters and schedule them to occur at the desired times.
Can I cancel a scheduled transfer? Yes, you can cancel a scheduled transfer by stopping the AzCopy process or by deleting the scheduled task in the Task Scheduler. If you are using a script to automate your transfer schedule, you can stop the script or remove the scheduled task that runs the script. It is important to cancel a scheduled transfer carefully to avoid any data loss or corruption. For example, if you stop the AzCopy process while a transfer is in progress, some files may be partially transferred or not transferred at all.
Can I schedule transfers to occur on specific days of the week? Yes, you can schedule transfers to occur on specific days of the week by specifying the appropriate days in the cron expression. For example, if you want to schedule a transfer to occur on Mondays and Fridays at 2 AM, you would use the following command: azcopy copy "C:\source" "https://destination.blob.core.windows.net/container" --schedule="0 2 * * 1,5" In this example, the cron expression 0 2 * * 1,5 specifies that the transfer should occur at 2 AM on Mondays and Fridays.
Can I schedule transfers between different Azure accounts? Yes, you can schedule transfers between different Azure accounts by specifying the appropriate source and destination parameters in the AzCopy command. For example, you may have an Azure Blob Storage account in one Azure subscription and an Azure File Storage account in another Azure subscription. You can create an AzCopy command with the appropriate source and destination parameters and schedule it to occur at the desired times.
AzCopy, a command-line utility designed by Microsoft, is the bridge that links data transfer and data management within Azure. Targeting seasoned professionals, it offers a granular level of control, especially when it comes to permissions. Managing permissions is not just about controlling access; it’s about maintaining the integrity of data, ensuring compliance, and optimizing operational efficiency. The precision that AzCopy offers in handling permissions allows administrators to sculpt data accessibility according to organizational needs. This guide is for those who already have a solid foundation in AzCopy and are looking to deepen their understanding of permission management within this tool. It will cover the core concepts of permissions, detail a comprehensive step-by-step guide, uncover best practices, and reveal common mistakes to avoid, all while maintaining a technical rigor appropriate for experts.
Cloud Storage Manager Main Window
Understanding Permissions in AzCopy
The arena of permissions in AzCopy is vast and nuanced. Permissions are not merely binary gates; they are fine-grained controls that dictate the very interaction between users and resources. In AzCopy, this is articulated through specific permissions like read (R), write (W), delete (D), and list (L), all of which serve precise functions. Permissions work in concert with Azure Blob, File, and Table storage, with specific strategies to manage each. For example, Blob permissions are governed through Shared Access Signatures (SAS), creating time-bound access control. File Share Permissions echo the characteristics of NTFS permissions, while Table Permissions manifest at the table level, allowing granular control over entities within the tables. This multifaceted nature of permissions within AzCopy necessitates a comprehensive understanding of their dynamics, their interplay with different Azure storages, and the tools and techniques to manipulate them effectively.
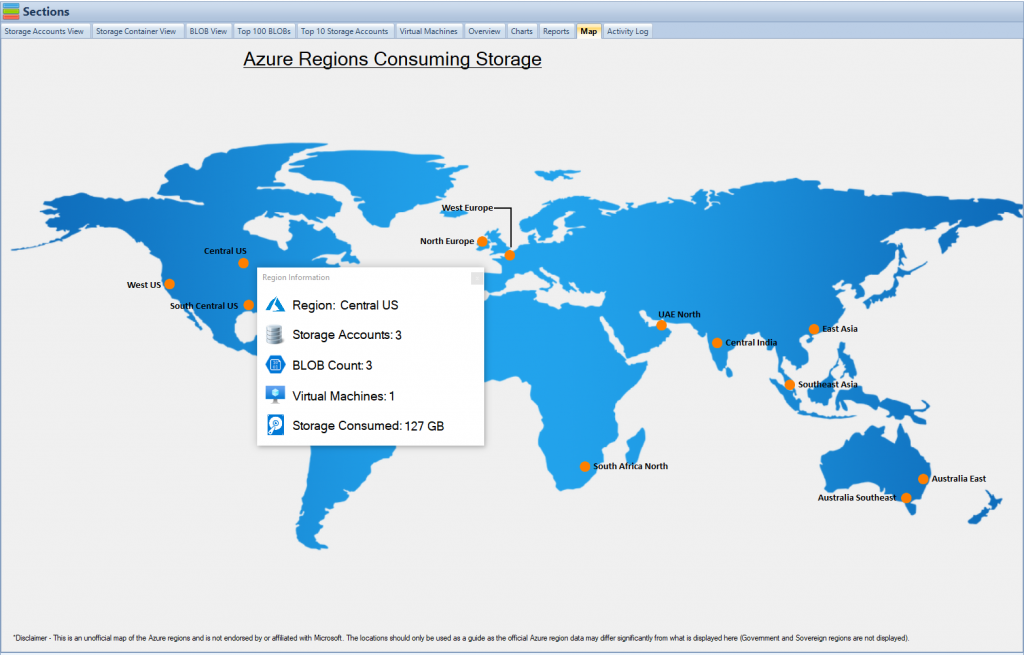
Cloud Storage Manager Map View
Step-by-Step Guide to Managing Permissions
In the AzCopy command-line tool, switches (also known as flags or options) are used to modify the behavior of a command. Here’s a breakdown of the switches used in the provided examples:
cp: This command is used to copy data between a source and a destination. It could be from one Azure storage to another or between Azure storage and the local file system.
--recursive=true: This switch is used to specify that the copy operation should include all subdirectories recursively. If this switch is omitted or set to false, only the files in the specified directory will be copied.
SAS Token Parameters: The Shared Access Signature (SAS) token within the URLs has specific parameters that control permissions and other aspects of access:
sv: Storage Service Version, specifies the version of the storage service to use.
ss: Storage Services, can be blob (b), file (f), table (t), or queue (q) to specify the type of storage service.
srt: Signed Resource Types, specifies the resource type that the SAS token can access, such as service (s), container (c), or object (o).
sp: Signed Permissions, defines what permissions the SAS grants, such as read (r), write (w), delete (d), list (l), etc.
se: Signed Expiry, sets the expiration time for the SAS token.
st: Signed Start, sets the start time for the SAS token’s validity period.
spr: Signed Protocol, specifies the allowed protocol for the request, such as HTTPS.
sig: Signature, contains the cryptographic signature for the SAS token.
Switches in AzCopy offer granular control over the copy operations, allowing users to define permissions, choose resources, set time limits, and more. This makes AzCopy a highly versatile tool for managing data within Azure, catering to various organizational needs and security requirements.
Setting Up AzCopy
Starting with the fundamental step, the installation of AzCopy requires an accurate understanding of the system requirements and dependencies. While AzCopy is available for Windows, Linux, and macOS, this guide focuses on the Linux installation. The command
not only downloads the executable but sets the necessary permissions to run it. An essential part of setting up AzCopy is authenticating it with Azure. It can be achieved through Managed Service Identity (MSI) or by manually entering the access credentials. The latter requires careful management as improper handling can expose sensitive information. This setup process, though simple on the surface, lays the groundwork for the entire permission management operation.
Configuring Permissions
In the world of AzCopy, configuring permissions is akin to tuning an intricate piece of machinery. It’s where the expertise of an Azure administrator truly shines. Let’s take the example of Blob permissions. These permissions are typically set using Shared Access Signatures (SAS), which allow you to specify the time frame and permissions for accessing Blob data. A SAS token can be generated from the Azure portal or programmatically using Azure Storage client libraries. For example, using the command
, you can grant read access to a blob. The SAS token embedded in the URL dictates the extent and duration of the access. Configuring permissions with AzCopy goes far beyond the basics, allowing for the setup of multilayered, nested permissions that control access at various levels, from containers to individual blobs. Such granularity can be instrumental in implementing organization-wide data governance policies.
Example: Granting and Revoking Permissions
AzCopy’s strength in permission management isn’t just about setting permissions; it’s also about modifying them in a controlled manner. Let’s dive into an example that looks at both granting and revoking permissions. Granting read and write access to a blob might be done using the following command:
Here, the SAS token is crafted to grant both read and write permissions. Now, let’s say that access needs to be revoked. Unlike many other tools, AzCopy doesn’t leave you stranded. You can either modify the SAS token, rendering the previous one invalid or use Azure Portal’s sophisticated interface to control permissions. The underpinning architecture of AzCopy ensures that changes in permissions are propagated consistently, minimizing the risk of unauthorized access.
Cloud Storage Manager Reports Tab
Best Practices
Navigating the complex pathways of AzCopy’s permissions requires not only skill but also adherence to best practices. The concept of the Least Privilege Principle resonates strongly here. AzCopy enables you to grant exactly the level of access that a user needs and no more. Such granularity minimizes security risks. Time-bound access, another facet, ensures that permissions do not linger beyond their necessity. By using SAS tokens with specific expiry times, you encapsulate the access, rendering it void after the required period. Additionally, monitoring and logging play a crucial role. AzCopy, when coupled with Azure Monitor and Azure Activity Log, becomes a potent combination, enabling real-time monitoring and alerts. These best practices are not mere recommendations; they are the embodiment of efficient, secure, and responsible permission management in AzCopy.
. Copying a Blob with Read Permissions
You can copy a blob and set read permissions using a SAS token like this:
These examples demonstrate the flexibility and precision of AzCopy in managing permissions for various Azure storage services. The permissions are defined by the sp parameter in the SAS token, where you can specify different combinations like read (r), write (w), delete (d), list (l), etc.
Remember to replace the example URLs, paths, and SAS tokens with your specific details, and note that these tokens should be handled securely, as they grant access to the resources.
Common Mistakes and How to Avoid Them
The road to mastery in managing permissions with AzCopy is fraught with potential mistakes. Understanding these common pitfalls and learning how to avoid them is a hallmark of expertise.
Overly Broad Permissions
A common mistake is to assign permissions that are too broad. AzCopy allows for finely grained control, and it should be utilized. For example, providing write access when only read access is needed can lead to unintentional data modifications. The use of specific roles, along with clear understanding and planning of the required permissions, can alleviate this risk. By aligning permissions with the exact needs of each user or process, you not only minimize security risks but also align with the principle of least privilege, which is central to robust security design.
Lack of Monitoring and Not Revoking Temporary Permissions
Another common mistake in permission management with AzCopy is the lack of ongoing monitoring and failing to revoke temporary permissions. Even the most meticulously crafted permissions can become a liability if they are not regularly reviewed and adjusted as needs change. AzCopy, when integrated with monitoring tools like Azure Security Center, can provide real-time insights into how permissions are being used. Such insights enable prompt action if suspicious activity is detected. Furthermore, temporary permissions should be time-bound, and AzCopy’s support for SAS tokens with expiry dates facilitates this. It’s not just about setting permissions correctly at the outset; it’s about maintaining them accurately over time, and AzCopy provides the tools needed to do this effectively.
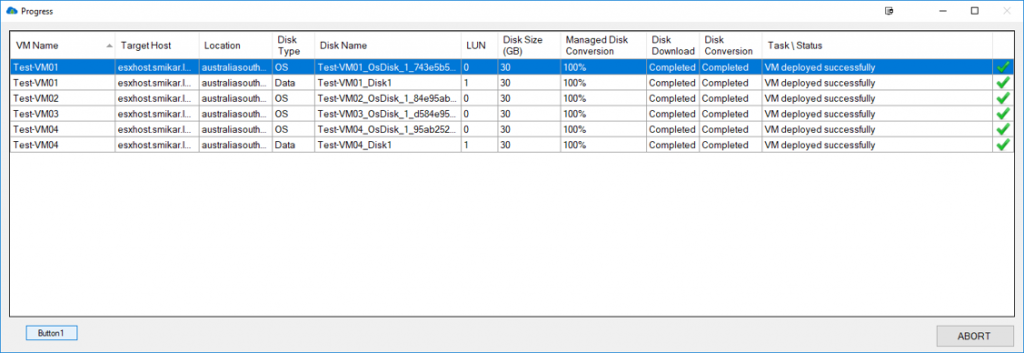
Carbon Azure Migration Progress Screen
Advanced Techniques and Tools
Expertise in AzCopy’s permission management is not only about understanding the basic and intermediate concepts; it also involves leveraging advanced techniques and integrating with other Azure services.
Automation with Azure Functions
AzCopy can be combined with Azure Functions to create automated data movement workflows that respond to specific triggers. Such automation can include the dynamic creation and revocation of permissions based on pre-defined rules. For example, an Azure Function could be set up to automatically grant read access to a blob when a new user is added to a specific Azure AD group and revoke that access when the user is removed. The combination of AzCopy’s robust permission management capabilities with Azure Functions’ flexible automation creates a powerful tool for dynamic, responsive data access management.
Utilizing AzCopy with Azure Policy
AzCopy can also be used in conjunction with Azure Policy to enforce organizational rules and compliance requirements. By defining custom policies that align with your organization’s specific needs, you can ensure that AzCopy is used in a manner that meets regulatory and internal governance requirements. This might include rules regarding the types of permissions that can be granted, the duration for which they can be granted, and the conditions under which they must be revoked. The ability to define and enforce such rules programmatically adds another layer of control and efficiency to AzCopy’s permission management capabilities.
Conclusion
Managing permissions with AzCopy is a complex and rewarding endeavor. This guide, crafted for those with an expert understanding, has delved into the intricacies of permissions within AzCopy, unraveling step-by-step procedures, best practices, common mistakes, and advanced techniques. Whether it’s the granular control offered by Shared Access Signatures, the dynamism of integrating with Azure Functions, or the governance provided by Azure Policy, AzCopy stands as a versatile tool in the hands of seasoned administrators. Embracing AzCopy’s capabilities is not just about efficient data management; it’s about crafting a secure, responsive, and optimized data ecosystem that aligns with the evolving needs of a modern organization.
Cloud Storage Manager Blobs Tab
AZCopy FAQs
What is AzCopy and why is it used for permission management? AzCopy is a command-line utility tool designed by Microsoft to facilitate efficient data transfer within Azure. It allows fine-grained control over permissions, making it essential for secure data access and compliance.
How do I install and authenticate AzCopy on my system? AzCopy can be installed on Windows, macOS, or Linux, and authentication can be done through Managed Service Identity (MSI) or manual access credentials. Follow the installation guide for your specific OS.
Can I set time-bound permissions with AzCopy? Yes, AzCopy allows setting time-bound permissions using Shared Access Signatures (SAS), enabling control over the duration of access to specific resources.
What are some best practices for managing permissions in AzCopy? Adhering to the principle of least privilege, using time-bound access, and regularly monitoring with tools like Azure Security Center are key best practices.
How can I avoid common mistakes in permission management with AzCopy? Avoid overly broad permissions, ensure ongoing monitoring, and revoke temporary permissions as needed to minimize risks.
Is it possible to automate permission management with AzCopy? Yes, AzCopy can be combined with Azure Functions to create automated, responsive data access management workflows.
Can I integrate AzCopy with Azure Policy for compliance? Absolutely! AzCopy can be used with Azure Policy to enforce organizational rules and align with regulatory requirements.
What are the types of permissions that can be managed with AzCopy? AzCopy allows managing various permissions like read (R), write (W), delete (D), and list (L) across Azure Blob, File, and Table storage.
How do I revoke permissions once granted through AzCopy? Permissions can be revoked by modifying the SAS token or using the Azure Portal’s interface to control access, ensuring a consistent propagation of changes.
Is there any real-time monitoring available with AzCopy? AzCopy can be coupled with Azure Monitor and Azure Activity Log for real-time monitoring, allowing for immediate alerts and insights into permission usage.
In the multifaceted world of cloud computing, managing and safeguarding data becomes paramount. Azure Blob Storage Versioning serves as a pivotal feature within the Microsoft Azure platform, providing the essential capacity to control and maintain various versions of data. Whether you’re a small business owner worried about accidental deletions or a large corporation dealing with regulatory compliance, understanding Azure Blob Storage Versioning is crucial. This comprehensive guide will equip you with an in-depth understanding of what it is, why it matters, how to use it, and much more.
Cloud Storage Manager Reports Tab
What is Azure Blob Storage?
Azure Blob Storage is a robust storage solution provided by Microsoft Azure. Its primary function is to handle unstructured data that doesn’t fit neatly into a database. This includes everything from documents and images to video files.
In a world where data is constantly growing and evolving, Azure Blob Storage offers scalability and flexibility unmatched by traditional storage solutions. Its ability to manage large volumes of unstructured data makes it a vital asset in diverse applications such as data analytics, machine learning, web content storage, and more.
But what truly sets Azure Blob Storage apart is its versioning capability. This critical feature allows users to store multiple versions of a blob (Binary Large Object), thus ensuring a safety net against accidental modifications or deletions.
Cloud Storage Manager Main Window
Understanding Versioning
Importance of Versioning
Data is dynamic. It’s continually created, modified, and sometimes deleted. In such a fluid environment, the need for a robust versioning system becomes evident. It’s akin to a digital library, where different versions of a document are stored, ready to be accessed when needed.
Azure Blob Storage Versioning serves this vital role. For companies, it ensures compliance with regulations that require maintaining multiple copies of data. For developers, it allows experimentation without the fear of losing the original data. And for everyday users, it offers a way to recover from accidental deletions or changes.
How Versioning Works in Azure
At its core, Azure Blob Storage Versioning is about keeping different states of a blob. Every time a change occurs – be it modification or deletion – Azure automatically stores the previous version.
Imagine having a continually updating photo album, where every change is stored, and nothing is ever truly erased. This ability to go back to prior versions ensures an added layer of security and flexibility. It acts as a historical record, providing a transparent look into data’s lifecycle.
Cloud Storage Manager Map View
Enabling Versioning
Steps to Enable Versioning
Enabling versioning in Azure Blob Storage follows a simple and intuitive process:
Access the Azure Portal: Log into your Azure account and open the portal.
Navigate to Blob Service: Select the desired storage account, and click on “Blob Service.”
Activate Versioning: Find the “Data protection” section and check the “Blob versioning” option.
Think of it as turning on a safety feature in your car. With a few clicks, you enable a mechanism that provides extra protection and control.
Necessary Permissions
Enabling versioning isn’t a task left open to everyone. Specific permissions are required, ensuring that only authorized individuals can activate this feature. Generally, you would need the ‘Storage Account Contributor’ role or similar rights. It’s like having a secure vault where only designated personnel have the key.
Managing Versions
Viewing Versions
Azure Blob Storage Versioning offers different ways to view blob versions. Here’s a step-by-step guide:
Azure Portal:
Step 1: Log into your Azure Portal.
Step 2: Navigate to your desired storage account.
Step 3: Select the container and then the blob you wish to view versions for.
Step 4: Click on the “Version history” tab to see the different versions.
Azure Storage Explorer:
Step 1: Open Azure Storage Explorer.
Step 2: Connect to your Azure subscription.
Step 3: Navigate to the blob whose versions you want to view.
Step 4: Right-click and choose “View Blob Versions” from the context menu.
Azure SDK:
Step 1: Utilize the Azure SDK in your preferred programming language.
Step 2: Use specific methods and properties designed to access blob versions.
Step 3: Code and run the program to view the versions.
Restoring Previous Versions
Restoring a previous version in Azure is a straightforward process. Follow these steps:
Step 1: Log into your Azure Portal.
Step 2: Navigate to your desired storage account.
Step 3: Select the blob whose version you want to restore.
Step 4: Click on the “Version history” tab.
Step 5: Choose the specific version you want to restore.
Step 6: Click the “Restore” button, and the selected version will be restored.
Think of it as a time machine for your data, where you can go back to a specific point and bring it back to life.
Deleting Versions
Managing storage efficiently might require you to delete certain versions. Here’s how to do it:
Manual Deletion:
Step 1: Log into your Azure Portal.
Step 2: Navigate to the storage account.
Step 3: Select the blob whose versions you want to delete.
Step 4: Click on the “Version history” tab.
Step 5: Select the versions you wish to delete.
Step 6: Click the “Delete” button to remove those versions.
Automated Deletion Using Lifecycle Management Policy:
Step 1: In the Azure Portal, navigate to your storage account.
Step 2: Click on the “Lifecycle Management” tab.
Step 3: Create a new policy or edit an existing one.
Step 4: Define rules for the deletion of blob versions based on age or other criteria.
Step 5: Save the policy, and Azure will automatically delete versions according to your specified rules.
These detailed guides ensure that managing versions within Azure Blob Storage remains an accessible and efficient process. Whether you’re an experienced Azure user or a novice, these step-by-step instructions provide the roadmap to successfully view, restore, or delete versions as needed. It puts the control of your data right at your fingertips!
Regularly monitoring the versions in your Azure Blob Storage is essential. It ensures that your system remains efficient, optimized, and secure. Consider it like regular health check-ups for your data, ensuring everything is functioning as it should.
Security Considerations
In addition to basic versioning, applying robust security measures is key. Implementing proper permissions, encryption, and access controls adds multiple layers of security to your data, akin to a state-of-the-art security system for your digital assets.
Integrating with Other Tools
Integration with Azure DevOps
Integration with Azure DevOps amplifies the benefits of Azure Blob Storage Versioning. Together, they enhance control over versions, promote collaboration, streamline the development process, and align with Agile methodologies.
Integration with Third-Party Tools
Azure’s ability to integrate with third-party tools, such as data management platforms or security applications, extends its functionality. Like fitting your car with advanced navigation and entertainment systems, these integrations add value and enhance the overall experience.
Pricing Considerations
Azure Blob Storage Versioning’s cost structure can be complex. It’s based on the storage size, access frequency, retrieval requirements, and selected storage tier. Understanding these factors is essential for managing costs effectively. It’s akin to planning a budget, where every detail matters.
Conclusion
Azure Blob Storage Versioning is a powerful tool in the modern data landscape. Its ability to manage, restore, and control different versions of data places it at the forefront of data security, compliance, and management. From enabling and managing versions to integrating with other tools and understanding pricing, this guide offers a comprehensive look into the world of Azure Blob Storage Versioning.
Cloud Storage Manager Charts Tab
FAQs
What is Azure Blob Storage Versioning?
Azure Blob Storage Versioning allows users to store and manage multiple versions of a blob, making it possible to revert to previous states if needed. It’s like having a complete history of your data at your fingertips.
How can I enable Versioning in Azure Blob Storage?
You can enable Versioning through the Azure Portal by accessing your storage account, navigating to “Blob Service,” and activating “Blob versioning.” It’s a straightforward process that adds a powerful feature to your data management toolkit.
Can I delete previous versions in Azure Blob Storage?
Yes, Azure Blob Storage allows you to delete older or unnecessary versions. You can do this manually or set up policies to automate the process, ensuring that your storage remains optimized and clutter-free.
How does Azure Versioning integrate with other tools?
Azure Versioning seamlessly integrates with tools like Azure DevOps and third-party platforms, enhancing collaboration, control, and functionality.
What are the cost considerations for Azure Blob Storage Versioning?
Costs for Azure Blob Storage Versioning depend on factors like storage size, access frequency, and chosen tier. Understanding these factors and planning accordingly can help you manage costs effectively.