Azure VM Scheduler tasks not running

Azure VM Scheduler tasks not running

Troubleshooting Azure VM Scheduler (AVMS) Task Issues

If your scheduled AVMS tasks aren’t running as expected, don’t worry — this guide will walk you through common issues and how to resolve them quickly.

Error 1: Proxy Authentication Required

Check the AVMS log file located at:

C:\Program Files (x86)\SMIKAR Software\AVMS\avms.log

Look for entries similar to the following:

01/11/2016 11:23:46 AM Attempting to ADD-azureaccount using account XXXX@XXXX.onmicrosoft.com
01/11/2016 11:23:46 AM Failed to ADD-azureaccount using account XXXX@XXXX.onmicrosoft.com - error user_realm_discovery_failed: User realm discovery failed: The remote server returned an error: (407) Proxy Authentication Required.

This typically means your on-site proxy server requires authentication. The AVMS console works under your domain account (which has proxy access), but the scheduled task runs under the system account — which usually doesn’t.

To fix this:

  • Open Control Panel → Task Scheduler
  • Find the AVMS task, right-click, and choose Properties
  • Change the user from System to a domain account with proxy permissions

Azure VM Scheduler Tasks

Azure VM Scheduler Tasks Properties

Your scheduled task should now run successfully using this authenticated user.

Error 2: Email Notification Hang

Check the log again for an incomplete sequence like this:

01/11/2016 12:46:56 PM Started code block to Stop VMs
01/11/2016 12:46:56 PM Adding servers to array for email
01/11/2016 12:46:56 PM email form created notifying task has started

If the log halts here, it’s likely due to an issue with your email notification settings. Confirm that:

  • Your SMTP server address, port, and credentials are correctly configured in AVMS
  • Firewall or outbound rules aren’t blocking mail traffic

Alternatively, you can disable email notifications if you don’t need them — but note that you won’t receive job start/complete alerts.

Need More Help?

Still having issues? Contact support@smikar.com or visit our AVMS page for more resources.

Upgrade SCCM 1610 – A Comprehensive Guide

Upgrade SCCM 1610 – A Comprehensive Guide

How to upgrade SCCM 1610​

SCCM 1610

Microsoft has recently released SCCM 1610, the much-awaited upgrade to their System Center Configuration Manager. This upgrade includes new features and enhancements in Office 365 management, application management, Windows 10, client management, end-user experience, and new functionality for customers using Intune with SCCM. In this article, we will discuss how to upgrade to SCCM 1610 and its new features and enhancements.

A quick overview of these enhancements are;

  • Windows 10 Upgrade Analytics integration allows you to assess and analyze device readiness and compatibility with Windows 10 to allow smoother upgrades.
  • Office 365 Servicing Dashboard and app deployment to clients features help you to deploy Office 365 apps to clients as well as track Office 365 usage and update deployments.
  • Software Updates Compliance Dashboard allows you to view the current compliance status of devices in your organization and quickly analyze the data to see which devices are at risk.
  • Cloud Management Gateway provides a simpler way to manage Configuration Manager clients on the Internet. You can use the ConfigMgr console to deploy the service in Microsoft Azure and configure the supported roles to allow cloud management gateway traffic.
  • Client Peer Cache is a new built-in solution in Configuration Manager that allows clients to share content with other clients directly from their local cache with monitoring and troubleshooting capabilities.
  • Enhancements in Software Center including customizable branding in more dialogs, notifications of new software, improvements to the notification experience for high-impact task sequence deployments, and ability for users to request applications and view request history directly in Software Center.
  • New remote control features including performance optimization for remote control sessions and keyboard translation.

and if you use SCCM with Microsoft’s Intune you get the following new features;

  • New configuration item settings and improvements now only show settings that apply to the selected platform. We also added lots of new settings for Android (23), iOS (4), Mac (4), Windows 10 desktop and mobile (37), Windows 10 Team (7), Windows 8.1 (11), and Windows Phone 8.1 (3).
  • Lookout integration allows to check device’s compliance status based on its compliance with Lookout rules.
  • Request a sync from the admin console improvement allows you to request a policy sync on an enrolled mobile device from the Configuration Manager console.
  • Support for paid apps in Windows Store for Business allows you to add and deploy online-licensed paid apps in addition to the free apps in Windows Store for Business.

SCCM 1610 FAQs

Question Answer

What is SCCM 1610?

SCCM 1610 is the upgrade to Microsoft’s System Centre Configuration Manager.

What new features are included in SCCM 1610?

SCCM 1610 includes new features and enhancements in Office 365 management, Windows 10, application management, client management, end user experience, and new functionality for customers using Intune with SCCM.

What is Windows 10 Upgrade Analytics integration?

Windows 10 Upgrade Analytics integration allows you to assess and analyze device readiness and compatibility with Windows 10 to allow smoother upgrades.

What is the Office 365 Servicing Dashboard?

The Office 365 Servicing Dashboard is a feature that helps you to deploy Office 365 apps to clients as well as track Office 365 usage and update deployments.

What is the Software Updates Compliance Dashboard?

The Software Updates Compliance Dashboard allows you to view the current compliance status of devices in your organization and quickly analyze the data to see which devices are at risk.

What is the Cloud Management Gateway?

The Cloud Management Gateway provides a simpler way to manage Configuration Manager clients on the Internet. You can use the ConfigMgr console to deploy the service in Microsoft Azure and configure the supported roles to allow cloud management gateway traffic.

What is Client Peer Cache?

Client Peer Cache is a new built-in solution in Configuration Manager that allows clients to share content with other clients directly from their local cache with monitoring and troubleshooting capabilities.

What are the enhancements in Software Center?

The enhancements in Software Center include customizable branding in more dialogs, notifications of new software, improvements to the notification experience for high-impact task sequence deployments, and ability for users to request applications and view request history directly in Software Center.

What are the new remote control features?

The new remote control features include performance optimization for remote control sessions and keyboard translation.

What new features are available if you use SCCM with Microsoft’s Intune?

If you use SCCM with Microsoft’s Intune, you get new configuration item settings and improvements, Lookout integration, Request a sync from the admin console improvement, and support for paid apps in Windows Store for Business.

How do you upgrade to SCCM 1610?

To upgrade to SCCM 1610, you need to follow several steps, including checking to see if SCCM 1610 has downloaded, enabling the Fast Ring, forcing a check for the update, and downloading and installing the SCCM 1610 update.

Upgrade to SCCM 1610

Now to upgrade your SCCM to version 1610, follow the following steps;


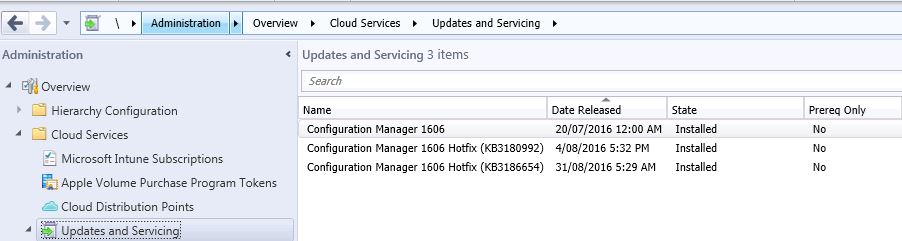
Check to see if SCCM 1610 has downloaded.

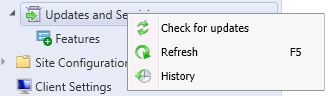
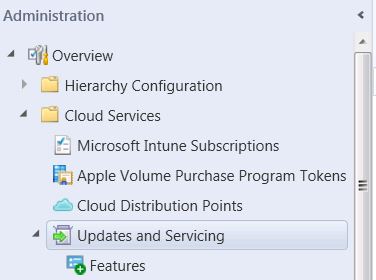
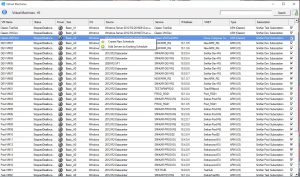
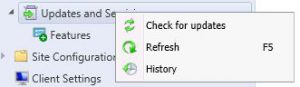
Open your SCCM console, and go to Administration, expand Cloud Services, then Updates and Servicing.

no sccm 1610

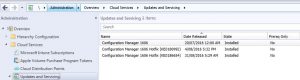
As in the picture above, you can see that the update to SCCM 1610 has not downloaded as yet. You can choose to right click and check for updates, but as Microsoft are slowly rolling out this update over the next few weeks it may not download. If you cannot wait for it to download itself, you can force the update to do so by running the following Powershell script located here https://gallery.technet.microsoft.com/ConfigMgr-1610-Enable-046cc0e9


Download SCCM 1610 Fast Ring

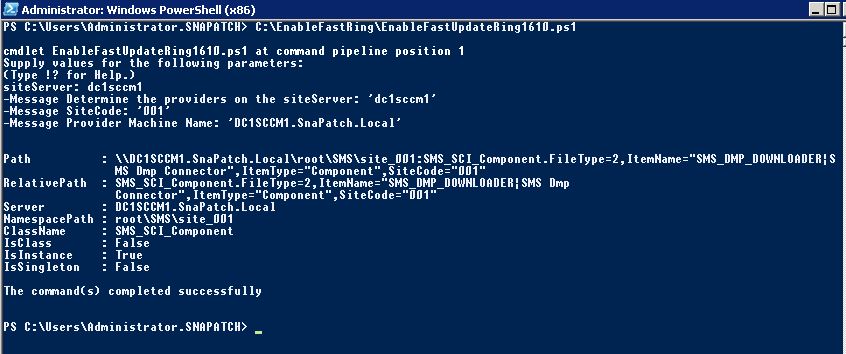
If you have waited quite sometime and SCCM 1610 hasn’t downloaded, then you need to download the EnableFastRing.Exe to do this for you. Once downloaded. launch the file and extract the powershell script and follow these steps.

SCCM 1610 Fast Ring

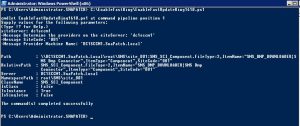
  • Launch an elevated command prompt
  • Run PowerShell
  • Run the EnableFastUpdateRing1610.ps1 script
    • EnableFastUpdateRing1610.ps1 where SiteServer refers to the CAS or standalone primary site server
  • Force a check for the update.
    • If you are upgrading from version 1602 or higher go to Administration, Overview, Cloud Services, Updates and Servicing and click “Check for Updates”.  You may need to try “Check for Updates” more than once if the package is not downloaded on the first try.
    • If you are upgrading from version 1511, restart the SMS_Executive.
  • The new 1610 Update should now be available in the Configuration Manager Console.

Download SCCM 1610 update

Now that Fastring has been enabled, go back to your SCCM console and right click the Updates and Servicing node and click check for updates.

sccm-1606-check-for-updates

Give SCCM sometime to start the download of SCCM 1610. Refresh the console to see the status and then proceed to install when downloaded.

sccm 1610 downloading


 SCCM 1610 Downloaded

Now hopefully your SCCM 1610 update has downloaded and is now available in your console.

sccm 1610 downloaded

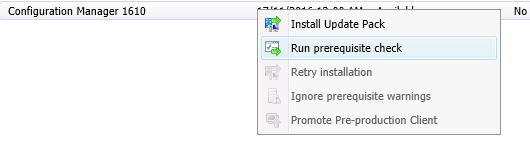
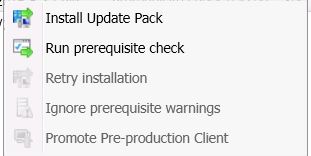
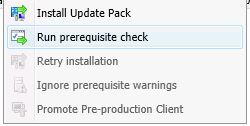
Select the Configuration Manager 1610 update, right click and choose Run prerequisite check.

sccm 1610 prerequisite check

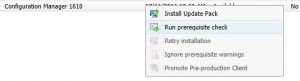
SCCM will now check your environment is ready for the upgrade to SCCM 1610.

sccm 1610 prerequisite checks

Let SCCM complete the check, refresh the console to see when it has completed.

 sccm 1610 prerequisite check complete


SCCM 1610 Update Installation

Now that the prerequisites have been checked and passed, you can now start to install the upgrade to SCCM 1610. Right click the update and choose Install Update Pack.

sccm 1610 install update pack


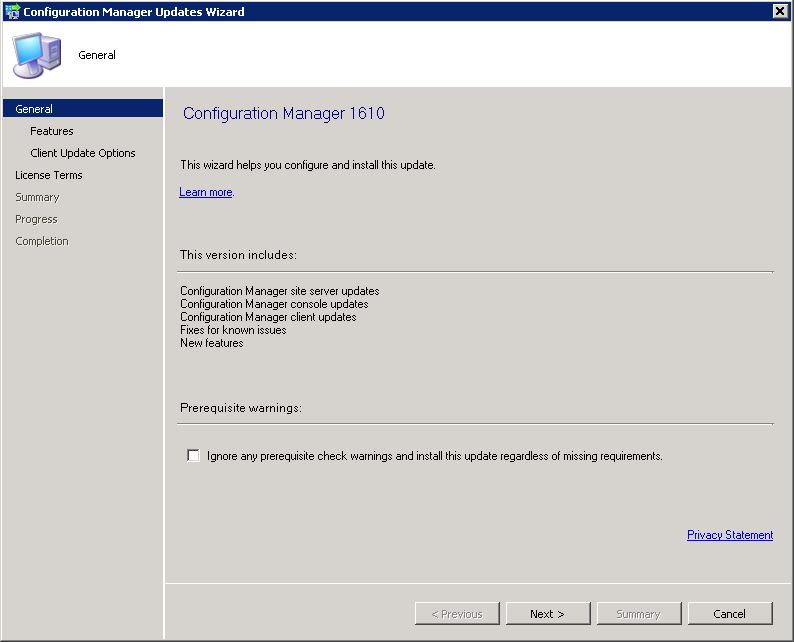
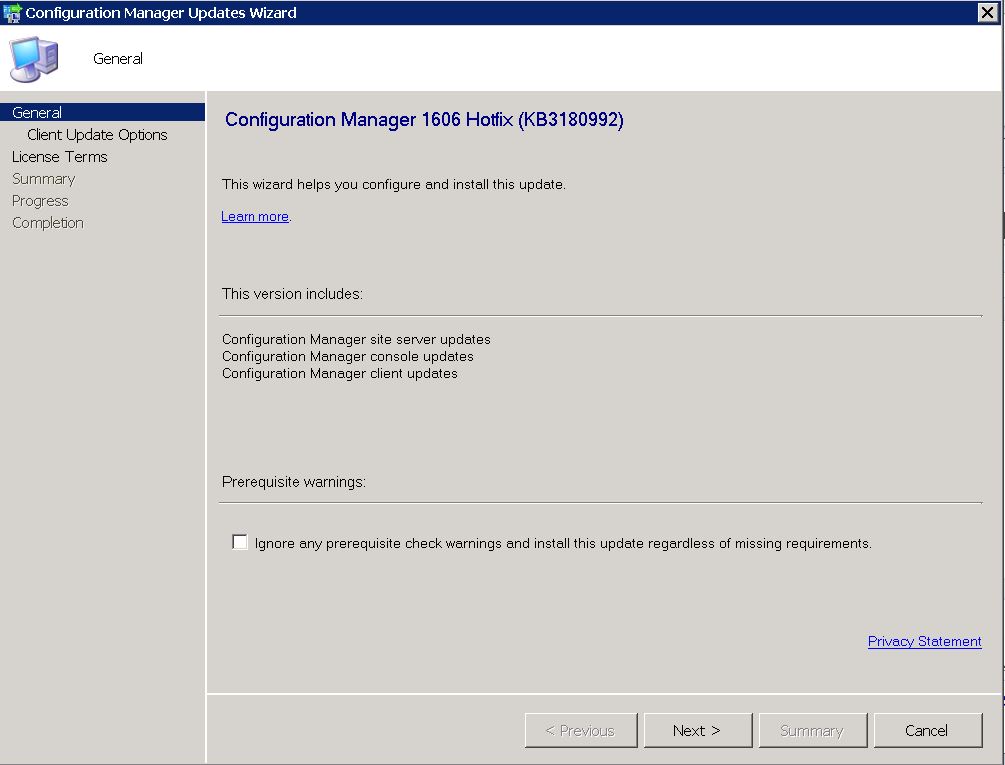
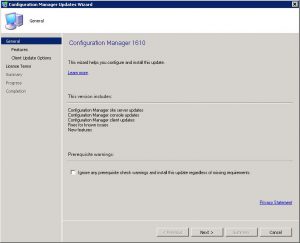
SCCM 1610 Update Installation – General Tab

The General Tab starts off the installation of the SCCM 1610 update. Click Next when you are ready to install.

sccm 1610 update 1


SCCM 1610 Update Installation – Features Tab

On the Features tab, you can select which options you wish to install. Click Next when ready to proceed.

sccm 1610 update 2


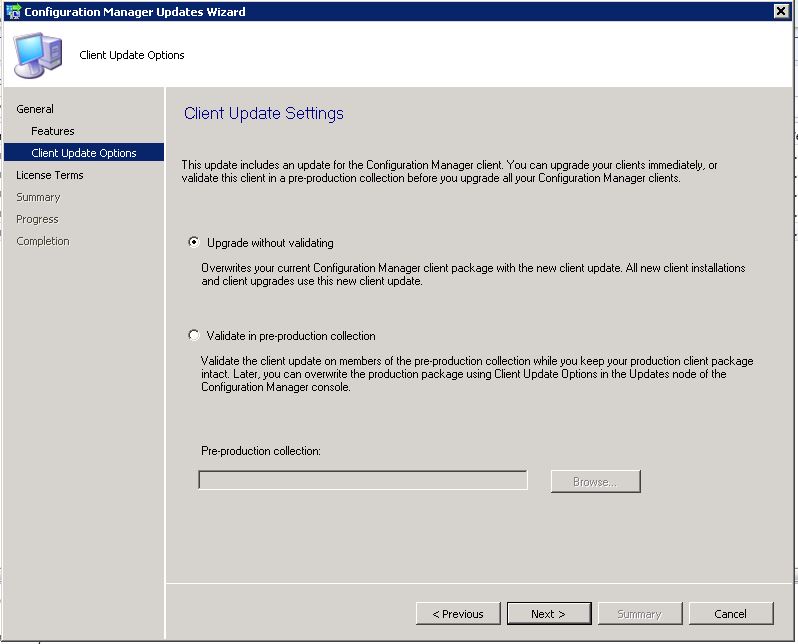
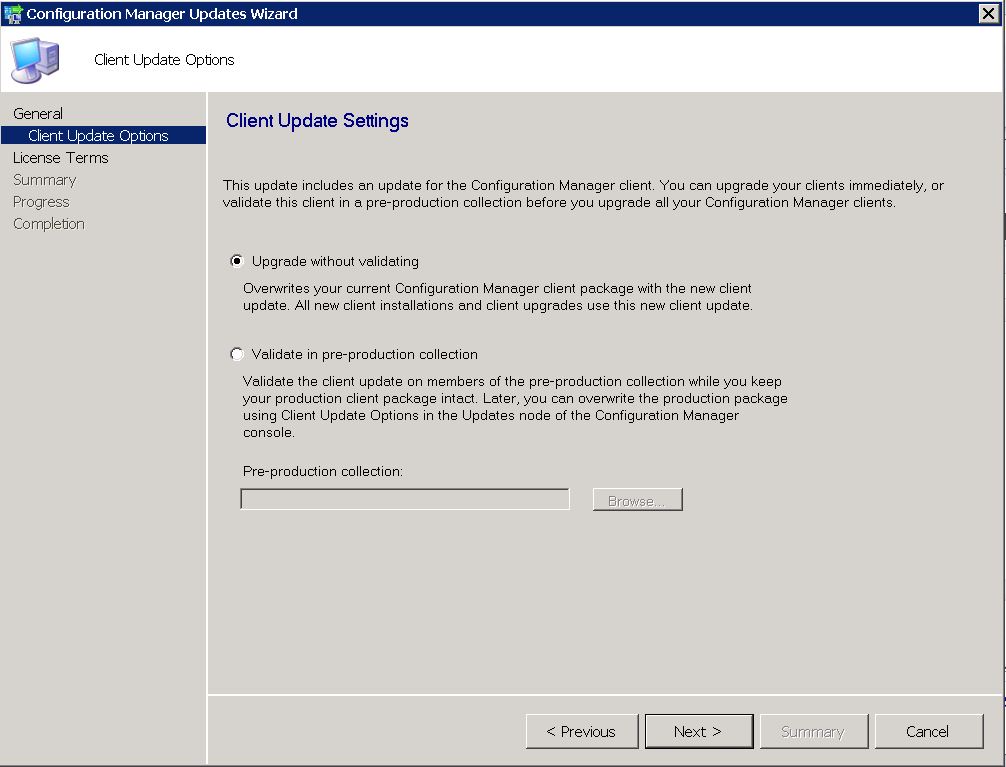
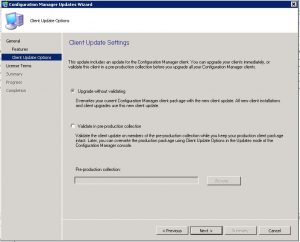
SCCM 1610 Update Installation – Client Update Options Tab

Next is the Client update options Tab, you can choose on this tab to upgrade without validating or validate the upgrade in a pre-production collection. As this is one of our lab environments, I have chosen to upgrade without validating. If this is your production environment, it always pays to be mindful of any upgrades, SCCM included so it may be worth you choosing the other option and validating the upgrade against a test collection.

Choose the option you wish and click Next.

sccm 1610 update 3


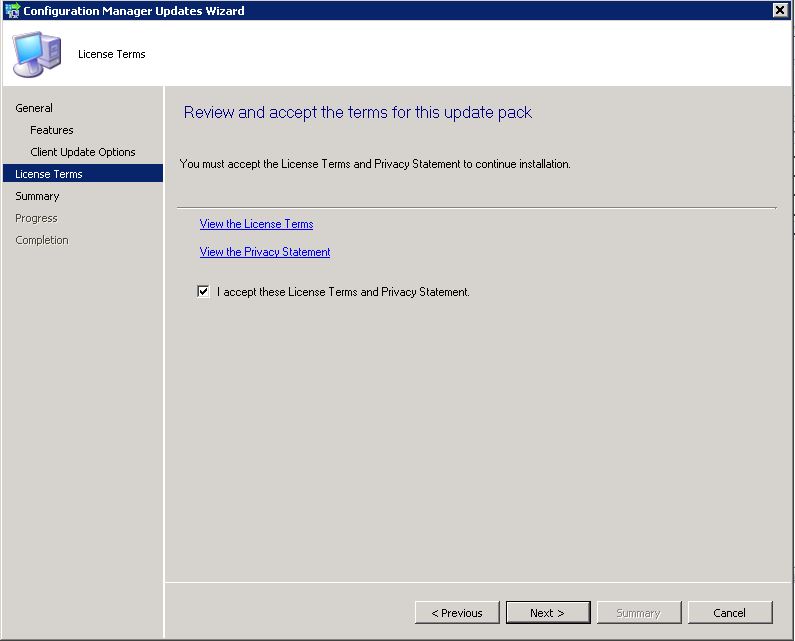
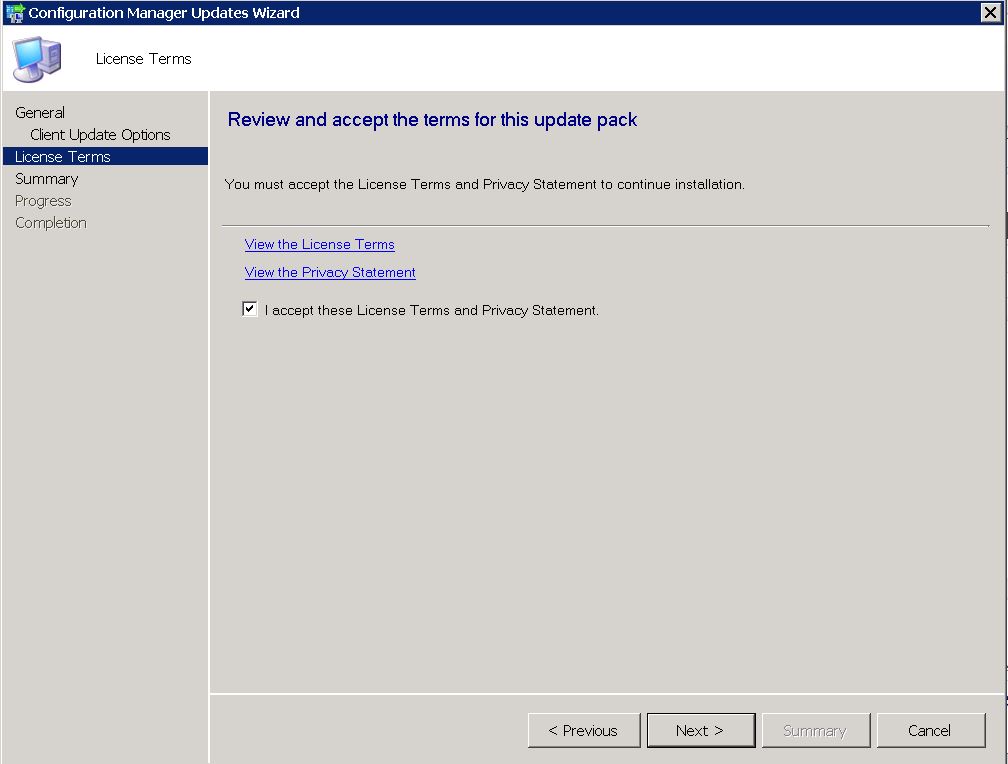
SCCM 1610 Update Installation – Licensing Terms Tab

Accept the license terms and privacy statement and click Next.

sccm 1610 update 4


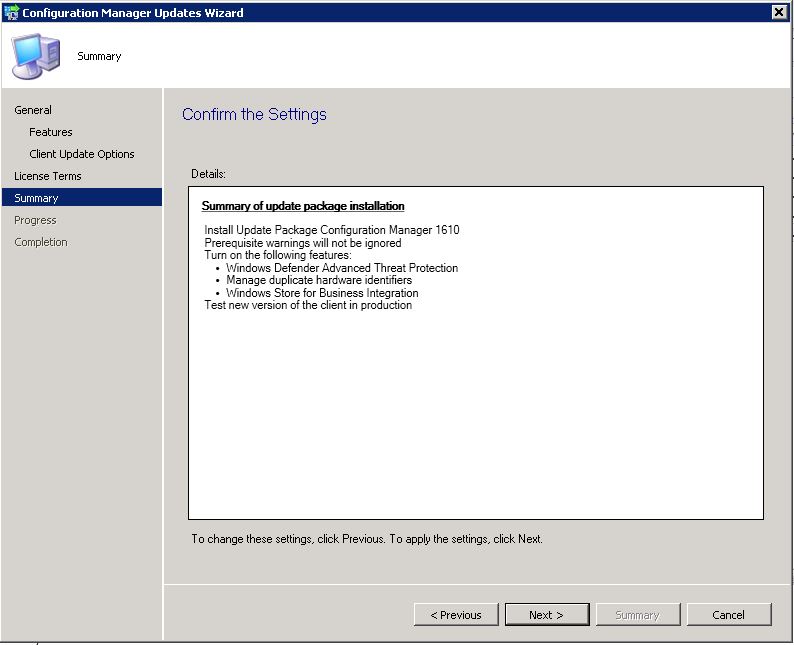
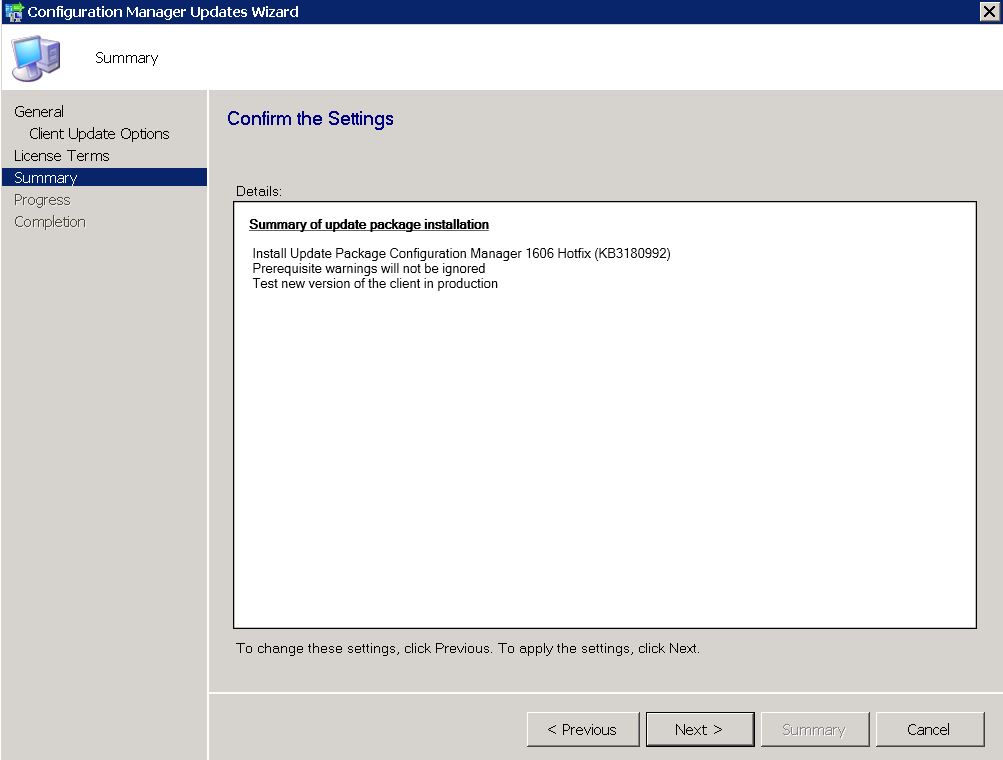
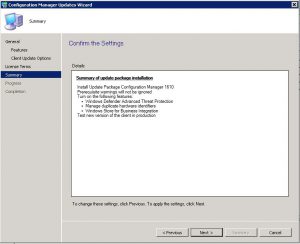
SCCM 1610 Update Installation – Summary Tab

On the Summary Tab, confirm the options you have chosen are correct and then click on Next to continue.

sccm 1610 update 5


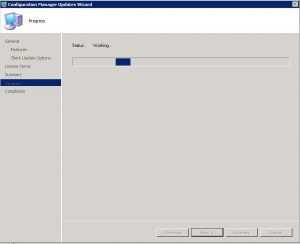
SCCM 1610 Update Installation – Progress Tab

The update to SCCM 1610 will now install.

sccm 1610 update 6


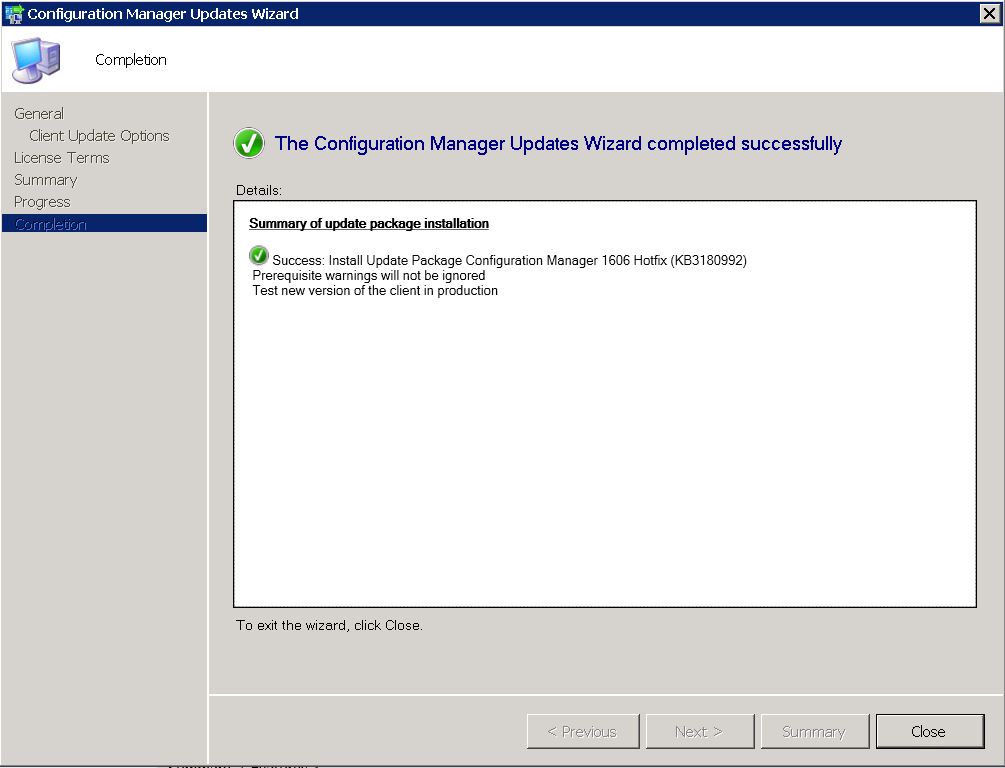
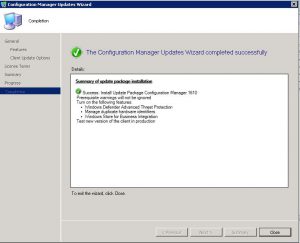
SCCM 1610 Update Installation – Completion Tab

Hopefully all went with your installation of SCCM 1610 and you should see a screen similar to the one below. Click now on Close and SCCM will continue updating in the background.

sccm 1610 update 7


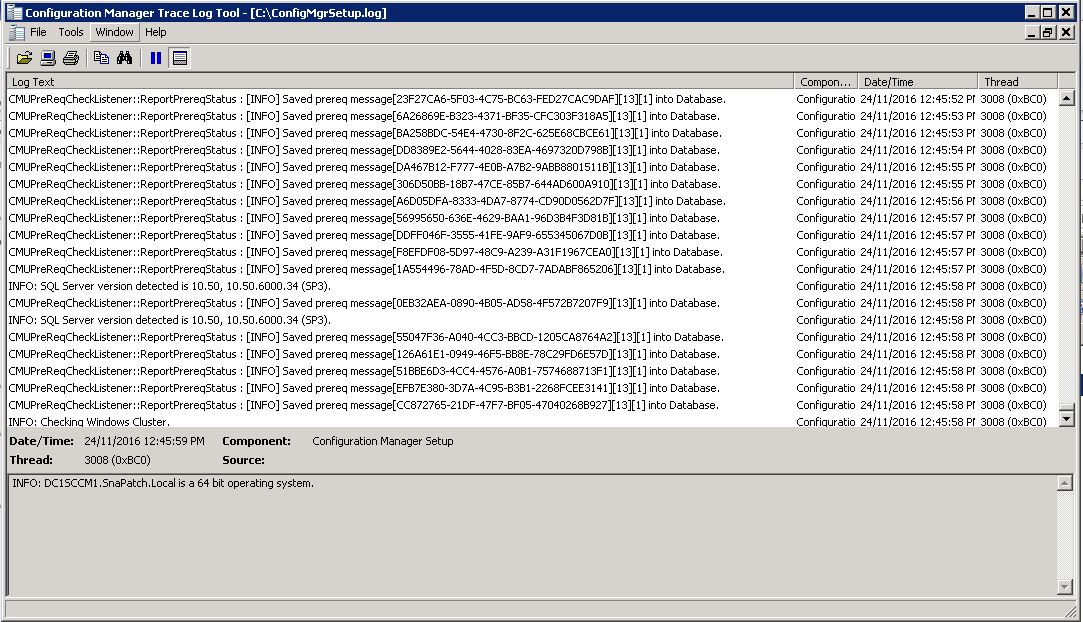
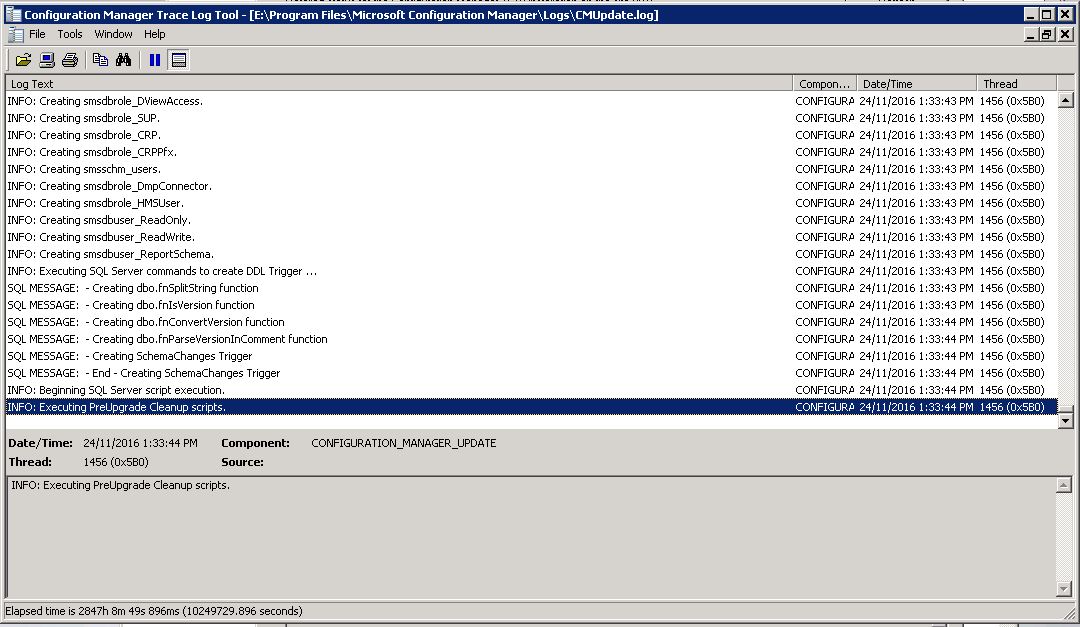
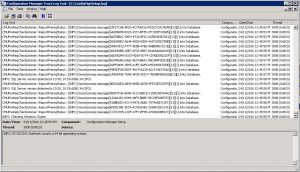
SCCM 1610 Update Installation – Update Log

To view the installation logs, go to your C Drive of your SCCM server and locate the ConfigMgrSetup.log. If you have Trace32 installed, double click the log file to see the installation status.

sccm 1610 update log

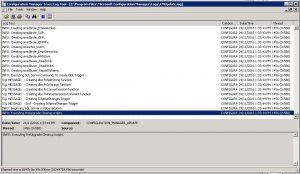
Refreshing the console shows that the SCCM 1610 update is installing. Depending on your infrastructure, this could take some time.

sccm 1610 update 8


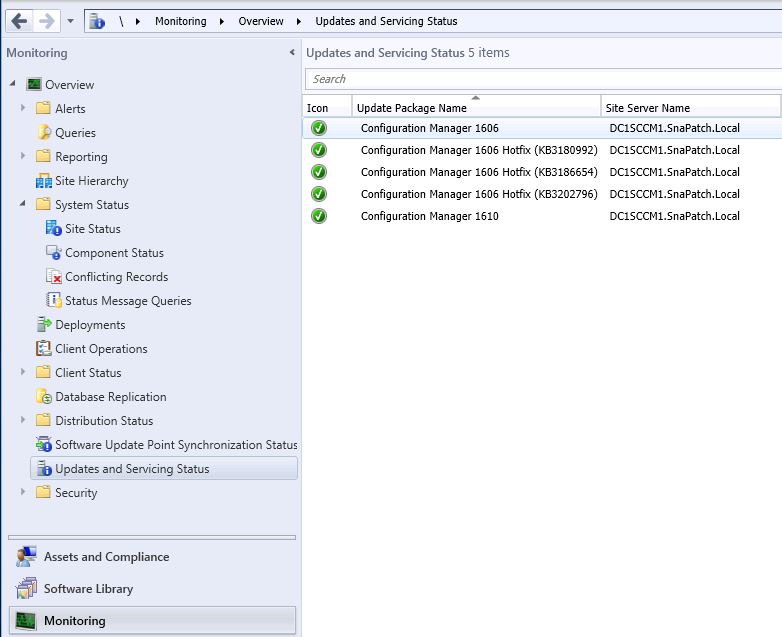
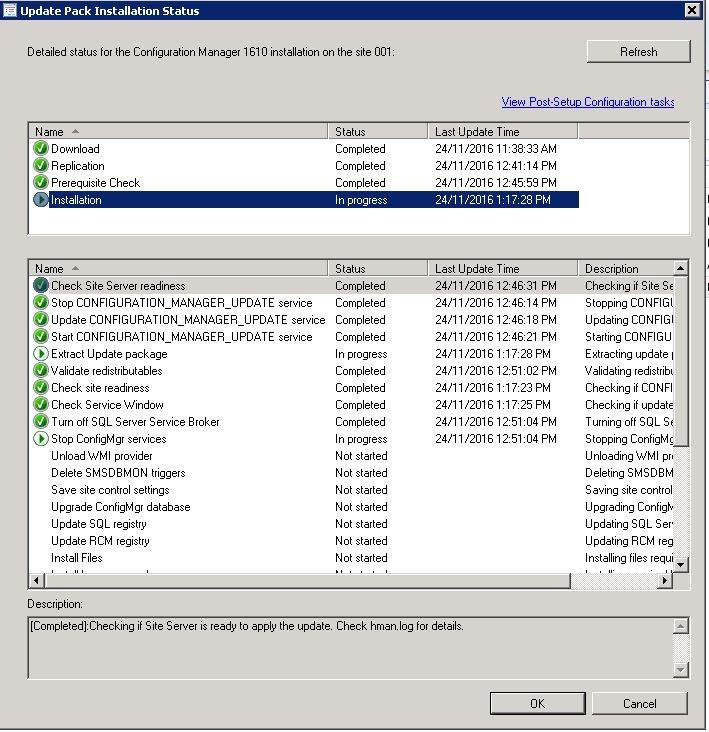
Monitor the SCCM 1610 upgrade – Installation Status

You can additionally monitor the status of the installation of SCCM 1610 in your console. Go to the Monitoring tab, then Updates and Servicing Status where you can see the updates you have applied. Highlight the Configuration Manager 1610 update and right click and chose show status.

sccm 1610 update 9

sccm 1610 update 10

Also, the cmupdate.log contains more details of the installation progress.

sccm 1610 update 11


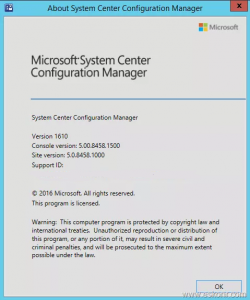
You should see after quite sometime that your SCCM version is now showing as version SCCM 1610

sccm 1610 installed

You can finally go and party like its 1999. Dont forget since you are here, to check out our many software products that help make an Administrators life easy.

sccm 1610 finally upgraded

Configuration Manager 1606 Hotfix KB3180992

Configuration Manager 1606 Hotfix KB3180992

Configuration Manager 1606 Hotfix KB3180992

If you’re using System Center Configuration Manager (SCCM) and haven’t updated to build 5.00.8412.1204 yet, it’s time to do so. Microsoft has released a hotfix KB3180992 to fix various issues with SCCM. In this article, we’ll guide you through the installation process and explain how to fix the known issues that this hotfix addresses.

What’s New in SCCM 1606 Hotfix KB3180992

This hotfix addresses several known issues with SCCM, including:

  • An exception error that occurs when selecting the “Update all clients in the hierarchy using production client” option on the Client Upgrade tab of Hierarchy Settings Properties.
  • Software update installation freezing on SCCM clients.
  • Inaccurate client counts on the Production and Preproduction Client Deployment dashboards.
  • Incorrectly showing a state of Compliant on the Device Compliance section of the Software Center application.
  • Incorrectly showing an error state that indicates the role is not available on the Service Connection Point after upgrading to version 1606.
  • The SMS Agent Host process consuming excessive CPU resources on Pull Distribution Points after updating to version 1606.
  • The ccmexec.exe process stopping responding when distributing a software update package containing many updates to a Pull Distribution Point.

SCCM 1606 Hotfix FAQ

Question Answer

What is System Centre Configuration Manager?

System Centre Configuration Manager (SCCM) is a software management tool that allows administrators to manage large numbers of computers and devices from a single location.

What is Configuration Manager 1606 Hotfix KB3180992?

Configuration Manager 1606 Hotfix KB3180992 is an update for SCCM that fixes various issues identified with SCCM, including a freeze during software update installation and inaccurate client counts.

How do I install Configuration Manager 1606 Hotfix KB3180992?

To install this update, go to Administration, then expand Cloud Services and highlight Updates and Servicing. In the main console window, you should see the SCCM 1606 Hotfix has downloaded and is available for deployment. Highlight the update (KB3180992), right-click, then run the prerequisite pack. This will now check that your SCCM meets the prerequisites for this update. Once the prerequisite check has completed, highlight the update once again, right-click, and choose Install Update Pack.

What should I do if the Service Connection Point incorrectly shows an error state after upgrading to version 1606?

If the Service Connection Point is already showing an error state after upgrading to version 1606, you need to change the Availability State registry value from 1 to 4 under HKEY_LOCAL_MACHINE-SOFTWARE-Microsoft-SMS-Operations Management-SMS Server Role-SMS Dmp Connector, then restart the SMS Executive service on the site server.

How do I validate the client update on my preproduction SCCM members?

On the Client Update Options Tab of the Configuration Manager Updates Wizard, you have the chance to validate the client update on your preproduction SCCM members. Simply select the checkbox next to “Validate in pre-production collection” and choose the pre-production collection to use for validation.

How long does it take to install SCCM 1606 Update 1?

Installation of SCCM 1606 Update 1 may take some time, as it installs in the background. Keep refreshing the window to see when KB3180992 shows a status of installed.

How to upgrade SCCM


To install this update, go to Administration, then expand Cloud Services and highlight Updates and Servicing.

SCCM 1606 Update 1


In the main console Window, you should now see the SCCM 1606 Hotfix has downloaded and is available for deployment.

SCCM 1606 Update 1 - 2


Highlight the update (KB3180992), Right Click then Run Prerequisite Pack. This will now check that your SCCM meets the prerequisites for this update.

SCCM 1606 Update 1 - 3

This may take some time, so be patient and be sure to refresh the console to make sure the prerequisite check has been successful.

SCCM 1606 Update 1 - 4


Now that the prerequisite check has completed, highlight the update once again, right click and choose Install Update Pack

SCCM 1606 Update 1 - 5


Next you are presented with the Configuration Manager Updates Wizard. Click on Next to start the installation.

SCCM 1606 Update 1 - 6


On the Client Update Options Tab, you have the chance to validate the client update on your preproduction SCCM members. In this example, I am upgrading without validation.

SCCM 1606 Update 1 - 7

Click Next to continue.


Accept the License Terms and click Next.

SCCM 1606 Update 1 - 8


Review you are happy with the options you have selected on the Summary Tab, then click Next.

SCCM 1606 Update 1 - 9


Installation of the SCCM 1606 Update 1 will now occur. If all goes well, you should see the Completion Window as below. SCCM will install this in the background, so it may take some time. Keep refreshing the Window, to see when KB3180992 shows a status of installed.

SCCM 1606 Update 1 - 10

Azure Tools

Azure Tools

Azure tools

Azure Cloud

Cloud Computing

As cloud computing continues to transform the IT landscape, businesses are turning to cloud providers to meet their infrastructure and service needs. Microsoft’s Azure is one of the top cloud providers on the market, offering an array of cloud services and solutions for businesses of all sizes. In this article, we’ll explore the suite of Azure tools and how they can help you optimize your cloud infrastructure.

Azure Cloud Computing: The Game Changer

Cloud computing has revolutionized the way businesses approach IT. With Azure, you have access to a range of cloud-based services, including Platform as a Service (PAAS), Software as a Service (SAAS), Disaster Recovery as a Service (DRAAS), and Infrastructure as a Service (IAAS). With these tools, you can create, manage, and deploy your applications and services with ease, allowing you to scale your business and increase your bottom line.

Azure Management Tools

SmiKar Software has developed a suite of Azure management tools that allow you to recover costs and time. Here are some of the key tools you should know about:

Azure Virtual Machine Scheduler – AVMS

If you’re using virtual machines within Azure, you know that they’re billed every minute they’re running. If you don’t shut them down and deallocate them properly, you’ll end up incurring unnecessary costs. The Azure Virtual Machine Scheduler (AVMS) is a tool that automates and schedules the shutdown, deallocation, and powering up of your virtual machines. This can save you significant time and money. Imagine having your development and test servers shut down and deallocate every night at 7 pm, then power back up at 7 am, ready for your developers and application owners to use. By doing this alone, you can save thousands of dollars a year. Try the Azure Virtual Machine Scheduler now for free with a 30-day trial key.

Azure Virtual Machine Cloner – AVMC

Whether you need to migrate your VMs within Azure from Azure Service Manager to Azure Resource Manager, or simply want to clone one of your VMs quickly and easily, the Azure VM Cloner (AVMC) is the tool for you. With AVMC, you can create a clone of your VM (like a snapshot) while you patch or upgrade components of your server, avoiding the risk of upgrades. Try the Azure Virtual Machine Cloner now for free with a trial key.

Azure Virtual Machine Deployer – AVMD

Deploying virtual machines to Microsoft Azure cloud can be challenging and may require you to learn PowerShell. However, SmiKar Software has developed a completely free tool to help make the process easier: the Azure Virtual Machine Deployer. With this tool, you can deploy virtual machines to Azure cloud without needing to learn PowerShell. Download the Azure Virtual Machine Deployer for free today.

Final Thoughts

By leveraging the power of Azure’s cloud services and SmiKar Software’s management tools, you can optimize your cloud infrastructure, save time, and reduce costs. Whether you need to automate the shutdown and deallocation of virtual machines or deploy virtual machines without learning PowerShell, Azure and SmiKar Software have you covered. Download and try these tools for yourself to see how they can benefit your business.

Automate Azure Shutdown

Automate Azure Shutdown

Automate the Shutdown and Startup of your Azure VMs

If you’re using Microsoft Azure, you know that time is money when it comes to running virtual machines. Fortunately, you can automate the shutdown and startup of your Azure VMs to save both. In this article, we’ll explore the benefits of automating your virtual machine schedules and provide a step-by-step guide to getting started..

Azure Overview

As one of the leading providers of IAAS, SAAS, PAAS, and DRAAS, Microsoft’s Azure cloud is flexible and supports a huge selection of operating systems and programming languages. You can run Windows or Linux servers, as well as Windows and Linux containers with Docker integration. Azure also allows you to build applications on a solid, highly scalable infrastructure built by Microsoft.

Benefits of Microsoft Azure Cloud Offering

Some of the benefits of Microsoft’s Azure cloud offering include:

  • No upfront costs
  • No termination fees
  • Pay only for what you use
  • Per minute billing
  • Quick to build, deploy, and scale (up or down)

Automating Azure VM Shutdown and Startup

To save time and money, especially with virtual machines that aren’t required to operate outside regular business hours (for example, development and test VMs), having the ability to automate a scheduled shutdown and power back on of your virtual machines is crucial. Here’s how to get started:

Download and Install Azure Virtual Machine Scheduler (AVMS)

First, download and install the Azure Virtual Machine Scheduler (AVMS) that we’ve developed. You can run this application within your on-premise network as long as it has internet access, or alternatively, as a Virtual Machine running within Azure itself. However, if you’re running it in Azure, be mindful not to select this machine to be one of those you choose to power down.

Configure Azure Virtual Machine Scheduler (AVMS)

Once installed, configure the Azure Virtual Machine Scheduler by following the instructions provided in the link.

Automate Azure VM Shutdown and Startup

Now that you’ve installed and configured the Azure Virtual Machine Scheduler, it’s time to automate the shutdown and startup of your VMs. Follow the link to see how to automate Azure shutdown and power on of your virtual machines.

Automating the shutdown and startup of your Azure VMs is a simple but effective way to save time and money. With Microsoft’s Azure cloud, you have the flexibility and scalability to meet all your business needs. Follow the step-by-step guide we’ve provided to start automating your virtual machine schedules today.

How to Automate a scheduled power down and on of Azure VMs

How to Automate a scheduled power down and on of Azure VMs

How to Automate a scheduled power down and on of Azure VMs

Automate the Shutdown

If you need to create an automated process that shuts down or powers on your Azure VMs to save you from paying fees to Microsoft for services while they are not being utilised, you can do this with the Azure Virtual Machine Scheduler tool that we have created. AVMS as it is known can automate a schedules that you specify to do all this for you and to send you email alerts during the process. You could use AVMS for your Development and Test systems housed within Azure, saving you money while they are not being used.

It is quite a simple process to create a new schedule. Open up the Azure Virtual Machine Scheduling tool and first let it sync with your Microsoft Azure Subscriptions so that it can populate all your VMs.

Start your Azure VM Automation Schedule

Click the Virtual Machines Icon to show your Azure virtual machines.

Schedule Azure VM shutdown

List all your Azure VMs

The Azure VM Scheduler / Orchestrator will scan your total Azure Environment and list all your Azure VMs.

Shutdown Azure VM

Select your Azure VMs

Select the Azure VMs you want to either power down or power on and make sure that you tick the according checkbox for each machine. Once you have selected all the machines you wish, right click in the console as below and choose create new schedule.

Azure Create new schedule

Azure VM Schedule Details

Next, give the schedule a name, use the drop down box to choose whether to automate a power on or shutdown schedule for your Azure Virtual Machines and then a description if you wish to do so. Click OK  to continue. In the example below, we can see we are creating a Power on Schedule. Keep in mind, if you wish to power machines on and then off, you will need to go through these steps twice, choosing the appropriate Job type.

Azure VM Schedule Creation

Schedule the Power on of your Azure VMs

Click NEW to create a new schedule

AVMS Power On Schedule execute

Choose your Azure VM Power On date and time

Now choose a date and time you wish your Azure virtual machines to Power On. Click OK when ready.

Azure VM Power On Schedule

Confirm the Azure VM Power On schedule

Confirm the Date and Time are what you created and then click OK.

Azure VM Power On Schedule Complete

Thats all there is to it. You have now automated a scheduled power down or power on of your virtual machines within Azure.

The Azure Virtual Machine Scheduling tool will now start up your virtual machines with Microsoft’s Azure cloud at the time you specified. If you have setup email alerts, you will be notified when the job starts and completes.

Azure VM Shutdown Schedule

If you now need to complete a Power Off schedule, go through these same steps again, but choose Shutdown Virtual Machines (Deallocate) as show in the window below.

Azure VMS Power On Schedule 6

Click this link to learn more about the Azure Virtual Machine Scheduler. Feel free to Download a fully functioning 30 day trial and test it for yourself.

Also, see the other products that SmiKar Software have developed. From SnaPatch our patch management addon for SCCM, SnapShot Master that automates your Vmware or Hyper-V snapshots and even AVMD our free tool that helps deploy Virtual Machines to Microsoft’s Azure cloud.

The Azure Virtual Machine Scheduler tool is an excellent way to automate the power down and on of your Azure VMs, saving you money while they are not being used. It is a straightforward process that can be completed within a matter of minutes. Try it out for yourself and see how it can benefit you. For more information on the Azure Virtual Machine Scheduler and other tools developed by SmiKar Software, click the link provided in this article.