How Cloud Technology Can Help Your Business

How Cloud Technology Can Help Your Business

How Cloud Technology Can Help Your Business

Between 2019 and 2020, more Australian businesses have turned to cloud computing technologies. A recent survey from the Australian Bureau of Statistics found that businesses using paid cloud computing — IT services used over the internet to access software, computing power, and storage capacity — jumped to 55% from 42% in 2017 to 2018.

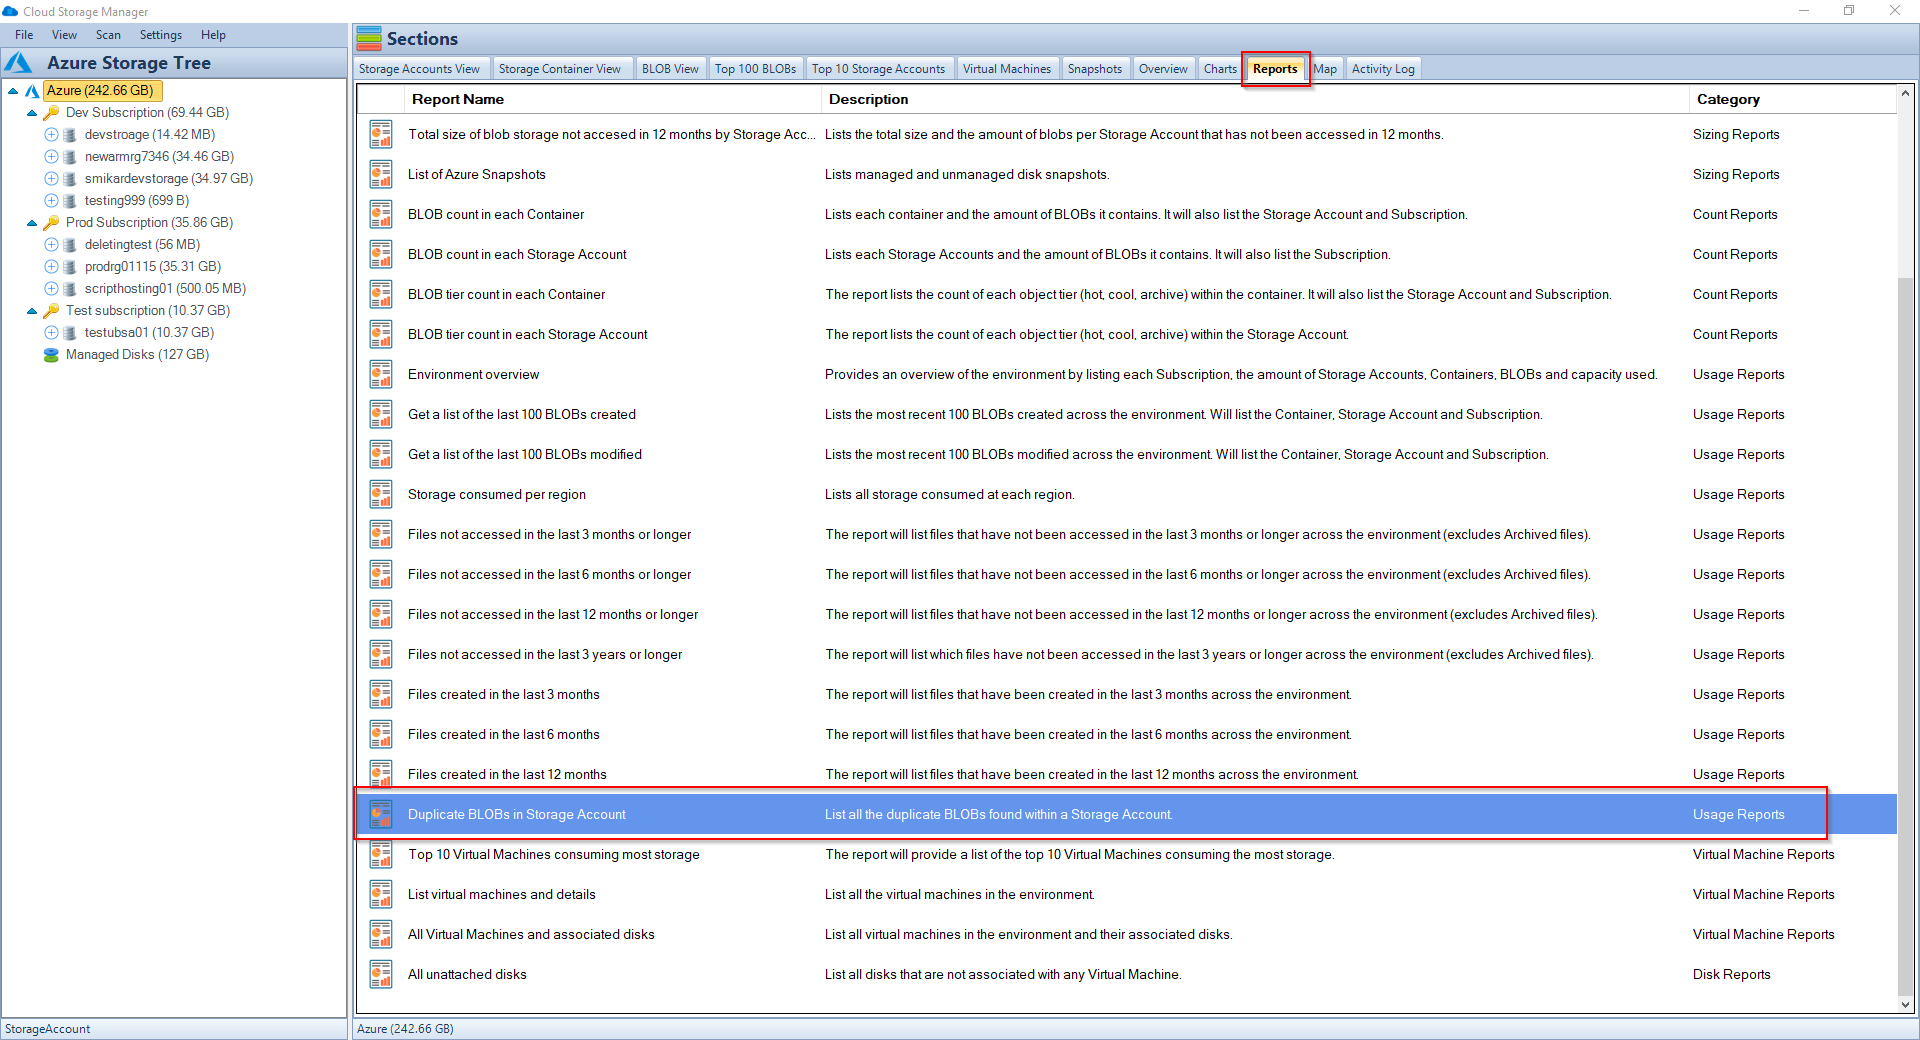
Indeed, cloud hosting technology is more popular now than ever before. It’s incredibly useful for storing and organising hundreds of TB and PB in unstructured data, as mentioned in a blog post on Microsoft Azure BLOBs. Beyond storage capabilities, cloud technology can help you run your business through:

Remote file sharing and collaboration

Since the coronavirus pandemic started, collaborative tools on the cloud have helped businesses move forward, even as most employees have been working remotely. Instead of storing information, files, and apps on a work computer or an office server, cloud technology enables you to store data over the internet. With the proper access credentials, a compatible device, and an internet connection, all the information you need to work on is available from anywhere in the world.

Cloud-based services also enable you to share and work on files together with your colleagues; Microsoft Azure Boards is especially useful, as it connects your Microsoft Teams account so you can smoothly plan, track, and discuss work across your teams on customisable Kanban boards and team dashboards.

Improved website ranking

These days, it’s impossible to gain a wider audience online if your business doesn’t rank well on search engines. In a competitive environment, a high ranking on search engines gives you increased visibility and a better reputation. Cloud hosting can improve search engine optimization (SEO) efforts to boost the rankings of business websites online. Leading global SEO agency Ayima highlights that rankings and digital performance are determined by factors such as performance SEO, analytics, and user experience.

These factors can aid in driving organic traffic to your website and increase your presence on Google. For one, cloud technology vastly boosts the user experience by allowing pages to load faster and more smoothly; faster loading times keep users satisfied as they interact with your site, leading to lower bounce rates. Robust cloud hosting programs also offer strong security against bots and malware, which protects your content and provides visitors an optimal experience.

Enhanced security

Cloud technology offers better levels of security, especially if you compare it to physical data storage. You can automate settings to constantly back up your data so you won’t have to worry about losing it to data theft, viruses, natural disasters, or malicious actors. By default, Azure Storage services are equipped with Storage-side Encryption, where data is encrypted by Microsoft-managed keys before getting stored.

Whether it’s an on-site system failure, fire, or flood, cloud technology also allows users to retrieve the latest version of data from a safe, online location. Some providers even have geo-redundant back-ups, where data is saved across multiple locations, and in case something happens, everything will continue running on your end.

Cost-efficient scaling

Buying or building a bespoke server involves a great deal of time, expertise, money, and maintenance, so it may not be the most ideal choice if you’re trying to scale up and expand your business. On the other hand, cloud computing allows you to expand at will for a predictable, monthly expense.

Cloud technologies are elastic and flexible, so they can handle busy periods or react accordingly when things slow down — preventing you from overspending. Recently, hybrid cloud infrastructure solution Microsoft Azure Stack HCI was integrated into Hewlett Packard’s HPE GreenLake platform for additional control over both on-premise workloads and cloud environments, enabling businesses to determine what setup works best for their needs.

For the latest on Microsoft Azure and cloud computing, be sure to follow the SmiKar Software blog.

This article was specially written for www.smikar.com as a guest post by Aileen Conner

How to search for an Azure Blob

How to search for an Azure Blob

How do you search for an Azure Blob, Storage Account or even a Container?

While Azure provides massive storage capabilities, often users and IT Departments alike use Azure Storage for dumping large amounts of files to remove reliance on on-premise storage devices. This has massive benefits to the business by providing agile deployments in line with business data storage needs,  by not having to wait for disk expansions or procurement of additional local storage.

What happens though is that the amount of storage you have within Azure never really is managed properly, and should you need to search for a particular file (Azure Blob) or folder (Azure Blob Storage Container) you may not even know which storage account it resides in.

In this blog post I will show you how to search through all your Azure Subscriptions, Storage Accounts to find a particular Azure Blob.

Why Use Cloud Storage Manager for Azure Blob Search?

Using Cloud Storage Manager makes searching for an Azure Blob easy and efficient. You can search through all your Azure Subscriptions and Storage Accounts to find a particular Azure Blob. Additionally, Cloud Storage Manager offers a variety of search criteria to help you find exactly what you’re looking for.

Find an Azure Blob

Search all your Azure Subscriptions.

To search all your Azure Storage Accounts and find an Azure Blob, simply open up Cloud Storage Manager, then go to the FILE and then SEARCH.


Azure Blob Search

Choose your Azure Storage Search criteria.

Now the Search window will open up in Cloud Storage Manager.

Choose the category of the item you want searched for, either an Azure Storage Account, Container, or a Blob can be searched.

Type in the name of what you want to search for in the SEARCH box and then finally choose if you want an Exact Match, Starts with, Ends with or Contains, then press Search.

Cloud Storage Manager will then query all your Azure Storage Accounts looking for the item you want found.


Azure Blob Search Window

Search for an Azure Blob / Container or Storage Account

In this example I am going to search for a Blob that contains the following characters, 23748029402. (Alphanumeric, Numeric or a combination of these can be searched)


Azure Blob File Search

Azure Blob Search Results

Cloud Storage Manager has queried through its own internal database to find the Blobs that contain the text I typed in the search box. 

We can see here that there are two Azure Blobs that we searched for that contain that text.

You also have the option to export the search results directly to CSV.


Azure Blob Search Options

Now that Cloud Storage Manager has returned the search results, you can see the locations where that Blob resides. 

Simply highlight the Blob you searched for and you have the option to either Jump to the Storage Account, the Container or directly to the Blob itself.


Azure Blob Jump to

Azure Blob Search Details

As I had chosen the option to Jump directly to the Azure Blob, you can see that the Blob highlighted does in fact contain the text I searched for.

If you right click the blob you searched for, these are some of the options you can perform;

  • Change Tier of the Azure Blob
  • Delete selected Blobs
  • Jump back to the Storage Account or Container
  • View the Blob Properties
  • Download the Azure Blob to your computer

Thats all there is to it, quickly and easily Search for an Azure Blob through your complete Tenancy, Subscription, Storage Account or just a lone Azure Storage Container with Cloud Storage Manager.


Azure Blob search can be a daunting task if you don’t know where to look. By using Cloud Storage Manager, you can quickly and easily search for an Azure Blob through your complete Tenancy, Subscription, Storage Account, or just a lone Azure Storage Container. With its variety of search criteria and easy-to-use interface, Cloud Storage Manager is a must-have tool for anyone who wants to efficiently manage their Azure Blob storage. Download a FREE TRIAL of Cloud Storage Manager today and start organizing your Azure Blob storage more effectively.

Cloud Storage Manager

Gain insights into your Azure Storage with our FREE to use Tool.
FREE DOWNLOAD

Send download link to:

I confirm that I have read and agree to the End User License Agreement.

Download a FREE TRIAL of Cloud Storage Manager today.

How to find duplicate BLOBs in your Azure Storage Accounts

How to find duplicate BLOBs in your Azure Storage Accounts

Reduce your Azure Storage Costs

Azure Storage is like an all you can eat buffet, except the more you eat, the more you pay! This has provided organisations an almost limitless supply of storage, and as we all know, the more that’s available, the more we’ll use.

Azure Storage has changed the way many organisations operate both in terms of availability and service. No longer do organisations have to concern themselves with capacity planning or worry about the SAN running out of disk space, or even how to make that storage available in terms of disaster and across regions. Azure Storage has effectively resolved many of the issues traditional on-premises storage services faced.

However, because of this unlimited supply of storage in Azure, storage growth, cost and duplication has exploded. Managing and controlling the data across all the Storage Accounts has become increasingly difficult as users keep piling on more and more data.

OK, so how can we gain some control back, by finding and reducing the number of duplicate BLOBs and therefore reduce cost?

We have been asked that exact same question by many of our customers, and the short answer was, you couldn’t. There is no way in Azure to find out which BLOBs are duplicates, how many of them are duplicate BLOBs, which Azure Storage Account and container do they reside in, or how much data duplicate BLOBs in Azure Storage are consuming…until now.

Cloud Storage Manager to the rescue.

Cloud Storage Manager allows you to scan your entire Azure environment in order to review and manage your Azure Storage consumption.

Cloud Storage Manager has so many features in helping you control and manage your Azure Storage, but I won’t go into them here as the list is too long – however, click here to get more information and even download a free trial for yourself.

One of the many features of Cloud Storage Manager is the reporting option, which offers a number of reports you could run to get a better understanding of your Azure Storage and overall environment.

How many Duplicate Blobs are in your Azure Storage

However, the one we will be looking at today, is the “Duplicate BLOBs in Storage Account” report.

Once you’ve installed Cloud Storage Manager and allowed it to scan your environment, click on the
Reports” tab.

Scroll down and find the “Duplicate BLOBs in Storage Account” report.


Azure Blob Duplicates Report

Duplicate Blob Report

Right click on the report and select to “Run Report”.

The result will be displayed showing you all the duplicate BLOBs in your Azure Storage Accounts, along with information such has which Subscription, Storage Account, Container, tier, filename, type, size, created date and modified date.

From here you can now open the report in Excel, and work out which duplicate blobs you need to keep, or perhaps even delete to reduce your Azure Storage and costs.


Find Azure Blob Duplicates

Duplicate Blob Analysis

You also have the option to export the report to a CSV file for further assessment.

If you want to get a better handle of your Azure Storage consumption and reduce your overall cost, give Cloud Storage Manager a try. 

Download a FREE TRIAL of Cloud Storage Manager today.

What are the consuquences of having Duplicate Blobs?

Duplicate BLOBs in Azure Storage can be a result of a lack of proper management and control of data in the storage accounts. Azure Storage has become increasingly popular due to its unlimited supply of storage, which has led to an explosion of storage growth, cost, and duplication. This can be due to various reasons such as multiple copies of data being created, incorrect data management procedures, or even data being inadvertently duplicated.

The consequences of having duplicate BLOBs in Azure Storage can lead to increased storage costs, difficulty in managing and controlling data across all the storage accounts, and loss of visibility into the actual data usage. This can also result in data redundancy, which can negatively impact the performance and reliability of the storage environment. In addition, it can also lead to data versioning issues and make it difficult to determine which version of the data is the most recent and accurate.

Therefore, it is important to implement proper data management procedures and use tools such as Cloud Storage Manager to scan and manage your Azure Storage environment to help reduce the number of duplicate BLOBs, thus reducing costs and increasing overall control of the data.

How to get the size of all your Azure Storage Accounts

How to get the size of all your Azure Storage Accounts

Are you using Azure Blob Storage for storing your data? Do you want to keep track of how much Azure Storage you are consuming, the number of Blobs per storage account, the number of containers, and the Azure Blob Storage capacity used? 

If so, you need a reliable tool to monitor and control your Azure Blob Storage usage. In this article, we will show you how to use both the Azure Portal and  Cloud Storage Manager to gather insights into your Azure Storage consumption.

Before we dive into how to use Cloud Storage Manager, let’s briefly discuss Azure Blob Storage. It is an online cloud service that provides fast access to large amounts of data at a low cost. However, it’s crucial to monitor and control your Azure Blob Storage usage to optimize costs.

Investigate Your Azure Storage Accounts

Before we dive into how to use Cloud Storage Manager, let’s briefly discuss Azure Blob Storage. It is an online cloud service that provides fast access to large amounts of data at a low cost.

If you are using Azure Blob Storage for storing your data, you need a reliable tool to monitor and control your Azure Blob Storage usage. With Cloud Storage Manager, you can gather insights into your Azure Storage consumption.

What are the benefits?

Benefit Description
Cost Optimization
Understanding your Azure Blob storage usage is crucial for cost optimization, as it helps you monitor and control your usage. By keeping track of the number of Blobs, Containers, and the Azure Blob Storage capacity used, you can ensure that you are not overpaying for storage that you are not using.
Performance Optimization
Monitoring your Azure Blob storage usage can help you optimize the performance of your applications. By analyzing the data usage patterns, you can make informed decisions about how to optimize your storage for faster access times and better performance.
Improved Security
By monitoring your Azure Blob storage usage, you can identify any potential security threats or breaches. You can set up alerts to notify you when unusual activity is detected, enabling you to take action to prevent or mitigate any damage.
Compliance
Monitoring your Azure Blob storage usage can help you ensure that you are meeting any regulatory or compliance requirements. By keeping track of your usage, you can demonstrate compliance and avoid potential penalties or legal issues.
Resource Planning
Understanding your Azure Blob storage usage can help you plan for future resource needs. By analyzing your usage patterns, you can make informed decisions about how much storage you will need in the future and plan accordingly.

So how do I gather all this information about my Azure Storage?

Scan all your Azure Storage Accounts

Hopefully you have installed and run a full environment scan of all your Azure Subscriptions with Cloud Storage Manager

(If you havent, download and test it for yourself with a free trial)

Once you have run an environment scan, go to the Reports Tab in Cloud Storage Manager.


Azure Storage Reports Tab

Azure Storage Usage Reports

Now that you are in the Reports Tab, you can see all the various reports you can run to gather information and insights in to your Azure Storage Consumption

For this Blog post, we are focusing on the size of all of your Azure Subscriptions, Storage Accounts, the number of containers, Blobs and their capacity


Azure Storage Reports

Azure Storage Consumption Reports

The fastest way to get an Overview of your Azure Storage Consumption is to run the Environment Overview report.

Simply highlight the report, then right click and choose Run Report


Azure Storage Usage Overview

When you run the Azure Reports, you are presented with a screen showing the details about your Azure Storage.

As can bee seen in the adjacent screenshot, this report provides you with high level details about your Azure Storage Usage by Subscription, including the number of Containers, the number of Blobs and finally the Azure Storage Capacity used in each subscription. 

You can export this information to CSV if you wish and perform further analysis in Excel.


Azure Storage Environment Report

Now what if you require further analysis of your Azure Blob Storage consumption?

Azure Storage Analysis

Now that you have a good overview of the amount of Azure Storage you are consuming, another good report to run for further insights is Storage Consumed per Region.

This report will show you the total amount of storage consumed per Azure Region.

Highlight that report in Cloud Storage Manager and choose Run  Report.


Azure Storage consumed per region

Azure Storage Regions

As you can see in the screen shown, here is a list of each Azure Regions and the amount of Azure Blob Storage you are consuming there. 

As usual, you can export this to Excel for further analysis.


Azure Blob Storage consumed per region

Unattached Azure Virtual Machines disks.​

Another great report to run is All Unattached Disks.

This report will find and show you all the Azure Virtual Machine disks that are not associated with any Azure VM. These disks are costing you money as they arent being used by any Virtual Machines, sitting there dormant and not being used.

Again, Highlight that report and choose Run Report.


Azure VM Unattached disks

See Azure VM disks that are not associated.

As seen in the screenshot here, all these Azure Disks are not associated with any Azure Virtual Machine. 

Yet again you can export this information to excel so that you can investigate further.


Azure Virtual Machine Disks

Download a FREE trial of Cloud Storage Manager today and start saving money, and understanding your Azure Storage Growth and Consumption.

Dont overspend on your Azure Storage

Knowing the size of your Azure Blob storage is crucial for cost optimization as it helps you monitor and control your usage. By keeping track of the number of Blobs, Containers, and the Azure Blob Storage capacity used, you can ensure that you are not overpaying for storage that you are not using. Additionally, by using a report like “All Unattached Disks,” you can identify any dormant disks that are not associated with any virtual machine and cut costs by deleting or resizing them. By regularly monitoring your Azure Blob storage with the help of tools like Cloud Storage Manager, you can make informed decisions about your usage and reduce unnecessary spending on storage.


Free

Cloud Storage Manager Icon

Database size is limited to a maximum of 5MB.

Typically for small or personal environments usually consisting of 3 or less Azure Subscriptions and consuming under 30TB of Azure Blob Storage. 

Advanced

Cloud Storage Manager Icon

Database size is limited to a maximum of 1GB.

For medium sized environments typically consisting of less than 10 Azure Subscriptions and consuming under 500TB of Azure Blob Storage.

Enterprise

Cloud Storage Manager Icon

Unlimited database size.

For use in large environments typically consisting of more than 10 Subscriptions and consuming more than 1PB of Azure Blob Storage.

Azure Storage Consumption FAQ

Question Answer
What is Azure Storage?
Azure Storage is a cloud-based storage solution provided by Microsoft Azure that enables users to store and manage data in various forms such as blobs, files, queues, tables, and disks.
Why is it important to understand how much Azure Storage I consume?
Understanding how much Azure Storage you consume is crucial because it helps you optimize your storage usage, control costs, and avoid unexpected charges.
What are the benefits of optimizing Azure Storage consumption?
Optimizing Azure Storage consumption helps reduce costs, improve performance, and enhance security by ensuring that you only pay for the storage you need, and that your data is stored and managed efficiently.
How can I monitor my Azure Storage consumption?
Use Cloud Storage Manager to deep dive in to your Azure Storage, find out how much you are consuming and where you can start saving money
What are some best practices for optimizing Azure Storage consumption?
Some best practices for optimizing Azure Storage consumption include cleaning up unused data, compressing data before storing it, using tiered storage options, and using automation to manage and optimize your storage resources.
How can I estimate my Azure Storage costs?
You can estimate your Azure Storage costs using the Azure Pricing Calculator, which provides an estimated cost based on your storage requirements and usage patterns.
How can I reduce my Azure Storage costs?
You can reduce your Azure Storage costs by optimizing your storage usage, deleting unused data, using tiered storage options, compressing data, and leveraging Cloud Storage Manager manage your costs.
Minimizing Azure Blob Storage Costs: Tips and Tricks

Minimizing Azure Blob Storage Costs: Tips and Tricks

Maximizing cost savings on Azure Blob Storage and Files has become increasingly important as more businesses migrate their data to the cloud. In this article, we’ll discuss how utilizing Cloud Storage Manager can help you optimize Azure storage consumption and significantly reduce expenses. We’ll also explore various ways to identify and remove redundant data and manage your virtual machine snapshots effectively.

Uncovering Azure Blob Storage Consumption

A Comprehensive Scan with Cloud Storage Manager

By using Cloud Storage Manager, you can perform a full scan of all your Azure Subscriptions and Blob Storage Accounts, providing a clear overview of your Azure Blob Storage usage. This visibility allows you to identify potential areas where you can cut costs and better allocate resources.


Azure Storage Overview

Azure Blob Storage Locations

Not only could they easily see the amount of Azure Blob Storage in use, they could also see all the Microsoft Datacentres where they are using storage from the map tab.


How much blob storage are your VM snapshots consuming?

Azure Blob Storage Reporting

One of the easiest ways to start saving on your Azure Blob Storage is to find often forgotten about Azure Virtual Machine Snapshots.

Often snapshots are created and then forgotten about.

Simply go to the Reports Tab in Cloud Storage Manager and run the LIST OF AZURE SNAPSHOTS report.

From the reports, you can quickly see where you could apply an Azure Storage Lifecycle Management Policy, and move the files that havent been accessed to a lower storage Tier to save you money.


Azure VM Snapshot Storage

Azure Virtual Machine Snapshots: Out of Sight, Out of Mind

Once the Azure Snapshot report has been generated, simply open it up in excel to see all your Azure VM snapshots.

The report provides you with information including the name of the Azure snapshot, which subscription it resides in, the Azure Storage Account, the relevant Container, size of the Azure VM snapshot, when it was created, if its a managed or unmanaged disk, the Azure Resource Group, type of snapshot created and finally any Azure Tags if you have them.

From this report, we found that they had 1168 Azure VM snapshots lingering in their environment, some well over 3 years old.

Using a simple calculation in Excel using standard Azure storage costs, ($0.02750 per TB using azure blob storage pricing provided by Microsoft – IN $AUS.


Azure Pricing Calculator

Visit the Azure Pricing Calculator for pricing in your currency ) deleting all these snapshots saved the client just under $2,000 per month, an approximate saving of $24,000 a year.

Just running these two simple reports and then taking action on them
saved this client $33,600 in their yearly Azure Blob Storage Costs.

Managing Azure Files Consumption

Gaining Insights with Cloud Storage Manager

As organizations increasingly adopt Azure Files to replace on-premise file servers, it’s crucial to understand exactly how much data resides in your Azure Files.

Cloud Storage Manager can scan all your Azure Files across your tenancy, offering quick and easy insights into Azure Files consumption.

Identifying Cost-Saving Opportunities

With a clear view of your Azure Files consumption, you can identify opportunities to reduce costs by optimizing storage usage and eliminating unnecessary data.


Azure Files Overview

Handling Unattached Azure VM Disks

Finding Unattached Disks with Cloud Storage Manager

Next on the list to reduce their Azure Storage costs, was finding unattached Azure Virtual Machine disks.

Again, this is often overlooked, to delete any disks no longer needed when decommissioning your Azure VMs.

Another standard report is run, this time All Unattached Disks.

Once the report has completed, again open it up in Microsoft Excel, and you can go through this data to see which Azure VM Unattached Disks can be deleted, further reducing your Azure Storage Costs.


Azure VM Unattached Disk

Azure VM Storage Cost Savings

Now using the same quick costing formulas from before, we can see an estimated monthly Azure Storage cost for these unattached virtual machine disks.

Estimating Savings with the Azure Pricing Calculator

After running this report and using the Azure Cost Estimator (I used AUD pricing here) to get cloud storage pricing, we found that the client had over 110 unattached Azure Virtual Machine Disks.

Removing all these unattached disks saved them $800 per month, so around $9,600 per year.


Reduce your Microsoft Azure Storage Costs

In a follow-up blog post, we will then dig a little deeper into more Azure Storage cost-saving initiatives (looking to further reduce your Azure Blob and FIles storage pricing and costs) using the insights from Cloud Storage Manager.

Download a free trial of Cloud Storage Manager today and start saving money with your Azure Storage.

Azure Cost Optimisation Conclusion

Azure pricing is based on a pay-as-you-go model, where customers are only charged for the services and resources they consume. This allows for flexible and cost-effective cloud computing. There are a variety of services available in Azure, including computing, storage, networking, and security. The pricing for these services can vary based on factors such as the type of service, the amount of resources used, and the duration of use.

The Azure pricing calculator is a tool that can be used to estimate the cost of using Azure services. The calculator allows you to select the services you want to use, input the details of your usage, and see an estimated cost. This can help you to budget for your cloud computing needs and make informed decisions about which services to use and how much to use them.

In addition to the pricing calculator, there are also a number of pricing options and discounts available to help you save money on your Azure bill. For example, you can use reserved instances to save up to 72% on virtual machine costs, or you can take advantage of Azure Hybrid Benefit to use your existing Windows Server licenses in Azure and save up to 40%.

The Cloud Storage Manager is a tool that helps manage and optimize cloud storage costs for organizations using Azure storage. By providing insights into storage usage patterns, the tool helps organizations make informed decisions about storage capacity planning, tiering, and rightsizing, which can result in cost savings. With its easy-to-use interface and intuitive navigation, the Cloud Storage Manager simplifies the process of managing and optimizing cloud storage costs.

In addition to cost savings, the Cloud Storage Manager also offers benefits such as improved visibility into storage usage, with the ability to view storage costs by usage, users can identify and eliminate redundant, underutilized, or unnecessary storage resources.

Overall, the Cloud Storage Manager is a valuable tool for organizations using Azure storage. By helping to optimize cloud storage costs and streamline management of storage resources, the tool enables organizations to focus on delivering value to their customers, rather than managing storage resources.

How to download an Azure VM

How to download an Azure VM

Migrate an Azure VM to VMware or Hyper-V

If you’re looking to download an Azure Virtual Machine to either VMware or Hyper-V for cost savings or compliance reasons, our software Carbon automates the process with just a few clicks. With Carbon, you won’t need to use PowerShell or download the VHD from the Azure portal.

To download your Azure VM to your preferred hypervisor, simply follow the steps outlined below for VMware.

First, download and install Carbon. Then, select your Azure VM and specify your VMware environment as the target. Carbon will handle the rest, downloading and converting your Azure VM to VMware.

In addition to VMware, Carbon also supports Hyper-V as a target environment. So whether you need to export your Azure VM to VMware or Hyper-V, Carbon can help.

To get started, download a free trial of Carbon and try it out for yourself. Don’t waste time with manual downloads or complicated PowerShell scripts – let Carbon simplify the process for you.

The Easiest way to convert your Azure VM to VMWare or Hyper-V

Launch Carbon

Once you have Carbon installed, the first task is to launch Carbon.

Carbon Azure Migration Tool Loading Screen

Sign in to the Azure Portal

You will now be prompted to login to Azure, so enter your credentials with access to your Azure Portal.

Carbon Azure VM Download Login

Scan your Azure Portal for all of your Azure Virtual Machines

Find all your Azure VMs

Once you have authenticated against your Azure Tenant, Carbon will now start scanning your Azure environment for all your Azure Virtual Machines.

This could obviously take some time if you have a large Azure Environment.

Once the scan of your Azure VMs has completed, you will see the list of all the Azure VMs in your Azure Tenancy.

Carbon Azure VM Download Scanning

List all your Azure VMs

Now that your scan of all your Azure VMs is complete, choose Select Virtual Machine/s to list all your Azure VMs in your Tenancy and start the migration process.

Carbon Home Screen

Select your Azure VM for Migration

Which Azure VMs do you want to migrate back to your Hypervisor

Now you should see a list of all your virtual machines in your Azure Environment.

Details displayed include:

  • The Azure VM Name
  • The status of the Azure VM
  • The Azure VM size
  • The number of CPUs your Azure VM has
  • The amount of Ram
  • The Azure VM’s IP Address
  • The Azure vNet it resides in
  • The Operating System of your Azure Virtual Machine
  • The Azure Resource Group
  • The Azure Subscription
  • The Azure location
  • and finally, the number of disks attached to your virtual machine

You simply select (by using the checkbox on the very right of the screen) the Azure VMs you want to download to VMware, then click Next.
The VMs you want to migrate will need to be powered off, so make sure you do this prior to attempting the migration.


Carbon Azure VM Details

Managed or Unmanaged Disks

Azure VM Disk Configuration

Now if the Azure VMs you are going to convert to VMware are using Azure Managed Disks, you will get this prompt.

Click OK to proceed.

What Carbon will do next is copy this Azure VM disks to a storage account that you specify in the next screen.

Please take note of the location of your Azure VM, as you want to use an Azure Storage Account in the same region.

Azure Managed Disk Prompt

Azure Storage Account for Conversion

Choose a destination Azure Storage Account

Next we select the appropriate Azure Storage Account that the Azure VM will be copied and converted to.

Choose the storage account you want and then choose Select.

Carbon will now read your Azure VM disk configuration. This can take a few minutes.

Azure Storage Account Details

Choose your VMWare or Hyper-V Environment for Azure VM Migration

Connect to you Hypervisor

Now we are presented with your virtual environment (in this case our VMware vCentre environment)

Choose from the dropdown lists the VMware Host, the datastore and virtual network you want your Azure VM to download to.

You have the option here to send you an email once the migration has completed.

Click Start Migration to proceed to the final step


Azure VM Download VMware

Ready to start the Migration of your Azure VM

Start the Migration Process

Finally we are prepared to start the conversion of your Azure VM to VMware.

Review the information here, when you are ready, click the circle next to Understood and Accepted, then click Start.  

Azure VM Migration to VMware

Azure VM Migration Process

Converting your Azure VM

Now, the conversion process is underway. Your Azure VM will be downloaded and converted to the appropriate format for either VMware or Hyper-V before finally being deployed to your on-premise virtual infrastructure.

Please Note: This may take some time, dependent on the size of your Azure VM disks, so please be patient. 

If you have email alerting setup and turned on, you will receive an email once the process has completed.

Azure VM Conversion Process

Azure VM Conversion Progress

Converting your Azure VM for your selected Hypervisor

Watching the Progress window you can see the status of your download and conversion of your Azure VM.

In this picture you can see that the disk download has completed as well as the conversion and its currently being uploaded to our VMware environment.

Azure VM Conversion Status

Azure VM Converted

Azure VM Conversion is now Complete

After some time your Azure VM should now have downloaded, converted to VMware and be available within your vCentre server.

Azure VM download to VMware Complete

Azure VM Migration Alerts

If you requested an email alert, you should have received one in your inbox stating that the Azure VM has now deployed to your VMware environment.

Azure VM Download Email

Azure VM Conversion Completed

View the migrated VM in your Hypervisor

If you go to your vCentre now you should be able to find the Azure VM you had migrated to your VMware environment.

All left for you to do now, is power it on then log on to the VM and update the IP address if needed.


Azure VM on VMware

Azure VM Conversion Completed

Find the migrated VM in your Hypervisor

If you go to your vCentre now you should be able to find the Azure VM you had migrated to your VMware environment.

All left for you to do now, is power it on then log on to the VM and update the IP address if needed.


Azure VM on VMware

Your Azure VM has been converted and then migrated to your Hyper-v or VMware environment.

And that’s all there is to it. You have downloaded an Azure VM and converted it to VMware or Hyper-V. (Obviously in this example we converted the Azure VM to VMWare. For HyperV the last few steps are replaced with VCentre with SCVMM)

You can download a fully functioning trial of Carbon here to test it for yourself.

Carbon: Moving You Forward by Bringing You Back.