by Mark | Sep 8, 2019 | How To, Microsoft HyperV, Snapshot / Checkpoint, VMWare
How to schedule the snapshot of multiple VMware or Hyper-V Virtual Machines with auto deletion.
Every so often you need to schedule a snapshot on a virtual machine, whether that be a VMware virtual machine or a Hyper-V virtual machine, or even multiple virtual machines because someone or something is going to be changed and you need a quick way to roll them back to a running state, just in case things go belly up. It’s a very common task that administrators need to do. Other times you need to create a snapshot on a schedule, whether it’s a one-off snapshot at a specific date and time, or a recurring one that happens every week or month. Doing this using the standard vCenter console is fairly simple and easy to do. But how do you schedule it for multiple VMs? And to then also automatically remove the snapshot? Or what if you have a combination of VMware and Hyper-V? Doing that usually involves a combination of scheduled tasks via the console and PowerShell with PowerCLI.
But the easiest and simplest way by far is to use Snapshot Master. Hopefully you have installed and are running Snapshot Master in your environment, if not, you can download and request a 30 Day trial key and try it out for yourself.
Creating a schedule to snapshot one or multiple virtual machines and then automatically deleting the snapshot after a period you define is a walk in the park.
OK, so now that I’ve talked up Snapshot Master and how easy it is to create a scheduled snapshot on one or multiple VMs either VMware or Hyper-V with auto-deleting the snapshot, how do you actually do it?
Snapshot Scheduling Use Cases
| Use Case |
Why Schedule a Snapshot? |
Testing and Development
|
To quickly roll back changes made to a virtual machine during testing and development. |
Software Upgrades
|
To create a snapshot before performing a software upgrade, in case the upgrade causes issues that need to be rolled back. |
Disaster Recovery
|
To have a recent snapshot available in the event of a disaster or data loss. |
Compliance
|
To maintain compliance with data retention policies or audit requirements. |
Resource Optimization
|
To free up disk space on a virtual machine by automatically deleting old snapshots after a specified time period. |
Performance Tuning
|
To create a snapshot before making changes to a virtual machine’s configuration or performance settings, in case the changes negatively impact performance. |
By scheduling snapshots, you can ensure that you have a recent backup of your virtual machines that can be easily restored in the event of issues or data loss. Additionally, scheduling snapshots can help you meet compliance requirements, optimize resource usage, and improve the overall performance of your virtual environment.
Launch Snapshot Master
The first step is to open Snapshot Master. Ensure that you have already installed Snapshot Master on your system. If not, you can download it and request a 30-day trial key to test it out.

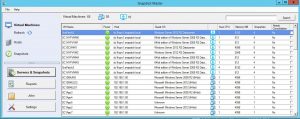
Select the Virtual Machines you want to Schedule a Snapshot
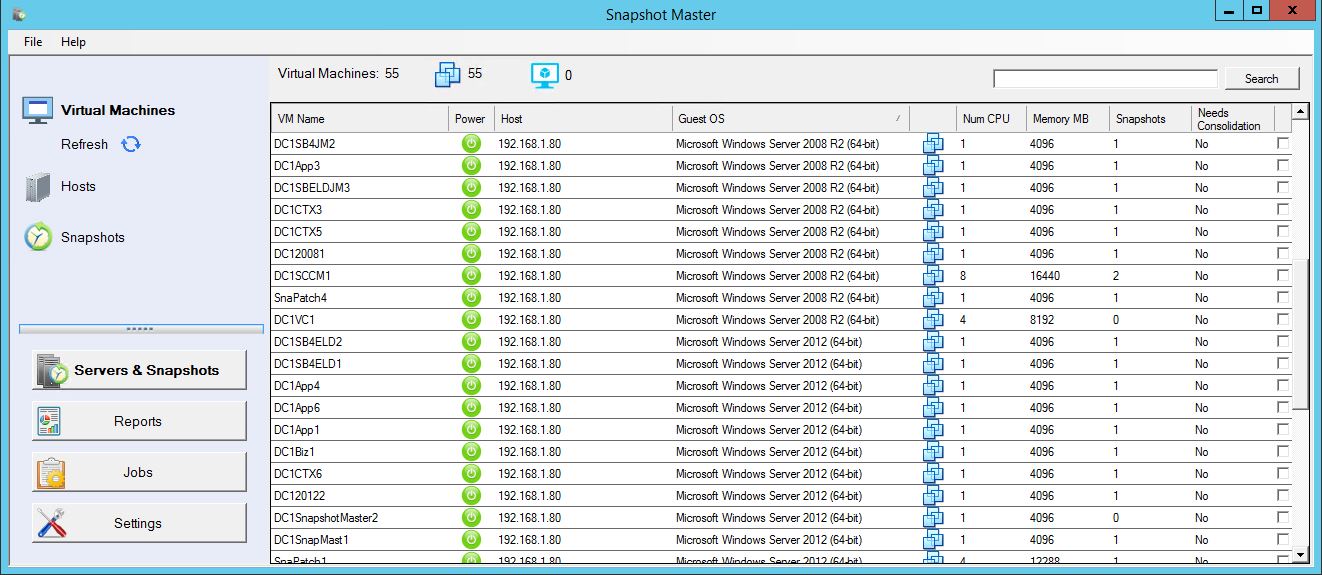
Once you launch Snapshot Master, select the virtual machines you want to snapshot. You can do this by either placing a tick in the checkbox or double-clicking the row.
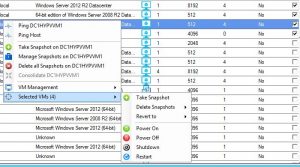
Take a Virtual Machine Snapshot
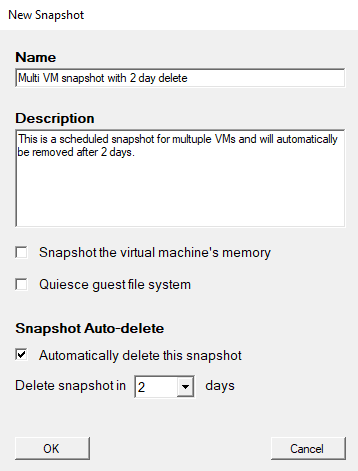
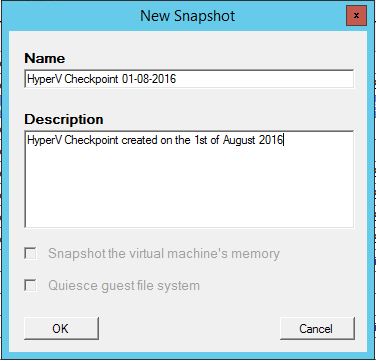
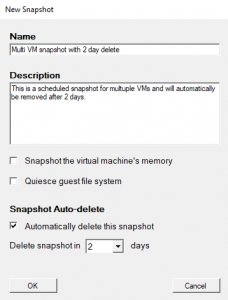
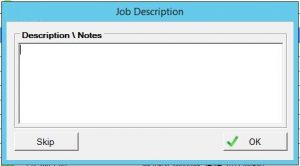
Right-click anywhere on the screen, move to Selected VMs, and click Take Snapshot. A dialog box will appear to give the job a name and description. Tick the box to automatically delete the snapshot and use the drop-down list to select the number of days after which it should be deleted, then press OK.
VM Snapshot Name
Give the job a name and description. Tick the box to automatically delete the snapshot and use the drop down list to select the number of days it should be deleted in and press OK.
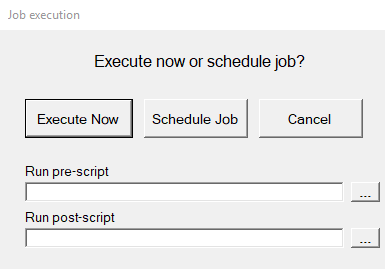
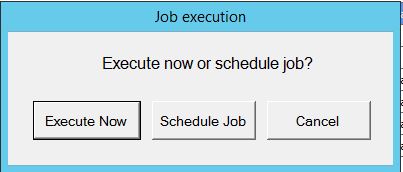
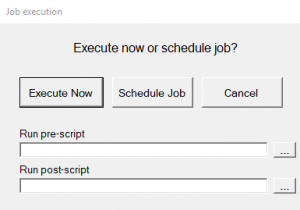
VM Snapshot Execute Now or Scheduling
Click Schedule job.
Note, if you need to run a pre or post script along with this job, you may call it here.
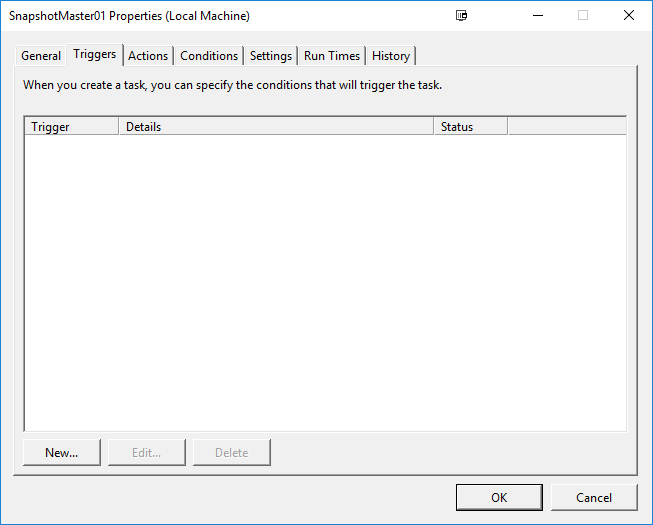
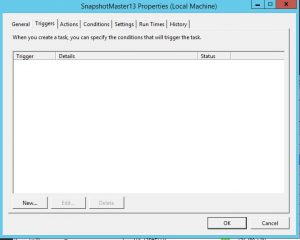
Schedule VM Snapshot Creation
Click New and setup the schedule for this job.
Press OK when done.
SnapShot Master will now start the snapshot / checkpoint creation process, at the schedule you have created.

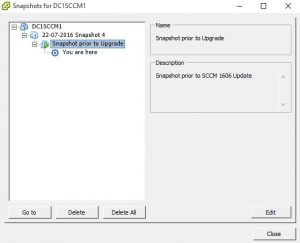
Scheduled VM Snapshot Job Notification
You will receive a notification letting you know the job has been scheduled.
Scheduled VM Snapshot Email Alerts
That’s all there is to it. Doesn’t get much easier than that. And if you have setup email notifications, you will receive an email detailing the success and failures of the job.

SnapShot Master FAQs
| Question |
Answer |
What is Snapshot Master?
|
Snapshot Master is a software tool that simplifies the process of creating and managing snapshots of VMware and Hyper-V virtual machines. |
How does Snapshot Master work?
|
Snapshot Master provides a user-friendly interface for scheduling and creating snapshots of virtual machines, as well as automatically deleting old snapshots after a specified time period. It also supports pre- and post-snapshot scripts for more advanced customization. |
Can Snapshot Master handle both VMware and Hyper-V virtual machines?
|
Yes, Snapshot Master can create and manage snapshots for both VMware and Hyper-V virtual machines. |
Is Snapshot Master easy to use?
|
Yes, Snapshot Master is designed to be simple and user-friendly, with an intuitive interface that makes it easy to schedule and create snapshots of virtual machines. |
Can I try Snapshot Master before purchasing it?
|
Yes, a free 30-day trial version of Snapshot Master is available for download. |
What are the system requirements for Snapshot Master?
|
Snapshot Master requires Windows 7 or higher and .NET Framework 4.5 or higher. It also requires administrative privileges to install and run. |
Does Snapshot Master provide email notifications?
|
Yes, Snapshot Master can send email notifications to inform you of the success or failure of snapshot jobs. |
Can Snapshot Master automate the snapshot creation and deletion process?
|
Yes, Snapshot Master can automatically create and delete snapshots on a schedule that you define. |
What other features does Snapshot Master offer?
|
Snapshot Master also includes the ability to clone virtual machines, and provide email reports of your virtual environment. |
Automate VM Snapshot creation and deletions
Taking snapshots on multiple VMs has never been easier than with Snapshot Master. It’s a simple, automated process that helps to ensure the protection of your virtual machines. Snapshot Master is also capable of managing other aspects of your virtual machines. You can download a free fully functioning trial of Snapshot Master to explore its capabilities.
Free Fully Functioning Trial available to download.

by Mark | May 27, 2017 | How To, Microsoft HyperV, Patch Management, SCCM, VMWare
Automate Snapshot Creation Before Deployment
Reduce Patching Risks with SnaPatch
System administrators are responsible for ensuring the smooth functioning of their organization’s computer systems. They are the ones who deploy new software and updates, perform maintenance tasks, and troubleshoot any issues that arise. However, keeping these systems up-to-date can be a daunting task, especially when new updates and patches are released frequently. This is where taking a snapshot before patching comes into play.
A snapshot before patching is a crucial tool that system administrators can use to protect their systems from vulnerabilities. In this article, we will discuss why taking a snapshot before patching is essential and how it can help system administrators safeguard their systems.
What is a Snapshot Before Patching?
A snapshot before patching is a backup copy of your system’s current state. This copy can be used to restore your system to its previous state in case something goes wrong during the patching process. Taking a snapshot before patching ensures that you have a stable and reliable system to fall back on if the patching process fails.
Why is a Snapshot Before Patching Important?
Taking a snapshot before patching is essential for several reasons. Here are some of the main reasons why system administrators should make this a standard practice:
- Protects Against System Failure: Patching can sometimes cause system failures. Having a snapshot before patching ensures that you can quickly restore your system to its previous state in case of such failures.
- Provides a Safe Environment for Testing: Taking a snapshot before patching allows system administrators to test the patches in a safe environment. This ensures that any issues that arise during the testing process can be addressed before the patches are applied to the live system.
- Helps in Disaster Recovery: Snapshots can be used as part of a disaster recovery plan. In case of a disaster, snapshots can be used to restore your system to a previous state.
Best Practices for Using Snapshots Before Patching
Here are some best practices for using snapshots before patching:
Always Test Patches:
Test patches in a safe environment before applying them to the live system.
Schedule Regular Snapshots:
Schedule regular snapshots so that you always have an up-to-date backup of your system.
Name Your Snapshots:
Give your snapshots meaningful names so that you can easily identify them.
Store Snapshots Securely:
Store your snapshots in a secure location to prevent unauthorized access.
Snapshots Before Patching FAQs
What is the difference between a snapshot and a backup?
A snapshot is a point-in-time copy of your system, whereas a backup is a copy of your system’s data that is stored separately.
How often should I take a snapshot before patching?
It depends on your organization’s needs. However, it is a good practice to take a snapshot before each patching session.
Can I take a snapshot of a virtual machine?
Yes, you can take a snapshot of a virtual machine. In fact, taking snapshots of virtual machines is a common practice in virtualized environments.
What happens if I don’t take a snapshot before patching?
If you don’t take a snapshot before patching, you run the risk of losing important data or causing system failures.
How to Snapshot before deploying Patches.
How SnaPatch Can Help You Take Snapshots Before Patching
When it comes to taking snapshots before patching, it can be a time-consuming and manual process for system administrators. However, there is a tool that can simplify the process and make it more efficient: SnaPatch.
What is SnaPatch?
SnaPatch is a software application that interacts with your Microsoft System Centre Configuration Manager (SCCM) environment to pull in all your machine information. It uses SCCM as the source of truth for all your VM information.
Next, it interfaces with either your vCentre or System Centre Virtual Machine Manager (SCVMM), or both. It takes control of your VM environment, allowing it to create and delete snapshots of your VMs.
How does SnaPatch work?
SnaPatch simplifies the snapshot process by automating it. It creates a snapshot of any virtual machine before allowing it to be patched. If the snapshot fails, the VM will not receive updates and will be removed from the patching schedule. SnaPatch streamlines the process and frees up your time by automating the snapshot and patching processes, while keeping you updated on progress via email notifications.
How do you deploy SnaPatch?
Deploying SnaPatch is easy and straightforward. After installation, the application discovers your SCCM environment and allows you to configure various settings such as email notifications, snapshot creation, and patch deployment.
Why use SnaPatch?
SnaPatch helps you take snapshots before patching in a more efficient and streamlined manner. It complies with SOX regulations and minimizes risk, and its automated snapshot creation feature ensures that you can easily roll back updates if necessary, giving you peace of mind and more time to focus on other critical tasks.
Conclusion
In conclusion, taking snapshots before patching is a critical step in ensuring the security and stability of your systems. SnaPatch can help simplify and automate this process, allowing you to deploy Microsoft updates in your VM environment safely and efficiently. Try SnaPatch today and streamline your patching process!

by Mark | Aug 9, 2016 | How To, Microsoft HyperV, Snapshot / Checkpoint, VMWare
How to snapshot multiple VM servers with SnapShot Master
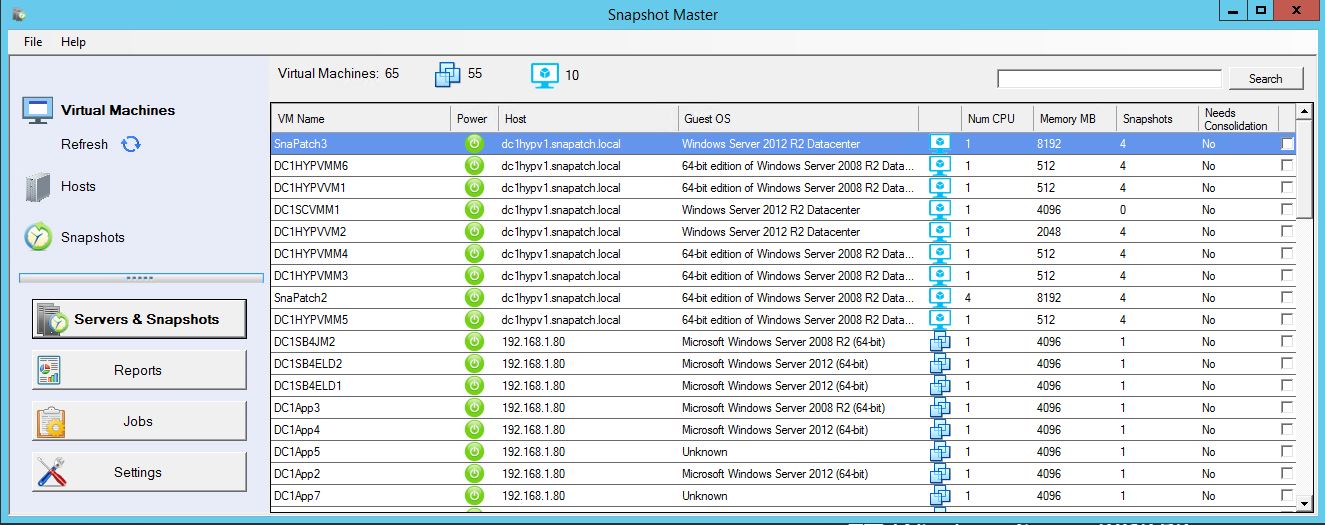
SnapShot Master is a software that helps to create or delete snapshots of multiple VMs in unison. It is a useful tool for VMware’s Vsphere and Microsoft’s HyperV users. With this software, taking snapshots of multiple VMs is a relatively easy task. In this article, we will guide you through the process of snapshotting multiple VM servers using SnapShot Master.
Installing SnapShot Master Before you can use SnapShot Master, you need to install it in your environment. If you haven’t done so, you can download the software and request a 30-day trial key. Once you have installed and are running SnapShot Master in your environment, you can proceed to snapshot multiple VMs.
Synchronous or Asynchronous Snapshotting SnapShot Master can perform snapshotting synchronously or asynchronously. This means that it can keep systems that need to be in sync, have snapshots taken at the same time, or one after the other. To learn more about the functions of SnapShot Master, click this link.
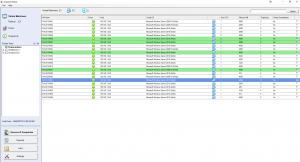
Syncing with Your Virtual Environment Open your SnapShot Master console and let it synchronize with your VMware or HyperV environment. Depending on your virtual environment, this may take some time.
The need arises at times for the creation or deletion of snapshots of multiple VMs in unison. Creating snapshots of multiple VMs (virtual servers) for VMware’s Vsphere or even for Microsoft’s HyperV with SnapShot Master is a relatively easy task. Hopefully you have installed and are running SnapShot Master in your environment, if not, you can download and request a 30 Day trial key and try it out for yourself.
 SnapShot Master can do this synchronously or asynchronously. This can keep systems that need to be in sync, have snapshots taken at the same time, or one after the other. To learn more about the functions of SnapShot Master, click this link.
VM Console Screen
Open you SnapShot Master console and let it synchronise with your Vmware or HyperV environment. Depending on your virtual environment, this may take some time.
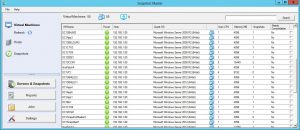
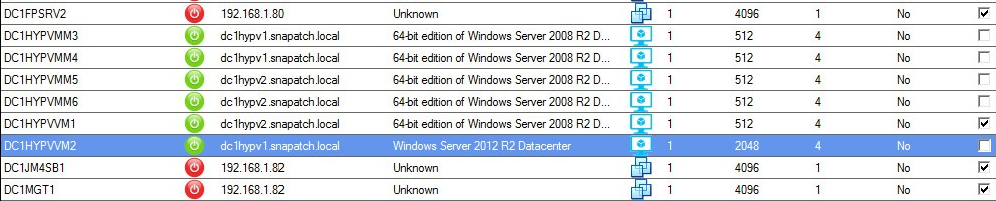
Virtual Machines Populated.
Now that the console has populated, Tick the checkboxes of the corresponding virtual machines that you wish a snapshot to be performed for.
Virtual Machine Selection
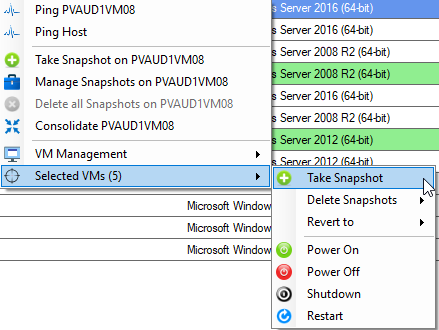
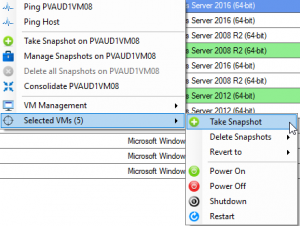
Once you have selected the multiple VMs for a snapshot, right click on any VM and scroll down the drop down menu to Selected VMs then across to Take Snapshot.

VM Snapshot Name
Once you have selected the multiple VMs for a snapshot, right click on any VM and scroll down the drop down menu to Selected VMs then across to Take Snapshot.
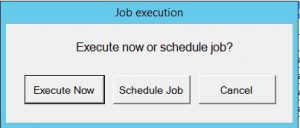
Execute or Schedule VM Snapshot Job
You are now prompted to either Execute Now or Schedule Job. If you choose to execute now, the job will start to immediately snapshot multiple VMs. To schedule the snapshot for a later time, choose Schedule Job.
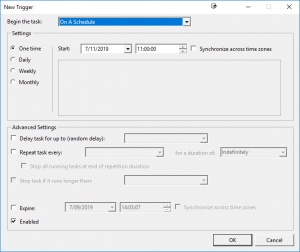
Schedule Snapshot Time
We now need to create a schedule for when you wish the snapshots to be performed. Click on New in the scheduling window and set the Date and Time then close the Windows.
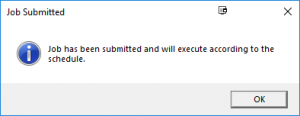
Scheduled Snapshot Notifications
So thats all there is to it. You have chosen the virtual machines that require a snapshot, set your snapshot schedule and SnapShot Master will complete all this. If you have setup email notifications, you will receive emails detailing success and any failures.
Taking a snaphot multiple VMs has never been easier than with SnapShot Master. To learn what else SnapShot Master can do, other than snapshot multiple VMs, click this link.
Download a trial of SnapShot Master today.
To trial SnapShot Master, fill in the form below to get access to download the trial software.
FREE DOWNLOAD
SnapShot Master FAQs
Disaster Recovery
SnapShot Master can be used to create snapshots of multiple VMs at once, ensuring that all the VMs are captured at the same point in time. This makes it easy to restore the VMs in case of a disaster.
Testing and Development
SnapShot Master can be used to create a snapshot of a VM before making any changes. This allows developers and testers to revert back to the original state if anything goes wrong during testing.
Reporting and Auditing
SnapShot Master can be used to create snapshots of VMs on a regular basis for reporting and auditing purposes. This ensures that you always have a historical record of the VMs.
Performance Tuning
SnapShot Master can be used to create snapshots before making any performance tuning changes. This allows you to compare the performance of the VM before and after the changes.
Patch Management
SnapShot Master can be used to create snapshots before applying patches to the VMs. This ensures that you have a backup of the VM before applying any changes.
Overall, SnapShot Master is a versatile tool that can be used for a variety of use cases, providing a simple and efficient way to create and manage snapshots of multiple VMs.
by Mark | Aug 8, 2016 | How To, Snapshot / Checkpoint, VMWare
How to Schedule a VMWare Snapshot.
Before I show you how to use SnapShot Master to create and schedule a VMWare Snapshot I will briefly describe what a snapshot is.
VMWare Snapshots are a crucial feature of the VMWare environment that allows you to roll back to a specific point in time in case of any issues. Snapshots can be created manually but, it is essential to have an automated process to make the process easier and more efficient. This is where SnapShot Master comes in.
What is a VMWare Snapshot?
VMWare Snapshots are a quick and easy way to provide a previous point in time in which you can revert your virtual machine to. Snapshots are a great feature to use prior to performing any risky upgrades, applying Windows updates or hardware reconfiguration as they give you the benefit of a fast roll back point should any issues occur.
When creating a VMWare Snapshot a differencing disk is created with *–delta.vmdk extension and an .vmsn file for configuration changes. the VMWare Snapshot preserves the state of the virtual machine at a specific point in time. (These new files leave the original VMDK files intact, hence allowing you to have a role back position.)
The more Snapshots you create, the more disk space you will utilise. It is also worth noting that the VM will also have its performance effected by each snapshot created.
VMWare Snapshot Tree
From within VMWare’s Vcentre, you can select the VM you want and view the VMWare Snapshot Tree. This shows each and every snapshot created for the virtual machine selected.
Each subsequent snapshot stems from the previous one with the delta changes stored on the snapshot’s disk which is the difference between the current state and the last snapshot created.
Scheduling a VMWare Snapshot
VMWare sheduled snapshot creation
Now that you understand VMWare Snapshots a little better, we can now start automating and scheduling their creation and deletion
Open your SnapShot Master console and let it sync with your VMWare environment and populate the console with your virtual machines.
VMWare VM snapshot Selection
Once all your virtual machines have shown up, choose the VMs you want to create a snapshot for by checking the checkbox. You can choose to either do a single machine or multiple machines. In this example Ill create a snapshot for multiple VMs. Right Click any VM and from the menu go to Selected VMs then Take Snapshot.
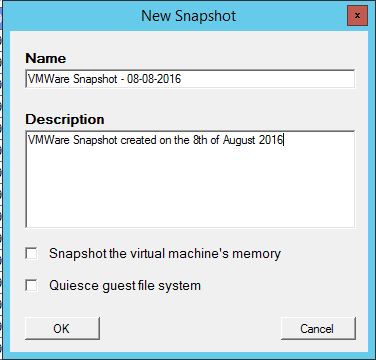
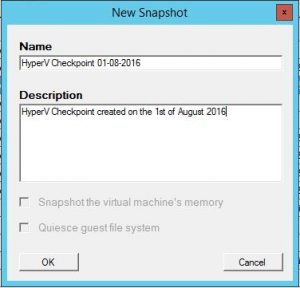
VMWare VM snapshot Name
Give the Snapshot a Name and Description then click OK.
This makes it easier to identify what the scheduled snapshot was created for at a later date.

VMWare VM snapshot Options
Next we can choose to Execute Now or Schedule Job. I have chosen to schedule the Vmware snapshot creation.
If you choose Execute now, SnapShot Master will immediately create a snapshot of the VMs you have selected.
VMWare VM snapshot Description
You can now give the Scheduled VMWare snapshot job a name then click OK.
VMWare VM snapshot scheduled task
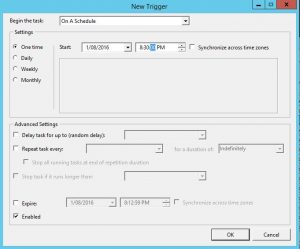
The task scheduler window now starts up. Click on NEW to create a new scheduled task.
Date and Time for the Scheduled Snapshot
Choose a date and time that you want to schedule the VMWare Snapshot for then click OK and then Click OK again on the task scheduling window. The VMWare Snapshots will now be automated and created at the time you have scheduled.
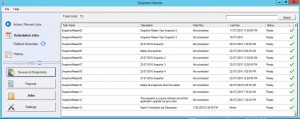
Scheduled Snapshot Status
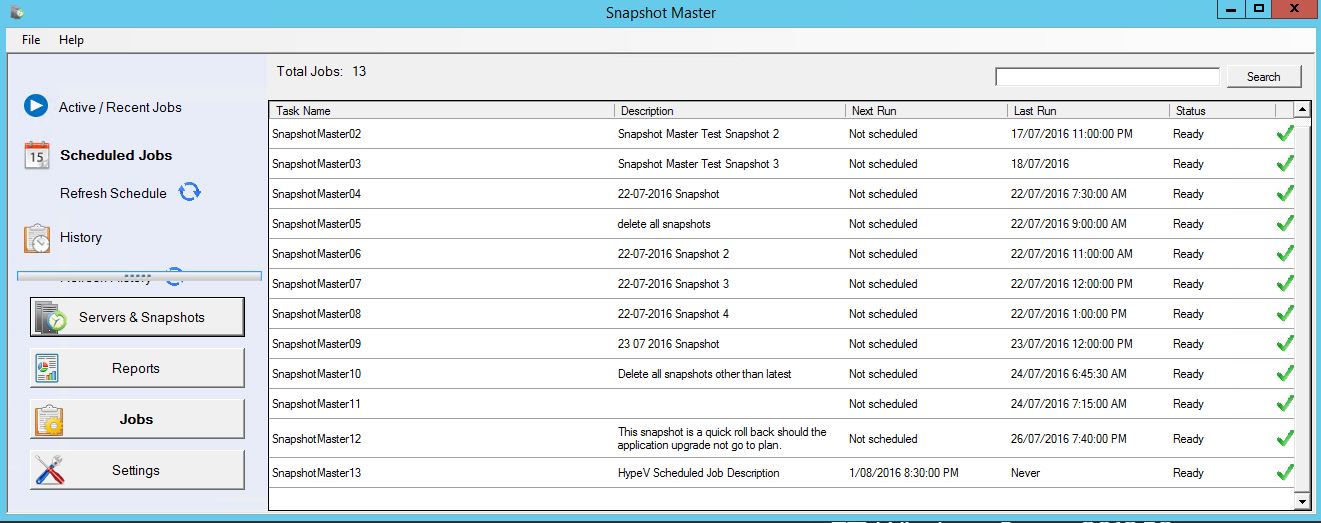
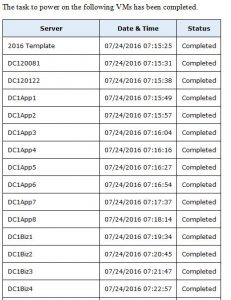
To view Job Status of your scheduled tasks within SnapShot Master, go to the JOBS tab and then Scheduled Jobs. You can see Active / Recent Jobs, Scheduled Jobs as well as Job History.
Scheduled Snapshot Email Alerts
Now when the time you have scheduled the creation of the VMWare Snapshot comes, SnapShot Master will automate this. If you have email notifications setup within SnapShot Master, you will receive emails detailing when the job started and finalised.
AUTOMATE AND SCHEDULE SNAPSHOTS EASILY WITH SNAPSHOT MASTER
Want to simply Schedule Snapshot Creations and Deletions?
Now when the time you have scheduled the creation of the VMWare Snapshot comes, SnapShot Master will automate this. If you have email notifications set up within SnapShot Master, you will receive emails detailing when the job started and finalized.
Conclusion Automating and scheduling VMWare Snapshots with SnapShot Master is an easy and efficient process that can save you time and effort. It is essential to have a robust backup and disaster recovery strategy in place, and SnapShot Master can play a crucial role in this. If you want to simplify the process of scheduling and managing VMWare Snapshots, consider downloading a trial of SnapShot Master today.
Download a trial of SnapShot Master today.
To trial SnapShot Master, fill in the form below to get access to download the trial software.
FREE DOWNLOAD
To learn more about the features of SnapShot Master to simply automate and schedule snapshots.

by Mark | Jul 12, 2016 | Errors, Fixes, How To, VMWare
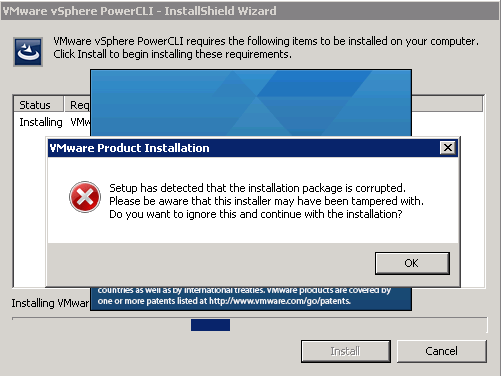
VMWare PowerCLI Installation Failed
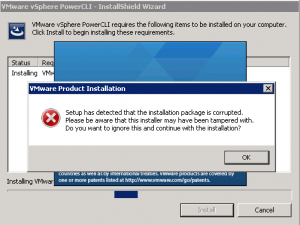
If you are installing VMWare’s PowerCLI for remote administration of your VMWare farm, or for SnaPatch or Snapshot Master you may at times receive the following error, “Setup has detected that the installation package is corrupted. Please be aware that this installer may have been tampered with.” One of the possible causes for this is that the root certificate for VeriSign isnt installed on your computer. There are a few ways to fix this issue, one is to download the root certificate from VeriSign themselves and then to install it to the local computer account under Third-Party Root Certification Authorities-Certificates, or to export it from the VMWare PowerCLI installation package.
VMWare PowerCLI setup error
These screenshots show the error you would receive while trying to install the VMWare PowerCLI installer.

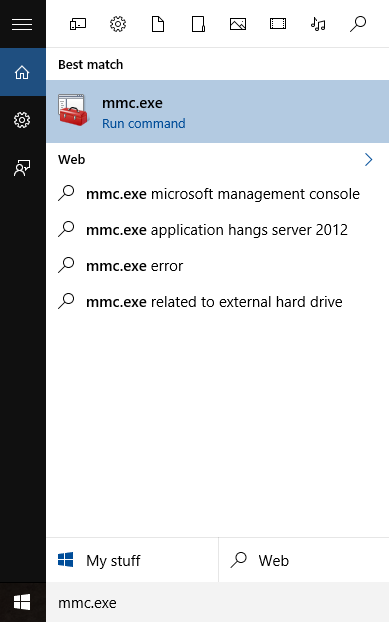
How to Manually install the root certificate
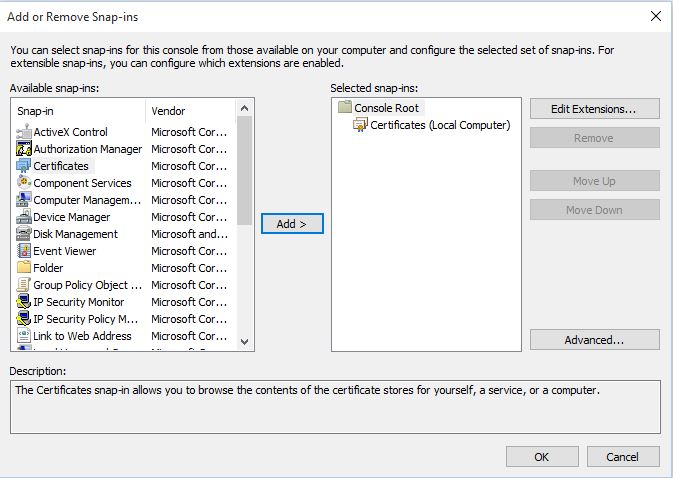
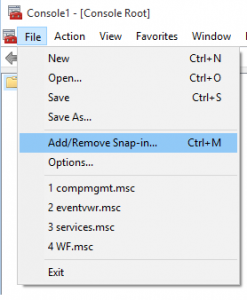
First off we will see if the root certificate is in fact already installed or not. From a command prompt type mmc.exe to open up the Microsoft Management Console.

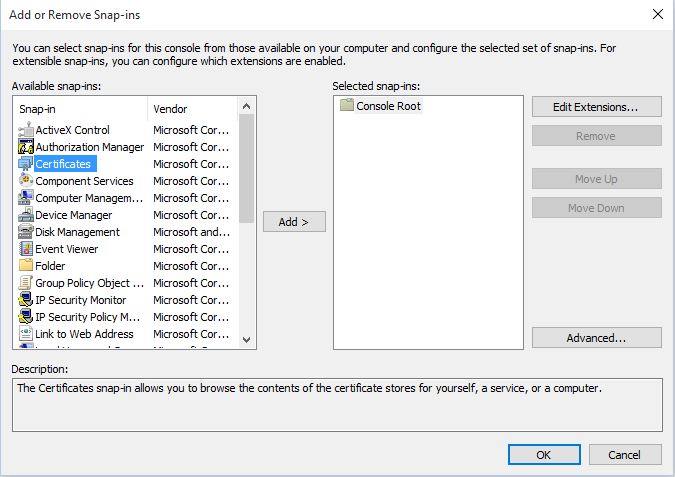
Now go to File, then Add/Remove Snap-in
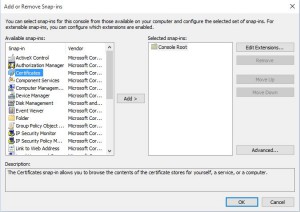
Next we have to choose the Certificates addin. Highlight Certificates then click on Add.
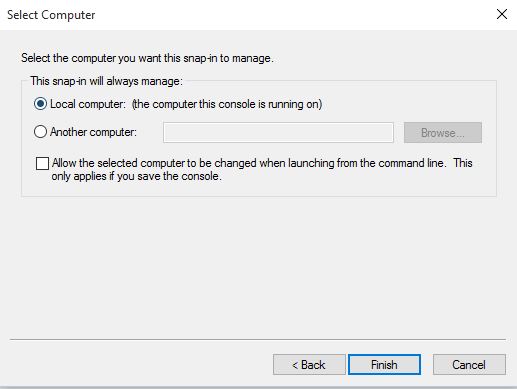
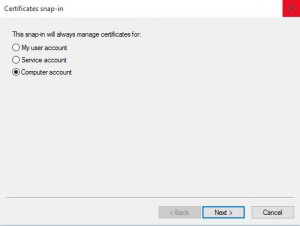
You will now need to select Computer Account and then click Next.
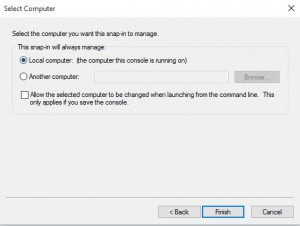
Choose Local Computer for the location that this snap-in will manage then click Next.
Now click OK and the Certificates Snap-in will be available.
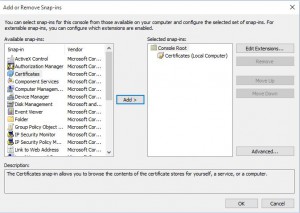
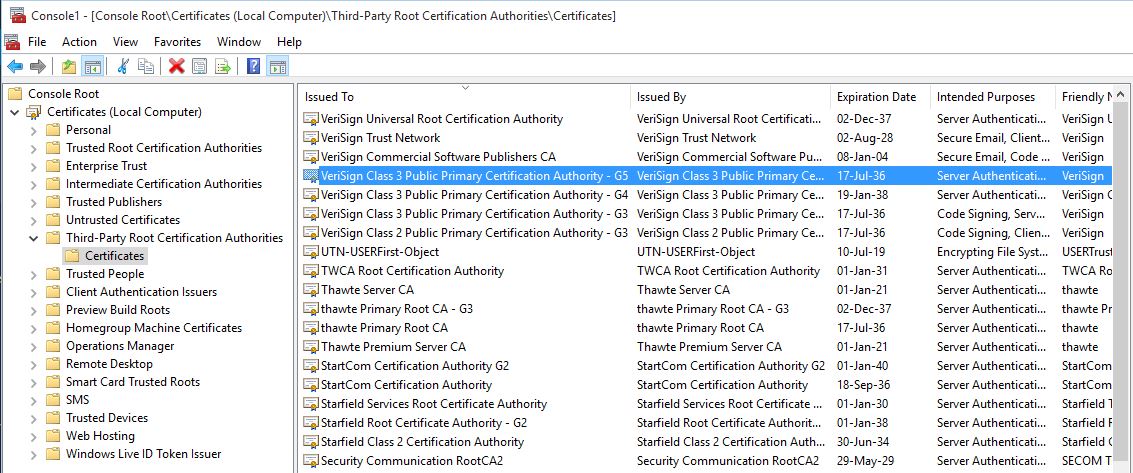
Expand Certificates, then Third-Party Root Certification Authorities and finally Certificates. You will now need to look for the Root Certificate, VeriSign Class 3 Public Primary Certification Authority – G5. In this example you can see that the certificate is installed. If it isnt installed you can download and install the certificate to the shown location. If you cannot download the root certificate it is possible to import the certificate from the VMWare PowerCLI installation package, as shown in further steps.

How to import the certificate from the VMWare package
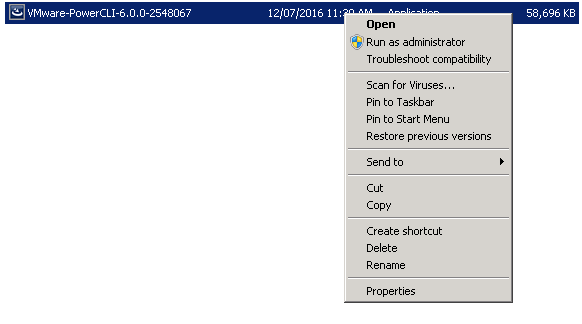
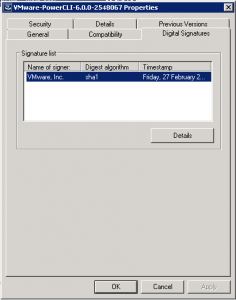
Now you will need to export the Root Certificate from the VMWare PowerCLI installation package. To do so, locate the EXE file and right click it then choose properties.

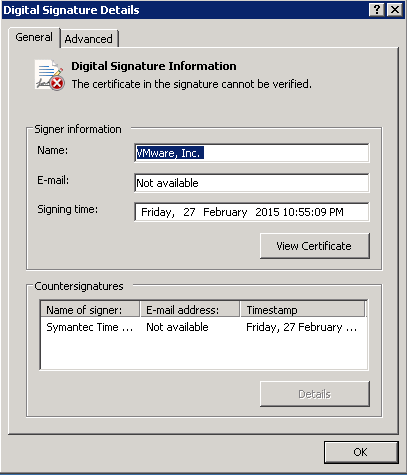
Change the tab to Digital Signatures then click Details.
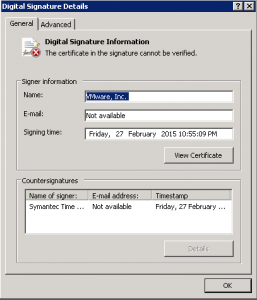
As you can see in this example, “the certificate in the signature cannot be verified”. Click View Certificate to proceed.
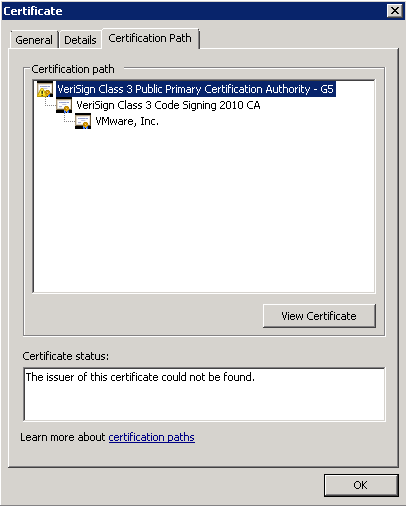
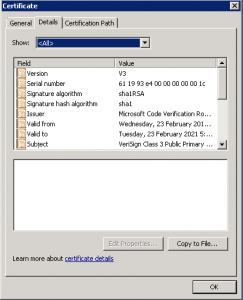
Change to the Certification Path tab and make sure you select the top of the certification path. In this example, you can see it highlighted as VeriSign Class 3 Public Primary Certification Authority – G5. Once selected click View Certificate.

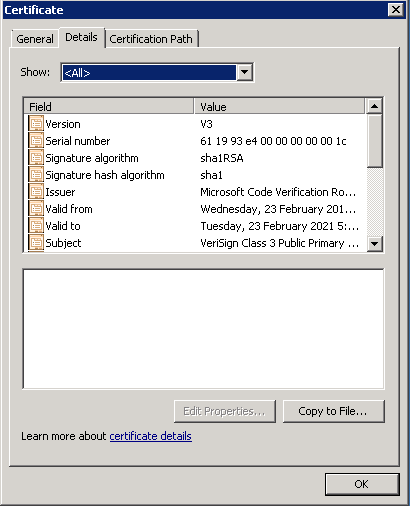
Again, in the next window go to the Details tab then click Copy to File.
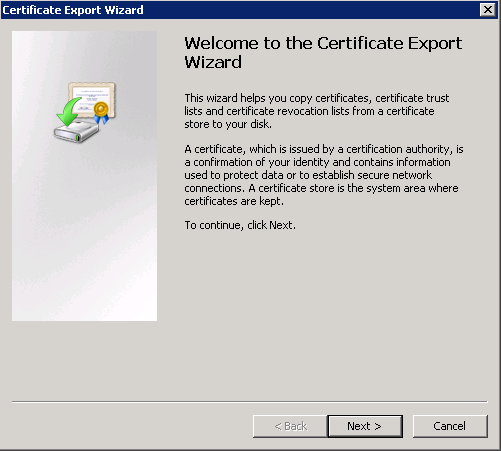
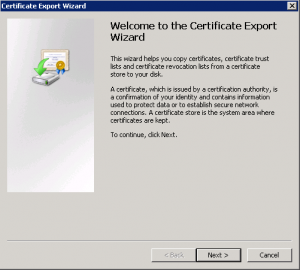
The Certificate Export Wizard starts next. Click on Next to proceed with the Wizard.
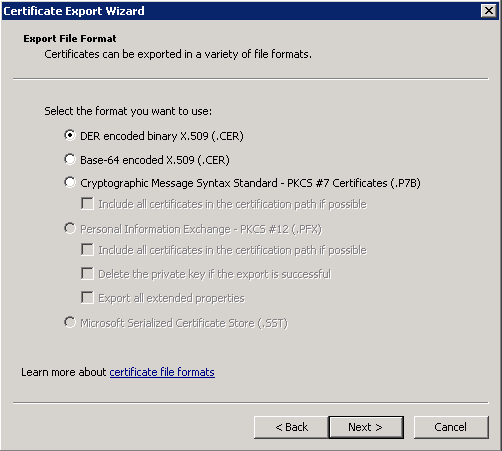
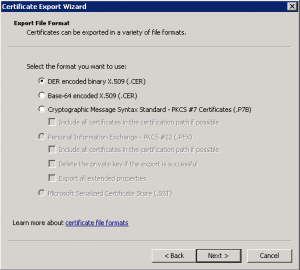
Leave the Format as DER and then click on Next.
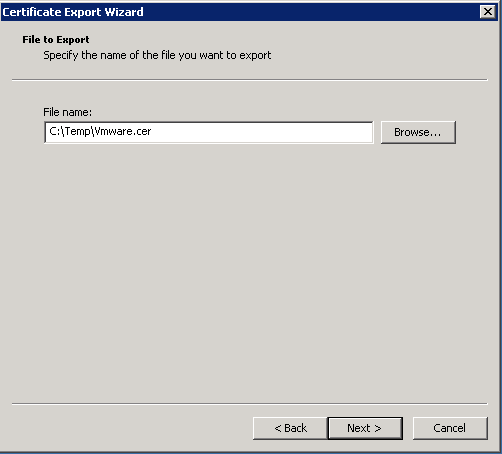
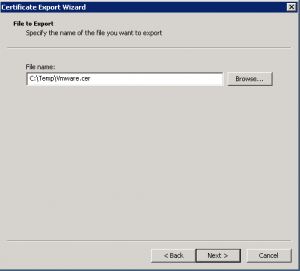
Choose the location and filename where you want to save the exported certificate and then click Next.
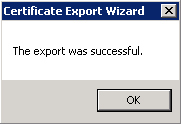
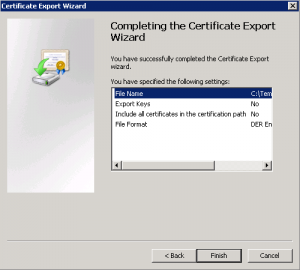
You can now click Finished and the Certificate Export Wizard will then close.
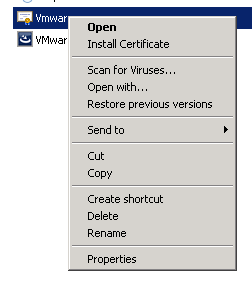
Next we need to import the VeriSign Root Certificate to the correct location. Right click the exported certificate and select Install Certificate.
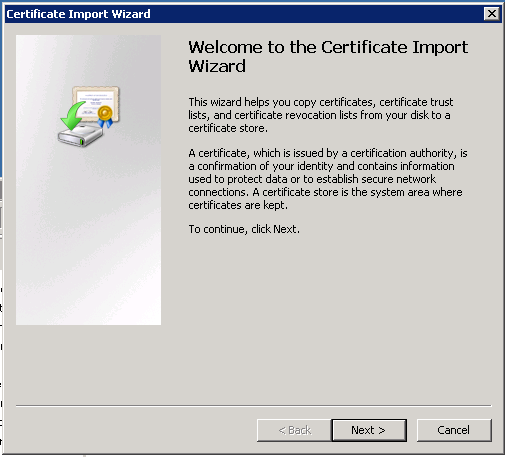
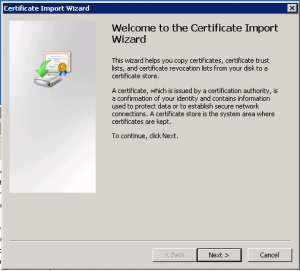
The Certificate Import Wizard now starts. Click Next.
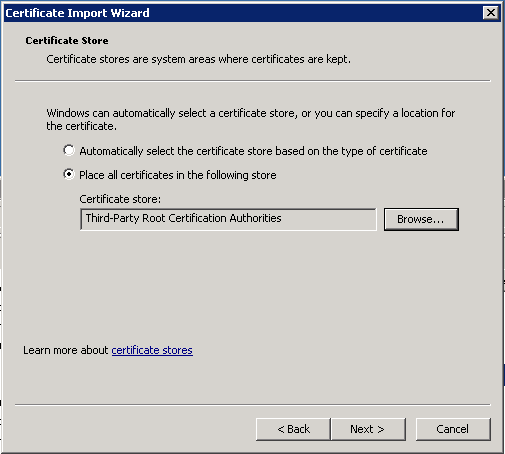
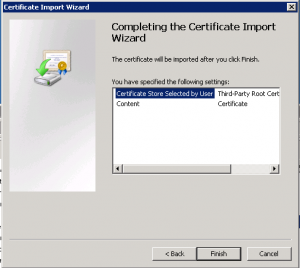
Select Place all certificates in the following store and then choose Third-Party Root Certification Authorities. Click Next when ready to do so.

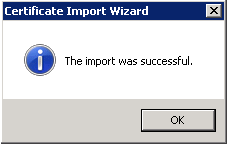
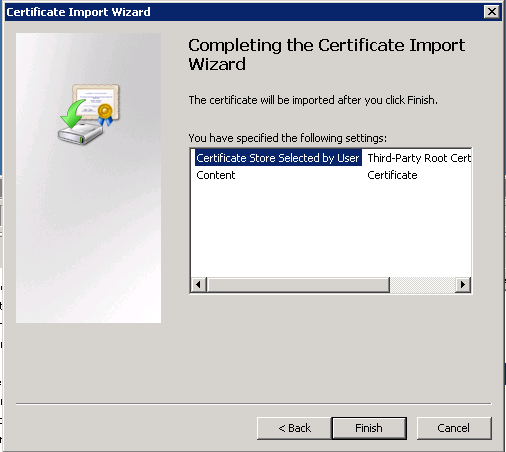
Now click Finish.
The Root Certificate from VeriSign should now have installed in to the correct location and you can then restart the installation of VMWare PowerCLI.