by Mark | Apr 17, 2023 | Azure, Azure Blobs, Blob Storage, Cloud Storage, Storage Accounts
Introduction to Block Blobs
Azure Block Blobs are an essential part of the Microsoft Azure cloud storage platform. They provide a scalable, secure, and cost-effective solution for storing large amounts of unstructured data, such as images, videos, and text files. In this article, we’ll explore the features, benefits, and use cases of Azure Block Blobs, and how our software, Cloud Storage Manager, can help you manage and optimize your Azure Storage consumption.
Understanding Azure Storage Services
Microsoft Azure offers four main storage services:
Blob Storage
Blob Storage is designed for storing unstructured data in a highly scalable and accessible manner. It is suitable for storing large files, such as images, videos, and documents. Azure Block Blobs are a part of this service.
File Storage
File Storage provides fully managed file shares that can be accessed via the SMB protocol. It’s ideal for applications that require a shared file system.
Queue Storage
Queue Storage offers a reliable messaging solution for asynchronous communication between different components of a cloud application.
Table Storage
Table Storage is a NoSQL datastore for storing structured, non-relational data, such as user information or application settings.
Azure Block Blobs: Features and Benefits
Azure Block Blobs come with several advantages:
Scalability and Performance
Block Blobs can scale up to store petabytes of data, with high throughput and low latency for fast data access.
Security and Data Protection
Azure provides built-in encryption, secure access controls, and data redundancy to ensure data protection and compliance.
Cost-Effectiveness
Azure Block Blob Storage offers flexible pricing tiers to match different performance and access requirements, enabling you to optimize costs based on your needs.
Azure Block Blob Storage Structure
Azure Block Blob Storage has a hierarchical structure:
Accounts, Containers, and Blobs
An Azure Storage Account is the top-level container for all your storage resources. Within a storage account, you can create containers, which are logical groupings of block blobs. Each container can hold an unlimited number of blobs.
Block Blob Types: Block Blobs vs. Append Blobs
There are two types of block blobs: Block Blobs and Append Blobs. Block Blobs are optimized for streaming and storing large files, while Append Blobs are designed for scenarios that require frequent additions to existing blobs, such as log files.
Creating and Managing Azure Block Blobs
Using Cloud Storage Manager for Azure Block Blob Management
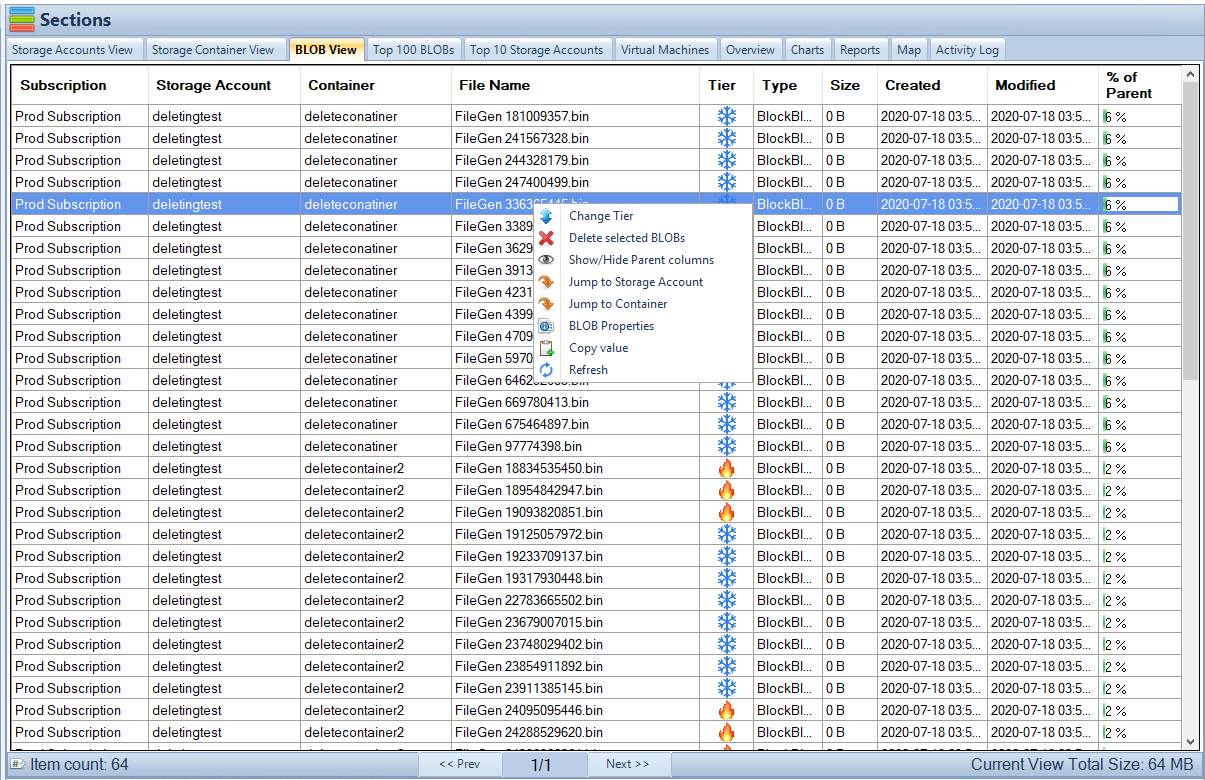
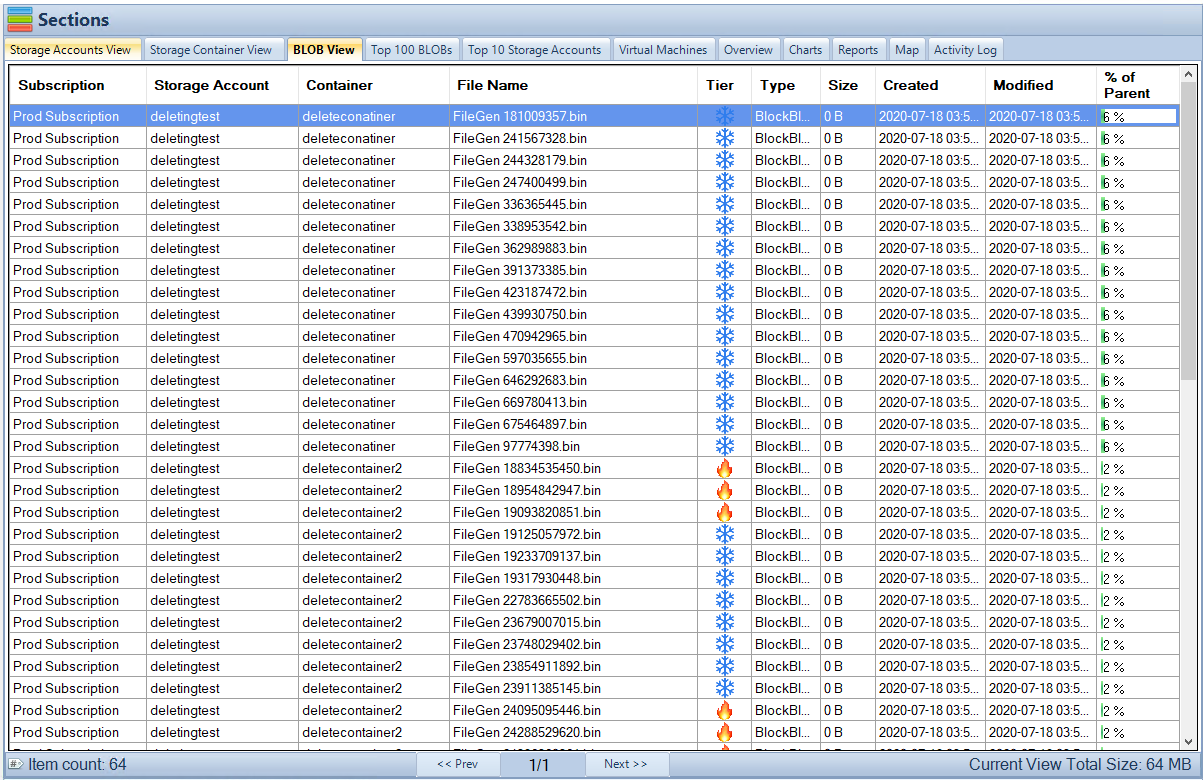
Our software, Cloud Storage Manager, simplifies the process of creating, managing, and monitoring your Azure Block Blobs. It provides insights into your Azure Blob and File Storage consumption, offers detailed reports on storage usage and growth trends, and helps you save money on your Azure Storage.
Azure Block Blob Use Cases
Azure Block Blobs are versatile and can be used in various scenarios:
Streaming Large Files
Block Blobs are ideal for streaming large files, such as video and audio content, as they support parallel read and write operations, ensuring fast and efficient data access.
Data Backup and Archiving
Azure Block Blobs provide a secure and cost-effective solution for storing backups and archival data, with built-in data redundancy and encryption.
Big Data and Analytics
Block Blobs can store large volumes of unstructured data for big data and analytics workloads, enabling you to analyze and process data at scale.
Content Delivery and Web Applications
Azure Block Blobs can be used as a storage backend for web applications, serving images, videos, and other static content directly to end-users. With Azure Content Delivery Network (CDN) integration, you can improve the performance and availability of your content delivery.
Disaster Recovery and Business Continuity
Azure Block Blobs can be used to store critical data, such as backups and application configurations, ensuring that your data is available in the event of a disaster. Azure provides geo-redundant storage options to maintain multiple copies of your data across different regions for added resiliency.

Comparing Azure Block Blobs with Other Azure Storage Services
Azure offers various storage services to cater to different use cases and requirements. Let’s compare Azure Block Blobs with some of these services:
Azure Block Blobs vs. Azure File Storage
While both Azure Block Blobs and Azure File Storage are designed for storing data, they cater to different use cases. Block Blobs are optimized for storing large unstructured data files, whereas File Storage provides a shared file system for applications that require file-based access.
Azure Block Blobs vs. Azure Queue Storage
Azure Queue Storage is a messaging service that enables asynchronous communication between different components of a cloud application. Block Blobs are not designed for messaging; instead, they’re focused on storing and streaming large data files.
Azure Block Blobs vs. Azure Table Storage
Azure Table Storage is a NoSQL datastore for storing structured, non-relational data. It is designed for storing and querying large amounts of structured data, while Block Blobs are optimized for storing unstructured data files.
Pricing and Cost Optimization for Azure Block Blob Storage
Understanding the pricing tiers and optimizing costs is essential when using Azure Block Blob Storage:
Understanding Pricing Tiers
Azure offers different performance and access tiers for Block Blob Storage, such as Hot, Cool, and Archive tiers. Hot tier is designed for frequently accessed data, while Cool and Archive tiers are for infrequently accessed data with lower storage costs.
Data Lifecycle Management
Azure provides automatic data lifecycle management policies that help you transition data between different access tiers based on usage patterns. This enables you to optimize your storage costs by ensuring that data is stored in the most cost-effective tier.
Saving Money with Cloud Storage Manager
Our Cloud Storage Manager software helps you monitor and optimize your Azure Storage consumption, enabling you to identify inefficiencies and save money on your Azure Storage.
Pricing and Cost Optimization for Azure Block Blob Storage
Understanding the pricing tiers and optimizing costs is essential when using Azure Block Blob Storage:
Understanding Pricing Tiers
Azure offers different performance and access tiers for Block Blob Storage, such as Hot, Cool, and Archive tiers. Hot tier is designed for frequently accessed data, while Cool and Archive tiers are for infrequently accessed data with lower storage costs.
Azure Blob Storage Cost Estimator
Our Azure Blob Storage Cost Estimator allows users to visualize and understand Azure Blob Storage costs and options. By inputting various storage parameters such as storage type, redundancy, access tier, and data transfer, users can estimate their storage costs and explore cost-saving opportunities.
You can use our Azure Storage Estimator below to give you an estimate of your Azure Costs.
The Azure Storage costs provided are for illustration purposes and may not be accurate or up-to-date. Azure Storage pricing can change over time, and actual prices may vary depending on factors like region, redundancy options, and other configurations.
To get the most accurate and up-to-date Azure Storage costs, you should refer to the official Azure Storage pricing page: https://azure.microsoft.com/en-us/pricing/details/storage/
Data Lifecycle Management
Azure provides automatic data lifecycle management policies that help you transition data between different access tiers based on usage patterns. This enables you to optimize your storage costs by ensuring that data is stored in the most cost-effective tier.
Saving Money with Cloud Storage Manager
Our Cloud Storage Manager software helps you monitor and optimize your Azure Storage consumption, enabling you to identify inefficiencies and save money on your Azure Storage.
Integrating Azure Block Blobs with Other Azure Services
Azure Block Blobs can be integrated with various Azure services to enhance their functionality and enable new scenarios:
Azure Functions
You can use Azure Functions to build serverless applications that automatically process data stored in Block Blobs. For example, you can create a function that automatically generates thumbnails for images uploaded to Block Blob Storage.
Azure Machine Learning
Azure Block Blobs can be used to store large datasets for machine learning and AI workloads. With Azure Machine Learning integration, you can access and process data stored in Block Blobs directly within your machine learning workflows.
Azure Data Factory
Azure Data Factory allows you to create data pipelines that ingest, transform, and move data from various sources to different destinations. You can use Block Blobs as both a source and a destination within your data pipelines.
Best Practices for Working with Azure Block Blobs
To get the most out of your Azure Block Blob Storage, consider the following best practices:
Optimizing Data Transfer
For large-scale data transfers, consider using Azure Import/Export Service, Azure Data Box, or AzCopy to efficiently transfer data to and from Azure Block Blob Storage.
Data Partitioning
Organize your data into multiple containers and blobs based on access patterns and performance requirements. This helps you achieve better performance and scalability.
Monitoring and Diagnostics
Enable monitoring and diagnostics for your Azure Storage Account to gain insights into the performance, availability, and usage of your Azure Block Blobs. Use Azure Monitor, Azure Storage Analytics and Cloud Storage Manager to analyze metrics, logs, usage and alerts.
Data Security and Compliance
Use Azure Private Endpoints, firewall rules, and role-based access control to secure access to your Block Blob Storage. Additionally, consider using customer-managed keys for added data encryption control.
Backup and Disaster Recovery
Implement a backup and disaster recovery strategy for your Azure Block Blob data, such as using Azure Backup, creating snapshots, or implementing geo-redundant storage.
Conclusion
Azure Block Blobs offer a scalable, secure, and cost-effective solution for storing large amounts of unstructured data in the cloud. They are suitable for various use cases, from streaming large files to data backup and analytics. With the help of Cloud Storage Manager, you can efficiently manage and optimize your Azure Storage consumption.
FAQs
What are the main differences between Azure Block Blobs and Azure File Storage?
Azure Block Blobs are designed for storing large unstructured data files, while Azure File Storage provides a shared file system for applications that require file-based access.
How can I save money on Azure Block Blob Storage?
You can save money by choosing the right performance and access tier based on your needs, implementing data lifecycle management policies, and using tools like Cloud Storage Manager to monitor and optimize your storage consumption.
How secure is my data stored in Azure Block Blobs?
Azure provides built-in encryption, secure access controls, and data redundancy to ensure data protection and compliance.
What are some common use cases for Azure Block Blobs?
Common use cases include streaming large files, data backup and archiving, big data and analytics, content delivery and web applications, and disaster recovery and business continuity.
How does Cloud Storage Manager help me manage my Azure Block Blobs?
Cloud Storage Manager provides insights into your Azure Blob and File Storage consumption, offers detailed reports on storage usage and growth trends, and helps you save money on your Azure Storage.

by Mark | Apr 17, 2023 | Azure Blobs, Blob Storage, Cloud Storage, Storage Accounts
Introduction to Azure Blob Storage Change Feed
In today’s data-driven world, the ability to monitor and track changes to data is essential for organizations across all industries. Azure Blob Storage Change Feed is a powerful feature that helps you keep tabs on your data by providing a log of all changes made to the blobs within your storage account. This article will guide you through understanding and using Azure Blob Storage Change Feed to effectively manage your data.
The Importance of Data Monitoring
Data monitoring is critical for organizations to maintain data quality, ensure compliance with regulations, and make informed decisions. The ability to track changes in real-time allows for rapid response to potential issues and aids in identifying trends and patterns in data.
Understanding Azure Blob Storage
Azure Blob Storage is a scalable, cost-effective, and secure storage solution offered by Microsoft Azure. It is designed to store and manage large amounts of unstructured data, such as text, images, videos, and log files.
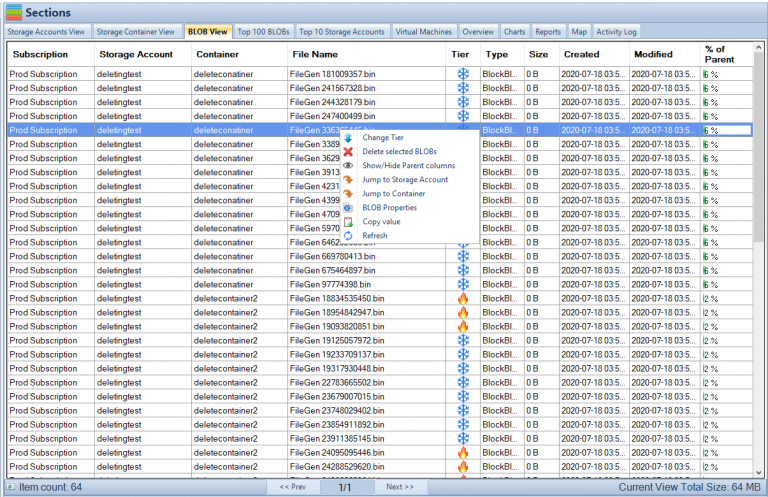
Types of Blob Storage
There are three types of blob storage:
- Block blobs: Optimized for streaming and storing large amounts of data, such as documents, images, and media files.
- Append blobs: Designed for handling log files, where data is added sequentially, and modifications are not allowed.
- Page blobs: Suitable for random read/write operations, such as virtual hard disk (VHD) files used in Azure virtual machines.
What is Change Feed
Change Feed is a feature of Azure Blob Storage that logs all the changes made to the blobs within a storage account. It provides an append-only log of all blob events, allowing you to track modifications and respond accordingly. This feature simplifies data processing and analysis, making it an essential tool for many organizations.
Setting Up Azure Blob Storage Change Feed
Before you can use Change Feed, you need to set up your Azure Blob Storage account and enable the feature.
Creating a Storage Account
- Log in to your Azure portal.
- Click on “Create a resource
- Search for “Storage account” and click “Create.”
- Fill in the required fields and click “Review + create.”
- Once the validation is passed, click “Create” to deploy the storage account.
Enabling Change Feed for Blob Storage
After creating a storage account, follow these steps to enable Change Feed:
- Navigate to the storage account in the Azure portal.
- Click on “Data management” in the left-hand menu.
- Select “Change Feed.”
- Set the “Status” to “Enabled.”
Configuring Change Feed Retention
You can configure the retention period for your Change Feed data, determining how long the logged events are stored in your account. To configure retention, navigate to the “Change Feed” tab in the storage account and set the desired retention period.
Change Feed Snapshot
Change Feed Snapshot is an optional feature that allows you to create point-in-time snapshots of your Change Feed data. This can be useful for historical analysis and reporting purposes. To enable Change Feed Snapshot, go to the “Change Feed” tab in the storage account and set the “Snapshot” option to “Enabled.”
Accessing and Processing Change Feed Data
There are several Azure services and tools that can be used to access and process Change Feed data, including Azure Functions, Azure Data Factory, Azure Logic Apps, and Azure Storage Explorer.
Azure Functions Integration
Azure Functions provide seamless integration with Change Feed, allowing you to create serverless applications that react to blob events. Popular methods for processing Change Feed data with Azure Functions include Event Grid Triggers and Timer Triggers.
Event Grid Triggers
Event Grid Triggers enable Azure Functions to respond to specific events, such as blob creation or deletion. To set up an Event Grid Trigger, follow these steps:
- Create a new Azure Functions app in the Azure portal.
- Add a new function with an “Event Grid Trigger” template.
- Configure the trigger to listen to the desired blob events.
Timer Triggers
Timer Triggers allow Azure Functions to run on a schedule, making them ideal for processing Change Feed data at regular intervals. To set up a Timer Trigger, follow these steps:
- Create a new Azure Functions app in the Azure portal.
- Add a new function with a “Timer Trigger” template.
- Configure the trigger’s schedule using a CRON expression or a time interval.
Processing Change Feed Using Azure Data Factory
Azure Data Factory is a cloud-based data integration service that allows you to create, schedule, and manage data pipelines. It can be used to process Change Feed data through Copy Data activities and Mapping Data Flows.
Copy Data Activity
The Copy Data activity enables you to copy Change Feed data from one location to another. To process Change Feed data with a Copy Data activity, follow these steps:
- Create a new Azure Data Factory instance in the Azure portal.
- In the Data Factory authoring UI, create a new pipeline.
- Add a new “Copy Data” activity to the pipeline.
- Configure the source dataset to use the “AzureBlobStorage” connector and set the “ChangeFeed” option.
- Configure the destination dataset according to your desired output format and location.
- Publish and trigger the pipeline to start processing the Change Feed data.
Mapping Data Flows
Mapping Data Flows in Azure Data Factory allow you to build complex data transformations using a visual interface. To process Change Feed data with a Mapping Data Flow, follow these steps:
- Create a new Azure Data Factory instance in the Azure portal.
- In the Data Factory authoring UI, create a new pipeline.
- Add a new “Mapping Data Flow” activity to the pipeline.
- Configure the source dataset to use the “AzureBlobStorage” connector and set the “ChangeFeed” option.
- Design the data transformation logic using the visual interface, including aggregations, filters, and joins.
- Configure the destination dataset according to your desired output format and location.
- Publish and trigger the pipeline to start processing the Change Feed data.
Utilizing Azure Logic Apps
Azure Logic Apps is a cloud-based service that allows you to create and run workflows that integrate with various services and data sources. You can use Logic Apps to process Change Feed data by setting up a workflow triggered by blob events. To create a Logic App for processing Change Feed data, follow these steps:
- Create a new Azure Logic App instance in the Azure portal.
- In the Logic App Designer, add a new trigger for the desired blob event, such as “When a blob is added or modified.”
- Add actions to process the Change Feed data, such as sending notifications, updating databases, or calling external APIs.
- Save and enable the Logic App to start processing the Change Feed data.
Azure Storage Explorer
Azure Storage Explorer is a standalone application that enables you to manage and monitor your Azure storage resources, including Change Feed data. With Storage Explorer, you can view, download, and delete Change Feed data directly from your local machine. To use Azure Storage Explorer, download the application from the official website and sign in with your Azure account credentials.
Cloud Storage Manager
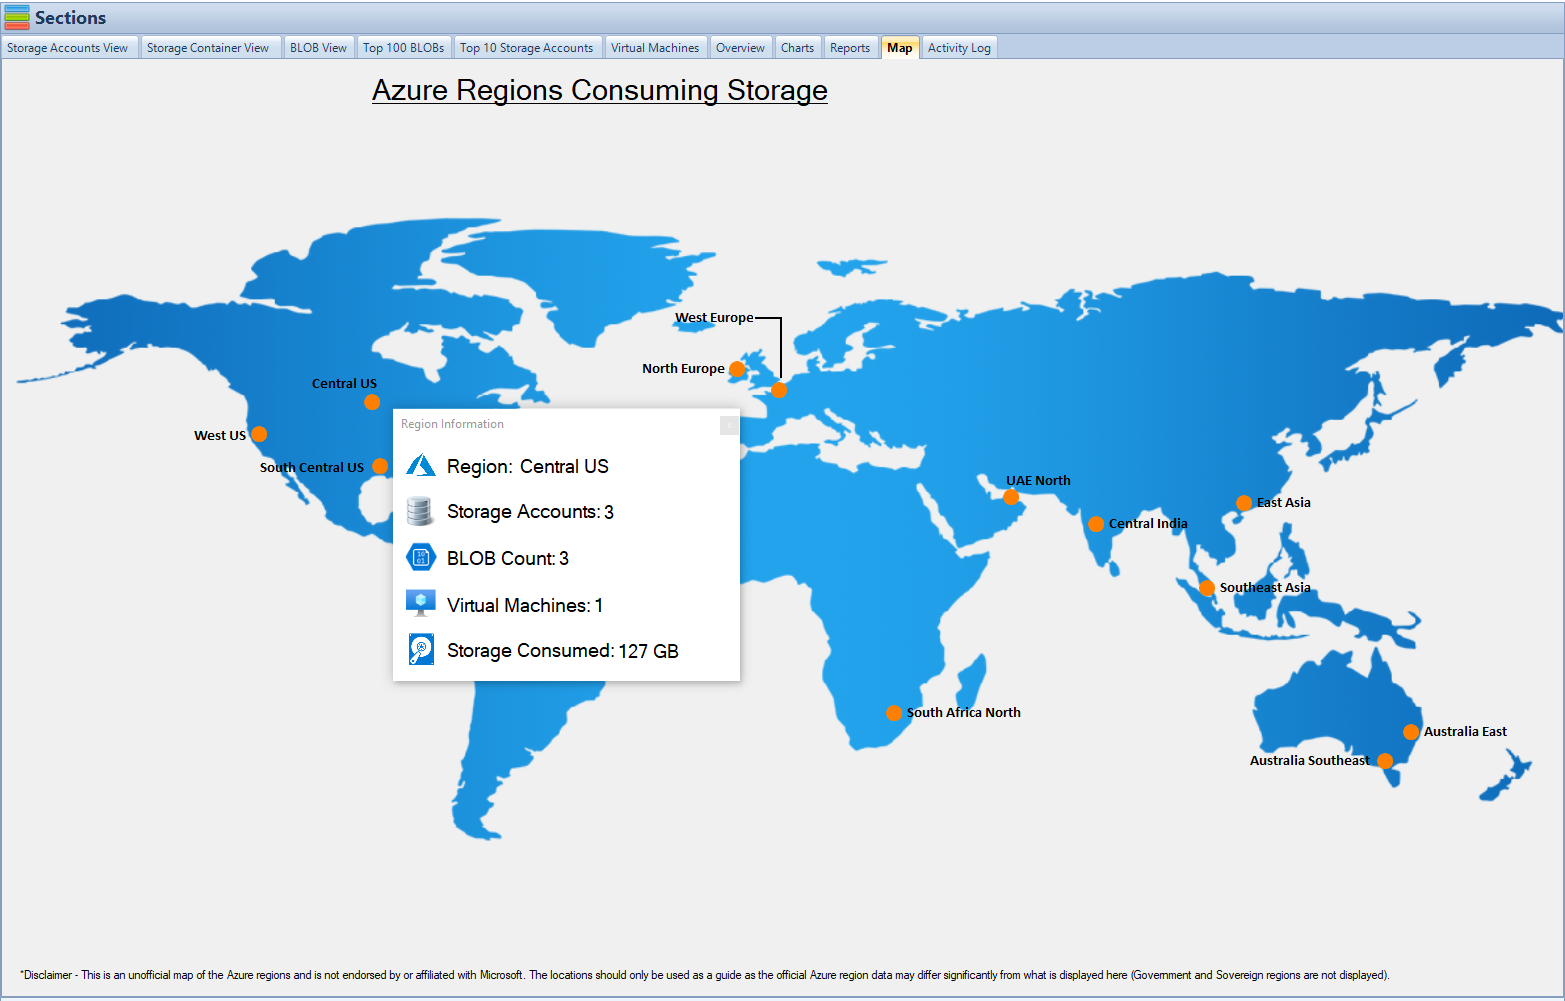
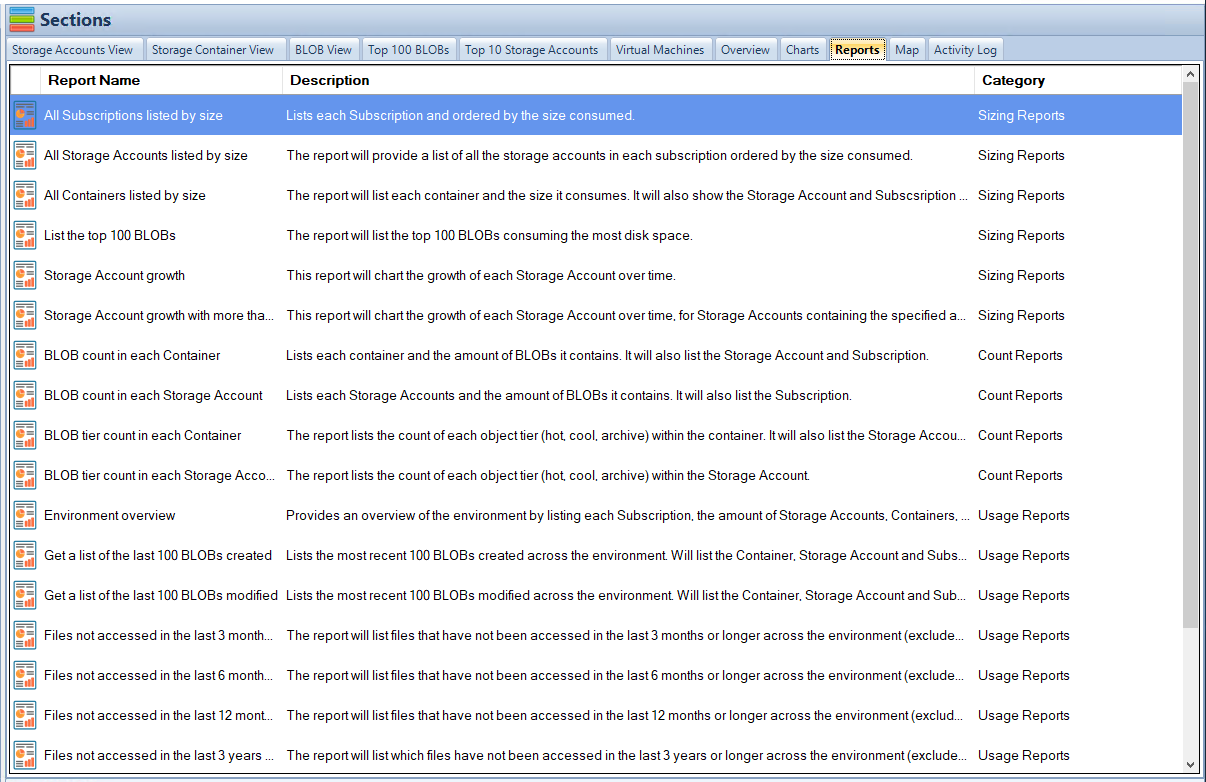
Cloud Storage Manager is a tool designed to help organizations manage their Azure Blob and Azure File storage. It provides a map view, tree view, graphs, and reporting capabilities to show storage growth over time and offer insights into storage consumption. Users can search across all Azure Storage Accounts, identify Blobs to move to lower storage tiers to save costs, and perform actions like changing tiering or deleting Blobs within the explorer view. Cloud Storage Manager offers a free version (up to 30TB), an Advanced version (up to 1PB), and an Enterprise version (unlimited storage) based on the size of the organization’s Azure Subscriptions and storage consumption. A free 14-day trial is available.
Real-World Use Cases of Azure Blob Storage Change Feed
Azure Blob Storage Change Feed has numerous practical applications across various industries. Some common use cases include:
Audit and Compliance
Change Feed can be used to maintain a complete audit trail of all changes made to your blob storage. This helps organizations ensure compliance with data protection regulations and internal policies.
Data Processing and Analytics
Change Feed simplifies data processing by providing an organized, chronological log of all blob events. This data can be used for various analytics tasks, such as monitoring data growth, detecting anomalies, and generating insights.
Backup and Disaster Recovery
By tracking changes in real-time, Change Feed can be used to create incremental backups and improve disaster recovery strategies. This allows organizations to minimize data loss and ensure business continuity in the event of an outage or data corruption.
Event Sourcing
Change Feed enables event sourcing patterns by providing a reliable, ordered log of events that can be used to recreate the state of an application or system at any point in time.
Data Archiving and Migration
Change Feed data can be used to implement data archiving and migration strategies by providing an accurate record of all blob modifications, deletions, and additions, facilitating the transfer of data between storage accounts or locations.
Best Practices for Using Azure Blob Storage Change Feed
To make the most of Azure Blob Storage Change Feed, it’s essential to follow best practices for efficient data processing, monitoring, and security.
Efficient Data Processing
When processing Change Feed data, it’s crucial to use the right Azure services and tools that meet your specific needs. Evaluate the capabilities of Azure Functions, Azure Data Factory, Azure Logic Apps, and Azure Storage Explorer to determine the most suitable solution for your data processing requirements.
Monitoring and Alerting
Keep a close eye on your Change Feed data to detect potential issues and trends. Set up monitoring and alerting mechanisms, such as Azure Monitor or custom Logic Apps, to notify you of any critical events or anomalies.
Data Security and Privacy
Ensure that your Change Feed data is protected by following Azure Blob Storage security best practices, such as encrypting data at rest and in transit, managing access control policies, and maintaining regular security audits.
Conclusion
Azure Blob Storage Change Feed is an invaluable tool for organizations that require efficient and scalable solutions for tracking and processing data changes. By integrating with other Azure services and tools, Change Feed can help you monitor, analyze, and react to changes in your blob storage data in real-time. With a wide range of real-world use cases and best practices, Azure Blob Storage Change Feed is a powerful feature that can significantly improve your organization’s data management capabilities.
Frequently Asked Questions (FAQs)
Is Azure Blob Storage Change Feed available for all storage account types?
Yes, Change Feed is available for all Azure Blob Storage account types, including General-purpose v2, Blob Storage, and Premium Block Blob accounts.
How much does it cost to use Azure Blob Storage Change Feed?
The cost of using Change Feed depends on factors such as the amount of data stored, the number of operations performed, and the duration of data retention. For detailed pricing information, refer to the Azure Blob Storage pricing page.
Can I enable Change Feed for an existing storage account?
Yes, you can enable Change Feed for an existing storage account by navigating to the “Change Feed” tab in the storage account settings and setting the “Status” to “Enabled.”
Is there a way to filter Change Feed data based on specific blob events?
Yes, you can filter Change Feed data based on specific blob events by utilizing Azure services like Azure Functions or Azure Logic Apps. These services allow you to create triggers and actions based on the desired events, such as blob creation or deletion.
Can I process Change Feed data in real-time?
Yes, Azure Blob Storage Change Feed data can be processed in real-time by using Azure Functions with Event Grid Triggers or Timer Triggers, or by creating workflows in Azure Logic Apps.

by Mark | Apr 14, 2023 | Azure, Azure Disks, Cloud Storage
Azure Disk Storage is a robust and versatile cloud storage solution provided by Microsoft Azure. It offers high-performance, durable, and scalable storage options for various workloads, such as virtual machines, databases, and business-critical applications. Understanding the key factors impacting costs, best practices, and how to optimize Azure Disk Storage can help users save money and make the most of their cloud storage investment. This article will delve into these aspects, exploring the challenges and trade-offs involved in balancing different factors. It will also highlight the importance of considering the impact on when making decisions about Azure disks. To better visualize and understand Azure Blob Storage costs and options, we recommend using our software, Cloud Storage Manager, provides insights into Azure blob and file storage consumption, reporting on storage usage and growth trends.
Understanding Azure Disk Storage
Azure Disk Storage offers four types of managed disks: Ultra Disk, Premium SSD, Standard SSD, and Standard HDD. Each type caters to different workloads and performance requirements, with varying costs associated.
Ultra Disk
Ultra Disks are high-performance storage designed for IO-intensive workloads that require low-latency and high-throughput. They are suitable for applications such as SAP HANA, top-tier databases, and other transaction-heavy workloads.
Premium SSD
Premium SSDs offer high-performance storage for production workloads that require consistent low-latency and high IOPS. They are ideal for virtual machines running databases, data warehousing, and enterprise applications.
Standard SSD
Standard SSDs provide cost-effective storage for workloads that require consistent performance but do not have high IOPS requirements. They are suitable for web servers, low-traffic applications, and development and test environments.
Standard HDD
Standard HDDs are low-cost storage options designed for workloads with low IOPS and throughput requirements. They are ideal for backup, archival, and other infrequent access use cases.
Key Factors Impacting Costs
Several factors influence the overall cost of Azure Disk Storage, including disk type, disk size, performance tiers, data transfer, and redundancy options.
Disk Type
Azure Disk Storage offers four types of managed disks, as mentioned earlier. Ultra Disks and Premium SSDs come at a higher price due to their superior performance, while Standard SSDs and HDDs are more affordable options. It’s crucial to select the right disk type for your workloads to balance cost and performance effectively.
Disk Size
The cost of Azure Disk Storage increases with the size of the disk. Larger disks provide more storage capacity and higher performance, but they also incur higher costs. To optimize costs, it’s essential to choose a disk size that meets your storage and performance requirements without over-provisioning.
Performance Tiers
Azure Disk Storage offers different performance tiers based on the number of input/output operations per second (IOPS) and throughput (MB/s) required. Higher performance tiers come at a higher cost. It’s essential to select the appropriate tier to meet your workloads’ performance requirements while minimizing costs.
Data Transfer
Data transfer costs are incurred when data is transferred in and out of Azure Disk Storage. Ingress (data transfer into the storage) is generally free, while egress (data transfer out of the storage) incurs charges. To optimize data transfer costs, it’s essential to monitor and manage data traffic patterns and minimize unnecessary data transfers.
Redundancy Options
Azure Disk Storage offers different redundancy options to ensure data durability and availability. Locally redundant storage (LRS), zone-redundant storage (ZRS), and geo-redundant storage (GRS) are available, with increasing levels of redundancy and associated costs.
Best Practices for Azure Disk Storage
Implementing best practices for Azure Disk Storage can help optimize costs, performance, and durability. This section will discuss various best practices in detail.
Select the Appropriate Disk Type and Size
Choose the right disk type based on your workload’s performance requirements and budget. Also, consider the appropriate disk size to meet your storage capacity and performance needs without incurring unnecessary costs. Regularly review your storage requirements and adjust disk types and sizes accordingly to ensure optimal cost and performance.
Optimize Performance Tiers
Select the performance tier that best aligns with your workload’s IOPS and throughput requirements. Over-provisioning can lead to increased costs, while under-provisioning can negatively impact performance. Regularly monitor your workloads’ performance and adjust the performance tiers accordingly to maintain optimal cost and performance balance.
Use Snapshots and Backup
Leverage Azure Disk snapshots to create point-in-time backups of your disks. Regularly schedule backups to protect your data from accidental deletion, corruption, or disaster. Implementing a backup strategy helps ensure data durability and recovery in case of unforeseen incidents.
Implement Redundancy
Choose the right redundancy option based on your data durability and availability needs. Consider factors such as recovery point objectives (RPO) and recovery time objectives (RTO) when making this decision. Regularly review your redundancy requirements and adjust the redundancy options accordingly to optimize cost and data protection.
Monitor and Optimize Storage Usage
Regularly monitor your Azure Disk Storage usage to identify patterns, trends, and potential areas for optimization. Our software, Cloud Storage Manager, can provide valuable insights into your storage consumption and help identify cost-saving opportunities.
Trade-offs and Challenges
When optimizing Azure Disk Storage, it’s essential to consider the trade-offs and challenges associated with different approaches.
Performance vs. Cost
Higher-performing disk types and performance tiers come with higher costs. Balancing performance requirements with budget constraints can be challenging, and it’s crucial to evaluate the potential impact on your workload and user experience. Regularly review your workloads’ performance requirements and adjust the disk types and performance tiers accordingly to maintain an optimal balance between cost and performance.
Redundancy vs. Cost
Increased redundancy offers better data durability and availability but also incurs higher costs. Evaluate the risks associated with data loss or unavailability and choose a redundancy option that meets your business requirements without excessive expense. Regularly review your workloads’ redundancy requirements and adjust the redundancy options accordingly to optimize cost and data protection.
Scalability vs. Management Complexity
Azure Disk Storage is designed to be scalable, but increased storage usage can introduce management complexity. Implementing monitoring and management tools, such as Cloud Storage Manager, can help mitigate these challenges while maintaining scalability. Regularly review your storage usage and implement appropriate management and monitoring solutions to maintain storage efficiency and optimize costs.
How to Use Azure Disk Storage
This section provides a step-by-step guide on using Azure Disk Storage.
Create an Azure Disk Storage Account
To start using Azure Disk Storage, you’ll first need to create an Azure Storage account. Sign in to the Azure portal, click ‘Create a resource’, and search for ‘Storage account.’ Fill in the required information, such as subscription, resource group, account name, and location. Choose the desired performance tier and redundancy option, and then click ‘Create.’
Create a Managed Disk
Once your storage account is created, navigate to the ‘Disks‘ section of the Azure portal. Click ‘Add’ to create a new managed disk. Select the appropriate disk type, size, and performance tier based on your requirements. You can also enable additional features such as disk encryption and disk snapshots during this process.
Attach the Disk to a Virtual Machine
To use the managed disk with a virtual machine (VM), navigate to the ‘Virtual machines’ section of the Azure portal. Select the VM you want to attach the disk to, and click on ‘Disks’ in the VM settings. Click ‘Add data disk’ and choose the managed disk you created earlier. Save the changes to attach the disk to the VM.
Configure and Use the Disk
After attaching the disk to the VM, you’ll need to configure the disk within the VM’s operating system. This process varies depending on the operating system in use. For Windows-based VMs, you’ll need to initialize the disk, create partitions, and format the partitions using Disk Management or diskpart utility. For Linux-based VMs, you’ll need to use tools like fdisk or parted to create partitions and file systems. Once configured, you can use the disk as you would any other storage device.
Monitor and Optimize Storage Usage
Regularly monitor your Azure Disk Storage usage using Azure portal metrics, Azure Monitor, or third-party tools like Cloud Storage Manager. Identify patterns, trends, and potential areas for optimization, such as adjusting disk types, sizes, performance tiers, or redundancy options. Implementing regular monitoring and optimization practices can help maintain storage efficiency and optimize costs.

Azure Blob Storage Cost Estimator and Cloud Storage Manager
To help users save money on their Azure Storage, we recommend using our free Azure Blob Storage Cost Estimator and Cloud Storage Manager software.
Azure Blob Storage Cost Estimator
Our Azure Blob Storage Cost Estimator allows users to visualize and understand Azure Blob Storage costs and options. By inputting various storage parameters such as storage type, redundancy, access tier, and data transfer, users can estimate their storage costs and explore cost-saving opportunities.
You can use our Azure Storage Estimator below to give you an estimate of your Azure Costs.
The Azure Storage costs provided are for illustration purposes and may not be accurate or up-to-date. Azure Storage pricing can change over time, and actual prices may vary depending on factors like region, redundancy options, and other configurations.
To get the most accurate and up-to-date Azure Storage costs, you should refer to the official Azure Storage pricing page: https://azure.microsoft.com/en-us/pricing/details/storage/
Cloud Storage Manager
Cloud Storage Manager is a powerful software that provides insights into Azure blob and file storage consumption. It offers detailed reports on storage usage and growth trends, helping users identify potential cost-saving opportunities. By implementing Cloud Storage Manager, users can monitor their storage usage and make informed decisions on optimizing their Azure Storage investment.
Azure Disk Storage FAQs
| No. |
Question |
Answer |
| 1. |
What is Azure Disk Storage?
|
Azure Disk Storage is a cloud-based storage solution offered by Microsoft, designed for various workloads, including virtual machines, databases, and business-critical applications. |
| 2. |
What are the types of Azure managed disks?
|
Azure offers four types of managed disks: Ultra Disk, Premium SSD, Standard SSD, and Standard HDD. Each type caters to different workloads and performance requirements. |
| 3. |
What factors impact Azure Disk Storage costs?
|
Key factors impacting costs include disk type, disk size, performance tiers, data transfer, and redundancy options. |
| 4. |
How can I optimize Azure Disk Storage costs?
|
To optimize costs, select the appropriate disk type, size, and performance tier based on your workload requirements, monitor data transfer, and choose the suitable redundancy option. |
| 5. |
What are the best practices for Azure Disk Storage?
|
Best practices include selecting the appropriate disk type and size, optimizing performance tiers, using snapshots and backups, implementing redundancy, and monitoring and optimizing storage usage. |
| 6. |
What trade-offs and challenges should I consider?
|
Consider trade-offs between performance vs. cost, redundancy vs. cost, and scalability vs. management complexity when optimizing Azure Disk Storage. |
| 7. |
How do I create and use Azure Disk Storage?
|
Create an Azure Storage account, then create a managed disk. Attach the disk to a virtual machine, configure the disk within the VM’s operating system, and use it as any other storage device. Monitor and optimize storage usage. |
| 8. |
What is the Azure Blob Storage Cost Estimator?
|
The Azure Blob Storage Cost Estimator is a free tool that helps users visualize and understand Azure Blob Storage costs and options by inputting various storage parameters. |
| 9. |
What is Cloud Storage Manager?
|
Cloud Storage Manager is a software that provides insights into Azure blob and file storage consumption, offering detailed reports on storage usage and growth trends to help users identify potential cost-saving opportunities. |
| 10. |
Can I use Azure Disk Storage for backup and archival purposes?
|
Yes, you can use Azure Disk Storage, specifically Standard HDDs, for backup and archival purposes due to their low cost and lower IOPS and throughput requirements suitable for infrequent access use cases. |
Azure Disk Storage Conclusion
Azure Disk Storage is a versatile and powerful cloud storage solution that caters to a wide range of workloads and performance requirements. By understanding the key factors that impact costs, implementing best practices, and considering the trade-offs and challenges involved, you can optimize your Azure Disk Storage usage and save money. Utilizing tools like the Azure Blob Storage Cost Estimator and Cloud Storage Manager can further aid in understanding and managing your storage investment, allowing you to make informed decisions and maintain storage efficiency.

by Mark | Apr 13, 2023 | Azure, Azure Blobs, Azure FIles, Storage Accounts
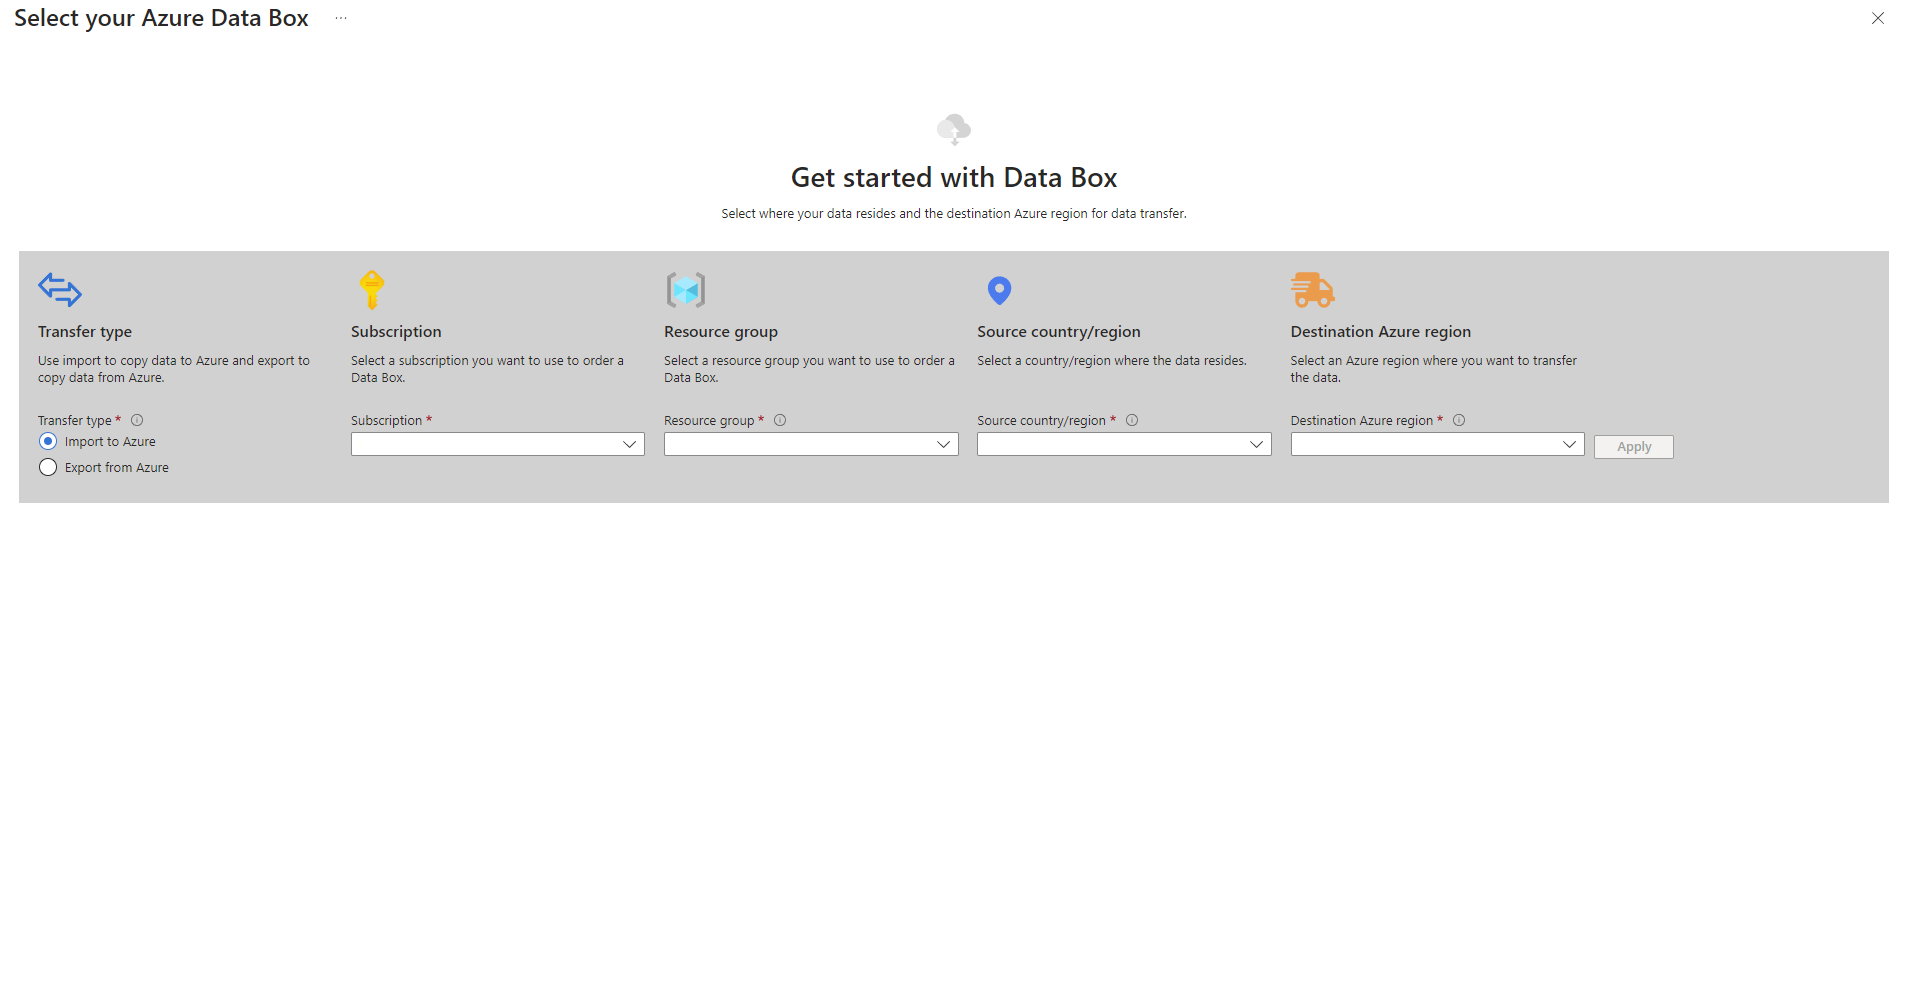
Microsoft’s Azure Data Box is a data transfer solution designed to simplify and streamline the process of moving large amounts of data to Azure cloud storage. With the continuous growth of data volumes, businesses are seeking efficient and cost-effective ways to transfer and store data in the cloud. This comprehensive article provides an in-depth analysis of the key factors impacting costs, best practices, and a step-by-step guide to using Azure Data Box. By discussing tradeoffs and challenges associated with various approaches, this article aims to inform and engage readers who are considering transferring data to Azure.
This article also highlights the importance of using tools such as the free Azure Blob Storage Cost Estimator and the Cloud Storage Manager software. These tools help users understand storage costs and options, provide insights into Azure Blob and File storage consumption, and generate reports on storage usage and growth trends to save money on Azure Storage.
Azure Data Box – An Overview
Azure Data Box is a family of physical devices that enable secure and efficient data transfer to Azure cloud storage. The Data Box family includes several products, each designed for different data transfer requirements:
Azure Data Box Disk
Designed for small to medium-sized data transfers, the Data Box Disk is a portable SSD device with an 8TB capacity. It supports data transfer rates of up to 450MB/s and is suitable for projects that require rapid data transfer.
Azure Data Box
The Azure Data Box is a rugged, tamper-resistant device designed for large-scale data transfers. With a 100TB capacity, it supports data transfer rates of up to 1.5GB/s, making it suitable for projects involving significant amounts of data.
Azure Data Box Heavy
Designed for massive data transfer projects, the Data Box Heavy has a 1PB capacity and supports data transfer rates of up to 40GB/s. This device is ideal for large enterprises looking to move vast amounts of data to the cloud.
Azure Data Box Gateway
The Azure Data Box Gateway is a virtual appliance that enables data transfer from on-premises environments to Azure Blob storage. This appliance is suitable for users who require a continuous, incremental data transfer solution to the cloud.
Azure Data Box Edge
The Azure Data Box Edge is a physical appliance that combines data transfer and edge computing capabilities. This device can process and analyze data locally before transferring it to the cloud, making it suitable for scenarios where real-time data processing is essential.
Key Factors Impacting Costs
When considering Azure Data Box, it’s crucial to understand the key factors that influence costs:
Device Usage
Azure Data Box devices are available on a pay-as-you-go basis, with pricing depending on the device type and duration of usage. When planning a data transfer project, it’s essential to select the most suitable device based on the project’s data volume and timeframe.
Data Transfer
While data transfer into Azure is typically free, data transfer out of Azure incurs charges. Depending on the data volume and frequency of transfers, these costs can significantly impact the overall expenses of a project.
Storage
Azure offers various storage options, including Blob Storage, File Storage, and Data Lake Storage. Each storage option has its pricing structure, with factors such as redundancy, access tier, and retention period affecting the costs.
Egress Fees
When transferring data out of Azure, egress fees may apply. These fees are based on the amount of data transferred and vary depending on the geographical region.
Data Processing
For scenarios involving Azure Data Box Edge, additional costs may be associated with data processing and analysis at the edge. These costs depend on the complexity and volume of the data being processed.
Azure DataBox Best Practices
To ensure a successful data transfer project with Azure Data Box, consider the following best practices:
Assess Your Data Transfer Needs
Before selecting an Azure Data Box device, thoroughly assess your data transfer requirements. Consider factors such as data volume, transfer speed, and project timeline to choose the most suitable device for your needs.
Data Compression
Compressing data before transferring it to Azure Data Box can help save time and reduce storage costs. Use efficient data compression algorithms to minimize data size without compromising data integrity.
Secure Data Transfer
Azure Data Box devices use encryption to protect data during transit and at rest. However, it’s essential to implement additional security measures, such as data access controls and data classification policies, to ensure the highest level of security for your data.
Monitor and Optimize
Continuously monitor the performance of your data transfer process to identify potential bottlenecks and optimize data transfer speeds. Leverage tools like the Azure Blob Storage Cost Estimator and Cloud Storage Manager to gain insights into your storage consumption and optimize costs.
Data Validation
Ensure that the data being transferred is accurate and valid. Implement data validation processes to catch errors and inconsistencies in the data before transferring it to Azure Data Box.
Network Configuration
Optimize your network configuration to maximize data transfer speeds. Factors such as bandwidth, latency, and network topology can significantly impact the efficiency of the data transfer process.
Incremental Data Transfer
For ongoing data transfer projects, consider using incremental data transfer methods to minimize data transfer time and costs. Azure Data Box Gateway and Data Box Edge provide options for continuous, incremental data transfer to Azure Blob storage.
How to Use Azure Data Box
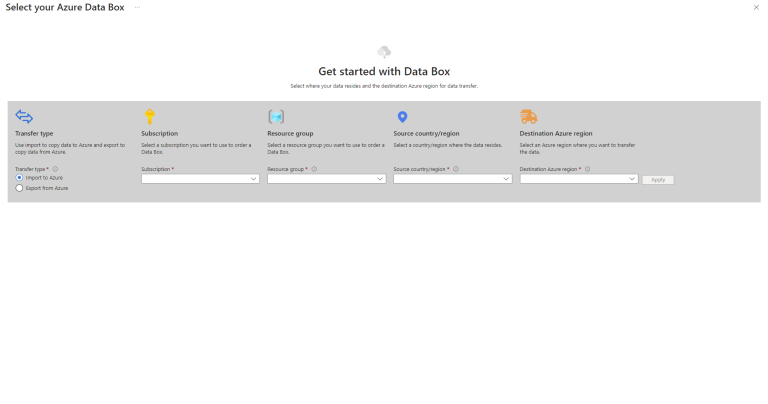
To use Azure Data Box for data transfer, follow these steps:
Order an Azure Data Box Device
Based on your data transfer requirements, order the appropriate Azure Data Box device from the Azure portal. Specify the destination Azure storage account where you want to transfer your data.
Receive and Set up the Device
Once you receive the device, connect it to your local network and configure the network settings. Power on the device and follow the setup instructions provided by Microsoft.
Copy Data to the Device
Using the Azure Data Box tools, copy your data to the device. Ensure that the data is properly organized and compressed for efficient data transfer.
Ship the Device
After copying the data, securely pack the device and ship it back to the Azure Data Center. Microsoft will process the device and upload the data to the specified Azure storage account.
Verify Data Transfer
Once the data is uploaded to your Azure storage account, verify the data transfer by comparing the source and destination data. Ensure that all data has been successfully transferred and is accessible in your Azure storage account.
Tradeoffs and Challenges
While Azure Data Box simplifies data transfer to Azure, it’s essential to be aware of the tradeoffs and challenges involved:
Limited Availability
Azure Data Box devices are available only in select regions, which may limit the service’s accessibility for some users. Check the availability of Azure Data Box devices in your region before planning a data transfer project.
Data Transfer Time
Data transfer time can vary depending on the device type, data volume, and network speed. While Azure Data Box devices are designed for high-speed data transfer, some projects may still require a significant amount of time to complete.
Device Handling
Azure Data Box devices are physical devices that require proper handling during shipping and setup. Mishandling can lead to data loss or device damage, impacting the success of your data transfer project.
Data Security
Though Azure Data Box devices use encryption to protect data during transit and at rest, ensuring data security throughout the entire data transfer process is crucial. Implementing additional security measures, such as data access controls and data classification policies, is necessary to guarantee the security of your data.
Data Transfer Costs
While Azure Data Box enables efficient data transfer, it’s essential to consider the overall costs associated with the data transfer process. Factors such as device usage fees, storage costs, and egress fees can impact the total project cost. Comparing the costs of using Azure Data Box with alternative data transfer methods can help determine the most cost-effective solution for your needs.
Network Configuration and Bandwidth
Optimizing your network configuration and ensuring sufficient bandwidth are essential to achieve the maximum data transfer speeds offered by Azure Data Box devices. Network limitations, such as low bandwidth or high latency, can negatively impact the efficiency of the data transfer process.
Importance of Considering the Impact on Data Transfer Decisions
When making decisions about transferring data to Azure, it’s vital to consider the impact of various factors on the overall success and cost of your project. Understanding the tradeoffs and challenges involved in using Azure Data Box, as well as considering alternative data transfer methods, can help you make informed decisions that best meet your needs and budget.
Data Migration Strategy
Developing a comprehensive data migration strategy is crucial for a successful data transfer project. This strategy should include an assessment of data transfer needs, selection of the most suitable Azure Data Box device, and a timeline for the data transfer process.
Cost Management
Understanding and managing the costs associated with Azure Data Box and Azure storage services are essential for optimizing expenses. Utilizing tools such as the Azure Blob Storage Cost Estimator and Cloud Storage Manager can provide valuable insights into storage costs and usage trends, helping businesses save money on their Azure Storage.
Compliance and Regulations
When transferring data to Azure, businesses must ensure compliance with industry-specific regulations and data protection laws. Understanding the requirements of these regulations and implementing appropriate measures to maintain compliance is essential for a successful data transfer project.
Disaster Recovery and Business Continuity
As part of a comprehensive data transfer strategy, businesses should consider the impact of data migration on disaster recovery and business continuity plans. Ensuring that data remains accessible and recoverable during and after the data transfer process is crucial for minimizing downtime and maintaining business operations.
Conclusion
Azure Data Box is an efficient and secure solution for transferring large volumes of data to Azure cloud storage. By understanding the key factors impacting costs, following best practices, and considering the tradeoffs and challenges associated with Azure Data Box, businesses can successfully transfer their data to Azure while optimizing costs. Utilizing tools like the Azure Blob Storage Cost Estimator and Cloud Storage Manager can further enhance the visibility and management of your Azure storage, ultimately saving money and improving your overall cloud storage experience.

by Mark | Apr 12, 2023 | Azure, Azure Blobs, Azure Disks, Azure FIles, Azure Queues, Azure Tables, Blob Storage, Cloud Computing, Cloud Storage, Security, Storage Accounts
In today’s fast-paced and technology-driven world, cloud computing has become an essential component of modern business operations. Microsoft Azure, a leading cloud platform, offers a wide range of services and tools to help organizations manage their infrastructure efficiently. One crucial aspect of managing Azure resources is the Azure Resource Group, a logical container for resources deployed within an Azure subscription. In this comprehensive guide, we’ll explore the best practices for organizing Azure Resource Groups, enabling you to optimize your cloud infrastructure, streamline management, and enhance the security and compliance of your resources.
Why Organize Your Azure Resource Groups?
Understanding the importance of organizing Azure Resource Groups is essential to leveraging their full potential. Efficient organization of your resource groups can lead to numerous benefits that impact various aspects of your cloud infrastructure management:
- Improved resource management: Proper organization of Azure Resource Groups allows you to manage your resources more effectively, making it easier to deploy, monitor, and maintain your cloud infrastructure. This can result in increased productivity and more efficient use of resources.
- Simplified billing and cost tracking: When resources are organized systematically, it becomes simpler to track and allocate costs associated with your cloud infrastructure. This can lead to better budgeting, cost optimization, and overall financial management.
- Enhanced security and compliance: Organizing your Azure Resource Groups with security and compliance in mind can help mitigate potential risks and ensure the protection of your resources. This involves implementing access controls, isolating sensitive resources, and monitoring for security and compliance using Azure Policy.
- Streamlined collaboration among teams: An organized Azure Resource Group structure promotes collaboration between teams, making it easier for them to work together on projects and share resources securely.
Now that we understand the significance of organizing Azure Resource Groups let’s dive into the best practices that can help you achieve these benefits.
Define a Consistent Naming Convention
Creating a consistent naming convention for your resource groups is the first step towards effective organization. This practice will enable you and your team to quickly identify and manage resources within your Azure environment. In creating a naming convention, you should consider incorporating the following information:
- Project or application name: Including the project or application name in your resource group name ensures that resources are easily associated with their corresponding projects or applications. This can be especially helpful when working with multiple projects or applications across your organization.
- Environment (e.g., dev, test, prod): Specifying the environment (e.g., development, testing, or production) in your resource group name allows you to quickly differentiate between resources used for various stages of your project lifecycle. This can help you manage resources more efficiently and reduce the risk of accidentally modifying or deleting the wrong resources.
- Geographic location: Including the geographic location in your resource group name can help you manage resources based on their physical location, making it easier to comply with regional regulations and optimize your cloud infrastructure for performance and latency.
- Department or team name: Adding the department or team name to your resource group name can improve collaboration between teams, ensuring that resources are easily identifiable and accessible by the appropriate team members.
Group Resources Based on Lifecycle and Management
Another essential practice in organizing Azure Resource Groups is to group resources based on their lifecycle and management requirements. This approach can help you better manage and maintain your cloud infrastructure by simplifying resource deployment, monitoring, and deletion. To achieve this, consider the following:
- Group resources with similar lifecycles: Resources that share similar lifecycles, such as development, testing, and production resources, shouldbe grouped together within a resource group. This approach allows you to manage these resources more effectively by simplifying deployment, monitoring, and maintenance tasks.
- Group resources based on ownership and responsibility: Organizing resources according to the teams or departments responsible for their management can help improve collaboration and access control. By grouping resources in this manner, you can ensure that the appropriate team members have access to the necessary resources while maintaining proper security and access controls.
- Group resources with similar management requirements: Resources that require similar management tasks or share common dependencies should be grouped together. This can help streamline resource management and monitoring, as well as ensure that resources are consistently maintained and updated.
Use Tags to Enhance Organization
Tags are a powerful tool for organizing resources beyond the scope of resource groups. By implementing a consistent tagging strategy, you can further enhance your cloud infrastructure’s organization and management. Some of the key benefits of using tags include:
- Filter and categorize resources for reporting and analysis: Tags can be used to filter and categorize resources based on various criteria, such as project, environment, or department. This can help you generate more accurate reports and analyses, enabling you to make more informed decisions about your cloud infrastructure.
- Streamline cost allocation and tracking: Tags can be used to associate resources with specific cost centers or projects, making it easier to allocate and track costs across your organization. This can help you optimize your cloud infrastructure costs and better manage your budget.
- Improve access control and security: Tags can be used to implement access controls and security measures, such as restricting access to resources based on a user’s role or department. This can help you maintain a secure and compliant cloud infrastructure by ensuring that users only have access to the resources they need.
Design for Security and Compliance
Organizing Azure Resource Groups with security and compliance in mind can help minimize risks and protect your resources. To achieve this, consider the following best practices:
- Isolate sensitive resources in dedicated resource groups: Sensitive resources, such as databases containing personal information or mission-critical applications, should be isolated in dedicated resource groups. This can help protect these resources by limiting access and reducing the risk of unauthorized access or modification.
- Implement role-based access control (RBAC) for resource groups: RBAC allows you to grant specific permissions to users based on their roles, ensuring that they only have access to the resources necessary to perform their job duties. Implementing RBAC for resource groups can help you maintain a secure and compliant cloud infrastructure.
- Monitor resource groups for security and compliance using Azure Policy: Azure Policy is a powerful tool for monitoring and enforcing compliance within your cloud infrastructure. By monitoring your resource groups using Azure Policy, you can identify and remediate potential security and compliance risks before they become critical issues.
Leverage Azure Management Groups
Azure Management Groups offer a higher-level organization structure for managing your Azure subscriptions and resource groups. Using management groups can help you achieve the following benefits:
- Enforce consistent policies and access control across multiple subscriptions: Management groups allow you to define and enforce policies and access controls across multiple Azure subscriptions, ensuring consistent security and compliance across your entire cloud infrastructure.
- Simplify governance and compliance at scale: As your organization grows and your cloud infrastructure expands, maintaining governance and compliance can become increasingly complex. Management groups can help you simplify this process by providing a centralized location for managing policies and access controls across your subscriptions and resource groups.
- Organize subscriptions and resource groups based on organizational structure: Management groups can be used to organize subscriptions and resource groups according to your organization’s structure, such as by department, team, or project. This can help you manage resources more efficiently and ensure that the appropriate team members have access to the necessary resources.
Azure Resource Groups FAQs
| FAQ Question |
FAQ Answer |
What is a resource group in Azure?
|
A resource group in Azure is a logical container for resources that are deployed within an Azure subscription. It helps you organize and manage resources based on their lifecycle and their relationship to each other. |
What is an example of a resource group in Azure?
|
An example of a resource group in Azure could be one that contains all the resources related to a specific web application, including web app services, databases, and storage accounts. |
What are the different types of resource groups in Azure?
|
There aren’t specific “types” of resource groups in Azure. However, resource groups can be organized based on various factors, such as project, environment (e.g., dev, test, prod), geographic location, and department or team. |
Why use resource groups in Azure?
|
Resource groups in Azure provide a way to organize and manage resources efficiently, simplify billing and cost tracking, enhance security and compliance, and streamline collaboration among teams. |
What are the benefits of resource groups?
|
The benefits of resource groups include improved resource management, simplified billing and cost tracking, enhanced security and compliance, and streamlined collaboration among teams. |
What is the role of a resource group?
|
The role of a resource group is to provide a logical container for resources in Azure, allowing you to organize and manage resources based on their lifecycle and their relationship to each other. |
What are the 3 types of Azure roles?
|
The three types of Azure roles are Owner, Contributor, and Reader. These roles represent different levels of access and permissions within Azure resources and resource groups. |
What are the four main resource groups?
|
The term “four main resource groups” is not specific to Azure. However, you can organize your resource groups based on various factors, such as project, environment, geographic location, and department or team. |
What best describes a resource group?
|
A resource group is a logical container for resources deployed within an Azure subscription, allowing for the organization and management of resources based on their lifecycle and their relationship to each other. |
What is an example of a resource group?
|
An example of a resource group could be one that contains all the resources related to a specific web application, including web app services, databases, and storage accounts. |
What are the types of resource group?
|
There aren’t specific “types” of resource groups. However, resource groups can be organized based on various factors, such as project, environment (e.g., dev, test, prod), geographic location, and department or team. |
What is the difference between group and resource group in Azure?
|
The term “group” in Azure typically refers to an Azure Active Directory (AAD) group, which is used for managing access to resources at the user level. A resource group, on the other hand, is a logical container for resources deployed within an Azure subscription. |
Where is Azure resource Group?
|
Azure Resource Groups are part of the Azure Resource Manager (ARM) service, which is available within the Azure Portal and can also be accessed via Azure CLI, PowerShell, and REST APIs. |
What is Azure resource Group vs AWS?
|
Azure Resource Groups are a feature of Microsoft Azure, while AWS is Amazon’s cloud platform. AWS has a similar concept called AWS Resource Groups, which helps users organize and manage AWS resources. |
What is the equivalent to an Azure resource Group in AWS?
|
The equivalent of an Azure Resource Group in AWS is the AWS Resource Group, which also helps users organize and manage AWS resources based on their lifecycle and their relationship to each other. |
Additional Azure Resource Group Best Practices
In addition to the best practices for organizing Azure Resource Groups previously mentioned, consider these additional tips to further improve your resource management:
Implement Consistent Naming Conventions
Adopting a consistent naming convention for your Azure Resource Groups and resources is crucial for improving the manageability and discoverability of your cloud infrastructure. A well-defined naming convention can help you quickly locate and identify resources based on their names. When creating your naming convention, consider factors such as resource type, environment, location, and department or team.
Regularly Review and Update Resource Groups
Regularly reviewing and updating your Azure Resource Groups is essential to maintaining an organized and efficient cloud infrastructure. As your organization’s needs evolve, you may need to reorganize resources, create new resource groups, or update access controls and policies. Schedule periodic reviews to ensure that your resource groups continue to meet your organization’s needs and adhere to best practices.
Document Your Resource Group Strategy
Documenting your resource group strategy, including your organization’s best practices, naming conventions, and policies, can help ensure consistency and clarity across your team. This documentation can serve as a reference for current and future team members, helping them better understand your organization’s approach to organizing and managing Azure resources.
Azure Resource Groups Conclusion
Effectively organizing Azure Resource Groups is crucial for efficiently managing your cloud infrastructure and optimizing your resources. By following the best practices outlined in this comprehensive guide, you can create a streamlined, secure, and compliant environment that supports your organization’s needs. Don’t underestimate the power of a well-organized Azure Resource Group structure – it’s the foundation for success in your cloud journey. By prioritizing the organization of your resource groups and implementing the strategies discussed here, you’ll be well-equipped to manage your cloud infrastructure and ensure that your resources are used to their fullest potential.