by Mark | Jun 28, 2016 | Deployment, How To, Patch Management, SCCM
SCCM Automatic Deployment Rule
As a system administrator, managing updates for your organization’s desktops, laptops, and servers can be a challenging task. It requires a lot of time and effort to keep your machines up-to-date with the latest software updates and security patches. However, with the SCCM Automatic Deployment Rule (ADR) feature, you can automate the entire update management process and save valuable time.
An Automatic Deployment Rule (ADR) is a useful feature for organizations using System Center Configuration Manager (SCCM) to manage their IT environment. With an ADR, administrators can automate the process of downloading, approving, and deploying software updates to client machines, saving time and effort compared to manually managing updates. Additionally, an ADR ensures that machines are up-to-date with the latest software updates and security patches, reducing the risk of security vulnerabilities and software bugs. By creating an ADR, administrators can specify what products and severity of updates they want to download, approve, and deploy, giving them greater control over the update management process. Overall, an ADR is an effective tool for streamlining the software update management process and maintaining a secure and up-to-date IT environment.
In this article, we’ll explore the SCCM Automatic Deployment Rule feature and show you how to create an ADR for your organization’s update management.
SCCM Automatic Deployment Rule FAQs
What is an ADR in SCCM?
An ADR is a feature of SCCM that automates the process of downloading, approving, and deploying updates to client machines.
How does an ADR work?
An ADR downloads the latest updates as per the requirements set by the administrator, distributes them to distribution points, and then deploys them to the target collection during the maintenance and deployment windows specified.
What are the benefits of using an ADR in SCCM?
The benefits of using an ADR include automating the update management process, saving time and effort for system administrators, ensuring machines are up-to-date with the latest software updates and security patches, and enabling control over what products and severity of updates to download, approve, and deploy.
How do I create an ADR in SCCM?
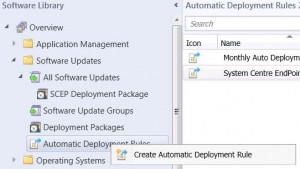
To create an ADR in SCCM, you need to open the SCCM console, navigate to the Software Library, expand Software Updates, and select Automatic Deployment Rules. From there, you can follow the steps to create an ADR, including selecting the products and classifications to include, configuring the deployment settings, and specifying the collection to which the updates will be deployed.
What are some best practices for using an ADR in SCCM?
Best practices for using an ADR in SCCM include following guidelines for patch management, creating a patch management process, setting maintenance and deployment windows, and monitoring Microsoft’s monthly patch releases.
Can an ADR be scheduled to run at a specific time?
Yes, an ADR can be scheduled to run at a specific time, such as after Microsoft’s monthly patch release.
How to create a SCCM Automatic Deployment Rule
ADR Creation
Creating the ADR is fairly easy process. Open your SCCM console and navigate to SOFTWARE LIBRARY, then expand SOFTWARE UPDATES. Now right click AUTOMATIC DEPLOYMENT RULES and choose CREATE AUTOMATIC DEPLOYMENT RULE.
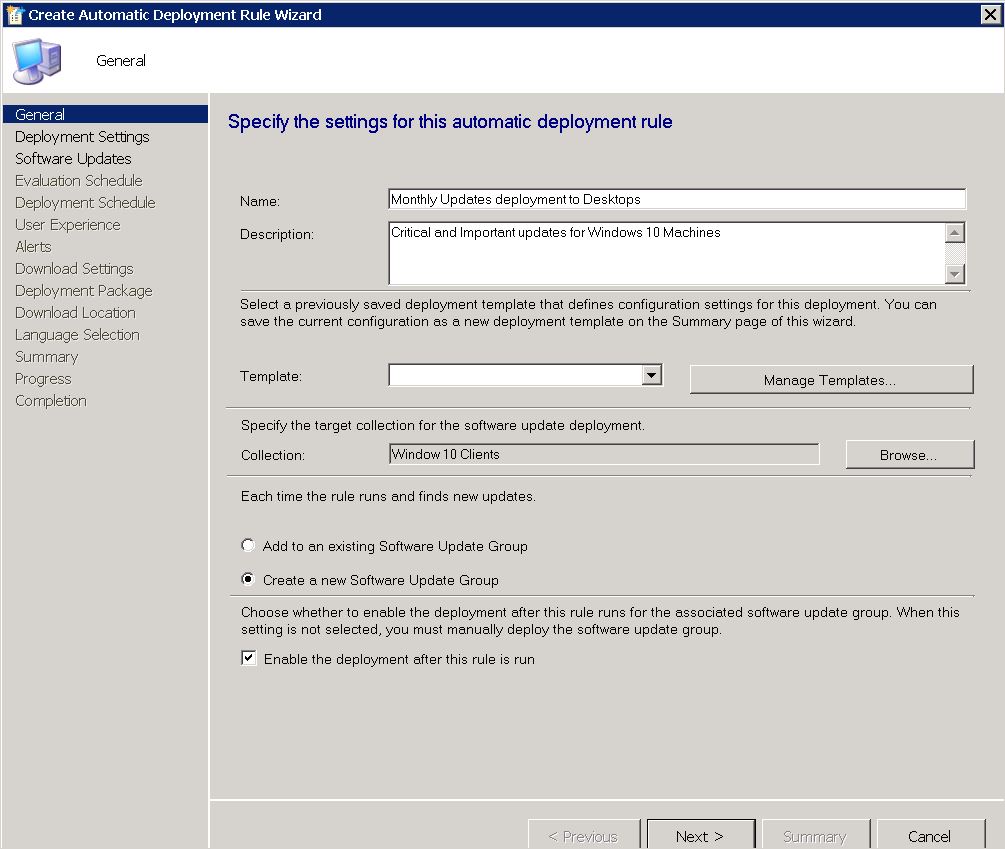
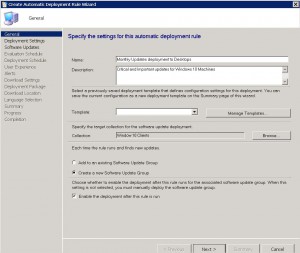
ADR General TAB
Now give the rule a descriptive NAME that will easily identify what this ADR is for (ie Monthly Update deployment to Desktops), a DESCRIPTION, choose a TEMPLATE (I choose Patch Tuesday) and then the TARGET COLLECTION. Now you will need to choose between CREATE A NEW SOFTWARE UPDATE GROUP or to ADD TO AN EXISTING SOFTWARE UPDATE GROUP. The differences between these two settings is, Add to an existing Software Update Group will create a new Software Update group the first time it runs, but then subsequent schedules of the ADR will utilise this update group, or creating a new software update group will create a new update group each time the ADR runs. Choose one of the options and then click on NEXT.
(Make sure you have the checkbox enabled, ENABLE THE DEPLOYMENT AFTER THIS RULE TO RUN).
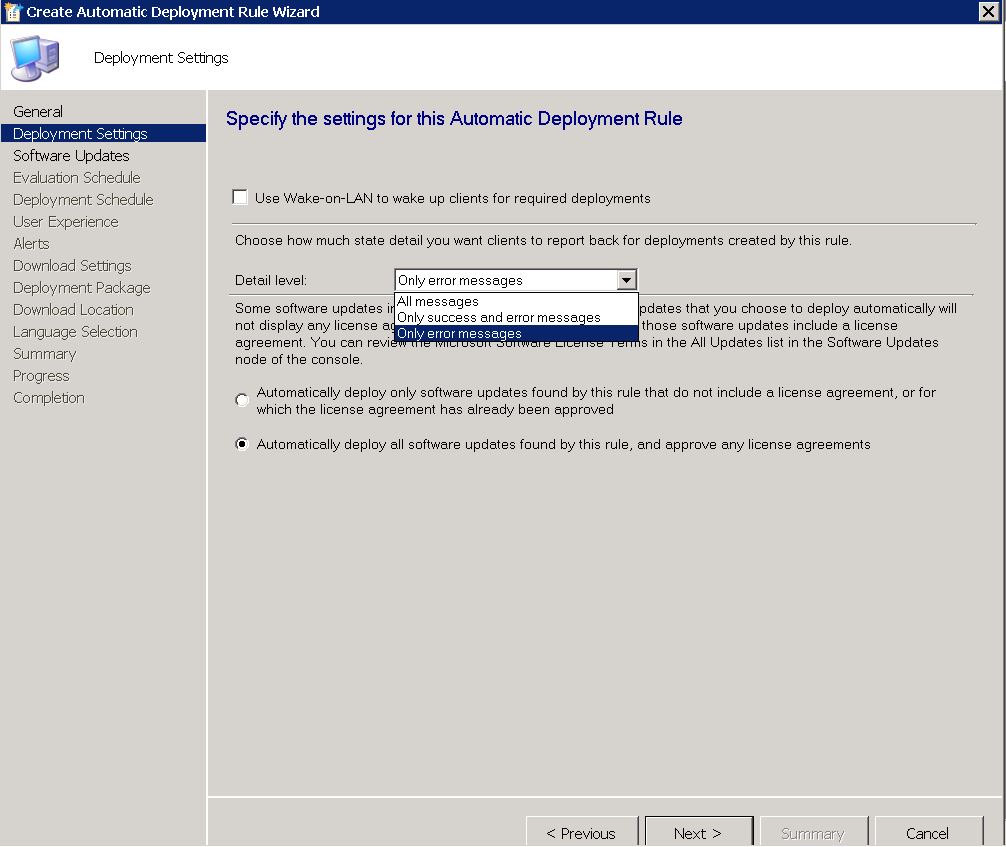
ADR Deployment Settings TAB
We are now presented with the Deployment Settings page next. You can choose to use Wake On Lan (if you have that enabled in your environment) and what level of detail we want regarding the Patch Deployment. You can also specify to Automatically deploy all software updates found by this rule and approve any license agreements. Obviously this will automatically approve and licenses agreements that may be required to deploy the updates, a very handy feature. Once you are happy to proceed, click on NEXT.

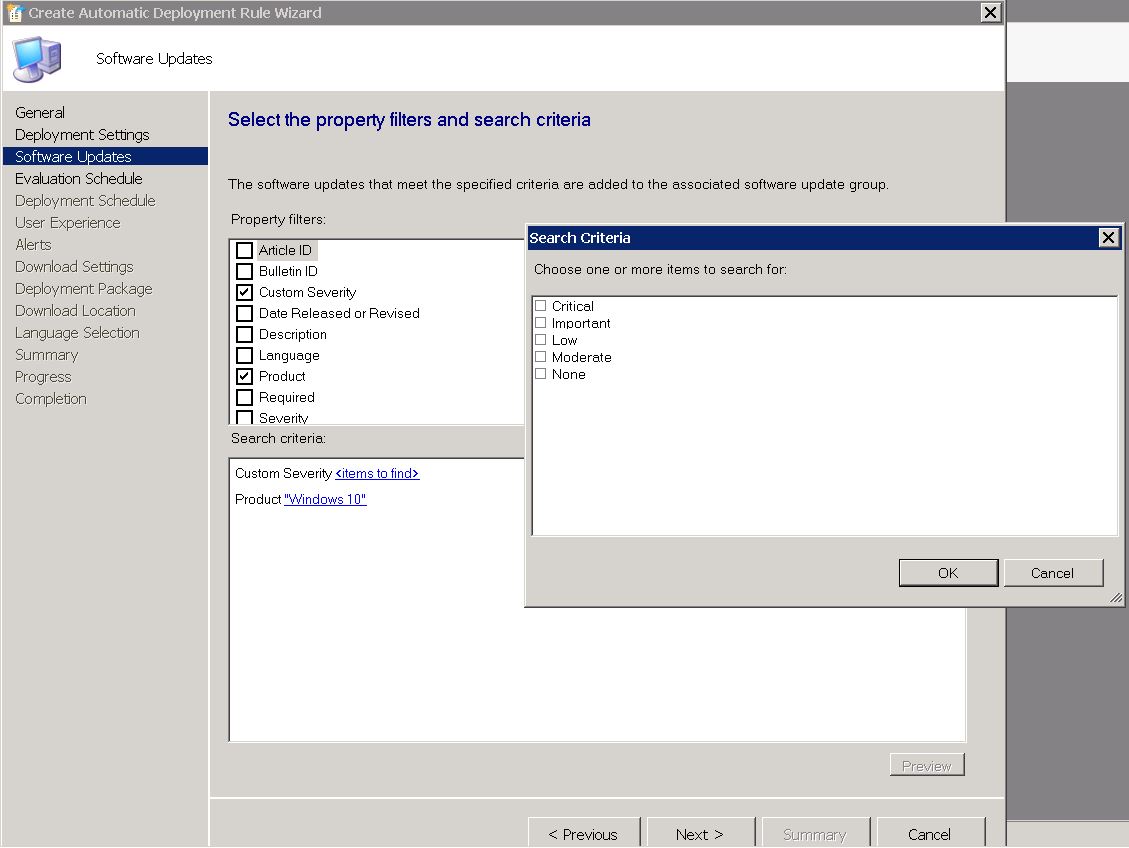
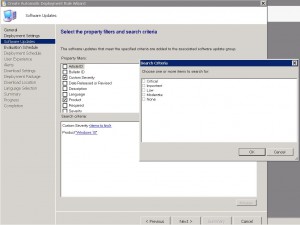
ADR Software Updates TAB
Next we get to choose the products and the severity among other things for the ADR. Choose the products you want (ie in this example Im choosing Windows 10) and the patch severity (Critical, Important, Low, Moderate or None) and date the patches were released (following on from my previous comments, I want the last months patch releases) . Click on NEXT when you have chosen the products you wish patches deploy to.
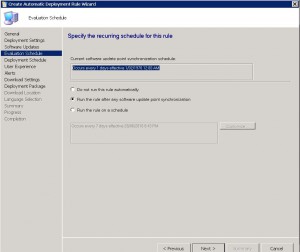
ADR Evaluation Schedule TAB
This tab allows you to configure the settings for when you would like the SCCM Automatic Deployment Rule to evaluate available software updates. You need to configure this schedule to run less frequently than your SUP synchronisation will run (highlighted in the example picture below). You can choose not to run this rule automatically (ie you will have to run this manually if required), after the SUP synchronisation happens (which is the default) or according to a schedule you specify.
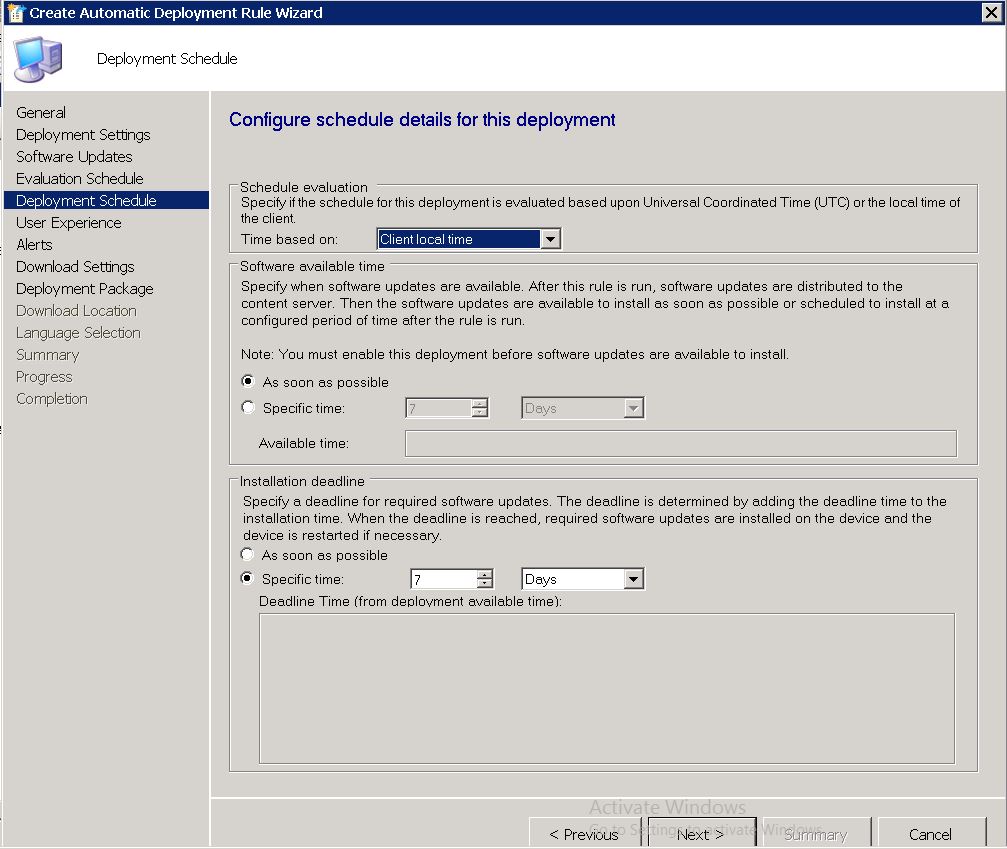
ADR Deployment Schedule TAB
On the ADR deployment schedule TAB, we choose when we would like our updates to be deployed to our client machines. You can choose Universal Coordinated Time or Client machine local time, when you would like the updates to be available to clients, and the software installation deadline. Choose the last two settings carefully as the wrong choice will have a major impact on your environment and users if incorrect.

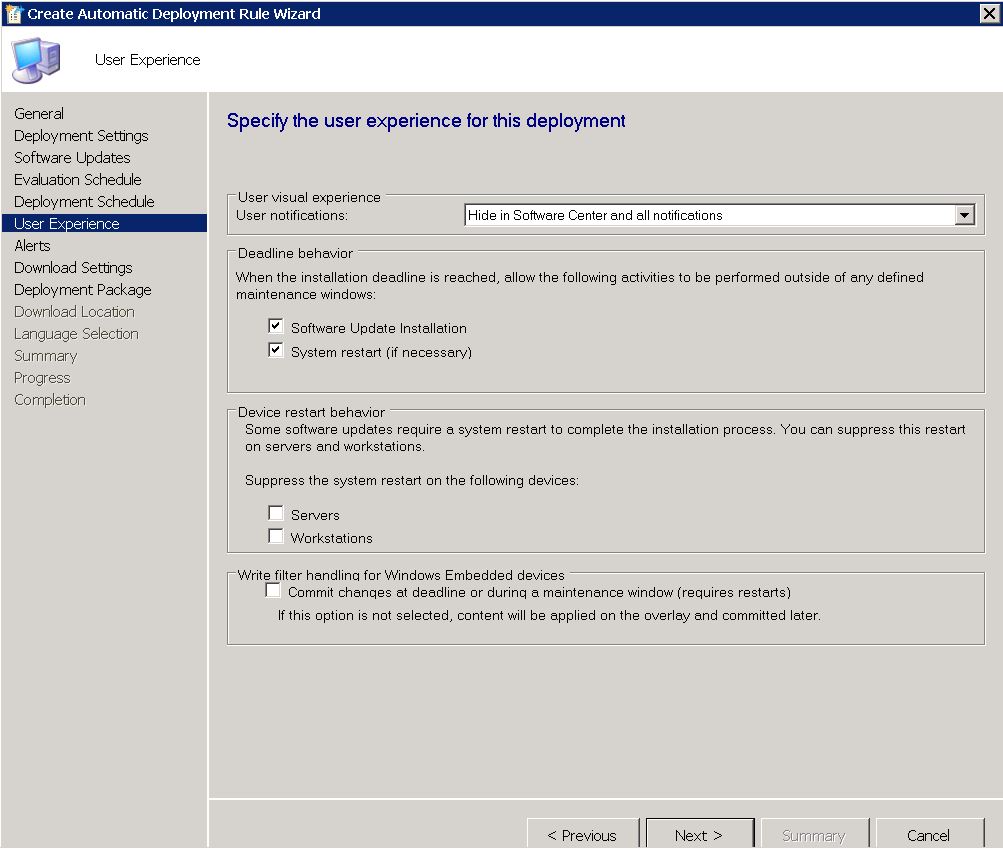
ADR User Experience TAB
One of the most important TABS, is the User Experience TAB. Do you wish to notify the users that updates are available and have them install them prior to the deadline you have set? Would you like the machines to automatically install restart at the deadline? Do you want to suppress a restart on Desktops or Servers, or even both? Choose the required settings and then click NEXT.

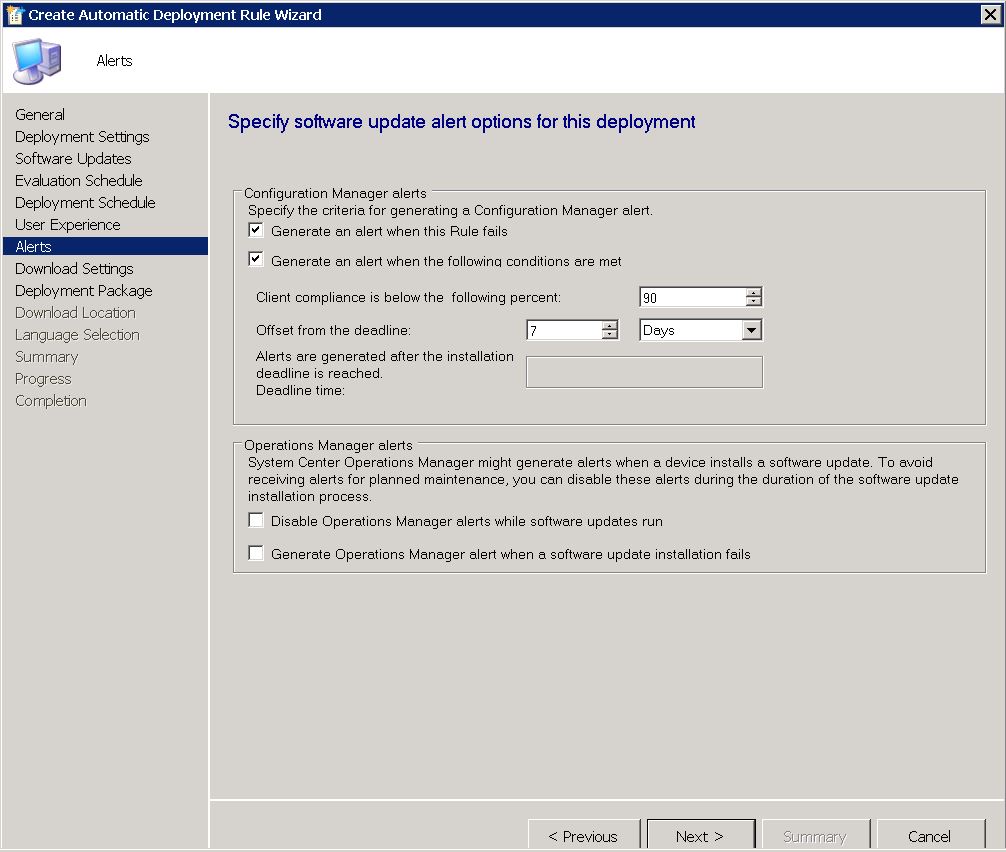
ADR Alerts TAB
The SCCM Automatic Deployment Rule alerts TAB is next. Various settings are available of how you would like to be alerted. From when the rule fails, to compliance settings to alert you of the percentage of machines that are compliant. Additionally, you can generate alerts to System Centre Operations Manager (or SCOM) if you have this in your environment. Again, choose your required settings and click on NEXT.

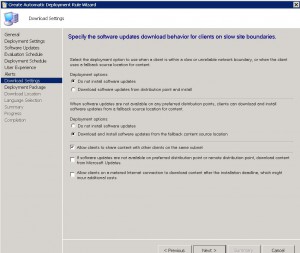
ADR Download Settings TAB
The ADR download settings tab will allow you to specify what and where the client machine downloads the updates from. Obviously, if they are connected to your corporate LAN, the nearest SCCM distribution point is the ideal location. Should the updates not be available on a preferred distribution point, then you can choose not to install updates, or from a fallback location. Allowing the client machines to share the update content with other clients on the same subnet is a great thing to have, especially if they do not have a local SCCM distribution point, or are on a slow WAN link. Additionally, you can allow those clients to download from Microsoft Update.
Click on NEXT when ready to proceed.
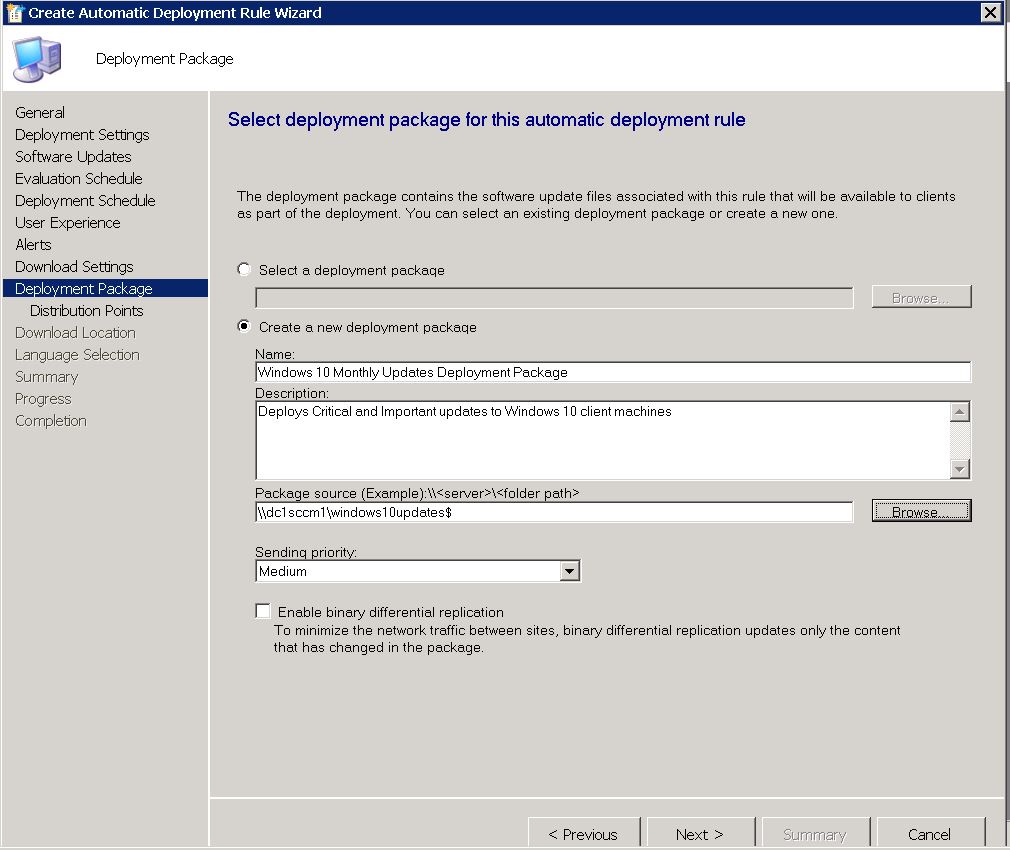
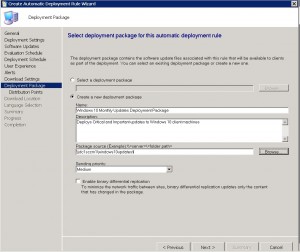
ADR Deployment Package TAB
We can now create a new deployment package, or select an existing one. I will create a new deployment package in this example to show you how that is done.
Choose CREATE A NEW DEPLOYMENT PACKAGE.
Give the deployment package a descriptive name, a description that is easy to identify, where you would like the source files to live (remember this should be a UNC path, so make sure to have shared out the folder and given the correct permissions for SCCM to save the updates to).
Click on NEXT when completed.
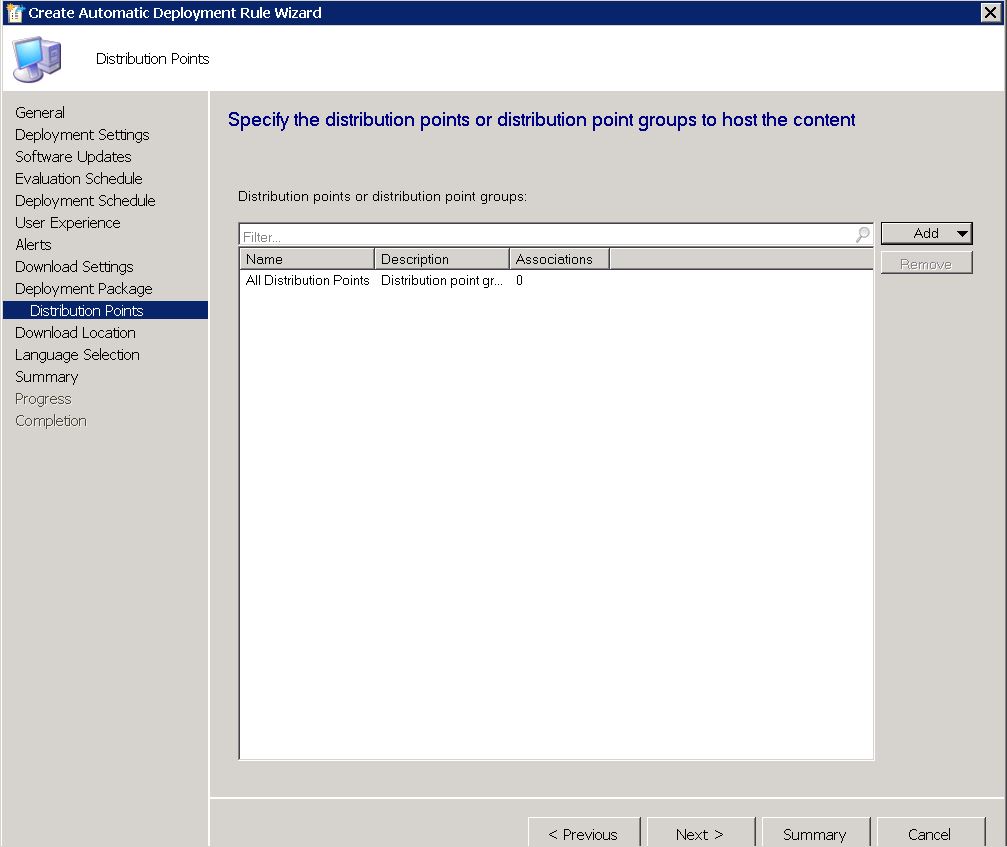
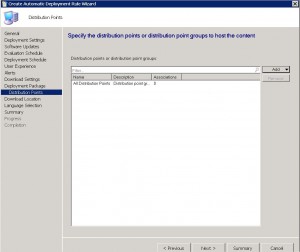
ADR Distribution Points TAB
Select the distribution points you wish the updates to be available from and for you client machines to download from. You can choose individual SCCM Distribution Points, or a Distribution Point Group. Click on NEXT when you have entered these details.
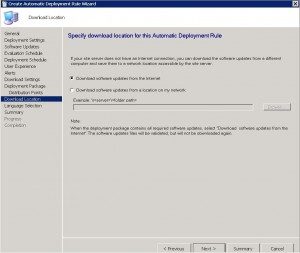
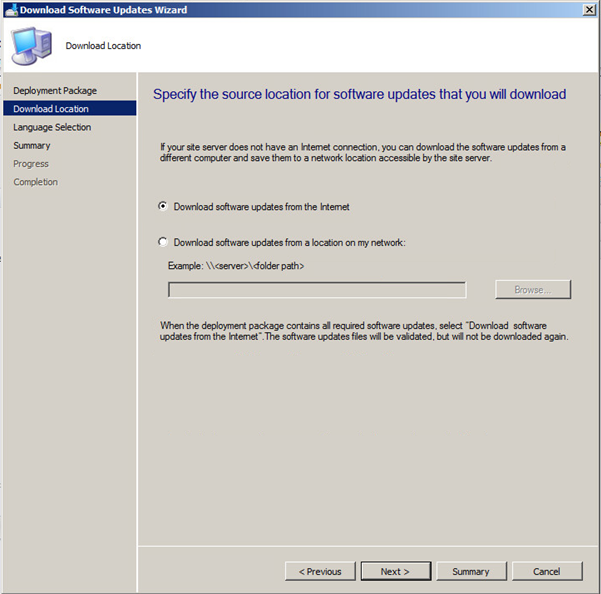
ADR Download Location TAB
Choose where to download the updates from. Should you have a location where updates are downloaded, you can specify that, or should you be using a Microsoft’s WSUS Server, to download them directly from the internet. Click on NEXT when done.
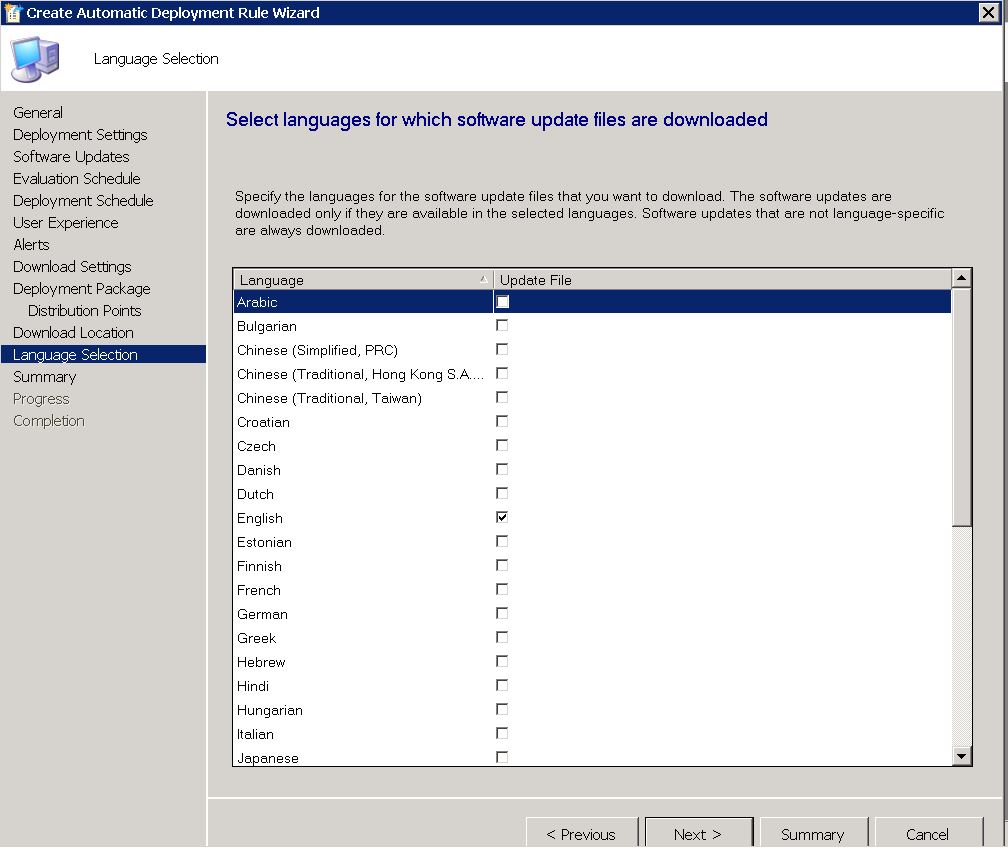
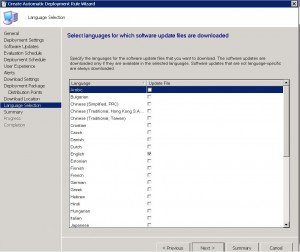
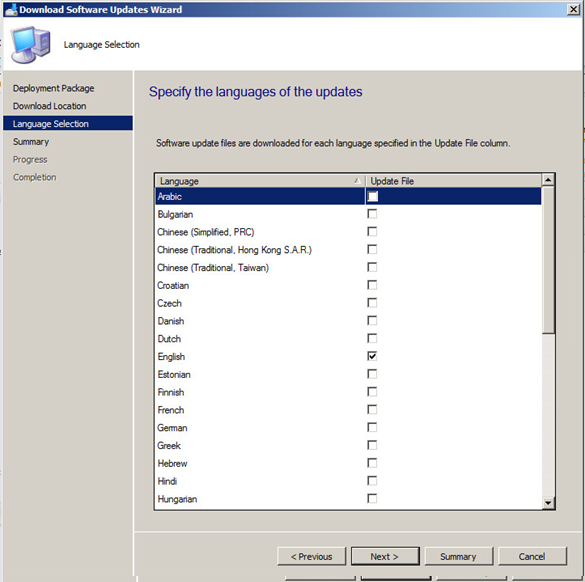
ADR Language Selection TAB
Now choose the appropriate languages you want the patches to download in and then click NEXT.
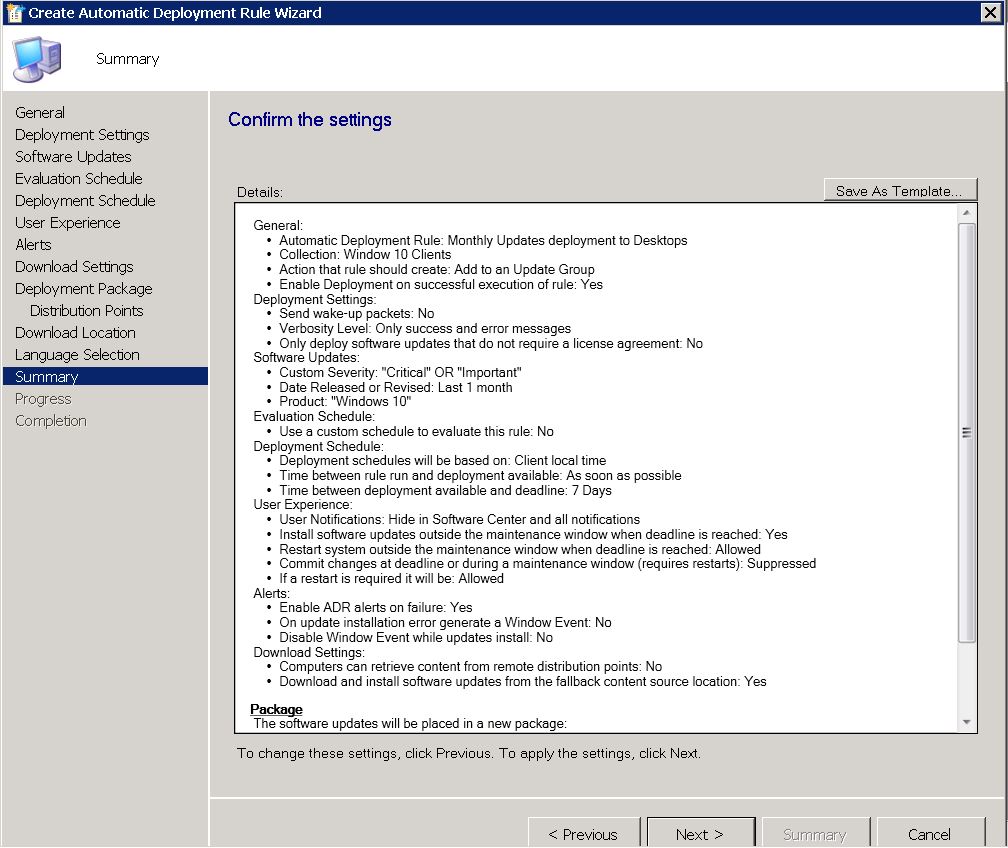
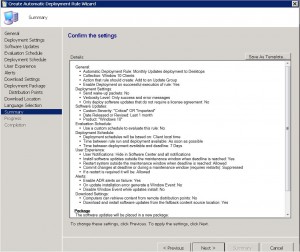
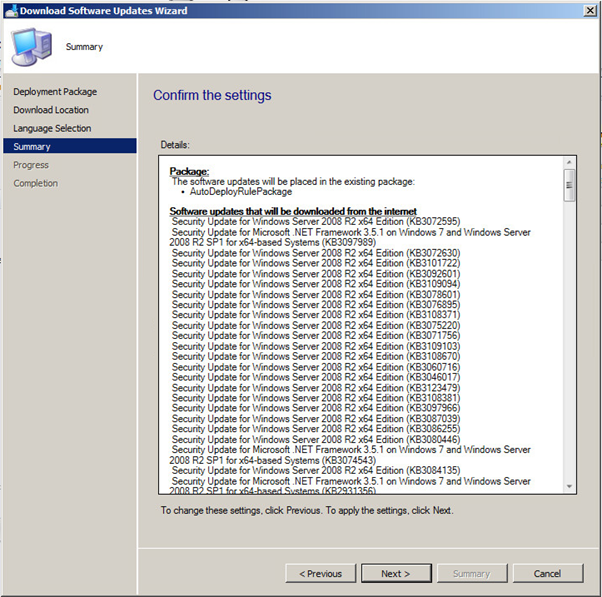
ADR Summary TAB
We are almost there. Almost finished. At the SCCM Automatic Deployment Rule Summary TAB, review the choices you have made and make sure they are correct. When you are happy with the settings, click on NEXT to continue.
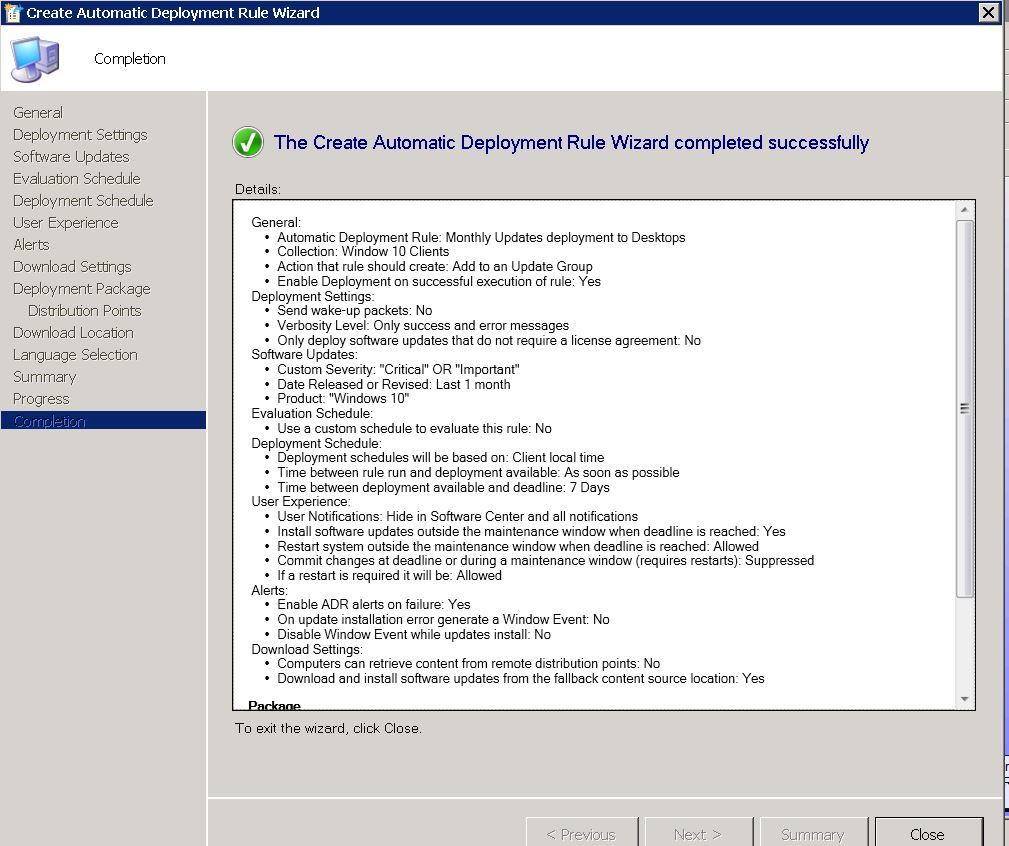
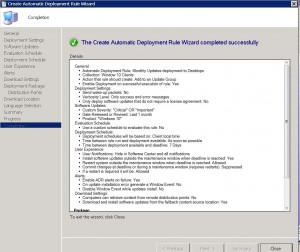
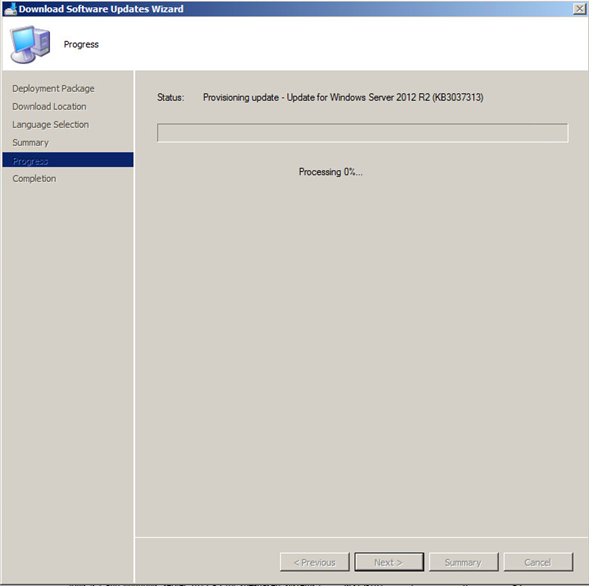
ADR Completion TAB
We made it. We finally got there. The Automatic Deployment Rule is now setup and will run with the settings you have specified. You can now close the wizard.
If you followed this post and were careful with the settings you have chosen for your SCCM Automatic Deployment Rule, then the updates you have selected will now deploy to your client machines, when and how you have requested.
See how SnaPatch can help you with Patching your Virtual Server environment.

by Mark | Jun 22, 2016 | How To, Patch Management, SCCM
Creating an Effective Patch Management Process for Your Enterprise
As cyber threats continue to grow in number and complexity, keeping your enterprise’s software and hardware up-to-date is crucial for maintaining security. A robust patch management process is key to achieving this goal. In this article, we’ll explore the steps involved in creating an effective patch management process that will help you reduce risk, save time and effort, and gain auditor approval.
Overview of Patch Management Process
One of the critical tasks for administrators is to create a patch management process that can deploy and manage software updates. Admins need to keep track of multiple sources, including blogs, emails, RSS feeds, and forums, to stay up-to-date with the latest vulnerabilities and patches. Having an outdated system can lead to vulnerabilities and potential security holes that hackers can exploit. In large enterprises that require compliance with ISO 27001, ISO 270012, or even SOX (Sarbanes-Oxley), outdated applications, hardware, and systems can raise red flags during audits.
To create a patch management process, you need to follow a set of procedures that involve various stages, including patch management risk, patch management software, and patch deployment.

Patch Management Software
One of the best patch management software available for managing a server and desktop fleet is Microsoft’s System Centre Configuration Manager (SCCM). SCCM not only automates the download and deployment of updates but also inventories all your systems and software, making life easier for administrators responsible for large environments. SCCM should have an up-to-date inventory of your environment, including the operating system types, to deploy patches to the right machines.
Patch Deployment
Automating the deployment of updates to your machines using an Automatic Deployment Rule within SCCM can save time and effort. Setting this rule to coincide when Microsoft releases its monthly updates (Patch Tuesday) is good practice. Before deployment, it is crucial to test the update to ensure it doesn’t break any systems. Gaining approval for deployment will require some sort of rollback functionality.
.
The Patch Management Process for deployment of updates follows these steps:
- SCCM downloads the latest updates from Microsoft on Patch Tuesday.
- Administrator socializes the latest patch releases with relevant parties.
- CAB (Change Approval Board) approval is required for deployment of the latest patches to the Pilot Group.
- The administrator sets a maintenance window and schedules when the patches should be installed.
- Patches are deployed to the Pilot group.
- UAT (User Acceptance Testing) is performed to ensure no issues arise due to patch deployment.
- Once UAT approval has been gained, the administrator presents a new Change Request to CAB for approval of the deployment of patches to Production systems.
- Approval has been accepted, and the administrator sets up a new deployment package for deployment to Production systems.
Patching Risk
Not having Pilot or Development and Test systems that mirror Production can create a roll-back position that is required before CAB will approve any update deployment. This often means the administrator spends late nights ensuring backups are successful or creating snapshots before allowing updates to deploy.
SnaPatch – SCCM Patch Management Addon Software – Reduce Effort and Risk

SnaPatch is an add-on software for Microsoft’s System Centre Configuration Manager that interfaces with your existing SCCM and virtual environment. SnaPatch will automate a snapshot of your virtual servers before SCCM deploys monthly updates, allowing you to gain the auditors’ approval for your ISO 27001, ISO 270012 or even SOX (Sarbanes-Oxley) patching compliance. This process that SnaPatch completes automatically, will give you a quick roll back position should a patch cause errors to your virtual servers. SnaPatch automates it all, from downloading the latest monthly Windows Updates, to completing a snapshot of your servers prior to patches being deployed, then communicating with SCCM that the patches can now deploy, and finally deleting the snapshot after a period of time, all while emailing you alerts about your patching progress.
In conclusion, creating and maintaining a well-defined patch management process is critical for ensuring the security of your environment. Automated patch deployment and testing are essential to save time and reduce effort, while add-on software like SnaPatch can help reduce risk and gain auditor approval. It’s important to understand the risks associated with outdated systems and the potential harm that can occur if those vulnerabilities are exploited. Don’t wait until it’s too late; start developing your patch management process today to keep your enterprise safe and secure. By following the guidelines outlined in this article, you can reduce risk, save time and effort, and ensure compliance with industry standards.

by Mark | Jun 21, 2016 | How To, SCCM
SCCM Update Deployment Issues?
Troubleshooting Tips and Logs to Resolve Common Problems
Are you experiencing issues with deploying updates within SCCM? Don’t worry; you’re not alone. Many administrators struggle with troubleshooting and identifying the root cause of update deployment problems. However, with the right knowledge and tools, you can quickly resolve these issues and ensure your updates are deployed successfully. In this article, we’ll discuss some troubleshooting tips and the logs you can use to identify and resolve common SCCM update deployment issues.
Identifying the Appropriate Log to Troubleshoot SCCM Update Deployment Issues
One of the most challenging aspects of troubleshooting SCCM update deployment issues is identifying which log to look at. Fortunately, SCCM has many logs available to help you determine the root cause of any issues. Here are some of the logs you can review to identify the issue:
Server Side Software Update Logs:

- SUPsetup.log – Installation of SUP Site Role.
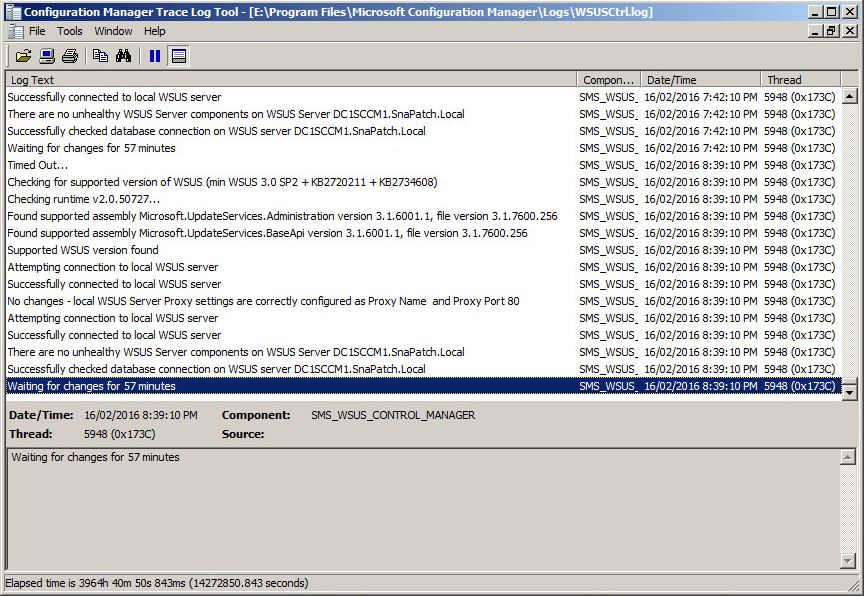
- WCM.log, WSUSCtrl.log – Configuration of WSUS Server/SUP.
- WSyncMgr.log – SMS/WSUS Updates Synchronization Issues.
- Objreplmgr.log – Policy Issues for Update Assignments/CI Version Info policies.
- RuleEngine.log – Auto Deployment Rules.
-
Client Side Software Update Logs:
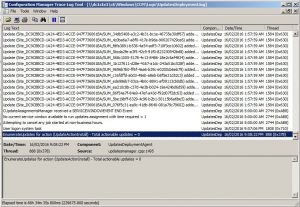
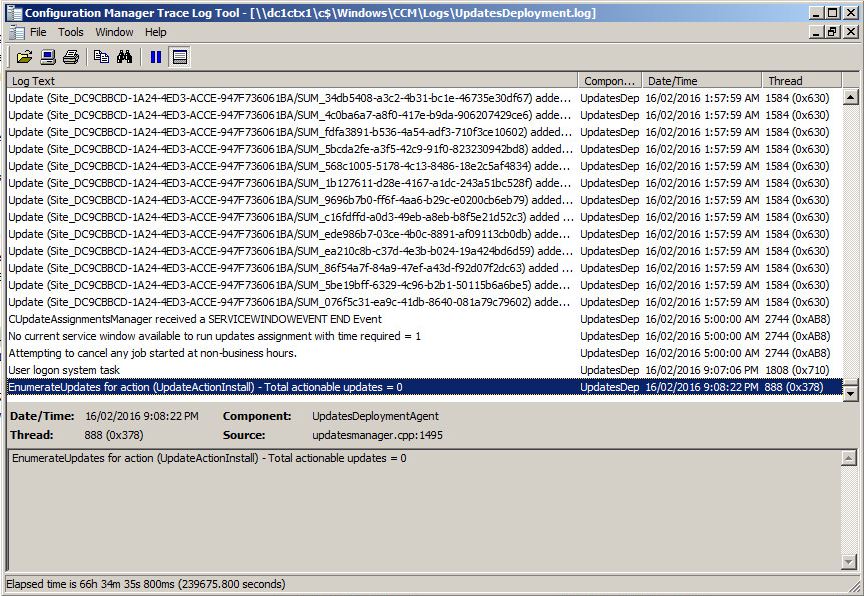
- UpdatesDeployment.log – Deployments, SDK, UX.
- UpdatesHandler.log – Updates, Download.
- ScanAgent.log – Online/Offline scans, WSUS location requests.
- WUAHandler.log – Update status (missing/installed – verbose logging), WU interaction.
- UpdatesStore.log – Update status (missing/installed).
- indirWindowsUpdate.log – Scanning/Installation of updates.
Hopefully these logs will help you troubleshoot Update Deployment from within SCCM. Click these links to see how you can create a SCCM Automatic Deployment Rule for your Microsoft Updates and SCEP Definition Updates to help you automate your update and definitions deployments.
Troubleshooting SCCM Update Deployment Issues
Now that you know which logs to look at, it’s time to start troubleshooting. Here are some common SCCM update deployment issues you may encounter, along with their possible solutions:
Issue 1: Updates are not downloading or installing on client devices.
Solution: Check the UpdatesDeployment.log and UpdatesHandler.log for errors. Make sure the client devices have access to the update source location, and the content is distributed to the distribution point.
Issue 2: The SCCM client is not reporting update compliance status.
Solution: Check the UpdatesStore.log, UpdatesDeployment.log, and WUAHandler.log for errors. Verify that the SCCM client has the correct permissions to read the WSUS catalogs and update metadata.
Issue 3: Automatic Deployment Rules (ADR) are not working correctly.
Solution: Check the RuleEngine.log and WCM.log for errors. Verify that the ADR criteria and schedules are configured correctly and that the update metadata is up to date.
Automating SCCM Update and Definitions Deployments
Manually deploying updates and definitions can be a time-consuming task, especially if you have many devices to manage. SCCM offers Automatic Deployment Rules (ADR), which allow you to automate the process of deploying updates and definition updates. By creating an ADR, you can define criteria for the types of updates to deploy, when to deploy them, and to which collections to deploy them. Here are some links to help you get started with creating SCCM Automatic Deployment Rules for your Microsoft Updates and SCEP Definition Updates:
In conclusion, SCCM update deployment issues can be frustrating, but with the right knowledge and tools, you can quickly identify and resolve them. By reviewing the appropriate logs and following the troubleshooting tips we’ve outlined, you can ensure that your updates are deployed successfully. Additionally, by automating the deployment

by Mark | Jun 19, 2016 | How To, SCCM
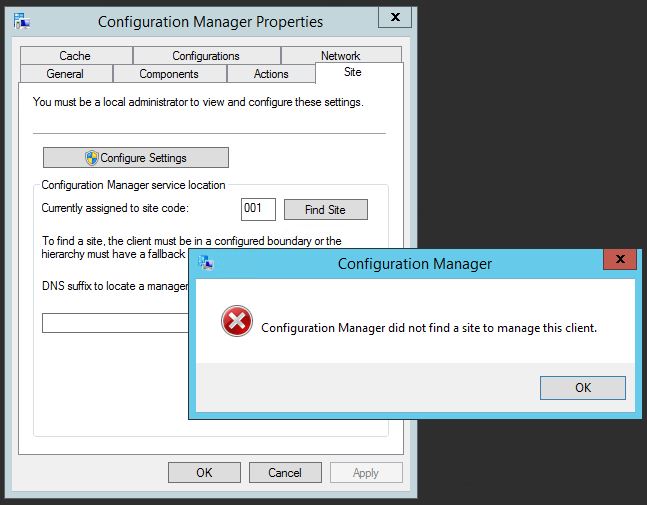
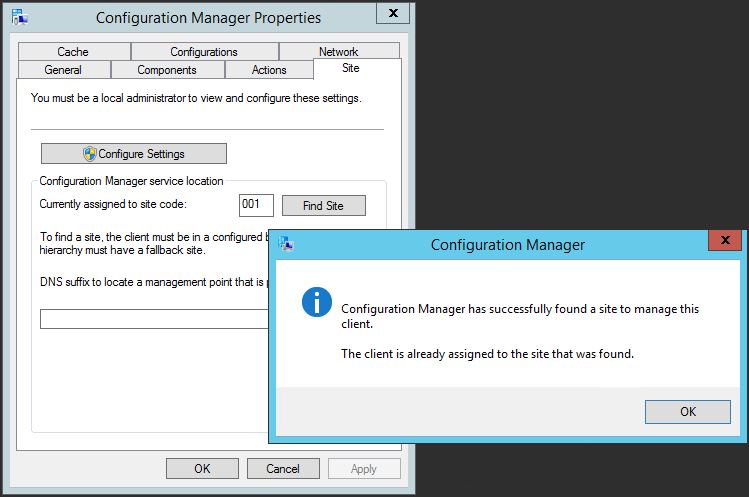
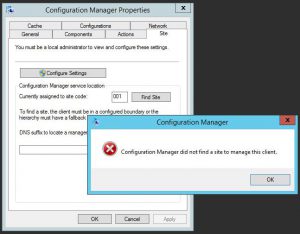
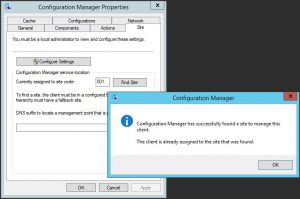
How to Resolve “Configuration Manager Did Not Find a Site to Manage This Client” Error
If you’re an IT professional, you may have encountered an error message that says “Configuration Manager did not find a site to manage this client” when trying to deploy Windows updates to your client machines. This error can be frustrating, especially when you’re not sure what’s causing it. In this article, we’ll discuss how to troubleshoot and fix this error.
Checking the SCCM Client Site
The first step in troubleshooting this error is to check the Configuration Manager applet on each of the affected clients to see if they belong to a client site. If they don’t, this could be the root cause of the error.
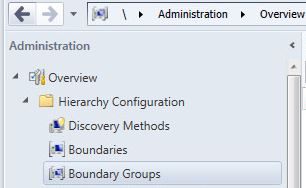
Checking the SCCM Boundary Groups
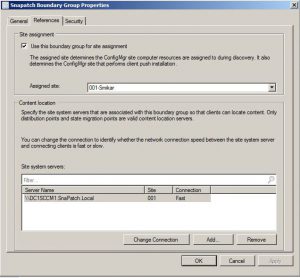
One possible reason why the clients don’t belong to a site is that there is an issue with the boundary groups. To check if this is the case, go to Administration, Hierarchy Configuration, then Boundary Groups on the Configuration Manager server. If you don’t see any boundary group set up, then you need to create one.
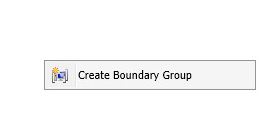
Creating a Boundary Group in SCCM
To create a boundary group, right-click on the blank area of the console and choose Create Boundary Group. You’ll then need to fill in the details of your boundaries and assign them the corresponding distribution point and site code. Give the boundary group a name and assign the appropriate boundary.
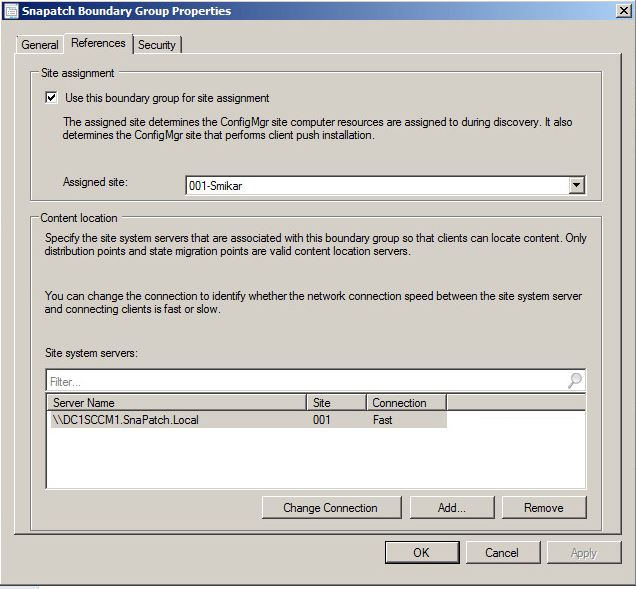
Assigning Site System Server and Choosing the Assigned Site
Once you’ve set up the boundary group, go to the References tab and assign the correct Site System Server for this boundary. Choose the assigned site and repeat these steps for each boundary and distribution point that you require.
Site Discovery
After setting up the boundary group, go back to your client machines and try another site discovery.
So how did we fix this SCCM Error?
In our Lab we had an issue where during Windows Update deployments as it seemed some clients were not getting their updates. Looking through various logs, we eventually checked the Configuration Manager applet on each of the clients and found they didnt belong to a client site.
First thing that came to mind, was that there is an issue with a boundary. As this was a recently new implementation of SCCM 2012 in the lab, I logged on to the Configuration Manager server, and opened the SCCM Console.
Go to Administration, Hierarchy Configuration, then Boundary Groups.

Looking at the Boundary Groups, there was never one setup. A slight mistake if we must say! 🙂
To set up a Boundary Group, right click in the blank area of the console and choose Create Boundary Group
From here, you will need to fill in the appropriate details of your Boundaries, and assign them the correlating distribution point and site code.
Give the Boundary Group a Name, and assign the appropriate Boundary.
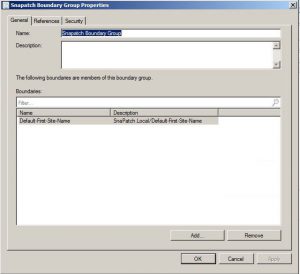
Go to the References tab.
Now assign the correct Site System Server for this boundary and choose the Assigned Site.
Repeat theses steps for each boundary and DP that you require.
You should now be able to go back to your client machines, and try another site discovery. If all is well you should get the following prompt.
Manually download updates with SCCM
The “Configuration Manager did not find a site to manage this client” error can be caused by several factors, but a missing or improperly configured boundary group is often the culprit. By following the steps above, you should be able to resolve this error and successfully deploy updates to your client machines. Remember to regularly check the Configuration Manager applet and the boundary groups to ensure that everything is functioning as expected.

by Mark | Jun 19, 2016 | How To, Patch Management, SCCM
How to Manually Download and Deploy Updates with SCCM
If you are an IT professional who is responsible for managing software updates for an organization, then you know how important it is to keep all systems up-to-date with the latest patches and security updates. Microsoft’s System Centre Configuration Manager (SCCM) is a popular tool used by many IT professionals for patch management. In this article, we will discuss how to manually download and deploy updates with SCCM.
SCCM FAQs
What is SCCM?
SCCM stands for System Centre Configuration Manager, which is a popular tool used by IT professionals for managing software updates, among other things.
Why would I need to manually download updates with SCCM?
There may be scenarios where the Auto Deployment Rule fails to download updates, or when using a third-party tool like SnaPatch, where you need to manually download and deploy updates with SCCM.
Can I automate the process of downloading and deploying updates with SCCM?
Yes, SCCM provides an Automatic Deployment Rules (ADR) feature, which can automate the process of downloading and deploying updates to multiple systems.
What are the benefits of using SCCM for patch management?
SCCM offers centralized management, automated deployment, reporting, and security features for patch management.
Is it necessary to manually download updates with SCCM?
It depends on your organization’s specific needs and scenarios. In most cases, SCCM’s Auto Deployment Rules feature can effectively manage software updates without the need for manual downloading and deployment. However, there may be certain situations where manual intervention is required.
How do I know which updates to download manually with SCCM?
You can use SCCM’s Software Updates feature to view available updates and select the ones you need to download manually.
What if I don’t have an Auto Deployment Rule set up in SCCM?
In that case, you can follow the same steps mentioned in the article to manually download updates with SCCM.
How long does it take to download updates manually with SCCM?
The time it takes to download updates manually with SCCM depends on the size of the updates and the speed of your internet connection.
Can I download updates manually with SCCM on multiple computers at once?
Yes, you can deploy updates manually to multiple computers at once by selecting multiple computers in SCCM’s console and initiating the update download process.
Are there any risks associated with manually downloading updates with SCCM?
There is always a risk associated with any manual process, such as human error, downloading the wrong updates, or disrupting systems during the update process. However, SCCM provides a range of tools and features to help mitigate these risks. It is important to follow best practices and guidelines when manually downloading updates with SCCM.
Step-by-Step Guide to Manually Download Updates with SCCM
If you ever need to manually download and deploy updates with SCCM, or even when using SnaPatch, and you dont know how to download updates that havent been downloaded automatically by the Auto Deployment Rule, this post will show you how.
To kick off a manual download of updates using SCCM, follow these steps.
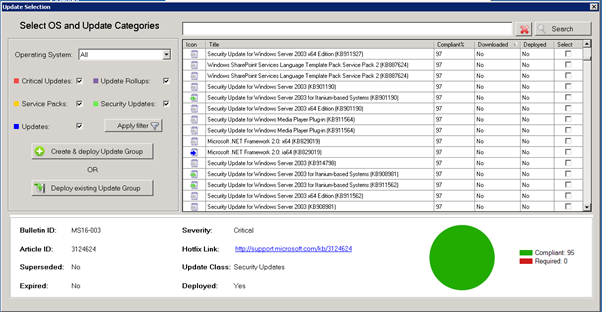
Open your SCCM console and go to Software Library, then expand Software Updates and then click on All Software Updates.
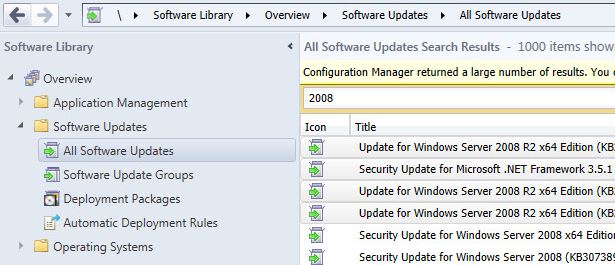
Let the list populate and select the updates that want to download, then right click and choose Download.
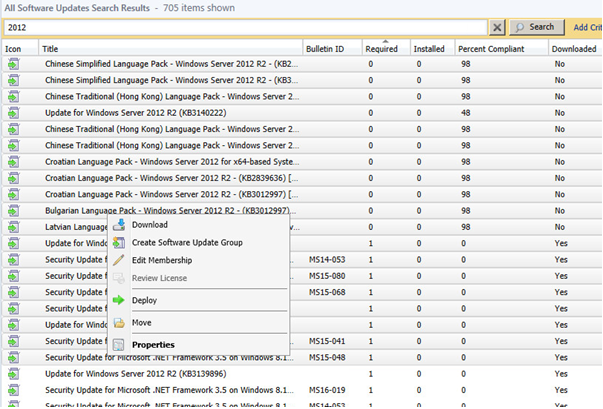
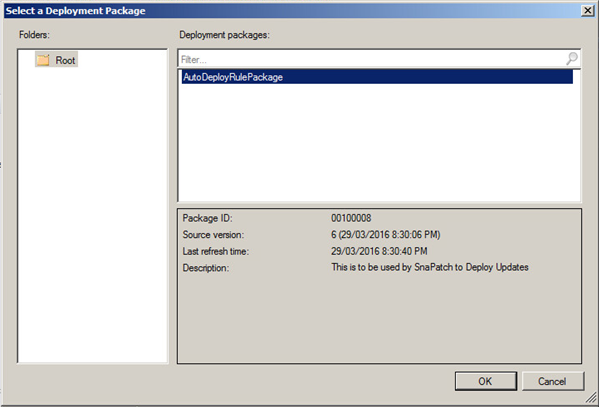
It will then prompt your to Select a Deployment Package. Click Browse.
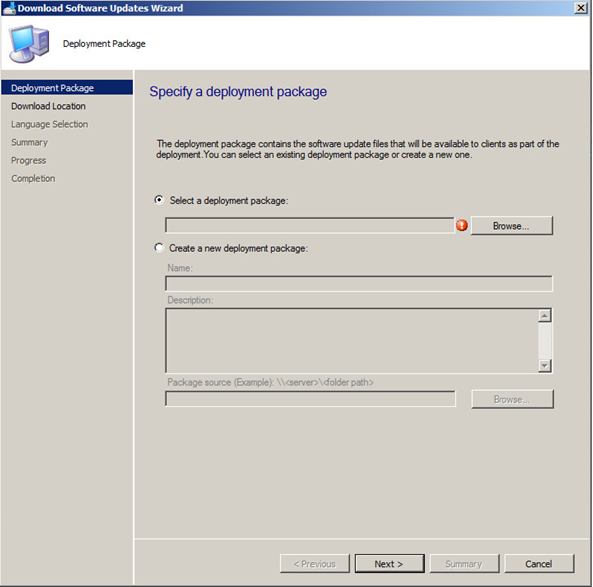
Select the Auto Deployment Rule that you use for your SnaPatch deployments and then click on OK.
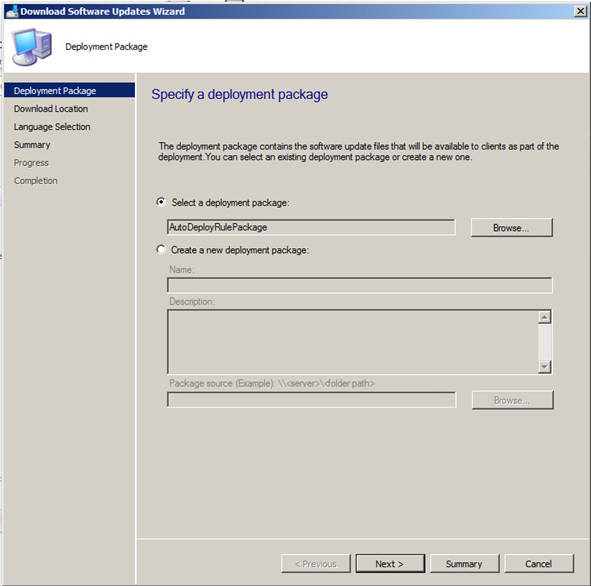
Once the deployment rule had been selected, click on Next.
Now choose to Download software updates from the Internet.
Choose the required update language.
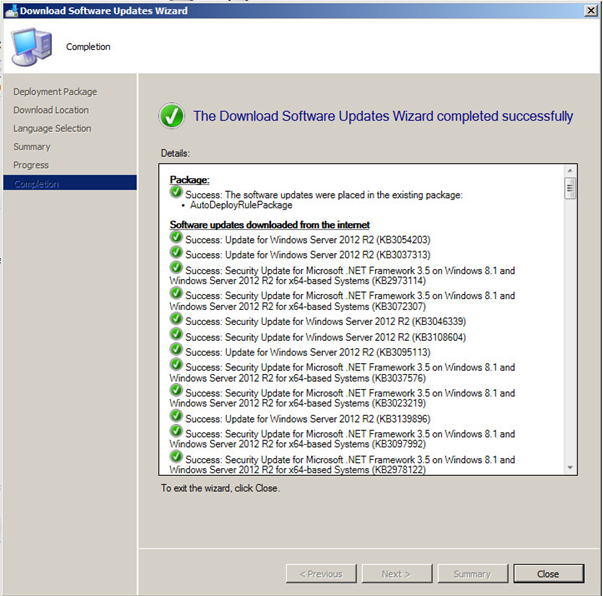
Now you should be ready to download the updates you have selected. If ready to do so, click on Next.
Your updates will start downloading. Note that this may take some time to complete the downloads.
Hopefully all went well and your updates are now ready to be deployed.
Click this link to see how to setup a SCCM Automatic Deployment Rule.
In this article, we have discussed how to manually download and deploy updates with SCCM. We have also highlighted the benefits of using SCCM for patch management. By following the steps outlined in this article, you can ensure that all systems in your organization are up-to-date with the latest patches and security updates.

by Mark | Jun 19, 2016 | How To, Patch Management, SCCM
Microsoft SCCM update deployment best practices
Microsoft SCCM (System Center Configuration Manager) is a powerful tool for deploying updates to Windows-based computers. However, deploying updates with SCCM can be tricky if you don’t follow best practices. In this article, we will discuss some of the best practices that Microsoft recommends for deploying Microsoft Updates from SCCM 2012.
Limit Software Updates to 1000 in a Single Deployment
One of the best practices recommended by Microsoft is to limit the number of software updates to 1000 for each software update deployment. When you create an automatic deployment rule or manually deploy software updates, do not select more than 1000 updates to deploy. This will prevent the deployment from becoming too large and overwhelming the systems that are receiving the updates.
Create a New Software Update Group for Every Deployment
Another best practice is to create a new software update group each time an automatic deployment rule runs for “Patch Tuesday” or for general deployment. There is a limit of 1000 software updates for a software update deployment. When you create an automatic deployment rule, you can specify whether to use an existing update group or create a new update group each time the rule runs. If you specify criteria in an automatic deployment rule that results in multiple software updates and the rule runs on a recurring schedule, specify to create a new software update group each time the rule runs. This will prevent the deployment from surpassing the limit of 1000 software updates per deployment.
Use an Existing Software Update Group for Endpoint Protection Definition Updates
When you use an automatic deployment rule to deploy Endpoint Protection definition updates on a frequent basis, it is recommended to always use an existing software update group. Otherwise, potentially hundreds of software update groups will be created over time. Typically, definition update publishers will set definition updates to expire when they are superseded by four newer updates. Therefore, the software update group that is created by the automatic deployment rule will never contain more than four definition updates for the publisher: one active and three superseded.
Test updates before deploying them
It’s always a good idea to test updates in a non-production environment before deploying them in a production environment. This can help identify any issues or conflicts that may arise during the deployment process.
Use maintenance windows
Maintenance windows can be used to specify a period of time during which updates can be installed on client machines. This can help prevent updates from being installed during critical business hours or when users are actively working on their computers.
Monitor deployment status
It’s important to monitor the deployment status of updates to ensure that they are being installed successfully. SCCM provides various reports that can be used to monitor deployment status.
Keep SCCM up-to-date
It’s important to keep SCCM up-to-date with the latest updates and hotfixes. This can help ensure that SCCM is functioning properly and can help prevent any issues or bugs from affecting the update deployment process.
SCCM Update Deployment FAQs
| Question |
Answer |
What is SCCM?
|
SCCM stands for System Center Configuration Manager. It is a software management tool that allows organizations to manage and deploy software, updates, and patches across multiple devices and systems. |
What are some best practices for deploying updates with SCCM?
|
Some best practices for deploying updates with SCCM include scheduling updates during non-business hours, testing updates on a small group of devices before deploying to the entire organization, and creating a rollback plan in case of issues. It’s also important to regularly monitor the deployment process and report any issues or errors. |
How should updates be prioritized for deployment?
|
Updates should be prioritized based on their criticality and potential impact on the organization. Security updates should always be prioritized, followed by critical updates and then important updates. Updates that are not critical or important can be deferred or postponed. |
How often should updates be deployed?
|
The frequency of updates deployment can vary depending on the organization’s needs and policies. However, it’s generally recommended to deploy updates at least once a month to ensure that systems are protected against known vulnerabilities and threats. |
How can SCCM help with update deployment?
|
SCCM provides a centralized platform for managing and deploying updates across multiple devices and systems. It allows administrators to automate the update deployment process, monitor the deployment status, and report any issues or errors. SCCM can also help ensure that updates are deployed in a consistent and standardized manner, reducing the risk of errors and inconsistencies. |
Should you have a Patching Process / Schedule?
|
Yes, a patching process will schedule when you regularly deploy your updates. It helps monitor and track when patches should be deployed to which environment. |
What should be included in a rollback plan?
|
A rollback plan should include steps for undoing the update deployment, as well as a plan for communicating with end-users and stakeholders. It should also identify any potential risks or challenges associated with rolling back updates, and outline strategies for mitigating those risks.
You can also use SnaPatch, which automates a snapshot of your servers prior to patch deployment. This will allow you to easily roll back should a patch cause an issue to your sever fleet. |
How can SCCM help with update reporting?
|
SCCM provides a variety of reporting tools that allow administrators to monitor the status of update deployments, identify any issues or errors, and report on compliance with organizational policies and regulatory requirements. These reports can help ensure that systems are up-to-date and secure, and can also provide valuable insights into the overall health and performance of the IT environment. |
SCCM Update Deployment Final Thoughts
What is SCCM update deployment?
SCCM (System Center Configuration Manager) is a software management tool used by IT administrators to deploy updates to client machines. SCCM update deployment involves deploying software updates to client machines in a controlled and efficient manner.
Why is SCCM update deployment important?
SCCM update deployment is important because it helps ensure that client machines are up-to-date with the latest security patches and software updates. This can help prevent security vulnerabilities and improve the overall performance and stability of client machines.
What are some best practices for SCCM update deployment?
Some best practices for SCCM update deployment include limiting the number of software updates to 1000 per deployment, creating a new software update group for each automatic deployment rule, using an existing software update group for Endpoint Protection definition updates, testing updates before deployment, using maintenance windows, monitoring deployment status, and keeping SCCM up-to-date with the latest updates and hotfixes.
How do I monitor the deployment status of updates in SCCM?
SCCM provides various reports that can be used to monitor the deployment status of updates. These reports can be accessed from the SCCM console and can provide information on the success or failure of update deployments.
How often should I deploy updates in SCCM?
The frequency of update deployments in SCCM can vary depending on the organization’s needs and policies. However, it is generally recommended to deploy updates on a regular basis, such as monthly or quarterly, to ensure that client machines are up-to-date with the latest security patches and software updates.