With the surge in digitization, the concept of cloud migration has become a fundamental reality for many organizations. VMware, a widely accepted leader in server virtualization, has enabled many businesses to take advantage of virtual machines’ benefits. However, as businesses evolve, so do their requirements. This often leads to the need for moving these VMware-based virtual machines to more flexible and scalable platforms like Microsoft Azure. This article will serve as a guide to the intricate process of migrating VMware VMs to Microsoft Azure, aiming to simplify and illuminate the process for organizations considering this important digital shift.
Firstly, what prompts businesses to migrate from VMware to Microsoft Azure? VMware has been instrumental in helping businesses consolidate their servers and maximize resources. Still, with growing demands for agility, scalability, and cost-effectiveness, many organizations are turning their eyes toward cloud platforms. Microsoft Azure, with its extensive suite of cloud services and robust security measures, has proven to be an attractive destination for such migration. From enhanced scalability that adapts to your business’s ebb and flow to potential cost reductions due to its pay-as-you-go model, Azure offers compelling advantages. Moreover, Azure provides businesses with the ability to harness the power of advanced analytics, machine learning, and artificial intelligence capabilities that are increasingly crucial in today’s data-driven world.
The process of migrating VMware VMs to Azure might initially seem daunting. However, with the correct tools, planning, and execution, it can be a smooth and rewarding process. It involves conducting a thorough assessment of your current VMware environment, designing the target Azure environment, choosing the right migration tools, and executing the migration while mitigating any potential issues. This guide will provide an in-depth understanding of each stage, ensuring that you are well-equipped to navigate this complex journey.
In essence, the transition from a VMware-based infrastructure to Azure is a strategic move that can set your organization on a path to improved operational efficiency and innovation. However, success depends on a clear understanding of the process, careful planning, and strategic execution. This article serves to provide that understanding and be your companion through this transformative journey. So, whether you’re a decision-maker looking to understand the migration benefits or an IT professional seeking step-by-step guidance, continue reading as we delve into the intricacies of migrating VMware VMs to Microsoft Azure.
Carbon Azure VM Details
Understanding VMware and Microsoft Azure
VMware, an industry leader in server virtualization, has been a critical part of IT infrastructures for many businesses. At its core, VMware offers a platform for creating, managing, and executing virtual machines (VMs). These VMs emulate a computer system, providing the functionality of a physical computer. They simplify resource management by enabling multiple virtual machines to share the resources of a single physical machine, such as memory, processor cycles, network bandwidth, and so on. This results in optimal resource utilization and reduced costs. VMware’s solutions extend beyond server virtualization, including network virtualization, cloud management, and digital workspace technology, among others.
VMware’s VMs are renowned for their robustness and reliability. Their ability to isolate applications and services in individual VMs adds a layer of security, making it an appealing choice for businesses of all sizes. Furthermore, VMware VMs provide businesses with the flexibility to run their applications on any device without modifying the application or the underlying operating system. This seamless interoperability is one of the main reasons businesses have come to rely heavily on VMware over the years.
However, the digital landscape is rapidly evolving, and the need for more scalable, agile, and cost-effective solutions is more pressing than ever. This is where Microsoft Azure comes into the picture. As one of the leading cloud service providers, Azure offers a comprehensive suite of services that extend far beyond simply hosting VMs. It offers a wide range of platform-as-a-service (PaaS), software-as-a-service (SaaS), and infrastructure-as-a-service (IaaS) solutions, among others.
One of Azure’s most compelling features is its scalability. It allows businesses to scale their services up or down based on their current needs, ensuring they only pay for what they use. This contrasts with traditional infrastructure setups, where organizations often had to overprovision resources to avoid potential capacity issues. In Azure, these resources can be allocated or de-allocated dynamically, offering incredible flexibility and cost savings.
Furthermore, Azure is known for its robust security features. It employs a multilayered security model, ensuring every layer of your cloud environment is protected. This includes physical data centers, infrastructure, networking, and applications. In addition, Azure’s built-in security center provides visibility and control over the security of your resources, making it easier to maintain compliance and protect against threats.
While VMware has served businesses well over the years, the shift towards cloud services like Microsoft Azure offers several advantages. From scalability and cost-effectiveness to advanced analytics and robust security, Azure provides a platform that can handle the needs of today’s businesses. In the next sections, we’ll delve deeper into how to make this transition from VMware to Azure a successful one.
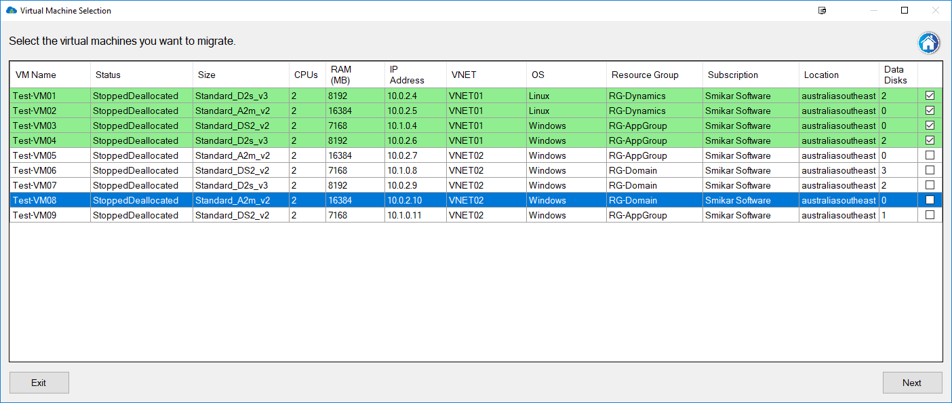
Carbon Azure VM Selection Screen
Preparing for Azure VM Migration
Before beginning the journey of migrating VMware VMs to Microsoft Azure, a significant amount of groundwork needs to be carried out. The success of the migration hinges upon how well you’ve prepared and evaluated your existing VMware environment. It’s like laying the foundation for a building – a strong foundation ensures that the structure can withstand the trials of time and natural elements.
The first step in preparation is performing a comprehensive assessment of your existing VMware environment. This includes understanding the current workload of your VMs, their interdependencies, performance metrics, and any potential bottlenecks. A well-rounded understanding of your present environment will not only help identify any challenges that might occur during the migration but also provide insights into optimizing your environment in Azure. Utilize tools like Azure Migrate to help perform this assessment, which can provide a detailed inventory of your on-premise servers, performance metrics, and visualizations of interdependencies. Remember, this phase is crucial for a successful migration, as it will shape your strategy moving forward. It’s like a reconnaissance mission, identifying potential roadblocks before they can impede your journey.
Designing the target Azure environment is the next crucial step. In this stage, you’ll be planning how to map your existing workloads to Azure resources. It involves considering the scalability, reliability, and cost-effectiveness of your future environment. Think about your organization’s needs and how Azure can meet them. This might mean deciding between Azure’s various VM types, storage options, networking capabilities, and other services. Consider using the Azure Pricing Calculator to estimate the cost of your future environment and optimize it accordingly. It’s like creating a blueprint of your future building, defining where each component should be placed to achieve maximum efficiency and effectiveness.
Choosing the right tools for migration is the third step in preparation. Microsoft provides several tools designed to aid in the migration from VMware to Azure, including Azure Migrate, Azure Site Recovery, and Azure Database Migration Service. Each tool has its strengths and serves different purposes during the migration process. Azure Migrate is your primary tool for assessing and migrating servers, Azure Site Recovery helps in large-scale migration and disaster recovery, and Azure Database Migration Service simplifies the process of migrating databases. If your environment has specific needs not addressed by these tools, third-party options can be explored. Choosing the right tool is like selecting the right equipment to construct your building – it must be suited to the task at hand to ensure a smooth and efficient construction process.
Preparation is key to a successful migration. By understanding your current VMware environment, designing your future Azure environment, and selecting the right tools, you lay a strong foundation for the migration. The next section will build upon this foundation, guiding you through the migration process step-by-step.
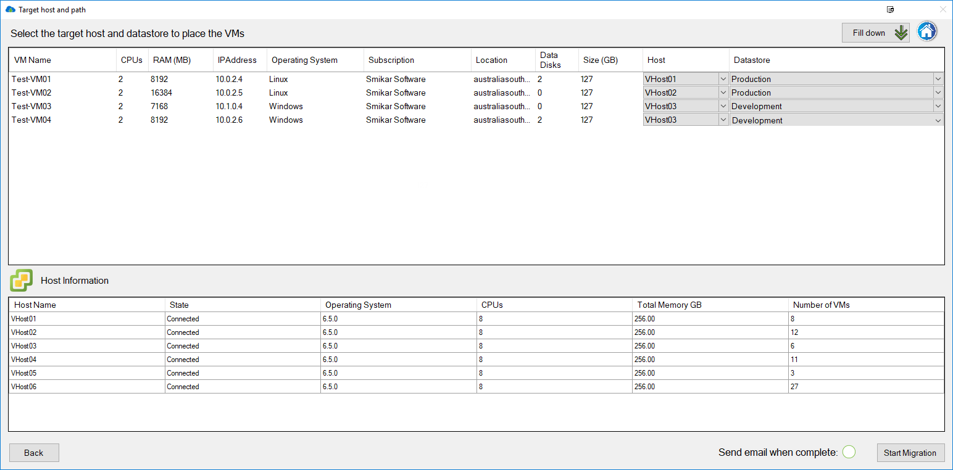
Carbon Hypervisor Screen
The Migration Process
With the preparation phase completed, it’s time to embark on the actual migration process. This stage is where the insights, plans, and tools from the preparation stage get put into action. It’s the equivalent of the construction phase in a building project – carefully assembling the different components to shape the final structure.
The migration process begins with the replication of your VMware VMs to Azure. This is carried out using the Azure Migrate: Server Migration tool or Azure Site Recovery, depending on your specific needs and the scale of migration. During replication, each VM’s data is copied and sent to a storage account in Azure without affecting the operation of the source VM. It’s like creating a mirror image of your existing VMs in the cloud. The Azure Migrate: Server Migration tool simplifies this process by providing a single location to start, monitor, and manage the replication of your VMs.
Once the replication is successful, it’s time to test the migrated VMs. Testing is an essential step to ensure the migration has been successful and that the Azure VMs can run the workloads without any issues. Azure allows you to test the migrated VMs without impacting your live environment. It’s like running a safety check on the building before anyone moves in. Conduct thorough tests, simulate real-world scenarios as much as possible, and validate the applications’ performance and functionality. Don’t rush this process; ensure that everything works as expected before moving on to the next step.
After testing, the next step is the actual cutover, marking the point of no return in your migration journey. During cutover, you’ll be switching your live traffic from the on-premise VMware VMs to the Azure VMs. It’s like opening the doors of your new building for business. Plan your cutover during a period of low activity, if possible, to minimize disruption. Azure provides flexibility here, allowing you to choose when you want to perform the cutover for each VM.
The migration process is a complex journey that requires careful execution. By replicating, testing, and performing a cutover, you’ll be transforming your plans into reality. But remember, the journey doesn’t end here. The final destination is a state where your migrated environment is optimized, monitored, and managed effectively. The next section will guide you through the post-migration activities to achieve this state.
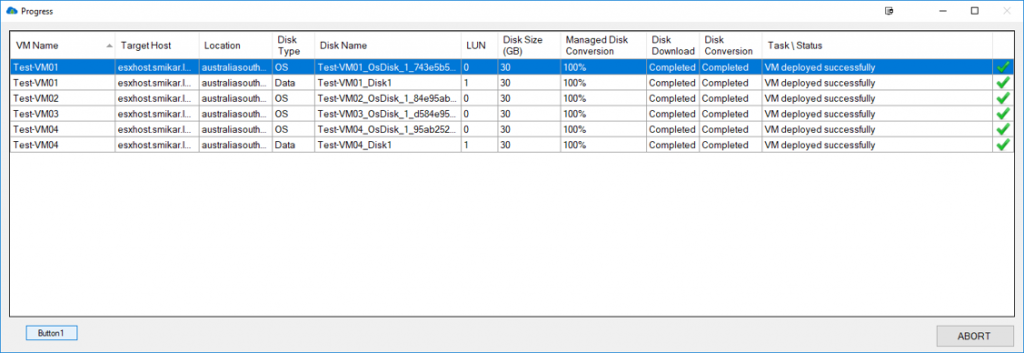
Carbon Azure Migration Progress Screen
Azure VM Post-Migration Activities
Just like a successful building project doesn’t end with the construction of the building, successful migration doesn’t conclude with the cutover. There are numerous post-migration activities that ensure the ongoing success of the migration project. This stage is like the maintenance and management phase of a building project – keeping the building in top shape and ensuring it continues to serve its purpose effectively.
Firstly, verifying the success of the migration is crucial. Although you would have tested the Azure VMs before the cutover, it’s important to continue monitoring them post-migration to ensure they’re functioning as expected in their live state. Use Azure Monitor and Azure Log Analytics to gain insights into the performance and health of your Azure VMs. Look for any anomalies or unexpected behavior and address them promptly. It’s akin to conducting routine inspections in a building to catch and fix any issues early.
Next, optimizing the Azure environment is an ongoing task. The great thing about Azure is its flexibility and the variety of options it provides. However, this also means there’s always room for improvement. Regularly review your usage and costs, and make use of Azure Cost Management to identify where savings can be made. Maybe a different VM size would be more cost-effective, or perhaps you could leverage Azure Reserved Instances or Azure Hybrid Benefit. Consider it like optimizing the energy efficiency or space usage in a building – small changes can lead to significant benefits.
Setting up proper monitoring and management is another vital post-migration activity. Azure provides a range of tools for this, such as Azure Monitor, Azure Security Center, and Azure Policy. These tools provide visibility into the operation and security of your Azure resources, help you maintain compliance, and enable you to respond swiftly to any issues. Just like a well-managed building has a maintenance team and security staff, a well-managed Azure environment utilizes these tools to keep things running smoothly.
Lastly, keep up with maintenance and updates. Azure regularly updates its services and introduces new features. Stay updated with these changes and incorporate them into your environment where beneficial. It’s like refurbishing a building to keep up with modern standards and expectations – staying current ensures your Azure environment continues to serve your business effectively.
Migrating your VMware VMs to Azure is a complex journey that doesn’t end with the cutover. It requires ongoing post-migration activities to ensure the migrated environment continues to deliver the benefits you sought from the migration. In the next section, we’ll look at some real-world examples of businesses that have successfully embarked on this journey.
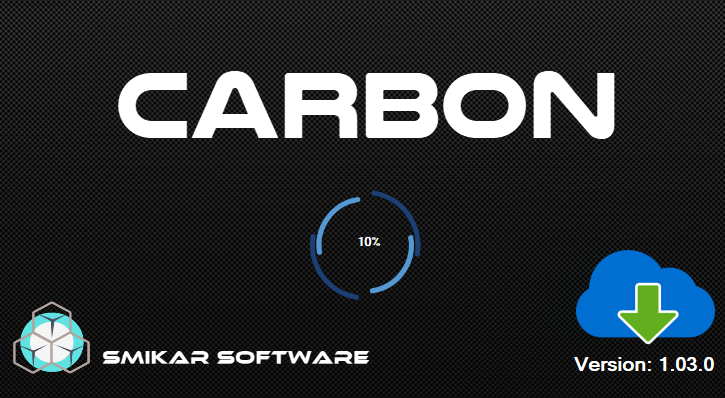
Carbon Azure VM Download Scanning
Reverse Migration: Azure VMs to VMware or Hyper-V with Carbon
While our guide so far has primarily focused on migrating VMware VMs to Azure, it’s essential to understand that the migration journey is not always a one-way street. In fact, businesses may find the need to reverse their migration for various reasons, a process often referred to as cloud repatriation. In this section, we’ll discuss how to utilize a powerful tool, Carbon, developed by SmiKar, to streamline the process of migrating Azure VMs back to on-premises environments, specifically to VMware or Hyper-V.
When considering a reverse migration or cloud repatriation, the primary challenge is maintaining data integrity and system continuity. This is where Carbon comes into play, offering comprehensive VM management that provides detailed information about Azure VMs. It gives you insights into VM name, status, size, number of CPUs, memory allocation, IP address, VNET, operating system, resource group, subscription name, location, and more. Such extensive information about Azure VMs sizes and configurations allows users to make informed decisions about the migration and how to integrate them into their on-premise environment.
One of the stellar features of Carbon is the ease with which it carries out the migration and conversion process. Whether you’re looking to migrate Azure VMs to VMware or Hyper-V, Carbon integrates seamlessly with these environments. It enables users to download an Azure VM, replicate it, and convert it to the chosen on-premises hypervisor with just a few clicks. Carbon ensures that the replicated Azure VMs have the same CPU, memory, and disk configurations as the original VMs on Azure, aiding in a smooth transition.
It’s important to understand the differences and similarities when comparing Azure, VMware, and Hyper-V. Carbon not only bridges these differences but also leverages the advantages each platform offers. For instance, it effectively handles the variances between Hyper-V and VMware, two different but popular hypervisors. To ensure you’re leveraging the best practices while working with these platforms, you can refer to SmiKar’s guides on Hyper-V vs. VMware and Hyper-V best practices.
Lastly, Carbon takes user convenience to another level with automatic configuration and email notifications about the migration progress. Its customizable interface allows users to adjust settings to suit their preferences, including their chosen hypervisor, datastore, and Azure subscription.
In conclusion, migrating Azure VMs to VMware or Hyper-V is an intricate process. Yet, with a tool like Carbon, the complexity can be significantly reduced, ensuring a smooth, informed, and effective reverse migration. Whether it’s a strategic decision to repatriate certain workloads or a broader move towards hybrid cloud models, Carbon equips you with the capabilities to make the transition without a hitch.
Carbon Azure VM Download Splash Screen
VMWare migration to Azure FAQs
Question
Answer
1. What is Azure Migrate?
Azure Migrate is a Microsoft service that helps you assess and migrate your on-premises servers, databases, applications, and data to Azure.
2. Can I migrate VMware VMs directly to Azure?
Yes, you can directly migrate your VMware VMs to Azure using Azure Migrate, which provides tools to assess readiness, and migrate your workloads.
3. What are the key stages in the VMware to Azure migration process?
Key stages include preparation (including assessment of current environment), replication of VMware VMs on Azure, testing and migration (or cutover), and post-migration activities.
4. How can I monitor my Azure VMs post-migration?
Azure provides several tools to monitor the performance of your Azure VMs, including Azure Monitor and Azure Log Analytics.
5. What is cloud repatriation?
Cloud repatriation, also known as reverse cloud migration, is the process of moving data and applications from a cloud platform back to an on-premises data center, or from one cloud platform to another.
6. What is SmiKar’s Carbon?
Carbon is a software tool developed by SmiKar that is designed to streamline the process of migrating Azure VMs back to an on-premise environment, either on VMware or Hyper-V.
7. How does Carbon aid in reverse migration?
Carbon offers comprehensive VM management and easy migration and conversion process. It integrates with VMware or Hyper-V environments, replicating and converting Azure VMs to the chosen on-premise hypervisor.
8. Does Carbon support both VMware and Hyper-V for reverse migration?
Yes, Carbon integrates with both VMware and Hyper-V, allowing users to choose their preferred on-premise hypervisor for the reverse migration.
9. What are the advantages of using Carbon for reverse migration?
Carbon offers detailed VM information, easy replication and conversion, automatic configuration, email notifications, and a customizable interface for a seamless reverse migration process.
10. Can Carbon replicate the exact Azure VM configurations in the on-premise environment?
Yes, Carbon sets up replicated Azure VMs with the same CPU, memory, and disk configurations as the original Azure VMs, ensuring a smooth transition to the on-premise environment.
What Is Azure Service Bus? A Beginner-Friendly Guide
Azure Service Bus is a fully managed enterprise message broker from Microsoft. It allows applications, services, and systems to communicate with each other reliably—even if they’re running at different times or in different places.
If you’re building apps using microservices, serverless, or cloud-based architecture, Service Bus helps keep everything connected, decoupled, and scalable.
Why Use Azure Service Bus?
Reliable messaging: Send data between apps with guaranteed delivery.
Decoupled systems: Services don’t need to be online at the same time.
Scalable architecture: Easily handle from hundreds to millions of messages.
Built-in redundancy & security: Microsoft manages uptime and encryption for you.
Core Concepts of Azure Service Bus
Namespaces
A namespace is your container for Service Bus resources. It gives you a unique URL and helps organize your queues and topics.
Entities
Queues: One-to-one message delivery. The sender adds a message, and a receiver pulls it off the queue.
Topics & Subscriptions: Publish-subscribe pattern. One message goes to many subscribers.
Relays: Enable bi-directional communication between cloud and on-prem systems (less common).
Messaging Patterns
Point-to-Point: Basic queueing from sender to receiver.
Publish-Subscribe: One message, multiple subscribers.
Request-Reply: Sender expects a response after sending a message.
Key Features
Message Queuing
Processes messages in order (FIFO)
Supports sessions for grouped messages
Dead-letter queues catch errors for review
Publish-Subscribe Model
Senders post to a topic
Subscribers define filters to get only relevant messages
Supports auto-deletion of idle subscriptions
Integration with Azure Functions
Trigger serverless logic when a message arrives
Build event-driven workflows
Scale automatically without managing infrastructure
Real-World Use Cases
Order Processing: Queue orders and process them independently
Financial Transactions: Secure, reliable messaging between systems
IoT Telemetry: Handle large volumes of device data in real time
Microservices Integration: Connect services without direct dependencies
Reliable: No message loss even if the receiver is offline
Secure: Encrypted data with Azure AD integration
Scalable: Handles massive workloads with ease
Fully Managed: No infrastructure to maintain
Integrated: Works with Azure Functions, Logic Apps, Event Grid
Frequently Asked Questions
What is Azure Service Bus?
It’s a fully managed message broker for decoupling and connecting services reliably.
When should I use queues vs. topics?
Use queues for one-to-one messaging, and topics when multiple subscribers need the same message.
Does Service Bus work offline?
Yes, it stores messages until the receiver is online again.
Can I trigger Azure Functions from Service Bus?
Absolutely. Azure Functions can be triggered by new messages in a queue or topic.
What’s the max message size?
256 KB in Basic/Standard tiers, 100 MB in Premium.
Conclusion
Azure Service Bus makes it easy to build reliable, scalable, and decoupled systems in the cloud. Whether you’re handling financial transactions, integrating microservices, or processing IoT data, it’s one of the most versatile messaging solutions available on Azure.
Need to get started? Head to the Azure portal and create a Service Bus namespace today.
Understanding Azure: Storage Queue vs. Service Bus
Azure is a cloud computing service created by Microsoft to help businesses tackle challenges and build solutions through a comprehensive suite of cloud services. It offers a wide range of integrated cloud services and functionalities such as analytics, computing, database, mobile, networking, storage, and web, allowing developers to pick and choose from these services to develop and scale new applications, or run existing applications, in the public cloud.
Azure’s breadth of service offerings is truly staggering, but today we’ll focus on two key components: Azure Storage Queue and Azure Service Bus. These are both messaging services provided by Azure and are crucial tools for ensuring smooth communication and data flow between different parts of a cloud application. Understanding how they work and the fundamental differences between them can be vital for choosing the right tool for your needs.
What is Azure Storage Queue?
Azure Storage Queue is a service for storing large numbers of messages. Think of it as a post office: you send messages (or “letters”) to the queue (the “post office”), and whoever you’ve sent them to can pick them up when they’re ready. This allows for asynchronous message queueing that works by holding messages that are to be logged by an application.
Azure Storage Queues are simple to use, highly available, and ensure that your data is always accessible. They’re great for tasks that require a high level of throughput, where you’re dealing with many messages per second. This makes them suitable for various use cases, including the creation of backlog tasks, the delivery of updates or notifications, and the distribution of workload among different parts of a system.
What is Azure Service Bus?
On the other hand, Azure Service Bus is a more complex service that operates as a broker between applications, allowing them to exchange messages in a loosely coupled way for improved scale and resiliency. It provides broader messaging capabilities like message sessions, duplicate detection, transactions, and scheduling, among others.
Azure Service Bus is designed for high-value enterprise messaging and can handle a higher order of complexity in its operations. It’s like an advanced postal system that not only delivers letters but also tracks them, schedules deliveries, and even handles packages (larger and more complex messages). This makes it an ideal choice for tasks that need highly reliable messaging between applications and services, and when you need to maintain the order of queued messages.
In the next section, we’ll delve into the key differences between Azure Storage Queue and Azure Service Bus to help you decide which one fits your needs better.
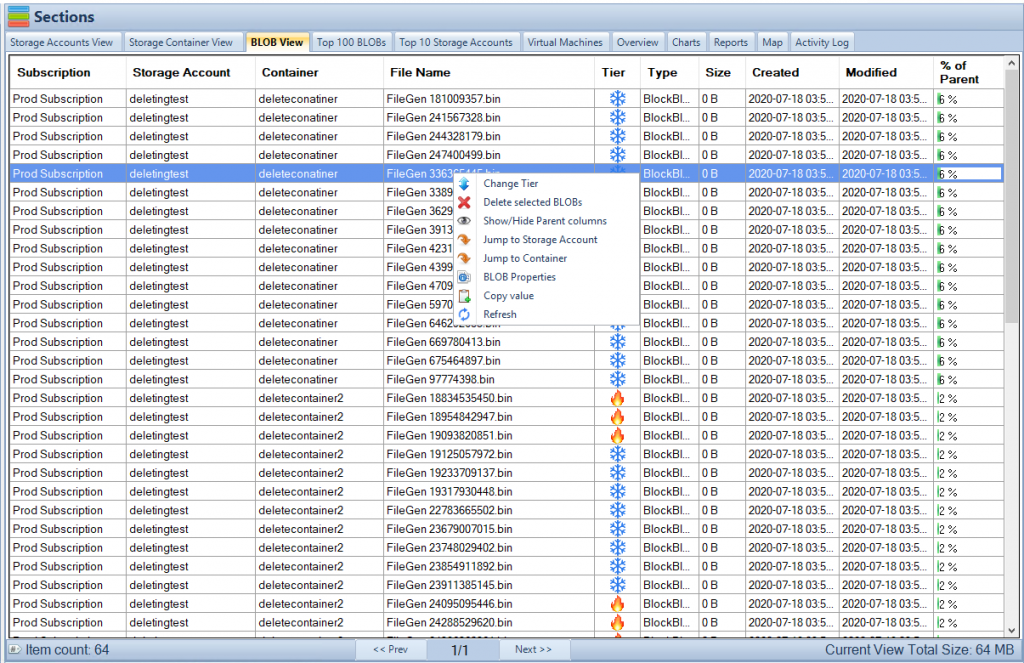
Cloud Storage Manager Blobs Tab
Key Differences
When you’re deciding between Azure Storage Queue and Azure Service Bus, it’s essential to understand the key differences. While both services offer robust messaging solutions, they are designed for different scenarios and offer distinct features.
Performance
The first thing to consider is performance. Azure Storage Queue, being the simpler of the two services, tends to excel in scenarios where high throughput is needed. It’s engineered to handle a large volume of messages, making it suitable for applications that need to process thousands of messages per second.
With Azure Storage Queue, you can use a single storage account to achieve up to 20,000 messages per second, which is quite impressive. This makes it an excellent choice for tasks that require high-speed message logging or when you need to distribute workload among different parts of your system rapidly.
On the other hand, Azure Service Bus is designed for more complex scenarios that require advanced features. While it might not offer the same raw performance as Azure Storage Queue in terms of the sheer number of messages, it makes up for it with its extended capabilities. It provides features like message sessions, duplicate detection, transactions, and scheduling, making it better suited for high-value enterprise-level messaging scenarios.
Message Delivery and Ordering
Another key difference between Azure Storage Queue and Azure Service Bus is how they handle message delivery and ordering. Azure Storage Queue provides basic FIFO (First-In-First-Out) message delivery. This means that if you put Message A into the queue before Message B, Message A will also be the first to be taken out.
Azure Service Bus, however, takes this a step further with its support for message sessions, which enable strict ordering of messages. This means you can ensure that Message A is processed before Message B, even if Message B is ready for processing first. This is particularly useful in scenarios where the order of operations matters.
Scalability
Scalability is yet another critical factor to consider. Both services are highly scalable, but in different ways. Azure Storage Queue’s scalability is primarily horizontal, meaning it can handle a high number of messages and can scale out to accommodate your needs.
On the other hand, Azure Service Bus offers more vertical scalability. It’s engineered to handle a large variety of message types, including more complex and larger messages. This means it can scale up to accommodate more complex scenarios and requirements, making it an excellent choice for enterprise-level applications.
Pricing
Last but certainly not least, there’s the matter of cost. Azure Storage Queue is generally more cost-effective for high-throughput scenarios where many messages need to be processed. Its pricing model is based on the number of operations, which means you pay for what you use.
Azure Service Bus, on the other hand, uses a tiered pricing model. It provides more advanced features and capabilities, so it tends to be more expensive. However, the cost can be justified if you require the advanced messaging capabilities that Azure Service Bus offers.
Cloud Storage Manager Main Window
Deep Dive: Azure Service Bus
Now that we’ve examined Azure Storage Queue in detail, let’s turn our attention to Azure Service Bus and see what it has to offer.
Pros of Azure Service Bus
One of the primary strengths of Azure Service Bus is its robust feature set. It offers a host of advanced messaging capabilities like message sessions, duplicate detection, transactions, and scheduling. These features allow you to handle complex messaging scenarios with ease, ensuring that your applications and services communicate efficiently and reliably.
Azure Service Bus also excels in the area of message delivery and ordering. Thanks to its support for message sessions, you can ensure strict ordering of messages. This is especially useful in situations where the order of operations is crucial, and you need to guarantee that Message A is processed before Message B, even if Message B is ready first.
Moreover, Azure Service Bus is designed for high-value enterprise messaging, capable of handling a variety of message types, including more complex and larger messages. This vertical scalability makes it an excellent choice for enterprise-level applications that need to manage complex scenarios and requirements.
Cons of Azure Service Bus
Despite its many strengths, Azure Service Bus isn’t without its drawbacks. For one, it’s a more complex service than Azure Storage Queue, which means it can be more challenging to set up and configure. This might pose a hurdle for those who are new to Azure or those who prefer a simpler setup.
Additionally, Azure Service Bus is typically more expensive than Azure Storage Queue. Its tiered pricing model means that you’ll pay more for the advanced features it offers. While the cost can be justified by the enhanced capabilities, it’s something to consider if you’re working with a tight budget.
In the following section, we will wrap up our discussion with a conclusion and address some frequently asked questions about Azure Storage Queue and Azure Service Bus.
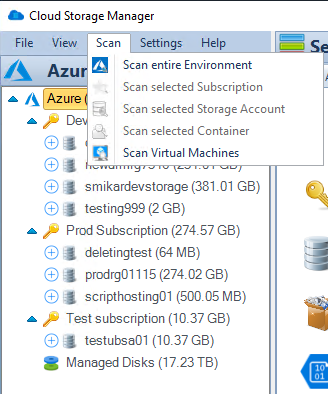
Cloud Storage Manager Scan Menu
Conclusion
Azure Storage Queue and Azure Service Bus both provide robust messaging solutions, but they are designed for different scenarios and offer unique features. Azure Storage Queue is the simpler and more cost-effective option, designed for high-throughput scenarios that require a large volume of messages. On the other hand, Azure Service Bus is a more complex service, offering advanced messaging capabilities that are ideal for high-value enterprise messaging scenarios.
When choosing between Azure Storage Queue and Azure Service Bus, consider the specific needs of your applications. If you need a simple, high-throughput messaging service, Azure Storage Queue might be the way to go. But if you require more advanced features and can handle a higher level of complexity, Azure Service Bus might be a better choice.
Frequently Asked Questions
What is the maximum message size for Azure Storage Queue and Azure Service Bus?
Azure Storage Queue supports a maximum message size of 64 KB, while Azure Service Bus supports a larger maximum message size of 256 KB in the standard tier and up to 100 MB in the premium tier.
Can Azure Storage Queue and Azure Service Bus maintain the order of messages?
Azure Storage Queue provides basic FIFO (First-In-First-Out) message delivery, which can maintain the order of messages to some extent. However, Azure Service Bus supports message sessions, which can ensure a strict ordering of messages, making it the better choice if the order of operations is crucial.
How can Cloud Storage Manager help me save money on Azure Storage?
Cloud Storage Manager provides insights into your Azure blob and file storage consumption. It offers detailed reports on storage usage and growth trends, helping you understand your usage better. This can enable you to manage your resources more effectively, potentially saving you money on your Azure Storage.
Which service should I choose if I’m new to Azure?
If you’re new to Azure, Azure Storage Queue might be a more accessible option due to its simplicity and straightforward setup process. However, as you become more familiar with Azure, you might find the advanced features of Azure Service Bus beneficial.
Can I switch from Azure Storage Queue to Azure Service Bus or vice versa?
Yes, you can switch between the two services if your needs change. However, keep in mind that this may require changes to your application code and could incur additional costs, depending on the features you need. Always consider your specific requirements and budget before making a switch.
Implementing Azure DevOps can bring numerous benefits to your organization. The impact of Azure DevOps is felt across many aspects of the software development lifecycle, including planning, development, delivery, and operations.
Improved Collaboration
Azure DevOps shines a light on the importance of collaboration in the software development process. With its integrated features, it breaks down the silos that often exist between various teams in an organization. Through Azure Boards, teams can plan, track, and discuss work across the entire development effort. With customizable dashboards and a host of analytics tools, it provides a unified view of the work being done. This transparency fosters better communication and collaboration among team members.
In addition, Azure DevOps promotes collaboration through Azure Repos, which provides unlimited, cloud-hosted private Git repositories. It enables team members to work together on code in a secure and efficient manner. With pull requests, team members can review each other’s code, fostering a culture of shared responsibility and continuous learning.
Faster Delivery of Software
With Azure Pipelines, teams can automate the build, testing, and deployment of their applications. This continuous integration and continuous delivery (CI/CD) service works with just about any language, platform, and cloud. It can deploy applications to Azure, AWS, GCP, or on-premises infrastructure.
With its comprehensive DevOps toolchain, Azure DevOps enables teams to automate many of the routine tasks associated with software delivery. This automation reduces the risk of human error, accelerates the delivery process, and allows teams to deliver value to their customers faster.
Moreover, Azure Pipelines provides unlimited minutes and 10 parallel jobs for CI/CD on any OS, even if you’re using the free tier of Azure DevOps. This is a significant advantage for teams that are managing multiple applications or working on large projects.
Enhanced Quality Control
Quality control is crucial in software development, and Azure DevOps offers several tools to help teams achieve high-quality outputs. For instance, Azure Pipelines supports continuous integration, a practice that involves automatically building and testing code every time a team member commits changes. This approach allows teams to detect and fix problems early in the development process.
Furthermore, Azure Test Plans offer a comprehensive tool for managing, tracking, and planning testing efforts. It provides a complete toolkit for both manual and exploratory testing, which is integrated with the other components of Azure DevOps. This integration allows testers to collaborate closely with developers, ensuring that quality is built into the product from the start.
Carbon Azure VM Selection Screen
Getting Started with Azure DevOps
Azure DevOps is a comprehensive solution that meets the needs of developers, project managers, and IT operations teams. But how do you get started with it? Let’s take a closer look.
Creating Your First Project
The first step in getting started with Azure DevOps is to create a project. In Azure DevOps, a project represents a product or service that is under development. It contains all the work items, code, build and release definitions, and test plans associated with that product or service.
Creating a project in Azure DevOps is straightforward. After signing in to Azure DevOps, you can create a new project from the Azure DevOps dashboard by clicking on ‘New project’. You’ll then need to provide some basic information about the project, such as its name and description. You can also choose whether the project is public or private, and select the version control system and work item process for the project.
Understanding Azure Boards
Once you’ve created your project, you can start to use Azure Boards to manage your work. Azure Boards is a work tracking system that can be used to track ideas at every stage of development, from inception to retirement. It supports Scrum, Kanban, and other agile methodologies, as well as traditional approaches to project management.
Azure Boards allows you to create and manage work items, which can represent anything from a new feature to a bug to be fixed. Work items can be categorized into different types, such as user stories, tasks, and bugs, to reflect the nature of the work being done. Each work item has a set of fields that can be filled in to provide more information about the work, such as its title, description, assignment, priority, and status.
You can also use Azure Boards to create backlogs and boards. A backlog is a prioritized list of work items, while a board is a visual representation of the status of work items. Boards can be customized to reflect your team’s workflow, and they provide a real-time view of the progress being made.
Building and Releasing with Azure Pipelines
Azure Pipelines is a powerful tool for automating the build and release process. It supports both continuous integration and continuous delivery, allowing you to automate the process of building, testing, and deploying your applications.
In Azure Pipelines, a pipeline is a series of steps that are run in sequence. These steps can include tasks such as compiling code, running tests, and deploying applications. You can define your pipeline in a YAML file, which allows you to version control your pipeline configuration alongside your code.
Azure Pipelines supports a wide variety of languages, platforms, and cloud providers. It integrates with popular tools like GitHub, Jenkins, and Chef, and it provides a marketplace of extensions for even more functionality. Whether you’re developing a web app, a mobile app, or a microservice, Azure Pipelines provides a flexible and powerful way to automate your build and release process.
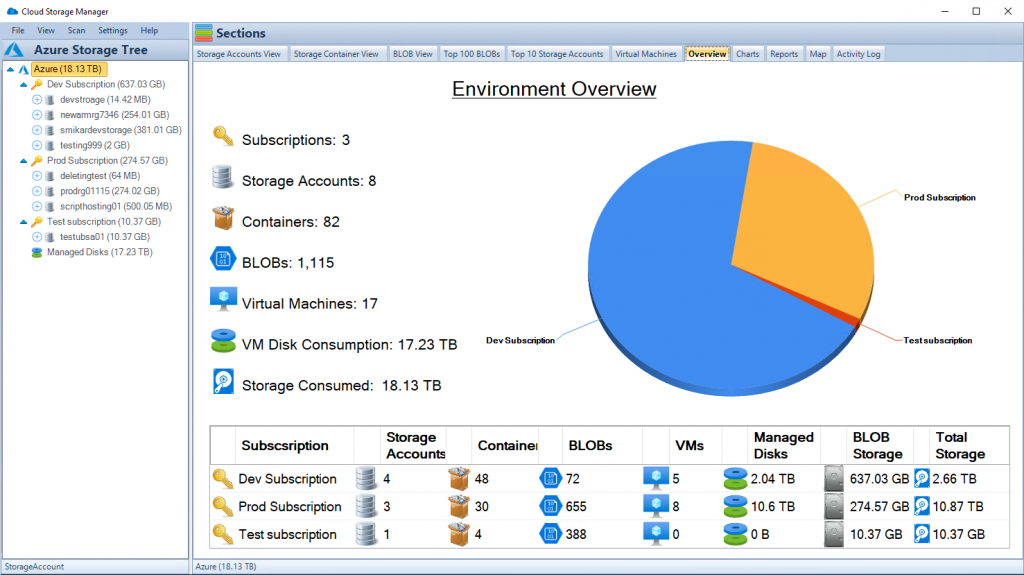
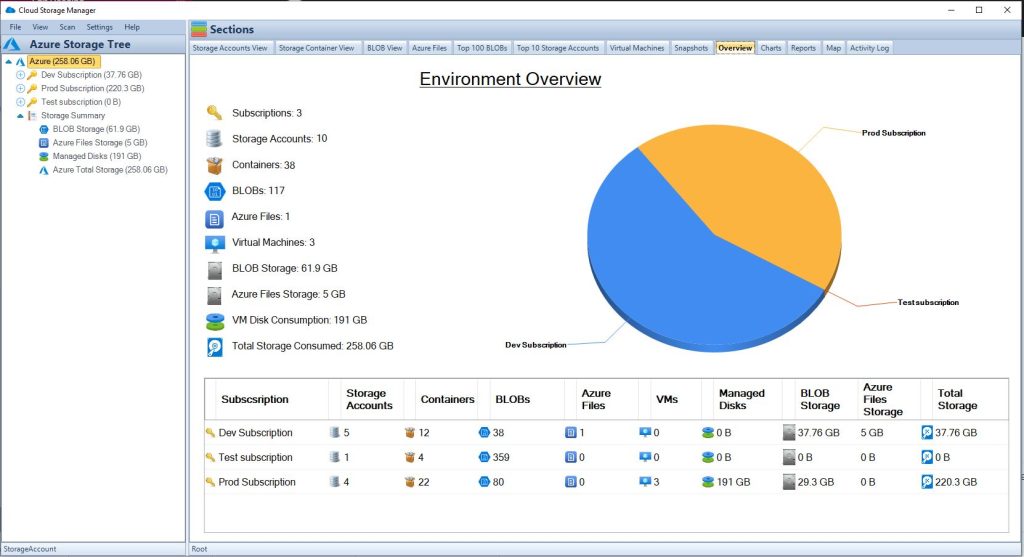
Cloud Storage Manager Overview
Managing Code with Azure Repos
Azure Repos provides a place for your team to store, manage, and track code. It supports both Git and Team Foundation Version Control (TFVC), so you can use the version control system that best suits your team’s needs.
With Azure Repos, you can create and manage repositories for your projects. A repository is a place where your code is stored and versioned. It’s like a database for your code, providing a history of all the changes that have been made.
Azure Repos also supports pull requests, which are a way to review and discuss changes before they’re merged into the main branch. With pull requests, you can ensure that your code is reviewed by other team members before it’s deployed, improving the quality of your code and fostering a culture of collaboration and continuous learning.
Testing with Azure Test Plans
Testing is an essential part of the software development process, and Azure Test Plans provides a suite of tools for managing, tracking, and planning your testing efforts. It offers a complete toolkit for manual and exploratory testing, and it’s integrated with the rest of Azure DevOps, so you can track your testing activities alongside your other work.
With Azure Test Plans, you can create test plans and test suites to organize your testing activities. A test plan is a set of test cases that are intended to be executed together, while a test suite is a collection of related test cases. You can also create test cases, which are detailed steps for verifying a particular functionality or feature.
Azure Test Plans also supports exploratory testing, which is an approach to testing that emphasizes the discovery of new information. With exploratory testing, testers are free to follow their intuition and experience, exploring the application in a less structured way. This allows them to uncover potential issues that may not be caught with traditional, scripted testing methods. Combined with the planning and tracking capabilities of Azure Test Plans, this provides a comprehensive solution for managing all aspects of the testing process within Azure DevOps.
Collaborating with Azure Artifacts
Azure Artifacts is an integrated package management solution provided by Azure DevOps. It allows teams to share and consume different types of packages in a single place, thus fostering collaboration and improving overall productivity. This could be packages produced by your team, or third-party packages that you are using in your projects.
With Azure Artifacts, you can create feeds to store your packages. A feed is a container for packages that can be used to group related packages together. You can control access to your feeds, ensuring that only the right people have access to your packages.
Moreover, Azure Artifacts supports a wide variety of package types, including NuGet, npm, Maven, Python, and more. This means that regardless of the type of project you’re working on or the languages you’re using, you can use Azure Artifacts to manage your packages. By centralizing package management in Azure Artifacts, you can ensure that all your packages are secure, reliable, and easily accessible.
Leveraging Azure Dashboards
Azure Dashboards is a service within Azure DevOps that allows you to create customizable dashboards for your projects. These dashboards can display a wide variety of data, including work items, build and release status, test results, and more. You can customize your dashboards to show the data that’s most relevant to you and your team, and you can create multiple dashboards to suit different needs.
One of the main benefits of Azure Dashboards is that it provides a visual representation of your project’s progress and status. By checking the dashboard, team members can quickly get a sense of how the project is progressing, what work is currently being done, and what work needs to be done next.
Azure Dashboards is fully integrated with the rest of Azure DevOps, meaning that data from Azure Boards, Azure Repos, Azure Pipelines, and Azure Test Plans can all be displayed on your dashboards. This level of integration makes Azure Dashboards a powerful tool for monitoring and managing your projects.
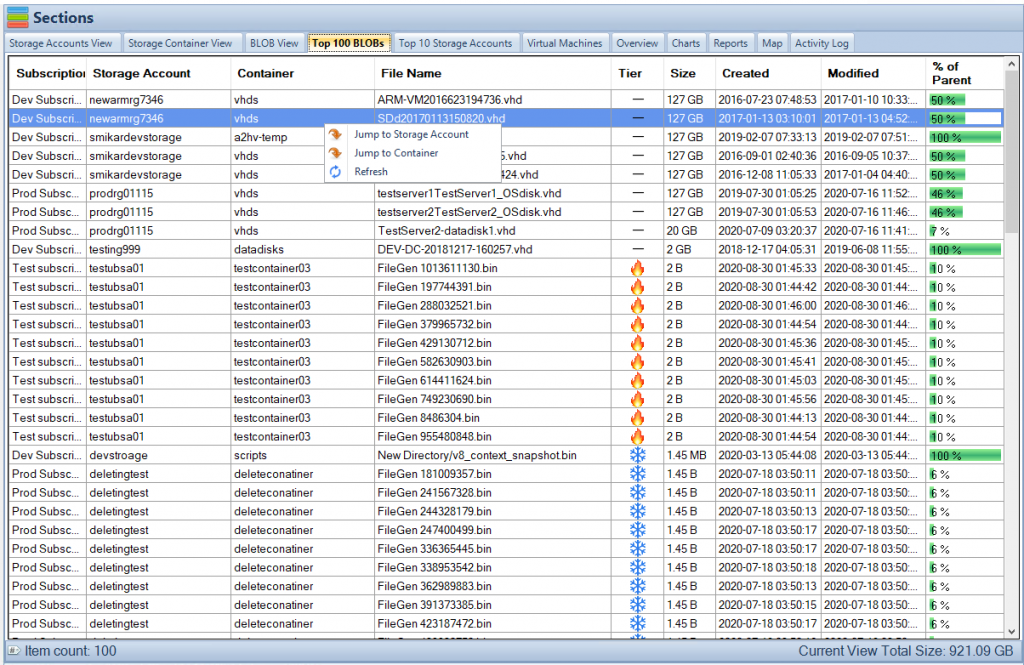
Cloud Storage Manager Top 100 Blobs Tab
Conclusion
Azure DevOps is a comprehensive suite of tools designed to support the entire software development lifecycle. With features for planning, developing, testing, and releasing software, Azure DevOps provides a centralized platform for managing your projects.
One of the key strengths of Azure DevOps is its integration. Each of the services within Azure DevOps – Azure Boards, Azure Pipelines, Azure Repos, Azure Test Plans, Azure Artifacts, and Azure Dashboards – is designed to work seamlessly with the others. This means that you can track your work from idea to release all within a single platform.
Whether you’re a developer, a tester, a project manager, or any other role involved in software development, Azure DevOps has something to offer you. It’s a flexible, powerful, and user-friendly tool that can help you and your team deliver high-quality software more efficiently and effectively.
FAQs
1. What is Azure DevOps?
Azure DevOps is a suite of development tools, services, and features that enables teams to plan work, collaborate on code development, and build and deploy applications. It includes Azure Boards, Azure Repos, Azure Pipelines, Azure Test Plans, Azure Artifacts, and Azure Dashboards.
2. Who can use Azure DevOps?
Azure DevOps can be used by software development teams of all sizes and across all industries. It’s suitable for both small teams working on a single project and large organizations managing multiple complex projects.
3. What are the main components of Azure DevOps?
The main components of Azure DevOps include Azure Boards, Azure Repos, Azure Pipelines, Azure Test Plans, Azure Artifacts, and Azure Dashboards. Each of these components serves a specific purpose in the software development lifecycle, from planning and coding to building, testing, and deploying.
4. Is Azure DevOps suitable for Agile methodologies?
Yes, Azure DevOps supports Agile methodologies. Azure Boards, one of the components of Azure DevOps, is particularly suitable for managing work in Agile teams, supporting Scrum, Kanban, and other Agile methodologies.
5. How does Azure DevOps support collaboration?
Azure DevOps supports collaboration through several of its features. Azure Boards allows for work item tracking and planning, Azure Repos provides version control for code collaboration, Azure Pipelines enables continuous integration and delivery, and Azure Artifacts allows for sharing and consuming packages among teams. All these features are integrated, allowing for seamless collaboration among team members.
Azure Storage is a cloud-based service that provides scalable, secure and highly available data storage solutions for applications running in the cloud. It offers different types of storage options like Blob storage, Queue storage, Table storage and File storage.
Blob storage is used to store unstructured data like images, videos, audios and documents while Queue storage helps in building scalable applications with loosely coupled architecture. Table storage is a NoSQL key-value store used for storing structured datasets and File share manages files in the same way as traditional file servers.
Azure Storage provides developers with a massively scalable object store for text and binary data hosting that can be accessed via REST API or by using various client libraries in languages like .NET, Java and Python. It also offers features like geo-replication, redundancy options and backup policies which provide high availability of data across regions.
The Importance of Implementing Best Practices
Implementing best practices when using Azure Storage can save you from many problems down the road. For instance, security breaches or performance issues can lead to downtime or loss of important data which could have severe consequences on your organization’s reputation or revenue.
By following best practices guidelines provided by Microsoft or other industry leaders you can ensure improved security, better performance and cost savings. Each type of Azure Storage has its own unique characteristics that may require specific best practices to be followed to achieve optimal results.
Therefore it’s essential to understand the type of data being stored and usage patterns before designing the storage solution architecture. In this article we’ll explore some best practices for securing your Azure Storage account against unauthorized access attempts as well as optimizing its performance based on your needs while also ensuring high-availability through replication options and disaster recovery strategies.
Security Best Practices
Use of Access Keys and Shared Access Signatures (SAS)
The use of access keys and shared access signatures (SAS) is a critical aspect of security best practices in Azure Storage. Access keys are essentially the username and password for your storage account, and should be treated with the same level of security as you would any other sensitive information. To minimize risk, it is recommended to use SAS instead of access keys when possible.
SAS provide granular control over permissions, expiration dates, and access protocol restrictions. This allows you to share specific resources or functionality with external parties without exposing your entire storage account.
Implementation of Role-Based Access Control (RBAC)
Role-based access control (RBAC) allows you to assign specific roles to users or groups based on their responsibilities within your organization. RBAC is a key element in implementing least privilege access control, which means that users only have the necessary permissions required for their job function. This helps prevent unauthorized data breaches and ensures compliance with privacy regulations such as GDPR.
Encryption and SSL/TLS usage
Encryption is essential for securing data at rest and in transit. Azure Storage encrypts data at rest by default using service-managed keys or customer-managed keys stored in Azure Key Vault.
For added security, it is recommended to use SSL/TLS for data transfers over public networks such as the internet. By encrypting data in transit, unauthorized third-parties will not be able to read or modify sensitive information being transmitted between client applications and Azure Storage.
Conclusion: Security Best Practices
Implementing proper security measures such as using access keys/SAS, RBAC, encryption, and SSL/TLS usage can help protect your organization’s valuable assets stored on Azure Storage from unauthorized access and breaches. It’s important to regularly review and audit your security protocols to ensure that they remain effective and up-to-date.
Performance Best Practices
Proper Use of Blob Storage Tiers
When it comes to blob storage, Azure offers three different tiers: hot, cool, and archive. Each tier has a different price point and is optimized for different access patterns. Choosing the right tier for your specific needs can result in significant cost savings.
For example, if you have data that is frequently accessed or modified, the hot tier is the most appropriate option as it provides low latency access to data and is intended for frequent transactions. On the other hand, if you have data that is accessed infrequently or stored primarily for backup/archival purposes, then utilizing the cool or archive tiers may be more cost-effective.
It’s important to note that changing storage tiers can take some time due to data movement requirements. Hence you should carefully evaluate your usage needs before settling on a particular tier.
Utilization of Content Delivery Network (CDN)
CDNs are an effective solution when it comes to delivering content with high performance and low latency across geographical locations. By leveraging a CDN with Azure Storage Account, you can bring your content closer to users by replicating blobs across numerous edge locations across the globe.
This means that when a user requests content from your website or application hosted in Azure Storage using CDN, they will receive that content from their nearest edge location rather than waiting for content delivery from a central server location (in this case – Azure storage). By using CDNs with Azure Storage Account in this way, you can deliver high-performance experiences even during peak traffic times while reducing bandwidth costs.
Optimal Use of Caching
Caching helps improve application performance by storing frequently accessed data closer to end-users without having them make requests directly to server resources (in this case – Azure Storage). This helps reduce latency and bandwidth usage.
Azure offers several caching options, including Azure Redis Cache and Azure Managed Caching. These can be used in conjunction with Azure Storage to improve overall application performance and reduce reliance on expensive server resources.
When utilizing caching with Azure Storage, it’s important to consider the cache size and eviction policies based on your application needs. Also, you need to evaluate the type of data being cached as some data types are better suited for cache than others.
Availability and Resiliency Best Practices
One of the most important considerations for any organization’s data infrastructure is ensuring its availability and resiliency. In scenarios where data is critical to business operations, any form of downtime can result in significant losses. Therefore, it is important to have a plan in place for redundancy and disaster recovery.
Replication options for data redundancy
Azure Storage provides users with multiple replication options to ensure that their data is safe from hardware failures or other disasters. The three primary replication options available are:
However, this option does not replicate your data across different regions or geographies, so there’s still a risk of data loss in case of a natural disaster that affects the entire region.
Zone-redundant storage (ZRS): This option replicates your data synchronously across three availability zones within a single region, increasing fault tolerance.
Geo-redundant storage (GRS):this option replicates your data asynchronously to another geographic location, providing an additional layer of protection against natural disasters or catastrophic events affecting an entire region.
Implementation of geo-redundancy
The GRS replication option provides a higher level of resiliency as it replicates the user’s storage account to another Azure region without manual intervention required. In the event that the primary region becomes unavailable due to natural disaster or system failure, the secondary copy will be automatically promoted so that clients can continue accessing their information without any interruptions.
Azure Storage offers GRS replication at a nominal cost, making it an attractive option for organizations that want to ensure their data is available to their clients at all times. It is important to note that while the GRS replication option provides additional resiliency, it does not replace the need for proper backups and disaster recovery planning.
Use of Azure Site Recovery for disaster recovery
Azure Site Recovery (ASR) is a cloud-based service that allows you to replicate workloads running on physical or virtual machines from your primary site to a secondary location. ASR is integrated with Azure Storage and can support the replication of your data from one region to another. This means that in case of a complete site failure or disaster, you can use ASR’s failover capabilities to quickly bring up your applications and restore access for your customers.
ASR also provides automated failover testing at no additional cost (up to 31 tests per year), allowing customers to validate their disaster recovery plans regularly. Additionally, Azure Site Recovery supports cross-platform replication, making it an ideal solution for organizations with heterogeneous environments.
Implementing these best practices will help ensure high availability and resiliency for your organization’s data infrastructure. By utilizing Azure Storage’s built-in redundancy options such as GRS and ZRS, as well as implementing Azure Site Recovery as part of your disaster recovery planning process, you can minimize downtime and guarantee continuity even in the face of unexpected events.
Cost Optimization Best Practices
While Azure Storage offers a variety of storage options, choosing the appropriate storage tier based on usage patterns is crucial to keeping costs low. Blob Storage tiers, which include hot, cool, and archive storage, provide different levels of performance and cost. Hot storage is ideal for frequently accessed data that requires low latency and high throughput.
Cool storage is designed for infrequently accessed data that still requires quick access times but with lower cost. Archive storage is perfect for long-term retention of rarely accessed data at the lowest possible price.
Effective utilization of storage capacity is also important for cost optimization. Azure Blob Storage allows users to store up to 5 petabytes (PB) per account, but this can quickly become expensive if not managed properly.
By monitoring usage patterns and setting up automated policies to move unused or infrequently accessed data to cheaper tiers, users can avoid paying for unnecessary storage space. Another key factor in managing costs with Azure Storage is monitoring and optimizing data transfer costs.
As data moves in and out of Azure Storage accounts, transfer fees are incurred based on the amount of data transferred. By implementing strategies such as compression or batching transfers together whenever possible, users can reduce these fees.
To further enhance cost efficiency and optimization, utilizing an intelligent management tool can make a world of difference. This is where SmiKar Software’s Cloud Storage Manager (CSM) comes in.
CSM is an innovative solution designed to streamline the storage management process. Its primary feature is its ability to analyze data usage patterns and minimise storage costs with analytics and reporting.
Cloud Storage Manager also provides an intuitive, user-friendly dashboard which gives a clear overview of your storage usage, helping you make more informed decisions about your storage needs.
CSM’s intelligent reporting can also identify and highlight opportunities for further savings, such as potential benefits from compressing certain files or batching transfers.
Cloud Storage Manager is an essential tool for anyone looking to make the most out of their Azure storage accounts. It not only simplifies storage management but also helps to significantly reduce costs. Invest in Cloud Storage Manager today, and start experiencing the difference it can make in your cloud storage management.
Cloud Storage Manager Main Window
The Importance of Choosing the Appropriate Storage Tier Based on Usage Patterns
Choosing the appropriate Blob Storage tier based on usage patterns can significantly impact overall costs when using Azure Storage. For example, if a user has frequently accessed but small files that require low latency response times (such as images used in a website), hot storage would be an appropriate choice due to its fast response times but higher cost per GB stored compared to cooler tiers like Cool or Archive.
Cooler tiers are ideal for less frequently accessed files such as backups or archives where retrieval times are not as critical as with hot tier files because the cost per GB stored is lower. Archive tier is perfect for long-term retention of rarely accessed data at a lower price point than Cool storage.
However, access times to Archive storage can take several hours. This makes it unsuitable for frequently accessed files, but ideal for long term backups or archival data that doesn’t need to be accessed often.
Effective Utilization of Storage Capacity
One important aspect of effective utilization of storage capacity is understanding how much data each application requires and how much space it needs to store that data. An application that requires a small amount of storage space should not be given large amounts of space in hot or cool storage tiers as these are more expensive options compared to archive tier which is cheaper but slower. Another way to optimize Azure Storage costs is by setting up automated policies that move unused or infrequently accessed files from hot or cool tiers to archive tiers where retrieval times are slower but the cost per GB stored is significantly less than cooler tiers.
Monitoring and Optimizing Data Transfer Costs
Data transfer fees can quickly add up when using Azure Storage, especially if there are large volumes of traffic. To minimize these fees, users should consider compressing their data before transfer as well as batching transfers together whenever possible.
Compressing will reduce overall file size which will reduce the amount charged per transfer while batching transfers allows users to combine multiple transfers into one larger transfer thus avoiding individual charges on each single transfer operation. Additionally, monitoring usage patterns and implementing strategies such as throttling connections during peak usage periods can also help manage costs associated with data transfer fees when using Azure Storage.
Cost optimization best practices for Azure Storage consist of choosing the appropriate Blob Storage tier based on usage patterns, effective utilization of storage capacity through automated policies and proper monitoring strategies for optimizing data transfer costs. By adopting these best practices, users can reduce their overall expenses while still enjoying the full benefits of Azure Storage.
Data Management Best Practices
Implementing retention policies for compliance purposes
Implementing retention policies is an important aspect of data management. Retention policies ensure that data is kept for the appropriate amount of time and disposed of when no longer needed.
This can help organizations comply with various industry regulations such as HIPAA, GDPR, and SOX. Microsoft Azure provides retention policies to manage this process effectively.
Retention policies can be set based on various criteria such as content type, keywords in the file name or metadata, or even by department or user. Once a policy has been created, it can be automatically applied to new data as it is created or retroactively applied to existing data.
In order to ensure compliance, it is important to regularly review retention policies and make adjustments as necessary. This will help avoid any legal repercussions that could arise from failure to comply with industry regulations.
Use of metadata to organize and search data effectively
Metadata is descriptive information about a file that helps identify its properties and characteristics. Metadata includes information such as date created, author name, file size, document type and more.
It enables easy searching and filtering of files using relevant criteria. By utilizing metadata effectively in Azure Storage accounts, you can easily organize your files into categories such as client names or project types which makes it easier for you to find the right files when you need them quickly.
Additionally, metadata tags can be used in search queries so you can quickly find all files with a specific tag across your organization’s entire file system regardless of its location within Azure Storage accounts. The use of metadata also ensures consistent naming conventions which makes searching through old documents easier while making sure everyone on the team understands the meaning behind each piece of content stored in the cloud.
Efficiently managing large-scale data transfers
With Azure Blob Storage account comes an improved scalability which is capable of handling large-scale data transfers with ease. However, managing such data transfers isn’t always easy and requires proper planning and management. Azure offers effective data transfer options such as Azure Data Factory that can help you manage large scale data transfers.
This service helps in scheduling and orchestrating the transfer of large amounts of data from one location to another. Furthermore, Azure Storage accounts provide an efficient way to move large amounts of data into or out of the cloud using a few different methods including AzCopy or the Azure Import/Export service.
AzCopy is a command-line tool that can be used to upload and download data to and from Blob Storage while the Azure Import/Export service allows you to ship hard drives containing your data directly to Microsoft for import/export. Effective management and handling of large-scale file transfers ensures that your organization’s critical information is securely moved around without any loss or corruption.
Conclusion
Recap on the importance of implementing Azure Storage best practices
Implementing Azure Storage best practices is critical to ensure optimal performance, security, availability, and cost-effectiveness. By utilizing access keys and SAS, implementing RBAC, and utilizing encryption and SSL/TLS usage for security purposes; proper use of Blob Storage tiers, CDN utilization, and caching for performance optimization; replication options for data redundancy, geo-redundancy implementation, and disaster recovery measures through Azure Site Recovery for availability and resiliency; appropriate storage tier selection based on usage patterns, effective utilization of storage capacity, monitoring data transfer costs for cost optimization; retention policies implementation for compliance purposes; using metadata to organize data effectively; efficiently managing large-scale data transfers – all these measures can help enterprises to achieve their business goals more efficiently.
Encouragement to continuously review and optimize storage strategies
However, it’s essential not just to implement these best practices but also continuously review them. As technology advances rapidly over time with new features being added frequently by cloud providers like Microsoft Azure – there may be better ways or new tools available that companies can leverage to optimize their storage strategies further. By continually reviewing the efficiency of your existing storage strategy against your evolving business needs – you’ll be able to identify gaps or areas that require improvements sooner rather than later.
Therefore it’s always wise to keep a lookout for industry trends related to cloud computing or specifically in this case – Microsoft Azure Storage best practices. Industry reports from reputable research firms like Gartner or IDC can provide you with insights into current trends around cloud-based infrastructure services.
The discussion forums within the Microsoft community where professionals discuss their experiences with Azure services can also give you an idea about what others are doing. – implementing Azure Storage best practices should be a top priority for businesses looking forward to leveraging modern-day cloud infrastructure services.
By adopting these practices and continuously reviewing and optimizing them, enterprises can achieve optimal performance, security, availability, cost-effectiveness while ensuring compliance with industry regulations. The benefits of implementing Azure Storage best practices far outweigh the costs of not doing so.