Check the Size of SharePoint Storage
The Future of Document Archiving
In today’s fast-paced digital environment, managing large volumes of documents in SharePoint Online can be a daunting task for any organization. As businesses grow, so does the need for efficient, cost-effective storage solutions that not only save space but also ensure compliance and ease of access. Enter Squirrel, an innovative SaaS product designed to automate the archiving of documents from SharePoint Online to Azure Blob Storage, providing a seamless blend of efficiency and security.

| Topic | Key Points |
|---|---|
| Introduction | Importance of monitoring SharePoint storage for performance, cost, and compliance. |
| Understanding Storage | Types of data (documents, list items, site content, recycle bin) and storage limits in SharePoint. |
| SharePoint Admin Center | User-friendly interface for managing storage; steps to check storage metrics. |
| PowerShell | Advanced method for managing storage with scripts; how to connect and retrieve storage information. |
| Third-Party Tools | Benefits of using tools like SharePoint Storage Explorer for detailed reports and easier management. |
| Monitoring Storage Usage | Setting up alerts, reviewing reports, and understanding storage trends. |
| Managing Storage | Optimising usage, implementing retention policies, and using third-party tools for better management. |
| Troubleshooting Issues | Common problems and solutions related to checking storage size. |
| Conclusion | Regular monitoring and management are key to maintaining efficient SharePoint storage. |
| FAQs | Answers to common questions about accessing admin tools, setting quotas, and reducing storage usage. |
SharePoint Archiving Introduction
SharePoint has become an integral part of many organisations, serving as a powerful tool for collaboration, document management, and information sharing. As the volume of data grows, it becomes crucial to monitor and manage SharePoint storage effectively. Proper storage management ensures optimal performance, cost efficiency, and compliance with organisational policies. This article will guide you through the process of checking the size of your SharePoint storage, ensuring you stay within storage limits and maintain a well-organised environment.
Managing SharePoint storage is essential for several reasons. First, it helps in maintaining the overall health and performance of your SharePoint sites. Overloaded storage can lead to slow performance, making it difficult for users to access documents and collaborate efficiently. Second, effective storage management ensures compliance with organisational policies and industry regulations, which is crucial for data governance. Finally, keeping an eye on storage usage helps in cost management, as exceeding storage limits in SharePoint Online can result in additional charges.
By understanding how to check and manage SharePoint storage, you can avoid these pitfalls and ensure your SharePoint environment remains efficient and cost-effective. This guide will provide step-by-step instructions on various methods to check SharePoint storage size, including using the SharePoint Admin Center, PowerShell, and third-party tools like SmiKar’s SharePoint Storage Explorer.
Understanding SharePoint Storage
Before diving into the methods of checking SharePoint storage size, it’s important to understand the structure and components of SharePoint storage. This foundational knowledge will help you interpret storage metrics and make informed decisions about storage management.
SharePoint Storage Structure
SharePoint stores various types of data, each contributing to overall storage usage. Here are the main components:
- Documents: Files uploaded to document libraries are a major part of SharePoint storage. These can include Word documents, Excel spreadsheets, PowerPoint presentations, PDFs, images, videos, and other file types. Document libraries are commonly used for team collaboration and project management, making them a significant contributor to storage usage.
- List Items: SharePoint lists are used to manage data in a structured format, similar to tables in a database. Each item in a list occupies storage space. Lists can contain data such as tasks, contacts, calendars, issue tracking, and custom lists tailored to specific business needs.
- Site Content: This includes everything else within a SharePoint site, such as site pages, templates, workflows, site assets, and custom solutions. While these elements might not be as large as document libraries, they collectively contribute to the overall storage usage.
- Recycle Bin: Deleted items are temporarily retained in the recycle bin before permanent deletion. This feature allows users to recover accidentally deleted items, but it also consumes storage space until the items are permanently removed.
Storage Limits and Quotas
Understanding storage limits and quotas is crucial for effective SharePoint management.
- SharePoint Online: Storage limits in SharePoint Online are defined by the plan you choose. Each site collection has a storage limit, and the total storage available is pooled across all site collections within your tenant. For example:
- Base Storage: Microsoft 365 plans typically include a base amount of storage per user. For example, each user might get 1 TB of OneDrive storage plus an additional pooled storage amount for SharePoint Online.
- Additional Storage: If your organisation needs more storage, additional storage can be purchased on a per-gigabyte basis. This flexibility allows you to scale storage based on your needs.
- SharePoint Server: On-premises versions of SharePoint, such as SharePoint 2016 and SharePoint 2019, allow more granular management of storage with site quotas and database storage management. Administrators can set storage limits at the site collection level, helping to control storage allocation and usage. For instance, you can set a quota of 100 GB for a particular site collection, ensuring it doesn’t exceed the allocated space.
Understanding these components and limits helps in better managing and optimising storage. Regular monitoring and proactive management are key to preventing storage-related issues and ensuring a smooth SharePoint experience.
Methods to Check SharePoint Storage Size
There are several methods available to check the size of your SharePoint storage. Below are the most common and effective ways:
Using the SharePoint Admin Center
The SharePoint Admin Center provides a user-friendly interface for administrators to manage various aspects of SharePoint, including storage. It is an essential tool for monitoring and managing your SharePoint environment, especially for administrators who prefer a graphical user interface over command-line tools.
-
Accessing the SharePoint Admin Center:
- Log in to the Microsoft 365 Admin Center: To access the SharePoint Admin Center, you need to log in to the Microsoft 365 Admin Center with your admin credentials. Navigate to https://admin.microsoft.com and sign in using your administrative account.
- Navigate to SharePoint Admin Center: In the left-hand navigation pane, select “Admin centers” and then “SharePoint”. This will redirect you to the SharePoint Admin Center where you can manage your SharePoint environment.
- Navigating to the Storage Metrics Section:
- Sites Tab: In the SharePoint Admin Center, click on the “Sites” tab. This tab provides an overview of all the site collections within your SharePoint environment.
- Active Sites: Select “Active sites” to view a list of your SharePoint sites. This list displays all the active site collections along with their URLs and administrators.
- Select a Site: Click on the specific site you want to check. This will open the site details page where you can view and manage various settings for the selected site.
- Storage Metrics: In the site settings, select “Storage” under the “Site Usage” section. This section provides a detailed view of the storage metrics for the selected site.
-
Interpreting Storage Usage Information:
- Total Storage Used: The storage metrics section displays the total storage used by the selected site. This includes all documents, list items, site content, and items in the recycle bin.
- Available Storage: This indicates the remaining storage available for the site. It helps you understand how much space is left before reaching the site’s storage limit.
- Storage Breakdown: The section also provides a breakdown of storage usage by site components (e.g., documents, list items, etc.). This breakdown helps you identify which areas are consuming the most storage and where you might need to take action to free up space.
- Insights and Trends: The storage metrics can provide insights into usage trends over time. For example, if you notice a sudden spike in storage usage, it could indicate the upload of large files or an increase in site activity.
By following these steps, you can easily monitor and manage the storage usage of your SharePoint sites through the SharePoint Admin Center. Regularly checking these metrics helps in maintaining optimal site performance and avoiding unexpected storage issues.
Using PowerShell
For more advanced users, PowerShell offers a powerful way to manage SharePoint storage through scripting. PowerShell provides more flexibility and automation capabilities compared to the SharePoint Admin Center, making it ideal for large-scale environments or complex administrative tasks.
- Installing the SharePoint Online Management Shell:
- Download and Install: Download and install the SharePoint Online Management Shell from the Microsoft website. This tool allows you to manage your SharePoint Online environment using PowerShell commands. You can find the download link on the Microsoft documentation page for SharePoint Online Management Shell.
- System Requirements: Ensure your system meets the requirements for installing the management shell. Typically, it requires Windows operating system and PowerShell version 3.0 or later.
- Connecting to SharePoint Online:
- Open the Management Shell: Open the SharePoint Online Management Shell on your computer. You can find it in your Start menu or by searching for “SharePoint Online Management Shell”.
- Connect to Your SharePoint Online Service: Use the following command to connect to your SharePoint Online service:
powershell
Connect-SPOService -Url https://your-domain-admin.sharepoint.comReplace
https://your-domain-admin.sharepoint.comwith the URL of your SharePoint Online admin center. You will be prompted to enter your admin credentials.
- Example Script to Retrieve Storage Information:
- Retrieve Storage Usage: Run the following script to retrieve storage information for all site collections:
powershell
Get-SPOSite -Limit All | Select-Object Title, Url, StorageUsageCurrentThis script lists all site collections along with their respective storage usage in megabytes. The
Get-SPOSitecmdlet retrieves all site collections, and theSelect-Objectcmdlet filters the output to show the title, URL, and current storage usage.
- Retrieve Storage Usage: Run the following script to retrieve storage information for all site collections:
- Interpreting the Results:
- Storage Usage by Site Collection: After running the script, you will see a list of your SharePoint site collections along with their storage usage. This information helps you identify which sites are consuming the most storage.
- Identifying Large Sites: Use this data to pinpoint large sites that may need attention. For example, if a site is approaching its storage limit, you might need to archive old data, increase storage quotas, or review the site’s content management practices.
- Automating Reports: PowerShell scripts can be automated to run at regular intervals, providing you with up-to-date storage reports. You can schedule these scripts using Windows Task Scheduler or other automation tools, ensuring you always have the latest storage information.
Using PowerShell for managing SharePoint storage provides a high level of control and automation, making it a valuable tool for SharePoint administrators.
Using Third-Party Tools
In addition to the built-in tools and PowerShell, there are third-party solutions available to help you manage SharePoint storage more efficiently. These tools often provide enhanced features and a more user-friendly interface, making storage management easier and more effective.
- SmiKar SharePoint Storage Explorer:
- Introduction: One such tool is SmiKar’s SharePoint Storage Explorer. This tool is designed to provide a comprehensive and easy-to-use interface for monitoring and managing SharePoint storage.
- Features of SharePoint Storage Explorer:
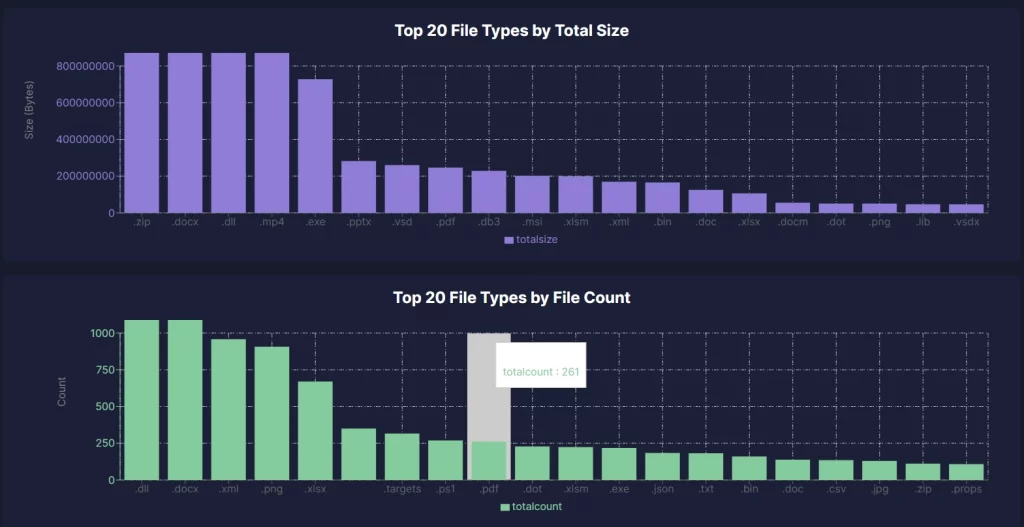
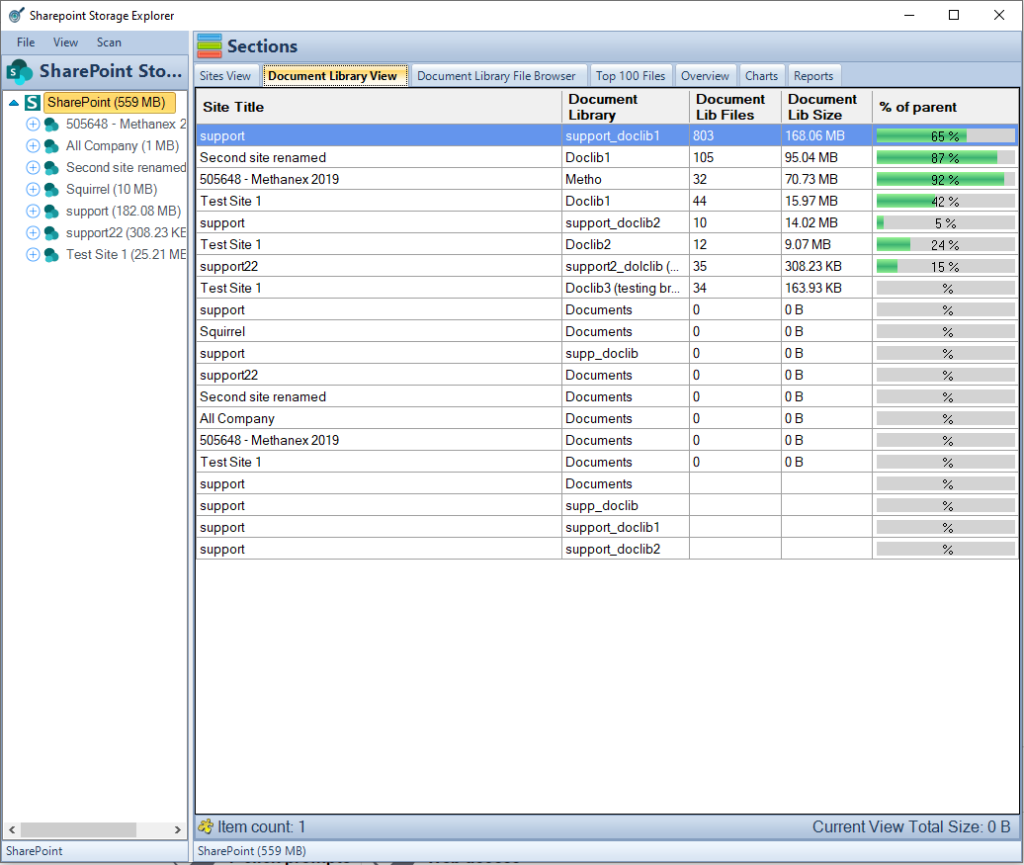
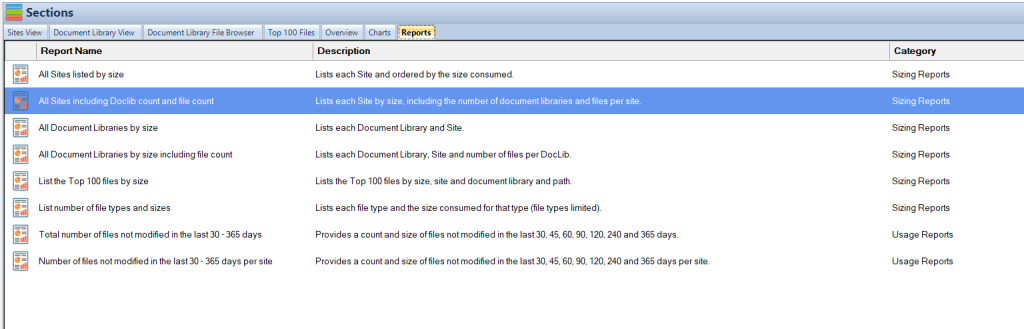
- Detailed Storage Reports: SharePoint Storage Explorer offers detailed storage reports that highlight large files and areas consuming the most storage. These reports help you understand where your storage is being used and identify opportunities for optimisation.
- User-Friendly Interface: SharePoint Storage Explorer provides an intuitive and user-friendly interface, making it easy for administrators to navigate and use the tool. Even if you are not a technical expert, you can still manage SharePoint storage efficiently with this tool.
- Free to Use: One of the most appealing features of SharePoint Storage Explorer is that it is free for anyone to use. This makes it an excellent addition to your SharePoint management toolkit, offering valuable features without additional costs.
- How to Use SharePoint Storage Explorer:
- Download and Install: Visit the SharePoint Storage Explorer page and download SharePoint Storage Explorer. Follow the installation instructions provided on the website.
- Connect to Your SharePoint Environment: Once installed, open the tool and connect it to your SharePoint environment by following the on-screen instructions. You will need to provide your SharePoint admin credentials to establish the connection.
- View and Manage Storage: Use the intuitive interface to view and manage your SharePoint storage. Generate detailed reports, and optimise storage usage with ease. The tool provides real-time insights into your storage usage, helping you make informed decisions.
- Squirrel: Automated SharePoint Archiving
While SharePoint Storage Explorer offers real-time insights, Squirrel complements it by automatically archiving SharePoint documents to Azure Blob Storage, reducing costs and ensuring compliance. Squirrel also allows you to set custom lifecycle policies, ensuring your SharePoint environment stays optimized without manual intervention.
By utilising SharePoint Storage Explorer, you can gain deeper insights into your SharePoint storage and manage it more efficiently. The tool’s comprehensive features and user-friendly interface make it an invaluable resource for SharePoint administrators.
Conclusion
Properly managing SharePoint storage is essential for maintaining optimal performance, ensuring cost efficiency, and staying compliant with organisational policies. By regularly monitoring storage usage, setting appropriate quotas, and leveraging tools like the SharePoint Admin Center, PowerShell, and SmiKar SharePoint Storage Explorer, you can keep your SharePoint environment running smoothly. Effective storage management not only helps in avoiding unexpected costs but also improves the overall user experience by ensuring that the system remains responsive and efficient.
SharePoint Online Archiving FAQs
How do I access the SharePoint Admin Center?
You can access the SharePoint Admin Center by logging into the Microsoft 365 Admin Center and selecting “SharePoint” under “Admin centers”.
What is the SharePoint Online storage limit?
The storage limit depends on your Microsoft 365 plan. Each user typically gets 1 TB of OneDrive storage, plus pooled storage for SharePoint Online that can be expanded by purchasing additional storage.
How can I check storage usage using PowerShell?
Install the SharePoint Online Management Shell, connect to your SharePoint Online service, and use the Get-SPOSite cmdlet to retrieve storage usage information.
What types of data consume SharePoint storage?
SharePoint storage is consumed by documents, list items, site content, and items in the recycle bin.
How can I set storage quotas in SharePoint Online?
You can set storage quotas for site collections through the SharePoint Admin Center by navigating to the “Storage” section under site settings.
What happens when a site exceeds its storage quota?
When a site exceeds its storage quota, users may be unable to upload new files or create new items until storage is freed up or the quota is increased.
Can I automate storage reports in SharePoint?
Yes, you can automate storage reports using PowerShell scripts and scheduling them with tools like Windows Task Scheduler.
Is SharePoint Storage Explorer really free to use?
Yes, SmiKar’s SharePoint Storage Explorer is free for anyone to use.
What are the benefits of using third-party tools for storage management?
Third-party tools often provide enhanced features, detailed reports, and a more user-friendly interface, making storage management easier and more effective.
How can I reduce storage usage in SharePoint?
Implement retention policies, using Automated SharePoint Online archiving solutions like Squirrel to archive old data, regularly clean the recycle bin, and optimise document libraries by removing duplicate and outdated files.
Managing Your SharePoint Costs Doesn’t Have to Be Hard.
Request more information or a demo of Squirrel to see how much it can save you with your SharePoint Online costs.