by Mark | Jun 19, 2016 | How To, SCCM
Streamlining SCCM Installation with Microsoft’s Prerequisite Tool
Microsoft has recently launched a valuable tool that simplifies the installation process of System Center Configuration Manager (SCCM). The SCCM Installation Prerequisites tool helps administrators ensure that the necessary prerequisites are in place before the installation process begins. This tool also automatically installs the required prerequisites, saving you time and effort.
Checking and Installing Prerequisites Made Easy
With the SCCM Installation Prerequisites tool, you can easily verify that all the required prerequisites are already in place. It checks for prerequisites for a Central Primary site, Primary or Secondary Sites, and other site system roles, such as Management Point, Application Catalog, Distribution Point, Enrollment Point, among others.
Additionally, the tool installs any missing prerequisites automatically. This reduces the risk of errors and makes the installation process smoother and quicker.
Installing SCCM Made More Efficient
Installing SCCM can be a challenging task, particularly when it comes to the setup process. However, the SCCM Installation Prerequisites tool streamlines the installation process and makes it more efficient. The tool is designed to run before the SCCM installation process begins, which ensures that all prerequisites are in place and ready to go.
To use the SCCM Installation Prerequisites tool, simply download it from the Microsoft website and run it before you begin the SCCM installation. It’s that simple!
Overall, Microsoft’s SCCM Installation Prerequisites tool is a valuable tool that simplifies the SCCM installation process. It ensures that all prerequisites are in place and automatically installs any missing ones, making the installation process more efficient and streamlined. So, if you’re an administrator who regularly installs SCCM, this tool is a must-have in your toolkit.

by Mark | Jun 3, 2016 | How To, Patch Releases, SCCM
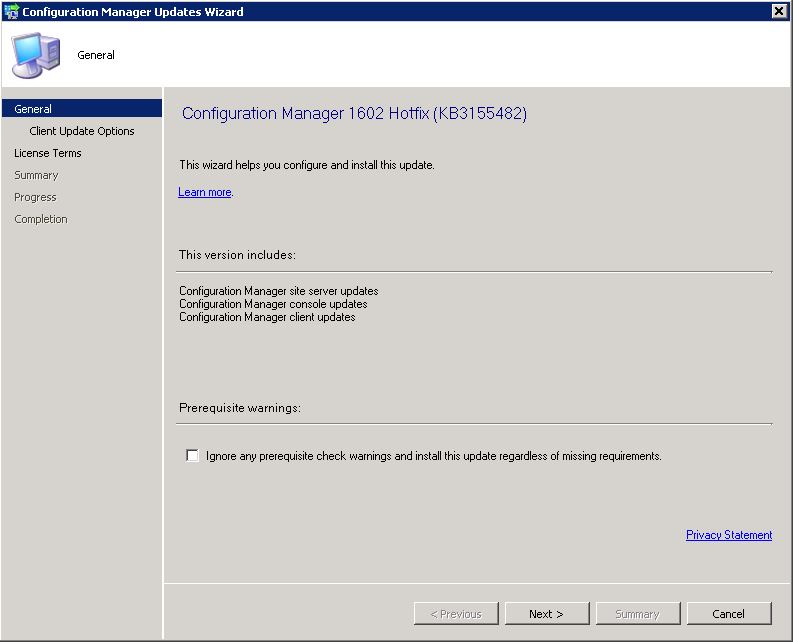
KB3155482 for SCCM 1602
Microsoft released a new patch for System Centre Configuration Manager today (KB3155482) which fixes the following issues in SCCM version 1602.
- Remote Control
- The SCCMRDPSYSTEM.EXE process stops running on Windows Embedded clients after your try and start a remote control session.
- Site Systems
- The DBSchemaChangeHistory table in the site database grows exponentially.
- Microsoft Intune and Mobile Device Management
- The Service Connection Point can take 30 minutes or more to recognize a newly added Microsoft Intune Subscription.
- Incorrect certificate data can be used to manage mobile devices which can causes this to fail
- The Service Connection Point may try and renew the wrong certificate if multiple certificates are installed and have the same expiration date.
- An “Invalid parameter to CIM setting” message is displayed when you try to check the baseline deployment status of a custom IOS or Mac profile.
- The SMS_DMP_Connector registry key remains after you remove a Microsoft Intune subscription. Successive attempts to add a new Microsoft Intune subscription trigger authentication errors.
The hotfix should be now available to install directly from your SCCM console.
Open the SCCM console and go to Administration, then Cloud Services, then Updates and Servicing
In the right pane, you should see the update has downloaded and is ready to install.

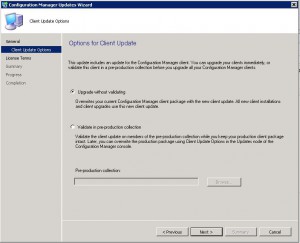
Right click the update and choose Install Update Pack
 Click on Next to start the installation.
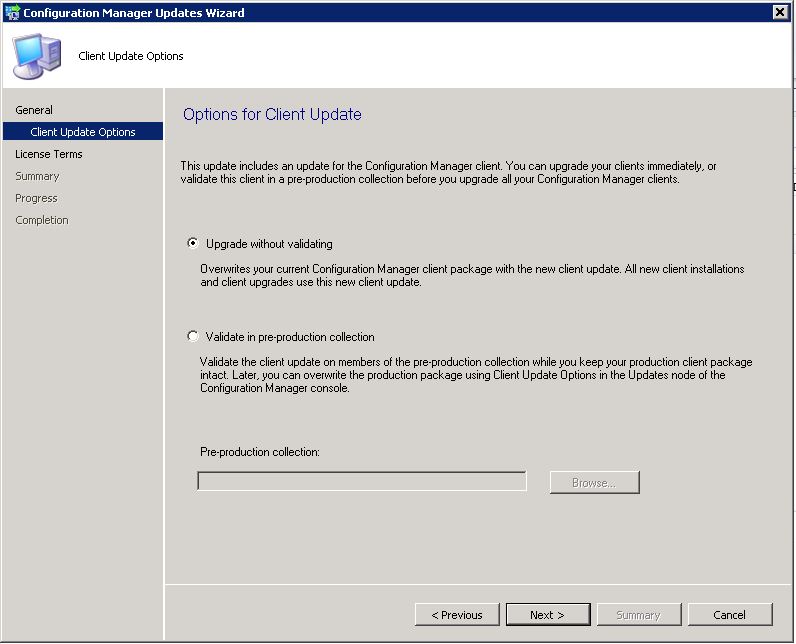
 Choose whether you want to vaildate or not and click on Next.
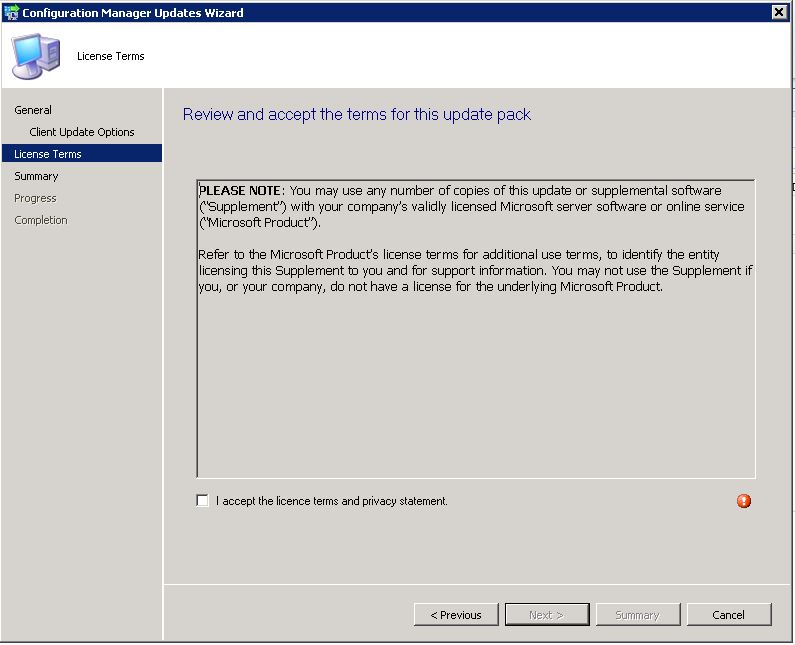
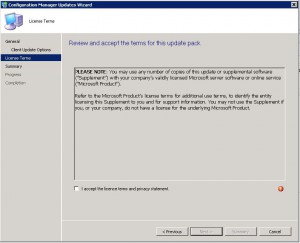
Accept the license terms checkbox and click on Next.
Make sure your environment is ready for the installation and when you are ready to do so, click on Next.
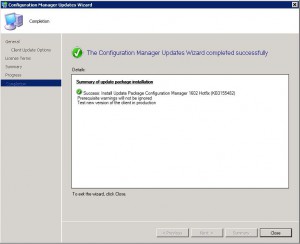
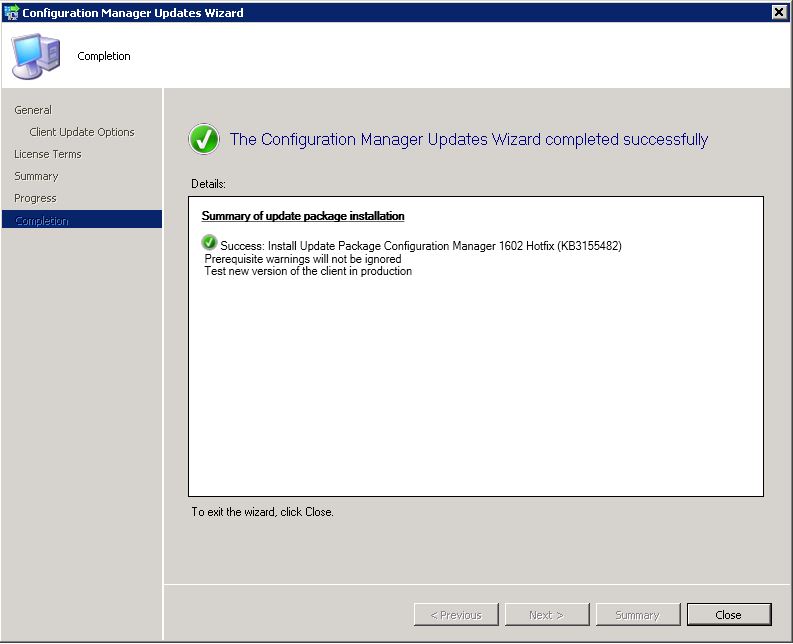
If all has gone well and the installation didnt come across any errors, you can now Close the window.
You should now have installed KB3155482 in to your SCCM 2012 environment.
See how our software, SnaPatch Patch Management addon for SCCM can help you.

by Mark | Mar 29, 2016 | How To, Patch Management
Manually download updates with SCCM
In today’s fast-paced world, keeping up with the latest software updates is critical. With new features, bug fixes, and security patches being released every day, it’s essential to ensure that your systems are up to date. Microsoft’s System Center Configuration Manager (SCCM) is an enterprise-grade software management solution that allows you to deploy and manage software updates across your organization. In this article, we will explore how to manually download updates with SCCM to keep your systems up to date.
What is SCCM?
SCCM is a software management tool developed by Microsoft. It allows IT administrators to manage and deploy software updates, security patches, and other configuration changes across their organization’s Windows devices. SCCM provides a centralized console where administrators can view and manage all of their organization’s Windows devices and ensure that they are up-to-date with the latest software and security updates.
Why Use SCCM?
There are several benefits to using SCCM for software management:
- Centralized management: SCCM provides a centralized console for managing all Windows devices in an organization, making it easy to manage software updates and security patches across multiple devices.
- Automation: SCCM can automate the deployment of software updates and security patches, saving IT administrators time and ensuring that updates are consistently applied across all devices.
- Reporting: SCCM provides detailed reporting capabilities, allowing administrators to track which devices are up-to-date with the latest software and security updates.
Now that we’ve covered the basics of SCCM let’s dive into the process of manually downloading updates with SCCM.
Understanding SCCM Software Updates
Before we dive into how to manually download updates with SCCM, let’s first understand what software updates are and how SCCM handles them. Software updates are packages that contain updates to existing software, such as security patches, bug fixes, and feature enhancements. SCCM uses the Windows Server Update Services (WSUS) infrastructure to manage and deploy software updates.
WSUS is a server role that allows administrators to manage and distribute updates for Windows operating systems and other Microsoft software. SCCM uses WSUS to download software updates from Microsoft Update and distribute them to client computers in the organization. SCCM also allows administrators to create and deploy custom software updates to meet specific business needs.
Now that we have a basic understanding of how SCCM handles software updates let’s explore how to manually download updates with SCCM.
If you ever have the need to Manually Download Updates with SCCM (like with a zero day exploit deployment) I will show you how to below. This helps even if updates haven’t been downloaded automatically by the Auto Deployment Rule.
To kick off a manual download of updates with SCCM, follow these steps.
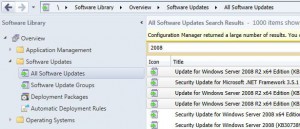
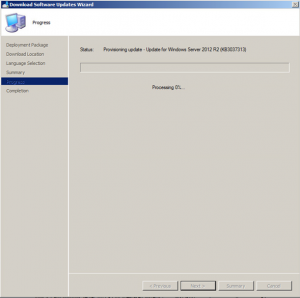
Open your SCCM console and go to Software Library, then expand Software Updates and then click on All Software Updates.
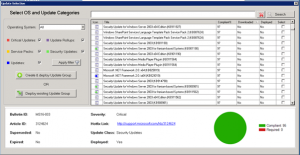
Let the list populate and select the updates that want to download, then right click and choose Download.

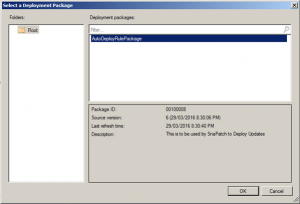
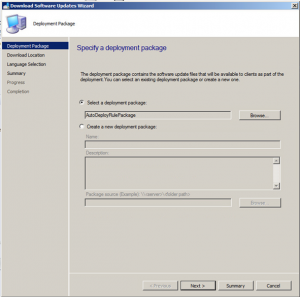
It will then prompt your to Select a Deployment Package. Click Browse.
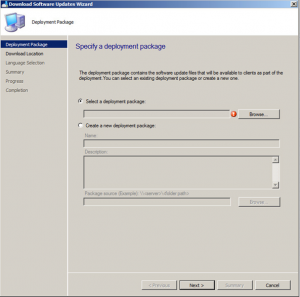
Select the Auto Deployment Rule that you use for your monthly patch deployments and then click on OK.
Once the deployment rule had been selected, click on Next.
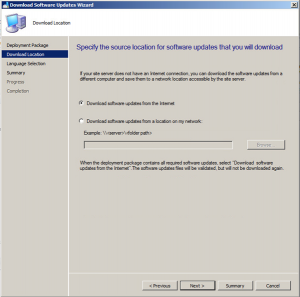
Now choose to Download software updates from the Internet.
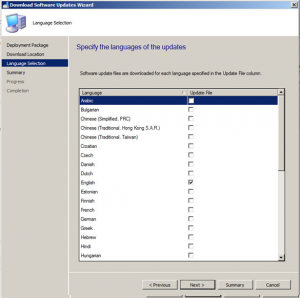
Choose the required update language then click Next.
Now you should be ready to download the updates you have selected. If ready to do so, click on Next.
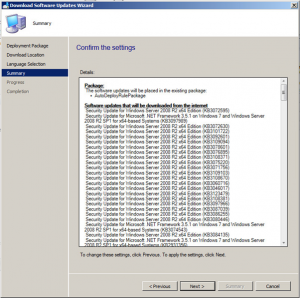
Your updates will start downloading. Note that this may take some time to complete the downloads.
Hopefully all went well and your updates are now ready to be deployed.

This is a great way to download updates really quickly and make them available to deploy them to your desktops and servers. Click the link to see another great post on how to create a SCCM Automatic Deployment Rule.

by Mark | Feb 27, 2016 | How To
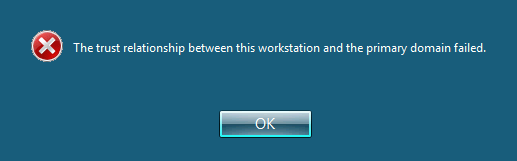
The trust relationship between this workstation and the primary domain failed.
Have you ever encountered the error message, “The trust relationship between this workstation and the primary domain failed”? This can be a frustrating issue for IT administrators and end-users alike. But don’t worry! In this article, we’ll dive deep into the reasons behind this error and provide actionable solutions to fix it. Along the way, we’ll discuss domain environments, trust relationships, and how to prevent this problem from occurring in the future.
Understanding Trust Relationships in a Domain Environment
The trust relationship between this workstation and the primary domain failed error occurs when there’s a disruption in the trust relationship between the computer and the domain controller. Here are some common causes of this error:
- Password synchronization issues: If the computer’s password doesn’t match the password stored in the domain controller, it can cause trust relationship issues.
- Time synchronization issues: If the time on the computer and the domain controller is out of sync, it can cause trust relationship issues.
- Computer account deletion: If the computer account is deleted from the Active Directory, it can cause trust relationship issues.
- The computer account password in Active Directory (AD) is not in sync with the password stored on the local machine.
- Corruption of the local security database on the workstation.
- Issues with DNS configuration or connectivity.
Symptoms caused by this Error
Symptoms of “The trust relationship between this workstation and the primary domain failed”:
Here are some symptoms that indicate that you’re facing “The trust relationship between this workstation and the primary domain failed” error:
- Unable to log in to the computer with domain credentials.
- Unable to access network resources.
- Unable to access shared folders.
- Error message: “The trust relationship between this workstation and the primary domain failed.”
- Applications that rely on domain authentication fail to function properly.
- Event logs display error messages related to trust relationship failures.
How to Fix “The trust relationship between this workstation and the primary domain failed”
There are several solutions to resolve the “The trust relationship between this workstation and the primary domain failed” error. Here are some of them:
Solution 1: Reset computer account password:
- Log in to the computer with local administrator credentials.
- Open Command Prompt as an administrator.
- Type the following command and press Enter: netdom resetpwd /s:domaincontroller /ud:domainadmin /pd:*
Note: Replace “domaincontroller” with the name of your domain controller and “domainadmin” with the domain administrator account.
Solution 2: Rejoin the computer to the domain:
- Log in to the computer with local administrator credentials.
- Open Control Panel and navigate to System.
- Click on “Change settings” next to “Computer name, domain, and workgroup settings.”
- Click on “Change” next to “To rename this computer or change its domain or workgroup, click Change.”
- Select “Domain” and enter the domain name.
- Enter the domain administrator credentials.
- Restart the computer.
Solution 3: Restore the computer account:
- Log in to the domain controller with domain administrator credentials.
- Open Active Directory Users and Computers.
- Navigate to the “Computers” container.
- Right-click on the computer account and select “Restore.”
Solution 4: Increase the Time out period of the computer account:
- Increase the computer account password age or even disable password changes altogether to prevent this error from occurring in the future. To do so, you’ll need to set the following registry key:
- KEY: HKEY_LOCAL_MACHINE – SYSTEM – CurrentControlSet – Services – Netlogon – Parameters Property: DisablePasswordChange Value: 1
This will disable password changes for the computer account, ensuring that the machine’s account password remains the same even if you restore an older snapshot.
Preventing Trust Relationship Failures
Preventing trust relationship failures is crucial to maintaining a smooth domain environment. Here are some best practices to help you avoid these issues:
Regularly Updating Passwords
Ensure that computer account passwords are regularly updated in both Active Directory and on the local workstations. By default, this happens every 30 days, but you can modify the password update interval if necessary.
Monitoring Active Directory Health
Keep an eye on the overall health of your Active Directory environment. Regularly monitor domain controllers, replication, and system logs to catch potential issues before they escalate into trust relationship failures.
Ensuring Proper DNS Configuration
Proper DNS configuration is vital for the smooth functioning of a domain environment. Make sure that workstations are using the correct DNS servers and that domain controllers have properly configured DNS settings.
FAQs
What is a trust relationship between a computer and a domain?
A trust relationship is established between a computer and a domain when the computer joins the domain. This trust allows the computer to access network resources and authenticate users.
Can I prevent “The trust relationship between this workstation and the primary domain failed” error?
Yes, you can prevent this error by ensuring that the computer’s time and password are synchronized with the domain controller.
How can I avoid trust relationship issues in the future?
You can avoid trust relationship issues by regularly resetting computer account passwords, synchronizing time between the computer and domain controller, and ensuring that the computer is not deleted from the Active Directory.
Can a non-administrator account resolve the “The trust relationship between this workstation and the primary domain failed” error?
No, a non-administrator account cannot resolve this error. You need to have local administrator or domain administrator credentials to resolve this error.
What causes a trust relationship to fail?
Trust relationship failures can occur due to reasons such as password synchronization issues, disabled or deleted computer accounts, DNS configuration problems, or corruption of the local security database.
How can I reset a computer account in Active Directory?
You can reset a computer account in Active Directory using the Active Directory Users and Computers console or PowerShell.
What is the Test-ComputerSecureChannel cmdlet in PowerShell?
The Test-ComputerSecureChannel cmdlet is a PowerShell command that allows you to test and repair the trust relationship between a workstation and the primary domain.
How can I prevent trust relationship failures?
To prevent trust relationship failures, ensure regular computer account password updates, monitor Active Directory health, and maintain proper DNS configuration.
Conclusion:
“The trust relationship between this workstation and the primary domain failed” error can be frustrating, but it’s a common issue faced by many computer users. This error occurs when there’s a disruption in the trust relationship between the computer and the domain controller. You can resolve this error by resetting the computer account password, rejoining the computer to the domain, or restoring the computer account. By following these solutions, you can prevent this error from occurring in the future. Remember to ensure that the computer’s time and password are synchronized with the domain controller to avoid trust relationship issues.

by Mark | Feb 27, 2016 | How To, VMWare
As a system administrator, you might face situations where a Domain Controller (DC) in your network fails due to hardware issues or software corruption. In such cases, restoring the DC from a snapshot can be a lifesaver. A snapshot is an image of the system’s state at a particular point in time, and restoring from it can bring back the system to that state. In this article, we will discuss how to restore a Domain Controller from a snapshot, step by step.
Understanding the Importance of Domain Controllers
Before we jump into the process of restoring a Domain Controller from a snapshot, let’s first understand why DCs are crucial for a network. In simple words, a Domain Controller is a server that manages network security and enables users to access shared resources, such as printers and files, on the network. It is the backbone of the Active Directory (AD) infrastructure, which is responsible for authentication and authorization in a Windows environment.
Reverting a snapshot of an active Domain Controller can be a risky and problematic issue.
If you are considering using this procedure it should be your very LAST option. This is not a supported Microsoft procedure and use of it could cause fatal issues to Active Directory.
Reassess your environment and take the proper steps to ensure this recovery model doesn’t have to be used again.
Use at your own risk!
What are the risks with doing this?
The risks of reverting a snapshot of a Domain Controller are significant and can have severe consequences for an organization’s Active Directory infrastructure. Some of the potential risks include:
-
Data loss: Reverting a snapshot of an Active Domain Controller can result in data loss, as the snapshot may not contain all of the latest changes to the Active Directory.
-
Active Directory corruption: The Active Directory database may become corrupted during the snapshot revert process, leading to issues with authentication, authorization, and other critical services.
-
Replication problems: The snapshot revert process can cause problems with replication between Domain Controllers, leading to inconsistencies in the Active Directory data across different servers.
-
Service disruptions: The snapshot revert process can result in disruptions to critical services, such as DNS, that depend on the Active Directory.
-
Security risks: The snapshot revert process can result in security risks, as it may expose sensitive data or compromise the security of the Active Directory infrastructure.
It is important to carefully consider the potential risks and consequences before attempting to revert a snapshot of an Active Domain Controller. It is recommended to only use this procedure as a last resort, and to thoroughly research and understand the potential risks before proceeding.
Preparing for the Restoration
Before you start the restoration process, you need to ensure that you have a snapshot of the Domain Controller that you want to restore. It is essential to note that restoring a DC from a snapshot is a risky process and should be performed only when no other options are available. Moreover, you must have a proper backup and recovery plan in place to avoid any data loss during the restoration.
Steps to revert a Domain Controller Snapshot
1) Revert to your last known good snapshot
2) Disable your network card so that it is unable to talk to the network
3) Note the value of your Invocation Id
- From a command prompt run the following command
- Repadmin /showrepl
4) Reboot your Domain Controller and make sure you boot into Directory Services Restore Mode
5) Stop the NTFRS service
6) From a command prompt start Regedit
- Drill down to HKLM – System – CurrentControlSet – Services – NTDS – Parameters
- Modify the RegKey “Database restored from backup” = 1
- If this RegKey doesn’t exist create one as a DWORD and set to a 1
- If the RegKey DSA Previous Restore Count exists in the same path, note its value. Upon reboot it should increment by one. If it didn’t exist it should be created and it should be set to a value of 1.
- Drill down to HKLM – SYSTEM – CurrentControlSet – Services – NtFrs – Parameters – Backup – Restore – Process
- Modify the RegKey BurFlags to D2
7) Reboot the server
8) Log back in to the Domain Controller
- Verify that the Invocation Id has changed
- In the Event Log look for the Event Id 1109 (AD restored from backup)
9) If both events have occurred in bullet point 8 then, enable the network card again
Best Practices for Restoring a Domain Controller from a Snapshot
Here are some best practices that you should follow while restoring a Domain Controller from a snapshot:
Best Practice 1: Ensure the Snapshot is Consistent
Make sure that the snapshot is consistent and the system is shut down gracefully before taking the snapshot.
Best Practice 2: Test the Snapshot
Before performing the actual restoration, test the snapshot on a test environment to ensure that the restoration process goes smoothly.
Best Practice 3: Have a Backup Plan in Place
Always have a backup plan in place and test it regularly to ensure that it is effective.
Best Practice 4: Monitor the DC after Restoration
Monitor the Domain Controller closely after the restoration to ensure that it is functioning correctly.
Conclusion
Restoring a Domain Controller from a snapshot can be a lifesaver in critical situations. However, it is a risky process and should be performed only when no other options are available. It is essential to have a proper backup and recovery plan in place and follow the best practices while restoring a Domain Controller

by Mark | Feb 27, 2016 | How To, SCCM
SCCM Log files for Software Updates
System Center Configuration Manager (SCCM) is a powerful tool used by administrators for managing large-scale deployments. SCCM software updates provide a simple way to keep client systems up to date with the latest security and feature updates. SCCM log files contain valuable information about the software updates deployment process and can help administrators troubleshoot issues. In this article, we will discuss the important SCCM log files for software updates and how to analyze them to troubleshoot issues.
SCCM Log files overview
What are SCCM Log files?
SCCM log files are text files that contain information about the various processes and actions taken by SCCM. These log files are created by SCCM components during their operation and provide valuable insights into the workings of SCCM.
Why are SCCM Log files important?
SCCM log files are crucial for troubleshooting issues that may arise during software updates deployment. They contain detailed information about the actions taken by SCCM components and can help administrators identify the root cause of an issue.
SCCM Log files for Software Updates
The following are the important SCCM log files for software updates:
| Log Name |
Description |
Server Side or Client Side |
CcmExec.log
|
Records actions taken by the SCCM client on the local machine, such as software deployments, inventory scans, and software update installations. |
Client Side |
UpdatesDeployment.log
|
Records details of the deployment process for software updates, including whether they were successfully installed or failed. |
Client Side |
WUAHandler.log
|
Records the communication between the SCCM client and Windows Update Agent (WUA), which is responsible for checking for and installing updates. |
Client Side |
PatchDownloader.log
|
Records the download process for software updates, including the location from which updates were downloaded and whether they were successfully downloaded. |
Client Side |
SiteComponentManager.log
|
Records the status of SCCM components and their installation or uninstallation. This log is useful for troubleshooting SCCM server component issues. |
Server Side |
SMS_AZUREAD_CONNECTOR.log
|
Records actions taken by the SCCM Azure Active Directory (AAD) Connector, which is responsible for syncing user and device data between SCCM and AAD. This log is useful for troubleshooting AAD sync issues. |
Server Side |
CAS.log
|
Records actions taken by the SCCM Central Administration Site (CAS), which is responsible for managing multiple primary sites. This log is useful for troubleshooting issues that affect multiple primary sites. |
Server Side |
MP_Location.log
|
Records actions taken by the SCCM Management Point (MP), which is responsible for managing client communications and data. This log is useful for troubleshooting MP issues. |
Server Side |
Wsyncmgr.log
|
Records the synchronization process for software updates between the SCCM server and the WSUS server. This log is useful for troubleshooting update synchronization issues. |
Server Side |
DataTransferService.log
|
Records the transfer of data between the SCCM server and client machines, including software updates and packages. This log is useful for troubleshooting issues related to data transfer. |
Client Side |
UpdatesHandler.log
|
Records actions taken by the SCCM software update handler, which is responsible for coordinating the download and installation of software updates on the client machine. This log is useful for troubleshooting update installation issues. |
Client Side |
UpdatesStore.log
|
Records the location and status of software updates stored on the client machine. This log is useful for troubleshooting issues related to software update storage. |
Client Side |
UpdatesAssignments.log
|
Records details of software update assignments, including which updates are assigned to which client machines. This log is useful for troubleshooting update assignment issues. |
Server Side |
ContentTransferManager.log
|
Records the transfer of content between the SCCM server and client machines, including software updates and packages. This log is useful for troubleshooting issues related to content transfer. |
Client Side |
RebootCoordinator.log
|
Records actions taken by the SCCM reboot coordinator, which is responsible for coordinating system reboots after software update installations. This log is useful for troubleshooting reboot-related issues. |
Client Side |
Supersedence.log
|
Records details of software update supersedence, including which updates supersede which other updates. This log is useful for troubleshooting update supersedence issues. |
Server Side |
PolicyEvaluator.log
|
Records actions taken by the SCCM policy evaluator, which is responsible for enforcing client policies and settings. This log is useful for troubleshooting policy-related issues. |
Client Side |
Analyzing SCCM Log files
Analyzing SCCM log files is crucial for troubleshooting issues related to software updates deployment. Here are the steps for analyzing SCCM log files:
- Identify the relevant log file(s) for the issue at hand.
- Open the log file using a text editor such as Notepad++.
- Search for the relevant error or warning messages in the log file.
- Analyze the messages to identify the root cause of the issue.
- Take the necessary actions to resolve the issue based on the root cause identified.
Common SCCM Update issues and their resolutions
Here are some common issues related to software updates deployment in SCCM and their resolutions:
- Software updates are not showing up in the SCCM console: Check the synchronization status of the software update point and ensure that the latest software updates are synchronized.
- Software updates are failing to install on client systems: Check the relevant log files to identify the root cause of the issue and take the necessary actions to resolve it.
- Software updates are getting stuck in the downloading phase: Check the ContentTransferManager.log and PatchDownloader.log files to identify the root cause of the issue and take the necessary actions to resolve it.
SCCM Logs FAQs
What is SCCM software updates deployment?
SCCM software updates deployment is a process of deploying the latest software updates to client systems in a managed environment.
What are SCCM log files?
SCCM log files are text files that contain information about the various processes and actions taken by SCCM components.
Why are SCCM log files important?
SCCM log files are important for troubleshooting issues related to software updates deployment in SCCM.
How do I analyze SCCM log files?
To analyze SCCM log files, you need to identify the relevant log file(s), open them using a text editor, search for the relevant error or warning messages, and analyze the messages to identify the root cause of the issue.
What are some best practices for analyzing SCCM log files?
Some best practices for analyzing SCCM log files include using a log file viewer, taking regular backups of the log files, and understanding the structure and messages contained in the log files.
How can I automate a Snapshot prior to deploying patches to my virtual servers?
Use SnaPatch to automate the whole update process to your virtual machines.
Where are the SCCM Log files located?
The SCCM (System Center Configuration Manager) log files are located in different directories on the SCCM server and client computers. On the SCCM server, the log files are typically located in the “Logs” folder within the SCCM installation directory. The default installation directory is “C:Program FilesMicrosoft Configuration ManagerLogs”.
On the client computers, the log files are located in the “CCMLogs” folder within the Windows directory. The default path is “C:WindowsCCMLogs”. The log files are named according to the component or feature they relate to. For example, the “ClientLocation.log” file logs information about the client’s location, while the “SoftwareCenter.log” file logs information about the Software Center feature.
SCCM Logs – Conclusion
SCCM log files are crucial for troubleshooting issues related to software updates deployment. In this article, we discussed the important SCCM log files for software updates and how to analyze them to troubleshoot issues. We also discussed some common issues related to software updates deployment in SCCM and their resolutions. By following the best practices for SCCM log file analysis, administrators can ensure a smooth and successful software updates deployment process.