
by Mark | Mar 15, 2021 | Azure, Azure Blobs, How To
Reduce your Azure Storage Costs
Azure Storage is like an all you can eat buffet, except the more you eat, the more you pay! This has provided organisations an almost limitless supply of storage, and as we all know, the more that’s available, the more we’ll use.
Azure Storage has changed the way many organisations operate both in terms of availability and service. No longer do organisations have to concern themselves with capacity planning or worry about the SAN running out of disk space, or even how to make that storage available in terms of disaster and across regions. Azure Storage has effectively resolved many of the issues traditional on-premises storage services faced.
However, because of this unlimited supply of storage in Azure, storage growth, cost and duplication has exploded. Managing and controlling the data across all the Storage Accounts has become increasingly difficult as users keep piling on more and more data.
OK, so how can we gain some control back, by finding and reducing the number of duplicate BLOBs and therefore reduce cost?
We have been asked that exact same question by many of our customers, and the short answer was, you couldn’t. There is no way in Azure to find out which BLOBs are duplicates, how many of them are duplicate BLOBs, which Azure Storage Account and container do they reside in, or how much data duplicate BLOBs in Azure Storage are consuming…until now.
Cloud Storage Manager to the rescue.
Cloud Storage Manager allows you to scan your entire Azure environment in order to review and manage your Azure Storage consumption.
Cloud Storage Manager has so many features in helping you control and manage your Azure Storage, but I won’t go into them here as the list is too long – however, click here to get more information and even download a free trial for yourself.
One of the many features of Cloud Storage Manager is the reporting option, which offers a number of reports you could run to get a better understanding of your Azure Storage and overall environment.
How many Duplicate Blobs are in your Azure Storage
However, the one we will be looking at today, is the “Duplicate BLOBs in Storage Account” report.
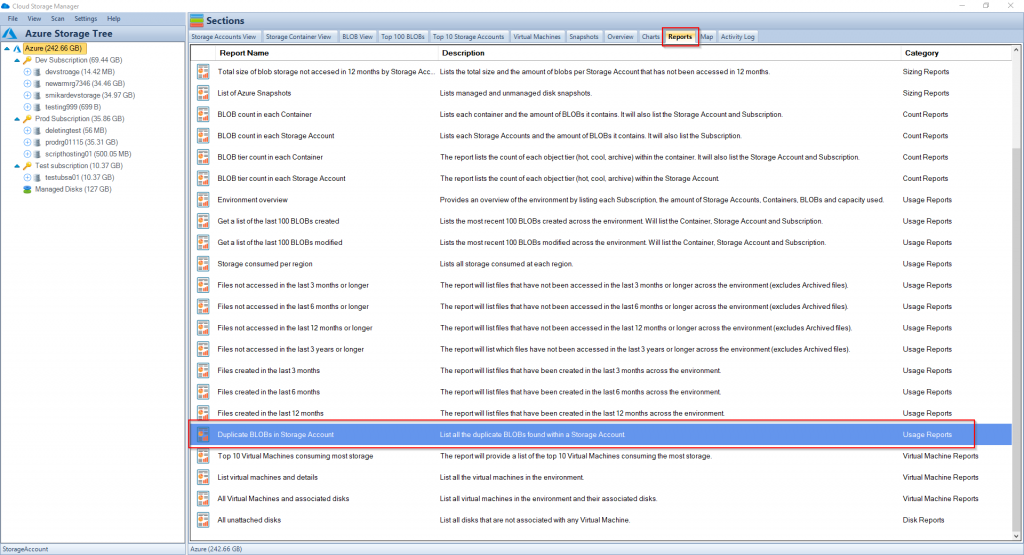
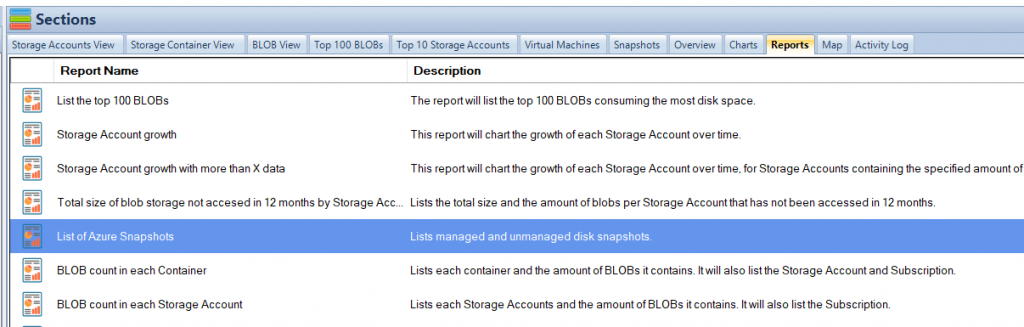
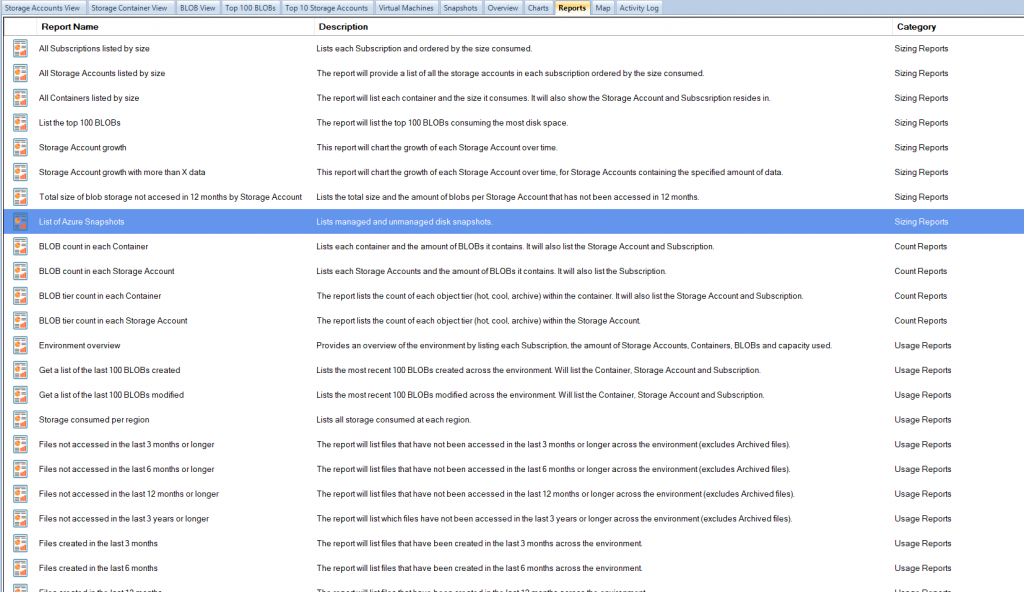
Once you’ve installed Cloud Storage Manager and allowed it to scan your environment, click on the
“Reports” tab.
Scroll down and find the “Duplicate BLOBs in Storage Account” report.
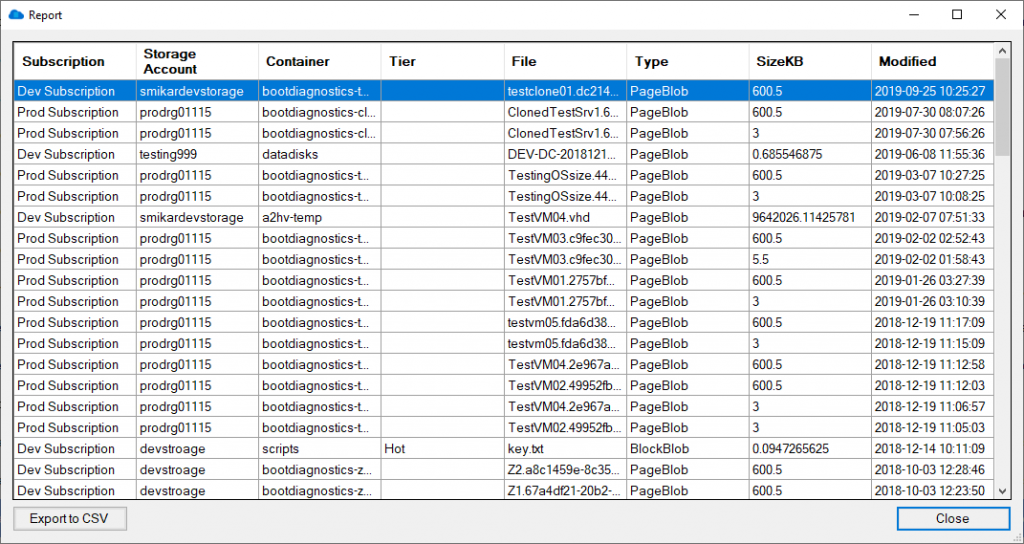
Duplicate Blob Report
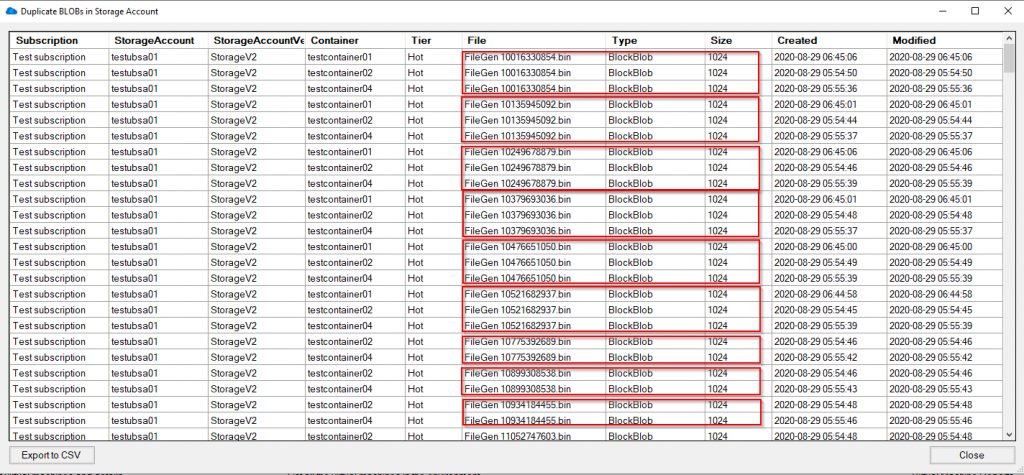
Right click on the report and select to “Run Report”.
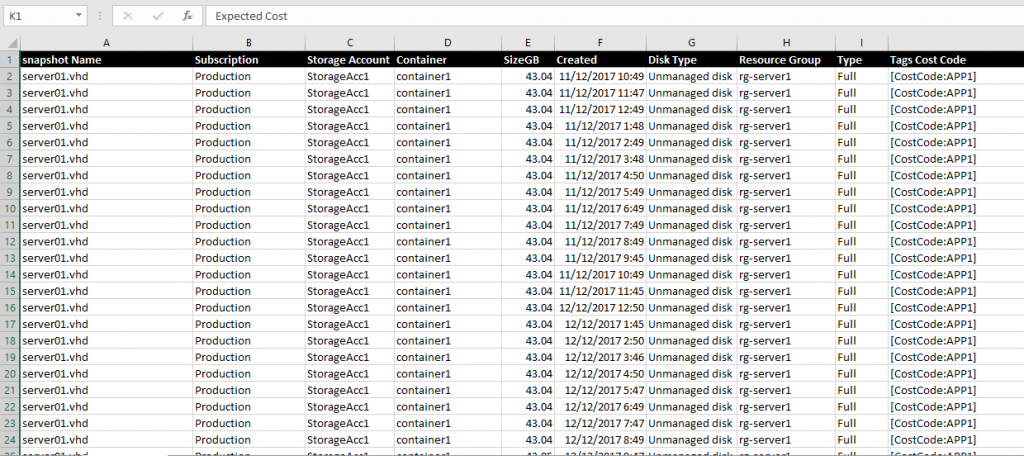
The result will be displayed showing you all the duplicate BLOBs in your Azure Storage Accounts, along with information such has which Subscription, Storage Account, Container, tier, filename, type, size, created date and modified date.
From here you can now open the report in Excel, and work out which duplicate blobs you need to keep, or perhaps even delete to reduce your Azure Storage and costs.
Duplicate Blob Analysis
You also have the option to export the report to a CSV file for further assessment.
If you want to get a better handle of your Azure Storage consumption and reduce your overall cost, give Cloud Storage Manager a try.
What are the consuquences of having Duplicate Blobs?
Duplicate BLOBs in Azure Storage can be a result of a lack of proper management and control of data in the storage accounts. Azure Storage has become increasingly popular due to its unlimited supply of storage, which has led to an explosion of storage growth, cost, and duplication. This can be due to various reasons such as multiple copies of data being created, incorrect data management procedures, or even data being inadvertently duplicated.
The consequences of having duplicate BLOBs in Azure Storage can lead to increased storage costs, difficulty in managing and controlling data across all the storage accounts, and loss of visibility into the actual data usage. This can also result in data redundancy, which can negatively impact the performance and reliability of the storage environment. In addition, it can also lead to data versioning issues and make it difficult to determine which version of the data is the most recent and accurate.
Therefore, it is important to implement proper data management procedures and use tools such as Cloud Storage Manager to scan and manage your Azure Storage environment to help reduce the number of duplicate BLOBs, thus reducing costs and increasing overall control of the data.

by Mark | Mar 1, 2021 | Azure, Azure Blobs, Snapshot / Checkpoint, Storage Accounts
Snapshot an Azure VM
Snapshots in Azure is a nice feature that allows you to take a read-only, “point in time” snapshot of a Virtual Machine’s disk. You can take a snapshot of a VM’s OS or data disk. You can use this snapshot to revert the VM to a point in time before an event occurred, or you installed something that didn’t go quite right.
Azure VM Disk Snapshot
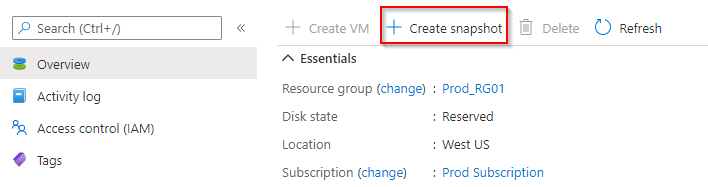
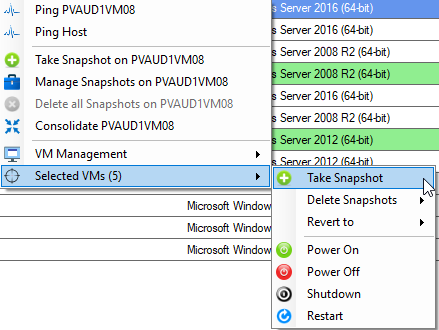
The process to take a snapshot of a VM that is using Managed Disks is quite simple, all you have to do is browse to the Disk of the VM and select “Create Snapshot”.
Azure VM Snapshot
Now that we’ve created these Snapshots, where do we find them?
That is where things get a little tricky. If you’ve taken Snapshots of VMs using Managed Disks, all you need to do is search for “Snapshots” and you will see all the Azure snapshots along with information such as the snapshot type, source disk, date and time it was created, the size and a few other items.
OK, great, what’s the problem?
Where are all your Azure VM Managed / Unmanaged Disks?
Well, this view will only show you snapshots of Managed Disks. If you are using unmanaged disks there is no one portal or view where you can see all your snapshots.
Much like everything else in Azure, Snapshots are not free! And if you have numerous VMs using unmanaged disks, you will need to check them one by one through the Storage Account view, locate their VHD and click on the Snapshots menu to see if there is a snapshot associated with the VM.
You could be paying for storage that Snapshots are consuming that were taken months or even years ago that have been forgotten.
OK, so how do you get this information without having to go through each and every VM disk?
Why are leaving Snapshots in Azure a bad thing?
The cost of storing snapshots in Azure depends on several factors, such as the size of the snapshots, the number of snapshots, and the type of storage you use. In Azure, snapshots are stored as page blobs in a storage account, and you are charged for the amount of storage used by the snapshots, as well as any additional features or services you may use, such as data transfer, data management, and data retrieval.
Snapshots stored in Azure are billed based on the size of the snapshots, so the larger the snapshots, the more storage you will be charged for. Additionally, snapshots are billed for the time they are stored, so the longer the snapshots are stored, the more you will be charged for storage.
In addition to storage, you may also incur charges for data retrieval and data transfer. Data retrieval charges apply when you access data stored in a snapshot, and data transfer charges apply when you move data to and from a snapshot.
To reduce the cost of storing snapshots in Azure, it is important to manage your snapshots carefully and only store the snapshots that you need. You can also use features such as automatic snapshot deletion or snapshots compression to reduce the size of your snapshots and reduce the cost of storage.
Overall, the cost of storing snapshots in Azure can be significant, so it is important to plan and manage your snapshots carefully to ensure that you are only paying for the storage that you actually need.
Azure Snapshot Sizes
Easy, just use Cloud Storage Manager and run the report to tell you.
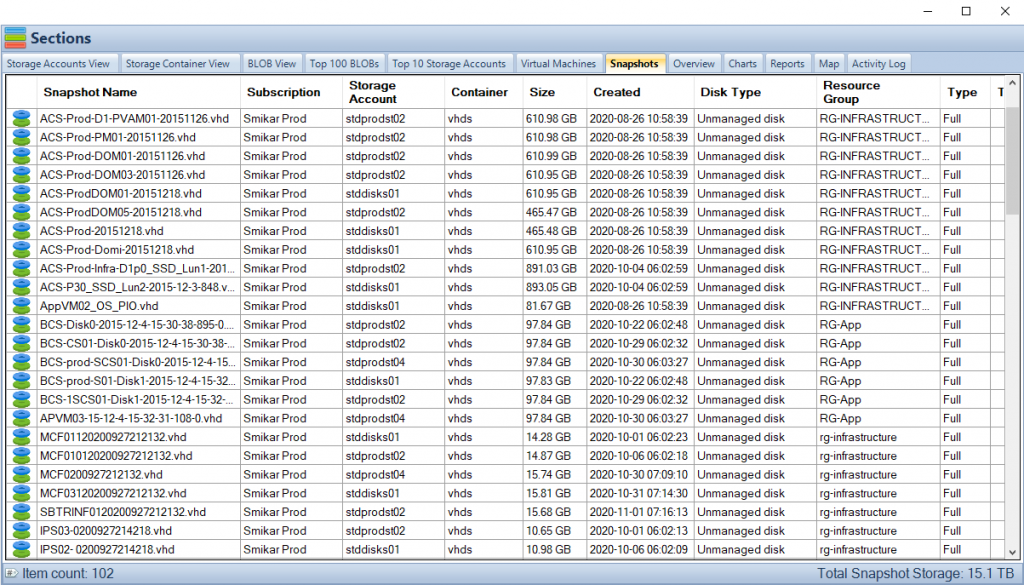
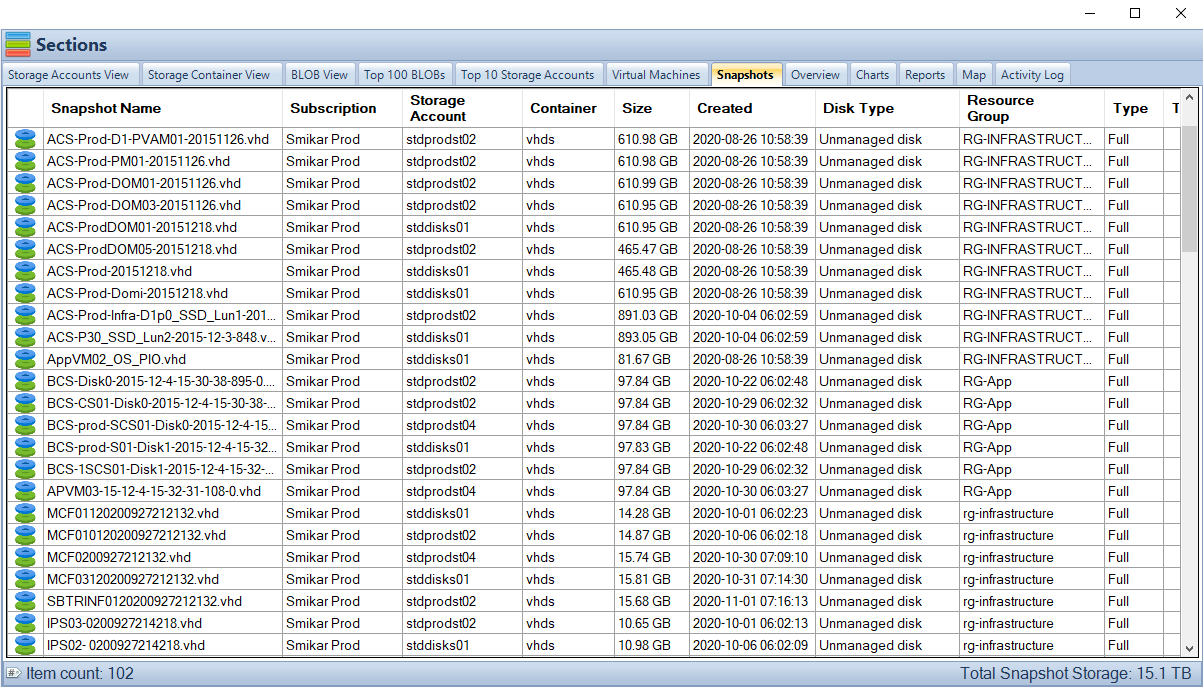
Once you’ve installed Cloud Storage Manager, it will scan your Azure environment and collect a heap of information. Then all you have to do is launch it, and select the “Snapshot” tab to see all your VM snapshots across your Azure environment, including both managed and unmanaged disks.
Of course Cloud Storage Manager doesnt only show how much storage your Snapshots are consuming, it also shows you the capacity of your Storage Accounts, and historical storage growth patterns, and loads more insights in to your Blob Storage within Azure.
Where are all my Azure VM Snapshots?
You may also export these results to a report using the Reports tab.
Select the Reports tab and click on the “List of Azure Snapshots”. You will also have the option to export the report to a CSV file.
Automate Azure VM Snapshot Creation
Now you may want to schedule the creation and deletion of Azure Virtual Machines automatically.
SnapShot Master can do this for you with just a few clicks.
SnapShot Master also shows you all your Azure Cloud and even your VMware or Hyper-V snapshot / checkpoint information and more.

by Mark | Dec 17, 2020 | Azure, Azure Blobs, How To, Storage Accounts
Are you using Azure Blob Storage for storing your data? Do you want to keep track of how much Azure Storage you are consuming, the number of Blobs per storage account, the number of containers, and the Azure Blob Storage capacity used?
If so, you need a reliable tool to monitor and control your Azure Blob Storage usage. In this article, we will show you how to use both the Azure Portal and Cloud Storage Manager to gather insights into your Azure Storage consumption.
Before we dive into how to use Cloud Storage Manager, let’s briefly discuss Azure Blob Storage. It is an online cloud service that provides fast access to large amounts of data at a low cost. However, it’s crucial to monitor and control your Azure Blob Storage usage to optimize costs.
Investigate Your Azure Storage Accounts
Before we dive into how to use Cloud Storage Manager, let’s briefly discuss Azure Blob Storage. It is an online cloud service that provides fast access to large amounts of data at a low cost.
If you are using Azure Blob Storage for storing your data, you need a reliable tool to monitor and control your Azure Blob Storage usage. With Cloud Storage Manager, you can gather insights into your Azure Storage consumption.
What are the benefits?
| Benefit |
Description |
Cost Optimization
|
Understanding your Azure Blob storage usage is crucial for cost optimization, as it helps you monitor and control your usage. By keeping track of the number of Blobs, Containers, and the Azure Blob Storage capacity used, you can ensure that you are not overpaying for storage that you are not using. |
Performance Optimization
|
Monitoring your Azure Blob storage usage can help you optimize the performance of your applications. By analyzing the data usage patterns, you can make informed decisions about how to optimize your storage for faster access times and better performance. |
Improved Security
|
By monitoring your Azure Blob storage usage, you can identify any potential security threats or breaches. You can set up alerts to notify you when unusual activity is detected, enabling you to take action to prevent or mitigate any damage. |
Compliance
|
Monitoring your Azure Blob storage usage can help you ensure that you are meeting any regulatory or compliance requirements. By keeping track of your usage, you can demonstrate compliance and avoid potential penalties or legal issues. |
Resource Planning
|
Understanding your Azure Blob storage usage can help you plan for future resource needs. By analyzing your usage patterns, you can make informed decisions about how much storage you will need in the future and plan accordingly. |
So how do I gather all this information about my Azure Storage?
Scan all your Azure Storage Accounts
Hopefully you have installed and run a full environment scan of all your Azure Subscriptions with Cloud Storage Manager.
(If you havent, download and test it for yourself with a free trial)
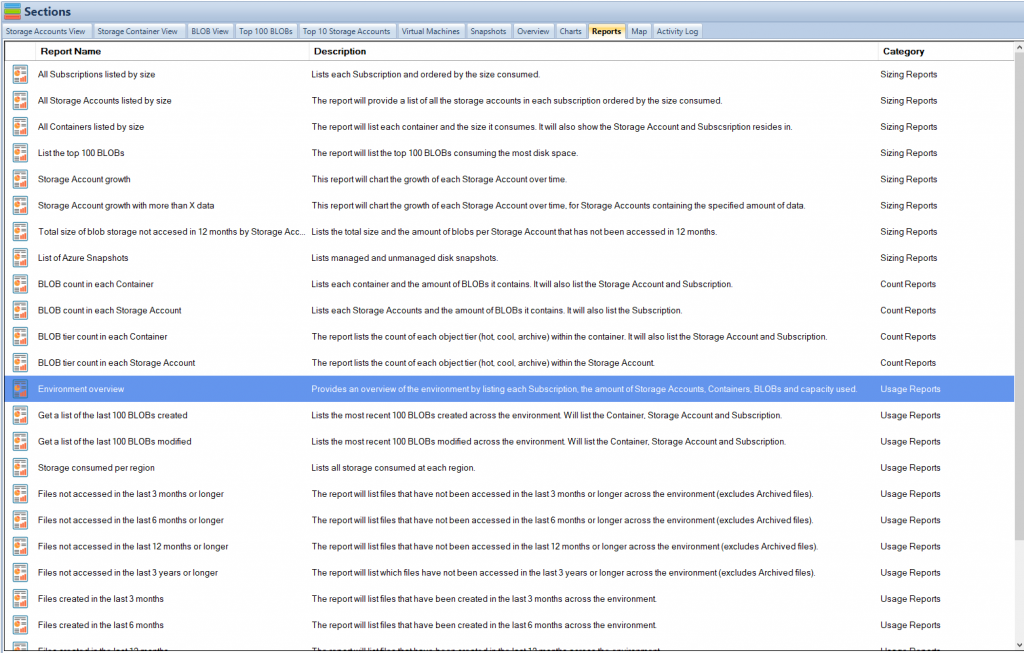
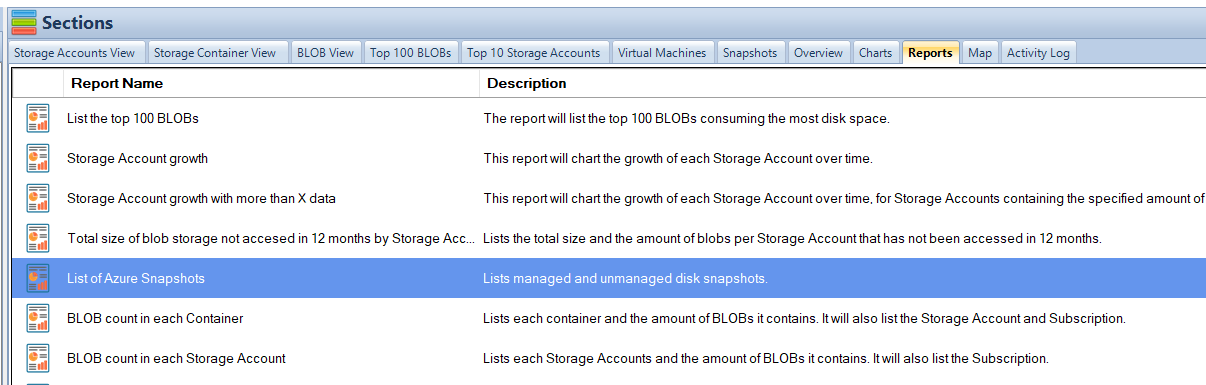
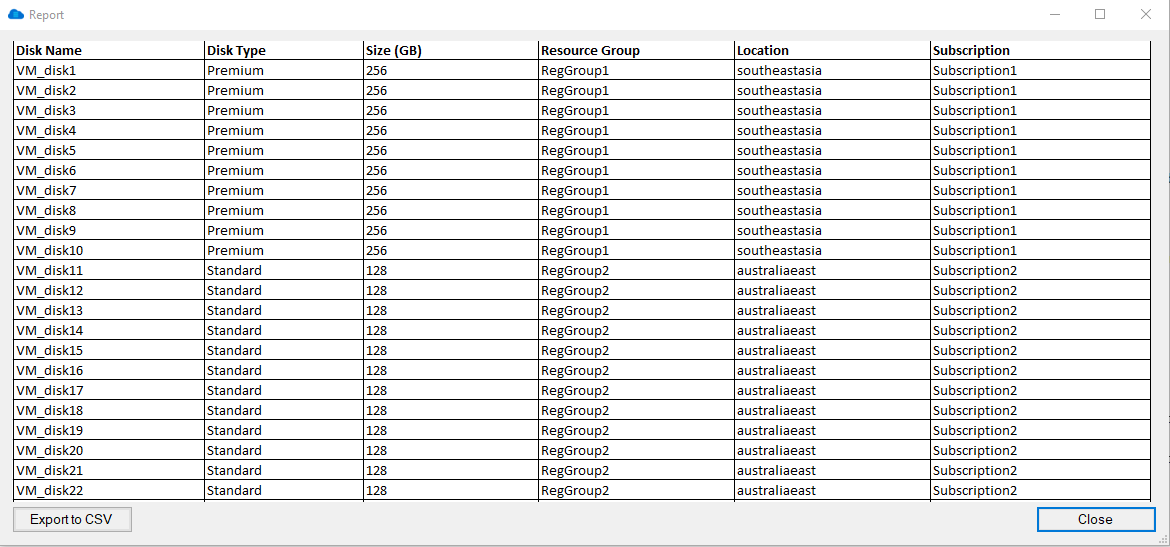
Once you have run an environment scan, go to the Reports Tab in Cloud Storage Manager.

Azure Storage Usage Reports
Now that you are in the Reports Tab, you can see all the various reports you can run to gather information and insights in to your Azure Storage Consumption.
For this Blog post, we are focusing on the size of all of your Azure Subscriptions, Storage Accounts, the number of containers, Blobs and their capacity.
Azure Storage Consumption Reports
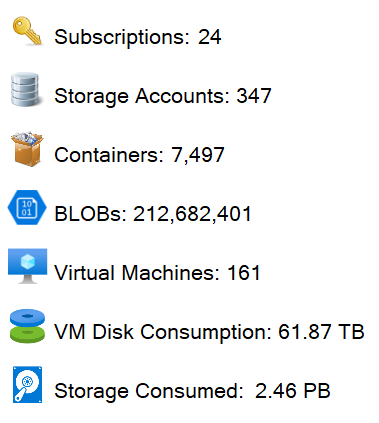
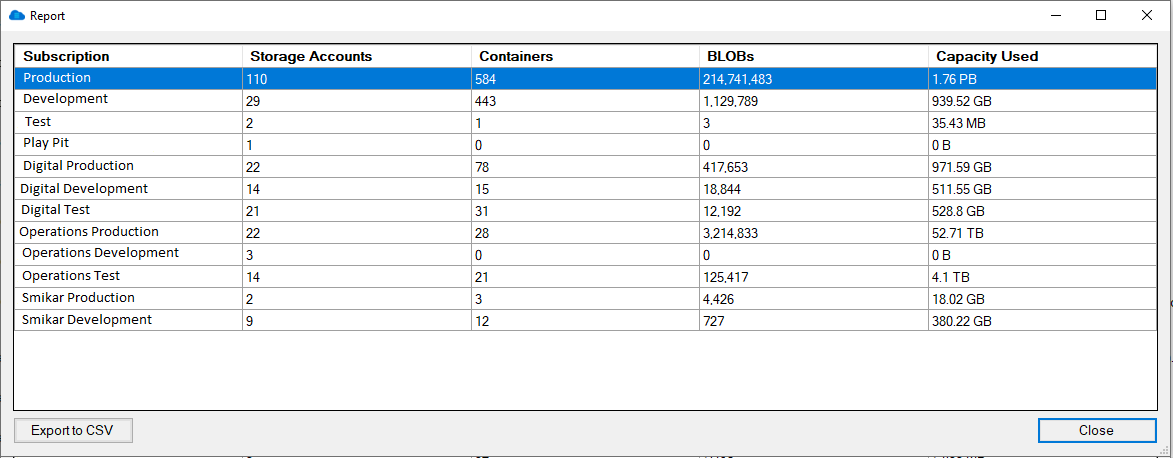
The fastest way to get an Overview of your Azure Storage Consumption is to run the Environment Overview report.
Simply highlight the report, then right click and choose Run Report.

Azure Storage Usage Overview
When you run the Azure Reports, you are presented with a screen showing the details about your Azure Storage.
As can bee seen in the adjacent screenshot, this report provides you with high level details about your Azure Storage Usage by Subscription, including the number of Containers, the number of Blobs and finally the Azure Storage Capacity used in each subscription.
You can export this information to CSV if you wish and perform further analysis in Excel.

Now what if you require further analysis of your Azure Blob Storage consumption?
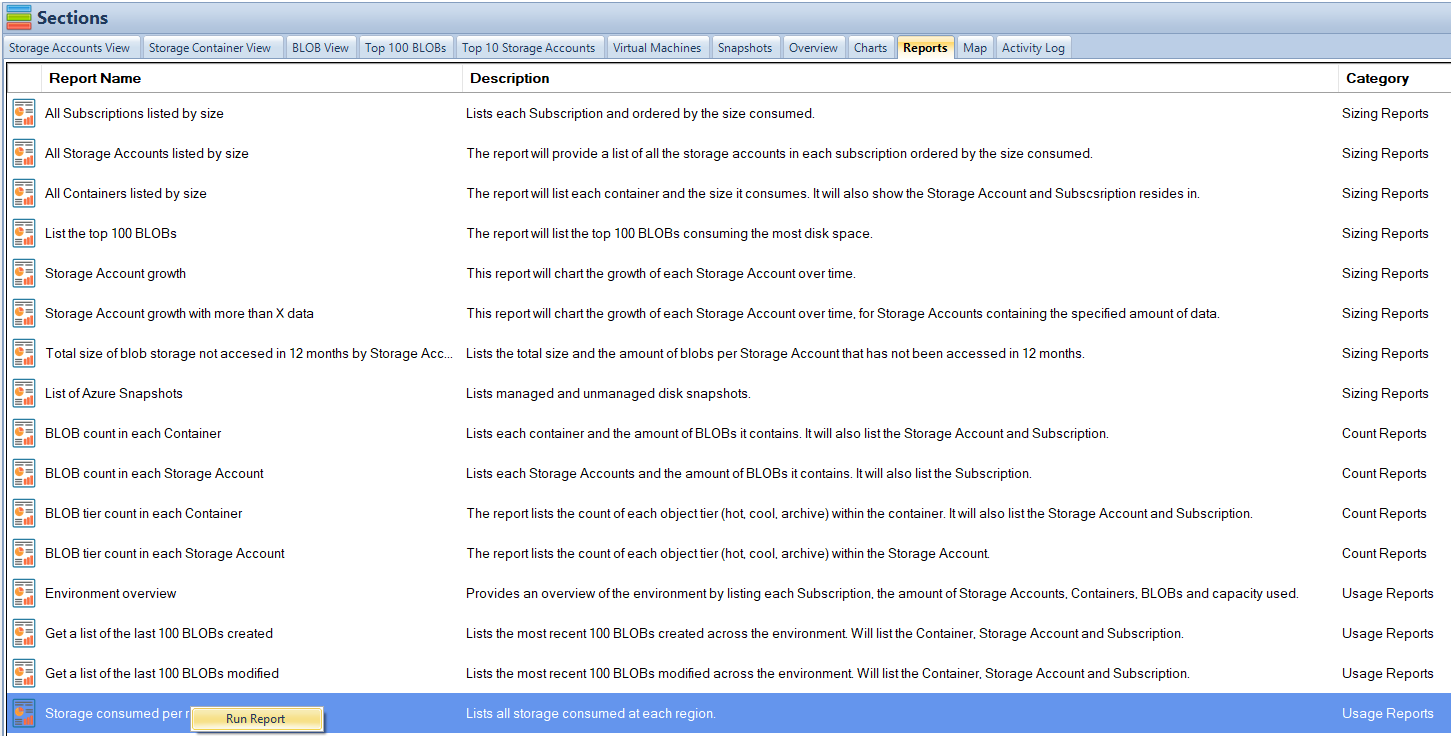
Azure Storage Analysis
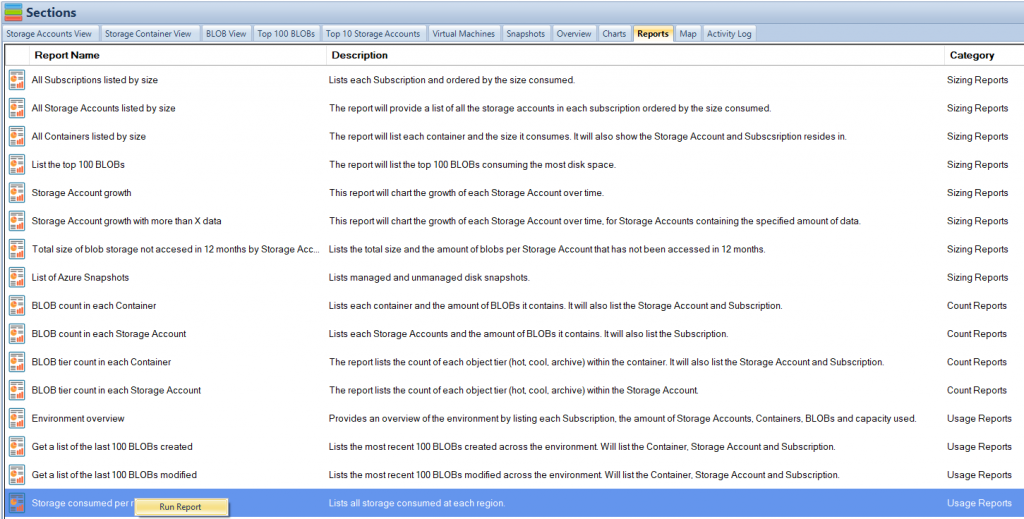
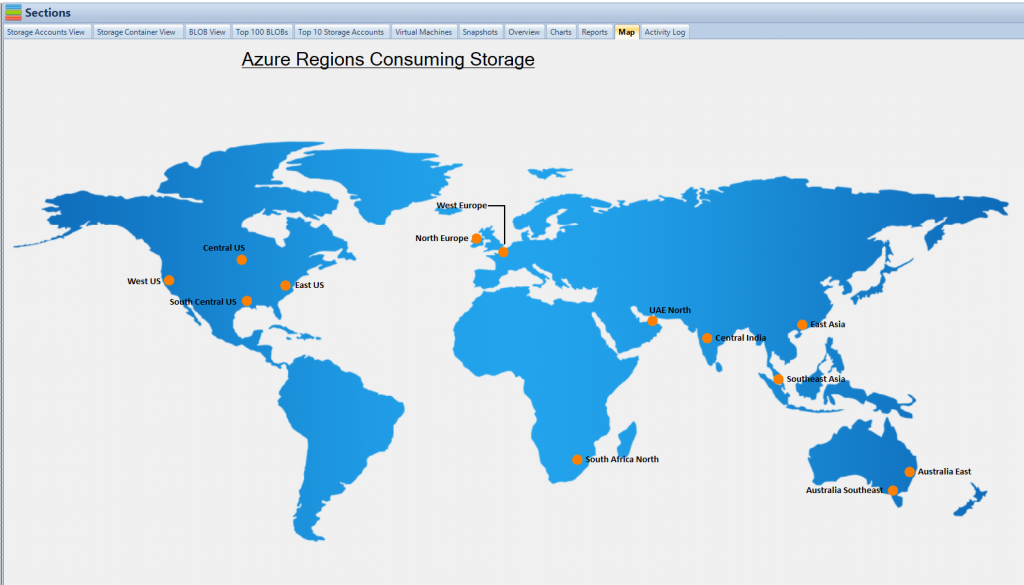
Now that you have a good overview of the amount of Azure Storage you are consuming, another good report to run for further insights is Storage Consumed per Region.
This report will show you the total amount of storage consumed per Azure Region.
Highlight that report in Cloud Storage Manager and choose Run Report.
Azure Storage Regions
As you can see in the screen shown, here is a list of each Azure Regions and the amount of Azure Blob Storage you are consuming there.
As usual, you can export this to Excel for further analysis.

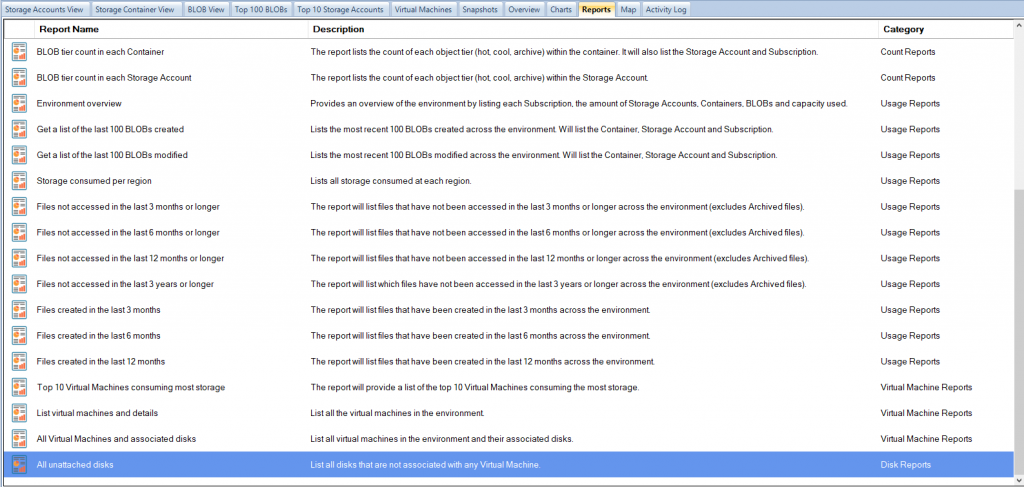
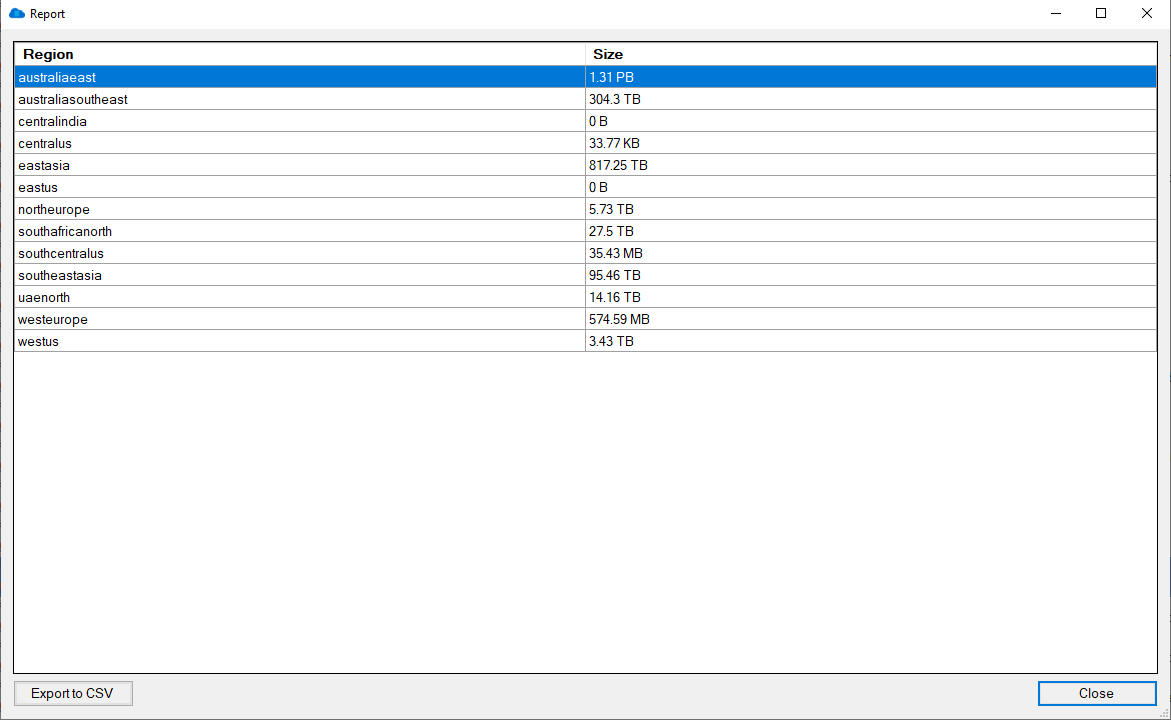
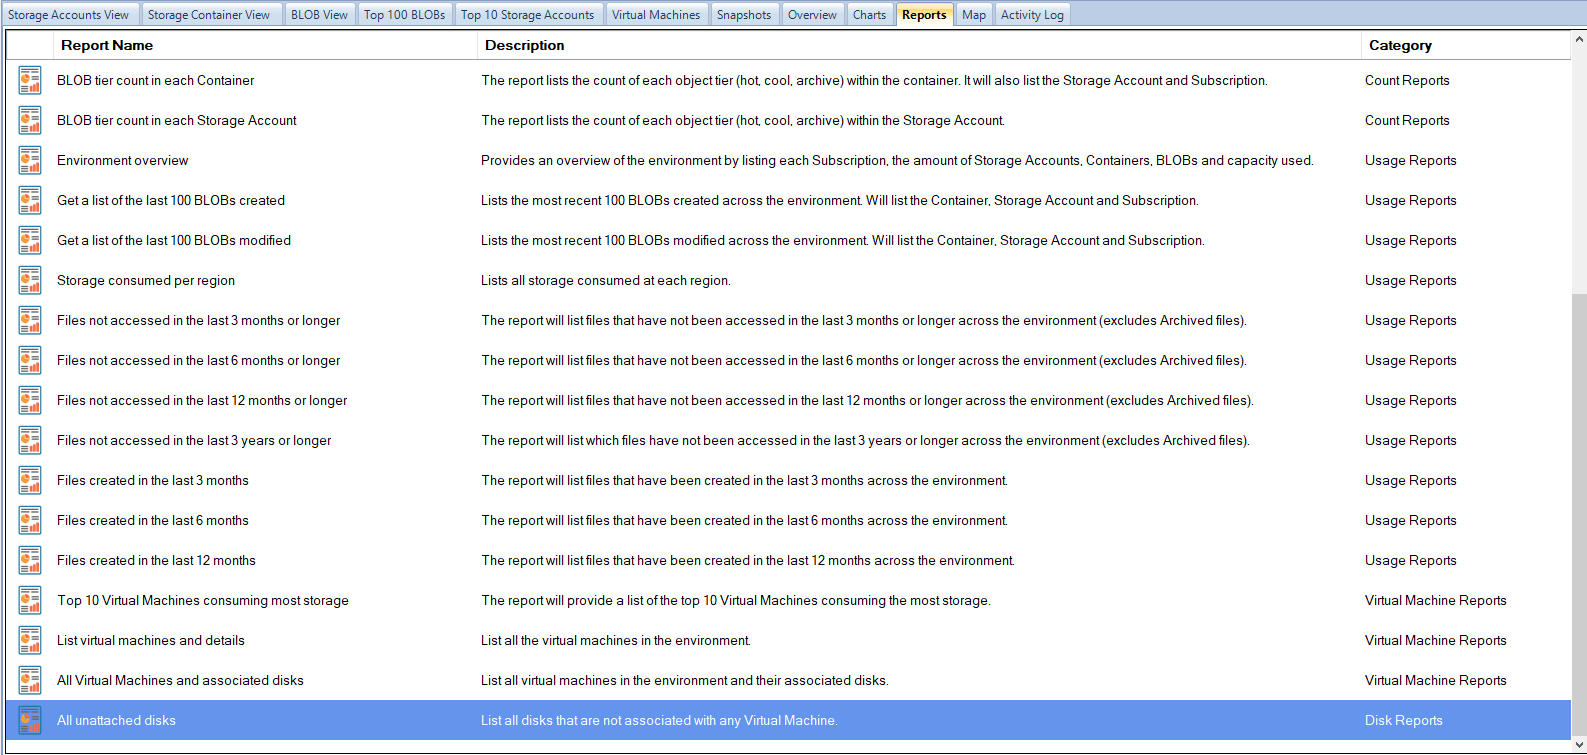
Unattached Azure Virtual Machines disks.
Another great report to run is All Unattached Disks.
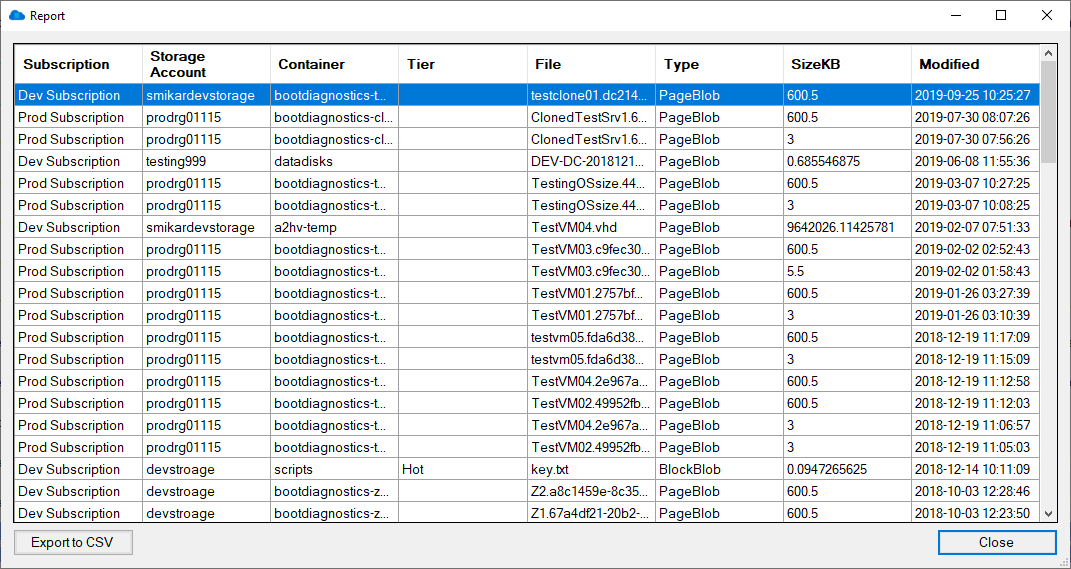
This report will find and show you all the Azure Virtual Machine disks that are not associated with any Azure VM. These disks are costing you money as they arent being used by any Virtual Machines, sitting there dormant and not being used.
Again, Highlight that report and choose Run Report.
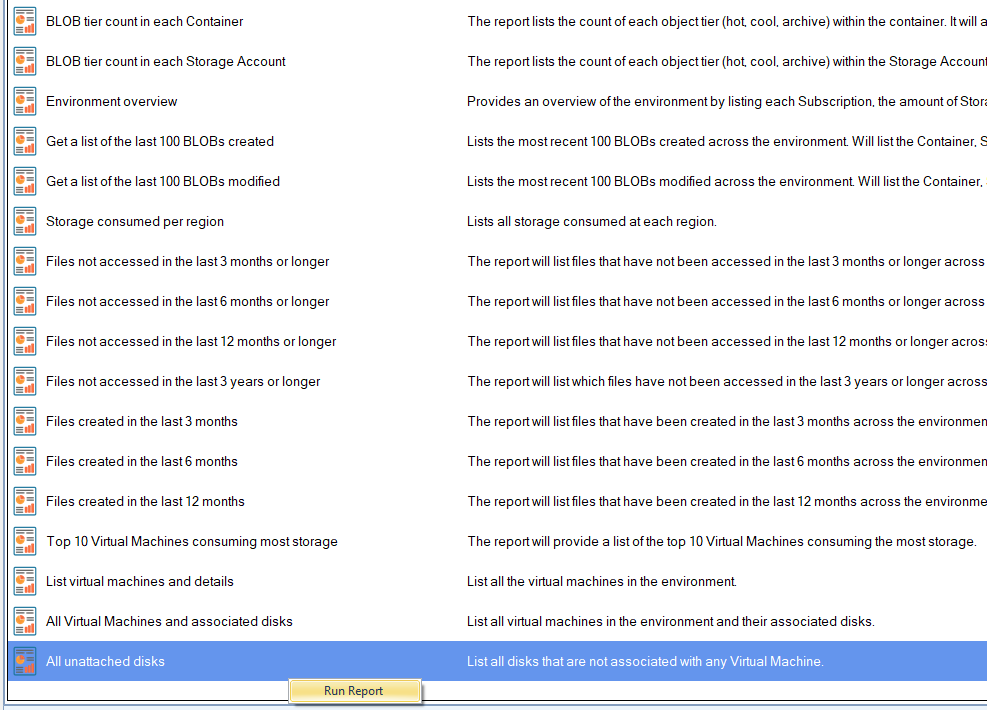
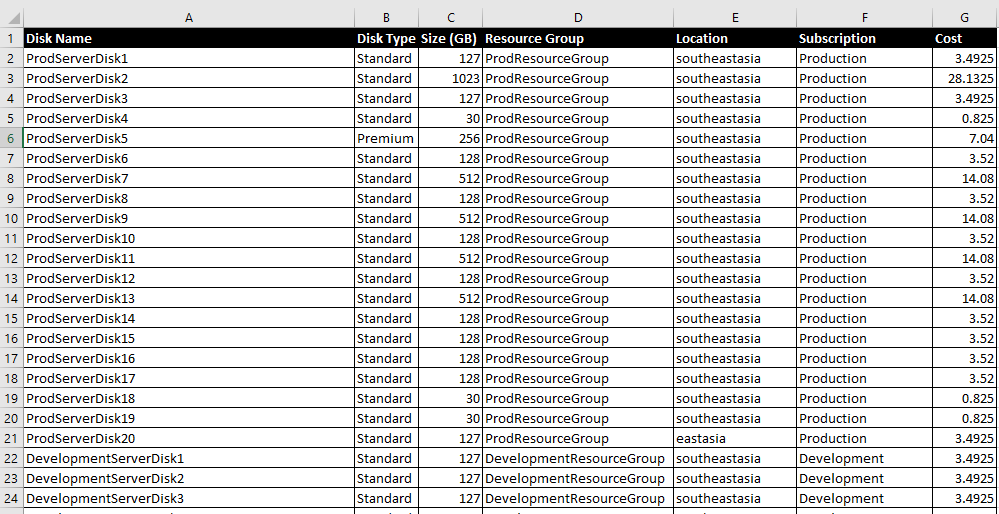
See Azure VM disks that are not associated.
As seen in the screenshot here, all these Azure Disks are not associated with any Azure Virtual Machine.
Yet again you can export this information to excel so that you can investigate further.
Download a FREE trial of Cloud Storage Manager today and start saving money, and understanding your Azure Storage Growth and Consumption.
Dont overspend on your Azure Storage
Knowing the size of your Azure Blob storage is crucial for cost optimization as it helps you monitor and control your usage. By keeping track of the number of Blobs, Containers, and the Azure Blob Storage capacity used, you can ensure that you are not overpaying for storage that you are not using. Additionally, by using a report like “All Unattached Disks,” you can identify any dormant disks that are not associated with any virtual machine and cut costs by deleting or resizing them. By regularly monitoring your Azure Blob storage with the help of tools like Cloud Storage Manager, you can make informed decisions about your usage and reduce unnecessary spending on storage.
Free

Database size is limited to a maximum of 5MB.
Typically for small or personal environments usually consisting of 3 or less Azure Subscriptions and consuming under 30TB of Azure Blob Storage.
Advanced
Database size is limited to a maximum of 1GB.
For medium sized environments typically consisting of less than 10 Azure Subscriptions and consuming under 500TB of Azure Blob Storage.
Enterprise
Unlimited database size.
For use in large environments typically consisting of more than 10 Subscriptions and consuming more than 1PB of Azure Blob Storage.
Azure Storage Consumption FAQ
| Question |
Answer |
What is Azure Storage?
|
Azure Storage is a cloud-based storage solution provided by Microsoft Azure that enables users to store and manage data in various forms such as blobs, files, queues, tables, and disks. |
Why is it important to understand how much Azure Storage I consume?
|
Understanding how much Azure Storage you consume is crucial because it helps you optimize your storage usage, control costs, and avoid unexpected charges. |
What are the benefits of optimizing Azure Storage consumption?
|
Optimizing Azure Storage consumption helps reduce costs, improve performance, and enhance security by ensuring that you only pay for the storage you need, and that your data is stored and managed efficiently. |
How can I monitor my Azure Storage consumption?
|
Use Cloud Storage Manager to deep dive in to your Azure Storage, find out how much you are consuming and where you can start saving money |
What are some best practices for optimizing Azure Storage consumption?
|
Some best practices for optimizing Azure Storage consumption include cleaning up unused data, compressing data before storing it, using tiered storage options, and using automation to manage and optimize your storage resources. |
How can I estimate my Azure Storage costs?
|
You can estimate your Azure Storage costs using the Azure Pricing Calculator, which provides an estimated cost based on your storage requirements and usage patterns. |
How can I reduce my Azure Storage costs?
|
You can reduce your Azure Storage costs by optimizing your storage usage, deleting unused data, using tiered storage options, compressing data, and leveraging Cloud Storage Manager manage your costs. |

by Mark | Nov 9, 2020 | Azure, Azure Blobs, How To, Snapshot / Checkpoint, Storage Accounts
Maximizing cost savings on Azure Blob Storage and Files has become increasingly important as more businesses migrate their data to the cloud. In this article, we’ll discuss how utilizing Cloud Storage Manager can help you optimize Azure storage consumption and significantly reduce expenses. We’ll also explore various ways to identify and remove redundant data and manage your virtual machine snapshots effectively.
Uncovering Azure Blob Storage Consumption
A Comprehensive Scan with Cloud Storage Manager
By using Cloud Storage Manager, you can perform a full scan of all your Azure Subscriptions and Blob Storage Accounts, providing a clear overview of your Azure Blob Storage usage. This visibility allows you to identify potential areas where you can cut costs and better allocate resources.
Azure Blob Storage Locations
Not only could they easily see the amount of Azure Blob Storage in use, they could also see all the Microsoft Datacentres where they are using storage from the map tab.
How much blob storage are your VM snapshots consuming?
Azure Blob Storage Reporting
One of the easiest ways to start saving on your Azure Blob Storage is to find often forgotten about Azure Virtual Machine Snapshots.
Often snapshots are created and then forgotten about.
Simply go to the Reports Tab in Cloud Storage Manager and run the LIST OF AZURE SNAPSHOTS report.
From the reports, you can quickly see where you could apply an Azure Storage Lifecycle Management Policy, and move the files that havent been accessed to a lower storage Tier to save you money.
Azure Virtual Machine Snapshots: Out of Sight, Out of Mind
Once the Azure Snapshot report has been generated, simply open it up in excel to see all your Azure VM snapshots.
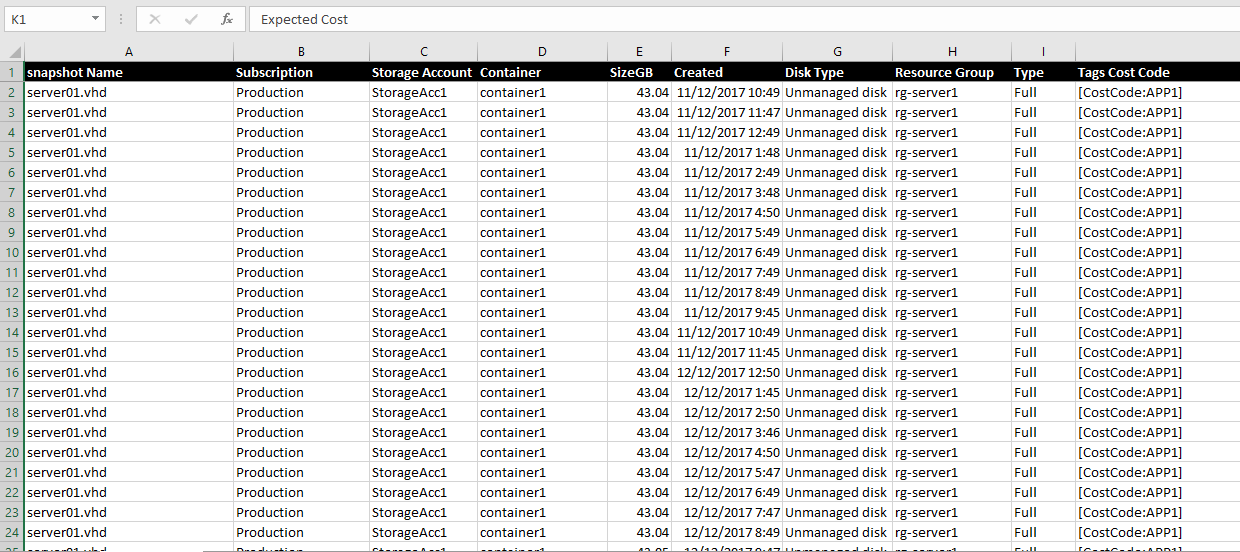
The report provides you with information including the name of the Azure snapshot, which subscription it resides in, the Azure Storage Account, the relevant Container, size of the Azure VM snapshot, when it was created, if its a managed or unmanaged disk, the Azure Resource Group, type of snapshot created and finally any Azure Tags if you have them.
From this report, we found that they had 1168 Azure VM snapshots lingering in their environment, some well over 3 years old.
Using a simple calculation in Excel using standard Azure storage costs, ($0.02750 per TB using azure blob storage pricing provided by Microsoft – IN $AUS.
Azure Pricing Calculator
Visit the Azure Pricing Calculator for pricing in your currency ) deleting all these snapshots saved the client just under $2,000 per month, an approximate saving of $24,000 a year.
Just running these two simple reports and then taking action on them
saved this client $33,600 in their yearly Azure Blob Storage Costs.
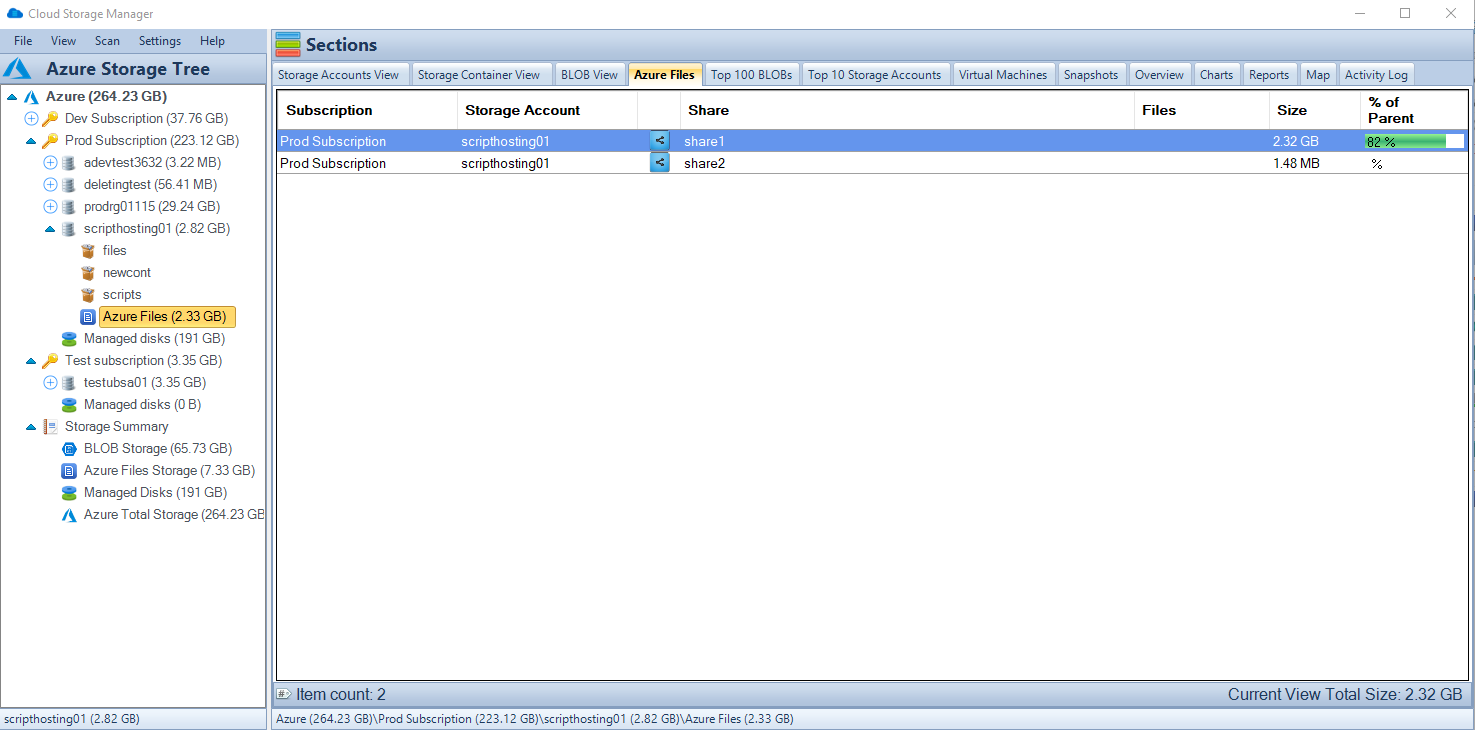
Managing Azure Files Consumption
Gaining Insights with Cloud Storage Manager
As organizations increasingly adopt Azure Files to replace on-premise file servers, it’s crucial to understand exactly how much data resides in your Azure Files.
Cloud Storage Manager can scan all your Azure Files across your tenancy, offering quick and easy insights into Azure Files consumption.
Identifying Cost-Saving Opportunities
With a clear view of your Azure Files consumption, you can identify opportunities to reduce costs by optimizing storage usage and eliminating unnecessary data.

Handling Unattached Azure VM Disks
Finding Unattached Disks with Cloud Storage Manager
Next on the list to reduce their Azure Storage costs, was finding unattached Azure Virtual Machine disks.
Again, this is often overlooked, to delete any disks no longer needed when decommissioning your Azure VMs.
Another standard report is run, this time All Unattached Disks.
Once the report has completed, again open it up in Microsoft Excel, and you can go through this data to see which Azure VM Unattached Disks can be deleted, further reducing your Azure Storage Costs.
Azure VM Storage Cost Savings
Now using the same quick costing formulas from before, we can see an estimated monthly Azure Storage cost for these unattached virtual machine disks.
Estimating Savings with the Azure Pricing Calculator
After running this report and using the Azure Cost Estimator (I used AUD pricing here) to get cloud storage pricing, we found that the client had over 110 unattached Azure Virtual Machine Disks.
Removing all these unattached disks saved them $800 per month, so around $9,600 per year.
Reduce your Microsoft Azure Storage Costs
In a follow-up blog post, we will then dig a little deeper into more Azure Storage cost-saving initiatives (looking to further reduce your Azure Blob and FIles storage pricing and costs) using the insights from Cloud Storage Manager.
Download a free trial of Cloud Storage Manager today and start saving money with your Azure Storage.
Azure Cost Optimisation Conclusion
Azure pricing is based on a pay-as-you-go model, where customers are only charged for the services and resources they consume. This allows for flexible and cost-effective cloud computing. There are a variety of services available in Azure, including computing, storage, networking, and security. The pricing for these services can vary based on factors such as the type of service, the amount of resources used, and the duration of use.
The Azure pricing calculator is a tool that can be used to estimate the cost of using Azure services. The calculator allows you to select the services you want to use, input the details of your usage, and see an estimated cost. This can help you to budget for your cloud computing needs and make informed decisions about which services to use and how much to use them.
In addition to the pricing calculator, there are also a number of pricing options and discounts available to help you save money on your Azure bill. For example, you can use reserved instances to save up to 72% on virtual machine costs, or you can take advantage of Azure Hybrid Benefit to use your existing Windows Server licenses in Azure and save up to 40%.
The Cloud Storage Manager is a tool that helps manage and optimize cloud storage costs for organizations using Azure storage. By providing insights into storage usage patterns, the tool helps organizations make informed decisions about storage capacity planning, tiering, and rightsizing, which can result in cost savings. With its easy-to-use interface and intuitive navigation, the Cloud Storage Manager simplifies the process of managing and optimizing cloud storage costs.
In addition to cost savings, the Cloud Storage Manager also offers benefits such as improved visibility into storage usage, with the ability to view storage costs by usage, users can identify and eliminate redundant, underutilized, or unnecessary storage resources.
Overall, the Cloud Storage Manager is a valuable tool for organizations using Azure storage. By helping to optimize cloud storage costs and streamline management of storage resources, the tool enables organizations to focus on delivering value to their customers, rather than managing storage resources.
by Mark | Oct 28, 2020 | Azure, clone, Cloud Computing, How To, Microsoft HyperV, VMWare
Migrate an Azure VM to VMware or Hyper-V
If you’re looking to download an Azure Virtual Machine to either VMware or Hyper-V for cost savings or compliance reasons, our software Carbon automates the process with just a few clicks. With Carbon, you won’t need to use PowerShell or download the VHD from the Azure portal.
To download your Azure VM to your preferred hypervisor, simply follow the steps outlined below for VMware.
First, download and install Carbon. Then, select your Azure VM and specify your VMware environment as the target. Carbon will handle the rest, downloading and converting your Azure VM to VMware.
In addition to VMware, Carbon also supports Hyper-V as a target environment. So whether you need to export your Azure VM to VMware or Hyper-V, Carbon can help.
To get started, download a free trial of Carbon and try it out for yourself. Don’t waste time with manual downloads or complicated PowerShell scripts – let Carbon simplify the process for you.
The Easiest way to convert your Azure VM to VMWare or Hyper-V
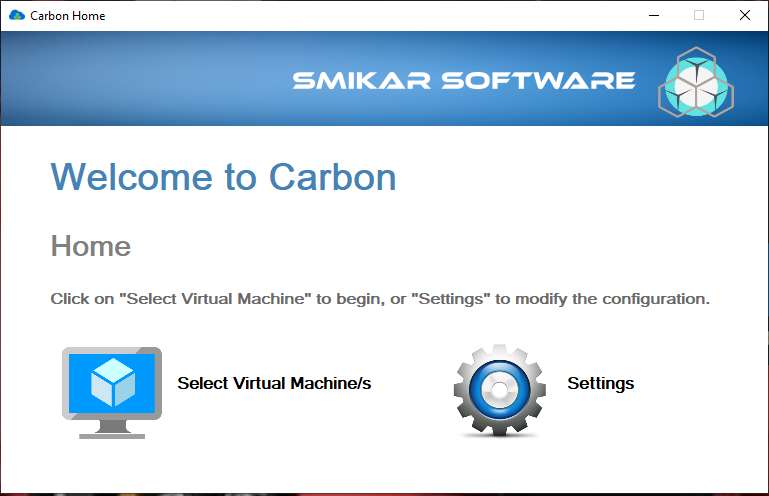
Launch Carbon
Once you have Carbon installed, the first task is to launch Carbon.
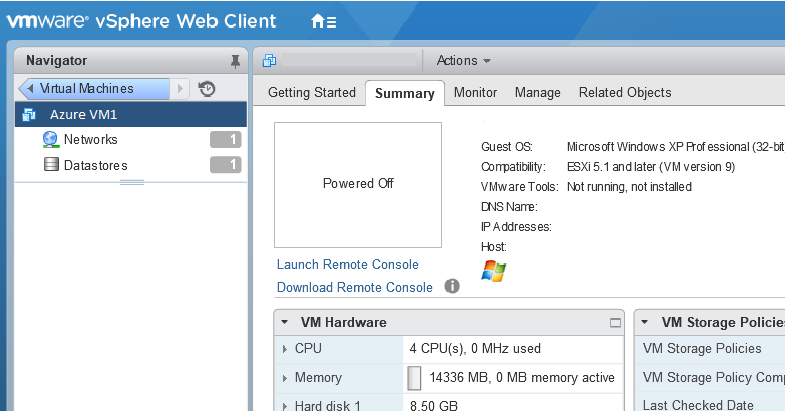
Sign in to the Azure Portal
You will now be prompted to login to Azure, so enter your credentials with access to your Azure Portal.
Scan your Azure Portal for all of your Azure Virtual Machines
Find all your Azure VMs
Once you have authenticated against your Azure Tenant, Carbon will now start scanning your Azure environment for all your Azure Virtual Machines.
This could obviously take some time if you have a large Azure Environment.
Once the scan of your Azure VMs has completed, you will see the list of all the Azure VMs in your Azure Tenancy.
List all your Azure VMs
Now that your scan of all your Azure VMs is complete, choose Select Virtual Machine/s to list all your Azure VMs in your Tenancy and start the migration process.
Select your Azure VM for Migration
Which Azure VMs do you want to migrate back to your Hypervisor
Now you should see a list of all your virtual machines in your Azure Environment.
Details displayed include:
- The Azure VM Name
- The status of the Azure VM
- The Azure VM size
- The number of CPUs your Azure VM has
- The amount of Ram
- The Azure VM’s IP Address
- The Azure vNet it resides in
- The Operating System of your Azure Virtual Machine
- The Azure Resource Group
- The Azure Subscription
- The Azure location
- and finally, the number of disks attached to your virtual machine
You simply select (by using the checkbox on the very right of the screen) the Azure VMs you want to download to VMware, then click Next.
The VMs you want to migrate will need to be powered off, so make sure you do this prior to attempting the migration.
Managed or Unmanaged Disks
Azure VM Disk Configuration
Now if the Azure VMs you are going to convert to VMware are using Azure Managed Disks, you will get this prompt.
Click OK to proceed.
What Carbon will do next is copy this Azure VM disks to a storage account that you specify in the next screen.
Please take note of the location of your Azure VM, as you want to use an Azure Storage Account in the same region.
Azure Storage Account for Conversion
Choose a destination Azure Storage Account
Next we select the appropriate Azure Storage Account that the Azure VM will be copied and converted to.
Choose the storage account you want and then choose Select.
Carbon will now read your Azure VM disk configuration. This can take a few minutes.
Choose your VMWare or Hyper-V Environment for Azure VM Migration
Connect to you Hypervisor
Now we are presented with your virtual environment (in this case our VMware vCentre environment)
Choose from the dropdown lists the VMware Host, the datastore and virtual network you want your Azure VM to download to.
You have the option here to send you an email once the migration has completed.
Click Start Migration to proceed to the final step
Ready to start the Migration of your Azure VM
Start the Migration Process
Finally we are prepared to start the conversion of your Azure VM to VMware.
Review the information here, when you are ready, click the circle next to Understood and Accepted, then click Start.
Azure VM Migration Process
Converting your Azure VM
Now, the conversion process is underway. Your Azure VM will be downloaded and converted to the appropriate format for either VMware or Hyper-V before finally being deployed to your on-premise virtual infrastructure.
Please Note: This may take some time, dependent on the size of your Azure VM disks, so please be patient.
If you have email alerting setup and turned on, you will receive an email once the process has completed.
Azure VM Conversion Progress
Converting your Azure VM for your selected Hypervisor
Watching the Progress window you can see the status of your download and conversion of your Azure VM.
In this picture you can see that the disk download has completed as well as the conversion and its currently being uploaded to our VMware environment.
Azure VM Converted
Azure VM Conversion is now Complete
After some time your Azure VM should now have downloaded, converted to VMware and be available within your vCentre server.
Azure VM Migration Alerts
If you requested an email alert, you should have received one in your inbox stating that the Azure VM has now deployed to your VMware environment.
Azure VM Conversion Completed
View the migrated VM in your Hypervisor
If you go to your vCentre now you should be able to find the Azure VM you had migrated to your VMware environment.
All left for you to do now, is power it on then log on to the VM and update the IP address if needed.
Azure VM Conversion Completed
Find the migrated VM in your Hypervisor
If you go to your vCentre now you should be able to find the Azure VM you had migrated to your VMware environment.
All left for you to do now, is power it on then log on to the VM and update the IP address if needed.
Your Azure VM has been converted and then migrated to your Hyper-v or VMware environment.
And that’s all there is to it. You have downloaded an Azure VM and converted it to VMware or Hyper-V. (Obviously in this example we converted the Azure VM to VMWare. For HyperV the last few steps are replaced with VCentre with SCVMM)
You can download a fully functioning trial of Carbon here to test it for yourself.
Carbon: Moving You Forward by Bringing You Back.

by Mark | Oct 26, 2020 | Azure, Azure Blobs, How To, Storage Accounts
Azure Blob storage has provided companies with a way to store almost limitless amount of data. But just like kids in a candy store this can get out of hand, and expensive. Being able to store as much data as you want is great, however it is something that can grow to a point where you are spending more on storage than you actually need.
Azure does provide a nice method of automatically shifting old or unused files to a lower access tier to save on cost, but this still means you are potentially holding onto files you don’t really need. I mean do you really need files you haven’t accessed in over 12 months? Sure there are certain industries that require files that are kept for 7+ years, but they are a special case.
If you don’t know how to create an Azure lifecycle policy to automatically move unused files to a lower access tier, check out our other post here: https://www.smikar.com/create-azure-storage-lifecycle-policy/
OK, so do I go about finding these files that haven’t been accessed in the last 3, 6, 12 or 36 months (3 years) without having to browse through each and every Azure Storage Account and Container?
So how do you find your Azure Blobs that havent been accessed in 3 months or more?
Azure Blob Storage Consumption Reports
Simple, use Cloud Storage Manager, and run one of the many usage reports.
Cloud Storage Manager has a number of reports you can run to get a better insight into exactly where all your Azure Blob Storage is being consumed, but let’s focus on the specific 4 reports that will tell us which Azure BLOB files haven’t been accessed in the last 3, 6, 12 or 36 months (3 years).
Once you’ve installed Cloud Storage Manager and allowed it some time to scan your Azure environment, browse to the Reports tab as shown here.
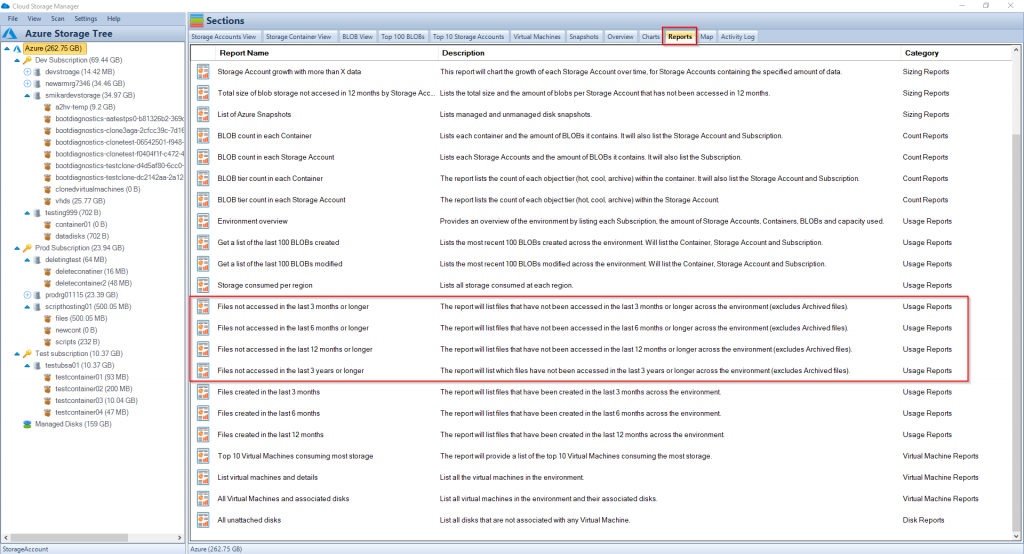
Azure Blobs not accessed within
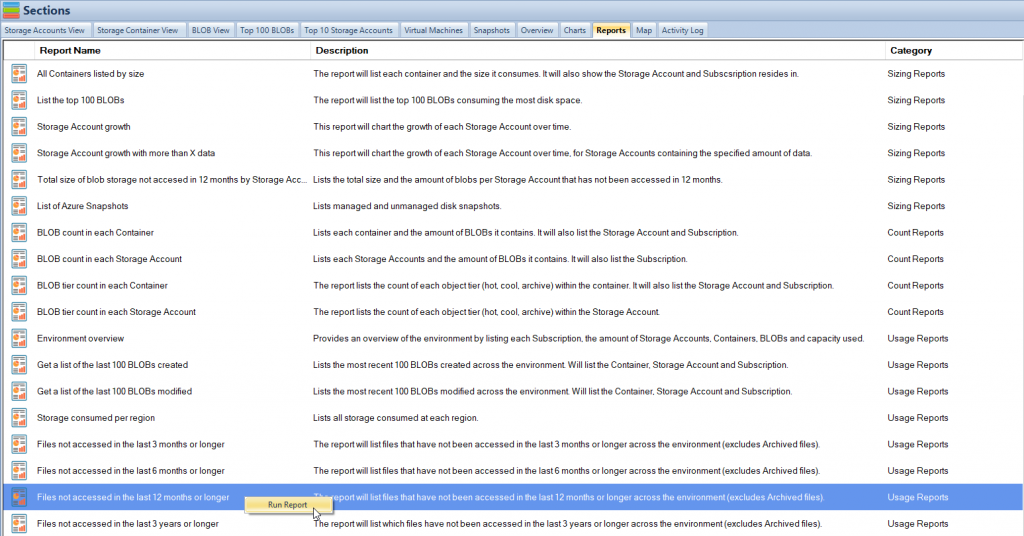
First let’s run the Files not access in the last 12 months or longer report.
Right click on the report and select Run Report.
Azure Blobs not used Report
Once the report finishes, you will be shown a list of files that have not been accessed in the last 3 months or longer.
The report will show you which Subscription, Storage Account and Container the Azure BLOB file resides in. Not only that, but it will also tell you the object tier of the blob, whether that be hot or cool (archive files are excluded), the size of the file, the last time it was modified and of course the name of the file.
Here is an example of the report.
You can also export the report to Excel in order to adjust the report or present the information to others.
The same report may be executed to provide similar results but extending the criteria further out to search for files that haven’t been accessed in a longer timeframe, such as 6 months, 12 months or 3 years.
Using these reports, you can decide whether or not these files need to be retained, in which case you would move them to a lower access tier, either Cool or Archive for long-term retention, or even delete them if they are deemed unnecessary.
These reports are a great way to find files that haven’t been accessed in a long time and could provide an immediate cost saving associated with your Azure Storage consumption.
Cloud Storage Manager has free to trial. Start seeing insights in to your Azure Blob Storage consumption today.
Download a Free Trial and test it for yourself.
Free
Database size is limited to a maximum of 5MB.
Typically for small or personal environments usually consisting of 3 or less Azure Subscriptions and consuming under 30TB of Azure Blob Storage.
Advanced
Database size is limited to a maximum of 1GB.
For medium sized environments typically consisting of less than 10 Azure Subscriptions and consuming under 500TB of Azure Blob Storage.
Enterprise
Unlimited database size.
For use in large environments typically consisting of more than 10 Subscriptions and consuming more than 1PB of Azure Blob Storage.
Cloud Storage Manager is licensed based on the size of it’s database which includes information of each of your Azure Subscriptions, Azure Storage Accounts, Containers and finally each Blob.
Each version has the same great functions including scheduled scans of your Azure Blob Storage and reporting.
Azure Storage Cost Saving FAQs
What is Azure Blob storage?
Azure Blob storage is a cloud-based storage solution provided by Microsoft Azure that allows users to store large amounts of unstructured data such as text or binary data.
Why is it important to manage Azure Blob storage?
While Azure Blob storage can store almost limitless amounts of data, it can also become expensive to maintain as data accumulates over time. Proper management of Azure Blob storage can help reduce storage costs and improve overall efficiency.
How can Cloud Storage Manager help manage Azure Blob storage?
Cloud Storage Manager provides a number of usage reports that can be used to identify which Azure Blob files haven’t been accessed in a certain period of time, such as 3, 6, 12 or 36 months. These reports allow users to make informed decisions about whether to retain, move to a lower access tier, or delete unnecessary files, which can help reduce storage costs.
What are the benefits of using Cloud Storage Manager?
By using Cloud Storage Manager, users can gain insights into their Azure Blob storage consumption and identify areas where they can optimize storage costs. The usage reports provided by Cloud Storage Manager are easy to use and allow users to quickly identify which files haven’t been accessed in a certain period of time, which can save time and effort compared to manually browsing through each Azure Storage Account and Container.
How can I try Cloud Storage Manager for myself?
Cloud Storage Manager offers a free trial that can be downloaded and installed. This allows users to see the insights provided by the software and determine if it is a good fit for their needs.
Azure Blob Storage Consumption Reports are an excellent way to find Azure BLOB files that haven’t been accessed in a long time, and they can provide immediate cost savings associated with your Azure Storage consumption. By using Cloud Storage Manager, you can run reports and gain insights into your Azure Blob Storage consumption, allowing you to make informed decisions on how to optimize your Azure storage.
In summary, using Azure Blob Storage Consumption Reports can help you find unused Azure BLOB files and reduce storage costs, providing a cost-effective solution for storing your data in Azure. Start using Cloud Storage Manager today to see insights into your Azure Blob Storage consumption and start saving costs.


