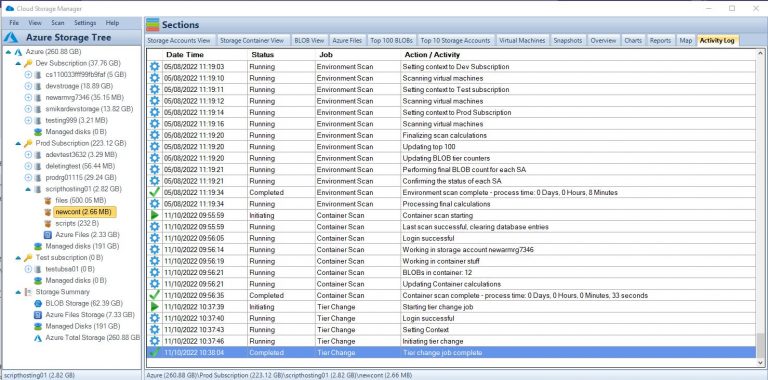
by Mark | May 10, 2023 | Azure, Cloud Computing, HyperV, Microsoft HyperV, VMWare
In today’s world of virtualization, IT professionals are often faced with the challenging task of choosing the right platform for their organization’s needs. Azure, VMware, and Hyper-V are three major players in the virtualization market, each with its strengths and weaknesses. In this article, we will provide a comprehensive comparison of these three platforms and discuss how Carbon, a software solution, can assist you in migrating Azure virtual machines back to on-premise VMware or Hyper-V environments.
Overview of Azure, VMware, and Hyper-V
Azure
Azure is a cloud computing platform developed by Microsoft that provides a range of cloud services, including virtual machines (VMs), databases, and storage. It offers a wide variety of VM sizes and configurations, as well as a robust ecosystem of third-party tools and services.
VMware
VMware is a virtualization and cloud computing software provider that offers a comprehensive suite of products, including vSphere, vCenter, and vSAN. VMware’s solutions allow organizations to create and manage virtual machines on-premises or in the cloud.
Hyper-V
Hyper-V is a virtualization platform developed by Microsoft, available as a stand-alone product or as a feature of Windows Server. It allows users to create and manage virtual machines on Windows-based systems and is known for its ease of use and integration with other Microsoft products.
Key Comparison Factors
Scalability
Azure provides virtually limitless scalability, with the ability to add or remove resources on-demand. This makes it an attractive option for organizations that experience fluctuating workloads or require rapid expansion.
VMware and Hyper-V both offer on-premises scalability, although they may be constrained by the physical hardware limitations of your organization’s data center.
Performance
Performance is highly dependent on the specific workloads and configurations of each platform. Azure typically offers good performance for most use cases, although its performance may vary due to factors like network latency and resource contention.
VMware has a long history of delivering high-performance virtualization solutions, and its performance is often considered industry-leading.
Hyper-V’s performance is generally on par with VMware, although some users may find that specific workloads perform better on one platform over the other.
Security
All three platforms offer robust security features, such as encryption, network security, and access controls. Azure benefits from Microsoft’s extensive security investments, providing users with a secure and compliant cloud environment.
VMware and Hyper-V both offer strong security features, with VMware’s security built around its vSphere platform and Hyper-V leveraging its integration with Windows Server.
Cost
Azure’s pay-as-you-go model can be cost-effective for organizations with fluctuating workloads, but it may become expensive for long-term, consistent use. Additionally, data transfer and storage costs can add up over time.
VMware and Hyper-V have upfront licensing costs, and on-premises hardware and maintenance expenses should also be considered. However, these platforms can be more cost-effective for organizations with stable workloads and those who prefer to manage their infrastructure.
Management Tools
Azure offers a wide range of management tools, including the Azure Portal, Azure CLI, and Azure PowerShell, making it easy to manage and monitor your VMs.
VMware provides a comprehensive suite of management tools, such as vCenter, vSphere, and vRealize, which are well-regarded for their functionality and ease of use.
Hyper-V’s management tools include Hyper-V Manager, System Center Virtual Machine Manager, and Windows Admin Center, providing a seamless management experience for Windows users.
Differences and Similarities in Deployment Options
Azure
Being a cloud-based platform, Azure allows users to deploy VMs and other services in Microsoft’s data centers worldwide. This global reach ensures low latency and redundancy for applications and data. Additionally, Azure enables hybrid cloud scenarios, allowing users to leverage on-premises resources alongside cloud resources.
VMware
VMware primarily focuses on on-premises virtualization solutions, with its vSphere platform enabling users to create and manage VMs in their data centers. However, VMware has also ventured into the cloud market with VMware Cloud, which offers VMware-based cloud services in partnership with providers like AWS, Azure, and Google Cloud. This allows users to create hybrid or multi-cloud environments using familiar VMware tools and interfaces.
Hyper-V
Hyper-V is primarily an on-premises virtualization solution, offering VM management on Windows Server or Windows 10 systems. While it does not have a native cloud offering, Microsoft offers Azure Stack HCI, a hybrid cloud solution that leverages Hyper-V and other Windows Server technologies to create a consistent experience across on-premises and Azure environments.
Differences and Similarities in Networking
Azure
Azure offers a robust suite of networking services and features, including Virtual Networks (VNETs), Load Balancers, and Application Gateways. Users can create isolated and secure virtual networks, manage traffic with load balancing, and implement advanced application delivery and security features.
VMware
VMware’s networking capabilities are built around its vSphere Distributed Switch (VDS) technology, which allows users to create and manage virtual networks, segment traffic, and enforce security policies across multiple hosts. VMware NSX, a network virtualization platform, extends these capabilities by providing advanced features like micro-segmentation, load balancing, and VPN.
Hyper-V
Hyper-V’s networking features are closely integrated with Windows Server, allowing users to create virtual switches, configure VLANs, and implement Quality of Service (QoS) policies. While its capabilities may not be as extensive as VMware’s NSX or Azure’s networking services, Hyper-V provides a solid foundation for virtualized network management.
Differences and Similarities in Storage
Azure
Azure offers a wide range of storage options, including Azure Blob Storage, Azure Files, and Azure Disk Storage. Users can choose from various performance tiers and redundancy levels to meet their specific requirements. Additionally, Azure provides advanced features like geo-replication, backup, and disaster recovery.
VMware
VMware’s storage capabilities are centered around its vSAN technology, which enables users to create software-defined storage pools using local storage resources on vSphere hosts. This allows for high-performance, scalable, and resilient storage for VMs. VMware also supports traditional storage technologies like SAN, NAS, and iSCSI.
Hyper-V
Hyper-V storage is based on Windows Server storage technologies, such as Storage Spaces and SMB file shares. Users can create flexible and resilient storage pools using local or shared storage resources. Hyper-V also supports features like storage live migration and storage replica for increased flexibility and reliability.
Differences and Similarities in High Availability and Disaster Recovery
Azure
Azure offers native high availability and disaster recovery features, such as Availability Sets, Availability Zones, and Azure Site Recovery. These services ensure that VMs remain operational during planned or unplanned outages and provide geo-redundancy for critical applications and data.
VMware
VMware’s high availability features are built around its vSphere High Availability (HA) and vSphere Fault Tolerance (FT) technologies, which automatically restart VMs on other hosts in case of a hardware failure or maintain continuous availability for mission-critical applications. For disaster recovery, VMware offers Site Recovery Manager (SRM), a solution that automates the recovery process and provides orchestrated failover and failback capabilities.
Hyper-V
Hyper-V leverages Windows Server Failover Clustering (WSFC) for high availability, allowing users to create clusters of Hyper-V hosts that automatically handle VM failover during host outages. For disaster recovery, Hyper-V offers Hyper-V Replica, a feature that asynchronously replicates VMs to a secondary site, enabling users to recover their VMs in case of a disaster.
Differences and Similarities in Backup and Recovery
Azure
Azure offers native backup and recovery services, such as Azure Backup and Azure Site Recovery, which allow users to protect and restore their VMs and data in case of failure or disaster. These services provide features like incremental backups, geo-replication, and automated recovery processes, ensuring data integrity and minimal downtime.
VMware
VMware’s backup and recovery capabilities are primarily delivered through third-party solutions, such as Veeam, Rubrik, and Commvault, which provide integration with vSphere for VM backup and recovery. These solutions offer features like image-level backups, deduplication, and instant recovery, ensuring reliable and efficient data protection.
Hyper-V
Hyper-V supports backup and recovery through its integration with Windows Server Backup, a built-in feature of Windows Server that allows users to create and manage backups of VMs and data. Additionally, third-party backup solutions like Veeam and Altaro provide advanced features and integrations for Hyper-V environments.
Differences and Similarities in Licensing and Pricing
Azure
Azure follows a pay-as-you-go pricing model, where users are billed based on the resources they consume. This model can be cost-effective for organizations with fluctuating workloads, but it may become expensive for long-term, consistent use. Additionally, data transfer and storage costs can add up over time.
VMware
VMware’s licensing model is based on per-CPU licensing for its vSphere product line, with additional costs for features like vSAN and NSX. Organizations must also consider the costs of on-premises hardware and maintenance when evaluating VMware’s pricing. However, VMware can be more cost-effective for organizations with stable workloads and those who prefer to manage their infrastructure.
Hyper-V
Hyper-V is included with Windows Server, which is licensed per-core, making it a cost-effective option for organizations already using Windows Server. However, additional costs for Windows Server Datacenter Edition or System Center may apply for organizations requiring advanced features.
Differences and Similarities in Ecosystem and Integration
Azure
Azure’s ecosystem is vast, with a wide variety of third-party tools and services available for users to choose from. Additionally, Azure has strong integration with other Microsoft products, such as Office 365, Dynamics 365, and Power BI, making it an attractive option for organizations invested in the Microsoft ecosystem.
VMware
VMware’s ecosystem is also extensive, with numerous third-party tools and services available for users to enhance their virtualization experience. VMware’s solutions integrate with many popular products like backup software, monitoring tools, and security solutions, providing users with a seamless and flexible experience.
Hyper-V
Hyper-V’s ecosystem is smaller compared to Azure and VMware, but it benefits from strong integration with other Microsoft products and services. This can be advantageous for organizations already using Windows Server, System Center, or other Microsoft solutions.
Differences and Similarities in Performance and Scalability
Azure
Azure offers a wide range of VM sizes and performance tiers to accommodate various workloads, from small development environments to large-scale enterprise applications. Azure’s autoscaling capabilities enable users to automatically scale their VMs based on demand, ensuring optimal performance and cost efficiency. Additionally, Azure’s global infrastructure provides the ability to deploy applications and services in multiple regions for increased redundancy and performance.
VMware
VMware’s vSphere platform is known for its performance and scalability, enabling users to create and manage large-scale virtual environments with ease. VMware supports advanced features like Distributed Resource Scheduler (DRS), which automatically balances VM workloads across hosts to optimize performance. Additionally, VMware’s VMotion technology enables live migration of VMs between hosts with no downtime, ensuring seamless scalability and resource optimization.
Hyper-V
Hyper-V offers solid performance and scalability for Windows-based virtual environments. While it may not provide as many advanced features as VMware’s vSphere platform, Hyper-V supports live migration and dynamic memory allocation for VMs, which helps optimize resource usage and performance. Hyper-V’s integration with Windows Server also allows users to leverage features like Storage Spaces Direct and Scale-Out File Server for increased storage scalability.
Differences and Similarities in Security Features
Azure
Azure provides a robust set of security features to protect VMs and data. These features include Azure Security Center, which offers centralized security management and monitoring, and Azure Private Link, which allows users to access Azure services over a private connection. Additionally, Azure supports encryption for data at rest and in transit, network security features like Network Security Groups and Firewalls, and access controls based on Azure Active Directory and role-based access control (RBAC).
VMware
VMware’s security features are built around its vSphere platform, with technologies like vSphere Trust Authority and vSphere Secure Boot ensuring the integrity of the virtual environment. VMware NSX provides advanced network security features like micro-segmentation, distributed firewalls, and intrusion detection and prevention. Additionally, VMware supports encryption for data at rest and in transit, as well as integration with third-party security solutions.
Hyper-V
Hyper-V leverages its integration with Windows Server to provide security features like Shielded VMs, which protect VMs from unauthorized access and tampering, and Host Guardian Service, which ensures the integrity of Hyper-V hosts. Hyper-V also supports encryption for data at rest and in transit, network security features like virtual network isolation and port ACLs, and access controls based on Windows Server Active Directory and RBAC.
Differences and Similarities in Container Support
Azure
Azure offers strong support for container technologies, including Azure Kubernetes Service (AKS), which enables users to easily deploy and manage Kubernetes clusters in Azure. Additionally, Azure supports container instances and Azure Container Registry for storing and managing container images.
VMware
VMware’s container support is built around its vSphere Integrated Containers (VIC) technology, which enables users to run containers alongside VMs on vSphere hosts. VMware also offers Tanzu Kubernetes Grid, a Kubernetes runtime that allows users to deploy and manage Kubernetes clusters across vSphere and public clouds.
Hyper-V
Hyper-V supports running containers through its integration with Windows Server and Windows 10, which includes support for both Windows and Linux containers. Additionally, Microsoft offers Azure Kubernetes Service on Azure Stack HCI, a hybrid cloud solution that enables users to deploy and manage Kubernetes clusters in their Hyper-V environments.
Carbon: The Migration Solution
For organizations looking to migrate their Azure VMs back to on-premises VMware or Hyper-V environments, Carbon offers a robust solution that streamlines the process and ensures a smooth transition.
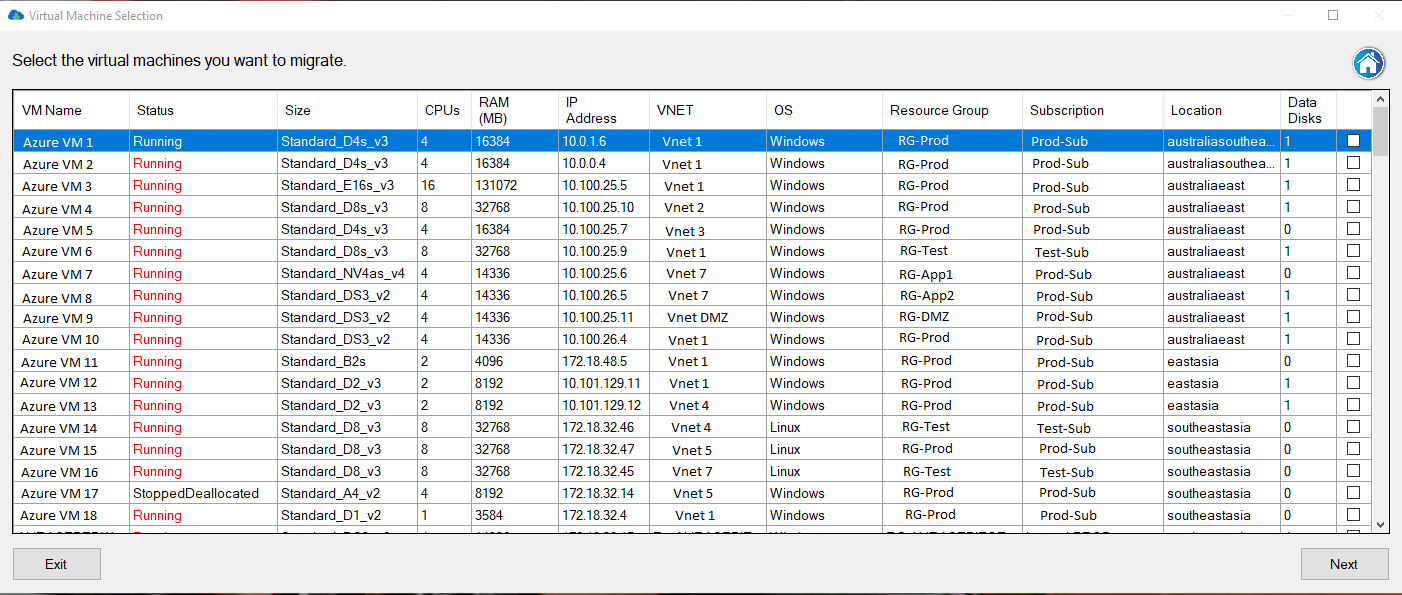
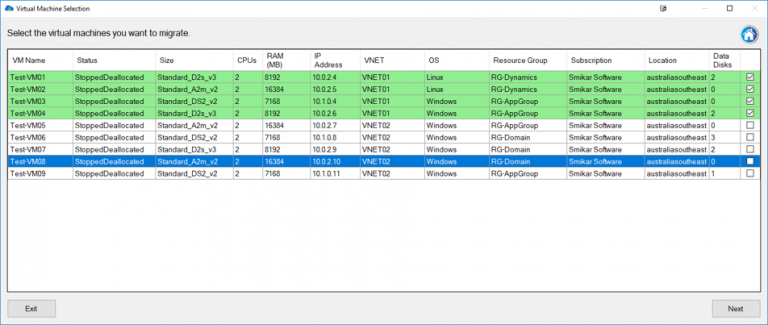
Migrating Azure VMs to VMware
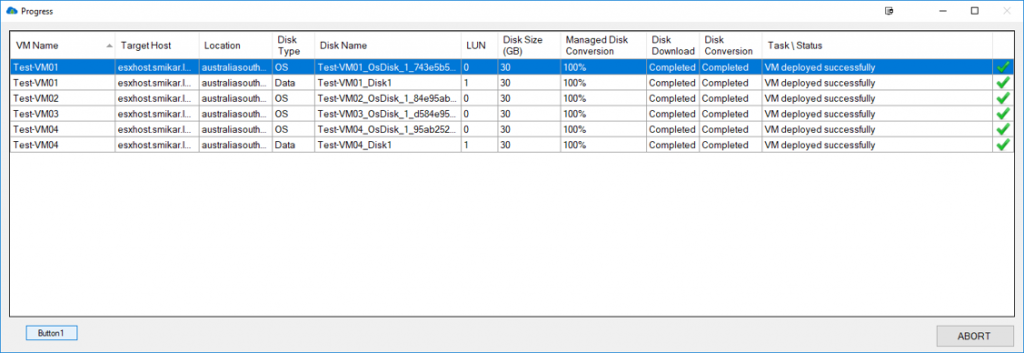
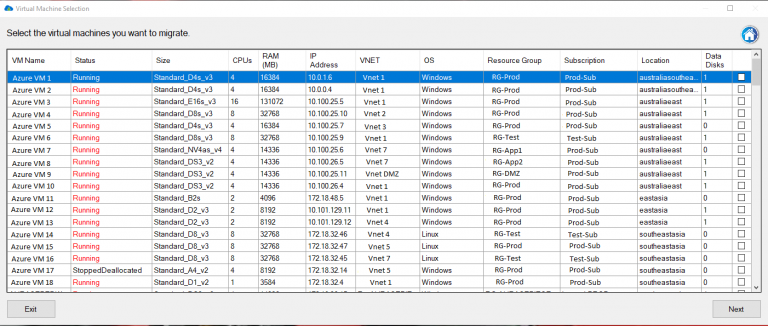
With Carbon, users can easily migrate Azure VMs to VMware using a step-by-step process that simplifies the migration and minimizes downtime.
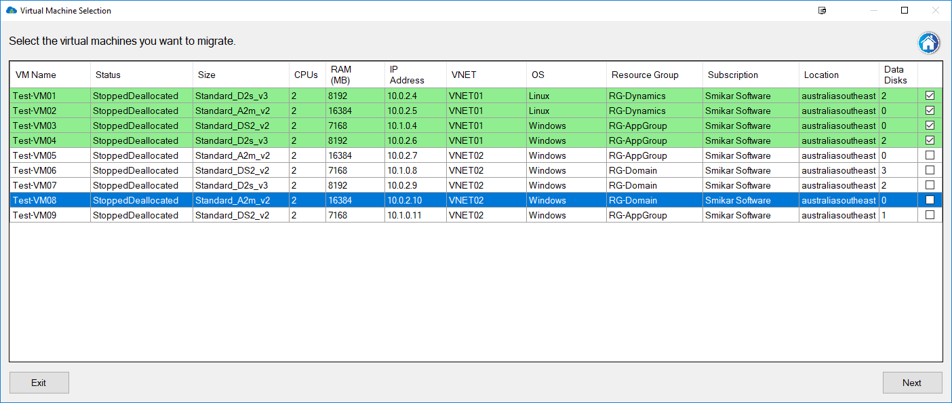
Migrating Azure VMs to Hyper-V
Carbon also supports migrating Azure VMs to Hyper-V environments, providing a flexible solution for organizations using either VMware or Hyper-V.
Carbon’s Key Features
Real-time Monitoring
Carbon offers real-time monitoring during the migration process, allowing users to keep track of their VMs and ensure a successful migration.
Customizable Settings
Carbon’s customizable settings allow users to tailor the migration process to their specific needs, providing greater control and flexibility.
Email Notifications
With Carbon’s email notifications, users are kept informed of the migration progress, ensuring that any issues can be addressed promptly.
Conclusion
In summary, Azure, VMware, and Hyper-V each offer unique benefits and drawbacks, making it essential for organizations to carefully evaluate their specific needs before selecting a virtualization platform. For those looking to migrate their Azure VMs back to on-premises VMware or Hyper-V environments, Carbon provides a robust, user-friendly solution that simplifies the process and ensures a smooth transition.
FAQs
- Can I migrate from Azure to both VMware and Hyper-V using Carbon?
Yes, Carbon supports migrating Azure VMs to both VMware and Hyper-V environments.
- How does Carbon ensure a smooth migration process?
Carbon offers real-time monitoring, customizable settings, and email notifications to keep users informed and in control throughout the migration process.
- Is Carbon suitable for users with limited technical skills?
Yes, Carbon’s step-by-step process and intuitive interface make it accessible for users of all skill levels.
- What factors should I consider when choosing between Azure, VMware, and Hyper-V?
Factors to consider include scalability, performance, security, cost, and available management tools.
- Do Azure, VMware, and Hyper-V all offer similar security features?
Yes, all three platforms provide robust security features, such as encryption, network security, and access controls.

by Mark | May 9, 2023 | Azure, Azure Blobs, Blob Storage, Storage Accounts
Brief Overview of Azure Storage Account Failover
Azure Storage Account Failover is a critical feature offered by Microsoft Azure that provides users with the ability to switch to an alternative instance of their storage account in case of a disaster or an outage. In simple terms, it is the act of transferring control of Azure storage account operations from one region to another, ensuring business continuity and disaster recovery. This means that if a user’s primary storage account becomes unavailable due to a natural disaster, human error, or any other reason, they can quickly failover to their secondary storage account without experiencing any disruption in services.
One advantage of Azure Storage Account failover is that it is fast and automated. With automatic failover configured for a user’s primary storage account, Microsoft can detect and respond to service disruptions automatically.
This feature ensures minimal downtime for your applications and data access. It is essential for businesses running mission-critical applications on Microsoft Azure that require high availability.
Importance of Failover in Ensuring Business Continuity and Disaster Recovery
The importance of failover in ensuring business continuity and disaster recovery cannot be overstated. A well-architected architecture should provide the highest level of uptime possible while still being able to recover promptly from unexpected failures/disasters. The goal should be maximum availability with minimal downtime.
A failure can occur at any time without warning – ranging from hardware failures to natural disasters like floods or fires. Businesses must have contingency plans in place because they are dependent on their IT systems’ availability at all times.
By having an Azure Storage Account Failover strategy in place, companies can mitigate the risk associated with sudden outages that could lead to significant data loss or prolonged downtime. Furthermore, regulatory compliance requires businesses operating within certain industries — such as finance and healthcare –to implement robust business continuity plans (BCPs) that include backup and disaster recovery procedures.
An Azure Storage Account Failover strategy can help businesses meet these requirements. In the next section, we will discuss what an Azure Storage Account Failover is and how it works to ensure business continuity and disaster recovery.
Understanding Azure Storage Account Failover
What is a Storage Account Failover?
Azure Storage Account Failover is a feature that allows you to switch your storage account from one data center to another in case of an outage or maintenance event. The failover process involves redirecting all requests and operations from the primary data center to the secondary data center, ensuring minimal disruption of service. Azure Storage Account Failover is critical for maintaining business continuity and disaster recovery in the cloud.
How does it work?
Azure Storage Account Failover works by creating a secondary copy of your storage account in an alternate region. This copy is kept in sync with the primary copy using asynchronous replication.
In case of an outage or maintenance event, Azure will automatically initiate failover by promoting the secondary copy as the new primary and redirecting all traffic to it. Once the primary region is back online, Azure will synchronize any changes made during the failover period and promote it back as the primary.
Types of failovers (automatic and manual)
There are two types of failovers supported by Azure Storage Account: automatic and manual. Automatic failovers are initiated automatically by Azure when there is an unplanned outage or disaster impacting your storage account’s availability. During automatic failover, all requests are redirected from the primary region to the secondary region within minutes, ensuring no data loss occurs.
Manual failovers are initiated manually by you when you need to perform planned maintenance or updates on your storage account’s primary region. During a manual failover, you can specify whether to wait for confirmation before initiating or immediately perform a forced takeover.
Factors to consider before initiating a failover
Before initiating a failover for your storage account, there are several factors you should consider. First, ensure that your secondary region is at least 400 miles away from your primary region to minimize the risk of both regions being impacted by the same disaster.
Additionally, consider the availability of your storage account’s services during failover and how it may impact your customers. Ensure you have adequate bandwidth and resources to support a failover event without impacting other critical operations.

Configuring Azure Storage Account Failover
Step-by-step guide on how to configure failover for your storage account
Configuring Azure Storage Account Failover is a crucial step in ensuring business continuity and disaster recovery. Here is a step-by-step guide on how to configure failover for your storage account:
1. Navigate to the resource group containing the storage account you want to configure for failover.
2. Open the storage account’s overview page by selecting it from the list of resources.
3. In the left-hand menu, select “Failover”.
4. Select “Enable” to enable failover for that storage account.
5. Select target region(s) where you want data replication. 6. Review and confirm the settings
Best practices for configuring failover
To ensure successful failover, here are some best practices that should be followed when configuring Azure Storage Account Failovers:
1. Ensure that your primary region is designated as “Primary”.
2. Choose secondary regions that are geographically separated from your primary region.
3. Use identical configurations in all regions, including network configurations, access keys, and firewall rules.
4. Configure monitoring services such as Azure Monitor or Log Analytics to receive alerts during an outage or when a failover event occurs.
Common mistakes to avoid when setting up failover
There are several common mistakes that can occur when setting up Azure Storage Account Failovers which could lead to ineffective disaster recovery solutions or further damage during outages:
1. Not having enough available secondary regions – it’s important not only to designate adequate secondary regions but also check their availability before committing them in case they’re already experiencing some problems themselves
2. Failing to keep configurations identical across all regions – failing to do this could cause unexpected behavior during a fail-over event which could lead into further complications
3. Not testing failover – test your storage account’s failover capabilities before an actual disaster occurs to ensure it works effectively. By following these best practices and avoiding common mistakes when configuring Azure Storage Account Failovers, you can ensure that your business stays operational even during a disaster.
Testing Azure Storage Account Failover
The Importance of Testing Failover Before an Actual Disaster Occurs
Testing the failover capabilities of your Azure Storage Account is a crucial step in ensuring that your business operations will continue to run smoothly in the event of a disaster. By testing your failover plan, you can identify any potential issues or gaps in your plan and take steps to address them before they become a real problem. Testing also allows you to measure the time it takes for your system to recover, and gives you confidence that your systems will work as expected.
Additionally, testing can help you ensure that all key personnel and stakeholders are aware of their roles and responsibilities during a failover event. This includes not only technical teams who are responsible for executing the failover process, but also business teams who may need to communicate with customers or other stakeholders during a disruption.
How To Test Your Storage Account’s Failover Capabilities
To test your storage account’s failover capabilities, there are several steps you can follow:
1. Create a test environment: Set up a separate environment that simulates what might happen during an actual disaster. This could include creating mock data or running tests on separate virtual machines.
2. Initiate Failover: Once the test environment is set up, initiate the failover process manually or automatically depending on what type of failover you have configured.
3. Monitor Performance: During the failover event, monitor key performance metrics such as recovery time and network connectivity to identify any problems or bottlenecks.
4. Perform Post-Failover Tests: Once the system has been restored, perform post-failover tests on critical applications to ensure that everything is functioning as expected. 5. Analyze Results: Analyze the results of your tests and use them to improve your overall disaster recovery plan
Tips for Successful Testing
To ensure that your testing is successful, consider the following tips:
1. Test Regularly: Regularly test your failover plan to identify and address issues before they become a problem.
2. Involve All Stakeholders: Involve all key stakeholders in the testing process, including business teams and technical teams.
3. Document Results: Document the results of your tests and use them to continuously improve your disaster recovery plan.
4. Don’t Rely on Testing Alone: While testing is crucial, it’s important to remember that it’s just one part of an overall disaster recovery strategy. Make sure you have a comprehensive plan in place that includes other elements such as data backups and redundant systems.
Monitoring Azure Storage Account Failovers
Monitoring your Azure Storage Account Failover is critical to ensure that you can take the proper actions in case of an outage. Monitoring allows you to detect issues as they arise and track the performance of your failover solution. There are several tools available in Azure for monitoring your storage account failovers, including:
Tools available for monitoring storage account failovers
Azure Monitor: This tool provides a unified view of the performance and health of all your Azure resources, including your storage accounts. You can configure alerts to notify you when specific metrics cross thresholds or when certain events occur, such as a failover event. Log Analytics: This tool enables you to collect and analyze data from multiple sources in real-time.
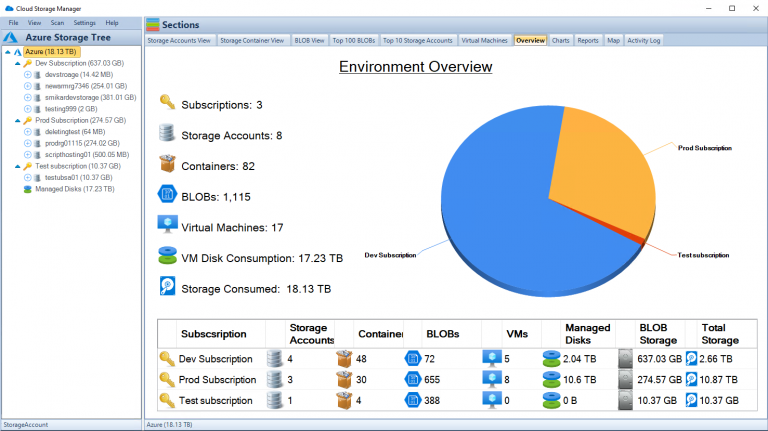
You can use it to monitor the status of your storage accounts, including their availability and performance during a failover event. Other tools that you might consider include Application Insights, which helps you monitor the availability and performance of web applications hosted on Azure; and Network Watcher, which provides network diagnostic and visualization tools for detecting issues that could impact a storage account’s failover capability. Additionally, use Cloud Storage Manager to monitor your Azure consumption.
Key metrics to monitor during a failover event
When it comes to monitoring your storage account’s failover capability, there are several key metrics that you should keep an eye on. These include:
Fault Domain: This metric indicates whether the primary or secondary location is currently active (i.e., which fault domain is currently serving requests).
Data Latency: this metric measures how long it takes for data to replicate from primary location to secondary location.
RPO (Recovery Point Objective): this metric indicates the point in time to which you can recover data in case of a failover event.
RTO (Recovery Time Objective): this metric indicates the amount of time it takes for your storage account to become available again after a failover event has occurred.
By monitoring these metrics, you can quickly detect issues and take appropriate actions to ensure that your storage account remains available and performs optimally during a failover event.
Troubleshooting Azure Storage Account Failovers
Common issues that can occur during a storage account failover
Common issues that can occur during a storage account failover
During a storage account failover, there are several issues that may arise. One common issue is data loss or corruption. This can happen if the replication between primary and secondary regions has not been properly configured or if there is a delay in replication before the failover occurs.
Another issue that may occur is an inability to access the storage account. This could be due to network connectivity issues or if there are incorrect settings in the DNS records.
Another common issue that can arise during a storage account failover is performance degradation. This can occur due to an increase in latency when accessing data from the secondary region, which may cause slower read/write speeds and longer response times.
How to troubleshoot these issues
To troubleshoot data loss or corruption issues during a storage account failover, it’s important to ensure that replication settings are properly configured and up-to-date before initiating a failover. Additionally, it’s important to monitor replication status throughout the process of failing over and afterwards.
To troubleshoot connectivity issues, first check your DNS records to ensure they are correctly configured for both regions. Also, check network connectivity between regions using tools like ping or traceroute.
If you’re experiencing performance degradation during a storage account failover, consider scaling up your secondary region resources temporarily until the primary region is fully restored. Ensure your resources have been optimized for optimal performance by monitoring metrics like CPU usage and IOPS.
While Azure Storage Account Failovers are designed to provide business continuity and disaster recovery capabilities, they do come with their own set of potential issues. By proactively monitoring and troubleshooting any potential problems before initiating a failover event you’ll be better prepared should any complications arise.
Recap on Azure Storage Account Failovers
In today’s digital age, data is an essential asset for businesses. With cloud computing becoming the norm, businesses need to ensure that their data is secure and accessible at all times to ensure business continuity.
Azure Storage Account Failover provides an automatic and manual option for protecting your data in the event of a disaster. Proper configuration, testing, monitoring, and troubleshooting provide confident assurance that your business will continue running smoothly even in the face of disaster.
This comprehensive guide has covered all aspects of Azure Storage Account Failover. By understanding what it is and how it works, configuring it properly, testing its capabilities regularly, monitoring for any issues during failover events and troubleshooting problems that may arise during those events, you can rest assured that your critical data will be protected.
Creating this guide on Azure Storage Account Failovers was necessary as this feature has become increasingly important to businesses given the amount of critical data being stored in cloud repositories. While it may seem daunting at first with proper planning and execution Azure Storage Account Failover provides a seamless way to protect your organization’s critical information from disasters or outages ensuring minimal downtime thus meeting the needs of today’s fast-paced digital world.

by Mark | May 3, 2023 | Azure
Definition of Azure Tenant
When it comes to the world of cloud computing, Microsoft Azure is one of the top players in the game. However, managing an Azure environment can be complex and requires a good understanding of its various components. One such component is an Azure tenant.
An Azure tenant, also referred to as a directory or a subscription, is essentially a dedicated and isolated instance of the Microsoft Cloud that holds your organization’s data and accounts. Within an Azure tenant, you can create and manage resources such as virtual machines, databases, storage accounts, etc., all while maintaining full control over who has access to them.
Importance of understanding Azure Tenant
As more organizations adopt cloud computing for their business needs, having a clear understanding of how to manage their cloud environment becomes crucial. This is where understanding an Azure tenant becomes important. An Azure tenant provides centralized security and management for your organization’s Microsoft cloud resources.
By having full control over who has access to each resource within your tenant, you can better protect sensitive data and applications from unauthorized users. It also allows you to easily manage user access across multiple services within one place.
Furthermore, each subscription within an Azure tenant has its own unique set of billing information and cost management tools. Understanding how this works will help you optimize costs by identifying trends in usage patterns across services or departments.
Having a good grasp on what an Azure tenant is and how it functions can greatly benefit any organization looking to utilize Microsoft’s cloud services securely while optimizing costs at the same time. The next section will provide an overview of what exactly makes up an Azure tenant.
Overview of Azure Tenant
Azure Tenant is a fundamental concept in the world of Microsoft Azure and plays a crucial role in managing and deploying resources within an organization. In simple terms, it is a dedicated and isolated instance of the Azure Active Directory (AAD) that provides authentication and authorization services for all applications and services running within it. Each tenant has its unique domain name, which can be used to access the directory from anywhere. What is an Azure Tenant?
An Azure tenant represents a dedicated instance of the AAD service that stores information about users, groups, and applications within an organization. It provides identity management services for all cloud-based applications running on the platform. This means that any application deployed on Azure will require users to authenticate themselves using their AAD credentials before accessing any resources. How it relates to other Azure components
Azure Tenants relate closely to other components such as subscriptions, resource groups, virtual networks, etc., in how they are created and managed. Each subscription within an organization belongs to a single tenant; this means that if you have multiple subscriptions for various departments or projects, they must all belong to the same tenant. Resource groups provide logical containers for managing resources such as virtual machines, storage accounts, databases deployed within your subscription.
When creating new resources under your subscription or deploying existing ones from templates or marketplaces, you must specify which resource group it should belong to within your tenant. Virtual networks provide isolation between different components deployed in your subscription by allowing you to segment them based on network security groups (NSGs).
NSGs consist of rules that allow or deny traffic between different subnets or network interfaces attached to VMs. Azure tenants play a vital role in governing access control policies for cloud-based applications running on Microsoft’s cloud platform.
It provides centralized identity management services across different regions globally. Understanding how tenants relate with other components is essential when designing, deploying and managing resources within your organization.
Creating an Azure Tenant
Azure Tenants are the foundational element of any Azure subscription. An Azure Tenant is a dedicated instance of the Azure Active Directory, or AAD, that provides identity and access management for your applications and services. In this section, we will discuss the step-by-step process of creating an Azure Tenant and best practices to keep in mind while doing so.
Step-by-step guide on creating an Azure Tenant
Creating an Azure tenant requires a Microsoft account with administrative privileges to set up new tenants. Follow these steps for creating a new Azure tenant:
1. Log in to your Microsoft account as an administrator.
2. Open the Azure portal at https://portal.azure.com.
3. Click on “Create a resource” and select “Azure Active Directory” from the drop-down menu.
4. In the “Azure Active Directory” pane that appears, click on “Create.”
5. Enter your organization’s name and domain name.
6. Choose your preferred location for storing directory data.
7. Set up security defaults and add any optional features you may require.
8. Click on “Review + Create,” then click on “Create.” After completing these steps, your new tenant should be ready to use.
Best practices for creating an Azure Tenant
Here are some best practices you should consider when creating your own tenant:
1. Use custom domains: To ensure that you have complete control over authentication and security methods used within your tenant, it is recommended that you use custom domains instead of default domains provided by AAD.
2. Set up user roles carefully: It is important to establish strict role-based access controls (RBAC) for users accessing resources in your tenant to avoid unauthorized access or accidental modifications from untrusted entities.
3. Enable Multi-factor authentication (MFA): By enabling MFA on all accounts within a tenant, users have to provide a secondary form of authentication beyond their password. This extra layer of security reduces the likelihood of successful attacks.
4. Monitor your tenant: You should regularly monitor the activities within your tenant to identify any suspicious activities that could lead to a data breach or other security issues. 5. Limit external access: Restricting external access is one of the most effective ways to reduce the risk of unauthorized access or data breaches.
You can use Azure AD B2B collaboration features to provide controlled access to users outside your organization. By following these best practices, you can ensure that your new Azure Tenant is set up securely and meets all your business needs.
Managing an Azure Tenant
Azure Tenant management is a crucial aspect of ensuring efficient and effective use of the cloud infrastructure. The management portal provides a centralized location where all the necessary configurations can be made to ensure optimal resource usage. In this section, we will discuss the overview of Azure tenant management portal, its features, and how to manage users and roles within an Azure tenant.
Overview of Management Portal
Azure Management Portal is a web-based console that allows you to manage your Azure resources. It provides a comprehensive view of your resources across different subscriptions, including virtual machines, storage accounts, networks, web apps and more.
The portal dashboard gives you access to information about your resource utilization and health status. The dashboard also has tabs for viewing alerts, backups and updates in real-time as well as providing insight into spending trends for your subscriptions.
It also provides advanced search functionality that enables you to filter resources by type or name. With the management portal’s integration into other Microsoft tools such as Visual Studio Online (VSO), it’s possible to have all aspects of project development in one place.
Features
One vital feature in the Azure Management Portal is the ability to create customizable dashboards which enable quick access to frequently used resources such as virtual machines or storage accounts. It’s possible to set alarms on any metric available for the services being used in the dashboard which ensures proactive response before issues escalate out of control.
Another great feature is role-based access control (RBAC) which enables granular access control for users with different roles within an organization while maintaining permissions at every level of service consumption within each subscription. The management portal also integrates with Microsoft Intune which allows organizations managing mobile devices through MDM solutions like Intune directly from within their Azure tenant dashboard simplifying management tasks even further.
Managing Users and Roles
Managing users and roles within an Azure tenant is crucial to ensure that only authorized personnel are accessing your resources. It’s possible to grant access to users individually or in groups based on their roles within the organization.
There are several built-in roles, including Owner, Contributor, Reader and User Access Administrator. Owners have full control over the subscription and can manage billing, support requests, resource creation and deletion while Contributors can create new resources but cannot delete them.
Readers can only view resources without being able to make any changes. To add or remove a user from a user role, navigate to the “Access Control (IAM)” section of the management portal dashboard for that resource or subscription and follow the instructions provided on each tab.
Azure Tenant management is an essential part of ensuring optimal utilization of cloud infrastructure. The management portal provides a comprehensive view of resource utilization while also providing granular access control for users with different roles within an organization.
It’s important to keep in mind that handling large amounts of subscriptions may be difficult without using automation tools like PowerShell or ARM templates. By following best practices when using these tools as well as understanding how each component interacts with others in your environment you’ll be able to effectively manage your Azure tenant and achieve maximum ROI from your cloud investment.
Security in an Azure Tenant
Overview of security features in an Azure tenant
Azure provides a range of security features that are designed to protect your tenant. These features include network security groups, virtual private networks (VPNs), and firewalls. Network security groups provide you with the ability to filter network traffic to and from virtual machines, whereas VPNs allow you to securely connect your on-premises network to your Azure environment.
Other important security features include application gateways, which provide application-level routing and load balancing, and web application firewalls (WAFs), which protect against attacks against web applications. Additionally, Azure Security Center provides a centralized view of all your resources within the tenant and offers recommendations for improving the security posture of your environment.
Best practices for securing your tenant
Securing your Azure tenant is critical in protecting against data breaches or cyberattacks. Here are a few best practices that can help improve the overall security of your environment:
1. Implement Multi-Factor Authentication – Multi-factor authentication (MFA) is one of the most effective ways to prevent unauthorized access to your resources within the tenant. MFA requires users to provide additional verification such as a code sent via text message or through an authenticator app.
2. Use Role-Based Access Control – Role-based access control (RBAC) allows you to control who has access to specific resources within the tenant based on their role or job function. This ensures that only authorized personnel have access to sensitive data.
3. Use Resource Locks – Resource locks allow you to prevent accidental deletion or modification of critical resources within the tenant by preventing users from deleting or modifying them.
4. Encrypt Data – Encryption is another critical component of securing sensitive data within the tenant. You can encrypt data at rest using services like Azure Disk Encryption or encrypt data in transit using transport layer security (TLS).
5. Regularly Review Logs – Regularly reviewing logs can help you identify potential security issues within the tenant. Azure provides several tools for logging and monitoring, including Azure Monitor and Azure Log Analytics.
Securing your Azure tenant is critical in protecting your organization’s data and resources. By implementing the best practices outlined above and taking advantage of the security features provided by Azure, you can minimize the risk of a data breach or cyberattack.
Billing and Cost Management in an Azure Tenant
The Importance of Billing and Cost Management in an Azure Tenant
When it comes to cloud computing, one of the most significant benefits is cost optimization. The cloud enables organizations to leverage technology resources without having to make significant capital expenditures or manage complex infrastructures. However, as more organizations adopt cloud technologies, there is a growing need to ensure that cloud usage is optimized for maximum efficiency and cost savings.
Billing and cost management are critical components of any Azure tenant strategy. Azure offers various billing models designed to meet the diverse needs of its customers.
One such model is pay-as-you-go pricing, which allows customers to pay only for what they use on a per-hour basis. Alternatively, some customers may opt for reserved instances pricing or prepay their annual usage to benefit from discounts.
An Overview of Billing Models Available within an Azure Tenant
Azure provides several billing models tailored explicitly for different workloads. One such model is Consumption-based or Pay-As-You-Go (PAYG) pricing, where you are billed only for what you use based on hourly consumption rates. Consumption-based billing lets you pay for the actual resources used by your applications in a specific period.
Reserved Instances (RI) pricing is another model that allows you to save money by prepaying your annual usage upfront and committing yourself to one-year or three-year terms at discounted rates. Alternatively, Enterprise Agreements (EA) enable customers with large-scale deployments access discounted prices on software licenses from Microsoft authorized resellers.
Cost Management Tools Available within an Azure Tenant
Azure provides various tools that help customers optimize their spending in the cloud effectively. These tools include: – Azure Cost Management: This tool helps track your usage through detailed reports and recommendations on how best you can optimize your spending across resource groups without sacrificing performance.
– Azure Advisor: This tool provides personalized recommendations on how to optimize your workloads based on best practices and industry standards. – Azure Reserved VM Instances (RIs): Reserved instances allow you to save up to 72% over pay-as-you-go pricing of virtual machines.
Tips for Optimizing Costs within an Azure Tenant
Managing the cost of cloud resources is often challenging, but it is possible with these tips:
1. Monitor and track your usage: Keep an eye on your consumption rates and adjust your resources regularly.
2. Use cost-effective resource types: Choose the resource types that fit the needs of your workload optimally.
3. Leverage auto-scaling capabilities: Scale up or down automatically based on demand, thereby minimizing costs.
4. Utilize free services: Azure offers several free services, such as storage and monitoring tools that can help reduce costs.
5. Use available discounts offered within an EA or through the RI model: Take advantage of discounts provided through Enterprise Agreements or discount programs for reserved instances to save substantial amounts of money. Effective billing and cost management is essential in any Azure tenant strategy.
With a variety of billing models and cost management tools available within Azure, organizations can optimize their spending while maintaining performance levels for their workloads. By implementing the tips provided above, organizations can achieve significant savings while leveraging cloud technologies for maximum efficiency.
Advanced Topics in an Azure Tenant
Multi-factor authentication (MFA) and Conditional Access Policies in a Tenant
Multi-factor authentication (MFA) is a security mechanism that requires users to provide two or more forms of authentication before accessing a resource. MFA can significantly increase the security of your Azure tenant by requiring users to provide additional credentials beyond just their username and password.
In an Azure tenant, MFA can be enforced using Conditional Access policies, which allow administrators to configure access controls based on specific conditions, such as user location or device type. Conditional Access policies enable you to create more secure access controls for your Azure resources by requiring certain conditions to be met before granting access.
For example, you may want to require MFA for all users accessing your tenant from outside the company network. You can also use Conditional Access policies to specify which applications are allowed or blocked for specific groups of users.
Azure AD Premium includes advanced features for MFA and Conditional Access policies, including custom controls based on risk assessments and integration with third-party identity providers. By using these advanced features, you can create highly secure access controls that protect your data and resources from unauthorized access.
Integration with Other Microsoft Services such as Office 365, Dynamics 365, etc.
Azure Tenant integrates seamlessly with other Microsoft services such as Office 365, Dynamics 365, SharePoint Online, and more. This integration allows you to manage your resources across different platforms from a single location. For example, if you’re using Office 365 for email and document collaboration within your organization, you can easily manage user accounts and licenses through the same Azure portal that you use for managing your Azure resources.
Similarly, if you’re using Dynamics 365 for customer relationship management (CRM), you can authenticate users with the same credentials used for accessing other Azure services. Integration with other Microsoft services also helps simplify identity management and access control.
By using Azure AD as the identity provider for Office 365, Dynamics 365, and other Microsoft services, you can enforce consistent access policies and reduce the risk of unauthorized access. Azure Tenant also provides integration with third-party services through Azure Active Directory (AD) Application Proxy.
This feature allows you to securely publish on-premises web applications for remote access without requiring a VPN connection. By using Azure AD Application Proxy, you can extend the reach of your applications to external users while maintaining security and compliance.
Overall, integration with other Microsoft services is a powerful feature that enables you to manage your resources more efficiently and securely. By leveraging the full capabilities of Azure Tenant, you can create a comprehensive solution that meets the needs of your organization.
Conclusion
Understanding and managing your Azure tenant is crucial for the success of your cloud environment. By having a clear understanding of what an Azure tenant is and how it relates to other Azure components, you can ensure that you are managing your resources in the most efficient way possible.
Recap on the importance of understanding and managing your azure tenant
An Azure tenant is a fundamental component for any organization using Microsoft’s cloud services. It provides a secure and isolated environment for managing resources such as virtual machines, storage accounts, and databases.
Proper management of an Azure tenant can lead to cost savings, improved security, and increased productivity. Creating an Azure tenant requires careful planning to ensure that it meets the specific needs of your organization.
The management portal provides powerful tools for managing users, roles, and access to resources within your tenant. Additionally, implementing security features such as multi-factor authentication (MFA) and conditional access policies can greatly improve the overall security posture of your environment.
Billing and cost management within an Azure tenant is also an important consideration. Understanding the different billing models available and utilizing cost optimization tools can help ensure that you are only paying for what you need.
Final thoughts on the topic
The world of cloud computing is constantly evolving, with new features and services being added all the time. As such, it’s important to stay up-to-date with best practices for managing your cloud environment. By continually monitoring your Azure tenant’s resource usage patterns, optimizing costs where possible, implementing robust security measures, regularly reviewing access controls, maintaining user roles appropriately and staying informed about current trends; you will be able to maximize its potential while minimizing risk exposure associated with cloud service operations in today’s increasing threat landscape from cyber-attacks originating from many sources around the world’s digital domain.
Ultimately, the success of your Azure tenant depends on good planning and effective management. By following best practices and staying informed, you can ensure that your organization is making the most of Microsoft’s cloud services, both today and in the future.

by Mark | May 2, 2023 | Azure, Azure Blobs, Azure Disks, Azure FIles, Azure Queues, Azure Tables, Azure VM Deployment, Cloud Computing
Introduction to Azure Subscriptions
Azure Subscriptions are a key component of Microsoft Azure’s cloud platform, as they form the foundation for managing and organizing resources in the Azure environment. In essence, an Azure Subscription is a logical container for resources that are deployed within an Azure account. Each subscription acts as both a billing and access control boundary, ensuring that resources are accurately accounted for and that users have the appropriate permissions to interact with them. This article will delve into the different types of Azure Subscriptions, their benefits, and how they fit into the broader Azure hierarchy. Additionally, we will explore best practices for managing multiple subscriptions to optimize cloud operations and maximize the return on your Azure investment.
Types of Azure Subscriptions
There are several types of Azure Subscriptions available, catering to the diverse needs of individuals, small businesses, and large enterprises. Let’s explore some of the most common subscription types:
Free Trial
The Free Trial subscription is designed for users who want to explore and test Azure services before committing to a paid plan. It offers a limited amount of resources and a $200 credit to use within the first 30 days.
Pay-as-you-go
This subscription model is designed for individuals or organizations that prefer to pay for resources as they consume them. It offers flexibility in terms of resource allocation and billing, allowing users to scale up or down based on their needs without any long-term commitment. Learn more about Azure’s pay-as-you-go pricing.
Enterprise Agreement
Enterprise Agreements are suitable for large organizations with extensive cloud requirements. They offer volume discounts, flexible payment options, and an extended range of support and management features. EA customers also benefit from a dedicated account team and additional resources to help optimize their cloud usage. To know more, visit Microsoft’s Enterprise Agreement page.
Cloud Solution Provider (CSP)
The CSP program enables Microsoft partners to resell Azure services to their customers. This subscription type is ideal for small and medium-sized businesses looking to leverage the expertise of a Microsoft partner to manage their cloud infrastructure. Learn more about the Microsoft Customer Agreement.
Azure Subscription Benefits
Azure subscriptions provide a number of benefits to users who want to use Microsoft’s cloud computing platform. Some of the key benefits of Azure subscriptions include:
Access to a wide range of services: Azure offers a comprehensive range of services that enable users to build, deploy, and manage applications and infrastructure on the cloud. With an Azure subscription, users can access these services and choose the ones that best meet their needs.
Scalability: Azure offers scalable infrastructure that allows users to quickly and easily scale up or down their resources as needed. This can help businesses and organizations to save money by only paying for the resources they need at any given time.
Cost-effective pricing: Azure offers a range of pricing options that can help users to save money on their cloud computing costs. For example, users can choose to pay only for the resources they use, or they can opt for a flat-rate pricing plan that provides predictable costs.
Security: Azure is designed with security in mind and offers a range of tools and features to help users secure their applications and data on the cloud. This includes features such as identity and access management, encryption, and threat detection.
Integration with other Microsoft services: Azure integrates seamlessly with other Microsoft services, such as Office 365 and Dynamics 365. This can help users to streamline their workflows and improve productivity.
Support: Azure offers a range of support options, including community support, technical support, and customer support. This can help users to get the help they need when they need it, whether they are experienced developers or new to cloud computing.
In addition to the benefits mentioned above, Azure subscriptions also offer several features that can help users with resource organization, access control, billing management, and policy enforcement. Here is a brief overview of these features:
Resource Organization: With Azure subscriptions, users can organize their cloud resources using groups, tags, and other metadata. This makes it easy to manage and monitor resources across multiple subscriptions, regions, and departments.
Access Control: Azure subscriptions provide robust access control features that allow users to control who can access their resources and what they can do with them. This includes role-based access control (RBAC), which enables users to assign roles to users or groups and limit their permissions accordingly.
Billing Management: Azure subscriptions offer a range of billing and cost management tools that enable users to track their cloud spending and optimize their costs. This includes features such as cost analysis, budget alerts, and usage reports.
Policy Enforcement: Azure subscriptions enable users to enforce policies that govern resource usage and compliance. This includes Azure Policy, which allows users to define and enforce policies across their cloud environment, and Azure Security Center, which provides security recommendations and alerts based on best practices and compliance requirements.
Overall, Azure subscriptions provide a powerful platform for building and managing cloud applications and infrastructure. With its wide range of services, scalability, cost-effectiveness, security, and support, Azure subscriptions can help users to achieve their cloud computing goals with ease and efficiency.
Subscription Limitations and Quotas
Azure Subscriptions have certain limitations and quotas on the number of resources and services that can be used. These limits are in place to prevent abuse and to ensure fair usage across all users. However, if your organization requires higher limits, you can request an increase through the Azure portal.
Subscription Cost Management
Effectively managing costs in Azure is essential to avoid unexpected charges and to optimize resource usage. Here are some tools and strategies to help you manage costs:
Azure Cost Management Tools
Azure Cost Management Tools allow you to monitor, analyze, and optimize your Azure spending. These tools provide insights into your resource usage, helping you identify areas for cost savings and optimization.
Budgets and Alerts
Creating budgets and setting up alerts can help you stay on top of your Azure spending. Azure Budgets allow you to set spending limits for your resources, while Azure Alerts notify you when you’re nearing or exceeding your budget.
Azure Subscription Limits
Resource Limits: Azure subscriptions have limits on the number of resources that users can deploy. This includes limits on the number of virtual machines, storage accounts, and other resources that can be created within a subscription. These limits can vary depending on the subscription tier and the region where the resources are deployed.
Scale Limits: While Azure is designed to be highly scalable, there are still limits on the amount of scaling that can be done for certain resources. For example, there are limits on the number of virtual machines that can be added to a virtual machine scale set or the number of instances that can be added to an Azure Kubernetes Service (AKS) cluster.
Performance Limits: Azure subscriptions have limits on the amount of performance that can be achieved for certain resources. For example, there are limits on the amount of IOPS (Input/Output Operations Per Second) that can be achieved for a storage account or the maximum throughput that can be achieved for a virtual network gateway.
API Limits: Azure subscriptions have limits on the number of API calls that can be made to certain services. These limits are designed to prevent overloading the services and to ensure fair usage by all users.
Cost Limits: While Azure offers cost-effective pricing options, users should be aware of the potential for unexpected costs. Azure subscriptions have limits on the amount of spending that can be done within a given time period, and users should monitor their usage carefully to avoid exceeding these limits.
| Resource Type |
Limit |
Virtual Machines
|
Up to 10,000 per subscription |
Storage Accounts
|
Up to 250 per subscription |
Virtual Network
|
Up to 500 per subscription |
Load Balancers
|
Up to 200 per subscription |
Public IP Addresses
|
Up to 10,000 per subscription |
Virtual Network Gateway
|
Up to 1 per subscription |
ExpressRoute Circuits
|
Up to 10 per subscription |
AKS Cluster Nodes
|
Up to 5,000 per subscription |
App Service Plans
|
Up to 100 per subscription |
SQL Databases
|
Up to 30,000 per subscription |
Please note that these limits are subject to change and may vary depending on the specific subscription tier and region where the resources are deployed. Users should consult the Azure documentation for the most up-to-date information on resource limits.
These limits can be increased by contacting Azure support, but it is important to be aware of these constraints when planning your Azure infrastructure.
Migrating Resources Between Subscriptions
In some cases, you may need to migrate resources between Azure Subscriptions. This could be due to organizational changes or to consolidate resources for better management. Azure provides tools and documentation to help you plan and execute these migrations with minimal disruption to your services.
Azure Subscription vs. Azure Management Groups
Azure Subscriptions and Azure Management Groups both serve as organizational units for managing resources in Azure. While Azure Subscriptions act as billing and access control boundaries, Azure Management Groups provide a higher level of organization, allowing you to manage multiple subscriptions within your organization.
Azure Management Groups can be used to apply policies, assign access permissions, and organize subscriptions hierarchically. This can help you manage resources more effectively across multiple subscriptions.
Managing Multiple Azure Subscriptions
In organizations with multiple Azure Subscriptions, it’s essential to manage them effectively to ensure consistency, compliance, and cost control across your cloud infrastructure. Here are some strategies for managing multiple Azure Subscriptions:
Use Azure Management Groups
Azure Management Groups help you organize and manage multiple subscriptions hierarchically. By creating a management group hierarchy, you can apply policies, assign access permissions, and manage resources consistently across all subscriptions within the hierarchy.
Implement Azure Policies
Azure Policies allow you to enforce compliance with your organization’s requirements and best practices across all subscriptions. By defining and applying policies at the management group level, you can ensure consistency and compliance across your entire cloud infrastructure.
Consolidate Billing
Consolidate billing across multiple subscriptions by using a single billing account or Enterprise Agreement (EA). This can simplify your billing process and provide a unified view of your organization’s cloud spending.
Implement Cross-Subscription Resource Management
Leverage Azure services like Azure Lighthouse to manage resources across multiple subscriptions. This enables you to perform cross-subscription management tasks, such as monitoring, security, and automation, from a single interface.
Monitor and Optimize Resource Usage Across Subscriptions
Regularly monitor your resource usage across all subscriptions to identify areas for cost savings and optimization. You can use Azure Cost Management tools and reports to gain insights into your spending and resource usage across multiple subscriptions.
Understanding Azure Subscription Hierarchies
Azure Subscription hierarchies play a crucial role in organizing and managing resources across an organization. At the top level, there is the Azure account, which is associated with a unique email address and can have multiple subscriptions. Each subscription can contain multiple resource groups, which are logical containers for resources that are deployed within a subscription. Resource groups help to organize and manage resources based on their lifecycle and their relationship to each other.
The Azure hierarchy is a way of organizing resources within an Azure subscription. It consists of four levels:
Management Group: The highest level of the hierarchy is the management group, which is used to manage policies and access across multiple subscriptions. A management group can contain subscriptions, other management groups, and Azure Active Directory (AD) groups.
Subscription: The next level down is the subscription, which is the basic unit of management in Azure. Each subscription has its own billing, policies, and access controls. Resources are created and managed within a subscription.
Resource Group: Within each subscription, resources can be organized into resource groups. A resource group is a logical container for resources that share common attributes, such as region, lifecycle, or security. Resources in a resource group can be managed collectively using policies, access controls, and tags.
Resource: The lowest level of the hierarchy is the resource itself. A resource is a manageable item, such as a virtual machine, storage account, or network interface. Resources can be created, updated, and deleted within a subscription and can be organized into resource groups.
The Azure hierarchy provides a flexible and scalable way to manage resources within an Azure environment. By organizing resources into logical containers, users can apply policies and access controls at a granular level, while still maintaining a high-level view of the entire Azure landscape. This can help to improve security, compliance, and efficiency when managing cloud resources.
Role-Based Access Control in Azure Subscriptions
Role-Based Access Control (RBAC) is a critical aspect of managing Azure Subscriptions. RBAC enables administrators to grant granular permissions to users, groups, or applications, ensuring that they have the necessary access to resources within a subscription. RBAC roles can be assigned at various levels, including the subscription level, the resource group level, or the individual resource level. This allows organizations to implement a least-privilege model, granting users only the access they need to perform their tasks.
FAQs
What is an Azure Subscription?
An Azure Subscription is a logical container for resources that are deployed within an Azure account. It acts as both a billing and access control boundary.
What are the different types of Azure Subscriptions?
The main types of Azure Subscriptions are Pay-As-You-Go, Enterprise Agreements, and Cloud Solution Provider.
What is the difference between Azure Subscriptions and Azure Resource Groups?
Azure Subscriptions act as a billing and access control boundary, while Azure Resource Groups are logical containers for resources based on their lifecycle and relationship to each other.
How can I manage multiple Azure Subscriptions?
Use Azure Management Groups, implement Azure Policies, consolidate billing, implement cross-subscription resource management, and monitor and optimize resource usage across subscriptions.
What are the limits associated with Azure Subscriptions?
Some notable limits include a maximum of 50 virtual networks, 250 storage accounts, and 10,000 virtual machines per subscription. These limits can
be increased by contacting Azure support, but it is important to be aware of these constraints when planning your Azure infrastructure.
What is the role of Role-Based Access Control (RBAC) in Azure Subscriptions?
RBAC is a critical aspect of managing Azure Subscriptions as it enables administrators to grant granular permissions to users, groups, or applications, ensuring that they have the necessary access to resources within a subscription.
How do Azure Management Groups help in managing multiple Azure Subscriptions?
Azure Management Groups provide a way to organize subscriptions into a hierarchy, making it easier to manage access control, policies, and compliance across multiple subscriptions.
How can I monitor and optimize resource usage across multiple Azure Subscriptions?
Use Azure Cost Management and Azure Monitor to track resource usage and optimize costs across all subscriptions in the organization.
What are some best practices for managing multiple Azure Subscriptions?
Some best practices include using Azure Management Groups, implementing Azure Policies, consolidating billing, implementing cross-subscription resource management, and monitoring and optimizing resource usage across subscriptions.
Can I increase the limits associated with my Azure Subscription?
Yes, you can request an increase in limits by contacting Azure support. However, it is important to plan your Azure infrastructure with the existing limits in mind and consider the impact of increased limits on your organization’s overall cloud strategy.
Conclusion
Understanding and effectively managing Azure Subscriptions is crucial for organizations using the Azure cloud platform. By implementing best practices for subscription management, organizing resources, and applying consistent policies across your infrastructure, you can optimize your cloud operations and make the most of your Azure investment. Regularly monitoring and optimizing resource usage across all subscriptions will ensure you are using Azure services efficiently and cost-effectively.

by Mark | Apr 27, 2023 | Azure, Azure Blobs
Azure Blob Storage Monitoring: A Comprehensive Guide
Introduction to Azure Blob Storage Monitoring
Azure Blob Storage is a cloud-based storage service provided by Microsoft Azure that allows users to store vast amounts of unstructured data like documents, images, videos, and more. Monitoring Azure Blob Storage is crucial for ensuring optimal performance, data security, and efficient cost management. In this comprehensive guide, we will explore the importance of monitoring Azure Blob Storage, various tools and techniques for monitoring, and how the Cloud Storage Manager can help you effectively manage your storage environment.
Importance of Monitoring Azure Blob Storage
Performance Optimization
Monitoring Azure Blob Storage ensures that your storage environment operates at peak performance. By identifying and addressing performance bottlenecks, you can optimize data access and improve the overall user experience.
Data Security
Azure Blob Storage monitoring enables you to identify potential security risks and implement appropriate measures to protect your data. This includes securing access to your storage account, encrypting data at rest and in transit, and integrating with Azure Active Directory for centralized identity management.
Cost Management
Effectively monitoring your Azure Blob Storage allows you to track your storage consumption and growth trends. By identifying areas for optimization, you can better control costs and allocate resources efficiently.
Monitoring Tools and Techniques
Azure Portal
The Azure Portal provides a comprehensive dashboard for monitoring your Azure Blob Storage. You can view metrics like data ingress, egress, and latency, as well as configure alerts for specific events.
Azure Monitor
Azure Monitor is a built-in monitoring service that collects and analyzes performance and diagnostic data from your Azure Blob Storage. It provides in-depth insights and allows you to set up custom alerts based on predefined metrics or custom queries.
Azure Storage Explorer
Azure Storage Explorer is a free, standalone application that enables you to manage and monitor your Azure Blob Storage accounts from a single interface. You can easily view and modify your storage account properties, access keys, and container-level permissions.
Cloud Storage Manager: An Effective Solution
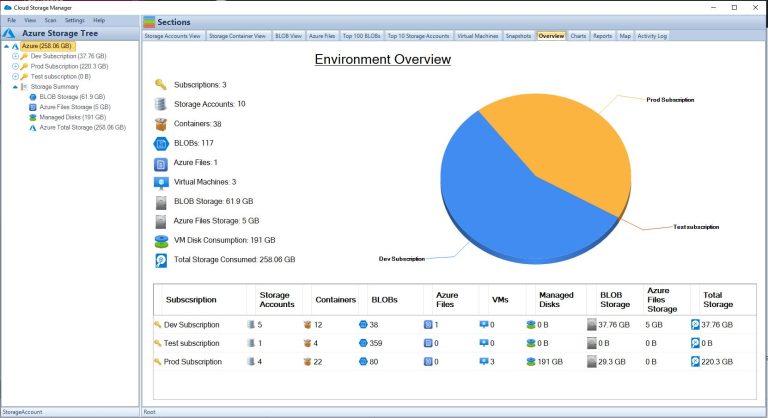
Insights into Storage Consumption
Our software, Cloud Storage Manager, provides you with valuable insights into your Azure Blob and file storage consumption. By tracking your storage usage, you can identify patterns and trends, enabling you to make informed decisions about your storage needs.
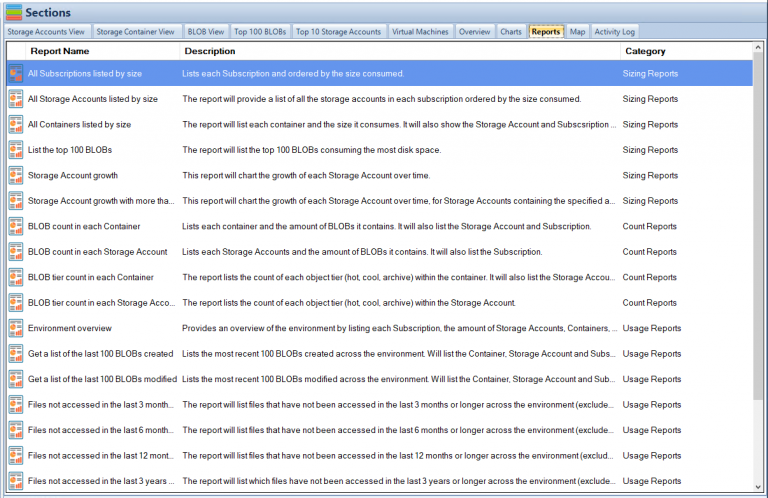
Storage Usage and Growth Reports
Cloud Storage Manager generates detailed reports on storage usage and growth trends. These reports help you understand your storage environment better, identify potential issues, and optimize your storage strategy.
Cost-saving Tips
Cloud Storage Manager helps you save money on your Azure Storage by providing cost-saving tips and recommendations. By implementing these suggestions, you can optimize your storage environment and reduce your overall expenses.
Security Best Practices
Securing Azure Blob Storage
Securing your Azure Blob Storage is crucial to protecting your data from unauthorized access and potential threats. You can follow best practices, such as implementing access control policies, using Shared Access Signatures, and enabling Azure Private Link. Learn more about securing Azure Blob Storage here.
Azure Storage Service Encryption
Azure Storage Service Encryption (SSE) automatically encrypts your data at rest using Microsoft-managed keys or customer-managed keys. This ensures that your data is secure, even if an unauthorized user gains access to the storage account. Learn more about Azure Storage Service Encryption here.
Azure Active Directory Integration
Integrating Azure Blob Storage with Azure Active Directory (AD) enables you to centralize identity management and enforce role-based access control for your storage accounts. Learn more about connecting Azure Storage accounts to Active Directory here.
Performance Optimization Techniques
Azure Blob Storage Tiers
Azure Blob Storage offers three performance tiers – Hot, Cool, and Archive – to meet your storage needs. By selecting the appropriate tier for your data, you can optimize performance and reduce storage costs. Learn more about Azure Blob Storage tiers here.
Azure Data Lake vs. Blob Storage
Azure Data Lake Storage and Azure Blob Storage are both suitable for storing large volumes of unstructured data. Understanding the differences between these services can help you make the right choice for your data storage needs. Learn more about Azure Data Lake vs. Blob Storage here.
Azure File Sync
Azure File Sync allows you to synchronize your on-premises file servers with Azure Files, providing a centralized, cloud-based storage solution. This can improve performance by offloading your on-premises storage infrastructure and leveraging Azure’s scalability. Learn more about Azure File Sync here.
Cost Management Strategies
Azure Blob Storage Pricing
Understanding Azure Blob Storage pricing is essential for managing your storage costs effectively. By analyzing your storage usage patterns and selecting the right performance tiers, redundancy options, and data transfer rates, you can minimize your storage expenses. Learn more about Azure Blob Storage pricing here.
Azure Storage Lifecycle Policies
Azure Storage Lifecycle Policies allow you to automate the transition of your data between different performance tiers and deletion of old or unused data. Implementing lifecycle policies can help you optimize storage costs and ensure that you’re only paying for the storage you need. Learn more about creating Azure Storage Lifecycle policies here.
Reviewing Storage Usage
Regularly reviewing your storage usage can help you identify areas for optimization and cost reduction. Cloud Storage Manager can assist you in tracking your storage consumption and providing actionable insights to improve your storage environment.
Data Redundancy and Disaster Recovery
Azure Data Redundancy Options
Azure offers various data redundancy options, such as Locally Redundant Storage (LRS), Zone-Redundant Storage (ZRS), Geo-Redundant Storage (GRS), and Read-Access Geo-Redundant Storage (RA-GRS). These options ensure data durability and high availability, even in the event of a data center failure. Selecting the right redundancy option for your data can help you achieve a balance between cost and reliability. Learn more about Azure Data Redundancy options here.
Azure Fault and Update Domains
Azure Fault Domains and Update Domains are designed to improve the resiliency of your storage infrastructure. Fault Domains protect against hardware failures, while Update Domains ensure that updates do not impact your entire storage environment simultaneously. Learn more about Azure Fault and Update Domains here.
Integration with Other Azure Services
Azure Resource Groups
Azure Resource Groups enable you to organize and manage resources that belong to a specific project or application. By organizing your Azure Blob Storage accounts within resource groups, you can simplify management and ensure that resources share the same lifecycle and permissions. Learn more about Azure Resource Groups here.
Azure SFTP with Storage
Azure SFTP (Secure File Transfer Protocol) with Storage is an integrated solution that allows you to securely transfer files to and from your Azure Blob Storage accounts. This enables you to leverage the security and performance benefits of Azure for your file transfers. Learn more about Azure SFTP with Storage here.
Managing Azure Blob Storage Metadata
Azure Blob Storage Metadata Overview
Azure Blob Storage metadata consists of key-value pairs that describe your blobs and containers. This metadata can help you manage and organize your storage environment more effectively.
Azure Blob Storage Metadata Best Practices
Following metadata best practices can help you optimize your storage environment and improve data management. These practices include using consistent naming conventions, implementing versioning, and leveraging custom metadata properties.
Understanding Azure Blob Storage Types
Block Blobs
Block blobs are designed for storing large volumes of unstructured data, such as text or binary data. They are optimized for streaming and can handle up to 4.75 TB of data per blob. Learn more about block blobs here.
Append Blobs
Append blobs are ideal for storing log files, as they allow you to append new data to the end of the blob without modifying existing data. Append blobs can handle up to 195 GB of data per blob. Learn more about append blobs here.
Page Blobs
Page blobs are designed for storing random access files, such as virtual hard disks (VHDs) used by Azure Virtual Machines. They support up to 8 TB of data per blob and offer low latency and high throughput. Learn more about page blobs here.
Migrating Data to Azure Blob Storage
Using AzCopy with Azure Storage
AzCopy is a command-line utility that enables you to copy and transfer data between your on-premises storage and Azure Blob Storage. It supports various data transfer scenarios, including parallel uploads and downloads, and can significantly speed up the migration process. Learn more about using AzCopy with Azure Storage here.
Migrating On-premises File Shares
Migrating your on-premises file shares to Azure Blob Storage can help you leverage the benefits of cloud-based storage, such as improved scalability, performance, and cost-efficiency. You can use tools like Azure File Sync, Azure Import/Export service, and AzCopy to facilitate the migration process. Learn more about migrating on-premises file shares here.
Comparing Azure Blob Storage with Competitors
Azure Blob Storage vs. Google Cloud Storage
Both Azure Blob Storage and Google Cloud Storage offer scalable, cost-effective solutions for storing unstructured data in the cloud. However, they differ in terms of features, pricing, and integration with other cloud services. Comparing these storage options can help you choose the best solution for your specific needs. Learn more about Azure Blob Storage vs. Google Cloud Storage here.
Azure Blob Storage vs. AWS S3
Azure Blob Storage and Amazon Web Services (AWS) Simple Storage Service (S3) are two popular cloud storage options for storing unstructured data. Both offer a wide range of features, including data redundancy, security, and performance optimization. Comparing Azure Blob Storage and AWS S3 can help you identify the best cloud storage solution for your organization. Learn more about Azure Blob Storage vs. AWS S3 here.
Conclusion
Monitoring Azure Blob Storage is essential for optimizing performance, ensuring data security, and effectively managing costs. By leveraging the tools and techniques outlined in this comprehensive guide, you can gain valuable insights into your storage environment and make informed decisions about your storage strategy. Additionally, our software, Cloud Storage Manager, can help you effectively manage your Azure Blob Storage, providing valuable insights and recommendations to optimize your storage environment.
FAQs
Q: How do I monitor Azure Blob Storage usage?
A: You can monitor Azure Blob Storage usage using the Azure Portal, Azure Monitor, Azure Storage Explorer, or third-party tools. Additionally, Cloud Storage Manager can help you track storage consumption and provide valuable insights.
Q: How do I ensure the security of my Azure Blob Storage data?
A: Securing your Azure Blob Storage data involves implementing access control policies, using Shared Access Signatures, enabling Azure Private Link, and integrating with Azure Active Directory. Azure Storage Service Encryption can also help protect your data at rest.
Q: How do I optimize the performance of my Azure Blob Storage?
A: Performance optimization techniques for Azure Blob Storage include selecting the appropriate performance tiers (Hot, Cool, or Archive), understanding the differences between Azure Data Lake Storage and Azure Blob Storage, and leveraging Azure File Sync.
Q: How do I manage costs for my Azure Blob Storage?
A: To manage costs for Azure Blob Storage, you need to understand the pricing structure, implement Azure Storage Lifecycle Policies, and regularly review your storage usage. Cloud Storage Manager can help you track consumption and provide cost-saving recommendations.

by Mark | Apr 26, 2023 | Azure, Azure VM Deployment, Cloud Computing
Introduction to Azure Virtual Machines
Microsoft Azure, one of the leading cloud computing platforms, provides various services that enable businesses to run and manage applications efficiently. Among these services are virtual machines (VMs), which offer scalable computing resources to accommodate the diverse requirements of modern applications. In this article, we will delve into the different Azure VM types available and guide you on how to select the most suitable option for your specific needs.
Azure VMs play a crucial role in today’s technology landscape, as more organizations are shifting towards cloud-based solutions. These VMs allow businesses to provision and manage virtual machines on-demand, making it easier to scale resources according to changing requirements. Moreover, Azure VMs provide a secure and reliable environment for running applications, with various tools and features available for monitoring, management, and optimization. By understanding the various VM types and their use cases, you can make informed decisions on which VM type to deploy for your workloads, ensuring optimal performance and cost-efficiency.
Understanding VM Series and Sizes
Azure provides an extensive range of VM series and sizes to cater to different workloads and requirements. Each series is tailored for specific use cases, with various sizes available to offer granular control over the computing resources. This wide selection ensures that you can find a VM type that matches your workload requirements perfectly. In this section, we will explore the different VM series available in Azure and discuss their primary use cases.
General Purpose VMs
General Purpose VMs cater to a wide range of workloads, including web servers, application servers, and small to medium-sized databases. These VMs provide a balanced ratio of compute, memory, and storage resources, making them suitable for various applications that do not have extreme resource requirements. The most common general purpose VM series in Azure include the B, D, and Dv2 series.
The B series, for example, is designed for workloads that require low to moderate CPU performance but can benefit from the ability to burst CPU usage during peak times. This series is ideal for test environments, small databases, and web servers with low to medium traffic. On the other hand, the D and Dv2 series offer a higher baseline performance compared to the B series, with more powerful processors and faster storage. These VM types are suitable for applications that require consistent performance and can handle larger workloads.
Compute Optimized VMs
Compute Optimized VMs are designed for compute-intensive applications that demand a higher CPU-to-memory ratio. These VMs are ideal for high-performance web servers, scientific simulations, and batch processing tasks. In Azure, the F and Fv2 series are examples of compute-optimized VMs.
The F series provides a high-performance Intel Xeon processor, with a higher CPU-to-memory ratio than the General Purpose VMs. This makes the F series suitable for applications that require more processing power but do not need as much memory or storage. The Fv2 series, on the other hand, is the latest generation of Compute Optimized VMs, offering even better performance with the latest Intel Xeon Scalable processors. These VMs are perfect for the most demanding compute-intensive workloads, providing exceptional performance and scalability.
Memory Optimized VMs
Memory Optimized VMs are specifically designed for applications that require large amounts of memory, such as in-memory databases, data analytics, and real-time processing. These VMs offer a higher memory-to-CPU ratio compared to general-purpose VMs, ensuring that your memory-intensive workloads can run smoothly and efficiently. Examples of memory-optimized VM series in Azure include the E and M series.
The E series provides a balance between memory and compute resources, with ample memory capacity to handle large datasets and demanding applications. This series is ideal for applications like SAP HANA, SQL Server, and other in-memory databases that require high memory capacity and consistent performance. The M series, on the other hand, offers the highest memory capacity among Azure VMs, making it suitable for the most demanding memory-intensive workloads. With the M series, you can run large-scale in-memory databases, high-performance analytics, and other applications that need massive amounts of memory to perform optimally.
Storage Optimized VMs
Storage Optimized VMs are tailored for workloads that require high disk throughput and low-latency storage access, such as big data analytics, NoSQL databases, and data warehousing. These VMs are designed to provide fast and efficient storage access, ensuring that your data-intensive applications can process and analyze large amounts of data quickly. The L series is an example of storage-optimized VMs in Azure.
The L series VMs offer high disk throughput and low-latency storage access, making them perfect for applications that involve heavy read and write operations. With the L series, you can run big data workloads, NoSQL databases, and data warehousing solutions efficiently, ensuring that your data processing tasks are completed quickly and without delays.
GPU Optimized VMs
GPU Optimized VMs are designed for workloads that require graphics processing units (GPUs) for parallel processing and high-performance computing, such as deep learning, rendering, and video processing. These VMs offer powerful GPUs that can handle complex calculations and graphics processing tasks, providing exceptional performance for GPU-intensive workloads. The NV and NC series are examples of GPU-optimized VMs in Azure.
The NV series is optimized for visualization and rendering workloads, offering powerful NVIDIA GPUs that can handle graphics-intensive tasks such as 3D modeling and video editing. On the other hand, the NC series is optimized for high-performance computing and deep learning, with powerful NVIDIA Tesla GPUs that can handle complex calculations and parallel processing tasks. With GPU Optimized VMs, you can run GPU-intensive workloads efficiently, ensuring that your applications have the processing power they need to perform at their best.
High Performance Computing VMs
High Performance Computing (HPC) VMs are designed for the most demanding workloads, such as simulations, modeling, and scientific research. These VMs offer the highest level of compute power and network performance, ensuring that your HPC workloads can run smoothly and efficiently. The H and HB series are examples of HPC VMs in Azure.
The H series VMs are optimized for high-performance computing, offering powerful Intel Xeon processors and a high-speed InfiniBand network for low-latency communication between VMs. This makes the H series suitable for running complex simulations, modeling tasks, and other HPC workloads that require high levels of compute power and network performance. The HB series, on the other hand, is designed for even more demanding HPC workloads, offering AMD EPYC processors and a high-speed InfiniBand network for exceptional performance and scalability.
Choosing the Right Azure VM Type for Your Needs
Selecting the appropriate VM type for your workload is crucial to ensure optimal performance and cost efficiency. To choose the right VM type, you should consider the following factors:
Assessing Your Workload Requirements
Analyze the specific requirements of your workload, such as the amount of CPU, memory, storage, and GPU resources needed. Determine if your application can benefit from high-performance computing capabilities or if it has specific storage requirements. By understanding your workload’s needs, you can narrow down the list of suitable VM types and make a more informed decision.
Evaluating Cost and Performance
Compare the cost and performance of different VM types that meet your workload requirements. Consider the pricing model, such as pay-as-you-go or reserved instances, to find the most cost-effective option. Keep in mind that selecting a VM with more resources than needed might result in higher costs, while choosing a VM with insufficient resources can negatively impact performance. By evaluating cost and performance, you can strike the right balance between affordability and performance for your specific workloads.
Scalability and Flexibility Considerations
Choose a VM type that can scale with your application’s growth and adapt to changing requirements. Azure offers features like autoscaling and VM resizing to help you manage your infrastructure efficiently. As your workloads grow or evolve, it is essential to have a VM type that can accommodate these changes without causing significant disruptions to your operations. By considering scalability and flexibility, you can ensure that your VM infrastructure remains agile and responsive to your organization’s needs.
Best Practices for Deploying Azure VMs
To maximize the benefits of Azure VMs, it is essential to follow best practices for deployment and management. By adhering to these practices, you can ensure that your VM infrastructure remains efficient, secure, and cost-effective.
Monitoring and Management
Monitor your VMs to ensure they are performing optimally and to detect potential issues. Use Azure Monitor, Log Analytics, and other management tools to gain insights into your VMs’ performance, health, and usage patterns. By actively monitoring your VMs, you can identify and address performance issues before they become critical, ensuring that your workloads continue to run smoothly and efficiently.
Security and Compliance
Secure your VMs by implementing strong access controls, encrypting data at rest and in transit, and regularly updating your software. Additionally, ensure that your VMs meet any compliance requirements specific to your industry or organization. By maintaining a robust security posture and adhering to compliance standards, you can protect your VM infrastructure and sensitive data from unauthorized access and potential breaches.
Optimizing for Cost Efficiency
Monitor and optimize your VM usage to minimize costs. Use features like Azure Cost Management, reserved instances, and Azure Hybrid Benefit to save money and manage your cloud spending effectively. By keeping track of your VM usage and optimizing your resource allocation, you can reduce costs without compromising performance or reliability.
Migrate your Azure VM back to your On Premise Environment.
Migrate your Azure VMs back to your on-premise environment with a few clicks, using Carbon. Carbon automates the replication, conversion, and setup of your Azure VMs on either your VMWare of Hyper-V Environment.
Azure VM Types FAQs
What is the main difference between General Purpose and Compute Optimized VMs?
General Purpose VMs offer a balanced ratio of compute, memory, and storage resources, while Compute Optimized VMs have a higher CPU-to-memory ratio, making them more suitable for compute-intensive workloads.
Can I change the VM type after deployment?
Yes, you can resize your VMs after deployment by stopping the VM, changing the VM type, and restarting the VM. However, consider possible downtime and data migration when resizing.
What is Azure Hybrid Benefit?
Azure Hybrid Benefit is a cost-saving feature that allows customers with existing Windows Server and SQL Server licenses to use their on-premises licenses in Azure, reducing the cost of running VMs.
How do I monitor the performance of my Azure VMs?
You can use Azure Monitor, Log Analytics, and other management tools to monitor the performance, health, and usage patterns of your VMs.
What are the best practices for securing Azure VMs?
Best practices for securing Azure VMs include implementing strong access controls, encrypting data at rest and in transit, regularly updating software, and ensuring compliance with industry-specific or organizational requirements.
Azure VM Types FAQs
| VM Type |
Series |
Description |
Use Cases |
| General Purpose |
B Series |
Balanced CPU-to-memory ratio, burstable CPU performance |
Test environments, small databases, low to medium traffic web servers |
| General Purpose |
D Series |
Higher baseline performance, powerful processors, faster storage |
Consistent performance, application servers, medium-sized databases |
| General Purpose |
Dv2 Series |
Improved performance over D series, powerful processors, faster storage |
Consistent performance, application servers, medium-sized databases |
| Compute Optimized |
F Series |
High-performance Intel Xeon processor, high CPU-to-memory ratio |
High-performance web servers, scientific simulations, batch processing |
| Compute Optimized |
Fv2 Series |
Latest generation Compute Optimized VMs, latest Intel Xeon Scalable processors |
High-performance web servers, scientific simulations, batch processing |
| Memory Optimized |
E Series |
Balanced memory and compute resources, high memory capacity |
SAP HANA, SQL Server, other in-memory databases |
| Memory Optimized |
M Series |
Highest memory capacity among Azure VMs |
Large-scale in-memory databases, high-performance analytics |
| Storage Optimized |
L Series |
High disk throughput, low-latency storage access |
Big data analytics, NoSQL databases, data warehousing |
| GPU Optimized |
NV Series |
Optimized for visualization and rendering, NVIDIA GPUs |
3D modeling, video editing, rendering |
| GPU Optimized |
NC Series |
Optimized for high-performance computing and deep learning, NVIDIA Tesla GPUs |
Deep learning, parallel processing, high-performance computing |
| High Performance Computing |
H Series |
Optimized for HPC, powerful Intel Xeon processors, high-speed InfiniBand network |
Simulations, modeling, scientific research |
| High Performance Computing |
HB Series |
Optimized for demanding HPC workloads, AMD EPYC processors, high-speed InfiniBand network |
Simulations, modeling, scientific research |
Please note that this table provides an overview of the different Azure VM types and their general specifications. For more detailed information on each VM series and their specific sizes, please refer to the official Azure documentation.
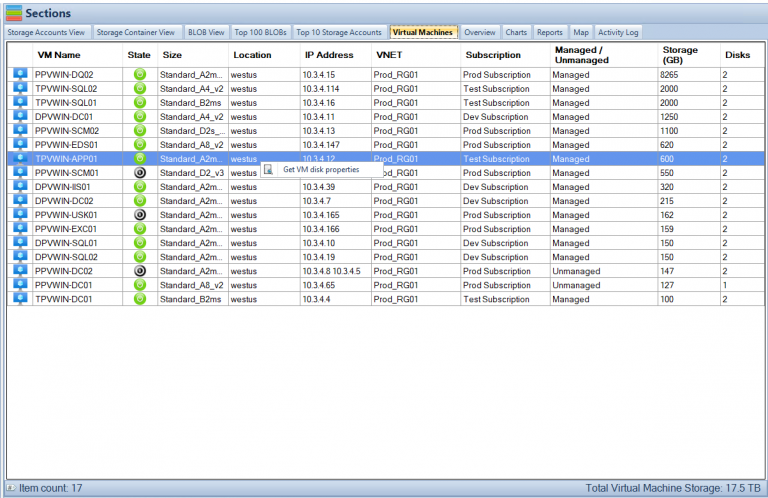
Conclusion
Azure offers a wide range of VM types to meet the diverse needs of modern applications. By understanding the different VM series and sizes, assessing your workload requirements, and following best practices, you can select the right Azure VM type for your application and ensure optimal performance and cost efficiency. As your organization continues to leverage the power of the cloud, the ability to choose the appropriate VM type will be crucial in maintaining efficient and reliable workloads that drive your organization’s success.