SharePoint On-Premise vs SharePoint Online: Which One Is Right for You?
Choosing the right SharePoint deployment model can make or break your productivity, security, and IT budget. In this comprehensive guide, we break down SharePoint On-Premise vs SharePoint Online—comparing features, scalability, cost, security, and maintenance—to help you make the smartest decision for your organization.
What is SharePoint On-Premise?
SharePoint On-Premise is hosted on your organization’s own servers. This version offers full control over security, customization, and compliance. It requires dedicated infrastructure and internal IT management, but allows deep integration with internal systems and legacy apps.
What is SharePoint Online?
SharePoint Online is Microsoft’s cloud-based version included with Microsoft 365. It’s scalable, always updated, and accessible anywhere—perfect for remote teams and organizations looking to reduce infrastructure and management overhead.
Side-by-Side Comparison
Feature
SharePoint On-Premise
SharePoint Online
Hosting
Your data center
Microsoft cloud
Customizations
Full code-level control
Limited by cloud architecture
Security
Fully in-house
Managed by Microsoft
Scalability
Manual scaling
Instant, flexible
Maintenance
Manual updates
Automatic updates
Cost Model
CapEx + OpEx
Subscription (OpEx)
Offline Access
Yes
Yes
Compliance Control
Complete control
Standard compliance templates
Use Case Scenarios
Choose SharePoint On-Premise if:
You need granular control over data and systems
Your organization must meet strict compliance requirements
You require deep customization or legacy integration
Choose SharePoint Online if:
You want lower infrastructure overhead
You support remote/hybrid workforces
You need seamless Microsoft 365 integration
Bonus: Streamline Your SharePoint Storage
Regardless of your deployment choice, managing growing data volumes is a challenge. That’s where Squirrel comes in. Squirrel automatically archives inactive SharePoint documents to secure Azure Blob Storage, reducing costs and improving performance—while maintaining easy access via stub links in the original libraries.
Looking to optimize your SharePoint storage and reduce costs? Contact us today to schedule a Squirrel demo or learn how much you could be saving.
✅ SharePoint On-Premise vs SharePoint Online: Decision Matrix
Here’s a side-by-side decision matrix based on common business needs:
Business Requirement
Prefer On-Premise
Prefer Online
Full Control of Data & Infrastructure
✅ You manage servers and storage
❌ Microsoft manages the infrastructure
Advanced Custom Development Needs
✅ Full-trust solutions allowed
❌ Limited to client-side (SPFx) & Power Platform
Lower Initial Cost
❌ High upfront CapEx
✅ Subscription-based model with lower initial costs
Scalability on Demand
❌ Manual scaling (hardware + config)
✅ Instantly scale with cloud resources
Minimal IT Maintenance Overhead
❌ Requires in-house IT expertise
✅ Microsoft handles updates, patches, backups
Offline Access or Internal Network Preference
✅ Can run in isolated or secure networks
❌ Requires internet connection
Regulatory Compliance (strict data rules)
✅ Choose data center, full audit trail control
✅ Microsoft compliance certifications, though less control
Remote Work & Device Flexibility
❌ VPN often needed
✅ Cloud-native, accessible from any device
Collaboration and Real-Time Co-Authoring
❌ Needs configuration or third-party apps
✅ Built-in real-time collaboration via Office apps
Updates & Feature Enhancements
❌ Manual updates, risk of legacy version usage
✅ Always up to date with latest features and security
Hello, tech aficionados and IT professionals! If you’re in the business of managing digital assets, workflows, or intranets, chances are you’ve crossed paths with SharePoint. But do you ever wonder how this versatile platform has evolved over the years? Or perhaps you’re curious about what future enhancements are on the horizon? Well, buckle up, because we’re about to embark on a comprehensive journey through the fascinating world of SharePoint.
SharePoint Storage Explorer Overview
A Glimpse into the History of SharePoint
The Early Days
Let’s rewind the clock back to 2001. Microsoft released something called “SharePoint Portal Server,” aiming to redefine how organizations manage and share digital content. It was like the first version of a software that you knew was going to change the game, but it was still finding its feet. While it was primarily targeted at document storage and management, the seeds for something grander were already sown.
Milestone Releases
As we fast-forward through time, we encounter multiple milestone releases that have shaped SharePoint into what it is today. SharePoint 2007 introduced enhanced user interfaces and better content management. But the real game-changer was SharePoint 2010. Why? Because it brought along capabilities like Service Applications and Business Connectivity Services, allowing for a more modular and scalable architecture.
What is SharePoint?
Definition and Core Functions
Alright, let’s address the elephant in the room: What exactly is SharePoint? To put it simply, it’s a web-based collaboration platform that integrates with Microsoft Office. But don’t let the simplicity of that definition fool you. SharePoint is a multipurpose tool that serves various roles—document management, intranet portals, collaboration, you name it. Think of it as the Swiss Army knife in your IT toolbox; it has a tool for almost every job you can think of.
Types of SharePoint
SharePoint isn’t a one-size-fits-all solution; it comes in different flavors. There’s SharePoint On-Premises for those who like to keep everything under their own roof. SharePoint Online offers cloud-based services that are highly scalable and flexible. And for organizations that can’t decide between the two, there’s the Hybrid model, which combines the best of both worlds.
SharePoint Storage Explorer Charts
Core Components of SharePoint
Sites
Imagine you’re building a house. You wouldn’t start without laying down a foundation, right? In SharePoint, ‘Sites’ act as that foundation. These are individual websites created within SharePoint that serve as containers for your lists, libraries, and other goodies. They can be customized to fit various needs, from a simple blog page to a full-fledged project management dashboard.
Lists and Libraries
Lists are like the furniture in your SharePoint house—tables, chairs, and shelves where you can place your data. They hold items that can be anything from a row in a table to a complex multi-field form. Libraries, on the other hand, are specialized lists designed specifically for storing files. Think of them as your digital bookshelves.
Workflows
The plumbing and electrical systems in your house need to function smoothly to make life comfortable. Similarly, workflows in SharePoint are the automated sequences that handle the flow of documents and tasks across your organization. They ensure that processes are streamlined, reducing the need for manual intervention.
The Evolution of SharePoint
From Portal Server to Modern SharePoint
SharePoint has undergone a fascinating metamorphosis over the years. Initially focused primarily on content management, it has expanded its wings to incorporate social networking features, business intelligence tools, and more. With each version release, SharePoint has become more intuitive and user-friendly, transforming from a caterpillar into a butterfly.
Introduction of SharePoint Online and Office 365
The advent of cloud computing brought a paradigm shift in SharePoint’s capabilities. SharePoint Online, part of the Office 365 suite, introduced a world of possibilities like real-time collaboration, advanced analytics, and seamless integration with other cloud services.
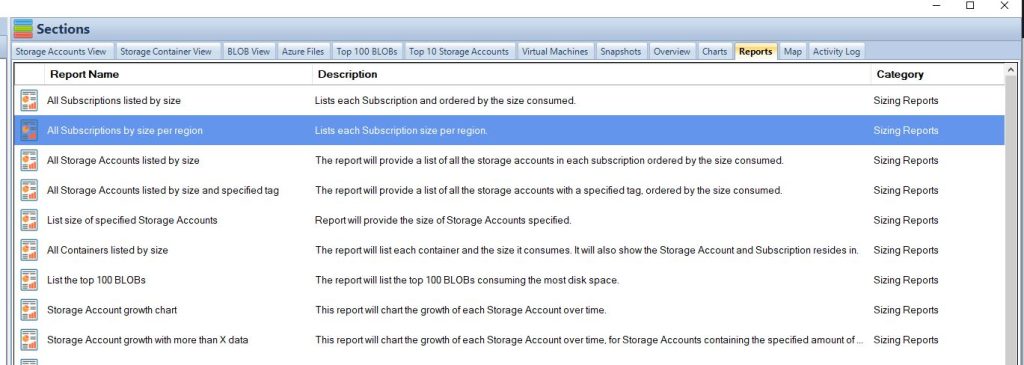
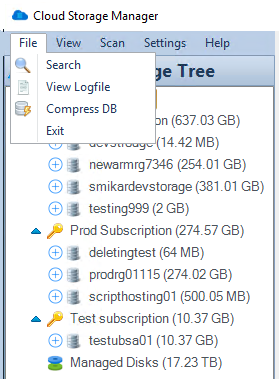
SharePoint Storage Explorer ReportsSharePoint Storage Explorer Main Windows
SharePoint Architecture
Farm Architecture
In a SharePoint environment, a ‘Farm’ is like a small village, a collection of servers that work in harmony. This architecture allows SharePoint to be highly scalable, capable of supporting both small businesses and large enterprises. It comprises web servers, application servers, and database servers, each serving a unique purpose.
Service Applications
Service Applications in SharePoint are like the various departments in a company—HR, Finance, Operations, etc. They handle specific functionalities like Search, Managed Metadata, and User Profile Services. You can mix and match these services depending on your organization’s needs, making SharePoint incredibly versatile.
Databases
The databases are the backbone of any SharePoint Farm, acting as the repositories for all your digital assets. From site collections to user profiles, everything is stored in these databases, making them the treasure chests of your SharePoint village.
SharePoint Online vs SharePoint On-Premises
Pros and Cons
Each version has its own merits and drawbacks. SharePoint Online provides the luxury of cloud storage and remote access but may lack some of the deep customization options that SharePoint On-Premises offers. On the flip side, an On-Premises setup gives you full control over your data but requires a dedicated IT team for maintenance.
Decision Factors
Choosing between SharePoint Online and On-Premises is like deciding between buying a ready-made house or building one from scratch. Factors like cost, control, scalability, and business requirements play a crucial role in this decision.
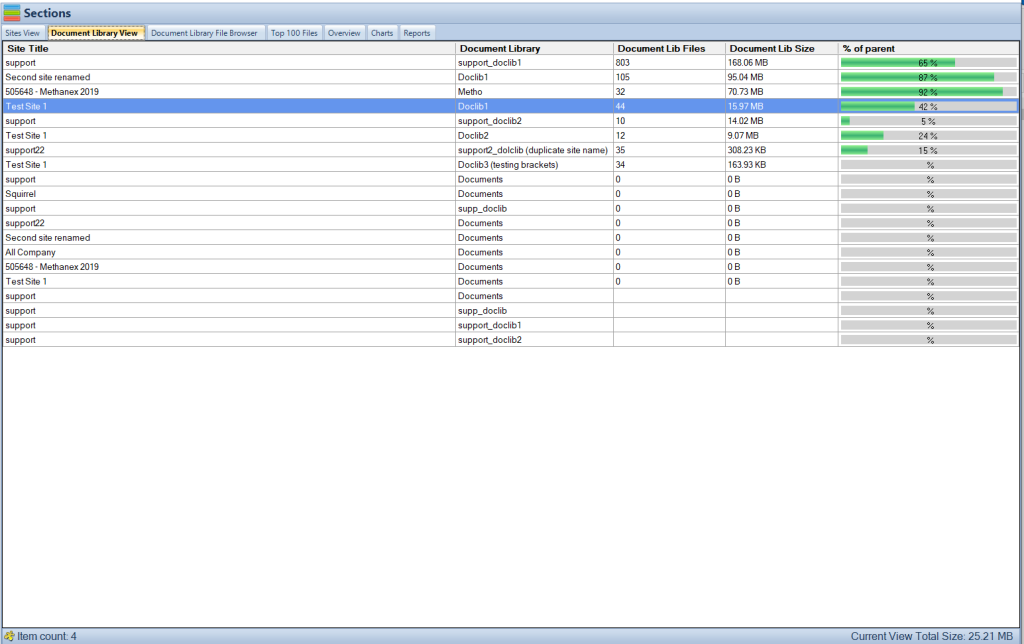
SharePoint Storage Explorer Doc Library View
Integration with Office 365
Synergy with Other Microsoft Tools
One of the most compelling aspects of SharePoint is its seamless integration with the Office 365 suite. It’s like having a talented ensemble cast where each actor—be it Word, Excel, or Teams—plays a pivotal role. This synergy amplifies productivity by allowing users to create, edit, and share documents without having to juggle multiple platforms.
Features and Benefits
The integration offers a smorgasbord of features like real-time co-authoring, file storage, and advanced search capabilities. It’s like having a state-of-the-art kitchen in your house where you can whip up any dish you desire with ease and finesse.
Security Aspects in SharePoint
User Permissions
Security is paramount in any IT solution, and SharePoint is no exception. User permissions in SharePoint act like different keys for different locks in your house. You can grant access at various levels—site, list, or even individual item—ensuring that sensitive data remains secure.
Data Encryption
Data encryption in SharePoint is like a robust security system protecting your valuables. It ensures that your data is safe during both transit and storage, giving you peace of mind.
Customization and Extensibility
Web Parts
Web Parts in SharePoint are like the custom fixtures and fittings in your dream home. They allow you to add a range of functionalities to your site, from simple text boxes to complex data visualizations, making your SharePoint environment uniquely yours.
SharePoint Framework
The SharePoint Framework (SPFx) takes customization to a whole new level. Think of it as hiring an architect to design your house exactly the way you want. With SPFx, developers can build modern, responsive web parts and extensions using popular web technologies.
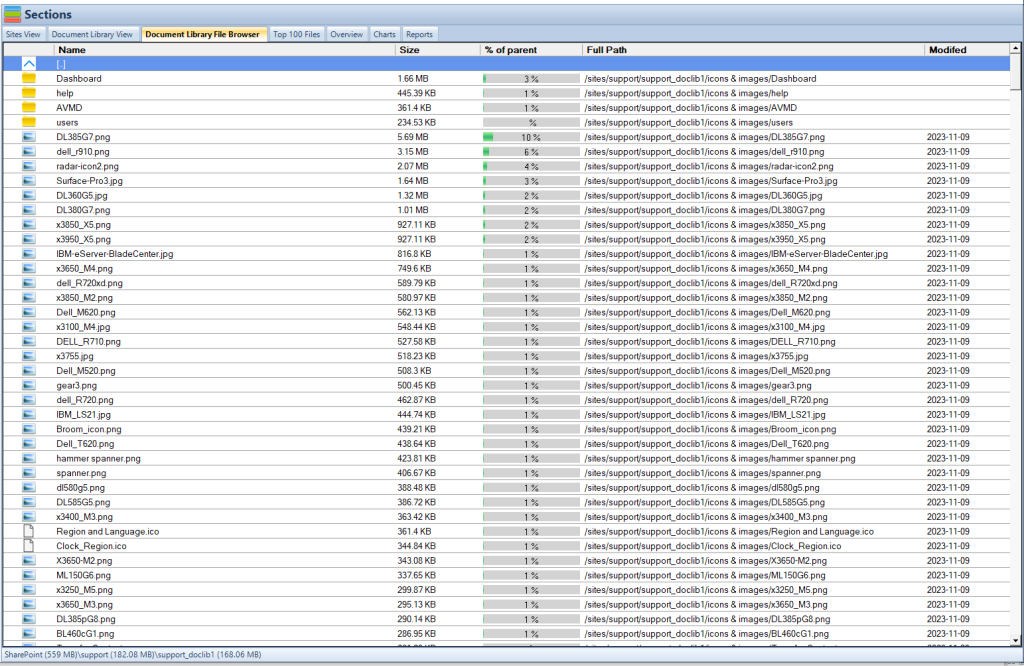
SharePoint Storage Explorer File Browser
Future of SharePoint
SharePoint Spaces
Virtual and augmented reality are gradually seeping into the enterprise world, and SharePoint Spaces is leading the charge. Imagine walking through a 3D representation of your SharePoint site! It’s like turning your house into a theme park.
AI and Automation in SharePoint
Artificial Intelligence and automation are not just buzzwords; they are the future. SharePoint is embracing these technologies to offer features like automated content tagging, intelligent search, and more.
Best Practices for IT Professionals
Governance
Proper governance in SharePoint is like having a well-defined set of house rules. It ensures that your SharePoint environment is orderly, compliant, and serves its intended purpose.
Backup and Recovery
Having a robust backup and recovery plan is like installing a fire safety system in your house. It’s essential for protecting your valuable data and allows you to recover quickly in case of any mishaps.
Challenges and How to Overcome Them
Common Issues
Despite its many virtues, SharePoint is not without its challenges—performance issues, complicated user interface, etc. But don’t despair; every cloud has a silver lining.
Troubleshooting Tips
Understanding the underlying causes and having a set of troubleshooting tools at your disposal can help you navigate through these challenges like a ship through a storm.
Community and Resources
SharePoint Community
Joining the SharePoint community is like being part of a vibrant neighborhood. You’ll find a wealth of information, forums, and expert advice to help you on your SharePoint journey.
Blogs, Forums, and Webinars
There’s a plethora of resources available—blogs, forums, webinars—to help you stay updated and solve any issues you might encounter. It’s like having a library and a community center right in your backyard.
Unveil the Power of SharePoint Storage Explorer
1. Enhanced Visibility and Control:
Deep Insights: Dive into the details of your SharePoint environment. SharePoint Storage Explorer offers unparalleled visibility into your storage structure, allowing you to see exactly what’s stored and where. This clarity is essential for effective management and decision-making.
Total Control: With detailed analytics at your fingertips, you gain full control over your SharePoint storage. Easily identify which areas need attention, and manage your storage space more effectively.
2. Optimized Storage Management:
Space Efficiency: Identify and eliminate redundant, obsolete, or trivial data, freeing up valuable space and improving overall storage efficiency.
Cost Savings: By optimizing storage usage, SharePoint Storage Explorer can help reduce the costs associated with unnecessary storage consumption.
3. Improved SharePoint Performance:
Speed and Reliability: A well-organized SharePoint environment runs smoother and faster. By keeping your storage optimized, SharePoint Storage Explorer ensures that your SharePoint performs at its best.
Reduced Load Times: With streamlined storage, the load times for accessing files and documents are significantly improved, enhancing user experience.
4. Data Governance and Compliance:
Policy Adherence:SharePoint Storage Explorer assists in enforcing data governance policies by providing insights into how data is stored, accessed, and managed.
Regulatory Compliance: Stay compliant with internal and external regulations through better data management and reporting capabilities.
5. User-Friendly Experience:
Intuitive Interface: Designed for ease of use, SharePoint Storage Explorer can be utilized by both technical and non-technical users, making SharePoint management accessible to everyone.
Quick Learning Curve: Get up to speed quickly with minimal training, thanks to the tool’s straightforward and intuitive design.
6. Strategic Decision Making:
Informed Decisions: Armed with detailed reports and analytics, make strategic decisions that can shape the way your organization uses SharePoint.
Long-term Planning: Use data trends and usage patterns to plan for future SharePoint needs and expansions.
Conclusion
So, there you have it—a comprehensive guide to SharePoint, tailored for IT professionals. Whether you’re a seasoned SharePoint veteran or a newbie looking to get your feet wet, understanding this versatile platform’s ins and outs is crucial. After all, in today’s rapidly evolving digital landscape, staying ahead of the curve is not just an option; it’s a necessity.
Frequently Asked Questions (FAQs)
1. What is the difference between SharePoint and SharePoint Online?
SharePoint On-Premises is the traditional version that you host on your own servers. You’re responsible for its maintenance, backups, and updates. SharePoint Online, on the other hand, is hosted on the cloud by Microsoft. You don’t have to worry about hardware or software upkeep—it’s all taken care of for you.
2. How secure is SharePoint for storing sensitive data?
SharePoint comes equipped with robust security features like user permissions, data encryption, and multi-factor authentication. So yes, it’s highly secure for storing sensitive data, but remember, no system can be 100% foolproof. Always follow best practices to ensure maximum security.
3. Can SharePoint integrate with non-Microsoft products?
Yes, SharePoint can be integrated with third-party systems using APIs, web parts, and custom coding. This makes it highly versatile and adaptable to your existing tech stack.
4. What are the hardware requirements for a SharePoint On-Premises setup?
The hardware requirements vary depending on the size and needs of your organization. However, you’ll generally need a 64-bit processor, a minimum of 12 GB RAM, and a hard disk with at least 80 GB free space for the system drive.
5. How does SharePoint handle mobile access?
SharePoint offers a mobile-friendly interface and also provides native mobile apps for both iOS and Android platforms. This allows for easy access to documents and collaboration tools while on the go.
6. Is SharePoint suitable for small businesses?
Absolutely! SharePoint is scalable and offers a variety of plans, making it suitable for businesses of all sizes, including small enterprises.
7. What programming languages can be used for SharePoint customization?
SharePoint supports a variety of programming languages for customization, including C#, JavaScript, and HTML. With the SharePoint Framework (SPFx), you can also use popular web frameworks like React and Angular.
8. How does SharePoint compare with other content management systems?
SharePoint is more than just a content management system; it’s a comprehensive platform for collaboration, workflow automation, and intranet creation. While other CMSs may excel in specific areas, SharePoint offers a broad range of features all under one roof.
9. Can SharePoint be used for project management?
Yes, SharePoint offers various tools and templates designed for project management, including task lists, Gantt charts, and workflow automation features.
10. What is the cost structure for SharePoint and SharePoint Online?
SharePoint On-Premises involves upfront costs for licensing and hardware, along with ongoing maintenance costs. SharePoint Online comes with a subscription-based model with different plans to choose from, based on your needs.
Hello, and welcome to this deep dive into one of the most underappreciated yet profoundly useful technologies in the Windows operating system—Volume Shadow Copy Service, commonly known as VSS. Have you ever been caught in a situation where your computer crashes, and you lose hours, days, or even weeks of work? It’s a heart-stopping moment that most of us have unfortunately experienced. But here’s where VSS comes into play. This built-in Windows feature acts as a time traveler for your files and system settings, enabling you to take snapshots or “shadow copies” at specific points in time. These snapshots can then be used to restore your system to a previous state, effectively becoming your digital safety net.
Importance of VSS in Modern Computing
We’re living in an era where our lives are increasingly digital. From important work documents to irreplaceable photos and videos, our data is more than just 1s and 0s; it’s our memories, our work, our identity. In such a landscape, the importance of robust backup and restore capabilities cannot be overstated. That’s where VSS shines. It’s not just a backup tool; it’s a real-time backup tool that doesn’t require you to shut down your applications or disrupt your workflow. This is crucial in professional environments where downtime equals lost revenue or in emergency situations where every second count.
Scope of the Article
In this article, we’re going to delve deep into VSS. We’ll explore its origins, how it works under the hood, its various applications, and why it’s an essential tool for anyone who uses a Windows operating system. Whether you’re a casual user who wants to safeguard personal files or a system administrator responsible for maintaining an enterprise network, this guide is for you. So, let’s get started!
What is VSS?
Definition
So, what exactly is VSS? Standing for Volume Shadow Copy Service, it’s a technology developed by Microsoft to allow snapshots, also known as shadow copies, of computer files or volumes. But don’t mistake it for a simple backup solution. While traditional backup methods create a copy of your data at a specific point in time, VSS is smarter. It enables you to take snapshots that are consistent at the block level, ensuring that files are not in a half-written state. This is immensely beneficial when you’re dealing with databases or other files that are continuously in use.
Historical Background
VSS isn’t a new kid on the block. It has been part of the Windows family since the Windows Server 2003 era. But why was it developed in the first place? Well, Microsoft recognized the limitations of existing backup solutions, especially in enterprise environments. Traditional backup methods often required stopping services or locking files to take a consistent snapshot, which led to downtime or service degradation. Enter VSS—a technology designed to create consistent backups without interrupting user activities, a godsend for businesses where time is money.
Core Functionality
At its essence, VSS serves three main functions—requesting, providing, and writing. The ‘requestor’ is typically the backup software that asks for a snapshot. The ‘provider’ handles the heavy lifting of actually creating the shadow copy, and the ‘writer’ ensures that applications are in a consistent state during the snapshot process. Together, these components make VSS a powerful yet flexible solution that can be tailored to various backup scenarios, from simple file backups to complex database archiving.
How Does VSS Work?
Components of VSS
Think of VSS as a finely tuned orchestra, each component playing its part to produce a harmonious outcome—a snapshot. In the VSS world, this orchestra consists of the VSS service, VSS providers, and VSS writers. The VSS service is the conductor, directing the entire operation. It receives the backup request and coordinates with the other components to execute it. VSS providers are the instrumentalists, responsible for creating the shadow copies. They interact directly with the storage medium, be it a hard disk, SSD, or network storage. Last but not least, we have the VSS writers—these are the composers. They make sure that the data being backed up is in a consistent state, particularly important for complex data types like databases or system settings.
The VSS Process
So how does a VSS backup actually happen? Let’s break it down:
Initialization: A VSS requestor (often backup software) kicks things off by asking the VSS service to create a shadow copy.
Preparation: The VSS service communicates with all the VSS writers to make sure that the data is in a consistent state. This may involve flushing buffers or completing pending transactions.
Freeze: For a brief moment, write I/O requests to the disk are paused, ensuring that no changes occur during the snapshot.
Snapshot: This is the moment of truth. The VSS provider creates the shadow copy, essentially taking a snapshot of the data’s current state.
Thaw: Write I/O requests are resumed, and life goes back to normal, but now you have a snapshot safely stored away.
Interaction with the Operating System
VSS doesn’t operate in a vacuum; it’s deeply integrated into the Windows operating system. This integration allows for a seamless user experience and ensures high data integrity. For example, VSS works hand-in-hand with the NTFS file system (and ReFS in newer versions of Windows) to track changes to files during the backup process. It can also tap into Windows’ security features to ensure that backups are encrypted and access-controlled, adding a layer of security to your snapshots.
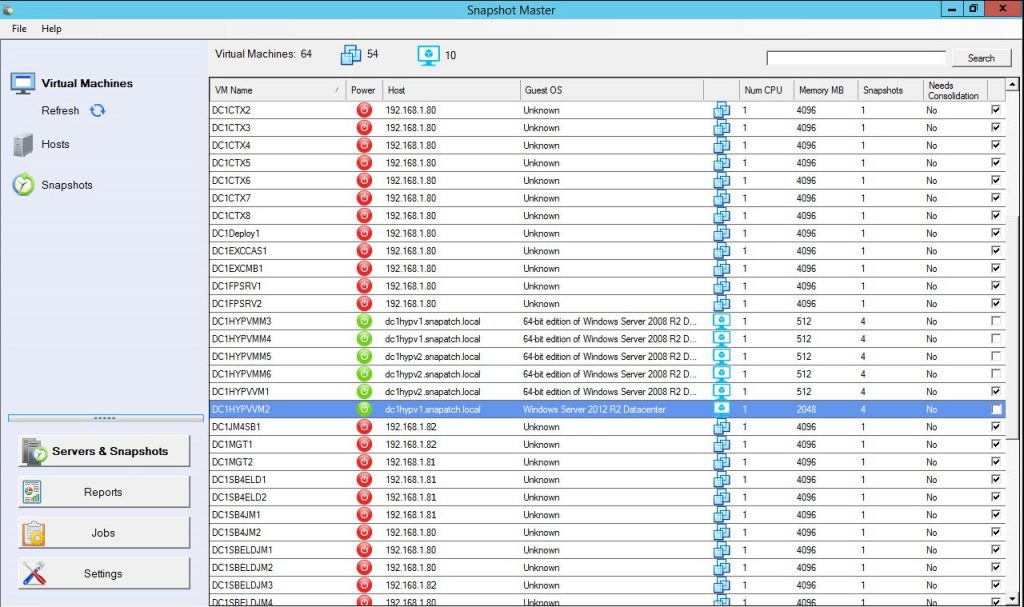
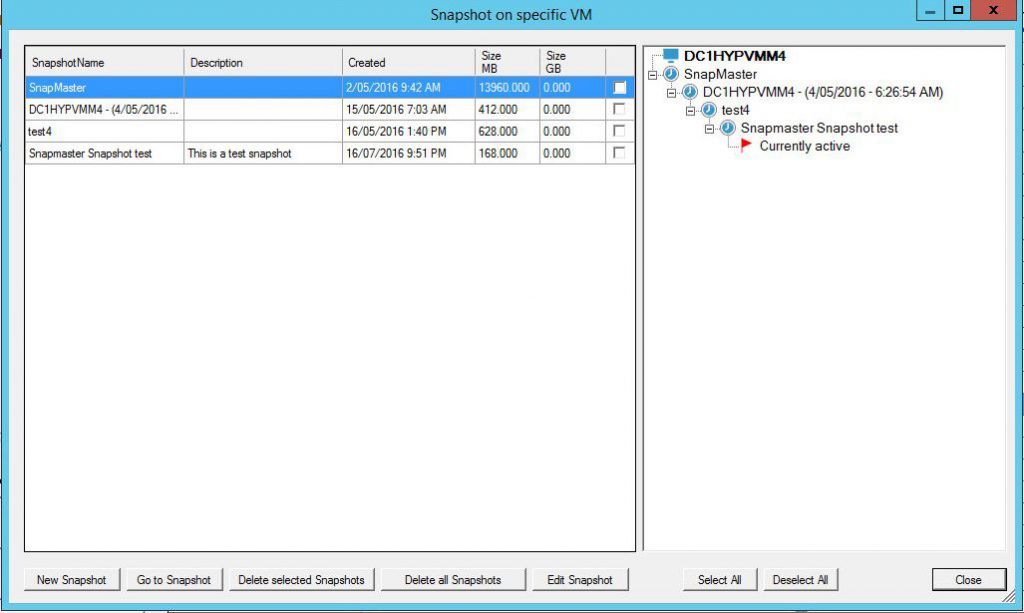
SnapShot Master Power On
Why Use VSS?
Advantages
So, you’re sold on the idea of backups, but why choose VSS over other methods? First and foremost, it’s the real-time aspect. Traditional backup methods might require you to schedule backups during off-hours to avoid affecting performance. But with VSS, those backups can happen while you’re working on that crucial presentation or binge-watching your favorite series. The service is designed to be non-disruptive. Secondly, it’s about data consistency. VSS ensures that the data in the snapshot is in a coherent state, meaning you won’t end up with half-saved files or databases in an unstable state. Lastly, there’s the matter of resource efficiency. VSS is designed to be light on system resources, so you won’t experience a sudden slowdown during the backup process.
Use Cases
The beauty of VSS lies in its versatility. For casual users, it’s an easy way to take regular backups of important files. For businesses, it’s a cornerstone of business continuity plans, allowing for quick recovery from data loss incidents or cyberattacks. The service is also a boon for database administrators. Traditional database backups can be a complex affair requiring careful planning to avoid data corruption. VSS simplifies this by ensuring that the database is in a consistent state before taking a snapshot. And let’s not forget virtual machines (VMs). Managing backups for VMs can be challenging due to their dynamic nature, but VSS comes to the rescue here as well, ensuring that VM snapshots are just as reliable as those of physical machines.
Real-World Applications
Let’s put this into a real-world context. Imagine you’re working in a healthcare setting where patient data is continuously updated. The last thing you want is to pause the system for backups, potentially delaying critical care. With VSS, backups can run in the background, ensuring data protection without disrupting essential services. Similarly, in fast-paced trading environments where downtime can mean significant financial loss, VSS allows for continuous data protection without affecting trading activities.
Setting up VSS on Windows
System Requirements
Before diving into the setup, let’s talk prerequisites. You’ll need a Windows operating system that supports VSS (Windows 10, Windows Server 2019, etc.), and your file system should be either NTFS or ReFS for newer Windows versions. Also, ensure you have enough disk space for the snapshots; otherwise, older snapshots might be deleted to make room for new ones.
Step-by-Step Guide
Setting up VSS is a walk in the park. Navigate to the Control Panel and then to the ‘System and Security’ section. Here, you’ll find ‘Backup and Restore’ options. Once you’re in, Windows will guide you through the setup, asking you to select the drive you want to back up, how often you want these backups, and where to store them. It’s that simple, yet it offers a level of customization that can satisfy even the most demanding users.
Configuration Options
VSS isn’t a one-size-fits-all solution; it’s highly customizable. You can specify which volumes or folders to include in the snapshots, set the frequency, and even choose the storage location, whether it’s on the same machine, a network drive, or an external storage device. There are also advanced settings that allow you to control how much disk space is allocated for shadow copies, giving you the power to manage system resources effectively.
Restoring Data with VSS
How to Restore Files
So you’ve accidentally deleted that essential report due tomorrow. Panic sets in. But wait, you’ve got VSS! Restoring your file is as easy as navigating to the folder where it used to be, right-clicking, and selecting ‘Restore previous versions.’ A window will pop up, showing available snapshots. Pick the one you want, click ‘Restore,’ and your file is back from the digital beyond.
Versioning with VSS
One of the standout features of VSS is versioning. Every snapshot you take serves as a version of your data at that specific point in time. This means you’re not just restoring the latest version of a file; you can go back to any point in its history, provided you have a snapshot from that time. This is invaluable when dealing with complex projects that go through multiple revisions, or databases where historical data may be required for audits or compliance checks.
Pitfalls to Avoid
While VSS is a robust system, it’s not infallible. One common pitfall is running out of allocated disk space for shadow copies, leading to older snapshots being deleted. Another is ignoring the ‘throttle’ settings, which control the impact of VSS on system performance. Overloading your system with frequent, large-scale snapshots can lead to performance issues. Therefore, it’s essential to balance your backup needs with available system resources.
Snapshot Master Restart
Comparison with Other Backup Solutions
Traditional Methods
Before the inception of VSS and similar technologies, data backup was a labor-intensive task. Remember those magnetic tapes? They were widely used for backups, requiring manual operations and careful handling. While they offered a tangible means of storage, accessing data from these tapes was slow. Restoring data meant sifting through tapes, finding the right one, and hoping it wasn’t corrupted. There were also disk-based backups, which were faster than tapes but still had limitations. They often required significant downtime, especially when backing up large volumes of data.
Cloud-based Solutions
Enter the age of cloud computing. With services like AWS, Google Cloud, and Azure, cloud backups have become the buzzword. They offer scalability, off-site storage, and easy access. You can backup data in real-time, automate the process, and scale as your data grows. Plus, there’s the added advantage of accessing your backups from anywhere, anytime. However, while cloud backups offer numerous benefits, they come with challenges. Data transfer speeds, especially for large volumes of data, can be a concern. There’s also the ever-present worry about security in the cloud, with fears of data breaches and unauthorized access.
Pros and Cons
So, how does VSS stack up against these methods? It offers the best of both worlds. You get the immediacy and data consistency of disk-based backups, combined with the flexibility and scalability of cloud backups. While VSS is tied to the Windows ecosystem, its integration with the operating system ensures optimal performance. However, one could argue that being OS-specific is also a limitation, especially in diverse IT environments.
Advanced Features
VSS for Databases
Databases are the backbone of many applications, from your favorite online shopping site to critical financial systems. Backing up databases, especially transactional ones like SQL Server, can be tricky. The challenge is to capture a consistent state of the database without interrupting its operations. VSS to the rescue! With its ability to work with database-specific VSS writers, it ensures that backups capture a consistent state of the database, even if transactions are ongoing. This means no more scheduling late-night backups or experiencing downtime during backup operations.
VSS for Virtual Machines
With the rise of virtualization, managing backups for virtual machines (VMs) has become crucial. VMs can be dynamic, with states changing rapidly. VSS is adept at handling this dynamism. Whether you’re running VMs on Hyper-V, VMware, or any other platform, VSS ensures that your VM snapshots are as reliable and consistent as those of physical machines.
Automation Capabilities
In today’s fast-paced IT environments, automation is key. VSS doesn’t disappoint in this department. With its integration with Windows Task Scheduler and compatibility with PowerShell scripts, you can automate your backup processes. Whether it’s taking daily snapshots, cleaning up old backups, or restoring data, you can set it and forget it, letting VSS handle the heavy lifting.
Common Issues and Troubleshooting
Typical Error Messages
No technology is without its quirks, and VSS is no exception. Users might occasionally encounter errors like “Failed to create a shadow copy” or “VSS encountered a problem.” These can be due to various reasons, from low disk space to conflicts with other applications.
Resolution Steps
Before you pull your hair out, here are some general troubleshooting steps:
Check Disk Space: Ensure there’s enough space for VSS to take snapshots.
Restart the VSS Service: Sometimes, a simple restart can resolve issues.
Check for Conflicting Software: Some software, especially disk utilities, can conflict with VSS.
Update Windows: Ensure your operating system is up-to-date, as updates often include fixes for known issues.
Third-Party Tools for Troubleshooting
If you’re still stuck, there’s a plethora of third-party tools designed to diagnose and fix VSS issues. Tools like VSSDiag can analyze VSS logs, pinpointing the root cause of problems. Additionally, forums and online communities can be a treasure trove of solutions, as chances are someone else has faced a similar issue.
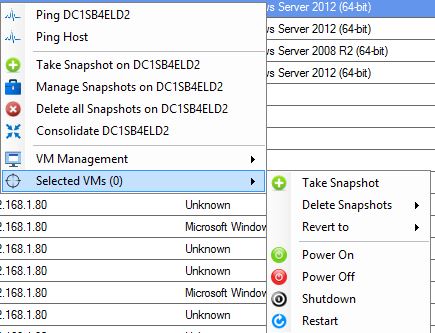
Snapshot Master Manage Snapshots
Conclusion
In the vast universe of data protection and backup solutions, Volume Shadow Copy Service (VSS) shines bright as a beacon of reliability and efficiency. Through our journey, we’ve unraveled the layers of this intricate technology, witnessing its power to safeguard our most precious digital assets. We’ve seen how VSS stands tall, not just as a backup solution, but as a real-time, integrated, and versatile tool designed for the modern age of computing.
The digital world is fraught with unpredictabilities, from system crashes to cyber-attacks. But with VSS in our arsenal, it feels like having a trusty shield, always ready to defend and restore. Whether you’re a casual user or an IT professional, embracing VSS can be a game-changer.
Yet, like any technology, it’s essential to keep learning, adapting, and evolving. As VSS continues to mature and expand its capabilities, we, as users, must stay informed, ensuring we harness its full potential.
In wrapping up, remember this: In the realm of data, being proactive beats being reactive. And with VSS, proactivity is just a snapshot away. So, have you taken yours today?
FAQs
Is VSS exclusive to Windows?
Yes, VSS is a technology developed by Microsoft and is specific to the Windows operating system.
How is VSS different from traditional backup methods?
VSS allows for real-time, consistent snapshots without needing to halt applications or services, unlike some traditional backup methods that require downtime.
Can VSS backups be stored on external drives or cloud storage?
While VSS itself creates local shadow copies, backup software leveraging VSS can store backups on external drives, network locations, or even cloud storage.
Is there a performance impact when using VSS?
VSS is designed to be lightweight and efficient. While there’s a minimal resource usage during the snapshot process, it’s generally negligible for most users.
What should I do if I encounter errors with VSS?
Start with basic troubleshooting like checking disk space, restarting the VSS service, and updating Windows. If problems persist, consider third-party diagnostic tools or seek help from online forums and communities.
I hope this conclusion and the FAQs provide a rounded end to our in-depth look into VSS. If there are any other questions or areas you’d like to explore further, please let me know!
Azure Files is a cornerstone of modern cloud-based file sharing. As IT professionals dive deeper into its offerings, several challenges may arise. This guide provides an in-depth look into these challenges and elucidates their solutions.
1. Performance Bottlenecks in Azure Files
Azure Files boasts a multitude of performance tiers, but selecting the ideal tier can become a daunting task without proper knowledge.
Solution:
Benchmarking: Before deploying Azure Files, set benchmarks based on the needs of your application. Monitor these benchmarks against the actual performance metrics. If the two don’t align, reassess your tier selection using insights from the Azure File Storage Performance Tiers.
Monitoring Tools: Azure Monitor and Azure Storage metrics provide invaluable insights into performance. Set up automated alerts for anomalies that could indicate misconfigurations or the need for a tier upgrade.
Storage Best Practices: Ensure files and data are structured in a way that maximizes retrieval times. This might involve reorganizing directories or ensuring a balanced distribution of files.
2. Complexities in Setting Up Azure Files
Setting up Azure Files requires a meticulous approach to guarantee optimal functionality.
Solution:
Guided Tutorials: Relying on comprehensive tutorials ensures that no step is overlooked. The how-to guide for Azure Files provides a detailed setup process.
Automation: Azure Resource Manager (ARM) templates streamline deployment by allowing for the automation of setups, ensuring consistent configurations across deployments.
Security Best Practices: Ensure that shared access signatures (SAS) and network security groups (NSG) are appropriately configured to maintain a balance between accessibility and security.
3. Cost Management in Azure Files
Without vigilant management, costs associated with Azure Files can quickly mount.
Solution:
Regular Clean-ups: Implement a lifecycle management policy. Regularly analyze and remove outdated files, redundant snapshots, and other non-essential data. Tools like Azure Advisor can recommend cost-saving measures.
Optimize Snapshots: Snapshots, though crucial for data integrity, can inflate costs. Ensure they’re only taken when necessary, and consider automating their retention and deletion. Dive deeper into how you can economize with Azure Files.
Leverage Reserved Capacity: By predicting your storage needs, you can opt for reserved capacity, which offers cost benefits over pay-as-you-go models.
4. Differentiating Azure Blob Storage from Azure Files
Misunderstanding the distinction between these services can lead to inefficient deployments.
Solution:
Education: Regular training sessions or workshops can be invaluable. IT professionals should understand the nuances between Azure Blob Storage and Azure File Storage. For instance, while Azure Files offers SMB protocols and is ideal for shared access, Blob Storage is geared towards vast amounts of unstructured data.
Deployment Strategies: Depending on the use case, Azure Blob Storage might be a more cost-effective solution, especially for large-scale, unstructured data. Ensure the team knows when to leverage each service.
Azure File Sync keeps your data consistent across on-premises and cloud environments. However, it can sometimes falter, leading to synchronization issues or data discrepancies.
Solution:
Sync Agent Updates: Ensure your Azure File Sync agents are up-to-date. Older versions might not only have vulnerabilities but can also lead to compatibility issues. Regularly visit the Azure File Sync guide for the latest updates and best practices.
Conflict Resolution: Implement a robust conflict resolution strategy. When data is edited in multiple locations simultaneously, conflicts can arise. Azure offers conflict detection, but it’s up to the administrators to decide on resolution strategies.
Monitoring & Logging: Use Azure Monitor to keep tabs on the sync health. Whenever there’s a hiccup, logs can offer a detailed view of what went wrong, enabling swift resolution.
6. Ensuring Data Security in Azure Files
As with all cloud services, security is paramount. Azure Files is no exception.
Solution:
Role-Based Access Control (RBAC): Implement RBAC to define who can access what. This ensures that only authorized personnel can view or modify data.
Encryption: Azure Files offers encryption both in transit and at rest. Always keep these features activated to safeguard your data from prying eyes.
Audit Trails: Set up logging to keep a record of who accessed what and when. In case of a breach or unexpected modification, these logs can be invaluable in tracing back the events.
7. Managing Azure Storage Accounts Efficiently
Storage accounts are foundational to Azure Files. However, improper management can lead to inefficiencies.
Solution:
Optimal Storage Type Selection: Depending on your workload, choosing between premium or standard storage can have a significant impact on performance and cost. Learn the specifications and limitations of each through guides like Azure Storage Accounts Size.
Regular Audits: Periodically review the storage accounts to weed out any inactive or redundant data. Tools such as Azure Storage Explorer can assist in this endeavor.
Leverage Lifecycle Management: Azure offers lifecycle management policies that automatically transition data to cooler storage or even delete it after a certain period.
8. Efficiently Handling Azure Blobs
Azure Blob Storage, though different from Azure Files, often finds its way into related workflows.
Solution:
Size Management: Keeping tabs on the size of individual blobs and containers ensures you don’t run into performance issues or unforeseen costs. Tools that provide insights into Azure Blob Container Size and the largest Azure Blobs can be instrumental.
Blob Tiering: Regularly evaluate and modify blob access tiers. Infrequently accessed data should be moved to cooler tiers, like Azure Blob Cool or Archive, to save on storage costs.
Data Archival: If certain blobs are no longer necessary but need retention for compliance reasons, consider moving them to Azure Blob Archive tier, which is more cost-effective for long-term storage.
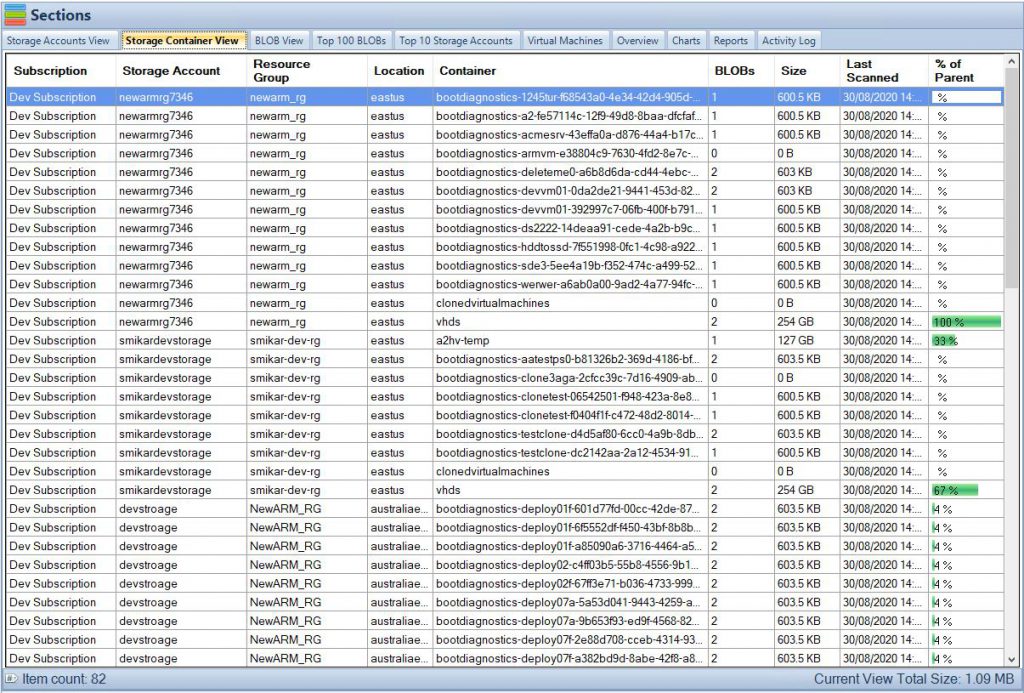
Cloud Storage Manager Map View
9. Choosing Between Azure Blob Storage and Azure File Storage
When it comes to storing large datasets, professionals often waver between Azure Blob Storage and Azure File Storage. Each has its unique set of strengths.
Solution:
Understand Use Cases: Azure Blob Storage is optimized for massive, unstructured data. Think videos, backups, or large datasets. Azure File Storage, on the other hand, shines for hierarchical datasets and shared access needs, much like a traditional file system. Evaluate your primary needs using this comparison guide.
Integration Needs: If your infrastructure leans heavily on applications requiring SMB or NFS protocols, Azure File Storage is the way to go. For web-based applications or analytics, Blob Storage might be more apt.
10. Navigating Azure File Share Permissions
Ensuring secure and appropriate access to Azure File Shares is crucial. Improper configurations can lead to data breaches or operational hiccups.
Solution:
NTFS Permissions: If migrating from an on-premises file share, your NTFS permissions will remain intact. However, periodically review these permissions to ensure they align with current operational needs.
Shared Access Signatures (SAS): Use SAS tokens to grant time-bound and specific access to Azure File Shares. They offer a fine-grained control mechanism.
11. Optimizing Costs Across Azure Storage Services
Azure offers multiple storage solutions, and managing costs across them can be a daunting task.
Solution:
Automate Data Lifecycle: Automate the migration of data between hot, cool, and archive tiers based on data access patterns. Understand how to minimize Azure Blob Storage costs to make informed decisions.
Monitor and Analyze: Use Azure Cost Management and Billing to keep tabs on your expenditures. Set up alerts for budget thresholds to prevent unforeseen expenses.
Review Storage Accounts: Regularly revisit your Azure Storage Account configurations to ensure they align with your current and projected needs.
Azure File Share offers seamless connectivity, but sometimes users might experience disruptions.
Solution:
VPN & ExpressRoute: If accessing Azure File Shares from on-premises, consider setting up an Azure VPN or ExpressRoute for a more reliable and faster connection.
Troubleshooting Tools: Use tools like Azure Storage Metrics and Logging to diagnose connectivity issues. They provide detailed insights into operations, allowing you to pinpoint disruptions.
13. Ensuring Data Redundancy in Azure Files
Data loss can be catastrophic. Ensuring redundancy is key to data integrity.
Solution:
Geo-Redundant Storage (GRS): Opt for GRS to maintain copies of your data in different geographical locations. This ensures data availability even if a primary region faces outages.
Regular Backups: While Azure Files offers built-in redundancy, consider setting up additional regular backups, especially for mission-critical data.
Cloud Storage Manager Main Window
14. Ensuring Compliance and Regulatory Adherence in Azure Files
For businesses operating in regulated industries, compliance is more than a best practice; it’s a mandate.
Solution:
Data Classification: Use Azure Information Protection to label and classify files based on sensitivity. This ensures the right level of protection is applied to specific data sets.
Audit Logs & Reporting: Regularly check Azure Activity Logs for any unauthorized or suspicious activity. These logs can be crucial during audits or compliance checks.
Azure Policy & Blueprints: Use Azure Policy to enforce organizational requirements. Azure Blueprints, on the other hand, allow for the creation of compliant environments, ensuring deployments align with regulatory needs.
15. Scaling Azure File Services Without Downtime
As businesses grow, so do their storage needs. Ensuring scalability without affecting operational uptime is crucial.
Solution:
Elastic Shares: Elastic shares in Azure Files Premium tier allows for the automatic scaling of IOPS and throughput, ensuring consistent performance even during high-demand periods.
Storage Account Limits: Be wary of the limits set on Azure storage accounts. Monitor them and consider spreading workloads across multiple accounts if nearing the thresholds.
16. Handling Large-Scale Data Migrations to Azure Files
Migrating massive amounts of data to Azure Files can be time-consuming and might lead to data loss if not done correctly.
Solution:
Azure Data Box: For terabytes to petabytes of data, consider using Azure Data Box. It’s a secure, tamper-resistant method of transferring large datasets without relying on the network.
Azure Storage Migration Tools: Tools such as Azure Storage Data Movement Library or AzCopy can accelerate data transfers while ensuring data integrity.
17. Dealing with Data Retrieval Latencies
Delayed data retrieval can affect business operations, leading to inefficiencies.
Solution:
Optimized Indexing: Ensure data is structured and indexed appropriately. This reduces retrieval times, especially for large datasets.
Premium Tier Consideration: For workloads requiring high-speed access, consider moving to Azure Files’ premium tier, which offers higher IOPS and lower latencies.
18. Protecting Against Ransomware and Malicious Attacks
The cloud environment isn’t immune to threats. Ensuring data security against ransomware and other attacks is paramount.
Solution:
Immutable Storage: This feature ensures data cannot be deleted or modified for a set period. It’s an excellent deterrent against ransomware which often seeks to encrypt or delete data.
Azure Backup and Azure Site Recovery: Regular backups ensure data integrity. In the face of an attack, data can be restored to its pre-attack state using these Azure services.
19. Seamless Integration with On-Premises Solutions
Many businesses operate in hybrid environments. Ensuring Azure Files integrates smoothly with on-premises solutions is essential.
Solution:
Azure File Sync: This service syncs on-premises file servers with Azure File shares, ensuring a seamless flow of data across environments. Dive deeper with this Azure File Sync guide.
Hybrid Connections: Azure Relay’s Hybrid Connections can be leveraged for secure, bi-directional integrations with on-premises data and applications.
Cloud Storage Manager Reports
20. Maintaining Azure File Shares Performance
Like any storage system, performance optimization ensures that your applications and services run smoothly.
Solution:
Monitor Throughput: Keep a close watch on the IOPS (Input/Output Operations Per Second) and bandwidth. If you notice a drop, you might be nearing your share’s limits. Consider optimizing data or upgrading to a higher performance tier.
Data Partitioning: Instead of a monolithic storage strategy, partition data into multiple file shares or storage accounts. This can distribute the load and enhance overall performance.
Refer to Performance Tiers: Azure File Storage offers different performance tiers, each with its benefits. Understand the Azure File Storage Performance Tiers to make informed decisions.
21. Mitigating Azure File Service Downtime
Unplanned outages can affect business operations and result in financial losses.
Solution:
Availability Zones: Distribute resources across different availability zones. If one zone faces outages, your system can continue functioning using resources from another zone.
Regular Health Checks: Use Azure Monitor and Azure Health services to consistently check the health of your Azure resources.
22. Managing Costs Effectively
Azure can quickly become expensive if not managed effectively, especially when dealing with vast amounts of data.
Solution:
Cost Analysis Tools: Use Azure Cost Management and Billing to get insights into your spending patterns. This will help identify areas where costs can be reduced.
Optimizing Storage: Understand how to save money with Azure Files. Consider strategies such as data deduplication, compression, and choosing the right storage tier.
23. Ensuring Efficient Data Access Across Global Teams
For businesses with a global presence, data access speed and reliability become crucial.
Solution:
Geo-Replication: Use Azure’s geo-replication features to maintain copies of your data in multiple regions, ensuring fast access for teams across the globe.
Content Delivery Network (CDN): Integrate Azure Files with Azure CDN to cache data at various points around the world, thus reducing data access latency for global users.
24. Managing Legacy Data in Azure Files
As businesses evolve, they might end up with outdated or legacy data that still needs to be stored and accessed occasionally.
Solution:
Archive Tier: Move old data that’s rarely accessed to Azure’s Archive Storage Tier. It’s the most cost-effective tier for data that doesn’t need frequent access.
Data Validation: Periodically review and validate the relevance of data. Tools that highlight Azure blob files not accessed can help identify legacy data that might be ripe for archiving or deletion.
Azure Files offers a wide range of functionalities, but like any tool, its effectiveness hinges on how it’s used. By understanding and proactively addressing these challenges, IT professionals can create a robust, efficient, and cost-effective storage infrastructure. If there are more specific areas or challenges you’d like to address, please inform me.
As datasets grow, retrieving large blobs becomes a challenge due to longer retrieval times and potential timeouts.
Solution:
Blob Download Strategies: Use tools such as AzCopy, which supports concurrent and segmented blob downloads, thus speeding up the process. By breaking the blob into chunks and downloading them simultaneously, you can significantly reduce retrieval times.
Use Insights: Employ tools to find the largest Azure blobs, allowing you to be proactive in managing them, either by partitioning or optimizing them.
26. Managing Azure Blob Container Sizes
As the number of blobs grow, managing them efficiently and ensuring they do not overwhelm the container’s limits becomes crucial.
Solution:
Monitor Container Limits: Regularly track the size and count of blobs within each container. Ensure they don’t exceed the Azure blob container size limits.
Optimize and Partition: Consider segregating blobs into multiple containers based on criteria like data type, application, or usage frequency. This ensures better organization and manageability.
27. Simplifying Azure Storage Account Creation
Azure Storage Account is fundamental to using Azure storage services. However, setting it up optimally can sometimes be intricate.
Solution:
Follow Step-by-Step Guides: Utilize comprehensive guides to create an Azure storage account. These guides provide a detailed walk-through, ensuring you configure settings tailored to your needs.
Automate with Templates: For repeated deployments, use Azure Resource Manager templates to automate storage account creation with desired configurations.
28. Ensuring Data Security in Transit and at Rest
Data breaches can lead to significant losses both in terms of reputation and financial implications.
Solution:
Encryption: Use Azure’s built-in encryption services, which encrypt data both in transit (using SSL/TLS) and at rest (using Azure Storage Service Encryption).
Access Control: Regularly review and update shared access signatures and role-based access controls. This ensures only authorized individuals can access the data.
29. Optimizing Queries on Azure File Datasets
For businesses using Azure Files as a part of analytics or data processing workflows, efficient querying becomes essential.
Solution:
Structured Data: When possible, structure your data in a way that’s optimized for your query patterns. This might include partitioning, indexing, or denormalizing data.
Leverage Azure Tools: Tools like Azure Data Lake Storage and Azure Data Explorer can be integrated with Azure Files to provide more efficient query capabilities on large datasets.
Azure Files, as a versatile cloud storage solution, can effectively cater to a myriad of storage needs. However, to harness its full potential, one must continuously adapt to the challenges that emerge as data scales and business needs evolve. Should you want further insights on any other challenges or details, please let me know.
Conclusion
Azure Files is undeniably a cornerstone for many businesses venturing into the cloud, offering scalability, flexibility, and a robust set of features. But like any technology, it presents its own set of challenges. Addressing these challenges isn’t merely about troubleshooting; it’s about strategizing, anticipating, and being proactive.
From ensuring top-notch data security to optimizing performance and managing costs, the spectrum of potential issues is wide. However, as illustrated in this comprehensive guide, solutions are readily available. By leveraging Azure’s extensive toolkit and staying informed about best practices, IT professionals can not only navigate these challenges with ease but also optimize their Azure experience.
In a constantly evolving digital landscape, the true potential of Azure Files is realized by those who understand its intricacies and are equipped to tackle the challenges head-on. Stay updated, stay informed, and let Azure propel your business to new heights.
For more in-depth insights on specific Azure aspects and tools, do explore the provided links throughout this guide. Here’s to seamless cloud storage experiences with Azure Files!
Hey there, cloud wanderer! Ever found yourself juggling multiple USB drives or emailing files to yourself just to have access to them on another device? Well, Microsoft OneDrive is here to make your life a whole lot easier. This article will be your ultimate guide to understanding what OneDrive is, how to use it, and why it might just be the cloud storage solution you’ve been looking for.
What is OneDrive?
OneDrive is Microsoft’s cloud storage solution that allows you to save files online and access them from anywhere. Think of it as your virtual filing cabinet, but way cooler. You can store documents, photos, and even entire folders. Plus, it’s integrated with Microsoft 365, so if you’re already using Microsoft apps, you’re in for a smooth ride.
Getting Started with OneDrive
Ready to jump in? First things first, you’ll need to download OneDrive. Whether you’re on a Mac, Windows, or even Linux, there’s a OneDrive app for you. Just head over to the official website, click on “OneDrive Download,” and follow the installation instructions. Once installed, you’ll need to sign in with your Microsoft account. Don’t have one? No worries, creating one is as easy as pie.
OneDrive Features
Alright, let’s talk features. OneDrive is not just a “store and ignore” kind of service. It offers real-time collaboration, file syncing across devices, and robust security measures. You can even access your OneDrive logs to keep track of changes and activities. It’s like having a personal assistant for your files.
File Storage and Syncing
The core feature of OneDrive is, of course, file storage. But it’s the syncing that makes it a game-changer. You can work on a document on your laptop, and it’ll be updated in real-time on your other devices. No need to hit “save” every two seconds; OneDrive does it for you.
Collaboration and Sharing
Working on a group project or need to share files with someone? OneDrive has got you covered. You can share files or folders with anyone, even if they don’t have a OneDrive account. Plus, with real-time collaboration features, multiple people can work on the same document at the same time. Say goodbye to the chaos of multiple versions and conflicting changes.
Security and Privacy
When it comes to your files, security is a big deal. OneDrive offers robust security features like two-factor authentication and automatic encryption. You can even check your OneDrive logs to see who has accessed your files and when.
OneDrive for Business
For those of you in the corporate world, OneDrive for Business offers additional features like advanced collaboration tools and higher storage limits. It’s integrated with SharePoint, allowing for seamless team collaboration.
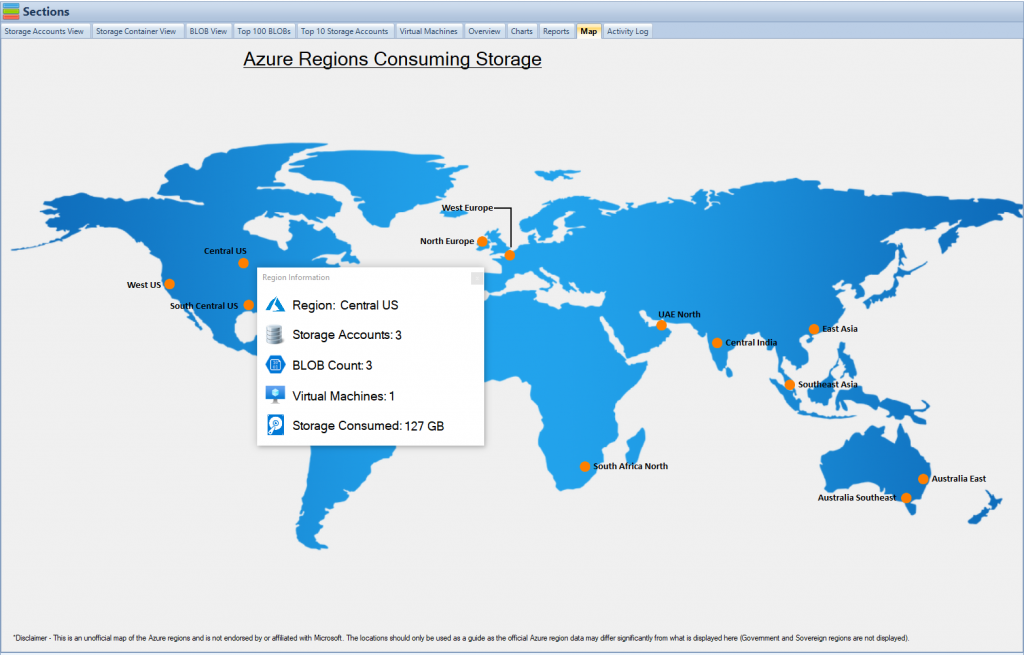
Cloud Storage Manager Map View
Microsoft OneDrive vs. Other Cloud Storage Solutions
Now, let’s talk comparisons. How does OneDrive stack up against other cloud storage solutions like Google Drive, Dropbox, and even SharePoint?
OneDrive vs. SharePoint
OneDrive and SharePoint are both Microsoft products, but they serve different purposes. SharePoint is more focused on team collaboration and is often used for intranet sites within a company. OneDrive, on the other hand, is more individual-centric. However, the two can sync together for a more cohesive experience.
OneDrive vs. Google Drive
Google Drive is another popular cloud storage solution. While it offers similar features like file storage and real-time collaboration, it’s deeply integrated with Google’s ecosystem. If you’re a Microsoft user, you’ll find OneDrive to be more seamless with your existing apps.
OneDrive vs. Dropbox
Dropbox is a straightforward, easy-to-use cloud storage solution. It doesn’t offer the suite of integrated apps that OneDrive does, but if you’re looking for a simple drag-and-drop storage solution, it’s a strong contender.
OneDrive vs. OneDrive for Business
You might be wondering, what’s the difference between OneDrive and OneDrive for Business? The latter offers more advanced features tailored for corporate use, such as higher storage limits and advanced security protocols.
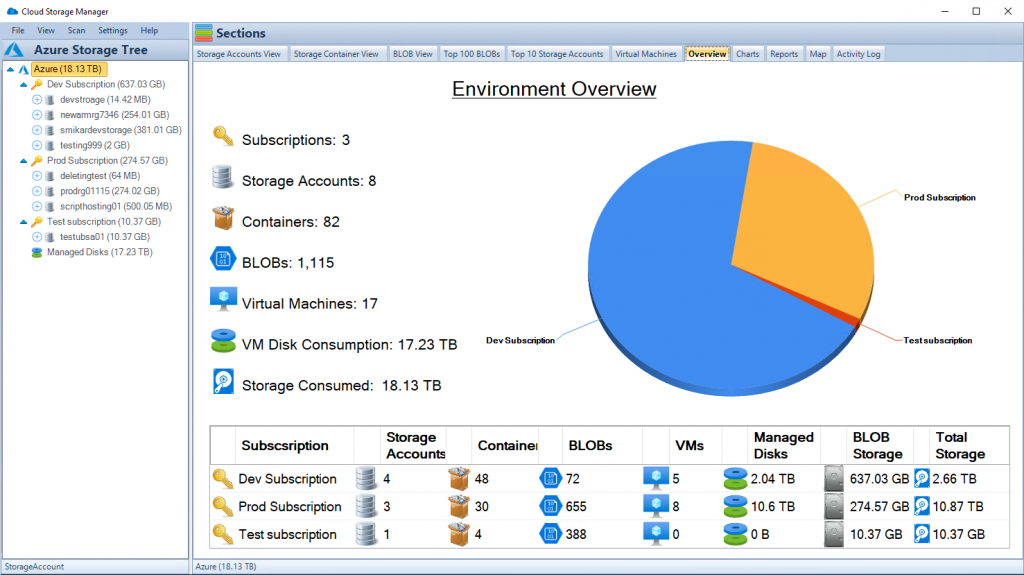
Cloud Storage Manager Main Window
Tips and Tricks for OneDrive
Ready to become a OneDrive pro? Here are some tips and tricks to get the most out of your OneDrive experience. Did you know you can automate file transfers, or set up special folders that are shared among multiple users? Dive into the settings and explore; you’ll be amazed at what you can do.
Common Issues and How to Solve Them
Like any software, OneDrive is not without its quirks. Some common issues include sync problems and storage limits. But don’t worry, most issues have straightforward solutions that can be found in the OneDrive settings or support forums.
1. Syncing Issues
Problem: One of the most common issues users face is syncing problems. You’ve placed a file in your OneDrive folder, but it’s not showing up on your other devices.
Solution: First, make sure you’re signed in to the same OneDrive account on all devices. If that’s not the issue, right-click on the OneDrive icon in your system tray (Windows) or menu bar (Mac) and select “Pause Syncing,” then “Resume Syncing.”
2. Storage Limit Reached
Problem: You’re trying to upload a file, and OneDrive tells you you’ve reached your storage limit.
Solution: Check how much storage you’ve used. If you’re close to or have exceeded the limit, you’ll need to delete some files or upgrade your storage plan.
3. File Size Too Large
Problem: You’re trying to upload a file, and OneDrive says it’s too large.
Solution: OneDrive has a file size limit for uploads. If your file exceeds this limit, you’ll need to either compress the file or split it into smaller parts.
4. Can’t Find OneDrive Icon
Problem: You can’t find the OneDrive icon in your system tray or menu bar.
Solution: This usually means OneDrive isn’t running. Search for OneDrive in your computer’s search bar and open the application.
5. OneDrive Not Working on Linux
Problem: You’re a Linux user and can’t find a OneDrive application for your OS.
Solution: OneDrive doesn’t officially support Linux, but you can use third-party software like rclone to sync your OneDrive files.
6. Conflicting Copies of Files
Problem: You see files with names like “Conflicting copy…” in your OneDrive folder.
Solution: This happens when the same file is edited on multiple devices before it has a chance to sync. You’ll need to manually compare the conflicting copies and decide which one to keep.
7. Can’t Sign In
Problem: You’re having trouble signing into your OneDrive account.
Solution: Make sure you’re using the correct Microsoft login credentials. If you’ve forgotten your password, use the “Forgot Password” option to reset it.
8. OneDrive Slowing Down Computer
Problem: Your computer is running slowly after installing OneDrive.
Solution: OneDrive can be resource-intensive, especially during syncing. You can pause syncing temporarily to see if that improves performance.
And there you have it! These are some of the most common issues you might encounter while using OneDrive, along with their solutions. Remember, the OneDrive support community is also a great resource if you run into any other issues.
Conclusion
So there you have it, your ultimate guide to Microsoft OneDrive. Whether you’re a student, a professional, or just someone looking to simplify their digital life, OneDrive offers a range of features to suit your needs. Ready to make the leap? Trust us, your future self will thank you.
Cloud Storage Manager File Menu
FAQs
Microsoft OneDrive: How to Sync?
To sync your files, simply drag and drop them into your OneDrive folder. Any changes you make will automatically be updated across all your devices.
Microsoft OneDrive: How to Use?
Using OneDrive is as simple as saving a file to a folder. Just drag and drop files into your OneDrive folder, and they’ll be accessible from any device.
How Much OneDrive Storage Do I Have?
The amount of storage you have depends on your subscription. Free users get 5GB, while Microsoft 365 subscribers get 1TB.
How Much OneDrive Storage Is Free?
OneDrive offers 5GB of free storage to all users. Need more? You can upgrade to a paid plan.
Where Is OneDrive on My Computer?
The location of the OneDrive folder on your computer can vary depending on your operating system and settings. However, here are some general guidelines:
For Windows Users:
After you’ve installed OneDrive, you’ll usually find a OneDrive folder in your File Explorer. It’s often located under “This PC” along with other folders like “Documents,” “Downloads,” and “Pictures.”
For Mac Users:
If you’re using a Mac, you’ll find the OneDrive folder in your Finder. It’s typically located in the sidebar, under “Favorites,” along with other folders like “Desktop,” “Documents,” and “Downloads.”
For Linux Users:
Linux users who have managed to set up OneDrive (usually through third-party software, as OneDrive doesn’t officially support Linux) will find the folder location varies based on the setup process.
To quickly access your OneDrive folder, you can also click on the OneDrive icon in the system tray (Windows) or menu bar (Mac), and then click on “Open Folder.”
So, whether you’re a Windows aficionado, a Mac enthusiast, or a Linux guru, accessing your OneDrive folder is usually just a few clicks away! 😊
And there you have it! I hope this guide helps you navigate the cloud-sprinkled skies of OneDrive. Got more questions? Feel free to drop them in the comments! 😊