Azure Disk Storage Best Practices

Azure Disk Storage Best Practices

Azure Disk Storage is a robust and versatile cloud storage solution provided by Microsoft Azure. It offers high-performance, durable, and scalable storage options for various workloads, such as virtual machines, databases, and business-critical applications. Understanding the key factors impacting costs, best practices, and how to optimize Azure Disk Storage can help users save money and make the most of their cloud storage investment. This article will delve into these aspects, exploring the challenges and trade-offs involved in balancing different factors. It will also highlight the importance of considering the impact on when making decisions about Azure disks. To better visualize and understand Azure Blob Storage costs and options, we recommend using our  software, Cloud Storage Manager, provides insights into Azure blob and file storage consumption, reporting on storage usage and growth trends.

Understanding Azure Disk Storage

Azure Disk Storage offers four types of managed disks: Ultra Disk, Premium SSD, Standard SSD, and Standard HDD. Each type caters to different workloads and performance requirements, with varying costs associated.

Ultra Disk

Ultra Disks are high-performance storage designed for IO-intensive workloads that require low-latency and high-throughput. They are suitable for applications such as SAP HANA, top-tier databases, and other transaction-heavy workloads.

Premium SSD

Premium SSDs offer high-performance storage for production workloads that require consistent low-latency and high IOPS. They are ideal for virtual machines running databases, data warehousing, and enterprise applications.

Standard SSD

Standard SSDs provide cost-effective storage for workloads that require consistent performance but do not have high IOPS requirements. They are suitable for web servers, low-traffic applications, and development and test environments.

Standard HDD

Standard HDDs are low-cost storage options designed for workloads with low IOPS and throughput requirements. They are ideal for backup, archival, and other infrequent access use cases.

Key Factors Impacting Costs

Several factors influence the overall cost of Azure Disk Storage, including disk type, disk size, performance tiers, data transfer, and redundancy options.

Disk Type

Azure Disk Storage offers four types of managed disks, as mentioned earlier. Ultra Disks and Premium SSDs come at a higher price due to their superior performance, while Standard SSDs and HDDs are more affordable options. It’s crucial to select the right disk type for your workloads to balance cost and performance effectively.

Disk Size

The cost of Azure Disk Storage increases with the size of the disk. Larger disks provide more storage capacity and higher performance, but they also incur higher costs. To optimize costs, it’s essential to choose a disk size that meets your storage and performance requirements without over-provisioning.

Performance Tiers

Azure Disk Storage offers different performance tiers based on the number of input/output operations per second (IOPS) and throughput (MB/s) required. Higher performance tiers come at a higher cost. It’s essential to select the appropriate tier to meet your workloads’ performance requirements while minimizing costs.

Data Transfer

Data transfer costs are incurred when data is transferred in and out of Azure Disk Storage. Ingress (data transfer into the storage) is generally free, while egress (data transfer out of the storage) incurs charges. To optimize data transfer costs, it’s essential to monitor and manage data traffic patterns and minimize unnecessary data transfers.

Redundancy Options

Azure Disk Storage offers different redundancy options to ensure data durability and availability. Locally redundant storage (LRS), zone-redundant storage (ZRS), and geo-redundant storage (GRS) are available, with increasing levels of redundancy and associated costs.


Cloud Storage Manager Main Window

Best Practices for Azure Disk Storage

Implementing best practices for Azure Disk Storage can help optimize costs, performance, and durability. This section will discuss various best practices in detail.

Select the Appropriate Disk Type and Size

Choose the right disk type based on your workload’s performance requirements and budget. Also, consider the appropriate disk size to meet your storage capacity and performance needs without incurring unnecessary costs. Regularly review your storage requirements and adjust disk types and sizes accordingly to ensure optimal cost and performance.

Optimize Performance Tiers

Select the performance tier that best aligns with your workload’s IOPS and throughput requirements. Over-provisioning can lead to increased costs, while under-provisioning can negatively impact performance. Regularly monitor your workloads’ performance and adjust the performance tiers accordingly to maintain optimal cost and performance balance.

Use Snapshots and Backup

Leverage Azure Disk snapshots to create point-in-time backups of your disks. Regularly schedule backups to protect your data from accidental deletion, corruption, or disaster. Implementing a backup strategy helps ensure data durability and recovery in case of unforeseen incidents.

Implement Redundancy

Choose the right redundancy option based on your data durability and availability needs. Consider factors such as recovery point objectives (RPO) and recovery time objectives (RTO) when making this decision. Regularly review your redundancy requirements and adjust the redundancy options accordingly to optimize cost and data protection.

Monitor and Optimize Storage Usage

Regularly monitor your Azure Disk Storage usage to identify patterns, trends, and potential areas for optimization. Our software, Cloud Storage Manager, can provide valuable insights into your storage consumption and help identify cost-saving opportunities.

Trade-offs and Challenges

When optimizing Azure Disk Storage, it’s essential to consider the trade-offs and challenges associated with different approaches.

Performance vs. Cost

Higher-performing disk types and performance tiers come with higher costs. Balancing performance requirements with budget constraints can be challenging, and it’s crucial to evaluate the potential impact on your workload and user experience. Regularly review your workloads’ performance requirements and adjust the disk types and performance tiers accordingly to maintain an optimal balance between cost and performance.

Redundancy vs. Cost

Increased redundancy offers better data durability and availability but also incurs higher costs. Evaluate the risks associated with data loss or unavailability and choose a redundancy option that meets your business requirements without excessive expense. Regularly review your workloads’ redundancy requirements and adjust the redundancy options accordingly to optimize cost and data protection.

Scalability vs. Management Complexity

Azure Disk Storage is designed to be scalable, but increased storage usage can introduce management complexity. Implementing monitoring and management tools, such as Cloud Storage Manager, can help mitigate these challenges while maintaining scalability. Regularly review your storage usage and implement appropriate management and monitoring solutions to maintain storage efficiency and optimize costs.


Cloud Storage Manager Blobs Tab

How to Use Azure Disk Storage

This section provides a step-by-step guide on using Azure Disk Storage.

Create an Azure Disk Storage Account

To start using Azure Disk Storage, you’ll first need to create an Azure Storage account. Sign in to the Azure portal, click ‘Create a resource’, and search for ‘Storage account.’ Fill in the required information, such as subscription, resource group, account name, and location. Choose the desired performance tier and redundancy option, and then click ‘Create.’

Create a Managed Disk

Once your storage account is created, navigate to the ‘Disks‘ section of the Azure portal. Click ‘Add’ to create a new managed disk. Select the appropriate disk type, size, and performance tier based on your requirements. You can also enable additional features such as disk encryption and disk snapshots during this process.

Attach the Disk to a Virtual Machine

To use the managed disk with a virtual machine (VM), navigate to the ‘Virtual machines’ section of the Azure portal. Select the VM you want to attach the disk to, and click on ‘Disks’ in the VM settings. Click ‘Add data disk’ and choose the managed disk you created earlier. Save the changes to attach the disk to the VM.

Configure and Use the Disk

After attaching the disk to the VM, you’ll need to configure the disk within the VM’s operating system. This process varies depending on the operating system in use. For Windows-based VMs, you’ll need to initialize the disk, create partitions, and format the partitions using Disk Management or diskpart utility. For Linux-based VMs, you’ll need to use tools like fdisk or parted to create partitions and file systems. Once configured, you can use the disk as you would any other storage device.

Monitor and Optimize Storage Usage

Regularly monitor your Azure Disk Storage usage using Azure portal metrics, Azure Monitor, or third-party tools like Cloud Storage Manager. Identify patterns, trends, and potential areas for optimization, such as adjusting disk types, sizes, performance tiers, or redundancy options. Implementing regular monitoring and optimization practices can help maintain storage efficiency and optimize costs.


Cloud Storage Manager Map View

Azure Blob Storage Cost Estimator and Cloud Storage Manager

To help users save money on their Azure Storage, we recommend using our free Azure Blob Storage Cost Estimator and Cloud Storage Manager software.

Azure Blob Storage Cost Estimator

Our Azure Blob Storage Cost Estimator allows users to visualize and understand Azure Blob Storage costs and options. By inputting various storage parameters such as storage type, redundancy, access tier, and data transfer, users can estimate their storage costs and explore cost-saving opportunities.

You can use our Azure Storage Estimator below to give you an estimate of your Azure Costs.

The Azure Storage costs provided are for illustration purposes and may not be accurate or up-to-date. Azure Storage pricing can change over time, and actual prices may vary depending on factors like region, redundancy options, and other configurations.

To get the most accurate and up-to-date Azure Storage costs, you should refer to the official Azure Storage pricing page: https://azure.microsoft.com/en-us/pricing/details/storage/

Cloud Storage Manager

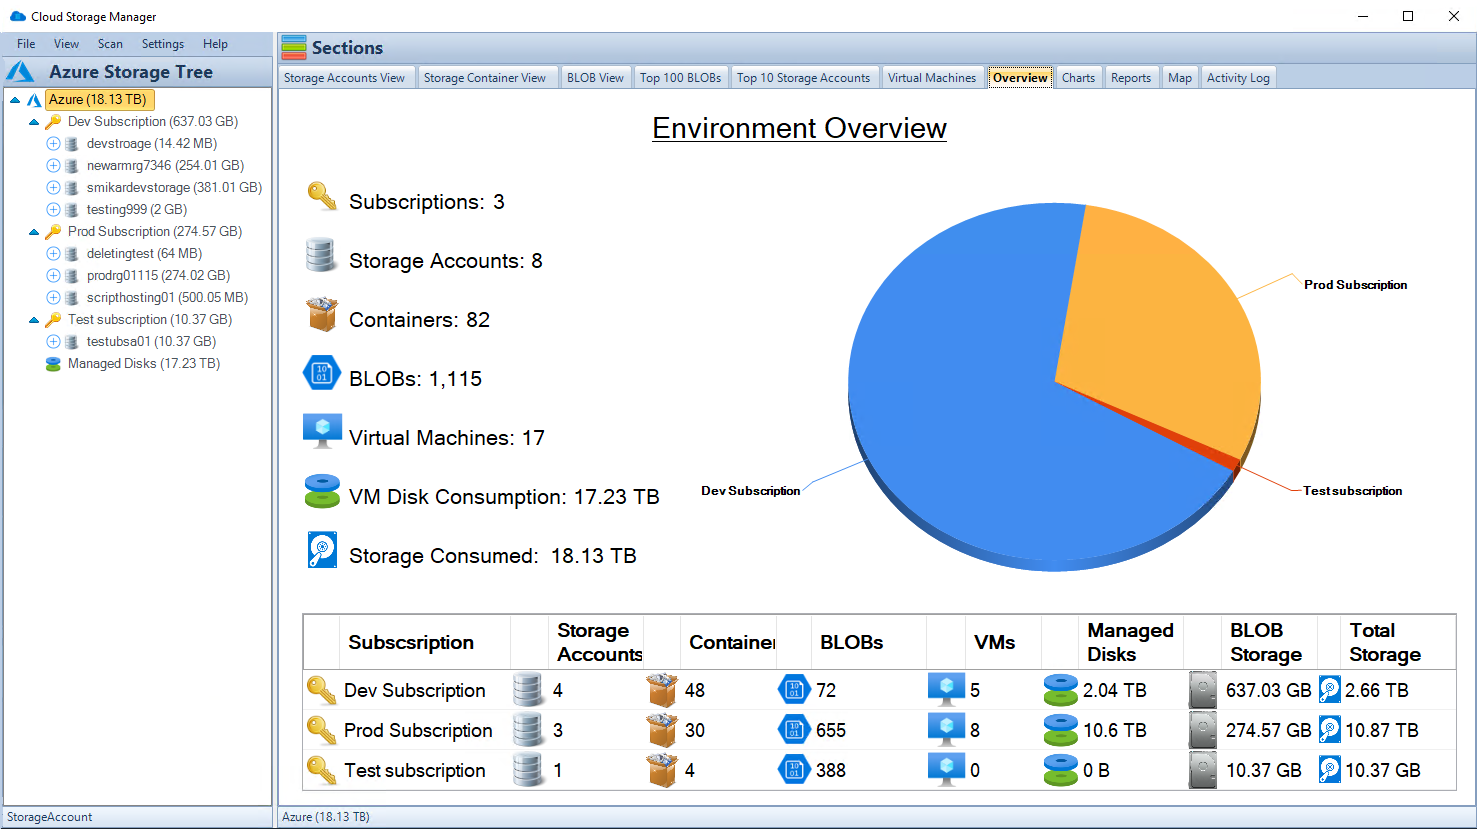
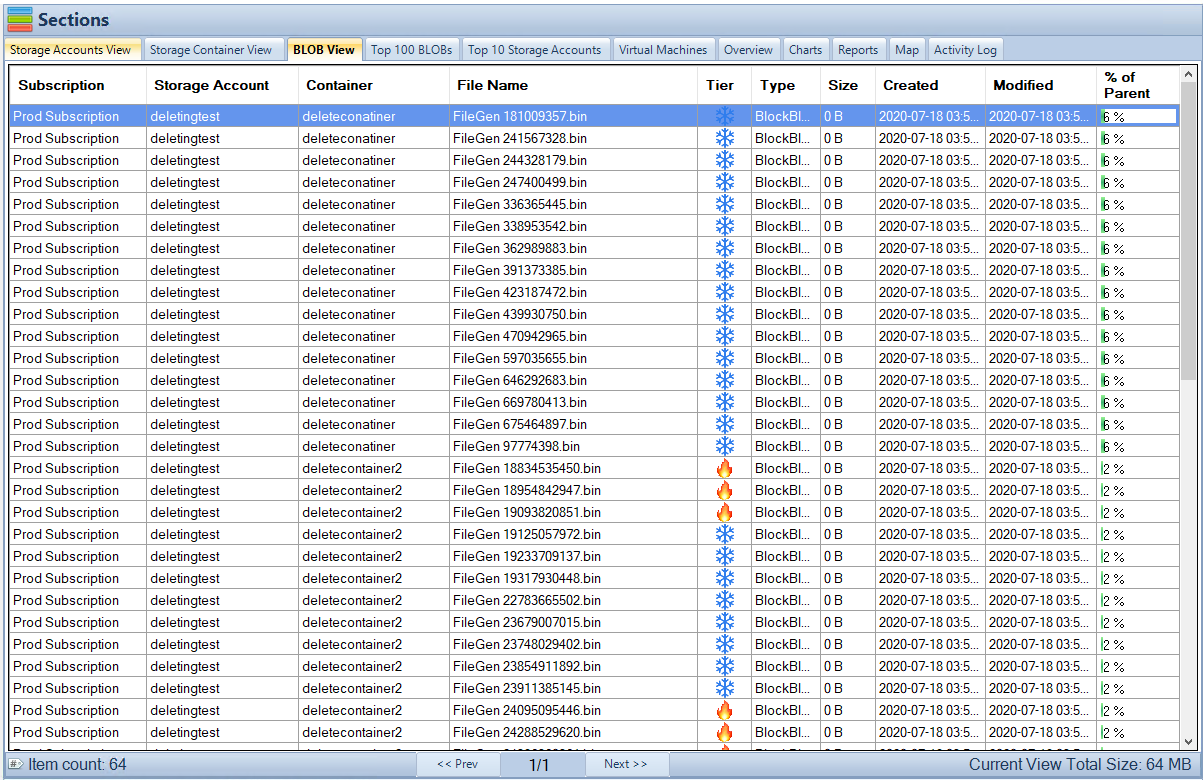
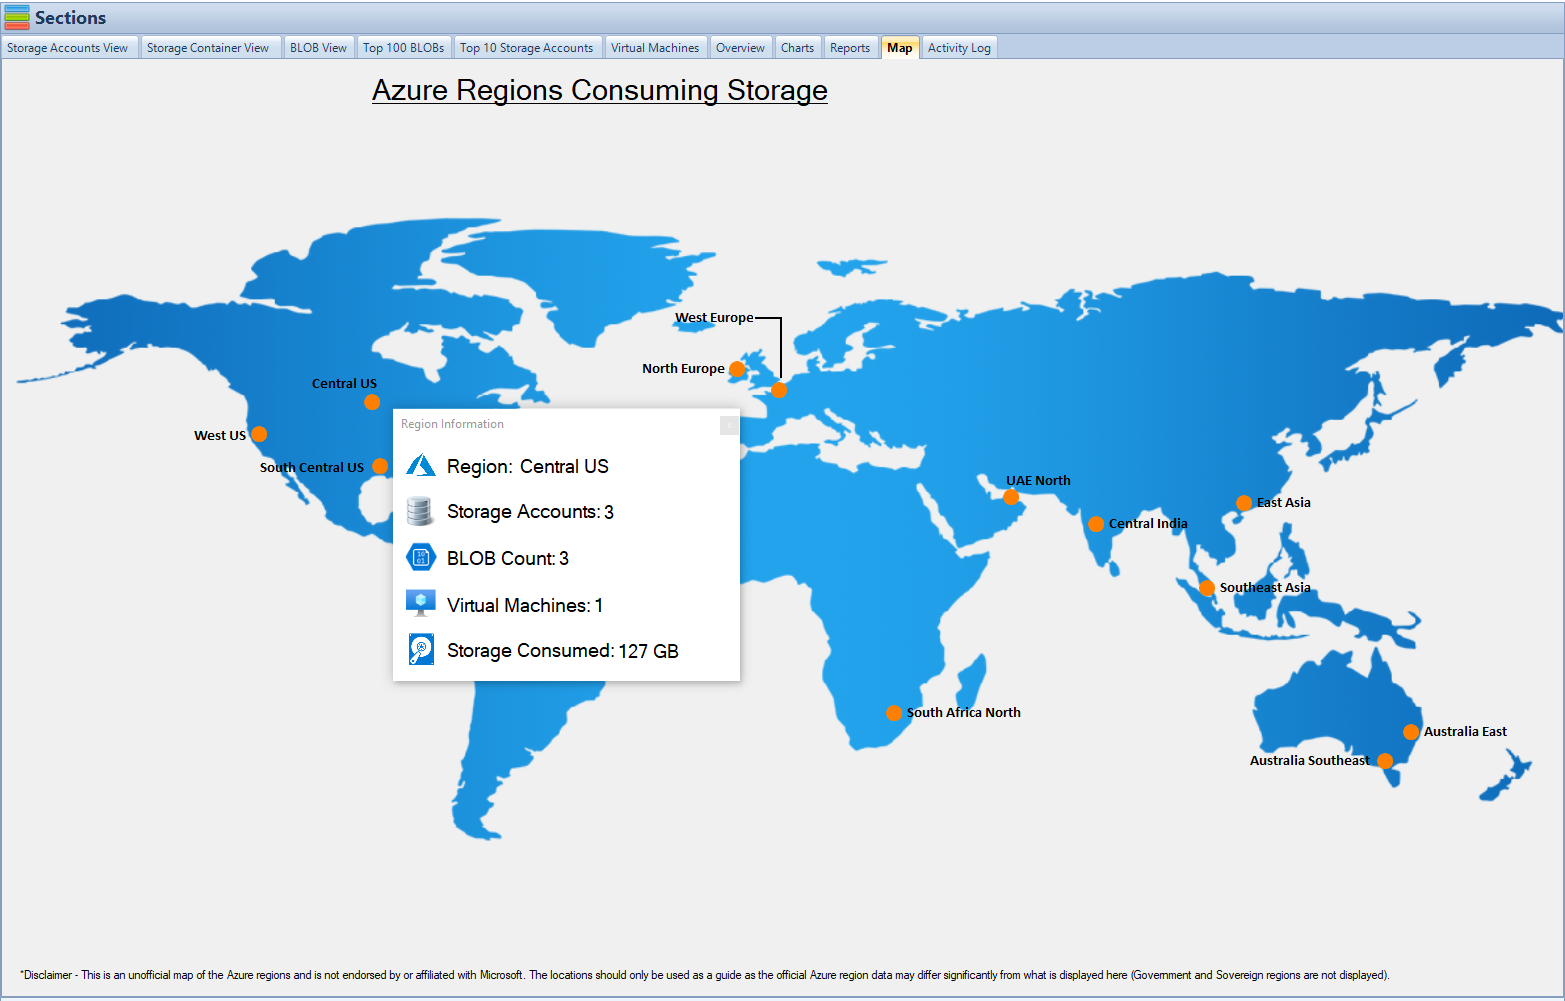
Cloud Storage Manager is a powerful software that provides insights into Azure blob and file storage consumption. It offers detailed reports on storage usage and growth trends, helping users identify potential cost-saving opportunities. By implementing Cloud Storage Manager, users can monitor their storage usage and make informed decisions on optimizing their Azure Storage investment.

Azure Disk Storage FAQs

No. Question Answer
1.

What is Azure Disk Storage?

Azure Disk Storage is a cloud-based storage solution offered by Microsoft, designed for various workloads, including virtual machines, databases, and business-critical applications.
2.

What are the types of Azure managed disks?

Azure offers four types of managed disks: Ultra Disk, Premium SSD, Standard SSD, and Standard HDD. Each type caters to different workloads and performance requirements.
3.

What factors impact Azure Disk Storage costs?

Key factors impacting costs include disk type, disk size, performance tiers, data transfer, and redundancy options.
4.

How can I optimize Azure Disk Storage costs?

To optimize costs, select the appropriate disk type, size, and performance tier based on your workload requirements, monitor data transfer, and choose the suitable redundancy option.
5.

What are the best practices for Azure Disk Storage?

Best practices include selecting the appropriate disk type and size, optimizing performance tiers, using snapshots and backups, implementing redundancy, and monitoring and optimizing storage usage.
6.

What trade-offs and challenges should I consider?

Consider trade-offs between performance vs. cost, redundancy vs. cost, and scalability vs. management complexity when optimizing Azure Disk Storage.
7.

How do I create and use Azure Disk Storage?

Create an Azure Storage account, then create a managed disk. Attach the disk to a virtual machine, configure the disk within the VM’s operating system, and use it as any other storage device. Monitor and optimize storage usage.
8.

What is the Azure Blob Storage Cost Estimator?

The Azure Blob Storage Cost Estimator is a free tool that helps users visualize and understand Azure Blob Storage costs and options by inputting various storage parameters.
9.

What is Cloud Storage Manager?

Cloud Storage Manager is a software that provides insights into Azure blob and file storage consumption, offering detailed reports on storage usage and growth trends to help users identify potential cost-saving opportunities.
10.

Can I use Azure Disk Storage for backup and archival purposes?

Yes, you can use Azure Disk Storage, specifically Standard HDDs, for backup and archival purposes due to their low cost and lower IOPS and throughput requirements suitable for infrequent access use cases.

Azure Disk Storage Conclusion

Azure Disk Storage is a versatile and powerful cloud storage solution that caters to a wide range of workloads and performance requirements. By understanding the key factors that impact costs, implementing best practices, and considering the trade-offs and challenges involved, you can optimize your Azure Disk Storage usage and save money. Utilizing tools like the Azure Blob Storage Cost Estimator and Cloud Storage Manager can further aid in understanding and managing your storage investment, allowing you to make informed decisions and maintain storage efficiency.

Best Practices for Azure Resource Groups

Best Practices for Azure Resource Groups

In today’s fast-paced and technology-driven world, cloud computing has become an essential component of modern business operations. Microsoft Azure, a leading cloud platform, offers a wide range of services and tools to help organizations manage their infrastructure efficiently. One crucial aspect of managing Azure resources is the Azure Resource Group, a logical container for resources deployed within an Azure subscription. In this comprehensive guide, we’ll explore the best practices for organizing Azure Resource Groups, enabling you to optimize your cloud infrastructure, streamline management, and enhance the security and compliance of your resources.

Why Organize Your Azure Resource Groups?

Understanding the importance of organizing Azure Resource Groups is essential to leveraging their full potential. Efficient organization of your resource groups can lead to numerous benefits that impact various aspects of your cloud infrastructure management:

  • Improved resource management: Proper organization of Azure Resource Groups allows you to manage your resources more effectively, making it easier to deploy, monitor, and maintain your cloud infrastructure. This can result in increased productivity and more efficient use of resources.
  • Simplified billing and cost tracking: When resources are organized systematically, it becomes simpler to track and allocate costs associated with your cloud infrastructure. This can lead to better budgeting, cost optimization, and overall financial management.
  • Enhanced security and compliance: Organizing your Azure Resource Groups with security and compliance in mind can help mitigate potential risks and ensure the protection of your resources. This involves implementing access controls, isolating sensitive resources, and monitoring for security and compliance using Azure Policy.
  • Streamlined collaboration among teams: An organized Azure Resource Group structure promotes collaboration between teams, making it easier for them to work together on projects and share resources securely.

Now that we understand the significance of organizing Azure Resource Groups let’s dive into the best practices that can help you achieve these benefits.

Define a Consistent Naming Convention

Creating a consistent naming convention for your resource groups is the first step towards effective organization. This practice will enable you and your team to quickly identify and manage resources within your Azure environment. In creating a naming convention, you should consider incorporating the following information:

  • Project or application name: Including the project or application name in your resource group name ensures that resources are easily associated with their corresponding projects or applications. This can be especially helpful when working with multiple projects or applications across your organization.
  • Environment (e.g., dev, test, prod): Specifying the environment (e.g., development, testing, or production) in your resource group name allows you to quickly differentiate between resources used for various stages of your project lifecycle. This can help you manage resources more efficiently and reduce the risk of accidentally modifying or deleting the wrong resources.
  • Geographic location: Including the geographic location in your resource group name can help you manage resources based on their physical location, making it easier to comply with regional regulations and optimize your cloud infrastructure for performance and latency.
  • Department or team name: Adding the department or team name to your resource group name can improve collaboration between teams, ensuring that resources are easily identifiable and accessible by the appropriate team members.

Group Resources Based on Lifecycle and Management

Another essential practice in organizing Azure Resource Groups is to group resources based on their lifecycle and management requirements. This approach can help you better manage and maintain your cloud infrastructure by simplifying resource deployment, monitoring, and deletion. To achieve this, consider the following:

  • Group resources with similar lifecycles: Resources that share similar lifecycles, such as development, testing, and production resources, shouldbe grouped together within a resource group. This approach allows you to manage these resources more effectively by simplifying deployment, monitoring, and maintenance tasks.
  • Group resources based on ownership and responsibility: Organizing resources according to the teams or departments responsible for their management can help improve collaboration and access control. By grouping resources in this manner, you can ensure that the appropriate team members have access to the necessary resources while maintaining proper security and access controls.
  • Group resources with similar management requirements: Resources that require similar management tasks or share common dependencies should be grouped together. This can help streamline resource management and monitoring, as well as ensure that resources are consistently maintained and updated.

Use Tags to Enhance Organization

Tags are a powerful tool for organizing resources beyond the scope of resource groups. By implementing a consistent tagging strategy, you can further enhance your cloud infrastructure’s organization and management. Some of the key benefits of using tags include:

  • Filter and categorize resources for reporting and analysis: Tags can be used to filter and categorize resources based on various criteria, such as project, environment, or department. This can help you generate more accurate reports and analyses, enabling you to make more informed decisions about your cloud infrastructure.
  • Streamline cost allocation and tracking: Tags can be used to associate resources with specific cost centers or projects, making it easier to allocate and track costs across your organization. This can help you optimize your cloud infrastructure costs and better manage your budget.
  • Improve access control and security: Tags can be used to implement access controls and security measures, such as restricting access to resources based on a user’s role or department. This can help you maintain a secure and compliant cloud infrastructure by ensuring that users only have access to the resources they need.

Design for Security and Compliance

Organizing Azure Resource Groups with security and compliance in mind can help minimize risks and protect your resources. To achieve this, consider the following best practices:

  • Isolate sensitive resources in dedicated resource groups: Sensitive resources, such as databases containing personal information or mission-critical applications, should be isolated in dedicated resource groups. This can help protect these resources by limiting access and reducing the risk of unauthorized access or modification.
  • Implement role-based access control (RBAC) for resource groups: RBAC allows you to grant specific permissions to users based on their roles, ensuring that they only have access to the resources necessary to perform their job duties. Implementing RBAC for resource groups can help you maintain a secure and compliant cloud infrastructure.
  • Monitor resource groups for security and compliance using Azure Policy: Azure Policy is a powerful tool for monitoring and enforcing compliance within your cloud infrastructure. By monitoring your resource groups using Azure Policy, you can identify and remediate potential security and compliance risks before they become critical issues.

Leverage Azure Management Groups

Azure Management Groups offer a higher-level organization structure for managing your Azure subscriptions and resource groups. Using management groups can help you achieve the following benefits:

  • Enforce consistent policies and access control across multiple subscriptions: Management groups allow you to define and enforce policies and access controls across multiple Azure subscriptions, ensuring consistent security and compliance across your entire cloud infrastructure.
  • Simplify governance and compliance at scale: As your organization grows and your cloud infrastructure expands, maintaining governance and compliance can become increasingly complex. Management groups can help you simplify this process by providing a centralized location for managing policies and access controls across your subscriptions and resource groups.
  • Organize subscriptions and resource groups based on organizational structure: Management groups can be used to organize subscriptions and resource groups according to your organization’s structure, such as by department, team, or project. This can help you manage resources more efficiently and ensure that the appropriate team members have access to the necessary resources.

Azure Resource Groups FAQs

FAQ Question FAQ Answer

What is a resource group in Azure?

A resource group in Azure is a logical container for resources that are deployed within an Azure subscription. It helps you organize and manage resources based on their lifecycle and their relationship to each other.

What is an example of a resource group in Azure?

An example of a resource group in Azure could be one that contains all the resources related to a specific web application, including web app services, databases, and storage accounts.

What are the different types of resource groups in Azure?

There aren’t specific “types” of resource groups in Azure. However, resource groups can be organized based on various factors, such as project, environment (e.g., dev, test, prod), geographic location, and department or team.

Why use resource groups in Azure?

Resource groups in Azure provide a way to organize and manage resources efficiently, simplify billing and cost tracking, enhance security and compliance, and streamline collaboration among teams.

What are the benefits of resource groups?

The benefits of resource groups include improved resource management, simplified billing and cost tracking, enhanced security and compliance, and streamlined collaboration among teams.

What is the role of a resource group?

The role of a resource group is to provide a logical container for resources in Azure, allowing you to organize and manage resources based on their lifecycle and their relationship to each other.

What are the 3 types of Azure roles?

The three types of Azure roles are Owner, Contributor, and Reader. These roles represent different levels of access and permissions within Azure resources and resource groups.

What are the four main resource groups?

The term “four main resource groups” is not specific to Azure. However, you can organize your resource groups based on various factors, such as project, environment, geographic location, and department or team.

What best describes a resource group?

A resource group is a logical container for resources deployed within an Azure subscription, allowing for the organization and management of resources based on their lifecycle and their relationship to each other.

What is an example of a resource group?

An example of a resource group could be one that contains all the resources related to a specific web application, including web app services, databases, and storage accounts.

What are the types of resource group?

There aren’t specific “types” of resource groups. However, resource groups can be organized based on various factors, such as project, environment (e.g., dev, test, prod), geographic location, and department or team.

What is the difference between group and resource group in Azure?

The term “group” in Azure typically refers to an Azure Active Directory (AAD) group, which is used for managing access to resources at the user level. A resource group, on the other hand, is a logical container for resources deployed within an Azure subscription.

Where is Azure resource Group?

Azure Resource Groups are part of the Azure Resource Manager (ARM) service, which is available within the Azure Portal and can also be accessed via Azure CLI, PowerShell, and REST APIs.

What is Azure resource Group vs AWS?

Azure Resource Groups are a feature of Microsoft Azure, while AWS is Amazon’s cloud platform. AWS has a similar concept called AWS Resource Groups, which helps users organize and manage AWS resources.

What is the equivalent to an Azure resource Group in AWS?

The equivalent of an Azure Resource Group in AWS is the AWS Resource Group, which also helps users organize and manage AWS resources based on their lifecycle and their relationship to each other.

Additional Azure Resource Group Best Practices

In addition to the best practices for organizing Azure Resource Groups previously mentioned, consider these additional tips to further improve your resource management:

Implement Consistent Naming Conventions

Adopting a consistent naming convention for your Azure Resource Groups and resources is crucial for improving the manageability and discoverability of your cloud infrastructure. A well-defined naming convention can help you quickly locate and identify resources based on their names. When creating your naming convention, consider factors such as resource type, environment, location, and department or team.

Regularly Review and Update Resource Groups

Regularly reviewing and updating your Azure Resource Groups is essential to maintaining an organized and efficient cloud infrastructure. As your organization’s needs evolve, you may need to reorganize resources, create new resource groups, or update access controls and policies. Schedule periodic reviews to ensure that your resource groups continue to meet your organization’s needs and adhere to best practices.

Document Your Resource Group Strategy

Documenting your resource group strategy, including your organization’s best practices, naming conventions, and policies, can help ensure consistency and clarity across your team. This documentation can serve as a reference for current and future team members, helping them better understand your organization’s approach to organizing and managing Azure resources.

Azure Resource Groups Conclusion

Effectively organizing Azure Resource Groups is crucial for efficiently managing your cloud infrastructure and optimizing your resources. By following the best practices outlined in this comprehensive guide, you can create a streamlined, secure, and compliant environment that supports your organization’s needs. Don’t underestimate the power of a well-organized Azure Resource Group structure – it’s the foundation for success in your cloud journey. By prioritizing the organization of your resource groups and implementing the strategies discussed here, you’ll be well-equipped to manage your cloud infrastructure and ensure that your resources are used to their fullest potential.

Filtering Users and Groups using Azure AD Connect

Filtering Users and Groups using Azure AD Connect

Filtering Users and Groups using Azure AD Connect

OOOOH the Cloud

Microsoft’s Azure AD Connect allows you to sync your on-prem AD to your Azure AD / Office 365.  If you leave all the settings as default, then AD Connect will happily sync all your AD objects. This is fine for some, however many large organisations do not want to sync their entire environment. There are options to filter the objects by selecting specific OU’s, but sometimes this isn’t granular enough. Another option is to select a group and filter based on its memberships – but this is considered “pilot” mode and should not be used in a production environment. Personally, this is my preferred method, it’s easy to setup and you can add or remove users and groups to this “sync” group whenever you wish – but who am I to argue with Microsoft.

So if you can’t filter based on OU, and you don’t want to go against Microsoft’s “best practice”, what other options do you have?

Well, you need to look use the “Synchronization Rules Editor”.

The rules editor allows you to create filter rules, to either filter in or filter out the AD objects you want to sync.

In the below example I will show you how to filter out Users and Groups from syncing.

The rules editor uses the AD Attributes of the object to determine whether or not to sync them. By attributes, I mean these…

Azure AD Connect


If you have Exchange in your environment then you will have the extensionAttribute 1 – 15 in your schema. I tend to use these attributes, but you may decide to use any that suits.

OK, so what I want to achieve is to only sync the users or groups that have the extensionAttribute1 set to “Sync to Azure”. Any object without this value will not get synced.

First, lets modify the attribute for 1 user and 1 group.

Open AD Users and Computers and click View, and make sure the Advanced Features option is ticked. Without this option you won’t see the attributes tab.

Azure AD Connect 2


Find a test user and open the properties, then click on the Attribute Editor tab.

Scroll through and find the extensionAttribute1 and click Edit. Set the value to Sync to Azure.


Repeat the process for a Group.

OK, now that we’ve set the attribute on both a user and group object, launch the Synchronization Rules Editor.

Azure AD Connect 4


We will now create two rules, one to filter users, and another to filter groups.

Ensure the Direction is set to Inbound and click the Add new rule button.

Give the rule a descriptive name and provide a description. I suggest something useful so when you come back in 3+ months it will make sense to you.

  1. Set the Connected System to your domain.
  2. Set the Connected System Object Type to User
  3. Set the Metaverse Object Type to Person
  4. Set the Link Type to Join
  5. Set the Precedence to 50 (or any value lower than the lowest value – if you haven’t created any other rules, then 50 will be fine).
  6. Click Next

Azure AD Connect 5


Click the Add Group button, and then the Add Clause button.

Azure AD Connect 6


Set the Attribute to the attribute you selected as the “filtering attribute”. In our example, it’s extensionAttribute1.

Set the Operator to NotEqual

And enter the value to look for, which in our example is “Sync to Azure”.

Click Next.

Azure AD Connect 7


Click Next on the Join Rules window, as it’s not used with this rule.

Azure AD Connect 8


In the Transformations section, click Add transformation

  1. Set the FlowType to Constant
  2. Set the Target Attribute to cloudFiltered
  3. In the Source field, enter true
  4. Leave all other settings and click Add

Azure AD Connect 9


The new rule should now appear at the top of the list.

Azure AD Connect 10


OK, so that’s the Users rule done. Let’s move onto the Groups rule.

The groups rule is a little tricker, so instead of trying to create it from scratch, we’ll use the existing one.

Select the In from AD – Group Join rule and click Edit.

Azure AD Connect 11


Click Yes to the message – which will disable the existing rule and create a copy for us to work with.

Azure AD Connect 12


Give the rule a name and description.

Set the Precedence to 55.

Click Next

Azure AD Connect 13


In the Scoping Filter section, select both of the existing clauses and click Remove Clause.

Azure AD Connect 14


Once all the Clauses have been removed, click Add Clause.

Azure AD Connect 15


Set the Attribute to the attribute you selected as the “filtering attribute”. In our example, it’s extensionAttribute1.

Set the Operator to Equal (with the user rule we set it to NotEqual, but here we use the Equal operator).

And enter the value “Sync to Azure”, or whatever value you are using.

Click Next.

In the Join rules, ensure the Source Attribute is set to objectGUID and the Target Attribute is sourceAnchorBinary.

Click Next.

Azure AD Connect 16


Leave the settings as default in the Transformations window and click Save.

Azure AD Connect 17


If you receive an expression warning, click Yes to continue saving the rule.

You should now have two rules in your rule set.

Azure AD Connect 18


OK, now that we’ve made our rules, we need to kick off a full sync.

Open up a PowerShell console, and enter: Start-ADSyncSyncCycle -PolicyType Initial

Once the sync finishes, log into the Azure or 365 portal and have a look under the Users and Groups sections.

As you can see, only my two test users have been synced

Azure AD Connect 19


And in the groups, only my two test groups are synced too.

Azure AD Connect 20


While you are here, please take the time to check out our software products for Azure, VMWare, Hyper-V and SCCM.

70-534 – Maintaining the Azure Cloud

70-534 – Maintaining the Azure Cloud

70-534 – Maintaining the Azure Cloud

Azure Hand Cloud

Azure Overview

As explained in the previous post around the Azure Datacentres, Microsoft’s Azure offerings have to be reliable, have high performance and be incredibly resilient. Therefore maintaining the Azure Datacentres can be quite a complex procedure. Microsoft has to have a plan in place for the two possible scenarios of maintenance, planned and the unplanned. Planned maintenance happens on a schedule, while unplanned maintenance occurs in response to an unexpected event, normally due to a hardware failure.

Azure Planned Maintenance

Microsoft routinely schedule maintenance of their hosting hardware. Whether these are a firmware update or applying a security patch to the underlying hypervisor. While most of these will not effect the virtual machines you have running on this infrastructure, there are some circumstances which may cause your VMs to shutdown and restart. Obviously Microsoft providing a multi-tenanted environment, it would be near impossible to schedule the downtime of all their customers servers that would be effected by the maintenance, so hence this may occur to your VMs

Azure Stop

Azure Availability Sets

So how do you avoid this and ensure your application keeps on going? Well Microsoft have an Service Level Agreement (SLA) in place only for multi instance VMs in the same logical group, which is called an availability set. When Microsoft performs maintenance, they ensure that not all the virtual machines within the same availability set will be restarted at the same time. So to give your applications the best chance, ensure that you have at least two virtual machines performing the same function (perhaps clustered for example) within the one availability set. Always remember that a single virtual machine will not have an SLA available and could be restarted at any time. During an Azure datacentre maintenance, the single instance VMs are brought down in parallel, then upgraded and restarted in no particular order. So if you have your applications on single instance Virtual Machines, they will naturally be unavailable during the maintenance window. Microsoft does send customers an email prior to any scheduled maintenance, detailing the date and time the outage is to be expected, but this is only for planned maintenance. Unplanned maintenance you will of course not be notified.

Azure Availability Sets

Azure Resilience

As shown in the example picture above, we have two Front End servers for the application within their own availability set, with the corresponding database servers also in their own one. AppSrv1 will be on a different host, and perhaps even rack to AppSrv2. Should the host running AppSrv1 have an issue and have the need to restart all the virtual machines running on that host, then this will not effect AppSrv2. Same thing goes for the database servers. It is best practice to also separate your application databases and other roles and have them in their own availability sets.

Where possible, always create multiple instances of your virtual machines and have them within the same availability set. If you do this you will then qualify for the Microsoft SLA.

Azure Update Domains

Azure Update Domains (sometimes these maybe called Upgrade Domains) are utilised for planned updates to the Azure Cloud service. The default number of Update domains is five with a maximum of twenty available to each availability set. Your virtual machines are spread across update domains to avoid outages to your applications and as Microsoft rolls out updates to their infrastructure, they will only ever update one update domain at any time. This will avoid unnecessary outages to your system

Azure Update Domains

Azure Unplanned Maintenance

So what happens when there is unplanned maintenance I hear you ask? As I am sure you are quite aware, problems with hardware can be a regular occurrence at times. Failures with the network, server issues and even total rack failures can and do happen. Azure detects these failures automatically and will migrate your virtual machines to another host that is healthy.

Azure Fault Domains

Azure fault domains are a boundary between the infrastructure within the same datacentre to help prevent issues caused by unplanned outages. Multiple virtual machines that are deployed in the same availability set are also allocated to different fault domains.  Fault Domains can be on separate racks, separate power supplies, different switches and sometimes even cooling systems. Fault Domains within Azure are assigned in a pattern, FD0, FD1, FD0, FD1 and so forth. All this helps alleviate any unplanned localised hardware failures that will interrupt services to your virtual machines. It is very unlikely that there will be issues with two or more fault domains, in fact it is more likely that there is a whole datacentre outage, which in this case you would need cross region replication.

Azure Fault Domains

Azure Fault Domain Example

Now we have shown two fault domains with the availability sets detailed in the earlier diagram. You can see that AppSrv1 and DBSrv1 are in the same fault domain, and therefore more than likely on the same hardware or within the same rack. Should the rack or hardware have a failure, then AppSrv2 and DBSrv2 will not be effected by this outage and will continue delivering your applications.

VM                 Fault Domain

AppSrv1         0

AppSrv2         1

DBSrv1           0

DBSrv2           1

When you boot your servers within your availability set they will be allocated to a fault domain in an order, e.g. FD0, FD1, FD0, FD1, FD0, FD1 etc. The pattern of fault domain allocation never changes and will always follow this pattern.

So how does this work?

It is worth noting, that each availability set automatically creates two Fault Domains and is assigned to five Update Domains. For example, you build an availability set with six virtual machines. The first five are allocated to the five Fault Domains, and the sixth virtual machine is then added in to the first Fault Domain, with the first VM. In the worst case, VMs number one and six could be restarted at the same time if a maintenance event was to occur. As Update Domains are only ever restarted one at a time and that the restart order of the Update Domains isnt always sequential, these can be restarted in any order.

 Cross Region Redundancy

Now, what happens in the unlikely event that a complete Azure Datacentre has an issue. Cross region redundancy is available within Azure which is basically a backup copy of your data in a secondary Azure datacentre (replication of your VMs to a second region). You can set up Cross Region Redundancy for your applications that require this level of service (thinking Tier 1 applications for the most part). You select the primary region to deliver your services from, choose a secondary region and Azure will take care of the replication. In the event of something catastrophic of the primary region, the system will automatically failover to the secondary region. The beauty of this service is that this happens automatically, there is no manual intervention required. Azure automatically takes care of the replication and the failover.

Service Throttling

As Microsoft’s Azure is a multi-tenant environment, with many many customers, how can Microsoft fairly monitor consumption? Service throttling will ensure consistent delivery of services to every customer they have according to the customers subscription limits. If throttling does ever occur, the experience that will be delivered will be degraded services. Azure bases this throttling on a few different criteria. From the amount of data stored, the number of transactions and system throughputs. You do always have the option to increase your limits should you ever reach them. As always, you should plan your architecture within Azure with performance in mind, but if the need arises you can scale up and scale out as needed.

       FAQs

Question Answer
What is Azure planned maintenance?
Azure planned maintenance is when Microsoft schedules maintenance of their hosting hardware, which could include firmware updates or applying security patches to the underlying hypervisor. Some virtual machines may need to be shutdown and restarted during this process.
What is Azure Availability Sets?
Azure Availability Sets is a feature that allows customers to group virtual machines together in the same logical group to ensure that they are not all restarted at the same time during maintenance. Having multiple instances of virtual machines in the same availability set qualifies customers for the Microsoft SLA.
What is Azure resilience?
Azure resilience refers to the ability of a system to withstand and recover from hardware failures or other unexpected events. To ensure resilience, it is best practice to separate application databases and other roles, and to have them in their own availability sets.
What are Azure Update Domains?
Azure Update Domains are used for planned updates to the Azure Cloud service. Virtual machines are spread across update domains to avoid outages to applications, and Microsoft will only ever update one update domain at any time.
What is Azure unplanned maintenance?
Azure unplanned maintenance occurs in response to unexpected events such as hardware failures. Azure automatically detects these failures and migrates virtual machines to another healthy host.
What are Azure Fault Domains?
Azure Fault Domains are a boundary between infrastructure within the same datacenter to prevent issues caused by unplanned outages. Multiple virtual machines deployed in the same availability set are allocated to different fault domains, which can be on separate racks, power supplies, switches, or cooling systems.
How do I ensure my applications are resilient in Azure?
To ensure application resilience in Azure, it is recommended to group virtual machines in the same availability set, separate application databases and other roles, and have them in their own availability sets.
How does Azure handle unplanned outages?
Azure automatically detects unplanned outages and migrates virtual machines to another healthy host.
How does Azure prevent outages during planned maintenance?
Azure uses Azure Availability Sets and Azure Update Domains to prevent outages during planned maintenance.

Well thats it for todays post. Ill continue with the Architecting Azure Solutions 70-534 study in a further post. Make sure you book mark this site for further updates.

70-534 – Azure Datacentres

70-534 – Azure Datacentres

70-534 – Azure Datacentres

The second post of many more to come to help you understand and pass the Architecting Microsoft Azure Solutions exam and gain that sort after certification.

Well first things first, lets cover off the Microsoft Azure Datacentres. The datacentres may be known as Azure GFS datacentres (Global Foundation Services) or they were newly renamed to Microsoft Cloud Infrastructure and Operations (MCIO).

MS Azure DCs

Microsoft’s Azure datacentres are in all 17 different regions throughout the world all networked together with access available to these datacentres from 140 different countries. They are operate in 10 different languages and 24 different currencies. Not only can you run your servers and applications in these datacentres, they also are used by Microsoft to deliver their own services, like Office 365 services, Bing search, Xbox live as well as the Azure platform. These datacentres are huge (some as big as three large cruise ships placed end to end) with over one million servers serving over one billion customers. They have to be to provide infrastructure to themselves as well as all their clients around the world with real time replication, low latency and very very high reliability.

The regions they are available in are;

Azure Region             Location

Central US                   Iowa

East US                        Virginia

East US 2                     Virginia

US Gov Iowa                Iowa

US Gov Virginia           Virgina

North Central US         Illinois

South Central US         Texas

West US                       California

North Europe               Ireland

West Europe                Netherlands

East Asia                      Hong Kong

Southeast Asia             Singapore

Japan East                   Tokyo, Saitama

Japan West                  Osaka

Brazil South                 Sao Paulo State

Australia East              New South Wales

Australia South East    Victoria

Central India                Pune

South India                   Chennai

West India                    Mumbai

Choosing a Microsoft Azure Datacentre

Whenever choosing a datacentre to build your environment in, its always best practice to choose the one that is closest to your users, this will help with any latency, performance and reliability issues. Not all of the Microsoft Azure datacentres share the same set of services. (Microsoft regularly roll out new services. To see which services are available and where, visit the Microsoft website https://azure.microsoft.com/en-us/regions/services/). Australia has an additional constraint that only customers residing within Australia and New Zealand can uses the services within that region. Additionally, China which you may have noticed isnt specified above, delivers Azure services independently from the others as it is offered by one of their largest Internet Service Providers, 21Vianet. Data within the China Azure infrastructure remains within China and doesnt replicate or share data to the other regions.

Azure Datacentre Resiliency

Having datacentres that big and making them highly available creates a huge problem. Just think about having to manage over one million servers, patching them, updating firmware, replacing failed hardware. The number of servers alone is enough to make the average administrator faint. The advantage that Azure has over the average datacentre is, the amount of physical hardware servers. When one server starts to fail, its virtual machines can be migrated to another healthy server. Faults are detected and migration is handled automatically. The ability to quickly recover, or in most instances, migrate these virtual machines live, means high resilience is built in. This is known as Mean Time to Recover (MTTR), which allows Microsoft to provide the availability of services to their customers, quickly and without user intervention.

Azure Security

Microsoft takes security of seriously. Imagine all the data belonging to all these customers and Microsoft have a rogue employee start stealing data. Well Microsoft has locked down Azure only so that the administrators only have enough access and time to do the task they require. This is known as Just in Time Administrator Access. By default, Microsoft administrators do not have access to customer data and can only gain access when granted by the client and only during a predetermined window. All their administrator access and actions are logged, monitored and audited. Physical access to the Microsoft Azure Datacentres and hardware is also monitored with continuous surveillance.

As you can imagine, Microsoft Azure datacentres would be a target for all sort of nefarious type of hackers and threats. Threat management is also provided as part of the service. Data is scrubbed and monitored for any potential threats prior to it coming in to your precious servers. Intrusion detection, Denial of Service attack prevention, regular penetration testing, data analytics and machine learning tools help to keep your servers and data safe. Azure scans all software during all physical server builds. They also have real time protection and on demand scanning of their cloud services and virtual machines.

Deployment of patching is automated to the Azure infrastructure. Patching deployment is based on the severity of the patch. Azure will also patch customers virtual machines unless the customer has requested to manually patch their systems themselves (ie using SCCM or WSUS or the like).

Having so many customers share infrastructure between them in the multitenant environment, could be a huge security risk. Azure logically isolates each customer from each other so that no customer should be able to access any other customers data. For customers own security and compliance, Microsoft Azure provides a set of tools to help the client achieve this. Azure offers technology like data encryption in transit and at rest (Azure storage is encrypted). Azure also obtains some of the highest security certifications, such as ISO27001 and ISO27002,
HIPPA, FISMA, FedRAMP etc (The Microsoft Azure Trust Centre details the certifications held further. Please visit https://www.microsoft.com/en-us/trustcenter/Compliance for more information).

 Azure Datacentre Designs

With so many datacentres that are this large and with so many customers utilising their services and expecting reliability and performance, every Azure datacentre is designed with infrastructure availability as the main concern. Every critical component of Azure is built with redundancy in mind. Multiple Uninterruptible Power Supplies (UPS), huge arrays of batteries and large generators with fuel reserves to compensate in case of a tremendous disaster.

As you can imagine, running each of these datacentres is a huge expense for Microsoft. So each datacentre is also designed with to lower their total cost of ownership. Each of the Azure datacentres operate with a lower Power Usage Effectiveness (PUE) rating as low as 1.125, in comparison an average datacentre PUE rating is an 1.8. A low PUE means that the datacentre consumes less power and Microsoft achieve this by looking at the datacentre as a whole, not just focusing on each single component.

Azure Datacentre FAQs

Question Answer
What are Microsoft Azure Datacentres?
Microsoft Azure Datacentres are facilities that house and maintain servers and other infrastructure for running applications and services on the Azure platform. They are located in 17 different regions throughout the world and are used by Microsoft to deliver their own services as well as provide infrastructure to clients around the world.
What are the regions in which Microsoft Azure Datacentres are available?
Microsoft Azure Datacentres are available in 17 different regions around the world, including Central US, East US, West US, North Europe, West Europe, East Asia, Southeast Asia, Japan East, Japan West, Brazil South, Australia East, Australia South East, Central India, South India, and West India.
How do I choose a Microsoft Azure Datacentre?
When choosing a Microsoft Azure Datacentre to build your environment in, it’s best practice to choose the one that is closest to your users to improve latency, performance, and reliability. Not all of the datacentres share the same set of services, so it’s important to check which services are available and where on the Microsoft website. Additionally, customers residing within Australia and New Zealand can only use the services within the Australia region.
What is Azure Datacentre Resiliency?
Azure Datacentre Resiliency refers to the high resilience built into Microsoft’s Azure datacentres, which allows virtual machines to be quickly recovered or migrated live to another healthy server in the event of a failure. Faults are detected and migration is handled automatically, resulting in a Mean Time to Recover (MTTR) that allows Microsoft to provide the availability of services to their customers quickly and without user intervention.
How does Microsoft ensure the security of its Azure Datacentres?
Microsoft takes the security of its Azure Datacentres seriously, and has implemented measures such as Just in Time Administrator Access, physical access monitoring, and continuous surveillance to prevent unauthorized access. Threat management is also provided as part of the service, which includes intrusion detection, Denial of Service attack prevention, regular penetration testing, data analytics, and machine learning tools to help keep customers’ servers and data safe. Azure logically isolates each customer from each other to reduce the risk of security breaches in the multi-tenant environment.

Well thats enough for the moment. I will continue on to the next blog post for the 70-534 exam another day.