by Mark | Mar 2, 2023 | Azure, Azure Blobs
In today’s world, data is king. Companies and organizations are generating vast amounts of data every day, and they need a way to store, manage, and organize that data. This is where cloud storage solutions like Azure Blob Storage come into play. Azure Blob Storage is a scalable, secure, and cost-effective cloud storage solution that allows you to store and retrieve large amounts of unstructured data.
One of the key features of Azure Blob Storage is metadata. Metadata is information that describes your data. It can include information such as the creation date, author, title, and keywords. In this article, we will dive deep into Azure Blob Storage metadata and learn how it can help you manage and organize your data more effectively.
What is Azure Blob Storage Metadata?
Azure Blob Storage metadata is additional information that you can add to your blob objects to describe them. Blob objects are unstructured data such as images, videos, documents, and more. Metadata can include information such as the creation date, author, title, and keywords.
Metadata is stored as name-value pairs and can be added to both block blobs and page blobs. Block blobs are used to store large amounts of unstructured data, such as text and binary data. Page blobs are used to store random access files, such as virtual hard disks.
How to use Azure Blob Storage Metadata
Adding metadata to your blob objects is a straightforward process. You can add metadata when you create a blob, or you can add it later by updating the blob properties. Here’s how to add metadata to your blob:
- Sign in to the Azure portal and navigate to your storage account.
- Select the container that contains the blob you want to add metadata to.
- Click on the blob you want to add metadata to.
- Click on the “Properties” tab.
- Under “Metadata,” click on “Add metadata.”
- Enter the name and value of the metadata you want to add.
- Click “Save.”
Once you have added metadata to your blob, you can use it to search, filter, and organize your data.
Benefits of Azure Blob Storage Metadata
Using metadata in Azure Blob Storage has several benefits:
- Search and Filter: Metadata can be used to search and filter your data more easily. For example, if you have a large number of images stored in your storage account, you can use metadata to filter them by the date they were created or the author who created them.
- Organization: Metadata can be used to organize your data more effectively. For example, you can use metadata to group your data by project, department, or category.
- Customization: Metadata can be customized to meet your specific needs. You can create your own metadata properties and values that are tailored to your organization’s requirements.
- Security: Metadata can be used to add an extra layer of security to your data. For example, you can use metadata to add access control policies to your blobs, limiting who can access them.
Best Practices for Using Azure Blob Storage Metadata
To make the most of Azure Blob Storage metadata, here are some best practices to keep in mind:
- Use a Consistent Naming Convention: Use a consistent naming convention for your metadata properties and values. This will make it easier to search and filter your data.
- Keep Metadata Simple: Avoid using too many metadata properties or values. This can make it harder to manage and search your data effectively.
- Use Descriptive Values: Use descriptive values for your metadata properties. For example, instead of using “Tag1” and “Tag2,” use descriptive values like “Product Name” and “Category.”
- Update Metadata Regularly: Keep your metadata up-to-date and accurate. This will ensure that your data is always organized and searchable.
- Use Metadata in Conjunction with Tags: Use metadata in conjunction with tags to provide additional context to your data. Tags are descriptive labels that can be applied to your blobs to provide additional information about them.
Azure Blob Storage Metadata Actionable Tips
| Tip |
Description |
Use descriptive file names
|
Use clear and concise file names that accurately describe the content of the file. Avoid generic names like “Untitled” or “Document 1”. |
Add tags
|
Assign relevant tags to your files to make them easier to search and filter. Tags can be used to describe the content, context, or purpose of the file. |
Utilize folder structures
|
Create a folder structure that makes sense for your data and stick to it. Use subfolders to further organize your files. |
Include creation and modification dates
|
Add creation and modification dates to your files to keep track of when they were created or last updated. This can be helpful when trying to find the most recent version of a file. |
Include author or contributor information
|
If multiple people are working on a project or contributing to a document, include author or contributor information in the metadata. This can help identify who created or contributed to specific files. |
Use consistent metadata standards
|
If you’re working with a team or sharing files with others, use consistent metadata standards to ensure everyone is on the same page. This can help prevent confusion and ensure that files are properly organized. |
Azure Blob Storage Metadata FAQs
| Question |
Answer |
What is the difference between azure blob metadata vs tags?
|
Azure Blob metadata is a set of key-value pairs that can be added to a blob to provide additional information about the blob, while tags are labels that can be applied to a blob to help categorize or organize it. Metadata is often used to provide more detailed information about a blob, while tags are more high-level descriptors. |
What is metadata in Azure blob?
|
Metadata in Azure Blob Storage is a set of key-value pairs that can be associated with a blob object to provide additional information about it. Metadata can be used to help organize and search your blobs more effectively. |
What is the difference between blob tags and metadata in Azure?
|
Blob tags and metadata both provide additional information about a blob, but they serve different purposes. Tags are high-level descriptors that can help categorize or organize a blob, while metadata provides more detailed information about a blob, such as creation date, author, or other specific attributes. |
What is the metadata limits in Azure blob?
|
The maximum size of metadata for a block blob is 8 KB, and for a page blob, it is 1 MB. |
What is often stored in Azure Blob metadata?
|
Azure Blob metadata can contain any kind of additional information about a blob, such as creation date, author, content type, or other attributes that can be used to organize and search for the blob more effectively. |
What is the maximum length of Azure Blob metadata?
|
The maximum length of Azure Blob metadata is 8 KB for block blobs and 1 MB for page blobs. |
What are the different types of Azure Blob metadata?
|
There are no specific types of metadata in Azure Blob Storage, but metadata can be used to store any kind of additional information about a blob, such as author, creation date, content type, or any other attribute that can help organize and search for the blob more effectively. |
What is the purpose of Azure Blob metadata?
|
The purpose of Azure Blob metadata is to provide additional information about a blob object that can help organize and search for it more effectively. Metadata can be used to store any kind of additional information about a blob that is not included in the blob’s name or content. |
What are the examples of Azure Blob Metadata?
|
Examples of Azure Blob metadata include creation date, author, content type, file format, and any other attribute that can help organize and search for the blob more effectively. Metadata can be customized to fit the needs of the application or user. |
Azure Blob Storage Metadata Conclusion
Azure Blob Storage Metadata is a feature of Azure Blob Storage that allows users to associate additional information, in the form of key-value pairs, with blob objects. Metadata can be used to provide more detailed information about a blob, such as creation date, author, content type, or any other attribute that can help organize and search for the blob more effectively.
Metadata is an optional feature of Azure Blob Storage and can be added or modified at any time. When a new blob is created, users can specify the initial set of metadata key-value pairs, which can be updated later as needed. Similarly, when a blob is copied or moved, its metadata is also copied or moved along with it.
Metadata in Azure Blob Storage has several advantages. First, it can help users organize and search for their blobs more effectively by providing additional information that is not included in the blob’s name or content. Second, metadata can be used to enable more efficient processing of blobs, such as by enabling filtering or sorting based on specific attributes. Finally, metadata can be used to integrate Azure Blob Storage with other Azure services or third-party tools, such as by providing additional context for search or analytics.
To work with metadata in Azure Blob Storage, users can use a variety of tools and interfaces, including the Azure Portal, Azure PowerShell, Azure CLI, Azure SDKs, or REST APIs. The maximum size of metadata for a block blob is 8 KB, and for a page blob, it is 1 MB.
Overall, Azure Blob Storage Metadata is a powerful feature of Azure Blob Storage that can help users better manage and process their blobs by providing additional context and information.
Azure Storage Unlocked
Please fill out the form below to get our free Ebook "Azure Storage Unlocked" emailed to you
FREE DOWNLOAD

by Mark | Feb 28, 2023 | Azure, Azure Blobs, Blob Storage, How To
Blob Storage is a highly scalable and secure cloud storage solution offered by Microsoft Azure. It allows users to store unstructured data like text, images, videos, and audio files. Accessing Blob Storage is crucial for developers, IT professionals, and business owners who want to manage their data and applications in the cloud. In this article, we will discuss how to access Blob Storage using different methods and tools.
Azure Blob Storage Use Cases
| Use Case |
Description |
Backup and Archive
|
Blob storage can be used as a low-cost, durable backup and archive solution for data that is infrequently accessed. |
Media Storage and Streaming
|
Blob storage can be used to store and serve media files such as images, videos, and audio. Blob storage also supports streaming of large media files. |
Web Content Storage
|
Blob storage can be used to store and serve web content such as HTML, CSS, and JavaScript files. |
Big Data Analytics
|
Blob storage can be used to store large amounts of data for big data analytics. Blob storage integrates with many big data services, such as Azure HDInsight and Azure Databricks. |
IoT Data Storage
|
Blob storage can be used to store data from IoT devices such as sensors, cameras, and smart meters. |
Disaster Recovery
|
Blob storage can be used as a disaster recovery solution for critical data. |
Machine Learning
|
Blob storage can be used to store and manage large datasets used for machine learning, and can integrate with Azure Machine Learning services. |
Distributed File System
|
Blob storage can be used as a distributed file system for applications running in Azure, such as Hadoop and Spark. |
These are just a few examples of the many use cases for accessing Blob storage.
Accessing Blob Storage using Azure Portal
If you are new to Azure and Blob Storage, the easiest way to access Blob Storage is by using the Azure Portal. Follow these steps:
Log in to the Azure Portal
To access the Azure Portal, log in to your Azure account using your credentials.
Navigate to the Blob Storage Account
Once you are logged in, navigate to the Blob Storage account you want to access.
Access the Blob Container
Select the Blob container you want to access from the list of available containers.
Accessing Blob Storage using Azure Storage Explorer
Azure Storage Explorer is a free, cross-platform tool that allows you to manage your Azure Storage accounts. Follow these steps to access Blob Storage using Azure Storage Explorer:
Download and Install Azure Storage Explorer
Download and install Azure Storage Explorer on your computer.
Log in to Azure Storage Explorer
Log in to Azure Storage Explorer using your Azure account credentials.
Connect to Blob Storage
Once you are logged in, connect to your Blob Storage account using the connection string or the account name and key.
Access the Blob Container
Select the Blob container you want to access from the list of available containers.
Access the Blob Files
Once you have selected the Blob container, you can access the Blob files by clicking on the file name.
Accessing Blob Storage using Azure Blob Storage REST API
The Azure Blob Storage REST API allows developers to programmatically access Blob Storage using HTTP/HTTPS requests. Follow these steps to access Blob Storage using the REST API:
Get the Account Name and Account Key
To access Blob Storage using the REST API, you need to get the Account Name and Account Key from your Azure Portal.
Construct the Request URL
Construct the request URL by combining the Account Name, Container Name, and Blob Name.
Authenticate the Request
Authenticate the request by including the Account Key in the request header.
Send the Request
Send the HTTP/HTTPS request using the appropriate method (GET, PUT, POST, DELETE).
Accessing Azure Blob Storage FAQs
| Question |
Answer |
How do I access Azure Blob storage?
|
You can access Azure Blob Storage through the Azure Portal, Azure Storage Explorer, and the Azure Blob Storage REST API. |
How do I access Azure Blob storage via URL?
|
To access Azure Blob Storage via URL, you need to create a shared access signature (SAS) and use it to access the Blob Storage URL. |
How do I access Azure Blob storage using the access key?
|
To access Azure Blob Storage using the access key, you need to create a storage account and obtain the account access key. You can then use the key to authenticate your access to Blob Storage. |
How do I check my BLOB data?
|
You can check your BLOB data by accessing it through the Azure Portal, Azure Storage Explorer, or the Azure Blob Storage REST API. |
How do I access Azure Blob storage from SQL Server?
|
You can access Azure Blob Storage from SQL Server by using SQL Server Integration Services (SSIS) or by using the OPENROWSET function. |
How do I access Azure Blob storage from a VM?
|
You can access Azure Blob Storage from a VM by using the Azure Blob Storage REST API, Azure PowerShell, or Azure CLI. |
How do I access private Blob container in Azure?
|
You can access private Blob Container in Azure by using the Shared Access Signature (SAS) and setting the permission of the container to private. |
How do I access Azure Blob storage with managed identity?
|
You can access Azure Blob Storage with a managed identity by assigning the identity to the Azure VM or Azure Function and then using the identity to authenticate your access to Blob Storage. |
What is the difference between Azure Blob and Azure VM?
|
Azure Blob Storage is a cloud-based storage solution that is used to store unstructured data, while Azure VM is a virtual machine that runs on the Azure platform. |
How do I map Azure Blob storage?
|
You can map Azure Blob Storage to your local machine using the Azure Storage Explorer. |
How do I access Azure Blob storage with PowerShell?
|
You can access Azure Blob Storage with PowerShell by installing the Azure PowerShell module and using the cmdlets provided by the module. |
How does Azure Blob storage work?
|
Azure Blob Storage works by storing unstructured data as blobs in a storage account. The blobs can be accessed through the Azure Portal, Azure Storage Explorer, or the Azure Blob Storage REST API. |
What is the difference between Azure storage and Blob storage?
|
Azure storage is a general term used to describe different storage solutions provided by Azure, including Blob, File, Queue, and Table storage. Azure Blob Storage, on the other hand, is a specific type of Azure storage used to store unstructured data. |
What is the difference between Blob and object storage?
|
Blob storage is a type of object storage used to store unstructured data, while object storage is a more general term used to describe different types of storage solutions that store data as objects, including S3 and Azure Blob Storage. |
Is Azure Blob storage a data lake?
|
Azure Blob Storage can be used to store data in a data lake architecture, but it is not a data lake solution on its own. |
What does Azure Blob stand for?
|
Azure Blob stands for Azure Binary Large Object. |
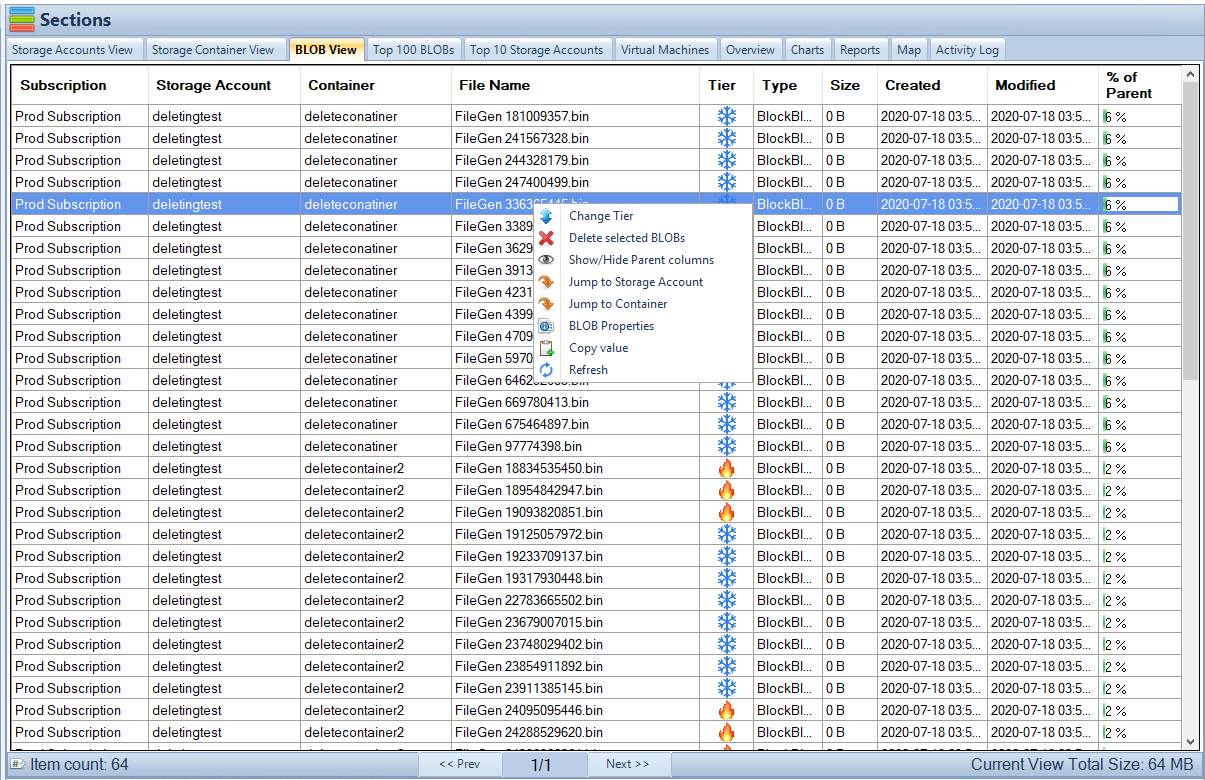
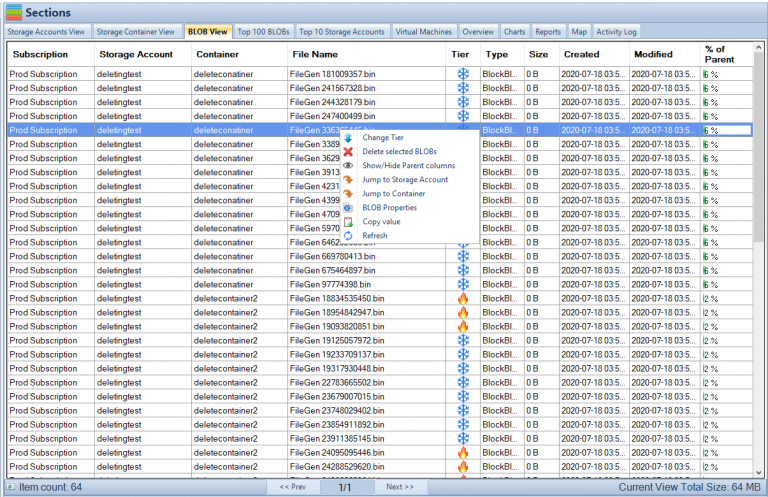
In conclusion, Cloud Storage Manager is a powerful tool that can help you track and manage your Azure Blob and Azure File storage consumption. With its unique features, you can easily visualize your Azure storage locations, view your Azure storage growth over time, browse through your Azure storage tree, and gain insights into your Azure Blob storage usage and consumption through its reporting feature.
You can search your Azure storage accounts across your complete Azure Tenancy, scan and report on your Azure Files usage, change the tiering of multiple Azure Blobs, delete the blob, as well as gather the Azure Blobs properties all with just a right-click. With Cloud Storage Manager, you can take back control of your Azure storage and reduce your costs, which often occur due to data residing in your Storage Accounts, and that continuously costs you money.
Azure Storage Unlocked
Please fill out the form below to get our free Ebook "Azure Storage Unlocked" emailed to you
FREE DOWNLOAD

by Mark | Feb 28, 2023 | Azure, Cloud Computing, Microsoft HyperV, VMWare
Virtual machines (VMs) have been around for quite some time now and have become a cornerstone of modern-day IT infrastructure. They provide a convenient way to run multiple operating systems on a single physical machine, allowing users to consolidate their hardware and save costs. However, as VM technology has evolved, newer versions of VMs have been introduced, such as generation 1 and generation 2 VMs. In this article, we’ll explore the differences between the two and help you understand which one is right for your needs.
What Are VMs?
A virtual machine is essentially a software-based emulation of a physical computer. It allows users to run one or more operating systems on a single physical machine, thereby saving costs and increasing efficiency. VMs are often used to create virtual environments for development, testing, and deployment of software applications.
What Are Generation 1 VMs?
Generation 1 VMs were introduced with the release of Windows Server 2008 R2. They are essentially the first iteration of virtual machines and are based on the traditional BIOS firmware. Generation 1 VMs use a virtualized hardware layer to present virtualized devices to the guest operating system.
What Are Generation 2 VMs?
Generation 2 VMs were introduced with the release of Windows Server 2012. They are the newer iteration of virtual machines and are based on the Unified Extensible Firmware Interface (UEFI) firmware. Generation 2 VMs use a more modern virtualized hardware layer to present virtualized devices to the guest operating system.
What Are the Differences Between Gen 1 and Gen 2 VMs?
There are several key differences between generation 1 and generation 2 VMs. These include:
Boot Process:
Generation 1 VMs use the traditional BIOS boot process, while generation 2 VMs use the more modern UEFI boot process.
Firmware:
Generation 1 VMs use BIOS firmware, while generation 2 VMs use UEFI firmware.
Boot Options:
Generation 2 VMs support more advanced boot options such as Secure Boot, which is not available in generation 1 VMs.
Device Support:
Generation 2 VMs have improved device support, including support for larger virtual hard disks (up to 64 TB), which is not available in generation 1 VMs.
Operating System Support:
Generation 2 VMs only support 64-bit guest operating systems, while generation 1 VMs support both 32-bit and 64-bit guest operating systems.
Integration Services:
Generation 2 VMs come with improved integration services, including support for online backups, remote desktop, and more.
Prons and Cons of Gen 1 and Gen 2 VMs
| Feature |
Gen 1 VMs |
Gen 2 VMs |
Pros
|
Widely used |
Secure boot |
|
Easy setup |
Improved performance |
|
Compatibility with older OS versions |
Better Linux Integration |
|
|
|
Cons
|
Slower boot time |
Requires Windows Server 2016 or newer |
|
Limited scalability |
More complex setup |
|
Limited security features |
Limited compatibility with older OS versions |
Gen 1 and Gen 2 VMs FAQs
| FAQ |
Answer |
Can I convert a Gen 1 VM to a Gen 2 VM?
|
No, it’s not possible to convert a Gen 1 VM to a Gen 2 VM. You’ll need to create a new Gen 2 VM and migrate your data and settings over manually. |
Can I run both Gen 1 and Gen 2 VMs on the same host server?
|
Yes, it’s possible to run both Gen 1 and Gen 2 VMs on the same host server, as long as the server meets the hardware requirements for both types of VMs. |
Are Gen 2 VMs more expensive than Gen 1 VMs?
|
No, there is no cost difference between Gen 1 and Gen 2 VMs. Both types of VMs are included with the appropriate versions of Windows Server. |
Gen 1 and Gen 2 VMs Use Cases
| Use Case |
Gen 1 VMs |
Gen 2 VMs |
Compatibility
|
Better suited for running older software applications or 32-bit guest operating systems. |
May not support older software applications or 32-bit guest operating systems. |
Device Support
|
Supports a limited number of virtual devices, and may not be able to use larger virtual hard disks or more advanced boot options like Secure Boot. |
Supports more virtual devices, and can use larger virtual hard disks or more advanced boot options like Secure Boot. |
Boot Time
|
Slower boot times due to the legacy BIOS firmware used in Gen 1 VMs. |
Faster boot times due to the use of the Unified Extensible Firmware Interface (UEFI) firmware in Gen 2 VMs. |
Integration
|
Limited integration services, such as support for online backups or remote desktop. |
Improved integration services, such as support for online backups or remote desktop, are available. |
Security
|
Limited security features, such as the lack of Secure Boot support. |
More advanced security features, such as support for Secure Boot, shielded VMs, and virtual TPM, are available. |
Migration
|
Limited migration options, as Gen 1 VMs cannot be converted to Gen 2 VMs. |
Migrating from Gen 1 VMs to Gen 2 VMs is possible, but requires creating a new VM and manually migrating data and settings. |
OS Support
|
Supports a wide range of guest operating systems, including older versions of Windows and Linux. |
Supports newer versions of Windows and Linux, but may not support older operating systems. |
Hardware Support
|
Runs on a wide range of hardware, including older processors and non-virtualization capable CPUs. |
Requires newer hardware, including a 64-bit processor with second-level address translation (SLAT) support, virtualization extensions (Intel VT or AMD-V), and support for UEFI firmware. |
Performance
|
May not be able to take advantage of the latest hardware improvements and virtualization features, leading to slower performance. |
Can take advantage of the latest hardware improvements and virtualization features, leading to better performance. |
Choosing the Right VM for Your Organization:
When it comes to choosing the right VM for your organization, it’s important to consider your specific needs and requirements. Here are some factors to keep in mind:
Compatibility:
If you’re running older software applications or need to support 32-bit guest operating systems, generation 1 VMs may be the better option for you.
Device Support:
If you need to use larger virtual hard disks or want more advanced boot options like Secure Boot, generation 2 VMs may be the better option.
Speed:
Generation 2 VMs generally have faster boot times than generation 1 VMs, so if boot speed is a concern for you, consider choosing a generation 2 VM.
Integration Services:
If you require improved integration services, such as support for online backups or remote desktop, generation 2 VMs are the better option.
Security:
If security is a top priority for your organization, consider choosing a generation 2 VM with Secure Boot and other advanced boot options.
What are the common VM platforms?
The common VM platforms are either On-premise virtualisation or Cloud virtualisation. These VM platforms are;
| Feature |
VMware |
Hyper-V |
Xen |
Azure |
AWS |
GCP |
Virtualization Platform
|
On-Premise |
On-Premise |
On-Premise |
Cloud-Based |
Cloud-Based |
Cloud-Based |
Customer Managed
|
Yes |
Yes |
Yes |
No |
No |
No |
Cloud-Based
|
No |
No |
No |
Yes |
Yes |
Yes |
Hypervisor Type
|
Type 1 |
Type 1 |
Type 1 |
Type 1 |
Type 1 |
Type 1 |
Live Migration
|
Yes |
Yes |
Yes |
Yes |
Yes |
Yes |
High Availability
|
Yes |
Yes |
Yes |
Yes |
Yes |
Yes |
Snapshot Capabilities
|
Yes |
Yes |
Yes |
Yes |
Yes |
Yes |
Networking
|
Yes |
Yes |
Yes |
Yes |
Yes |
Yes |
Storage
|
Yes |
Yes |
Yes |
Yes |
Yes |
Yes |
Resource Management
|
Yes |
Yes |
Yes |
Yes |
Yes |
Yes |
Integration with Other Technologies
|
Yes |
Yes |
Yes |
Yes |
Yes |
Yes |
Licensing Model
|
Proprietary |
Proprietary |
Open Source |
Proprietary |
Proprietary |
Proprietary |
|
|
Yes |
Yes |
No |
Yes |
Coming soon |
Coming soon |
In conclusion, the choice between generation 1 and generation 2 VMs depends on your specific needs and requirements. Generation 1 VMs are a good option if you need to support older software applications or 32-bit guest operating systems, while generation 2 VMs offer more advanced boot options, improved device support, and faster boot times. By considering factors such as compatibility, device support, speed, integration services, and security, you can choose the right VM for your organization’s needs.
Gen 1 or Gen 2 Further reading
Some useful links for further reading on Gen 1 or Gen 2 VMs, if you so require.
| Source |
Description |
|
|
Official documentation from Microsoft on the differences between Gen 1 and Gen 2 VMs |
|
|
A blog post from VMware that discusses the advantages and disadvantages of Gen 1 and Gen 2 VMs |
|
|
An article from TechTarget that provides a comparison between Gen 1 and Gen 2 VMs |
|
|
A whitepaper from Red Hat that explores the benefits and use cases of Gen 2 VMs |
|
|
A GitHub repository that contains scripts for converting Gen 1 VMs to Gen 2 VM |
In conclusion, the choice between generation 1 and generation 2 VMs depends on your specific needs and requirements. Generation 1 VMs are a good option if you need to support older software applications or 32-bit guest operating systems, while generation 2 VMs offer more advanced boot options, improved device support, and faster boot times. By considering factors such as compatibility, device support, speed, integration services, and security, you can choose the right VM for your organization’s needs.

by Mark | Feb 27, 2023 | Azure, Azure Blobs, Cloud Storage Manager, Storage Accounts
How to Get the Total Size of Storage Used in Azure Per Subscription
A Step-by-Step Guide
As a Microsoft Azure user, it’s essential to keep track of your storage usage to prevent exceeding your storage limits or wasting resources. In this article, we’ll guide you on how to get the total size of storage used in Azure per subscription.
Understanding Storage Usage in Azure
Azure provides a highly available and scalable cloud storage solution that allows you to store large amounts of unstructured data. Azure storage includes four different types of storage: Blob, Queue, File, and Table storage, each with its own pricing model and use case.
When you create an Azure subscription, you’re provided with a storage capacity that you can use across all your storage accounts. As you create storage accounts and store data, your storage usage will increase. Monitoring your storage usage is crucial to optimize your resources for maximum efficiency.
How to Get the Total Size of Storage Used in Azure Per Subscription
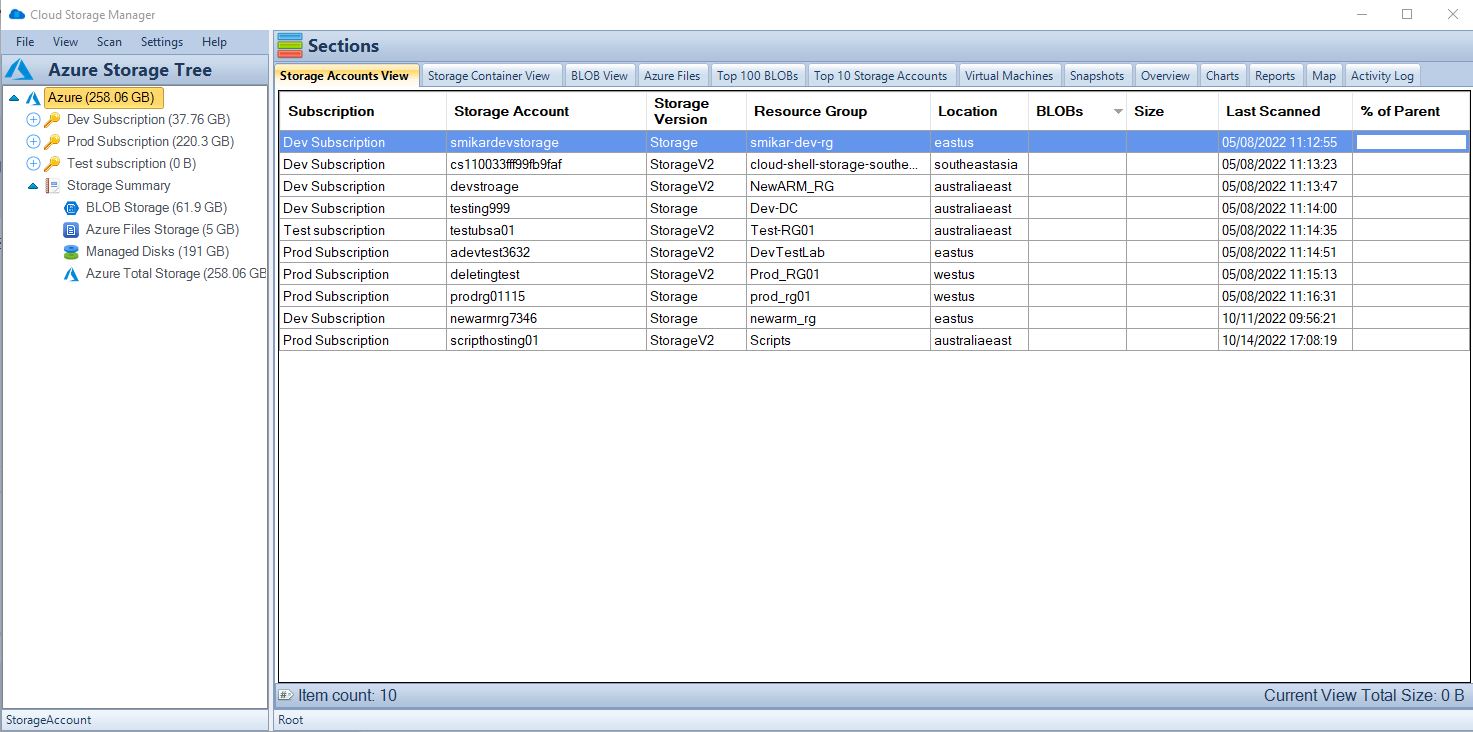
Open Cloud Storage Manager
Open the Cloud Storage Manager console.
Hopefully, you have scanned your whole environment, if not kick off a full scan.

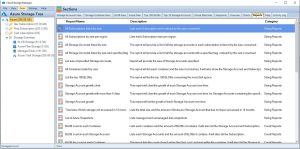
Go to the Cloud Storage Manager TAB
Go to the Reports TAB. Choose the report called “All Subscriptions Listed by Size”. Right click the report and choose Run Report.
This report will provide you with a list of Each Subscription and will be ordered by size consumed.
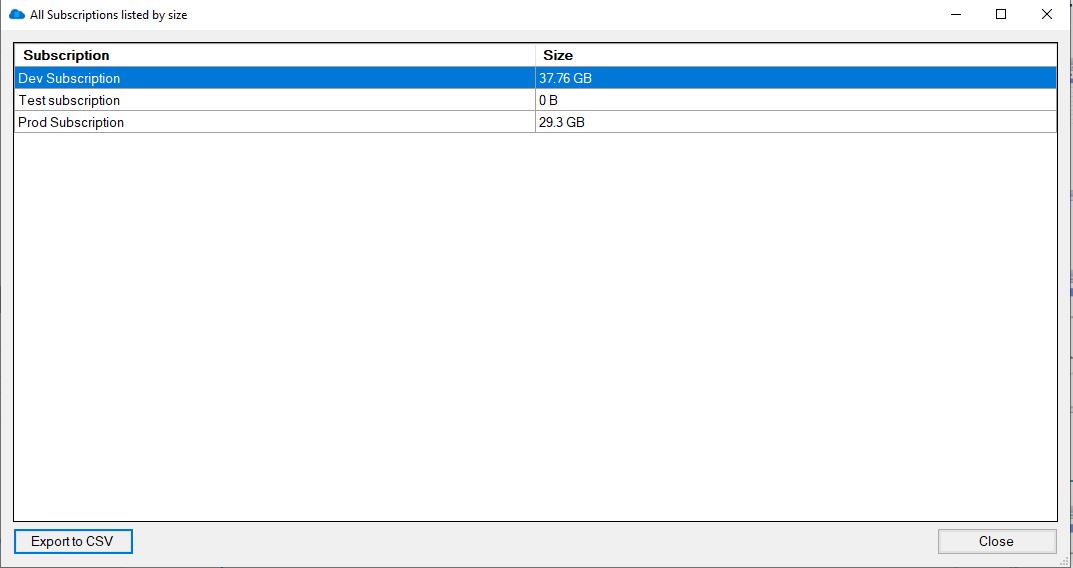
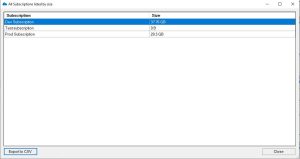
View the report
Cloud Storage Manager will now show you the total amount of Storage used per your Azure Subscription across your complete Azure Tenant.
You can export this data to Microsoft Excel if you wish to manipulate the data further
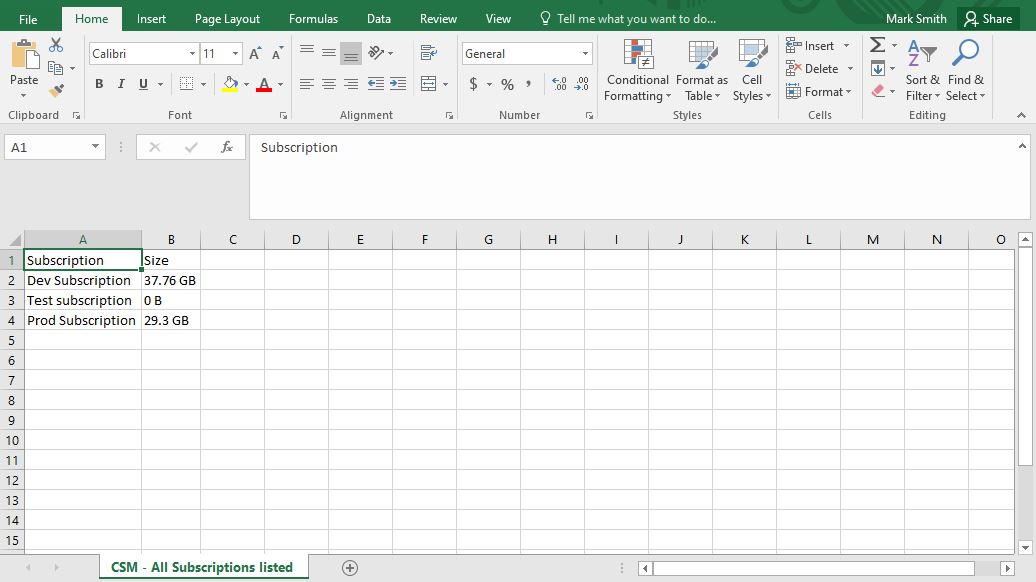
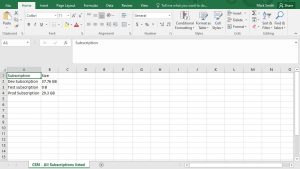
Export to Excel
Now you have the data in excel that shows each Azure Subscription and how much data resides within.
By exporting the data to Microsoft Excel, you’ll have a clear understanding of your storage usage and can optimize your resources accordingly. Regularly monitoring your storage usage, analyzing your data, and taking steps to optimize your usage can help you save costs and prevent waste.
FAQs
| Question |
Answer |
What is Microsoft Azure?
|
Microsoft Azure is a cloud computing service that provides a wide range of services, including virtual machines, databases, and storage. |
What is Azure Storage?
|
Azure storage is a scalable, highly available, and durable cloud storage solution that allows you to store and retrieve large amounts of unstructured data. |
What are the different types of Azure Storage?
|
Azure provides four different types of storage: Blob, Queue, File, and Table storage, each with its own use case and pricing model. |
How can I check my Azure Storage usage?
|
You can check your Azure storage usage by opening the Cloud Storage Manager console, going to the Reports tab, selecting the “All Subscriptions Listed by Size” report, and viewing the report to see the total amount of storage used per Azure subscription. |
Why is it important to monitor Azure Storage usage?
|
Monitoring your Azure storage usage is essential to prevent exceeding your storage limits or wasting resources. Regular monitoring and optimization can help you save costs and ensure maximum efficiency. |
Can I export Azure Storage usage data to Excel?
|
Yes, you can export your Azure Storage usage data to Microsoft Excel to manipulate the data further. |
What is the benefit of optimizing Azure Storage usage?
|
Optimizing your Azure Storage usage can help you save costs and ensure maximum efficiency by preventing waste and unnecessary resource consumption. |
In conclusion, getting the total size of storage used in Azure per subscription is an important task for any Azure user. By following the steps outlined in this article, you can easily get a clear understanding of your storage usage and optimize your resources for maximum efficiency.
Regularly monitoring your storage usage with Cloud Storage Manager, analyzing your usage data, and taking steps to optimize your usage can help you save costs and ensure you’re not wasting resources.
Azure Storage Unlocked
Please fill out the form below to get our free Ebook "Azure Storage Unlocked" emailed to you
FREE DOWNLOAD

by Mark | Feb 24, 2023 | Azure FIles
Azure Files. Challenges and Solutions.
As businesses grow, so does their need for scalable and secure data storage. For many companies, on-premises file shares have long been the preferred method of storing and sharing data. However, with the advent of cloud computing, more and more businesses are turning to cloud-based storage solutions like Azure File Storage. In this article, we will explore the challenges and solutions involved in migrating on-premises file shares to Azure File Storage.
Challenges of Migrating On-Premises File Shares to Azure File Storage
Migrating from on-premises file shares to cloud-based storage solutions can be a complex process, and it is important to identify potential challenges before starting the migration. Some of the challenges of migrating on-premises file shares to Azure File Storage include:
Network Bandwidth:
Moving large amounts of data from on-premises file shares to Azure File Storage can be time-consuming and may require significant network bandwidth. Depending on the size of the data and the available network bandwidth, the migration process can take hours, days, or even weeks.
Security Concerns:
Businesses need to ensure that the data they store in the cloud is secure and protected from cyber threats. Migrating on-premises file shares to Azure File Storage requires careful planning to ensure that the data is encrypted and protected both in transit and at rest.
Compatibility Issues:
On-premises file shares often use specific protocols and technologies that may not be compatible with Azure File Storage. This can cause compatibility issues during the migration process, which can lead to data loss or corruption.
Cost:
While cloud-based storage solutions like Azure File Storage can be cost-effective in the long run, the initial cost of migrating on-premises file shares to the cloud can be significant. Businesses need to carefully consider the cost of the migration process and ensure that it fits within their budget, or monitor the usage of their Azure Files with Cloud Storage Manager to see where optimistations and cost reductions can be.
Solutions for Migrating On-Premises File Shares to Azure File Storage
To overcome the challenges of migrating on-premises file shares to Azure File Storage, businesses need to develop a well-planned migration strategy that addresses each of the challenges outlined above. Some of the solutions for migrating on-premises file shares to Azure File Storage include:
Network Optimization:
To minimize the time required for data migration, businesses can optimize their network bandwidth by compressing data and using dedicated network connections for the migration process.
Encryption and Security:
Businesses should implement strong encryption and security measures to ensure that data is protected both in transit and at rest. Azure File Storage provides several encryption options, including client-side encryption and Azure Key Vault integration.
Compatibility Testing:
Before migrating data to Azure File Storage, businesses should test their existing protocols and technologies for compatibility issues. This can help identify potential issues before they cause data loss or corruption.
Cost Planning:
Businesses should carefully consider the cost of migrating on-premises file shares to Azure File Storage and develop a detailed cost plan that includes the cost of storage, data transfer, and other related expenses.
Azure Storage Explorer
Azure Storage Explorer is a free, cross-platform tool that provides a graphical user interface (GUI) for managing Azure storage accounts. It can be used to migrate files to Azure Files by simply dragging and dropping files from a local file system to an Azure Files share.
Pros
- User-friendly interface: Azure Storage Explorer provides a user-friendly interface that makes it easy to manage and migrate files to Azure Files.
- Simple setup: Azure Storage Explorer can be easily downloaded and installed, with no additional setup required.
- Quick migration: Migration using Azure Storage Explorer is quick and easy, and can be completed in a few simple steps.
Cons
- Limited functionality: Azure Storage Explorer is limited in terms of functionality, and cannot be used to migrate files with complex settings or configurations.
- Limited automation: Azure Storage Explorer does not provide automation options for migration, which can be time-consuming for large or complex migrations.
Azure PowerShell
Azure PowerShell is a command-line tool that provides a powerful and flexible interface for managing Azure resources. It can be used to migrate files to Azure Files by writing PowerShell scripts that automate the migration process.
Pros
- Powerful scripting options: Azure PowerShell provides a powerful scripting environment that allows for complex migrations to be automated.
- Greater control: Azure PowerShell provides greater control over the migration process, allowing for custom settings and configurations to be used.
- Can handle larger migrations: Azure PowerShell can handle larger or more complex migrations that may not be possible with Azure Storage Explorer.
Cons
- Steep learning curve: Azure PowerShell has a steep learning curve and requires experience with PowerShell scripting.
- Time-consuming: Migration using Azure PowerShell can be time-consuming, as scripts need to be written and tested before the actual migration can begin.
Azure Data Box
Azure Data Box is a physical device that can be used to migrate large amounts of data to Azure Files. The device is shipped to the user, who then uploads their data onto the device before shipping it back to Microsoft for the data to be uploaded to Azure Files.
Pros
- Can handle large migrations: Azure Data Box is designed for large or complex migrations, and can handle up to 100 TB of data.
- Secure: Azure Data Box provides a secure method of migration, as the data is physically shipped to Microsoft for upload to Azure Files.
- Fast migration: Azure Data Box provides fast migration, as the data is physically transferred rather than uploaded over the internet.
Cons
- Physical device required: Azure Data Box requires a physical device to be shipped to the user, which can add to the cost and time required for migration.
- Limited control: Azure Data Box provides limited control over the migration process, as the data is physically shipped to Microsoft for upload to Azure Files.
Each migration method has its own advantages and disadvantages. Azure Storage Explorer is a user-friendly tool that is quick and easy to use, but is limited in terms of functionality and automation options. Azure PowerShell provides greater control over the migration process, but has a steep learning curve and can be time-consuming. Azure Data Box is designed for large or complex migrations, but requires a physical device and provides limited control over the migration process. The choice of migration method depends on the specific requirements and constraints of the migration project.
Azure Files Technical Limits
| Azure Files Technical Limits |
| Maximum file share size: 5 TiB |
| Maximum file size: 1 TiB |
| Maximum IOPS per share: 10,000 |
| Maximum throughput per share: 5 GiB/s |
| Maximum number of file shares per storage account: 200 |
| Maximum number of files per file share: 5 billion |
Azure Files vs a traditional file server comparison.
| Criteria |
Azure Files |
File Server |
| Cost |
Pay-as-you-go pricing model, with cost depending on usage |
High initial setup cost for hardware, software, and maintenance |
| Scalability |
Highly scalable, able to support a large number of file shares and files |
Limited scalability, difficult to expand without significant investment in new hardware |
| Accessibility |
Accessible from anywhere with an internet connection |
Limited accessibility, can only be accessed within a company’s network |
| Maintenance |
Little to no maintenance required, with built-in redundancy and failover capabilities |
Regular maintenance required, including software updates, hardware replacement, and backups |
| Security |
Built-in security features, including encryption, access control, and auditing |
Limited security features, vulnerable to security threats like ransomware attacks |
| Collaboration |
Multiple users can access and collaborate on files from anywhere |
Limited collaboration capabilities, difficult to share files outside of the company network |
| Backup and Recovery |
Built-in backup and recovery capabilities with multiple redundant copies |
Backup and recovery solutions require additional hardware and software investment |
| Performance |
High-performance with high IOPS and throughput capabilities |
Performance dependent on hardware and network configuration |
Azure Files Pros and Cons
| Azure Files Pros |
Azure Files Cons |
| Easy to set up and use |
Limited support for certain file types |
| Scalable to support a large number of file shares and files |
Can be slow for large file transfers |
| High availability with built-in redundancy and failover capabilities |
Limited support for advanced features like file locking |
| Built-in security features including encryption, access control, and auditing |
Can be more expensive than other file storage solutions |
| Cost-effective solution compared to traditional on-premises storage |
Requires an Azure subscription to use |
Azure Files or a File Server?
Azure File Use Cases
- Storing and sharing files across multiple virtual machines or cloud instances
- Migrating on-premises file shares to the cloud
- Hosting media files for websites or applications
- Sharing files with remote teams or clients
- Backing up data to the cloud for disaster recovery purposes
Azure Files further reading
| Link |
Description |
|
|
Official Microsoft documentation on migrating on-premises file servers to Azure Files |
|
|
Service that enables caching of Azure Files on an on-premises Windows Server, providing performance and compatibility benefits |
|
|
Microsoft documentation on using Azure Migrate to migrate file services to Azure Files |
|
|
Guide on using Azure Data Box Gateway to migrate file shares to Azure Files |
|
|
Microsoft documentation on troubleshooting common issues with Azure File Sync |
Azure Files offers several advantages over traditional file servers. First and foremost, it eliminates the need for costly hardware and software investments, as well as ongoing maintenance expenses. Azure Files operates on a pay-as-you-go pricing model, which means that you only pay for the storage you use. You can always optimise your Azure Files by using Cloud Storage Manager to gain insights in to your Azure Storage to reduce your Azure Costs. Additionally, Azure Files is highly scalable, making it easy to expand your storage capacity as your needs change.
Another significant advantage of Azure Files is accessibility. Files stored in Azure can be accessed from anywhere with an internet connection, making it easy for remote employees to collaborate and work together. Azure Files also offers built-in security features, including encryption, access control, and auditing, which can help protect your data from unauthorized access and security threats like ransomware attacks.
There are various use cases for Azure Files, such as file shares for distributed teams, storing and sharing files for application deployment, backup and disaster recovery, and more. Azure Files is an excellent option for companies that need flexible and scalable storage solutions without the cost and hassle of maintaining traditional file servers.
Overall, Azure Files offers a cost-effective, scalable, and secure solution for file storage and sharing, making it an attractive alternative to traditional file servers for many organizations.
Migrating on-premises file shares to Azure File Storage can be a complex process that requires careful planning and consideration of potential challenges. However, by developing a well-planned migration strategy and addressing each of the challenges outlined above, businesses can successfully migrate their data to Azure File Storage and take advantage of its many benefits, including scalability, security, and cost-effectiveness.
Azure Storage Unlocked
Please fill out the form below to get our free Ebook "Azure Storage Unlocked" emailed to you
FREE DOWNLOAD