by Mark | Apr 11, 2023 | Azure, Azure Blobs, Blob Storage, Storage Accounts
Microsoft Azure Key Vault is a cloud-based service designed to help organizations securely store and manage sensitive information such as encryption keys, secrets, and certificates. As more organizations migrate to cloud services, ensuring the security of sensitive data and applications is crucial. In this comprehensive guide, we will discuss Azure Key Vault with a focus on securing Blob Storage, providing how-to guides and best practices. We will examine the tradeoffs involved in balancing various factors, explore the challenges associated with different approaches, and emphasize the importance of considering the impact when making decisions about Azure Key Vault.
Understanding Azure Key Vault
Azure Key Vault Explained
Azure Key Vault, also known as Microsoft Key Vault, is a service offered by Microsoft that enables organizations to securely store and manage sensitive information, including encryption keys, secrets, and certificates. Azure Vault provides a centralized solution for storing, controlling access to, and securely managing these vital assets.
Key Features of Azure Key Vault
Azure Key Vault offers several essential features to help organizations manage their sensitive information:
- Secure storage: Azure Key Vault uses Hardware Security Modules (HSMs) to protect keys and secrets’ storage.
- Access control: Azure Key Vault allows for granular access control by assigning permissions to specific users or groups.
- Auditing and monitoring: Azure Key Vault offers logging and monitoring features, enabling organizations to track key usage and access events.
Integrating Azure Key Vault with Blob Storage
Azure Blob Storage and Azure Key Vault
Azure Blob Storage is a scalable and cost-effective storage service for unstructured data. Securing this data is vital to protect sensitive information and maintain compliance with various data protection regulations. Azure Key Vault can be integrated with Blob Storage to provide encryption and secure access to stored data.
Server-Side Encryption with Customer-Managed Keys
Azure Blob Storage supports server-side encryption using Azure Storage Service Encryption (SSE). By default, SSE uses Microsoft-managed keys to encrypt data at rest. However, organizations can use customer-managed keys in Azure Key Vault for greater control over the encryption process.
To use customer-managed keys with Azure Key Vault, follow these steps:
- Create an Azure Key Vault instance.
- Generate or import an encryption key in the Key Vault.
- Configure the Blob Storage account to use the encryption key from the Key Vault.
Client-Side Encryption with Azure Key Vault
Another approach to secure data in Blob Storage is client-side encryption. In this scenario, data is encrypted before it is sent to Blob Storage and decrypted after it is retrieved. Azure Key Vault can be used to store the encryption keys used for client-side encryption, ensuring they are secure and only accessible by authorized users and applications.
To implement client-side encryption with Azure Key Vault, follow these steps:
- Create an Azure Key Vault instance.
- Generate or import an encryption key in the Key Vault.
- Encrypt data using the encryption key from the Key Vault before uploading it to Blob Storage.
- Decrypt data using the encryption key from the Key Vault after downloading it from Blob Storage.
Securing Access to Blob Storage
To secure access to Blob Storage, organizations can use Azure Active Directory (Azure AD) and Shared Access Signatures (SAS).
Azure AD provides role-based access control (RBAC) for Blob Storage. By integrating Azure AD with Key Vault, organizations can ensure that only authorized users and applications have access to encryption keys and secrets.
Shared Access Signatures are time-limited tokens that grant access to specific resources in Blob Storage. By using Azure Key Vault to store the storage account keys, organizations can enhance the security of SAS token generation and prevent unauthorized access.
Best Practices for Azure Key Vault and Blob Storage
Key Rotation
Regularly rotating keys in Azure Key Vault helps minimize the risk of unauthorized access and ensures compliance with data protection regulations. Organizations should establish a key rotation policy that specifies the frequency and process for updating keys.
Segregation of Duties
To maintain a secure environment, organizations should separate the responsibilities for managing Azure Key Vault and Blob Storage. This segregation of duties prevents unauthorized access and reduces the risk of insider threats.
Monitoring and Auditing
Azure Key Vault provides logging and monitoring features that enable organizations to track key usage and access events. Organizations should regularly review these logs to identify suspicious activity and respond to potential security incidents.
Backup and Recovery
To protect against data loss, organizations should implement a backup and recovery strategy for their Azure Key Vault instances. This strategy should include regular backups of keys, secrets, and certificates, as well as a plan for recovering these assets in case of a disaster.
Secure Application Development
When developing applications that use Azure Key Vault, organizations should follow secure development practices, such as least privilege, input validation, and secure coding techniques. These practices help ensure that applications do not introduce vulnerabilities that could compromise the security of Azure Key Vault or the stored data.
How to Guide
Integrating Azure Key Vault with Azure Storage
This how-to guide will walk you through the process of integrating Azure Key Vault with Azure Storage to provide enhanced security for your data.
Step 1: Create an Azure Key Vault instance
- Sign in to the Azure portal (https://portal.azure.com/).
- In the left-hand menu, click on “Create a resource.”
- In the search bar, type “Key Vault” and select “Key Vault” from the results.
- Click the “Create” button.
- Fill in the required information, such as subscription, resource group, key vault name, region, and pricing tier. Click “Review + create” when you’re done.
- Review your configuration and click “Create” to create the Key Vault instance.
Step 2: Generate or import an encryption key in Azure Key Vault
- In the Azure portal, navigate to your newly created Key Vault.
- Click on “Keys” in the left-hand menu.
- Click on “Generate/Import” at the top of the page.
- Select the “Generate” option to create a new key or the “Import” option to import an existing key. Fill in the required information, such as key name, key type, and key size.
- Click “Create” when you’re done
.Step 3: Configure Azure Blob Storage to use the encryption key from Azure Key Vault
- In the Azure portal, navigate to your Azure Storage account.
- Click on “Encryption” under the “Settings” section in the left-hand menu.
- Select the “Customer-managed key” option.
- Click on “Select a key” and choose your Key Vault and the encryption key you created in Step 2. Click “Select” when you’re done.
- Click “Save” to apply the changes.
Step 4: Grant Azure Storage access to the encryption key in Azure Key Vault
- In the Azure portal, navigate to your Key Vault instance.
- Click on “Access policies” in the left-hand menu.
- Click “Add Access Policy” at the top of the page.
- In the “Configure from template” dropdown menu, select “Azure Storage Service Encryption for customer-managed keys.”
- Under “Select principal,” click “None selected.” Search for your Azure Storage account in the “Select a principal” window and click “Select” when you find it.
- Click “Add” to create the access policy.
- Click “Save” at the top of the “Access policies” page to apply the changes.
Step 5: Configure role-based access control for Azure Key Vault
- In the Azure portal, navigate to your Key Vault instance.
- Click on “Access control (IAM)” in the left-hand menu.
- Click “Add” and then “Add role assignment” at the top of the page.
- Select a role that grants the necessary permissions, such as “Key Vault Contributor” or “Key Vault Reader.”
- Under “Assign access to,” select “User, group, or service principal.”
- In the “Select” field, search for the user, group, or service principal you want to grant access to and click “Select” when you find it.
- Click “Save” to apply the changes.
With these steps completed, you have successfully integrated Azure Key Vault with Azure Storage. Your data will now be encrypted using the customer-managed key stored in Azure Key Vault, providing enhanced security for your stored data.
Monitor your Azure Storage Consumption
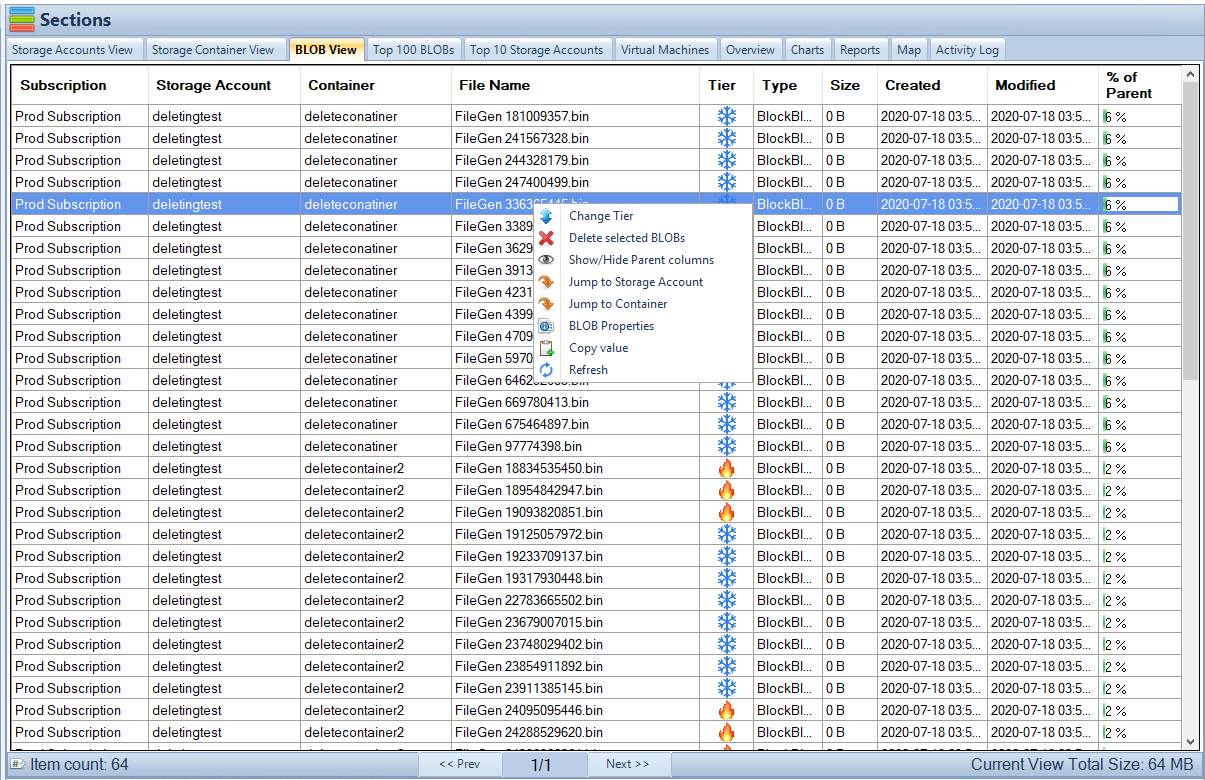
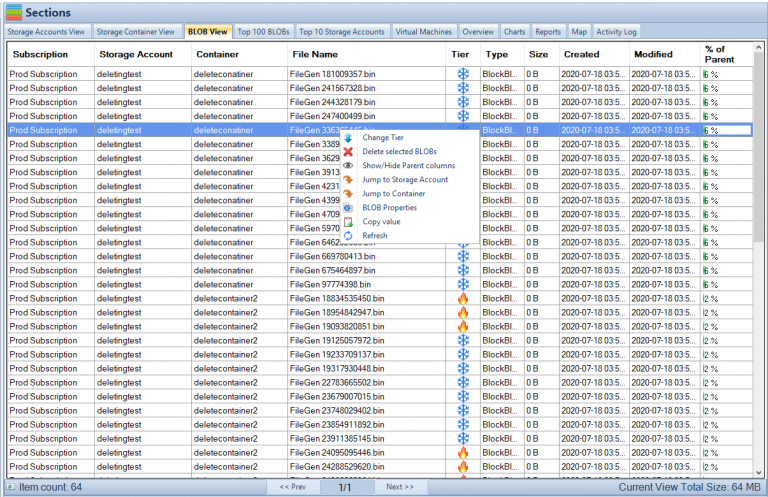
Cloud Storage Manager for Azure Blob and File Storage
Overview of Cloud Storage Manager
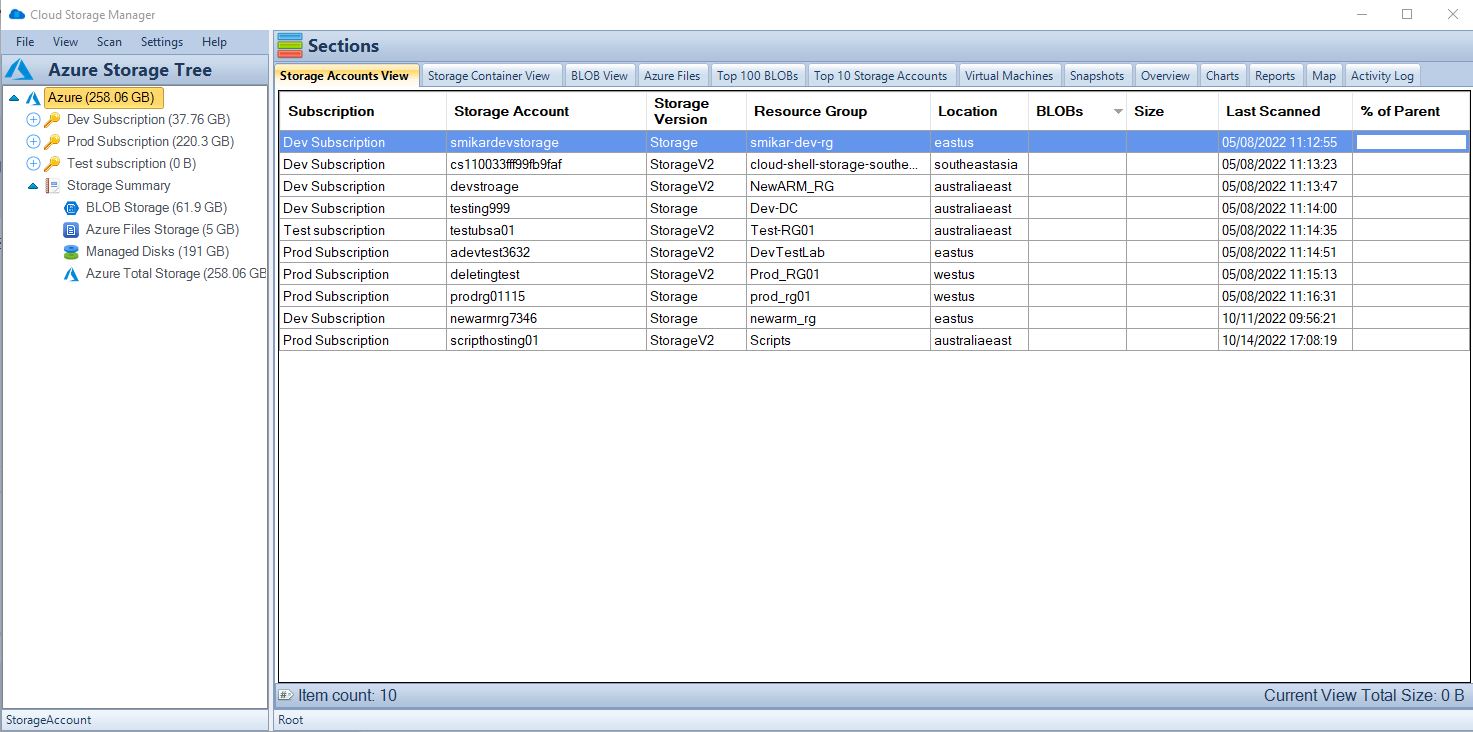
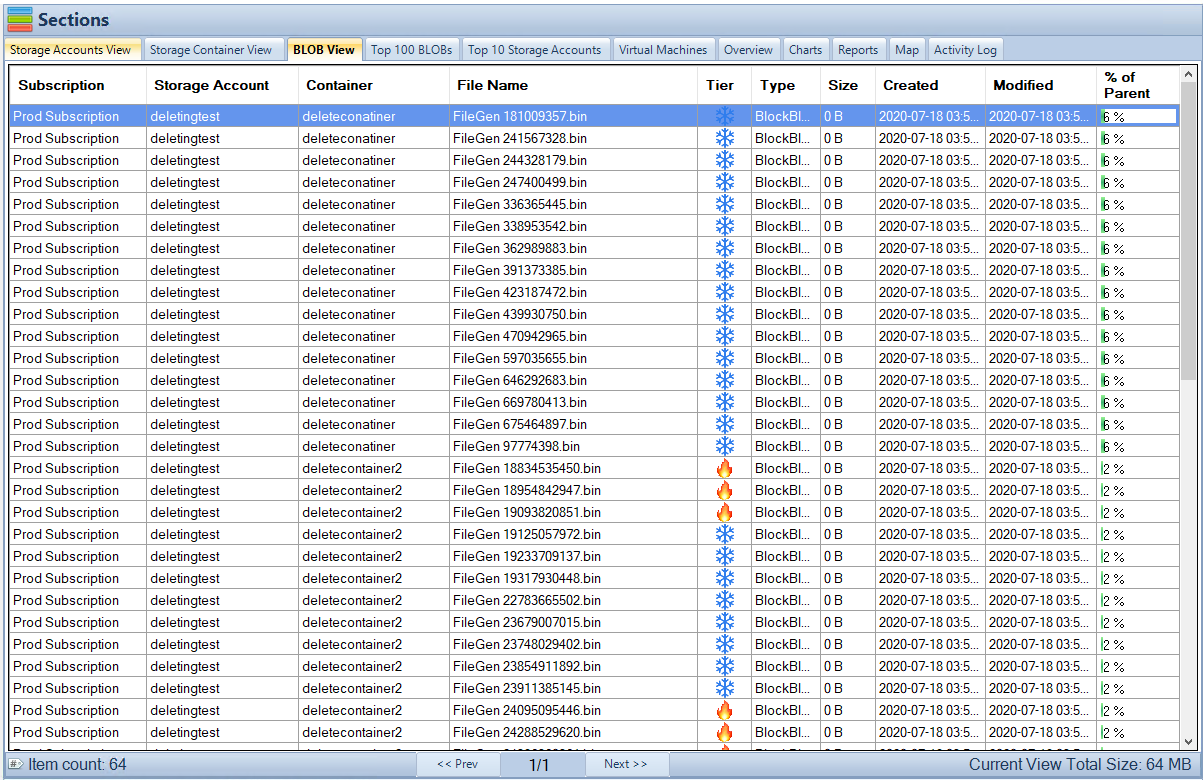
Cloud Storage Manager is a software solution designed to provide insights into Azure Blob and File Storage consumption. It offers reports on storage usage and growth trends, helping users save money on their Azure Storage costs. By using Cloud Storage Manager with Azure Storage, organizations can achieve a more secure and efficient storage environment.
Benefits of Cloud Storage Manager
Some key benefits of using Cloud Storage Manager in conjunction with Azure Key Vault include:
- Enhanced visibility: Cloud Storage Manager provides detailed reports on storage usage, allowing organizations to identify inefficiencies and optimize their storage strategies.
- Cost savings: By monitoring storage growth trends, organizations can better forecast their storage needs and optimize their spending on Azure Storage.
Azure Key Vault FAQs
| Question |
Answer |
What is Azure Key Vault?
|
Azure Key Vault is a cloud-based service for securely storing and managing encryption keys, secrets, and certificates. |
How does Azure Key Vault secure my data?
|
Azure Key Vault uses Hardware Security Modules (HSMs) to protect the storage of keys and secrets. It also offers granular access control and auditing features. |
How can I integrate Azure Key Vault with Blob Storage?
|
To integrate Azure Key Vault with Blob Storage, you need to create a Key Vault instance, generate or import an encryption key, and configure the Blob Storage account to use the encryption key from the Key Vault. |
What is the benefit of using customer-managed keys in Azure Key Vault?
|
Using customer-managed keys provides organizations with more control over the encryption process and allows for better compliance with data protection regulations. |
How do I secure access to Blob Storage using Azure Key Vault?
|
To secure access to Blob Storage, integrate Azure Key Vault with Azure Active Directory (Azure AD) for role-based access control and use Shared Access Signatures (SAS) with storage account keys stored in Azure Key Vault. |
What is the recommended key rotation policy for Azure Key Vault?
|
Key rotation policies vary depending on organizational requirements and compliance regulations. It is recommended to establish a key rotation policy that specifies the frequency and process for updating keys. |
How does Cloud Storage Manager work with Azure Storage?
|
Cloud Storage Manager integrates with Azure Storage to provide insights into Azure Blob and File Storage consumption . |
How can Cloud Storage Manager help me save money on Azure Storage?
|
Cloud Storage Manager provides detailed reports on storage usage and growth trends, allowing organizations to optimize their storage strategies and reduce spending on Azure Storage. |
What is the difference between Azure Key Vault and Azure Vault?
|
Azure Key Vault and Azure Vault refer to the same service. Azure Key Vault is the official name of the service, while Azure Vault is an alternative name used by some users. |
Can I use Azure Key Vault to secure other Azure services besides Blob Storage?
|
Yes, Azure Key Vault can be integrated with other Azure services, such as Azure SQL Database, Azure Functions, and Azure Kubernetes Service, to secure sensitive information and manage access. |
How does Azure Key Vault ensure high availability and redundancy?
|
Azure Key Vault is designed with built-in redundancy and high availability features. It automatically replicates data within a geographic region and supports disaster recovery with geo-redundant storage. |
Can I use Azure Key Vault with third-party cloud services?
|
While Azure Key Vault is primarily designed for Microsoft Azure services, you can use its REST API to integrate it with third-party cloud services and applications, provided they support the necessary integration requirements. |
How do I migrate my existing keys and secrets to Azure Key Vault?
|
You can import your existing keys and secrets into Azure Key Vault using the Azure portal, Azure CLI, or REST API. When migrating sensitive data, ensure that you follow security best practices to prevent unauthorized access during the migration process. |
How can I monitor access to my keys and secrets in Azure Key Vault?
|
Azure Key Vault offers logging and monitoring features that enable organizations to track key usage and access events. To monitor access, configure diagnostic settings to send logs to a storage account, event hub, or Azure Monitor logs. |
Can I use Azure Key Vault for certificate management?
|
Yes |

by Mark | Apr 6, 2023 | Azure Blobs
Azure Blob Storage is a versatile, scalable, and cost-effective cloud storage service provided by Microsoft. It is designed to store a wide range of data types, including unstructured data such as images, videos, audio files, and documents. As businesses increasingly rely on cloud storage for critical data, ensuring the security of Azure Blob Storage becomes a top priority. This article provides a comprehensive analysis of the key factors in securing Azure Blob Storage, offering how-to guides and best practices.
Azure Blob Storage Security
Importance of Securing Azure Blob Storage
As with any cloud-based storage solution, securing Azure Blob Storage is crucial to protect sensitive data and maintain compliance with industry regulations. Implementing robust security measures helps prevent unauthorized access, data breaches, and other security threats that can have severe consequences for your organization, such as financial losses, legal penalties, and reputational damage. Moreover, a secure Azure Blob Storage environment ensures data integrity and privacy, fostering trust among customers and partners.
Best Practices for Securing Azure Blob Storage
Use of Access Keys
Access keys are one of the primary methods to authenticate and authorize access to your Azure Blob Storage account. Each storage account has two access keys, allowing you to maintain uninterrupted access while rotating keys. It is essential to secure access keys by:
- Periodically rotating them to reduce the risk of unauthorized access.
- Avoiding sharing them in plain text or source code repositories. Use Azure Key Vault or other secure storage solutions to store your access keys.
- Implementing least privilege principles and providing access keys only to users or applications that require them.
Implementing Shared Access Signatures
Shared Access Signatures (SAS) allow you to grant limited access to specific resources in your Blob Storage account without sharing your access keys. By implementing SAS, you can:
- Control the level of access by specifying permissions, such as read, write, delete, or list.
- Set an expiration time to automatically revoke access after a certain period.
- Limit access to specific IP addresses or ranges, enhancing security.
SAS tokens should be generated on-demand and not reused across multiple users or applications to minimize the risk of unauthorized access.
Utilizing Azure Active Directory (AAD)
Azure Active Directory (AAD) provides identity and access management capabilities for Azure Blob Storage. By integrating AAD, you can:
- Implement role-based access control (RBAC), which allows you to define granular permissions for users and groups based on their roles and responsibilities.
- Use Multi-Factor Authentication (MFA) to add an extra layer of security during the authentication process.
- Monitor and audit user activities in your Blob Storage account through Azure Monitor and Azure Log Analytics.
Encrypting Data at Rest
Azure Blob Storage automatically encrypts data at rest using Service-Side Encryption (SSE) with Microsoft-managed keys. For additional security, you can:
- Opt for client-side encryption, where data is encrypted before being uploaded to Azure Blob Storage. This ensures that the data is encrypted both in transit and at rest, providing an added layer of protection.
- Use Azure Key Vault to manage your encryption keys. This allows you to store and manage your keys securely, separate from your Blob Storage account. You can also control access to your keys and monitor key usage through Azure Key Vault.
Encrypting Data in Transit
Data in transit can be secured using Secure Socket Layer (SSL)/Transport Layer Security (TLS) encryption. By enforcing HTTPS-only access, you can ensure that all data transferred between your storage account and clients is encrypted and secure. To enable HTTPS-only access for your Blob Storage account, follow these steps:
- Navigate to your storage account in the Azure Portal.
- Select “Configuration” under the “Settings” section.
- Toggle the “Secure transfer required” option to “Enabled.”
Advanced Security Solutions for Azure Blob Storage
Implementing Virtual Networks and Firewalls
By integrating Azure Virtual Networks and firewalls, you can further enhance the security of your Blob Storage account. This allows you to:
- Restrict access to your Blob Storage account based on IP addresses or ranges, ensuring only authorized clients can access your data.
- Create a private network connection between your Blob Storage account and your on-premises or cloud-based resources, isolating your storage account from public internet access.
Deploying Azure Private Link
Azure Private Link enables you to access your Blob Storage account over a private connection, ensuring that your data never traverses the public internet. By deploying Azure Private Link, you can:
- Reduce your exposure to external threats, such as man-in-the-middle attacks, by keeping your data within the Azure network.
- Simplify network configuration and reduce latency by connecting directly to your Blob Storage account from your Azure Virtual Network.
- Enforce data exfiltration protection by ensuring that data only flows within your organization’s network boundaries.
Monitoring and Auditing Blob Storage
Regular monitoring and auditing of your Blob Storage account are essential for maintaining security and compliance. Azure provides several tools to help you monitor and audit your storage account, such as:
- Azure Monitor, which allows you to collect and analyze metrics and logs related to your Blob Storage account.
- Azure Log Analytics, which provides advanced querying and alerting capabilities to identify and respond to security threats.
- Azure Security Center, which offers a centralized view of your Blob Storage security posture and provides actionable recommendations to enhance security.
How-to Guides on Securing Azure Blob Storage
Below, you’ll find step-by-step guides on securing Azure Blob Storage by implementing various security features and best practices.
Implementing Role-Based Access Control (RBAC)
a. Sign in to the Azure portal (https://portal.azure.com/).
b. Navigate to your storage account and select “Access control (IAM)” from the left menu.
c. Click “+ Add” and then “Add role assignment” to open the “Add role assignment” pane.
d. Select a role from the “Role” dropdown menu. For example, choose “Storage Blob Data Contributor” to grant read, write, and delete access to Blob Storage.
e. Choose the user, group, or application to which you want to assign the role.
f. Click “Save” to apply the role assignment.
Creating Shared Access Signatures (SAS)
a. Sign in to the Azure portal (https://portal.azure.com/).
b. Navigate to your storage account and select “Shared access signature” from the left menu.
c. Configure the SAS settings, such as allowed services, resource types, permissions, and start and expiry times.
d. Click “Generate SAS and connection string” to create the SAS token.
e. Copy the generated SAS token and use it to grant access to your Blob Storage resources.
Enabling Multi-Factor Authentication (MFA)
a. Sign in to the Azure portal (https://portal.azure.com/).
b. Navigate to “Azure Active Directory” and select “Users” from the left menu.
c. Click “Multi-Factor Authentication” at the top of the page.
d. Check the box next to the user(s) for whom you want to enable MFA.
e. Click “Enable” in the toolbar, and then click “Enable multi-factor auth” in the dialog box to confirm.
Enforcing HTTPS for Secure Data Transmission
a. Sign in to the Azure portal (https://portal.azure.com/).
b. Navigate to your storage account and select “Configuration” from the left menu.
c. Under “Secure transfer required”, toggle the switch to “Enabled”.
d. Click “Save” at the top of the page to enforce HTTPS for all data transfers.
Enabling Server-Side Encryption with Storage Service Encryption (SSE)
a. Sign in to the Azure portal (https://portal.azure.com/).
b. Navigate to your storage account and select “Encryption” from the left menu.
c. Under “Blob service”, select “Microsoft-managed key” or “Customer-managed key” based on your preference.
d. Click “Save” at the top of the page to enable server-side encryption.
Configuring Soft Delete for Blob Storage
a. Sign in to the Azure portal (https://portal.azure.com/).
b. Navigate to your storage account and select “Data protection” from the left menu.
c. Under “Blob soft delete”, toggle the switch to “Enabled”.
d. Set the “Retention period (in days)” based on your data recovery needs.
e. Click “Save” at the top of the page to enable soft delete.
These guides provide a starting point for securing Azure Blob Storage. By implementing these security features and best practices, you can improve the overall security of your data stored in the cloud.

Cloud Storage Manager
Enhancing Blob Storage Insights and Cost Management
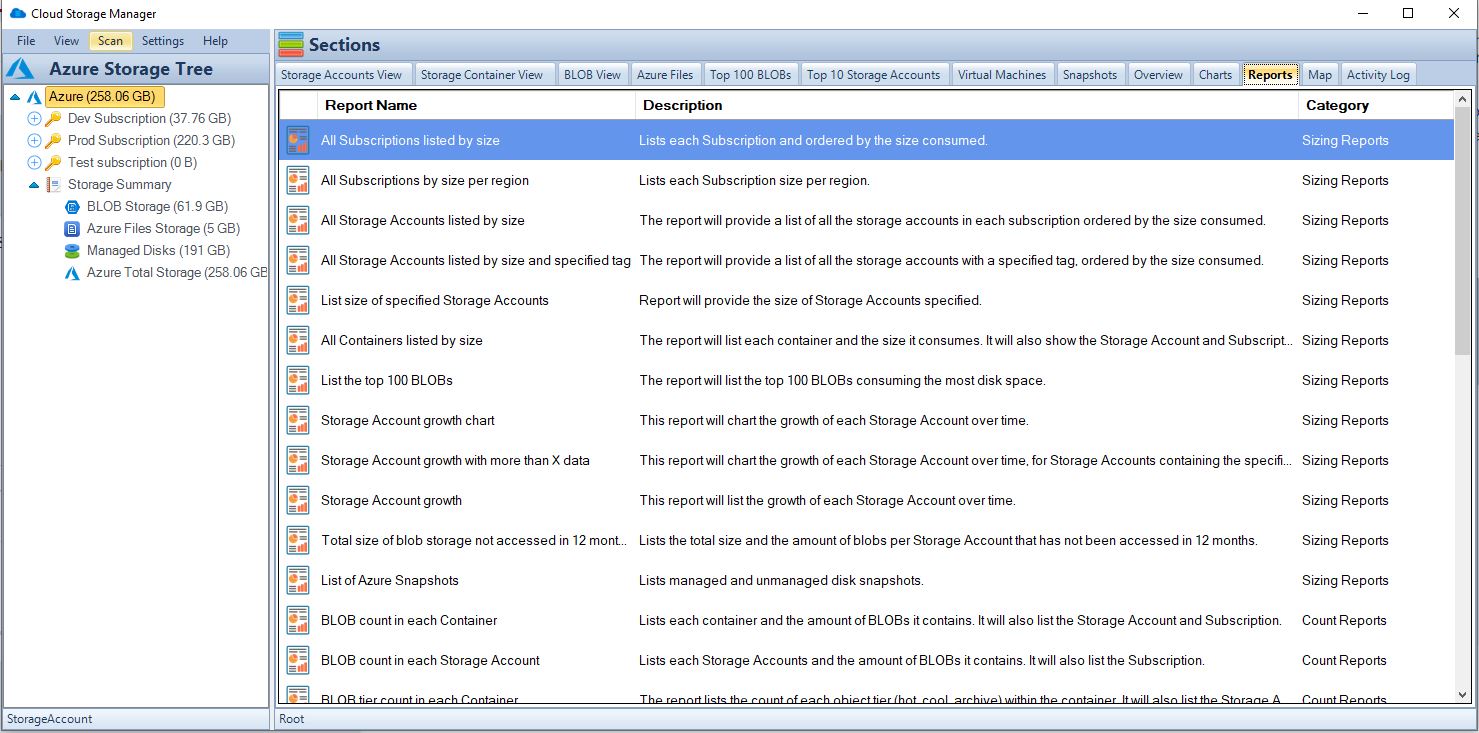
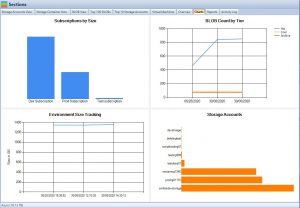
Our software, Cloud Storage Manager, provides valuable insights into Azure Blob and File Storage consumption. It generates detailed reports on storage usage and growth trends, enabling users to save money on their Azure Storage. Some of its key features include:
Comprehensive Storage Analysis
Usage and Growth Trend Reporting
- Receive regular reports on storage usage and growth trends.
- Use historical data to forecast future storage requirements and budgetary needs.
Cost Optimization Recommendations
FAQ Section: Securing Azure Blob Storage
|
Question
|
Answer
|
What is Azure Blob Storage?
|
Azure Blob Storage is a scalable, cost-effective cloud storage service provided by Microsoft for storing unstructured data such as images, videos, audio files, and documents.
|
How can I control access to my Azure Blob Storage?
|
Control access using role-based access control (RBAC), shared access signatures (SAS), and Azure Active Directory (Azure AD) integration.
|
What encryption options are available for Azure Blob Storage?
|
Azure Blob Storage supports encryption at rest with server-side encryption (SSE) and client-side encryption, as well as encryption in transit using HTTPS.
|
How can I monitor and audit my Azure Blob Storage?
|
Utilize Azure Monitor, Azure Storage Analytics, and Azure Security Center for monitoring and auditing your Blob Storage.
|
What disaster recovery options does Azure Blob Storage offer?
|
Azure Blob Storage provides geo-redundant storage (GRS), soft delete, and point-in-time restore (PITR) for data resilience and disaster recovery.
|
How can I enforce HTTPS for secure data transmission in Azure Blob Storage?
|
Enable “Secure transfer required” in your storage account’s configuration settings to enforce HTTPS for all data transfers.
|
How do I enable soft delete for Blob Storage?
|
In your storage account’s “Data protection” settings, toggle the switch to “Enabled” under “Blob soft delete” and set the retention period as needed.
|
What are the best practices for securing Azure Blob Storage?
|
Implement access control, data encryption, monitoring and auditing, disaster recovery planning, and follow security recommendations provided by Azure.
|
How can Cloud Storage Manager help me save money on Azure Storage?
|
Cloud Storage Manager provides storage analysis, usage and growth trend reporting, and cost optimization recommendations to identify cost-saving opportunities and improve storage efficiency.
|
How do I implement role-based access control (RBAC) in Azure Blob Storage?
|
Assign predefined or custom roles with specific permissions to users and groups using the “Access control (IAM)” settings in your storage account.
|
How can Cloud Storage Manager help me save money on Azure Storage?
|
Cloud Storage Manager provides comprehensive storage analysis, usage and growth trend reporting, and cost optimization recommendations to help users identify opportunities for cost savings and improve storage efficiency.
|
Conclusion
In conclusion, securing Azure Blob Storage involves a multi-layered approach that includes access control, data encryption, monitoring and auditing, and disaster recovery planning. Implementing best practices and leveraging tools like Cloud Storage Manager can further enhance security and cost management. As businesses continue to store critical data in the cloud, understanding and addressing these security considerations is essential for protecting valuable information and maintaining trust.

by Mark | Apr 5, 2023 | Azure, Azure Disks, Blob Storage, Cloud Storage, Storage Accounts
Azure Unmanaged Disks to be Deprecated Soon
Microsoft announced in September 2022 that they will be deprecating Azure Unmanaged Disks on September 30, 2025. This means that customers will no longer be able to create or use unmanaged disks after this date.
Unmanaged disks are a type of storage that is not managed by Microsoft. This means that customers are responsible for managing all aspects of the disk, including provisioning, backups, and security. Managed disks, on the other hand, are a type of storage that is managed by Microsoft. This means that Microsoft is responsible for managing all aspects of the disk, including provisioning, backups, and security.
There are a number of reasons why Microsoft is deprecating unmanaged disks. First, unmanaged disks are not as secure as managed disks. Managed disks are encrypted by default, while unmanaged disks are not. Additionally, managed disks are backed up by Microsoft, while unmanaged disks are not.
Second, unmanaged disks are more difficult to manage than managed disks. Customers are responsible for managing all aspects of the disk, including provisioning, backups, and security. This can be a time-consuming and error-prone process.
Third, unmanaged disks are not as scalable as managed disks. Managed disks can be scaled up or down as needed, while unmanaged disks cannot. This can be a problem for customers who need to scale their storage capacity quickly.
Customers who are currently using unmanaged disks should start planning to migrate to managed disks. The migration process is relatively straightforward, and Microsoft provides a number of resources to help customers with the migration
When will Microsoft deprecate Azure Unmanaged Disks?
Microsoft will deprecate Azure Unmanaged Disks on September 30, 2025. This means that after that date, you will no longer be able to create new unmanaged disks or use them in your Azure Virtual Machines. You will need to migrate your data from unmanaged disks to managed disks before the deprecation date.
Managed disks are a newer, more efficient option that offers the same functionality as unmanaged disks, plus additional benefits. For example, managed disks are automatically backed up, so you don’t have to worry about losing your data if your VM fails. Managed disks also support Azure Disk Encryption, which helps to protect your data from unauthorized access.
To migrate your data from unmanaged disks to managed disks, you can use the Azure Disk Migration Service. This service makes it easy to move your data from unmanaged disks to managed disks with minimal downtime.
If you are using Azure Unmanaged Disks, you should start planning your migration to managed disks now. You can find more information about the deprecation of Azure Unmanaged Disks and how to migrate to managed disks in the Azure documentation.
Here are some additional details about the deprecation of Azure Unmanaged Disks:
- The deprecation of Azure Unmanaged Disks is part of Microsoft’s ongoing commitment to provide customers with the best possible experience.
- Managed disks offer a number of advantages over unmanaged disks, including increased reliability, security, and manageability.
- Microsoft will provide customers with ample notice of the deprecation of Azure Unmanaged Disks. Customers will have at least 18 months to migrate their data from unmanaged disks to managed disks.
- Microsoft will provide customers with tools and resources to help them migrate their data from unmanaged disks to managed disks.
- Microsoft will provide customers with support during the migration process.
What are the key factors that customers should consider when making decisions about Azure Unmanaged Disks?
There are a number of key factors that customers should consider when making decisions about Azure Unmanaged Disks. These factors include:
Security:
Managed disks are encrypted by default, while unmanaged disks are not. Additionally, managed disks are backed up by Microsoft, while unmanaged disks are not.
Manageability:
Managed disks are easier to manage than unmanaged disks. Customers are responsible for managing all aspects of the disk, including provisioning, backups, and security for unmanaged disks.
Scalability:
Managed disks can be scaled up or down as needed, while unmanaged disks cannot.
What are the tradeoffs involved in balancing different factors?
There are a number of tradeoffs involved in balancing different factors when making decisions about Azure Unmanaged Disks. For example, customers may need to decide between security and manageability. Managed disks are more secure than unmanaged disks, but they are also more difficult to manage. Customers may also need to decide between scalability and cost. Managed disks are more scalable than unmanaged disks, but they also cost more.
What are the challenges associated with different approaches?
There are a number of challenges associated with different approaches to Azure Unmanaged Disks. For example, one challenge is that customers are responsible for managing all aspects of the disk, including provisioning, backups, and security. This can be a time-consuming and error-prone process. Another challenge is that unmanaged disks are not as scalable as managed disks. This can be a problem for customers who need to scale their storage capacity quickly.
Why is it important to consider the impact of Azure Unmanaged Disks when making decisions?
It is important to consider the impact of Azure Unmanaged Disks when making decisions because they can have a significant impact on the cost, security, and manageability of your Azure infrastructure. By understanding the tradeoffs involved in different approaches, you can make informed decisions about whether or not to use Azure Unmanaged Disks.
How can Cloud Storage Manager help customers save money on their Azure Storage?
Cloud Storage Manager is a software solution that provides insights into your Azure blob and file storage consumption. It also provides reports on storage usage and growth trends.
This information can help you identify opportunities to save money on your Azure Storage costs.
For example, Cloud Storage Manager can help you identify underutilized storage accounts and disks. You can then delete these unused resources to save money. Additionally, Cloud Storage Manager can help you identify inefficient storage usage patterns. You can then make changes to your storage usage patterns to save money.
Overall, Cloud Storage Manager can help you save money on your Azure Storage costs by providing you with the information and insights you need to make informed decisions about your storage usage.
The Future of Azure Storage
The future of Azure storage is bright. Microsoft is constantly investing in new features and capabilities for Azure storage, and it is clear that they are committed to making Azure the best possible platform for storing data.
One of the most exciting developments in Azure storage is the introduction of managed disks. Managed disks are a new type of storage that is fully managed by Microsoft. This means that customers do not need to worry about provisioning, backups, or security for managed disks. Microsoft takes care of all of this for you.
Managed disks offer a number of advantages over unmanaged disks. First, they are more secure. Managed disks are encrypted by default, and they are backed up by Microsoft. This means that your data is safe and secure, even if something happens to your Azure instance.
Second, managed disks are more scalable. Managed disks can be scaled up or down as needed, so you can always have the right amount of storage for your needs. This is not possible with unmanaged disks.
Third, managed disks are more manageable. Managed disks are easy to create, manage, and delete. This is not the case with unmanaged disks.
Overall, managed disks are a great choice for customers who want a secure, scalable, and manageable storage solution. If you are not already using managed disks, I encourage you to give them a try. You will not be disappointed.
Conclusion
Azure Unmanaged Disks are a type of storage that is not managed by Microsoft. They are being deprecated by Microsoft, and customers should start planning to migrate to managed disks. Managed disks are a type of storage that is managed by Microsoft. They offer a number of advantages over unmanaged disks, including security, scalability, and manageability. Cloud Storage Manager is a software solution that can help customers save money on their Azure Storage costs. It provides insights into your Azure blob and file storage consumption, and it can help you identify opportunities to save money. The future of Azure storage is bright. Microsoft is constantly investing in new features and capabilities for Azure storage, and it is clear that they are committed to making Azure the best possible platform for storing data.
Azure Disk FAQs
| FAQ |
Answer |
What are Azure Unmanaged Disks?
|
Azure Unmanaged Disks are a type of storage that is not managed by Microsoft. This means that customers are responsible for managing all aspects of the disk, including provisioning, backups, and security. |
When will Microsoft deprecate Azure Unmanaged Disks?
|
Microsoft announced in September 2022 that they will be deprecating Azure Unmanaged Disks on September 30, 2025. This means that customers will no longer be able to create or use unmanaged disks after this date. |
What are the key factors that customers should consider when making decisions about Azure Unmanaged Disks?
|
There are a number of key factors that customers should consider when making decisions about Azure Unmanaged Disks. These factors include:
* Security: Managed disks are encrypted by default, while unmanaged disks are not. Additionally, managed disks are backed up by Microsoft, while unmanaged disks are not.
* Manageability: Managed disks are easier to manage than unmanaged disks. Customers are responsible for managing all aspects of the disk, including provisioning, backups, and security for unmanaged disks.
* Scalability: Managed disks can be scaled up or down as needed, while unmanaged disks cannot. | |
What are the tradeoffs involved in balancing different factors?
|
There are a number of tradeoffs involved in balancing different factors when making decisions about Azure Unmanaged Disks. For example, customers may need to decide between security and manageability. Managed disks are more secure than unmanaged disks, but they are also more difficult to manage. Customers may also need to decide between scalability and cost. Managed disks are more scalable than unmanaged disks, but they also cost more. |
What are the challenges associated with different approaches?
|
There are a number of challenges associated with different approaches to Azure Unmanaged Disks. For example, one challenge is that customers are responsible for managing all aspects of the disk, including provisioning, backups, and security. This can be a time-consuming and error-prone process. Another challenge is that unmanaged disks are not as scalable as managed disks. This can be a problem for customers who need to scale their storage capacity quickly. |
Why is it important to consider the impact of Azure Unmanaged Disks when making decisions?
|
It is important to consider the impact of Azure Unmanaged Disks when making decisions because they can have a significant impact on the cost, security, and manageability of your Azure infrastructure. By understanding the tradeoffs involved in different approaches, you can make informed decisions about whether or not to use Azure Unmanaged Disks |
How can Cloud Storage Manager help customers save money on their Azure Storage?
|
Cloud Storage Manager is a software solution that provides insights into your Azure blob and file storage consumption. It also provides reports on storage usage and growth trends. This information can help you identify opportunities to save money on your Azure Storage costs.
For example, Cloud Storage Manager can help you identify underutilized storage accounts and disks. You can then delete these unused resources to save money.
Additionally, Cloud Storage Manager can help you identify inefficient storage usage patterns. You can then make changes to your storage usage patterns to save money.
Overall, Cloud Storage Manager can help you save money on your Azure Storage costs by providing you with the information and insights you need to make informed decisions about your storage usage. |
Whats The Future of Azure Storage
|
The future of Azure storage is bright. Microsoft is constantly investing in new features and capabilities for Azure storage, and it is clear that they are committed to making Azure the best possible platform for storing data.
* One of the most exciting developments in Azure storage is the introduction of managed disks. Managed disks are a new type of storage that is fully managed by Microsoft. This means that customers do not need to worry about provisioning, backups, or security for managed disks. Microsoft takes care of all of this for you.
* Managed disks offer a number of advantages over unmanaged disks. First, they are more secure. Managed disks are encrypted by default, and they are backed up by Microsoft. This means that your data is safe and secure, even if something happens to your Azure instance.
* Second, managed disks are more scalable. Managed disks can be scaled up or down as needed, so you can always have the right amount of storage for your needs. This is not possible with unmanaged disks.
* Third, managed disks are more manageable. Managed disks are easy to create, manage, and delete. This is not the case with unmanaged disks.
* Overall, managed disks are a great choice for customers who want a secure, scalable, and manageable storage solution. If you are not already using managed disks |

by Mark | Apr 3, 2023 | Azure, Azure Blobs, Azure Disks, Azure FIles, Cloud Storage, Cloud Storage Manager, Storage Accounts
AZCopy Introduction
In today’s data-driven world, the ability to efficiently and effectively manage vast amounts of data is crucial. As businesses increasingly rely on cloud services to store and manage their data, tools that can streamline data transfer processes become indispensable. AZCopy is one such powerful tool that, when combined with Azure Storage, can greatly simplify data management tasks while maintaining optimal performance. This article aims to provide a comprehensive guide on using AZCopy with Azure Storage, enabling you to harness the full potential of these powerful technologies.
AZCopy is a command-line utility designed by Microsoft to provide a high-performance, multi-threaded solution for transferring data to and from Azure Storage services. It is capable of handling large-scale data transfers with ease, thanks to its support for parallelism and resumable file transfers. Furthermore, AZCopy supports various data types, such as Azure Blob Storage, Azure Files, and Azure Table Storage, making it a versatile tool for managing different types of data within the Azure ecosystem.
Data management in the cloud is vital for businesses, as it allows for efficient storage, retrieval, and analysis of information. This, in turn, enables organizations to make data-driven decisions, optimize their operations, and drive innovation. Azure Storage is a popular choice for cloud-based storage, offering a range of services, including Blob storage, File storage, Queue storage, and Table storage. These services cater to various data storage needs, such as unstructured data, file shares, messaging, and NoSQL databases. By using Azure Storage, businesses can benefit from its scalability, durability, security, and cost-effectiveness, which are essential features for modern data storage solutions.
This article serves as a guide to help you harness the power of AZCopy with Azure Storage by providing step-by-step instructions for setting up your environment, using AZCopy for various data transfer scenarios, and troubleshooting common issues that may arise. We will begin by exploring what AZCopy is and providing an overview of Azure Storage. Next, we will delve into setting up your environment, including creating an Azure Storage account, installing AZCopy on your preferred platform, and configuring AZCopy for authentication.
Once your environment is set up, we will discuss various use cases for AZCopy with Azure Storage, such as uploading data to Azure Storage, downloading data from Azure Storage, copying data between Azure Storage accounts, and synchronizing data between local storage and Azure Storage. Step-by-step guides will be provided for each of these scenarios, helping you effectively use AZCopy to manage your data. Additionally, we will offer tips for optimizing AZCopy’s performance, ensuring that you get the most out of this powerful utility.
Finally, we will address troubleshooting common issues that may arise while using AZCopy, such as handling failed transfers, resuming interrupted transfers, dealing with authentication errors, and addressing performance issues. This comprehensive guide will equip you with the knowledge and skills needed to efficiently manage your data using AZCopy and Azure Storage, allowing you to take full advantage of these powerful tools.
In summary, the purpose of this article is to provide a comprehensive guide on using AZCopy with Azure Storage, enabling you to harness the full potential of these powerful technologies. By following this guide, you will be able to efficiently and effectively manage your data in the cloud, leading to improved data-driven decision-making, optimized operations, and increased innovation within your organization.
What is AZCopy?
AZCopy is a command-line utility developed by Microsoft to facilitate fast and reliable data transfers to and from Azure Storage services. Designed with performance and versatility in mind, AZCopy simplifies the process of managing data within the Azure ecosystem, catering to the needs of developers, IT professionals, and organizations of various sizes.
Definition of AZCopy
AZCopy is a high-performance, multi-threaded data transfer tool that supports parallelism and resumable file transfers, making it ideal for handling large-scale data transfers. It allows users to transfer data between local storage and Azure Storage, as well as between different Azure Storage accounts. AZCopy is specifically designed for optimal performance when working with Azure Blob Storage, Azure Files, and Azure Table Storage.
Key features
- High-performance: AZCopy is built for speed, utilizing multi-threading and parallelism to achieve high transfer rates. This enables users to transfer large amounts of data quickly and efficiently.
- Multi-threaded: By supporting multi-threading, AZCopy can simultaneously perform multiple file transfers, leading to reduced transfer times and increased efficiency.
- Resumable file transfers: In case of interruptions during a transfer, AZCopy is capable of resuming the process from where it left off. This feature minimizes the need to restart the entire transfer process, saving time and reducing the likelihood of data corruption.
- Supports various data types: AZCopy is compatible with multiple Azure Storage services, including Azure Blob Storage, Azure Files, and Azure Table Storage. This versatility allows users to manage a variety of data types using a single utility.
Supported platforms
AZCopy is available on several platforms, ensuring that users can easily access the utility on their preferred operating system:
- Windows: AZCopy can be installed on Windows operating systems, providing a familiar environment for users who prefer working with Windows.
- Linux: For users who work with Linux-based systems, AZCopy is available as a cross-platform utility, allowing for seamless integration with their existing workflows.
- macOS: macOS users can also take advantage of AZCopy, as it is available for installation on Apple’s operating system, ensuring compatibility with a wide range of devices and environments.
In the next section, we will explore Azure Storage, providing an overview of the various storage services it offers, as well as the benefits of using Azure Storage for your data management needs.
Azure Storage Overview
Azure Storage is a comprehensive cloud storage solution offered by Microsoft as part of its Azure suite of services. It provides scalable, durable, and secure storage options for various types of data, catering to the needs of businesses and organizations of all sizes. In this section, we will briefly describe Azure Storage and its core services, as well as the benefits of using Azure Storage for your data management needs.
Brief description of Azure Storage
Azure Storage is a highly available and massively scalable cloud storage solution designed to handle diverse data types and storage requirements. It offers a range of storage services, including Blob storage, File storage, Queue storage, and Table storage. These services are designed to address different data storage needs, such as unstructured data, file shares, messaging, and NoSQL databases, enabling organizations to store and manage their data effectively and securely.
Storage services
- Blob storage: Azure Blob storage is designed for storing large amounts of unstructured data, such as text, images, videos, and binary data. It is highly scalable and can handle millions of requests per second, making it ideal for storing and serving data for big data, analytics, and content delivery purposes.
- File storage: Azure File storage is a managed file share service that uses the SMB protocol, allowing for seamless integration with existing file share infrastructure. It is ideal for migrating on-premises file shares to the cloud, providing shared access to files, and enabling lift-and-shift scenarios for applications that rely on file shares.
- Queue storage: Azure Queue storage is a messaging service that enables communication between components of a distributed application. It facilitates asynchronous message passing, decoupling the components, and allowing for better scalability and fault tolerance.
- Table storage: Azure Table storage is a NoSQL database service designed for storing structured, non-relational data. It is highly scalable and provides low-latency access to data, making it suitable for storing large volumes of data that do not require complex queries or relationships.
Benefits of using Azure Storage
- Scalability: Azure Storage is designed to scale on-demand, allowing you to store and manage data without worrying about capacity limitations. This ensures that your storage infrastructure can grow alongside your business, meeting your changing needs over time.
- Durability: Azure Storage offers built-in data replication and redundancy, ensuring that your data is protected and available even in the event of hardware failures or other issues. This provides peace of mind and ensures the continuity of your operations.
- Security: Azure Storage includes various security features, such as data encryption at rest and in transit, role-based access control, and integration with Azure Active Directory. These features help you protect your data and comply with industry regulations and standards.
- Cost-effectiveness: Azure Storage offers flexible pricing options, allowing you to choose the storage solution that best fits your budget and requirements. By leveraging Azure’s pay-as-you-go model, you can optimize your storage costs based on your actual usage, rather than over-provisioning to account for potential growth.
In the following sections, we will guide you through setting up your environment to work with AZCopy and Azure Storage, as well as provide step-by-step instructions for using AZCopy for various data transfer scenarios.
Setting Up Your Environment
Before you can start using AZCopy with Azure Storage, you will need to set up your environment by creating an Azure Storage account, installing AZCopy on your preferred platform, and configuring AZCopy for authentication. This section will walk you through these steps to ensure your environment is ready for data transfers.
Creating an Azure Storage account
- Sign in to the Azure portal (https://portal.azure.com/) with your Microsoft account. If you do not have an account, you can sign up for a free trial.
- Click on the “Create a resource” button in the left-hand menu.
- In the search bar, type “Storage account” and select it from the list of results.
- Click the “Create” button to start the process of creating a new storage account.
- Fill in the required information, such as subscription, resource group, storage account name, location, and performance tier. Make sure to choose the appropriate redundancy and access tier options based on your requirements.
- Click “Review + create” to review your settings, then click “Create” to create your Azure Storage account. The deployment process may take a few minutes.
Further guidance on setting up an Azure Storage Account
Installing AZCopy
AZCopy can be installed on Windows, Linux, and macOS platforms. Follow the instructions for your preferred platform:
- Windows: a. Download the latest version of AZCopy for Windows from the official Microsoft website (https://aka.ms/downloadazcopy-v10-windows). b. Extract the contents of the downloaded ZIP file to a directory of your choice. c. Add the directory containing the extracted AZCopy executable to your system’s PATH environment variable.
- Linux: a. Download the latest version of AZCopy for Linux from the official Microsoft website (https://aka.ms/downloadazcopy-v10-linux). b. Extract the contents of the downloaded TAR file to a directory of your choice. c. Add the directory containing the extracted AZCopy executable to your system’s PATH environment variable.
- macOS: a. Download the latest version of AZCopy for macOS from the official Microsoft website (https://aka.ms/downloadazcopy-v10-mac). b. Extract the contents of the downloaded ZIP file to a directory of your choice. c. Add the directory containing the extracted AZCopy executable to your system’s PATH environment variable.
Configuring AZCopy
Obtaining storage account keys or SAS tokens:
To authenticate with your Azure Storage account, you will need either the storage account key or a Shared Access Signature (SAS) token. You can obtain these credentials from the Azure portal:
a. Navigate to your Azure Storage account in the Azure portal.
b. In the left-hand menu, click “Access keys” to obtain the storage account key, or click “Shared access signature” to generate a SAS token.
c. Copy the desired credential for use with AZCopy.
Setting up authentication:
AZCopy supports authentication using either the storage account key or a SAS token. To set up authentication, use the following command, replacing “ACCOUNT_NAME” and “ACCOUNT_KEY” or “SAS_TOKEN” with your actual credentials:
- Using the storage account key: azcopy login –account-name ACCOUNT_NAME –account-key ACCOUNT_KEY
- Using a SAS token:azcopy login –sas-token “SAS_TOKEN”
With your environment set up, you can now proceed to use AZCopy with Azure Storage for various data transfer scenarios, as described in the next sections.
Using AZCopy with Azure Storage
Now that your environment is set up, you can start using AZCopy to manage your data in Azure Storage. In this section, we will discuss common use cases for AZCopy with Azure Storage and provide step-by-step guides for each scenario.
Step-by-step guides
Uploading files to Blob storage:
a. Open a command prompt or terminal window. b. Use the following command, replacing “SOURCE_PATH” with the path to the local file or directory you want to upload, and “DESTINATION_URL” with the URL of the target Blob container in your Azure Storage account:
azcopy copy “SOURCE_PATH” “DESTINATION_URL” –recursive
Note: Use the --recursive flag to upload all files and subdirectories within a directory. Remove the flag if you are uploading a single file.
Downloading files from Blob storage:
Open a command prompt or terminal window. b. Use the following command, replacing “SOURCE_URL” with the URL of the Blob container or Blob you want to download, and “DESTINATION_PATH” with the path to the local directory where you want to save the downloaded files:
azcopy copy “SOURCE_URL” “DESTINATION_PATH” –recursive
Note: Use the –recursive flag to download all files and subdirectories within a Blob container. Remove the flag if you are downloading a single Blob.
Copying files between Azure Storage accounts:
a. Open a command prompt or terminal window. b. Use the following command, replacing “SOURCE_URL” with the URL of the source Blob container or Blob, and “DESTINATION_URL” with the URL of the target Blob container in the destination Azure Storage account:
azcopy copy “SOURCE_URL” “DESTINATION_URL” –recursive
Note: Use the –recursive flag to copy all files and subdirectories within a Blob container. Remove the flag if you are copying a single Blob.
Synchronizing local files with Azure Storage:
a. Open a command prompt or terminal window. b. Use the following command, replacing “SOURCE_PATH” with the path to the local directory you want to synchronize, and “DESTINATION_URL” with the URL of the target Blob container in your Azure Storage account:
azcopy sync “SOURCE_PATH” “DESTINATION_URL” –recursive
This command will synchronize the contents of the local directory with the Blob container, uploading new or updated files and deleting Blob files that are no longer present in the local directory.
Tips for optimizing AZCopy performance
Adjusting the number of concurrent operations:
AZCopy’s performance can be influenced by the number of concurrent operations it performs. You can adjust this number using the --cap-mbps flag in your AZCopy commands, replacing “X” with the desired number of megabits per second: azcopy copy “SOURCE_PATH” “DESTINATION_URL” –recursive –cap-mbps X
Using a response file:
For complex AZCopy commands or scenarios where you need to specify multiple flags, you can use a response file to store your command parameters. Create a text file containing your AZCopy command flags, one per line, then use the @ symbol followed by the response file path in your AZCopy command: azcopy copy “SOURCE_PATH” “DESTINATION_URL” @response_file_path
Managing transfer logs:
AZCopy generates log files during transfers to help you monitor progress and troubleshoot issues. By default, log files are created in the user’s home directory, but you can specify a custom log location using the --log-location flag: azcopy copy “SOURCE_PATH” “DESTINATION_URL” –recursive –log-location “CUSTOM_LOG_PATH”
Replace “CUSTOM_LOG_PATH” with the desired path for the log files.
Handling large files:
For large files, AZCopy can be configured to use the --block-size-mb flag to adjust the block size used during transfers. Larger block sizes can improve performance but may consume more memory. Replace “Y” with the desired block size in megabytes: azcopy copy “SOURCE_PATH” “DESTINATION_URL” –recursive –block-size-mb Y
Monitoring AZCopy transfers:
You can monitor the progress of your AZCopy transfers using the –status flag followed by the job ID: azcopy jobs show –job-id “JOB_ID”
Replace “JOB_ID” with the job ID displayed in the command prompt or terminal window during the transfer.
In conclusion, AZCopy is a powerful and versatile utility for managing data transfers to and from Azure Storage. By familiarizing yourself with its features and following the step-by-step guides provided in this article, you can efficiently manage your data in Azure Storage and optimize your cloud storage workflows.
Advanced AZCopy Features and Use Cases
In addition to the basic data transfer scenarios covered in the previous sections, AZCopy offers advanced features that can help you further optimize your data management tasks with Azure Storage. In this section, we will discuss these advanced features and provide examples of use cases where they can be particularly beneficial.
Advanced Features
Incremental Copy:
AZCopy supports incremental copy, which allows you to transfer only the modified or new files since the last transfer. This can help save time and bandwidth by avoiding the transfer of unchanged files. To perform an incremental copy, use the --incremental flag:
azcopy copy “SOURCE_PATH” “DESTINATION_URL” –recursive –incremental
Filtering Files:
You can filter files during a transfer based on specific criteria, such as file name patterns, last modified time, or file size. Use the --include-pattern, --exclude-pattern, --include-after, or --exclude-before flags to apply filters:
azcopy copy “SOURCE_PATH” “DESTINATION_URL” –recursive –include-pattern “*.jpg” –exclude-before “2023-01-01T00:00:00Z”
This command will transfer only files with a “.jpg” extension that were modified after January 1, 2023.
Preserving Access Control Lists (ACLs):
When transferring files between Azure Storage accounts, you can preserve the Access Control Lists (ACLs) by using the --preserve-smb-permissions flag for Azure File storage, or the --preserve-smb-info flag for Azure Blob storage:
azcopy copy “SOURCE_URL” “DESTINATION_URL” –recursive –preserve-smb-permissions
Advanced Use Cases
- Backup and Disaster Recovery: AZCopy can be used to create backups of your local data in Azure Storage or to replicate data between Azure Storage accounts for disaster recovery purposes. By leveraging AZCopy’s advanced features, such as incremental copy and file filtering, you can optimize your backup and recovery processes to save time and storage costs.
- Data Migration: AZCopy is a valuable tool for migrating data to or from Azure Storage, whether you are moving data between on-premises and Azure, or between different Azure Storage accounts or regions. AZCopy’s high-performance capabilities and support for resumable transfers help ensure a smooth and efficient migration process.
- Data Archiving: If you need to archive data for long-term retention, AZCopy can help transfer your data to Azure Blob storage, where you can take advantage of Azure’s cost-effective archiving and tiering options, such as Cool and Archive storage tiers.
- Content Distribution: For content delivery scenarios, AZCopy can be used to upload and synchronize your content with Azure Blob storage. This enables you to easily distribute your content through Azure Content Delivery Network (CDN) or other content delivery services.
By leveraging these advanced AZCopy features, you can further optimize your data management tasks with Azure Storage and address more complex requirements and scenarios. The flexibility and versatility of AZCopy make it an essential tool for managing your data in the Azure ecosystem.
Integrating AZCopy with Automation Tools and Scripts
To further streamline your data management tasks with Azure Storage, you can integrate AZCopy with various automation tools and scripts. This section will discuss some common tools and provide examples of how to use them in combination with AZCopy.
Automation Tools
- Windows Task Scheduler: Windows Task Scheduler can be used to schedule and automate AZCopy tasks on Windows systems. You can create tasks that execute AZCopy commands at specified intervals, such as daily or weekly backups, or during system startup or user login.
- Linux Cron Jobs: Linux cron jobs offer a similar scheduling capability for Linux systems, allowing you to automate AZCopy tasks on a recurring basis or at specific times.
- Azure Functions: Azure Functions is a serverless compute service that can be used to execute AZCopy commands in response to events, such as changes in your Azure Storage account or other Azure services.
- Azure Logic Apps: Azure Logic Apps is a cloud-based service that enables you to create and run workflows that integrate with various Azure services, including Azure Storage. You can use Azure Logic Apps to trigger AZCopy tasks based on specific events or conditions.
Integration Examples
Scheduling a daily backup using Windows Task Scheduler:
- Open the Windows Task Scheduler and click “Create Task” in the right-hand menu.
- In the “General” tab, provide a name and description for the task.
- In the “Triggers” tab, click “New” and configure a daily trigger for the desired time.
- In the “Actions” tab, click “New” and select “Start a program” as the action type. Enter the full path to the AZCopy executable in the “Program/script” field, and provide the AZCopy command with required parameters in the “Add arguments” field.
- Click “OK” to create the task. The AZCopy command will now run automatically at the scheduled time.
Running an incremental backup with a Linux cron job:
- Open a terminal window and enter the following command to open the crontab editor: crontab -e
- Add a new line with the following format, replacing “AZCOPY_COMMAND” with the desired AZCopy command: 0 0 * * * /path/to/azcopy “AZCOPY_COMMAND”
This example schedules the AZCopy command to run daily at midnight.
- Save and exit the crontab editor. The AZCopy command will now run automatically at the scheduled time.
Triggering an AZCopy command with an Azure Function:
- Create a new Azure Function in the Azure portal, using your preferred language and trigger type (e.g., HTTP trigger, Blob trigger, Timer trigger).
- In the function code, add the necessary code to execute the AZCopy command using a system command or process invocation, depending on the chosen language.
- Save and deploy the Azure Function. The AZCopy command will now run in response to the specified trigger event.By integrating AZCopy with automation tools and scripts, you can create more efficient and sophisticated data management workflows for your Azure Storage account. This approach helps minimize manual intervention and ensures that your data is consistently and reliably managed, ultimately reducing the risk of data loss and improving overall system performance.

Securing Your Data Transfers with AZCopy
When using AZCopy to transfer data to and from Azure Storage, it is essential to ensure that your data is protected and secure during the process. This section will discuss security best practices and features available within AZCopy to help you safeguard your data transfers.
Security Best Practices
Use HTTPS:
Always use HTTPS when transferring data with AZCopy to encrypt your data during transit. By default, AZCopy uses HTTPS when communicating with Azure Storage, ensuring a secure connection between your local environment and Azure.
Protect your SAS tokens and credentials:
Shared Access Signature (SAS) tokens and credentials are used to authenticate your AZCopy transfers. Be cautious when handling and storing these sensitive credentials, and avoid including them in scripts or configuration files that may be accessible to unauthorized users.
Rotate SAS tokens and keys:
Regularly rotate your SAS tokens and storage account keys to minimize the potential impact of a compromised token or key. By limiting the lifespan of your tokens and keys, you can reduce the risk of unauthorized access to your Azure Storage account.
Implement least privilege access:
When creating SAS tokens or assigning Azure RBAC roles, always adhere to the principle of least privilege. Limit access to the minimum set of permissions required for a specific task or user, reducing the potential damage in case of unauthorized access.
AZCopy Security Features
Server-side encryption:
Azure Storage supports server-side encryption of your data at rest, using either Azure-managed keys or customer-managed keys. By enabling server-side encryption, you can ensure that your data is securely stored in Azure Storage.
Data integrity checks:
AZCopy performs data integrity checks by computing and verifying MD5 checksums for each transferred file. This helps ensure that your data has not been tampered with or corrupted during transit.
Resume incomplete transfers:
AZCopy supports the resumption of incomplete transfers, which can be useful in the event of a network disruption or other issues during the transfer process. By using the --overwrite flag with the value “ifSourceNewer”, you can instruct AZCopy to resume an interrupted transfer, skipping any files that have already been successfully transferred and are up to date: azcopy copy “SOURCE_PATH” “DESTINATION_URL” –recursive –overwrite ifSourceNewer
Private endpoint support:
If you have configured a private endpoint for your Azure Storage account, you can use AZCopy to transfer data over a secure, private connection within your virtual network. This can help protect your data from potential attacks or eavesdropping on the public internet.
Troubleshooting Common AZCopy Issues
As with any tool, you may encounter issues while using AZCopy. In this section, we’ll cover some common problems and provide guidance on how to resolve them.
Common AZCopy Issues
Authentication errors:
If you receive authentication errors, double-check your SAS token, storage account key, or Azure AD credentials. Ensure they are valid and have the necessary permissions for the desired operation.
Transfer failures:
If some files fail to transfer, review the AZCopy log files for any error messages or warnings. Log files can help identify the root cause of transfer failures, such as network disruptions, file access issues, or storage account limitations.
Performance issues:
If your AZCopy transfers are slow or consume excessive resources, consider adjusting the number of concurrent operations or the block size, as discussed in Section V.C of this article. Additionally, ensure that your network connection is stable and has sufficient bandwidth.
Incomplete transfers:
If an AZCopy transfer is interrupted, you can resume the transfer using the --overwrite ifSourceNewer flag, as mentioned in Section VIII.B.3. This allows AZCopy to skip already transferred files and resume the transfer from where it left off.
Troubleshooting Steps
Verify your command syntax:
Double-check the AZCopy command you are using for any syntax errors or incorrect parameters. Consult the AZCopy documentation for guidance on the correct usage of flags and parameters.
Review log files:
Examine AZCopy log files for detailed information on any issues encountered during the transfer process. Log files can help you identify specific error messages or warnings, which can be helpful in diagnosing the problem.
Check your environment:
Ensure that your local environment meets the requirements for running AZCopy, such as the necessary system permissions and software dependencies. Also, verify that your Azure Storage account is properly configured and accessible.
Test with a smaller dataset:
If you are encountering issues during a large transfer, try running AZCopy with a smaller dataset to isolate the problem. This can help determine if the issue is related to the size or complexity of the transfer or if it is caused by a specific file or configuration.
Consult the AZCopy documentation and community:
The AZCopy documentation and online forums can be valuable resources for troubleshooting issues and finding solutions to common problems. Search for any error messages or symptoms you are experiencing, and consult the community for guidance.
By following these troubleshooting steps and addressing common AZCopy issues, you can quickly resolve problems and ensure smooth and efficient data transfers with Azure Storage. Remember that the AZCopy documentation, log files, and community resources are valuable tools for diagnosing and resolving issues you may encounter during the data transfer process.
AZCopy Alternatives and Complementary Tools
While AZCopy is a powerful tool for transferring data to and from Azure Storage, you might find it useful to explore alternative or complementary tools that can help you with specific tasks or use cases. In this section, we will discuss some of these tools and how they can be used alongside AZCopy.
Alternative Tools
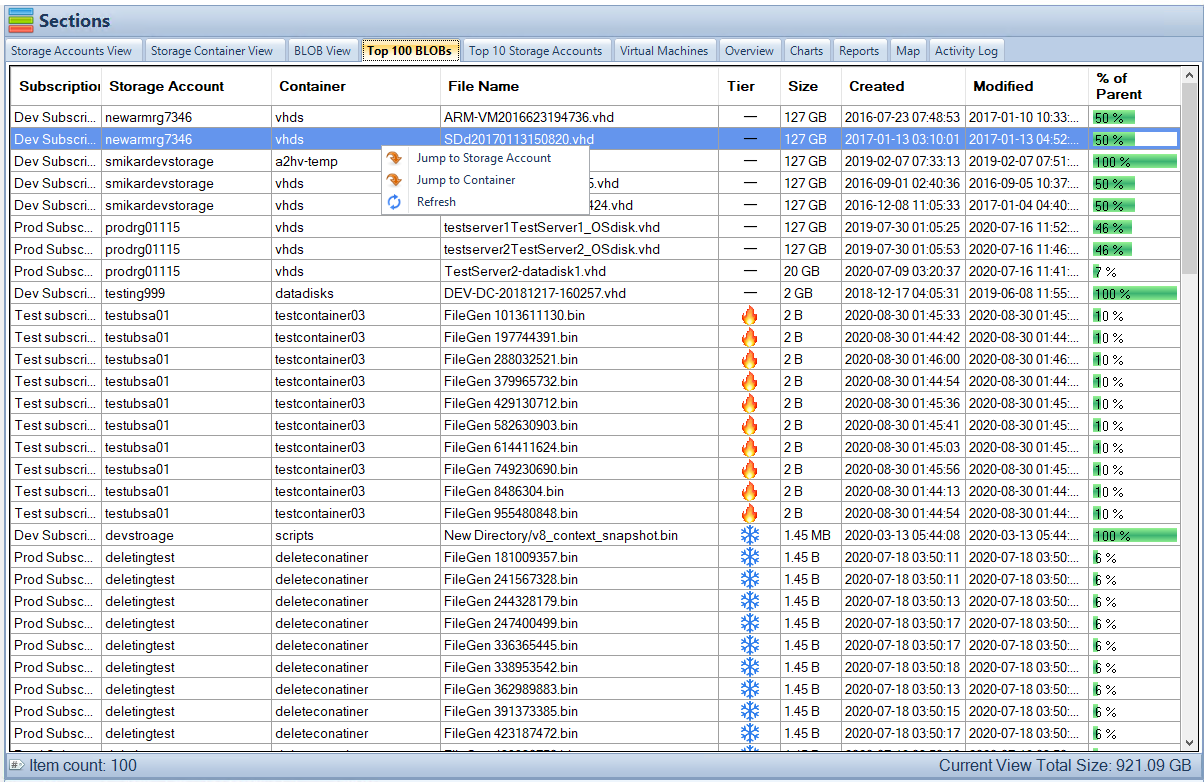
Cloud Storage Manager
Cloud Storage Manager provides you with a multitude of reports so you can see where your Azure Storage is consumed and costing you money. Easily see storage growth, and usage to reduce costs, improve performance and make the most of your Azure Storage.
Here are some of the reports that Cloud Storage Manager provides:
Storage Account Growth Report: This report shows you how much storage space your Azure Storage accounts are using over time. This can help you identify trends in storage usage and make sure that you are not overpaying for storage.
Storage Account Usage Report: This report shows you how much data is being stored in your Azure Storage accounts and how often it is being accessed. This information can help you identify which data is being used the most and optimize your storage costs.
Cloud Storage Manager is a valuable tool for anyone who wants to manage their Azure Storage accounts effectively. It provides you with the information you need to reduce costs, improve performance, and make the most of your Azure Storage.
Azure Storage Explorer:
Azure Storage Explorer is a graphical user interface (GUI) tool that allows you to interact with Azure Storage services such as Blob, File, Queue, and Table storage. It provides an intuitive interface for managing and transferring data, making it a suitable option for users who prefer a GUI over command-line tools like AZCopy.
Azure Data Factory:
Azure Data Factory is a cloud-based data integration service that allows you to create, schedule, and manage data workflows. It supports a wide range of data sources and destinations, including Azure Storage. If you require advanced data transformation or integration capabilities, Azure Data Factory might be a better fit than AZCopy.
Azure Data Box:
Azure Data Box is a family of physical data transfer devices that can be used to transfer large volumes of data to Azure Storage. If you have limited network bandwidth or need to transfer terabytes or petabytes of data, Azure Data Box can be a more efficient alternative to AZCopy.
Complementary Tools
Azure Backup:
Azure Backup is a managed backup service that can help protect your data in Azure Storage and other Azure services. It integrates seamlessly with Azure Storage, allowing you to create backup and restore policies for your data. You can use AZCopy to transfer data to Azure Storage and then protect it with Azure Backup.
Azure Site Recovery:
Azure Site Recovery is a disaster recovery service that can help you protect and recover your applications and data in case of an outage or failure. It supports replication and failover for Azure Storage and other Azure services. AZCopy can be used to transfer data to Azure Storage, which can then be protected and replicated with Azure Site Recovery.
Azure Monitor:
Azure Monitor is a comprehensive monitoring and diagnostics service that can help you track the performance, availability, and usage of your Azure resources, including Azure Storage. By integrating AZCopy with Azure Monitor, you can gain insights into your data transfer activities and ensure optimal performance and reliability.
Azure Security Center:
Azure Security Center is a unified security management and threat protection service that can help you monitor and protect your Azure resources, including Azure Storage. It provides visibility into your storage accounts’ security posture and can help you detect and respond to potential threats. You can use AZCopy to transfer data to Azure Storage while maintaining security best practices and leveraging Azure Security Center’s capabilities to protect your data.
By exploring these alternative and complementary tools, you can enhance your data management workflows with Azure Storage and address a broader range of use cases and requirements. Each tool offers unique capabilities and features that can help you optimize your data management processes, improve performance, and ensure the security and reliability of your data in Azure.