by Mark | Jan 18, 2022 | Azure, Azure Blobs, How To
In today’s digital world, data storage has become an essential aspect of businesses of all sizes. As data continues to grow exponentially, the need for reliable, scalable, and cost-effective storage solutions has become more critical than ever. Microsoft Azure is a popular cloud computing platform that provides a wide range of storage solutions. In this article, we will guide you through the process of creating an Azure Storage account step-by-step.
What is Azure Storage?
Azure Storage is a cloud-based storage solution that provides scalable, durable, and highly available storage for your applications and data. It offers a range of storage types, including Blob, File, Queue, and Table storage, which are designed to meet different storage needs. Azure Storage provides a high degree of flexibility and enables you to easily scale up or down as your storage needs change.
Azure Storage Account Use Cases
| Use Case |
Description |
| Data Backup and Recovery |
Azure Storage Account is an ideal solution for data backup and recovery purposes. It allows users to store backup data in a secure and scalable manner, and retrieve it as needed. This use case is particularly useful for businesses that need to store and retrieve large amounts of data quickly and efficiently. |
| Media Storage and Streaming |
Azure Storage Account is also an excellent option for storing and streaming media files, such as videos and music. It provides a high level of performance and scalability, making it easy to store and retrieve media files as needed. This use case is particularly useful for businesses that need to stream videos or other media content to their customers. |
| Application Data Storage |
Azure Storage Account is a reliable and cost-effective solution for storing application data. It provides flexible options for storing and retrieving data, making it easy to manage application data as needed. This use case is particularly useful for businesses that need to store and manage large amounts of application data. |
| Archival Storage |
Azure Storage Account also provides an excellent option for archival storage. This use case involves storing data that is infrequently accessed, but still needs to be retained for compliance or other reasons. Azure Storage Account offers cost-effective options for storing archival data over long periods of time, while still providing easy access to the data when needed. |
| Disaster Recovery |
Azure Storage Account can also be used for disaster recovery purposes. It allows businesses to store backup data in a separate location, providing an added layer of protection in case of a disaster. This use case is particularly useful for businesses that need to ensure that their data is protected and accessible at all times, even in the event of a disaster. |
STEP BY STEP GUIDE ON HOW TO CREATE AN AZURE STORAGE ACCOUNT.
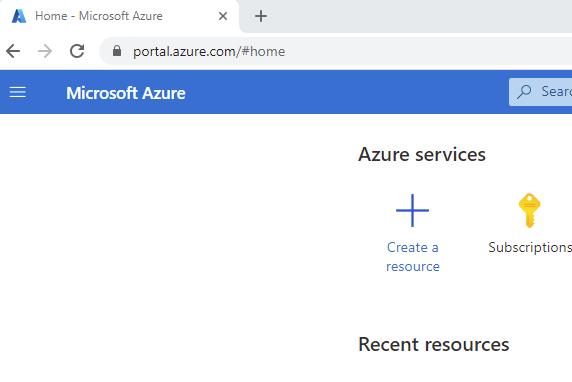
Open the Azure Portal
First thing to do is to open the browser of your choice and into your Azure Subscription at https://portal.azure.com
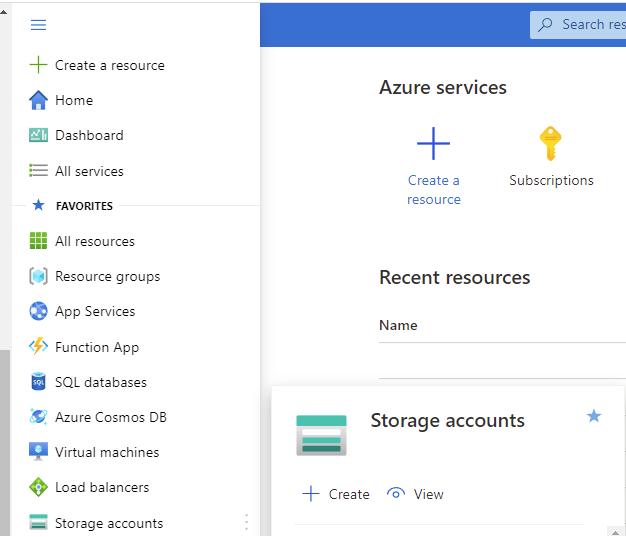
New Azure Storage Account
Now navigate to the top left of the browser, click the three dashes and scroll down to Storage Accounts, then choose create.
Create an Azure Storage Account
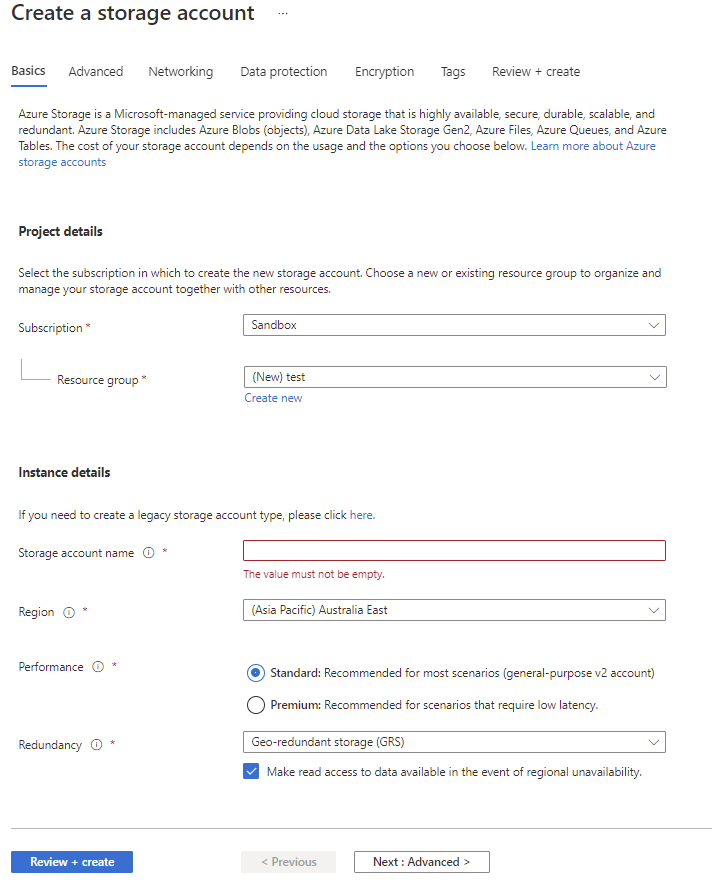
The Browser will now open into the Create a Storage Account Wizard.
Here you will need to know and set a few things so your storage account can be created.
SUBSCRIPTION – First thing is which of your Azure Subscriptions the Storage Account should reside in.
RESOURCE GROUP – Next is the Resource Group, you can either choose an existing Resource Group or create a new one.
STORAGE ACCOUNT NAME – This is the name that you want the Storage Account to be called. It must be unique.
REGION – The Azure datacentre you want the Storage Account to reside.
PERFORMANCE – You can choose Standard or Premium for the performance of the Storage Account.
REDUNDANCY – Choose what sort of redundancy you want for the Storage Account. (More info on this and more about Azure Blob Storage at this link)
Choose from;
-
- Locally Redundant Storage – (LRS)
- Geo Redundant Storage – (GRS)
- Zone Redundant Storage – (ZRS)
- Geo Zone Redundant Storage – (GZRS)
When you are ready to progress, you can skip the next few steps by clicking Review + Create or click Next : Advanced to proceed to the next steps.
Azure Storage Account Advanced Page
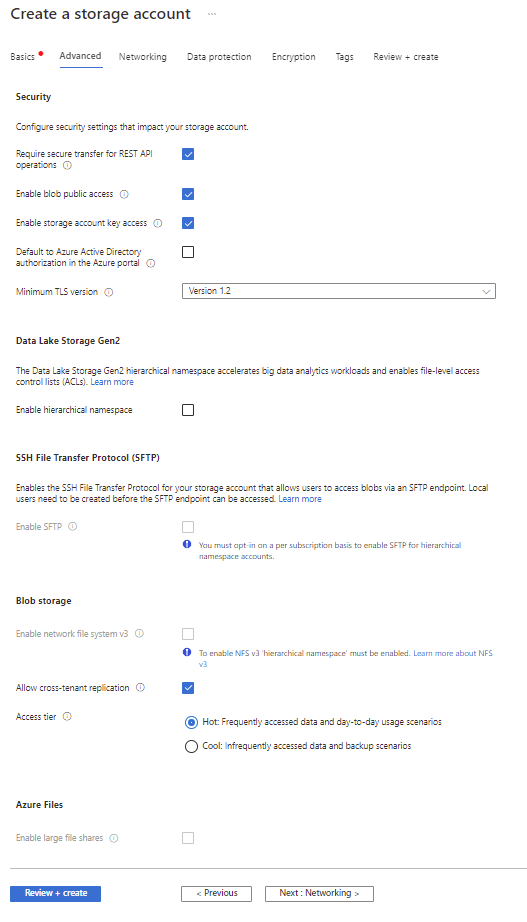
If you clicked on Review + Create on the previous page, you can skip these steps. However, if you click on Next : Advanced you will be on the further settings page in the Storage Account Creation wizard.
On this page you configure some further settings;
SECURITY
SECURE TRANSFER FOR REST API – This setting will only allow communication to the Storage Account using HTTPS. HTTP will be rejected when this setting is enabled.
ENABLE BLOB PUBLIC ACCESS – Choose if you want this storage account to be accessed externally, or only via your internal network.
ENABLE STORAGE ACCOUNT KEY ACCESS – Choose whether you want to enable access using an Azure Shared Storage Key.
AZURE ACTIVE DIRECTORY– If you have Azure Active Directory you can set this to allow access to the Storage Account using Azure AD.
MINIMUM TLS VERSION – This sets the minimum TLS version that any applications accessing the Storage Account can use.
-
- TLS version 1.2
- TLS version 1.1
- TLS version 1.0
DATA LAKE STORAGE GEN2
ENABLE HIERARCHICAL NAMESPACE – The Data Lake Storage Gen2 hierarchical namespace accelerates big data analytics workloads and enables file-level access control lists
SSH FILE TRANSFER PROTOCOL (SFTP)
ENABLE SFTP – Enables the SSH File Transfer Protocol for your storage account that allows users to access blobs via an SFTP endpoint.
BLOB STORAGE
ENABLE NETWORK FILE SYSTEM v3 – This will allow the Network File System Protocol so that users can access their files across the network.
ALLOW CROSS-TENANT REPLICATION – This allows object replication from this storage account to another storage account within a Different Azure tenant. Not enabling this setting will limit this replication only within the same Azure tenant.
ACCESS TIER – Sets the default access tier for the storage account.
-
- HOT – For frequently accessed data
- COOL – For less frequently accessed data
AZURE FILES
ENABLE LARGE FILE SHARES – Provides support for file shares up to 100 TiB.
When you are ready to progress, click Next : Networking to proceed to the next steps.5
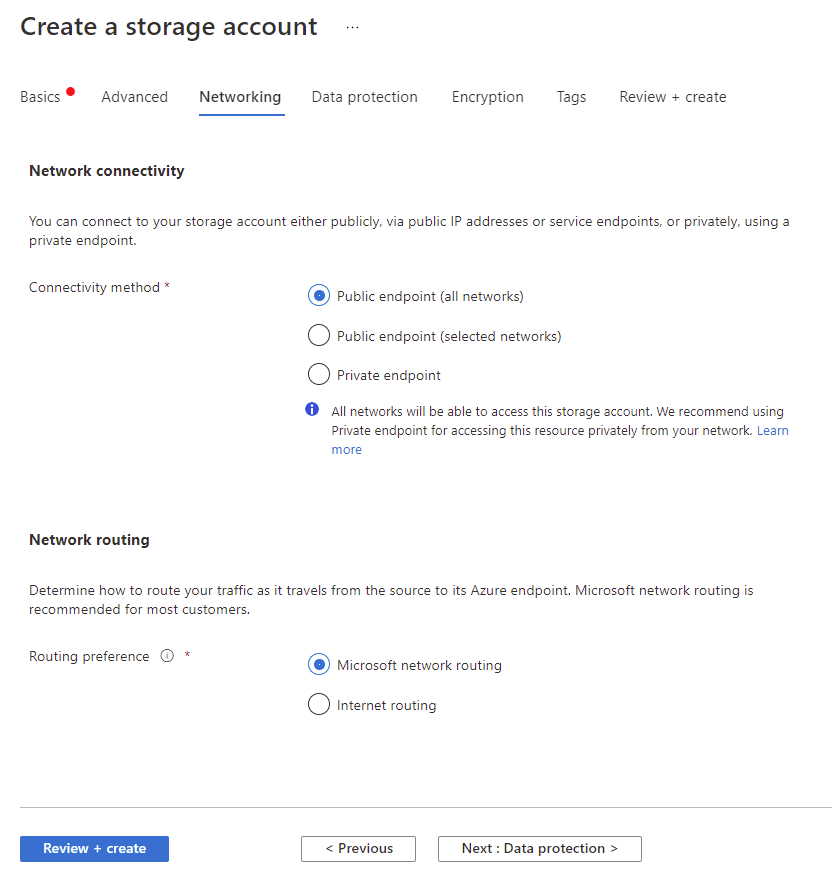
Azure Storage Account Network Connectivity
If you clicked on Review + Create on the previous page, you can skip these steps. However if you click on Next : Advanced you will be on the further settings page in the Storage Account Creation wizard.
On this page you configure some further settings;
NETWORK CONNECTIVITY
CONNECTIVITY METHOD – This setting will only allow communication to the Storage Account using HTTPS. HTTP will be rejected when this setting is enabled.
-
- PUBLIC ENDPOINTS (ALL NETWORKS) – All networks will be able to access this storage account.
- PUBLIC ENDPOINTS (SELECTED NETWORKS) – Selected networks will be able to access this storage account.
- PRIVATE ENDPOINT – Only allow access from your internal network.
NOTE: The remaining options on this page will change depending on which of the connectivity methods you chose above.
PUBLIC ENDPOINTS (ALL NETWORKS) OPTION
ROUTING PREFERENCE– Chose how to route the traffic to your storage account endpoint.
-
- MICROSOFT NETWORK ROUTING
- INTERNET ROUTING
PUBLIC ENDPOINTS (SELECTED NETWORKS) OPTION
VIRTUAL NETWORKS – Only the selected networks will be able to access this Storage Account.
VIRTUAL NETWORK SUBSCRIPTION – Which Azure Subscription the network will be provisioned.
VIRTUAL NETWORK – You can create or use an existing virtual network to allow access to this storage account.
NETWORK ROUTING – Determine how to route your traffic as it travels from the source to its Azure endpoint. Microsoft network routing is recommended for most customers.
ROUTING PREFERENCE – Two options here, Microsoft Routing or Internet Routing. Microsoft Network Routing will direct your traffic to enter the Microsoft cloud as quickly as possible from the source. Internet Routing will direct your traffic to enter the Microsoft Cloud closer to the Azure Endpoint.
-
- MICROSOFT NETWORK ROUTING
- INTERNET ROUTING
PRIVATE ENDPOINT
CREATE A PRIVATE ENDPOINT – Here you can create a Private Endpoint for connectivity to the Storage Account.
NETWORK ROUTING – Determine how to route your traffic as it travels from the source to its Azure endpoint. Microsoft network routing is recommended for most customers.
ROUTING PREFERENCE – Two options here, Microsoft Routing or Internet Routing. Microsoft Network Routing will direct your traffic to enter the Microsoft cloud as quickly as possible from the source. Internet Routing will direct your traffic to enter the Microsoft Cloud closer to the Azure Endpoint.
-
- MICROSOFT NETWORK ROUTING
- INTERNET ROUTING
When you are ready to progress, click Next : Data Protection to proceed to the next steps

Azure Storage Account Recovery
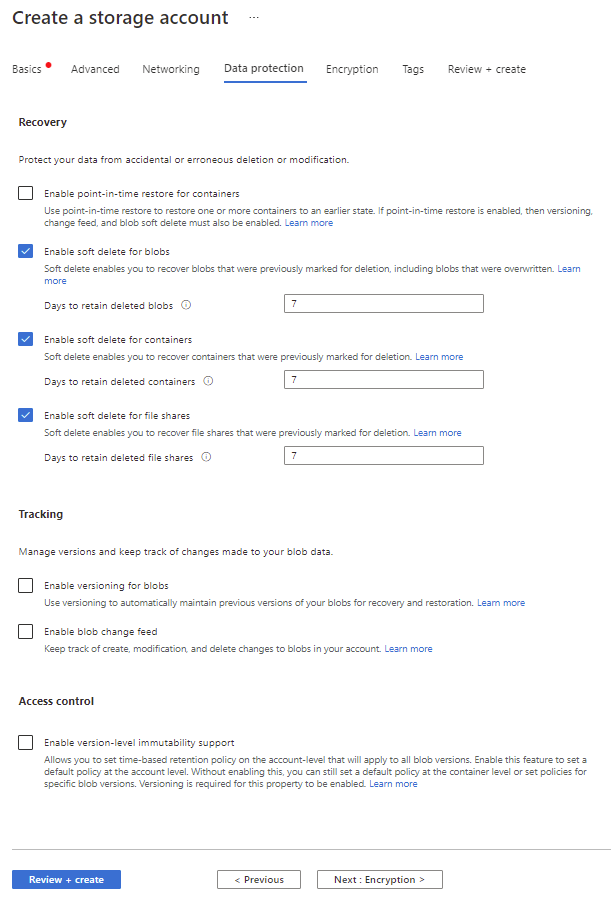
Now you should be presented with the Data Protection Page.
On this page you configure these settings;
RECOVERY – Protects your data from accidental deletion and erroneous deletion or modification.
Choose which of these options you want to protect the data within your Storage Account, and how many days you wish to retain the deleted Blobs.
-
- POINT IN TIME RESTORES FOR CONTAINERS
- ENABLE SOFT DELETE FOR BLOBS
- ENABLE SOFT DELETE FOR CONTAINERS
- ENABLE SOFT DELETE FOR FILE SHARES
TRACKING
Provides versioning and monitors and logs changes made to your Blob data.
- ENABLE VERSIONING FOR BLOBS
- ENABLE BLOB CHANGE FEED
ACCESS CONTROL
ENABLE VERSION LEVEL IMMUTABILITY SUPPORT– Allows you to set time-based retention policy on the account-level that will apply to all blob versions. Enable this feature to set a default policy at the account level. Without enabling this, you can still set a default policy at the container level or set policies for specific blob versions. Versioning is required for this property to be enabled.
When you are ready to progress, click Next : Encryption to proceed to the next steps
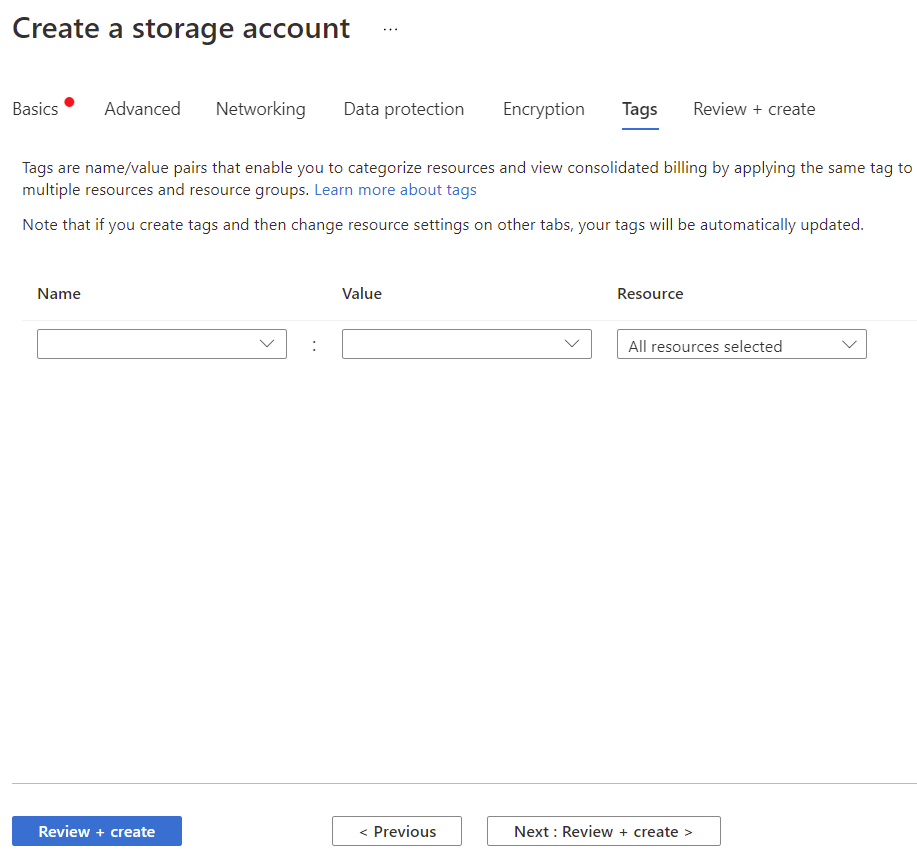
Azure Storage Account Tagging
Almost there, now on the TAGS Page.
On this page, you configure any TAGS you want to be applied to the Storage Account.
When you are ready to progress, the last step is to click on Next : Review + Create to proceed to the final step

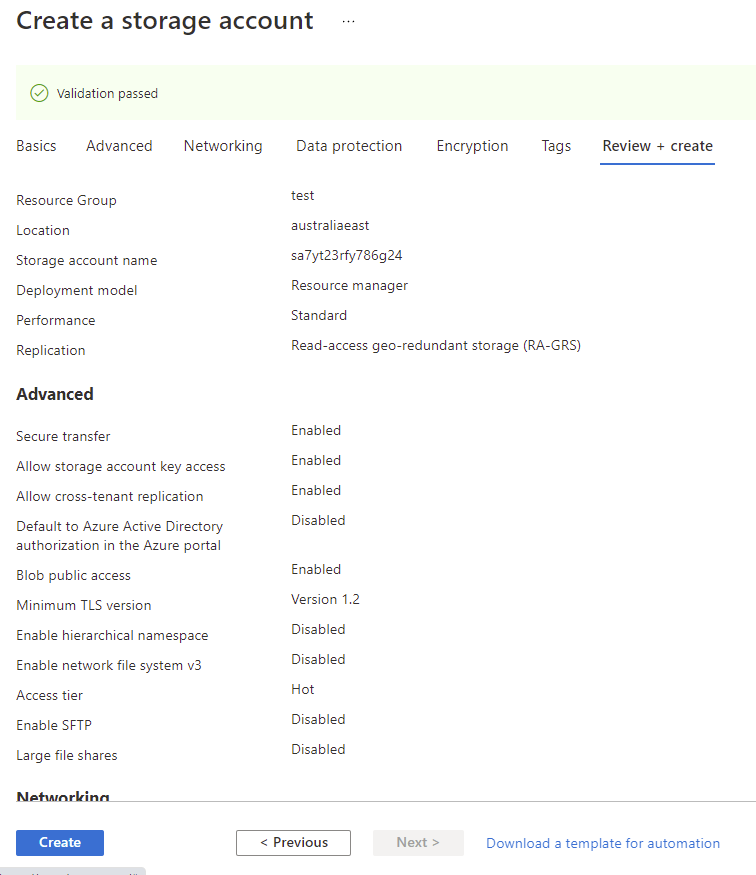
Azure Storage Account Created
Finally, we are there (Well if you did skip all options in Step 3, you were here a lot sooner)
Confirm all the settings here match the options you want and when you are finally ready to create your Azure Storage Account, click on Create.
And that’s all there is to it, you have created a Storage Account within Azure that you can now start to access and use all the benefits that Azure’s Storage has to offer.
Now once you start using it and want to gain some insights into your Azure Storage Consumption and Usage, you can trial our software for free, Cloud Storage Manager.
Azure Storage Account FAQs
What is a storage account?
A storage account is a secure and scalable cloud storage solution provided by cloud service providers like Microsoft Azure, Amazon Web Services, and Google Cloud Platform.
What are the benefits of using a storage account?
Storage accounts offer several benefits such as high availability, scalability, durability, security, and cost-effectiveness.
What types of data can be stored in a storage account?
Storage accounts can store various types of data such as files, blobs, tables, and queues.
Can multiple applications access the same storage account simultaneously?
Yes, multiple applications can access the same storage account simultaneously.
What is the pricing model for a storage account?
The pricing model for a storage account depends on the cloud service provider and the type of storage account. Generally, users are charged based on the amount of data stored, the number of transactions performed, and the amount of data transferred.
In today’s world, where data is one of the most valuable assets of any organization, having a reliable and scalable storage solution is crucial. Storage accounts offered by cloud service providers are an excellent option for storing, managing, and accessing data in a secure and cost-effective way. With the flexibility to store various types of data and the ability to scale up or down based on the requirements, storage accounts have become a popular choice among organizations of all sizes. Whether you’re a small startup or a large enterprise, a storage account can help you manage your data more efficiently and effectively.

by Mark | Jun 21, 2021 | Azure, Azure Blobs, How To
How do you search for an Azure Blob, Storage Account or even a Container?
While Azure provides massive storage capabilities, often users and IT Departments alike use Azure Storage for dumping large amounts of files to remove reliance on on-premise storage devices. This has massive benefits to the business by providing agile deployments in line with business data storage needs, by not having to wait for disk expansions or procurement of additional local storage.
What happens though is that the amount of storage you have within Azure never really is managed properly, and should you need to search for a particular file (Azure Blob) or folder (Azure Blob Storage Container) you may not even know which storage account it resides in.
In this blog post I will show you how to search through all your Azure Subscriptions, Storage Accounts to find a particular Azure Blob.
Why Use Cloud Storage Manager for Azure Blob Search?
Using Cloud Storage Manager makes searching for an Azure Blob easy and efficient. You can search through all your Azure Subscriptions and Storage Accounts to find a particular Azure Blob. Additionally, Cloud Storage Manager offers a variety of search criteria to help you find exactly what you’re looking for.
Find an Azure Blob
Search all your Azure Subscriptions.
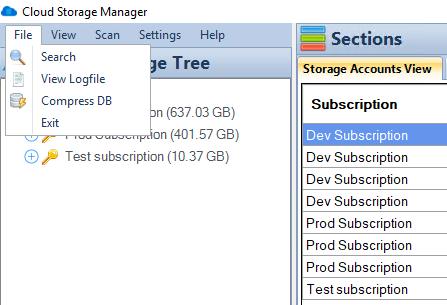
To search all your Azure Storage Accounts and find an Azure Blob, simply open up Cloud Storage Manager, then go to the FILE and then SEARCH.
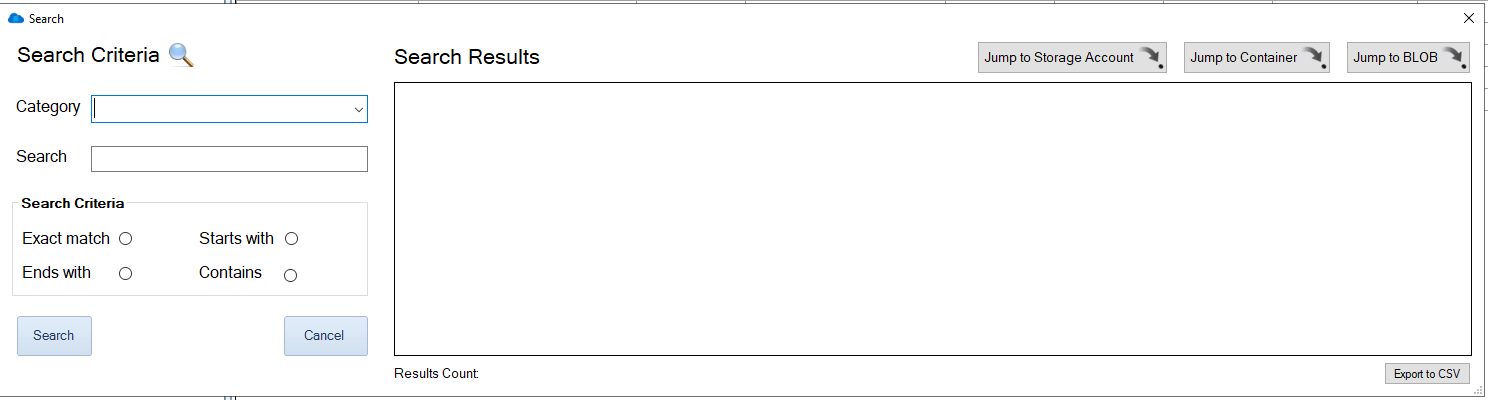
Choose your Azure Storage Search criteria.
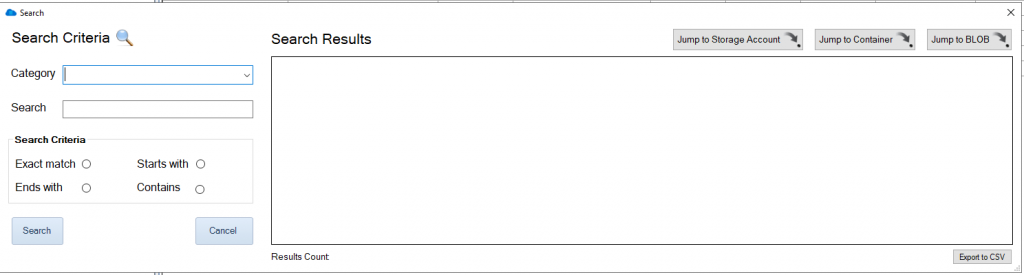
Now the Search window will open up in Cloud Storage Manager.
Choose the category of the item you want searched for, either an Azure Storage Account, Container, or a Blob can be searched.
Type in the name of what you want to search for in the SEARCH box and then finally choose if you want an Exact Match, Starts with, Ends with or Contains, then press Search.
Cloud Storage Manager will then query all your Azure Storage Accounts looking for the item you want found.
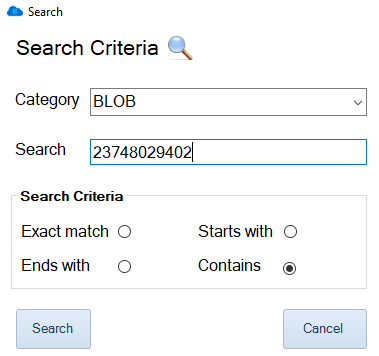
Search for an Azure Blob / Container or Storage Account
In this example I am going to search for a Blob that contains the following characters, 23748029402. (Alphanumeric, Numeric or a combination of these can be searched)
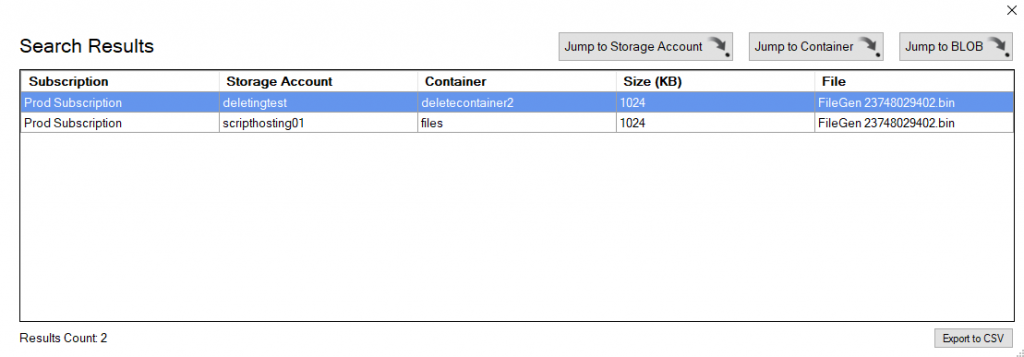
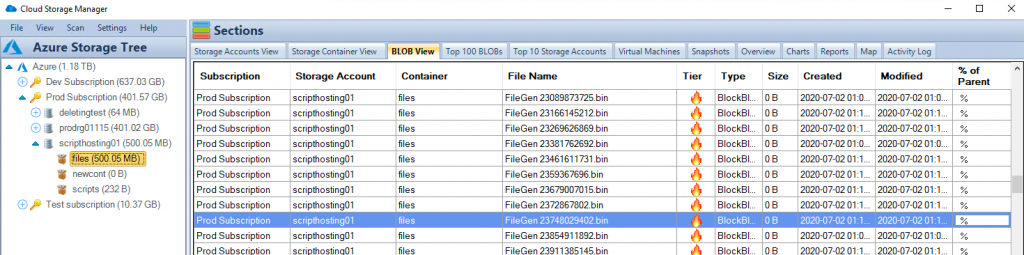
Azure Blob Search Results
Cloud Storage Manager has queried through its own internal database to find the Blobs that contain the text I typed in the search box.
We can see here that there are two Azure Blobs that we searched for that contain that text.
You also have the option to export the search results directly to CSV.
Azure Blob Search Options
Now that Cloud Storage Manager has returned the search results, you can see the locations where that Blob resides.
Simply highlight the Blob you searched for and you have the option to either Jump to the Storage Account, the Container or directly to the Blob itself.

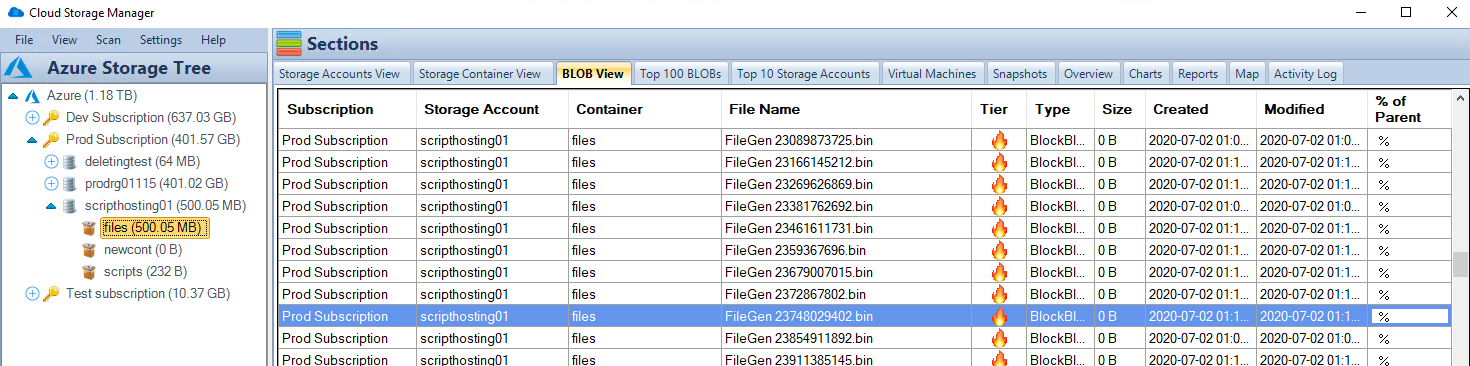
Azure Blob Search Details
As I had chosen the option to Jump directly to the Azure Blob, you can see that the Blob highlighted does in fact contain the text I searched for.
If you right click the blob you searched for, these are some of the options you can perform;
- Change Tier of the Azure Blob
- Delete selected Blobs
- Jump back to the Storage Account or Container
- View the Blob Properties
- Download the Azure Blob to your computer
Thats all there is to it, quickly and easily Search for an Azure Blob through your complete Tenancy, Subscription, Storage Account or just a lone Azure Storage Container with Cloud Storage Manager.
Azure Blob search can be a daunting task if you don’t know where to look. By using Cloud Storage Manager, you can quickly and easily search for an Azure Blob through your complete Tenancy, Subscription, Storage Account, or just a lone Azure Storage Container. With its variety of search criteria and easy-to-use interface, Cloud Storage Manager is a must-have tool for anyone who wants to efficiently manage their Azure Blob storage. Download a FREE TRIAL of Cloud Storage Manager today and start organizing your Azure Blob storage more effectively.
Cloud Storage Manager
Gain insights into your Azure Storage with our FREE to use Tool.
FREE DOWNLOAD

by Mark | Mar 15, 2021 | Azure, Azure Blobs, How To
Reduce your Azure Storage Costs
Azure Storage is like an all you can eat buffet, except the more you eat, the more you pay! This has provided organisations an almost limitless supply of storage, and as we all know, the more that’s available, the more we’ll use.
Azure Storage has changed the way many organisations operate both in terms of availability and service. No longer do organisations have to concern themselves with capacity planning or worry about the SAN running out of disk space, or even how to make that storage available in terms of disaster and across regions. Azure Storage has effectively resolved many of the issues traditional on-premises storage services faced.
However, because of this unlimited supply of storage in Azure, storage growth, cost and duplication has exploded. Managing and controlling the data across all the Storage Accounts has become increasingly difficult as users keep piling on more and more data.
OK, so how can we gain some control back, by finding and reducing the number of duplicate BLOBs and therefore reduce cost?
We have been asked that exact same question by many of our customers, and the short answer was, you couldn’t. There is no way in Azure to find out which BLOBs are duplicates, how many of them are duplicate BLOBs, which Azure Storage Account and container do they reside in, or how much data duplicate BLOBs in Azure Storage are consuming…until now.
Cloud Storage Manager to the rescue.
Cloud Storage Manager allows you to scan your entire Azure environment in order to review and manage your Azure Storage consumption.
Cloud Storage Manager has so many features in helping you control and manage your Azure Storage, but I won’t go into them here as the list is too long – however, click here to get more information and even download a free trial for yourself.
One of the many features of Cloud Storage Manager is the reporting option, which offers a number of reports you could run to get a better understanding of your Azure Storage and overall environment.
How many Duplicate Blobs are in your Azure Storage
However, the one we will be looking at today, is the “Duplicate BLOBs in Storage Account” report.
Once you’ve installed Cloud Storage Manager and allowed it to scan your environment, click on the
“Reports” tab.
Scroll down and find the “Duplicate BLOBs in Storage Account” report.
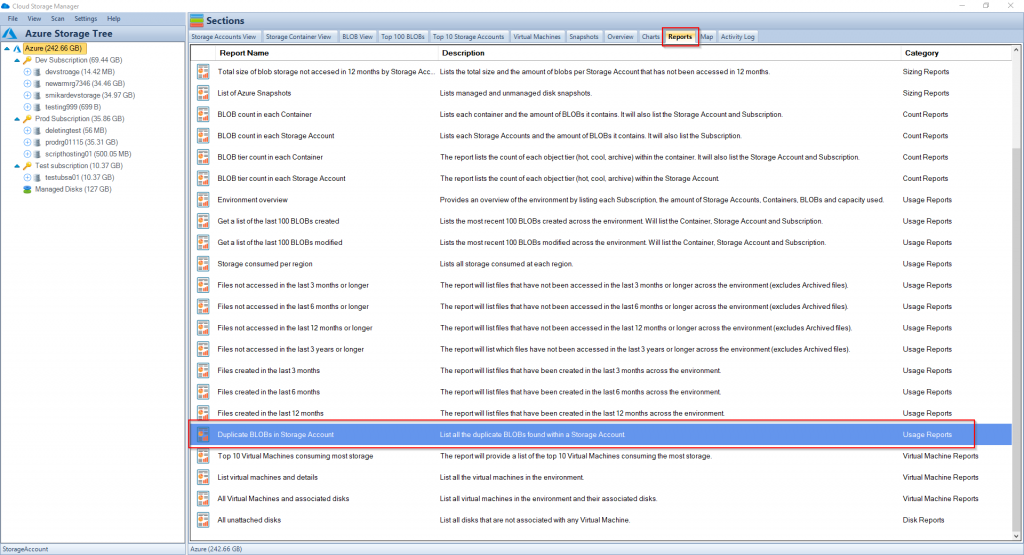
Duplicate Blob Report
Right click on the report and select to “Run Report”.
The result will be displayed showing you all the duplicate BLOBs in your Azure Storage Accounts, along with information such has which Subscription, Storage Account, Container, tier, filename, type, size, created date and modified date.
From here you can now open the report in Excel, and work out which duplicate blobs you need to keep, or perhaps even delete to reduce your Azure Storage and costs.
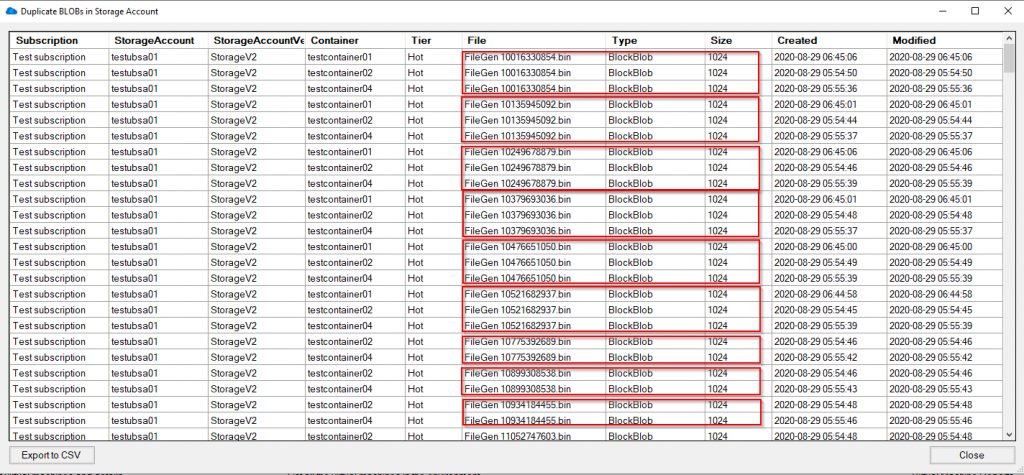
Duplicate Blob Analysis
You also have the option to export the report to a CSV file for further assessment.
If you want to get a better handle of your Azure Storage consumption and reduce your overall cost, give Cloud Storage Manager a try.
What are the consuquences of having Duplicate Blobs?
Duplicate BLOBs in Azure Storage can be a result of a lack of proper management and control of data in the storage accounts. Azure Storage has become increasingly popular due to its unlimited supply of storage, which has led to an explosion of storage growth, cost, and duplication. This can be due to various reasons such as multiple copies of data being created, incorrect data management procedures, or even data being inadvertently duplicated.
The consequences of having duplicate BLOBs in Azure Storage can lead to increased storage costs, difficulty in managing and controlling data across all the storage accounts, and loss of visibility into the actual data usage. This can also result in data redundancy, which can negatively impact the performance and reliability of the storage environment. In addition, it can also lead to data versioning issues and make it difficult to determine which version of the data is the most recent and accurate.
Therefore, it is important to implement proper data management procedures and use tools such as Cloud Storage Manager to scan and manage your Azure Storage environment to help reduce the number of duplicate BLOBs, thus reducing costs and increasing overall control of the data.

by Mark | Mar 1, 2021 | Azure, Azure Blobs, Snapshot / Checkpoint, Storage Accounts
Snapshot an Azure VM
Snapshots in Azure is a nice feature that allows you to take a read-only, “point in time” snapshot of a Virtual Machine’s disk. You can take a snapshot of a VM’s OS or data disk. You can use this snapshot to revert the VM to a point in time before an event occurred, or you installed something that didn’t go quite right.
Azure VM Disk Snapshot
The process to take a snapshot of a VM that is using Managed Disks is quite simple, all you have to do is browse to the Disk of the VM and select “Create Snapshot”.
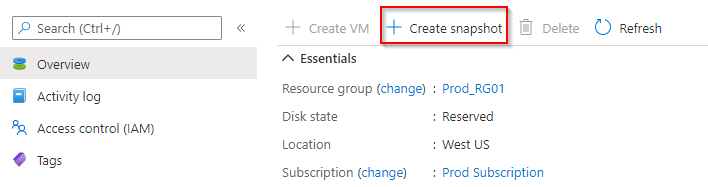
Azure VM Snapshot
Now that we’ve created these Snapshots, where do we find them?
That is where things get a little tricky. If you’ve taken Snapshots of VMs using Managed Disks, all you need to do is search for “Snapshots” and you will see all the Azure snapshots along with information such as the snapshot type, source disk, date and time it was created, the size and a few other items.
OK, great, what’s the problem?
Where are all your Azure VM Managed / Unmanaged Disks?
Well, this view will only show you snapshots of Managed Disks. If you are using unmanaged disks there is no one portal or view where you can see all your snapshots.
Much like everything else in Azure, Snapshots are not free! And if you have numerous VMs using unmanaged disks, you will need to check them one by one through the Storage Account view, locate their VHD and click on the Snapshots menu to see if there is a snapshot associated with the VM.
You could be paying for storage that Snapshots are consuming that were taken months or even years ago that have been forgotten.
OK, so how do you get this information without having to go through each and every VM disk?
Why are leaving Snapshots in Azure a bad thing?
The cost of storing snapshots in Azure depends on several factors, such as the size of the snapshots, the number of snapshots, and the type of storage you use. In Azure, snapshots are stored as page blobs in a storage account, and you are charged for the amount of storage used by the snapshots, as well as any additional features or services you may use, such as data transfer, data management, and data retrieval.
Snapshots stored in Azure are billed based on the size of the snapshots, so the larger the snapshots, the more storage you will be charged for. Additionally, snapshots are billed for the time they are stored, so the longer the snapshots are stored, the more you will be charged for storage.
In addition to storage, you may also incur charges for data retrieval and data transfer. Data retrieval charges apply when you access data stored in a snapshot, and data transfer charges apply when you move data to and from a snapshot.
To reduce the cost of storing snapshots in Azure, it is important to manage your snapshots carefully and only store the snapshots that you need. You can also use features such as automatic snapshot deletion or snapshots compression to reduce the size of your snapshots and reduce the cost of storage.
Overall, the cost of storing snapshots in Azure can be significant, so it is important to plan and manage your snapshots carefully to ensure that you are only paying for the storage that you actually need.
Azure Snapshot Sizes
Easy, just use Cloud Storage Manager and run the report to tell you.
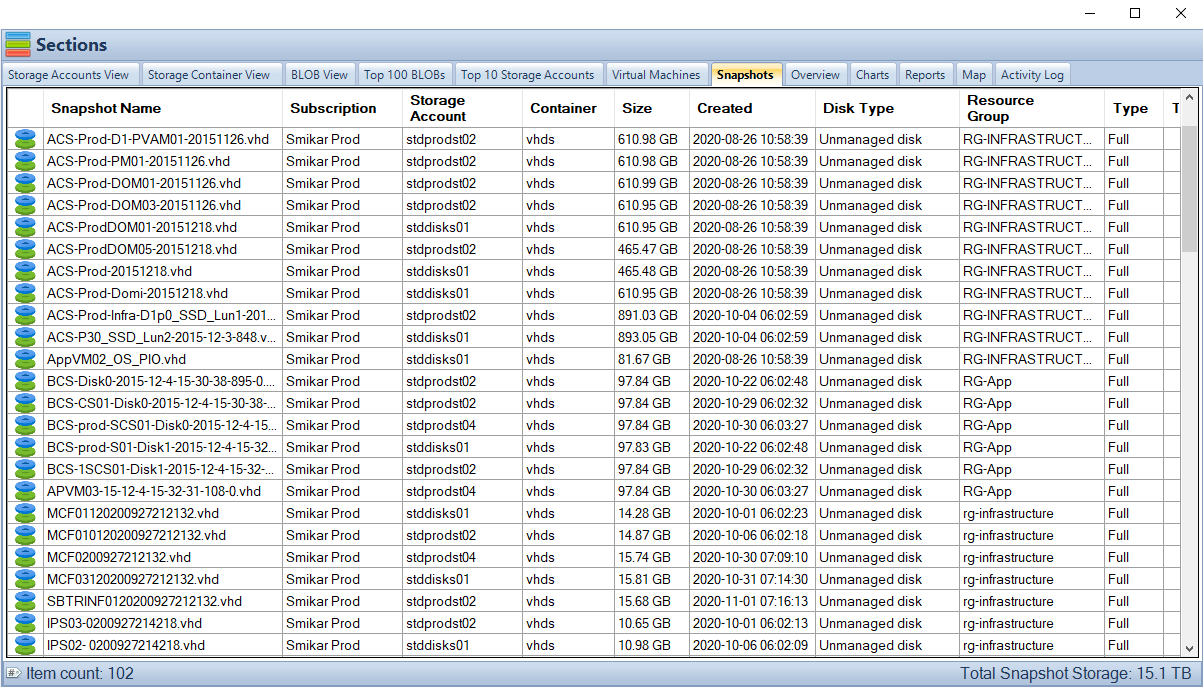
Once you’ve installed Cloud Storage Manager, it will scan your Azure environment and collect a heap of information. Then all you have to do is launch it, and select the “Snapshot” tab to see all your VM snapshots across your Azure environment, including both managed and unmanaged disks.
Of course Cloud Storage Manager doesnt only show how much storage your Snapshots are consuming, it also shows you the capacity of your Storage Accounts, and historical storage growth patterns, and loads more insights in to your Blob Storage within Azure.
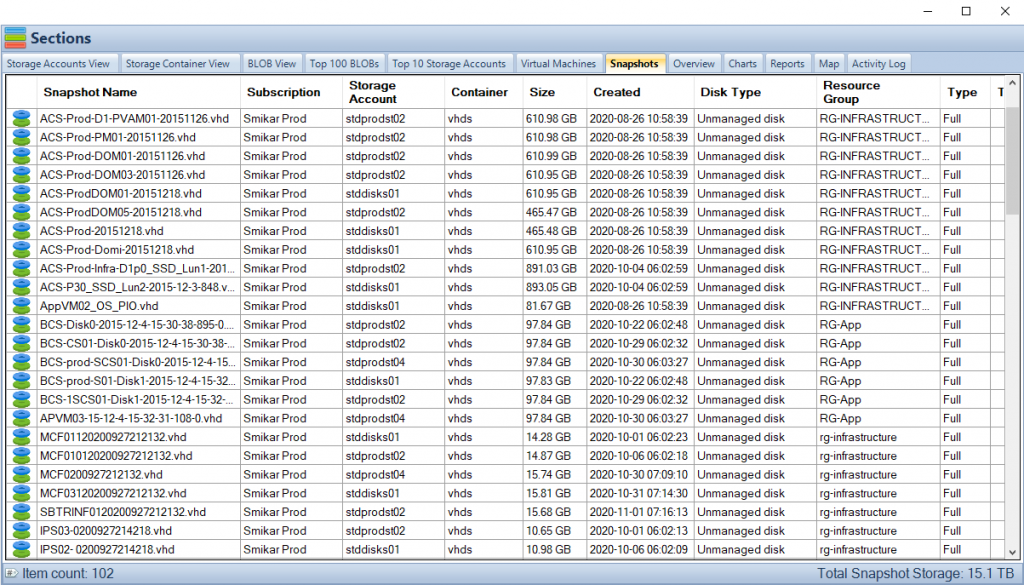
Where are all my Azure VM Snapshots?
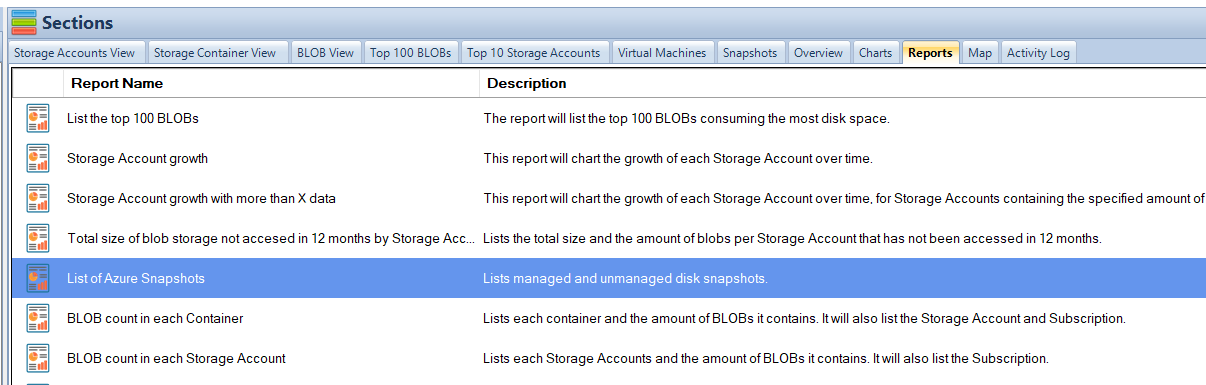
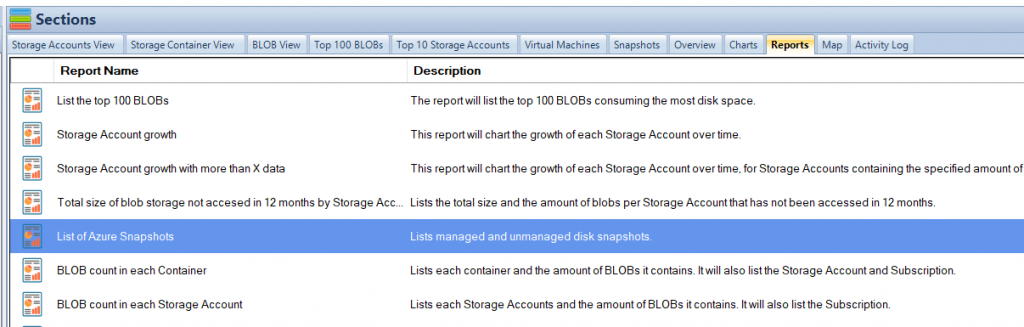
You may also export these results to a report using the Reports tab.
Select the Reports tab and click on the “List of Azure Snapshots”. You will also have the option to export the report to a CSV file.
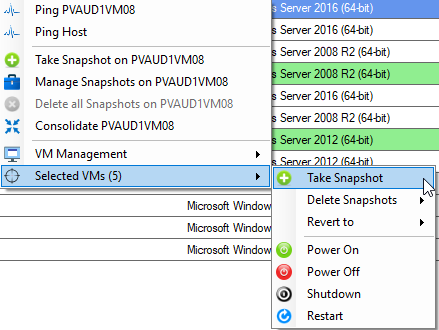
Automate Azure VM Snapshot Creation
Now you may want to schedule the creation and deletion of Azure Virtual Machines automatically.
SnapShot Master can do this for you with just a few clicks.
SnapShot Master also shows you all your Azure Cloud and even your VMware or Hyper-V snapshot / checkpoint information and more.

by Mark | Dec 17, 2020 | Azure, Azure Blobs, How To, Storage Accounts
Are you using Azure Blob Storage for storing your data? Do you want to keep track of how much Azure Storage you are consuming, the number of Blobs per storage account, the number of containers, and the Azure Blob Storage capacity used?
If so, you need a reliable tool to monitor and control your Azure Blob Storage usage. In this article, we will show you how to use both the Azure Portal and Cloud Storage Manager to gather insights into your Azure Storage consumption.
Before we dive into how to use Cloud Storage Manager, let’s briefly discuss Azure Blob Storage. It is an online cloud service that provides fast access to large amounts of data at a low cost. However, it’s crucial to monitor and control your Azure Blob Storage usage to optimize costs.
Investigate Your Azure Storage Accounts
Before we dive into how to use Cloud Storage Manager, let’s briefly discuss Azure Blob Storage. It is an online cloud service that provides fast access to large amounts of data at a low cost.
If you are using Azure Blob Storage for storing your data, you need a reliable tool to monitor and control your Azure Blob Storage usage. With Cloud Storage Manager, you can gather insights into your Azure Storage consumption.
What are the benefits?
| Benefit |
Description |
Cost Optimization
|
Understanding your Azure Blob storage usage is crucial for cost optimization, as it helps you monitor and control your usage. By keeping track of the number of Blobs, Containers, and the Azure Blob Storage capacity used, you can ensure that you are not overpaying for storage that you are not using. |
Performance Optimization
|
Monitoring your Azure Blob storage usage can help you optimize the performance of your applications. By analyzing the data usage patterns, you can make informed decisions about how to optimize your storage for faster access times and better performance. |
Improved Security
|
By monitoring your Azure Blob storage usage, you can identify any potential security threats or breaches. You can set up alerts to notify you when unusual activity is detected, enabling you to take action to prevent or mitigate any damage. |
Compliance
|
Monitoring your Azure Blob storage usage can help you ensure that you are meeting any regulatory or compliance requirements. By keeping track of your usage, you can demonstrate compliance and avoid potential penalties or legal issues. |
Resource Planning
|
Understanding your Azure Blob storage usage can help you plan for future resource needs. By analyzing your usage patterns, you can make informed decisions about how much storage you will need in the future and plan accordingly. |
So how do I gather all this information about my Azure Storage?
Scan all your Azure Storage Accounts
Hopefully you have installed and run a full environment scan of all your Azure Subscriptions with Cloud Storage Manager.
(If you havent, download and test it for yourself with a free trial)
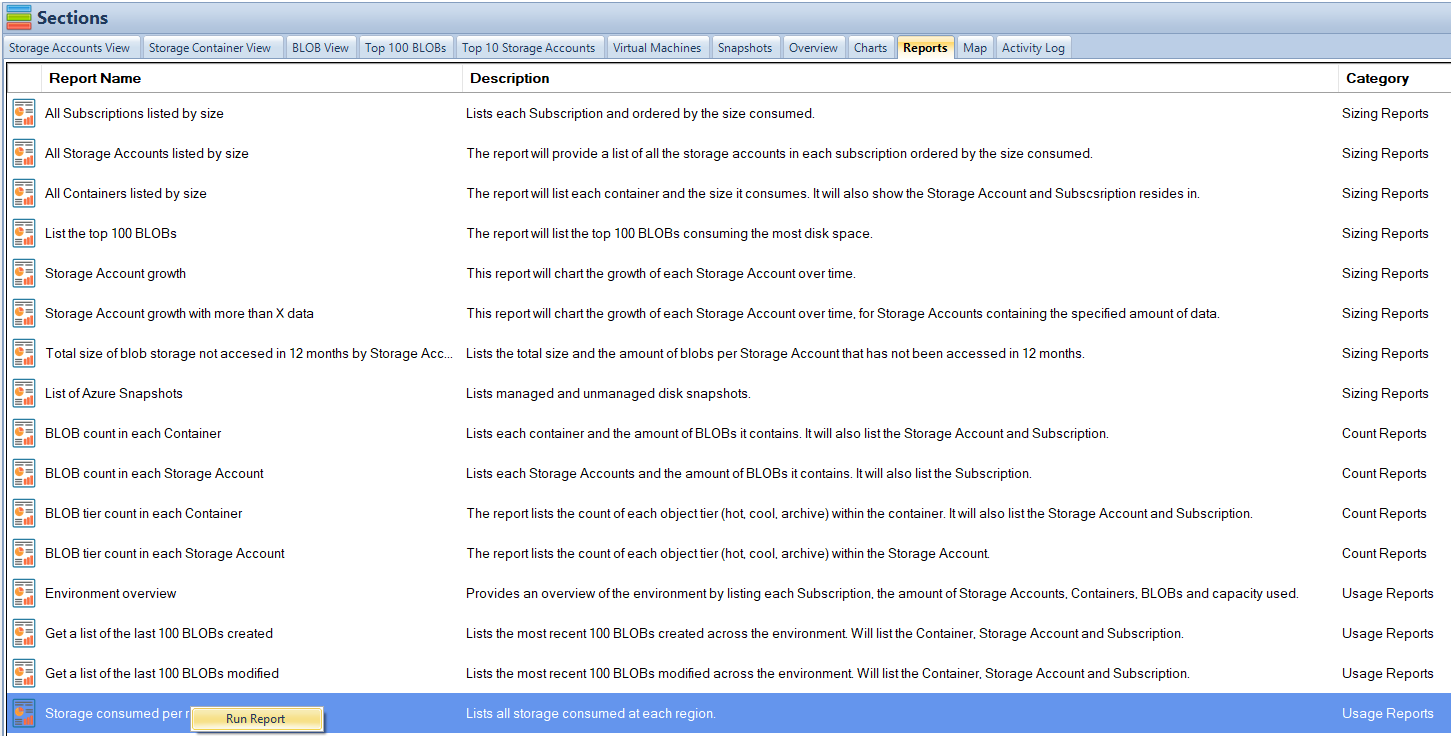
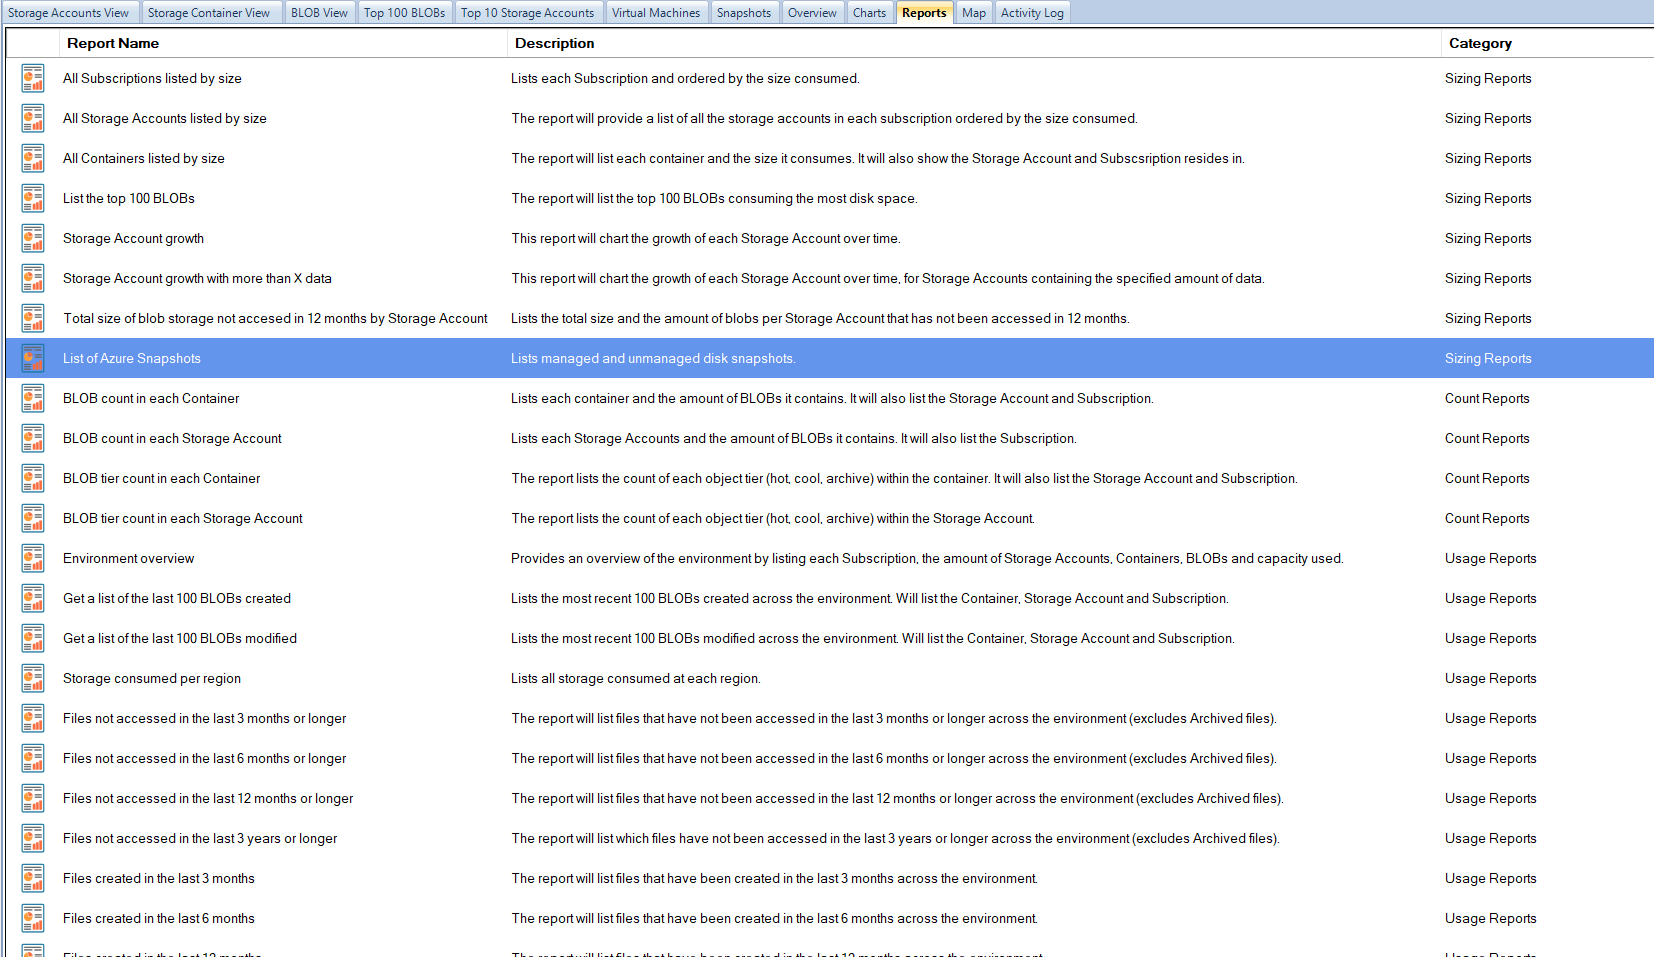
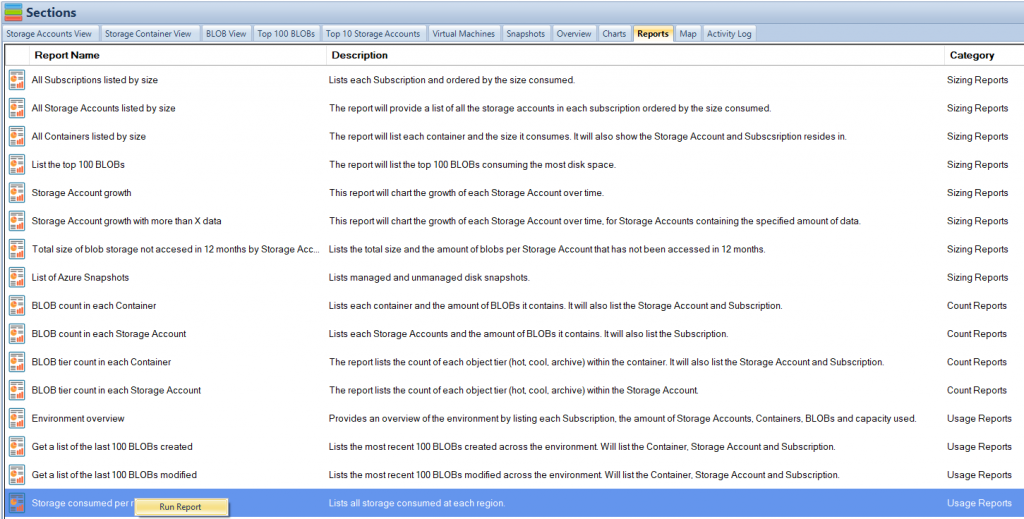
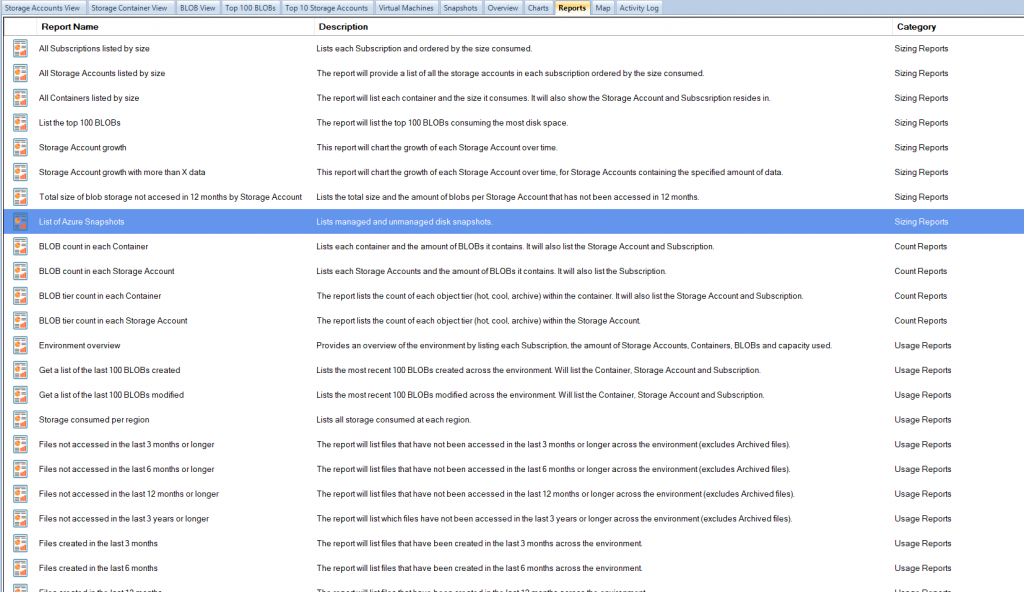
Once you have run an environment scan, go to the Reports Tab in Cloud Storage Manager.

Azure Storage Usage Reports
Now that you are in the Reports Tab, you can see all the various reports you can run to gather information and insights in to your Azure Storage Consumption.
For this Blog post, we are focusing on the size of all of your Azure Subscriptions, Storage Accounts, the number of containers, Blobs and their capacity.
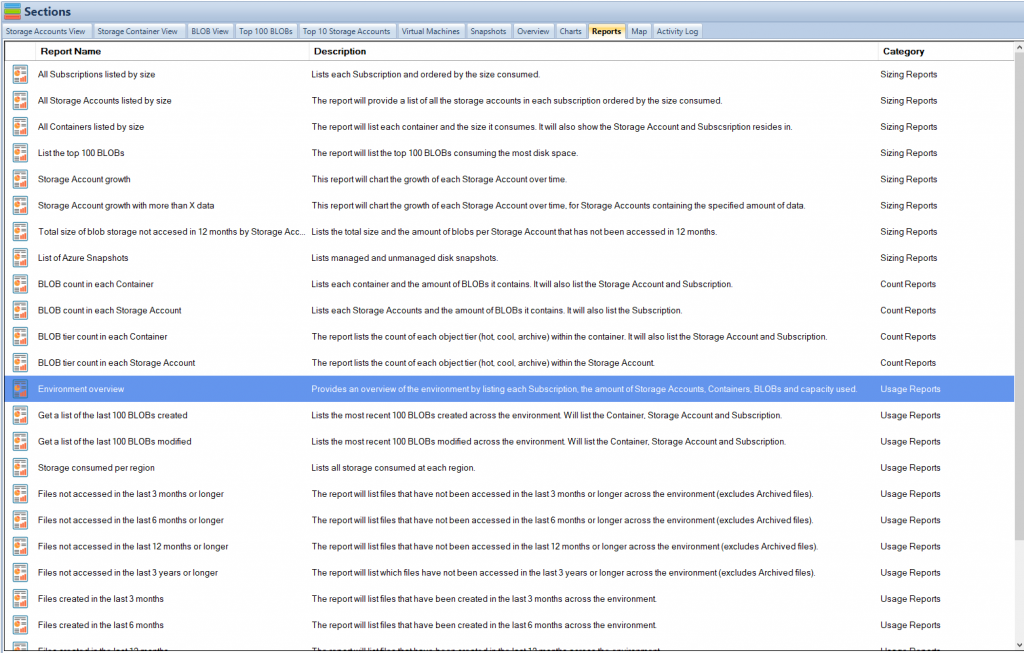
Azure Storage Consumption Reports
The fastest way to get an Overview of your Azure Storage Consumption is to run the Environment Overview report.
Simply highlight the report, then right click and choose Run Report.

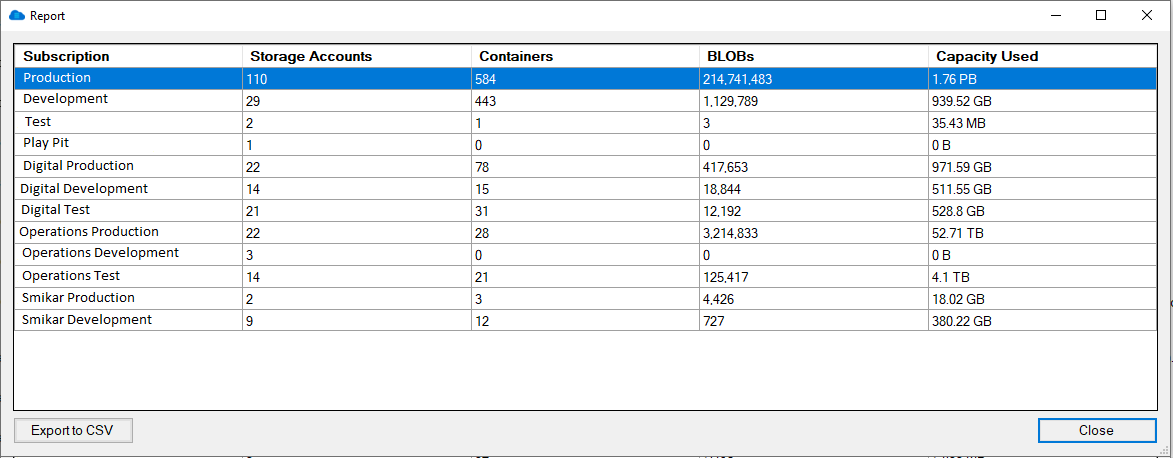
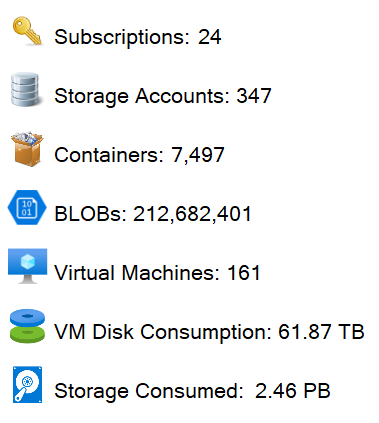
Azure Storage Usage Overview
When you run the Azure Reports, you are presented with a screen showing the details about your Azure Storage.
As can bee seen in the adjacent screenshot, this report provides you with high level details about your Azure Storage Usage by Subscription, including the number of Containers, the number of Blobs and finally the Azure Storage Capacity used in each subscription.
You can export this information to CSV if you wish and perform further analysis in Excel.

Now what if you require further analysis of your Azure Blob Storage consumption?
Azure Storage Analysis
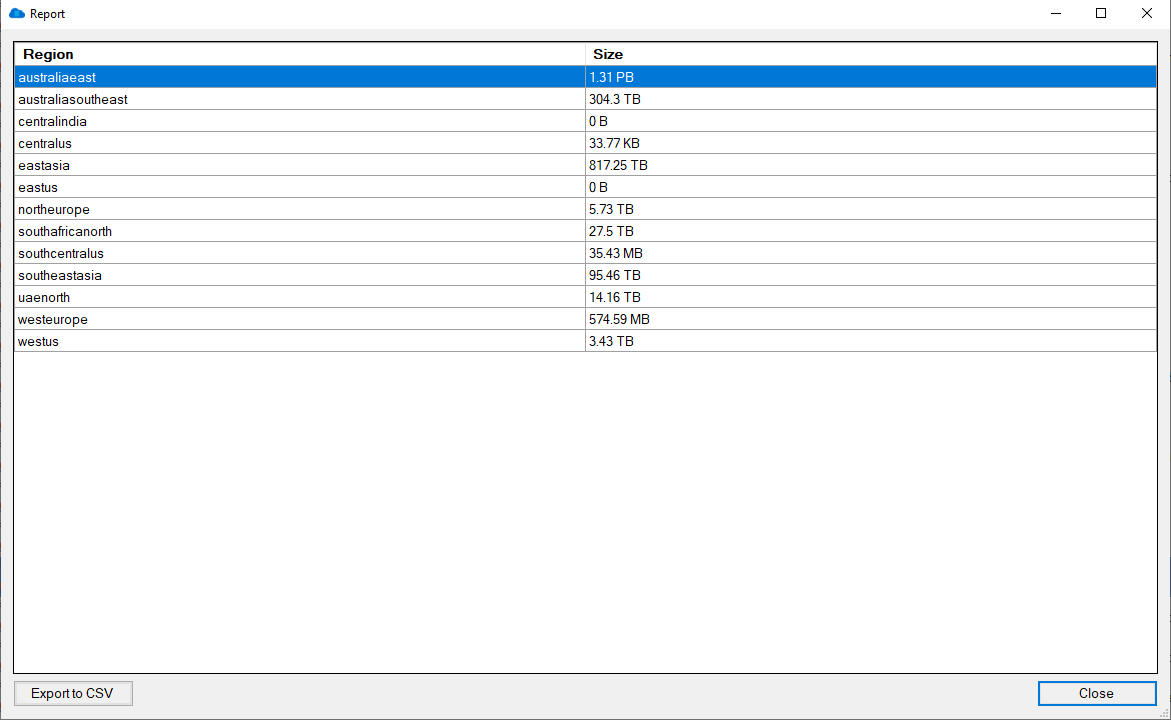
Now that you have a good overview of the amount of Azure Storage you are consuming, another good report to run for further insights is Storage Consumed per Region.
This report will show you the total amount of storage consumed per Azure Region.
Highlight that report in Cloud Storage Manager and choose Run Report.
Azure Storage Regions
As you can see in the screen shown, here is a list of each Azure Regions and the amount of Azure Blob Storage you are consuming there.
As usual, you can export this to Excel for further analysis.

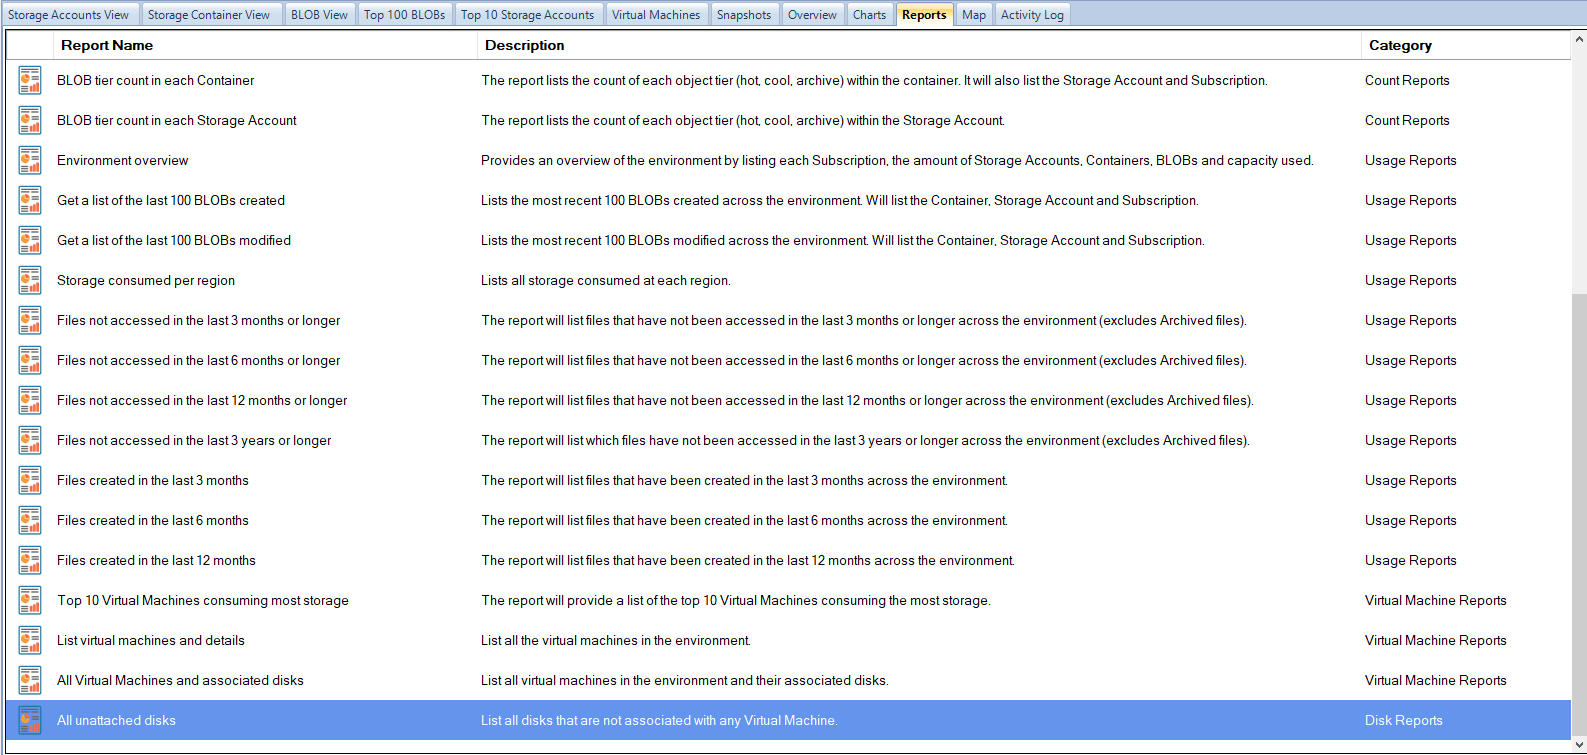
Unattached Azure Virtual Machines disks.
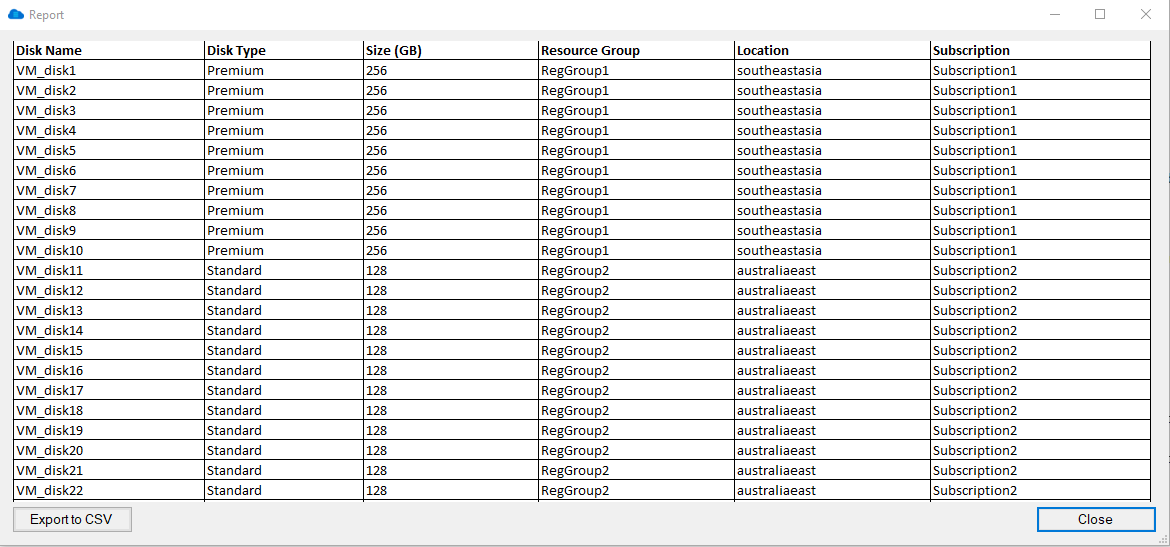
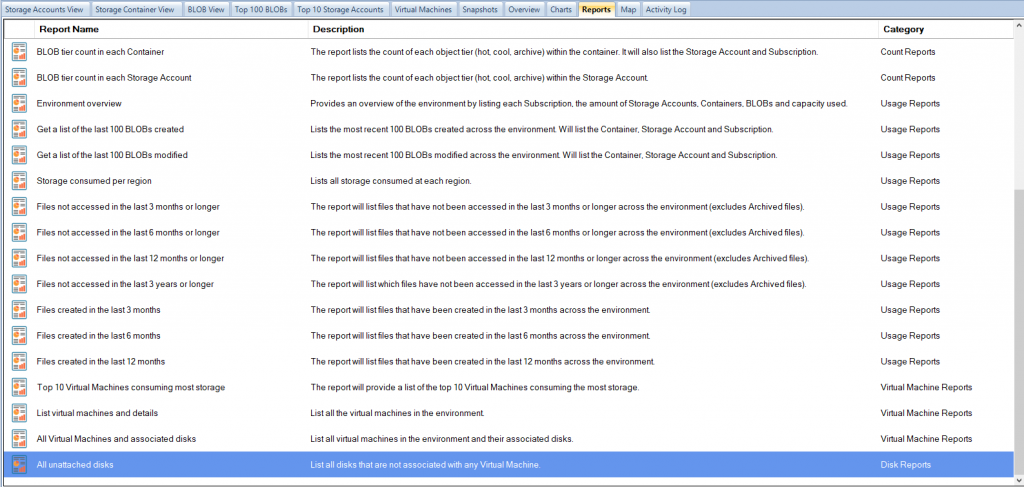
Another great report to run is All Unattached Disks.
This report will find and show you all the Azure Virtual Machine disks that are not associated with any Azure VM. These disks are costing you money as they arent being used by any Virtual Machines, sitting there dormant and not being used.
Again, Highlight that report and choose Run Report.
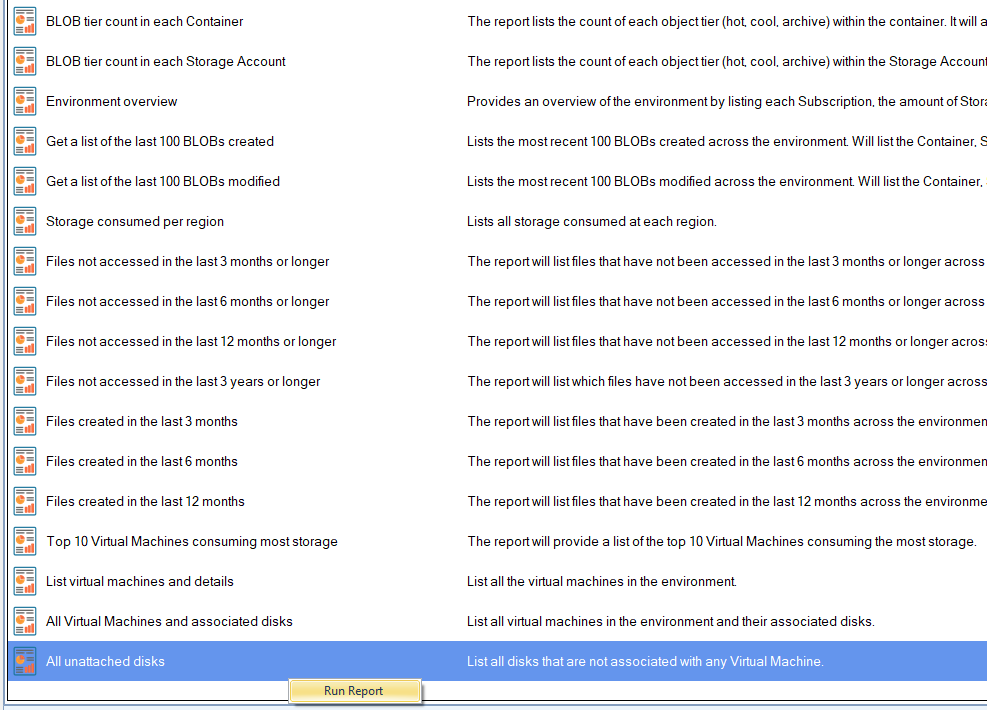
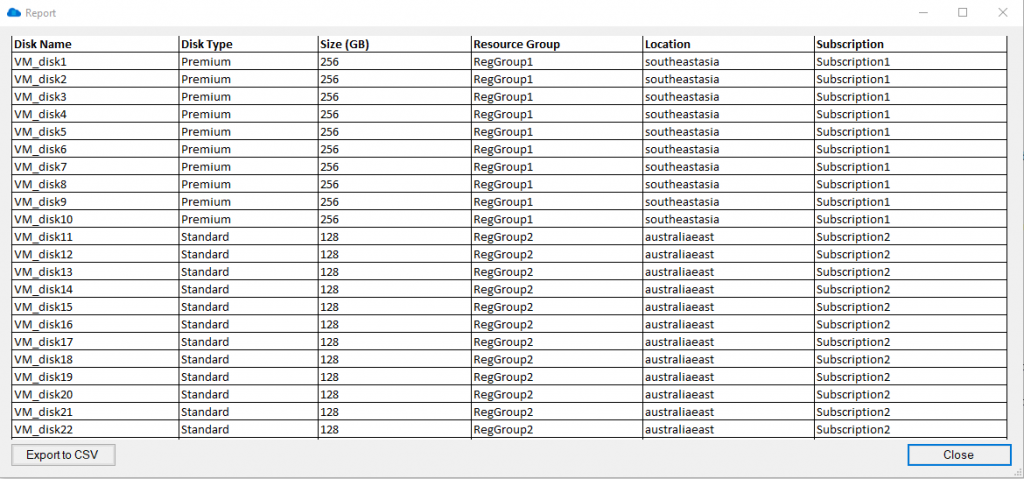
See Azure VM disks that are not associated.
As seen in the screenshot here, all these Azure Disks are not associated with any Azure Virtual Machine.
Yet again you can export this information to excel so that you can investigate further.
Download a FREE trial of Cloud Storage Manager today and start saving money, and understanding your Azure Storage Growth and Consumption.
Dont overspend on your Azure Storage
Knowing the size of your Azure Blob storage is crucial for cost optimization as it helps you monitor and control your usage. By keeping track of the number of Blobs, Containers, and the Azure Blob Storage capacity used, you can ensure that you are not overpaying for storage that you are not using. Additionally, by using a report like “All Unattached Disks,” you can identify any dormant disks that are not associated with any virtual machine and cut costs by deleting or resizing them. By regularly monitoring your Azure Blob storage with the help of tools like Cloud Storage Manager, you can make informed decisions about your usage and reduce unnecessary spending on storage.
Free

Database size is limited to a maximum of 5MB.
Typically for small or personal environments usually consisting of 3 or less Azure Subscriptions and consuming under 30TB of Azure Blob Storage.
Advanced
Database size is limited to a maximum of 1GB.
For medium sized environments typically consisting of less than 10 Azure Subscriptions and consuming under 500TB of Azure Blob Storage.
Enterprise
Unlimited database size.
For use in large environments typically consisting of more than 10 Subscriptions and consuming more than 1PB of Azure Blob Storage.
Azure Storage Consumption FAQ
| Question |
Answer |
What is Azure Storage?
|
Azure Storage is a cloud-based storage solution provided by Microsoft Azure that enables users to store and manage data in various forms such as blobs, files, queues, tables, and disks. |
Why is it important to understand how much Azure Storage I consume?
|
Understanding how much Azure Storage you consume is crucial because it helps you optimize your storage usage, control costs, and avoid unexpected charges. |
What are the benefits of optimizing Azure Storage consumption?
|
Optimizing Azure Storage consumption helps reduce costs, improve performance, and enhance security by ensuring that you only pay for the storage you need, and that your data is stored and managed efficiently. |
How can I monitor my Azure Storage consumption?
|
Use Cloud Storage Manager to deep dive in to your Azure Storage, find out how much you are consuming and where you can start saving money |
What are some best practices for optimizing Azure Storage consumption?
|
Some best practices for optimizing Azure Storage consumption include cleaning up unused data, compressing data before storing it, using tiered storage options, and using automation to manage and optimize your storage resources. |
How can I estimate my Azure Storage costs?
|
You can estimate your Azure Storage costs using the Azure Pricing Calculator, which provides an estimated cost based on your storage requirements and usage patterns. |
How can I reduce my Azure Storage costs?
|
You can reduce your Azure Storage costs by optimizing your storage usage, deleting unused data, using tiered storage options, compressing data, and leveraging Cloud Storage Manager manage your costs. |

by Mark | Nov 9, 2020 | Azure, Azure Blobs, How To, Snapshot / Checkpoint, Storage Accounts
Maximizing cost savings on Azure Blob Storage and Files has become increasingly important as more businesses migrate their data to the cloud. In this article, we’ll discuss how utilizing Cloud Storage Manager can help you optimize Azure storage consumption and significantly reduce expenses. We’ll also explore various ways to identify and remove redundant data and manage your virtual machine snapshots effectively.
Uncovering Azure Blob Storage Consumption
A Comprehensive Scan with Cloud Storage Manager
By using Cloud Storage Manager, you can perform a full scan of all your Azure Subscriptions and Blob Storage Accounts, providing a clear overview of your Azure Blob Storage usage. This visibility allows you to identify potential areas where you can cut costs and better allocate resources.
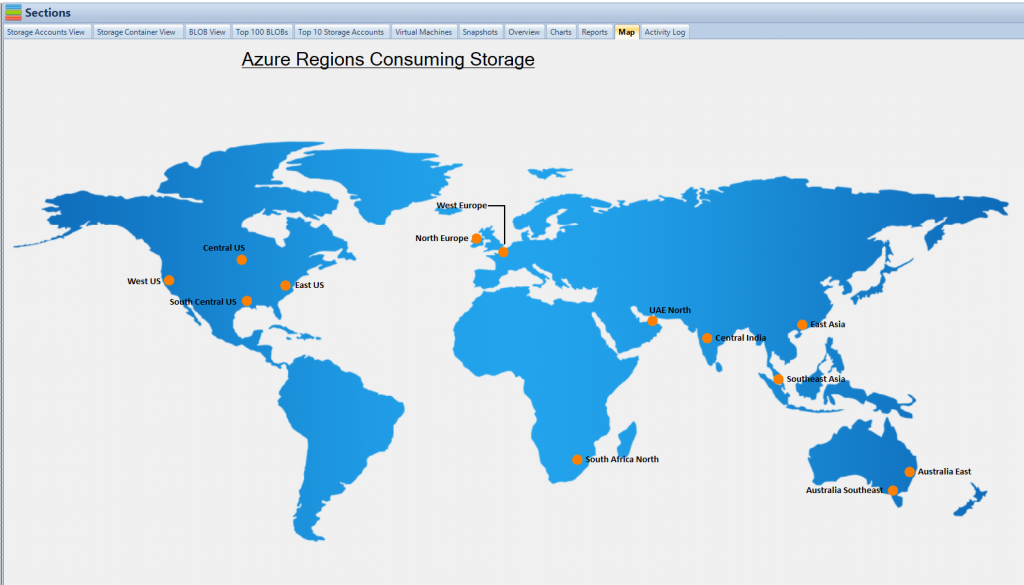
Azure Blob Storage Locations
Not only could they easily see the amount of Azure Blob Storage in use, they could also see all the Microsoft Datacentres where they are using storage from the map tab.
How much blob storage are your VM snapshots consuming?
Azure Blob Storage Reporting
One of the easiest ways to start saving on your Azure Blob Storage is to find often forgotten about Azure Virtual Machine Snapshots.
Often snapshots are created and then forgotten about.
Simply go to the Reports Tab in Cloud Storage Manager and run the LIST OF AZURE SNAPSHOTS report.
From the reports, you can quickly see where you could apply an Azure Storage Lifecycle Management Policy, and move the files that havent been accessed to a lower storage Tier to save you money.
Azure Virtual Machine Snapshots: Out of Sight, Out of Mind
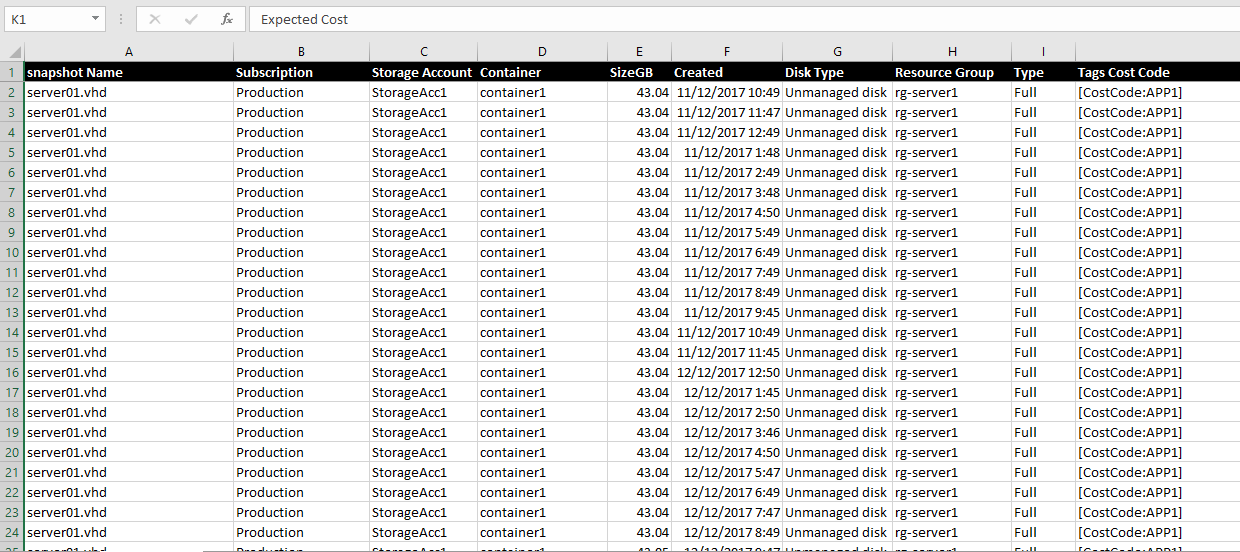
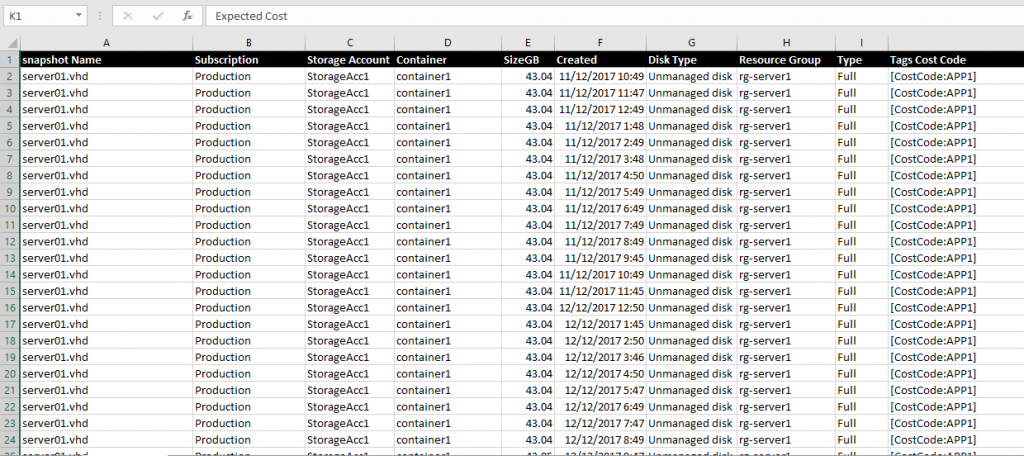
Once the Azure Snapshot report has been generated, simply open it up in excel to see all your Azure VM snapshots.
The report provides you with information including the name of the Azure snapshot, which subscription it resides in, the Azure Storage Account, the relevant Container, size of the Azure VM snapshot, when it was created, if its a managed or unmanaged disk, the Azure Resource Group, type of snapshot created and finally any Azure Tags if you have them.
From this report, we found that they had 1168 Azure VM snapshots lingering in their environment, some well over 3 years old.
Using a simple calculation in Excel using standard Azure storage costs, ($0.02750 per TB using azure blob storage pricing provided by Microsoft – IN $AUS.
Azure Pricing Calculator
Visit the Azure Pricing Calculator for pricing in your currency ) deleting all these snapshots saved the client just under $2,000 per month, an approximate saving of $24,000 a year.
Just running these two simple reports and then taking action on them
saved this client $33,600 in their yearly Azure Blob Storage Costs.
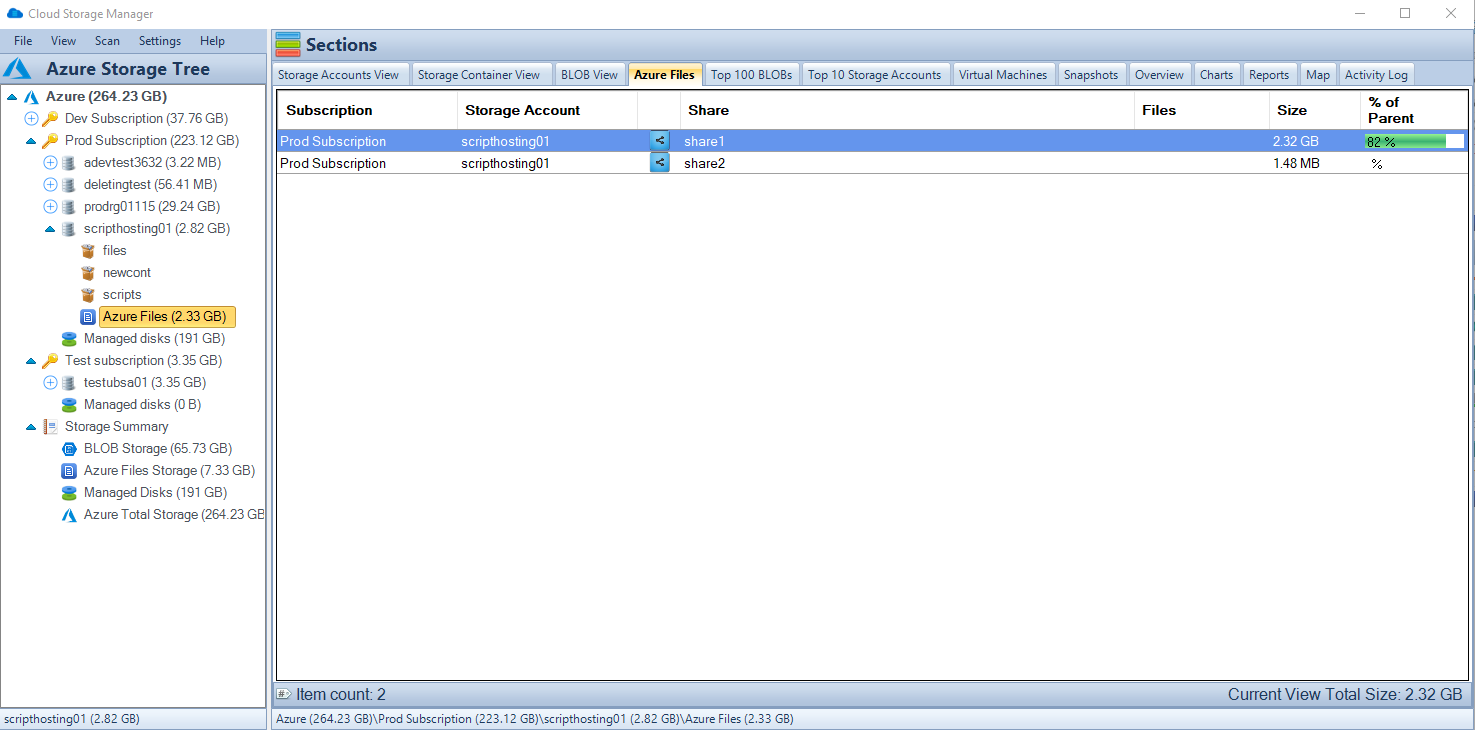
Managing Azure Files Consumption
Gaining Insights with Cloud Storage Manager
As organizations increasingly adopt Azure Files to replace on-premise file servers, it’s crucial to understand exactly how much data resides in your Azure Files.
Cloud Storage Manager can scan all your Azure Files across your tenancy, offering quick and easy insights into Azure Files consumption.
Identifying Cost-Saving Opportunities
With a clear view of your Azure Files consumption, you can identify opportunities to reduce costs by optimizing storage usage and eliminating unnecessary data.

Handling Unattached Azure VM Disks
Finding Unattached Disks with Cloud Storage Manager
Next on the list to reduce their Azure Storage costs, was finding unattached Azure Virtual Machine disks.
Again, this is often overlooked, to delete any disks no longer needed when decommissioning your Azure VMs.
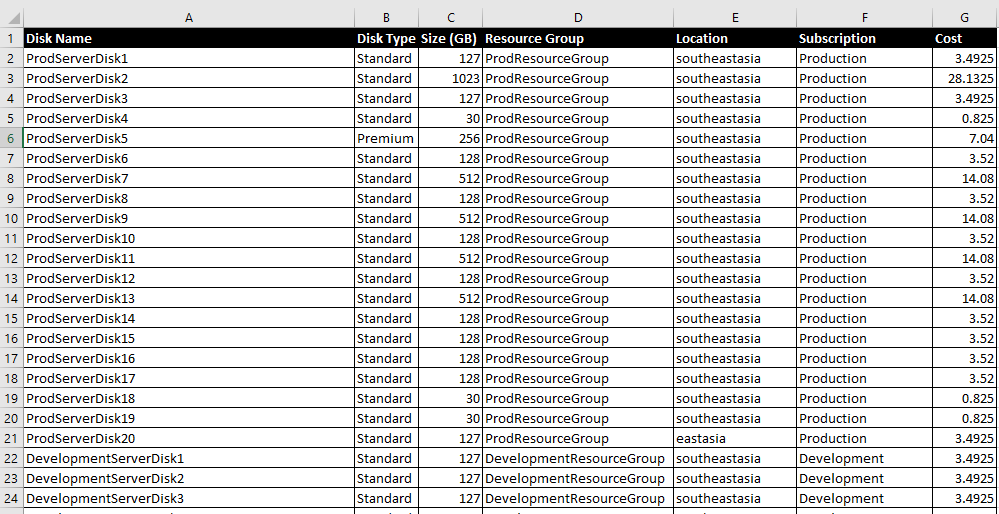
Another standard report is run, this time All Unattached Disks.
Once the report has completed, again open it up in Microsoft Excel, and you can go through this data to see which Azure VM Unattached Disks can be deleted, further reducing your Azure Storage Costs.
Azure VM Storage Cost Savings
Now using the same quick costing formulas from before, we can see an estimated monthly Azure Storage cost for these unattached virtual machine disks.
Estimating Savings with the Azure Pricing Calculator
After running this report and using the Azure Cost Estimator (I used AUD pricing here) to get cloud storage pricing, we found that the client had over 110 unattached Azure Virtual Machine Disks.
Removing all these unattached disks saved them $800 per month, so around $9,600 per year.
Reduce your Microsoft Azure Storage Costs
In a follow-up blog post, we will then dig a little deeper into more Azure Storage cost-saving initiatives (looking to further reduce your Azure Blob and FIles storage pricing and costs) using the insights from Cloud Storage Manager.
Download a free trial of Cloud Storage Manager today and start saving money with your Azure Storage.
Azure Cost Optimisation Conclusion
Azure pricing is based on a pay-as-you-go model, where customers are only charged for the services and resources they consume. This allows for flexible and cost-effective cloud computing. There are a variety of services available in Azure, including computing, storage, networking, and security. The pricing for these services can vary based on factors such as the type of service, the amount of resources used, and the duration of use.
The Azure pricing calculator is a tool that can be used to estimate the cost of using Azure services. The calculator allows you to select the services you want to use, input the details of your usage, and see an estimated cost. This can help you to budget for your cloud computing needs and make informed decisions about which services to use and how much to use them.
In addition to the pricing calculator, there are also a number of pricing options and discounts available to help you save money on your Azure bill. For example, you can use reserved instances to save up to 72% on virtual machine costs, or you can take advantage of Azure Hybrid Benefit to use your existing Windows Server licenses in Azure and save up to 40%.
The Cloud Storage Manager is a tool that helps manage and optimize cloud storage costs for organizations using Azure storage. By providing insights into storage usage patterns, the tool helps organizations make informed decisions about storage capacity planning, tiering, and rightsizing, which can result in cost savings. With its easy-to-use interface and intuitive navigation, the Cloud Storage Manager simplifies the process of managing and optimizing cloud storage costs.
In addition to cost savings, the Cloud Storage Manager also offers benefits such as improved visibility into storage usage, with the ability to view storage costs by usage, users can identify and eliminate redundant, underutilized, or unnecessary storage resources.
Overall, the Cloud Storage Manager is a valuable tool for organizations using Azure storage. By helping to optimize cloud storage costs and streamline management of storage resources, the tool enables organizations to focus on delivering value to their customers, rather than managing storage resources.