by Mark | Oct 28, 2020 | Azure, clone, Cloud Computing, How To, Microsoft HyperV, VMWare
Migrate an Azure VM to VMware or Hyper-V
If you’re looking to download an Azure Virtual Machine to either VMware or Hyper-V for cost savings or compliance reasons, our software Carbon automates the process with just a few clicks. With Carbon, you won’t need to use PowerShell or download the VHD from the Azure portal.
To download your Azure VM to your preferred hypervisor, simply follow the steps outlined below for VMware.
First, download and install Carbon. Then, select your Azure VM and specify your VMware environment as the target. Carbon will handle the rest, downloading and converting your Azure VM to VMware.
In addition to VMware, Carbon also supports Hyper-V as a target environment. So whether you need to export your Azure VM to VMware or Hyper-V, Carbon can help.
To get started, download a free trial of Carbon and try it out for yourself. Don’t waste time with manual downloads or complicated PowerShell scripts – let Carbon simplify the process for you.
The Easiest way to convert your Azure VM to VMWare or Hyper-V
Launch Carbon
Once you have Carbon installed, the first task is to launch Carbon.
Sign in to the Azure Portal
You will now be prompted to login to Azure, so enter your credentials with access to your Azure Portal.
Scan your Azure Portal for all of your Azure Virtual Machines
Find all your Azure VMs
Once you have authenticated against your Azure Tenant, Carbon will now start scanning your Azure environment for all your Azure Virtual Machines.
This could obviously take some time if you have a large Azure Environment.
Once the scan of your Azure VMs has completed, you will see the list of all the Azure VMs in your Azure Tenancy.
List all your Azure VMs
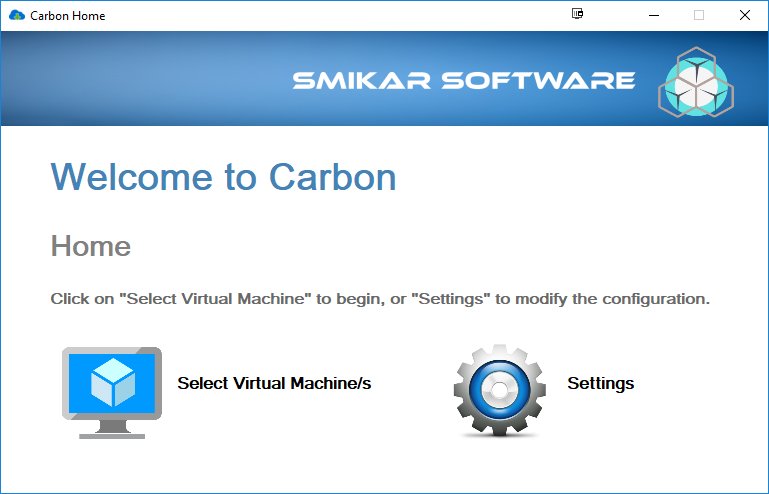
Now that your scan of all your Azure VMs is complete, choose Select Virtual Machine/s to list all your Azure VMs in your Tenancy and start the migration process.
Select your Azure VM for Migration
Which Azure VMs do you want to migrate back to your Hypervisor
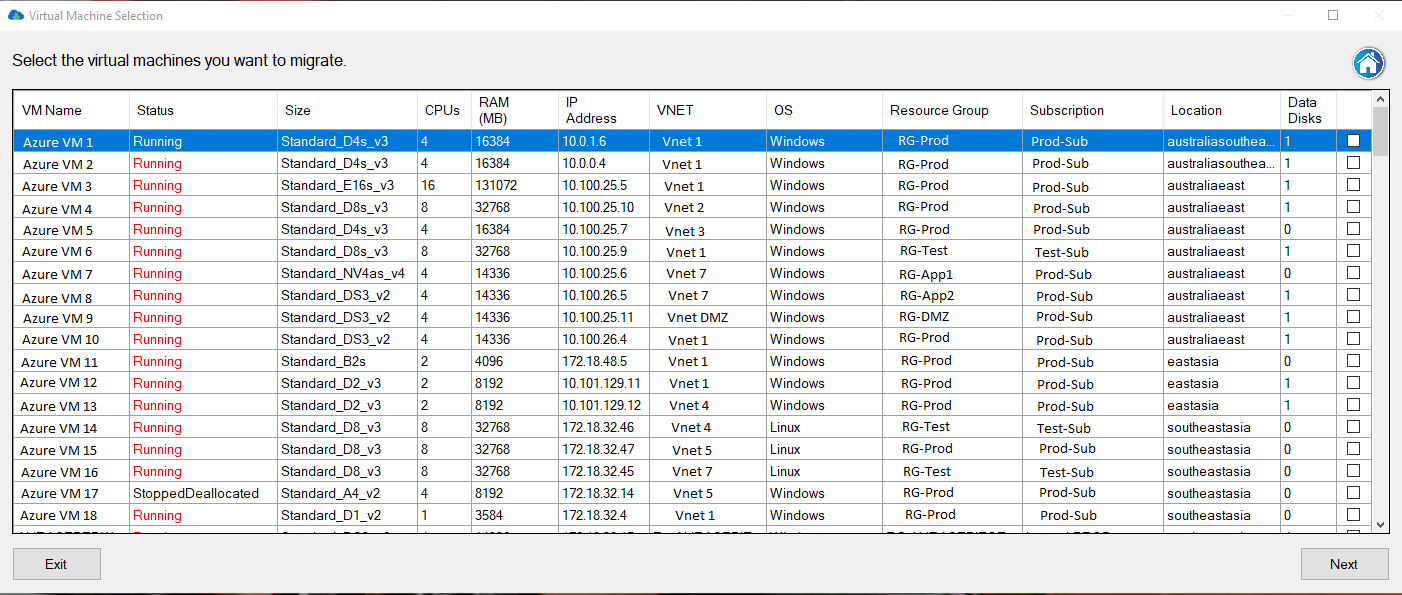
Now you should see a list of all your virtual machines in your Azure Environment.
Details displayed include:
- The Azure VM Name
- The status of the Azure VM
- The Azure VM size
- The number of CPUs your Azure VM has
- The amount of Ram
- The Azure VM’s IP Address
- The Azure vNet it resides in
- The Operating System of your Azure Virtual Machine
- The Azure Resource Group
- The Azure Subscription
- The Azure location
- and finally, the number of disks attached to your virtual machine
You simply select (by using the checkbox on the very right of the screen) the Azure VMs you want to download to VMware, then click Next.
The VMs you want to migrate will need to be powered off, so make sure you do this prior to attempting the migration.
Managed or Unmanaged Disks
Azure VM Disk Configuration
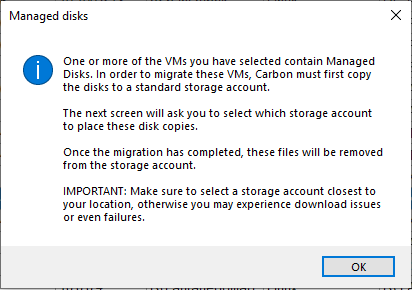
Now if the Azure VMs you are going to convert to VMware are using Azure Managed Disks, you will get this prompt.
Click OK to proceed.
What Carbon will do next is copy this Azure VM disks to a storage account that you specify in the next screen.
Please take note of the location of your Azure VM, as you want to use an Azure Storage Account in the same region.
Azure Storage Account for Conversion
Choose a destination Azure Storage Account
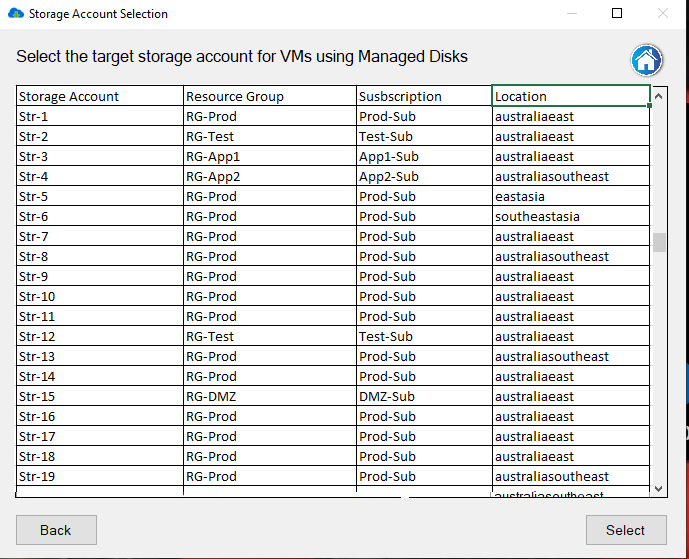
Next we select the appropriate Azure Storage Account that the Azure VM will be copied and converted to.
Choose the storage account you want and then choose Select.
Carbon will now read your Azure VM disk configuration. This can take a few minutes.
Choose your VMWare or Hyper-V Environment for Azure VM Migration
Connect to you Hypervisor
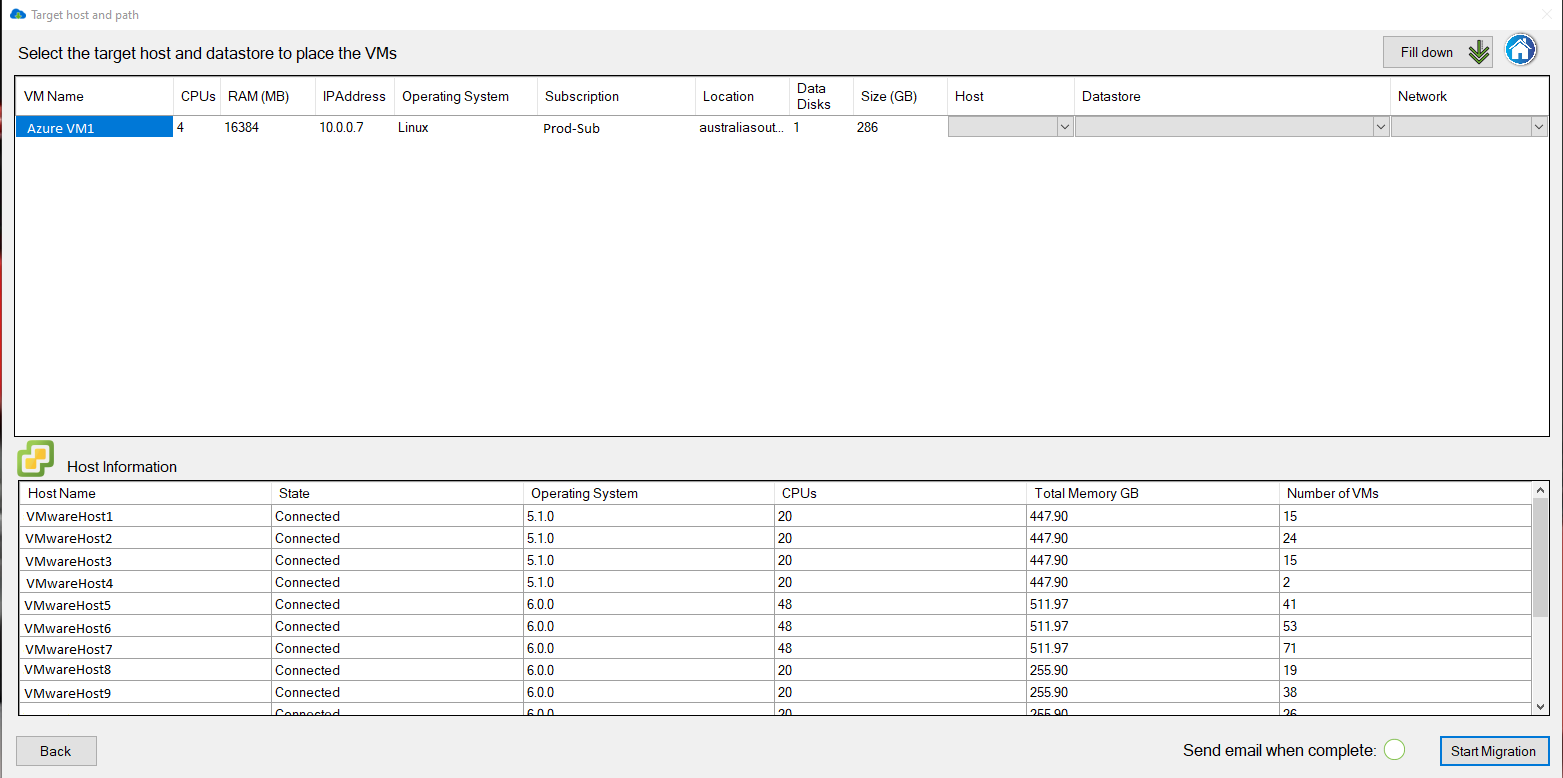
Now we are presented with your virtual environment (in this case our VMware vCentre environment)
Choose from the dropdown lists the VMware Host, the datastore and virtual network you want your Azure VM to download to.
You have the option here to send you an email once the migration has completed.
Click Start Migration to proceed to the final step
Ready to start the Migration of your Azure VM
Start the Migration Process
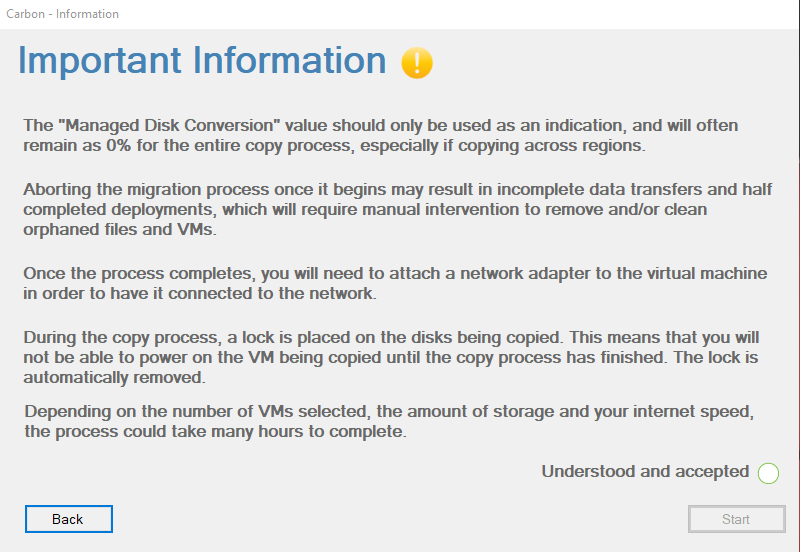
Finally we are prepared to start the conversion of your Azure VM to VMware.
Review the information here, when you are ready, click the circle next to Understood and Accepted, then click Start.
Azure VM Migration Process
Converting your Azure VM
Now, the conversion process is underway. Your Azure VM will be downloaded and converted to the appropriate format for either VMware or Hyper-V before finally being deployed to your on-premise virtual infrastructure.
Please Note: This may take some time, dependent on the size of your Azure VM disks, so please be patient.
If you have email alerting setup and turned on, you will receive an email once the process has completed.
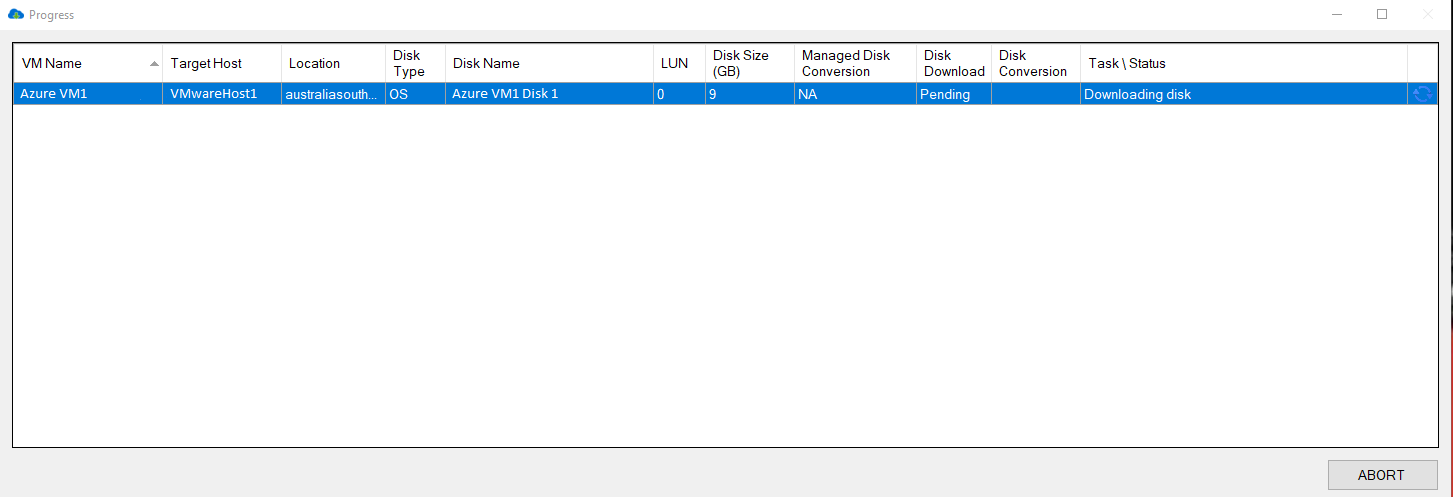
Azure VM Conversion Progress
Converting your Azure VM for your selected Hypervisor
Watching the Progress window you can see the status of your download and conversion of your Azure VM.
In this picture you can see that the disk download has completed as well as the conversion and its currently being uploaded to our VMware environment.
Azure VM Converted
Azure VM Conversion is now Complete
After some time your Azure VM should now have downloaded, converted to VMware and be available within your vCentre server.
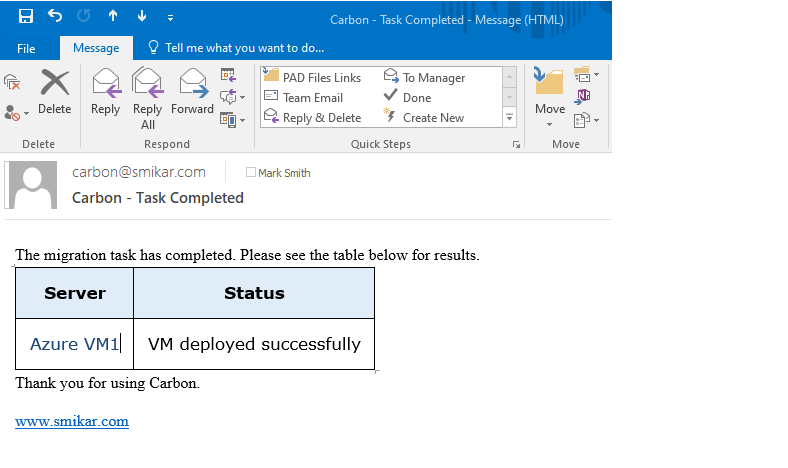
Azure VM Migration Alerts
If you requested an email alert, you should have received one in your inbox stating that the Azure VM has now deployed to your VMware environment.
Azure VM Conversion Completed
View the migrated VM in your Hypervisor
If you go to your vCentre now you should be able to find the Azure VM you had migrated to your VMware environment.
All left for you to do now, is power it on then log on to the VM and update the IP address if needed.
Azure VM Conversion Completed
Find the migrated VM in your Hypervisor
If you go to your vCentre now you should be able to find the Azure VM you had migrated to your VMware environment.
All left for you to do now, is power it on then log on to the VM and update the IP address if needed.
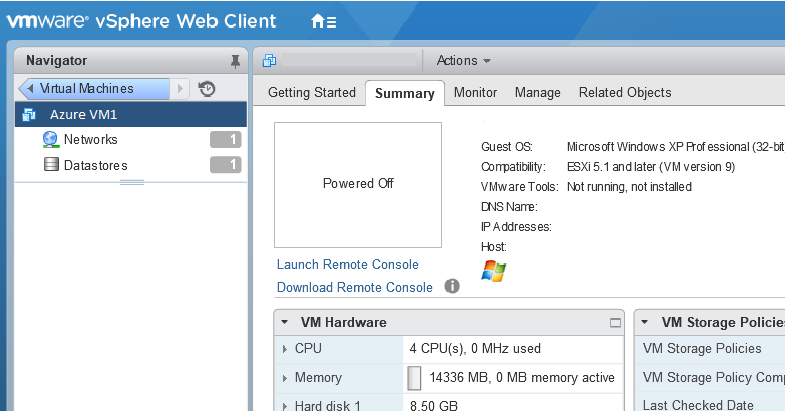
Your Azure VM has been converted and then migrated to your Hyper-v or VMware environment.
And that’s all there is to it. You have downloaded an Azure VM and converted it to VMware or Hyper-V. (Obviously in this example we converted the Azure VM to VMWare. For HyperV the last few steps are replaced with VCentre with SCVMM)
You can download a fully functioning trial of Carbon here to test it for yourself.
Carbon: Moving You Forward by Bringing You Back.

by Mark | Oct 26, 2020 | Azure, Azure Blobs, How To, Storage Accounts
Azure Blob storage has provided companies with a way to store almost limitless amount of data. But just like kids in a candy store this can get out of hand, and expensive. Being able to store as much data as you want is great, however it is something that can grow to a point where you are spending more on storage than you actually need.
Azure does provide a nice method of automatically shifting old or unused files to a lower access tier to save on cost, but this still means you are potentially holding onto files you don’t really need. I mean do you really need files you haven’t accessed in over 12 months? Sure there are certain industries that require files that are kept for 7+ years, but they are a special case.
If you don’t know how to create an Azure lifecycle policy to automatically move unused files to a lower access tier, check out our other post here: https://www.smikar.com/create-azure-storage-lifecycle-policy/
OK, so do I go about finding these files that haven’t been accessed in the last 3, 6, 12 or 36 months (3 years) without having to browse through each and every Azure Storage Account and Container?
So how do you find your Azure Blobs that havent been accessed in 3 months or more?
Azure Blob Storage Consumption Reports
Simple, use Cloud Storage Manager, and run one of the many usage reports.
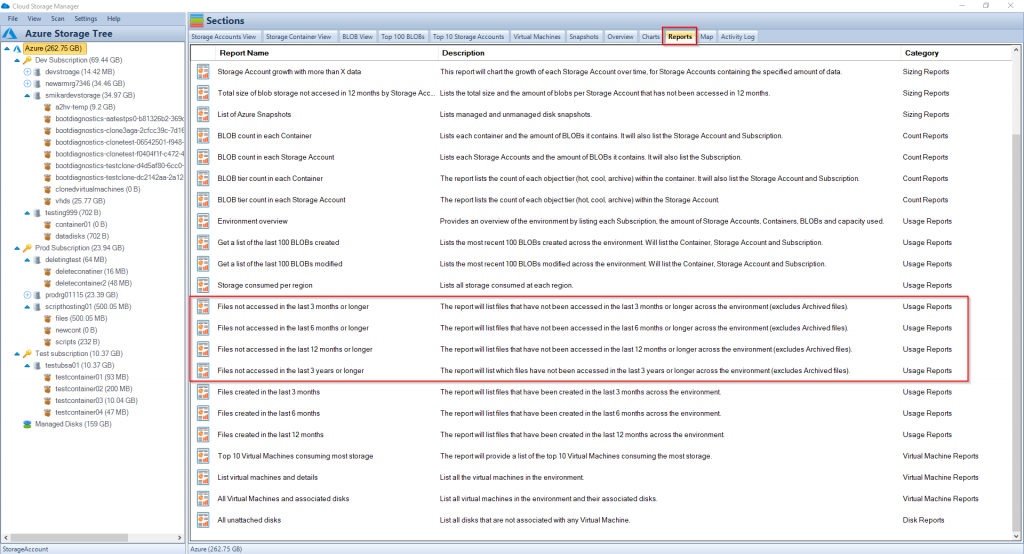
Cloud Storage Manager has a number of reports you can run to get a better insight into exactly where all your Azure Blob Storage is being consumed, but let’s focus on the specific 4 reports that will tell us which Azure BLOB files haven’t been accessed in the last 3, 6, 12 or 36 months (3 years).
Once you’ve installed Cloud Storage Manager and allowed it some time to scan your Azure environment, browse to the Reports tab as shown here.
Azure Blobs not accessed within
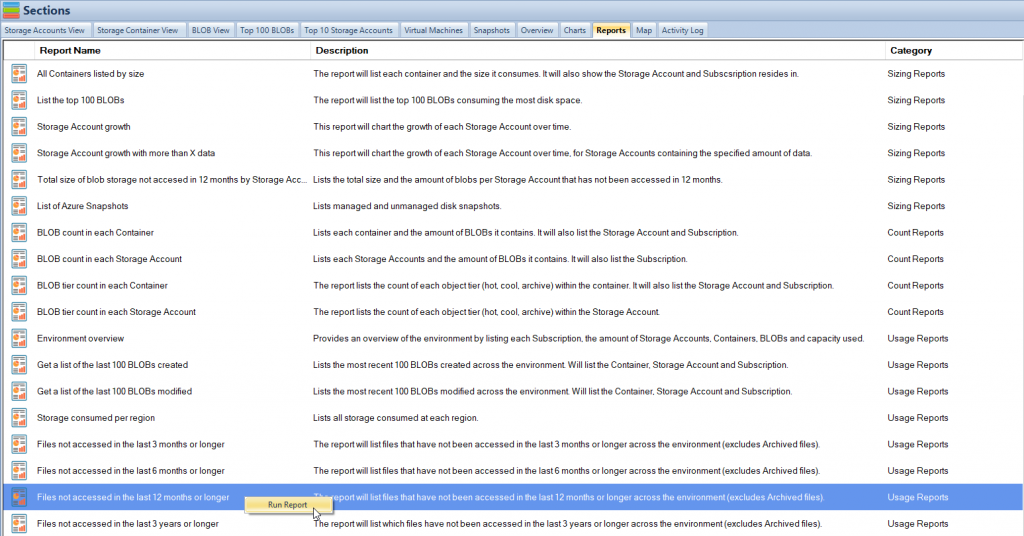
First let’s run the Files not access in the last 12 months or longer report.
Right click on the report and select Run Report.
Azure Blobs not used Report
Once the report finishes, you will be shown a list of files that have not been accessed in the last 3 months or longer.
The report will show you which Subscription, Storage Account and Container the Azure BLOB file resides in. Not only that, but it will also tell you the object tier of the blob, whether that be hot or cool (archive files are excluded), the size of the file, the last time it was modified and of course the name of the file.
Here is an example of the report.
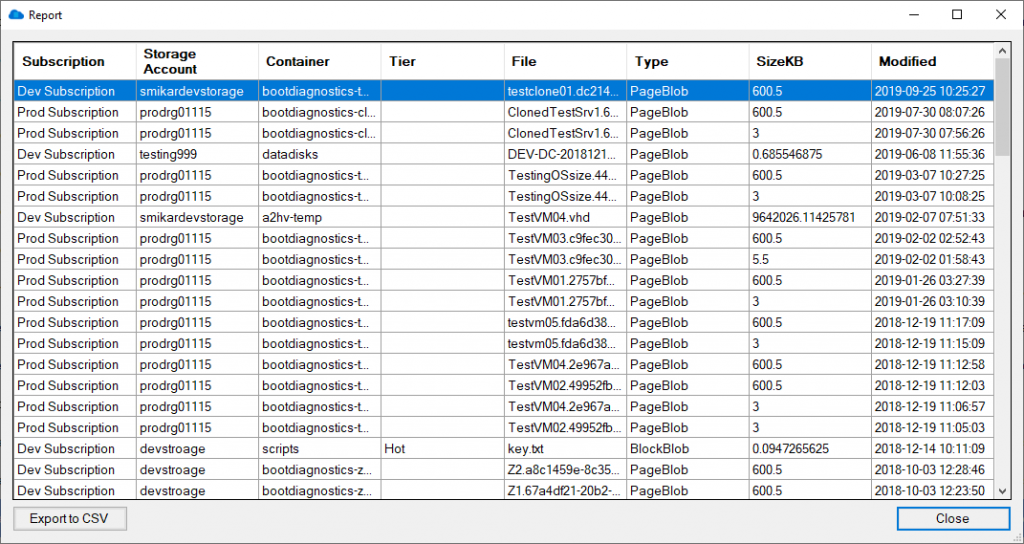
You can also export the report to Excel in order to adjust the report or present the information to others.
The same report may be executed to provide similar results but extending the criteria further out to search for files that haven’t been accessed in a longer timeframe, such as 6 months, 12 months or 3 years.
Using these reports, you can decide whether or not these files need to be retained, in which case you would move them to a lower access tier, either Cool or Archive for long-term retention, or even delete them if they are deemed unnecessary.
These reports are a great way to find files that haven’t been accessed in a long time and could provide an immediate cost saving associated with your Azure Storage consumption.
Cloud Storage Manager has free to trial. Start seeing insights in to your Azure Blob Storage consumption today.
Download a Free Trial and test it for yourself.
Free

Database size is limited to a maximum of 5MB.
Typically for small or personal environments usually consisting of 3 or less Azure Subscriptions and consuming under 30TB of Azure Blob Storage.
Advanced

Database size is limited to a maximum of 1GB.
For medium sized environments typically consisting of less than 10 Azure Subscriptions and consuming under 500TB of Azure Blob Storage.
Enterprise

Unlimited database size.
For use in large environments typically consisting of more than 10 Subscriptions and consuming more than 1PB of Azure Blob Storage.
Cloud Storage Manager is licensed based on the size of it’s database which includes information of each of your Azure Subscriptions, Azure Storage Accounts, Containers and finally each Blob.
Each version has the same great functions including scheduled scans of your Azure Blob Storage and reporting.
Azure Storage Cost Saving FAQs
What is Azure Blob storage?
Azure Blob storage is a cloud-based storage solution provided by Microsoft Azure that allows users to store large amounts of unstructured data such as text or binary data.
Why is it important to manage Azure Blob storage?
While Azure Blob storage can store almost limitless amounts of data, it can also become expensive to maintain as data accumulates over time. Proper management of Azure Blob storage can help reduce storage costs and improve overall efficiency.
How can Cloud Storage Manager help manage Azure Blob storage?
Cloud Storage Manager provides a number of usage reports that can be used to identify which Azure Blob files haven’t been accessed in a certain period of time, such as 3, 6, 12 or 36 months. These reports allow users to make informed decisions about whether to retain, move to a lower access tier, or delete unnecessary files, which can help reduce storage costs.
What are the benefits of using Cloud Storage Manager?
By using Cloud Storage Manager, users can gain insights into their Azure Blob storage consumption and identify areas where they can optimize storage costs. The usage reports provided by Cloud Storage Manager are easy to use and allow users to quickly identify which files haven’t been accessed in a certain period of time, which can save time and effort compared to manually browsing through each Azure Storage Account and Container.
How can I try Cloud Storage Manager for myself?
Cloud Storage Manager offers a free trial that can be downloaded and installed. This allows users to see the insights provided by the software and determine if it is a good fit for their needs.
Azure Blob Storage Consumption Reports are an excellent way to find Azure BLOB files that haven’t been accessed in a long time, and they can provide immediate cost savings associated with your Azure Storage consumption. By using Cloud Storage Manager, you can run reports and gain insights into your Azure Blob Storage consumption, allowing you to make informed decisions on how to optimize your Azure storage.
In summary, using Azure Blob Storage Consumption Reports can help you find unused Azure BLOB files and reduce storage costs, providing a cost-effective solution for storing your data in Azure. Start using Cloud Storage Manager today to see insights into your Azure Blob Storage consumption and start saving costs.

by Mark | Oct 21, 2020 | Azure, Azure Blobs, Blob Storage, Cloud Computing, Storage Accounts
If you are looking to optimize their storage costs on Azure Blob storage. With the increasing amount of data being stored in the cloud, it’s important to keep track of the size of each Blob and identify which ones are taking up the most storage. This is where the guide comes in – it provides a step-by-step process on how to use Cloud Storage Manager to find the largest Azure Blobs in your environment.
By identifying the largest Blobs, you can take steps to optimize your storage costs, such as deleting unnecessary data or moving data to a more cost-effective storage tier. Whether you’re new to Azure Blob storage or an experienced user, this guide is a helpful resource for optimizing your storage costs.
Recently we had one of our clients inform us that he used Cloud Storage Manager to find which were the largest Blobs in his Azure Storage Containers.
Here is a quick run down to show one of the many reports on your Azure Blob consumption that you can run with Cloud Storage Manager.
Which are my largest Azure Blobs?
See all your Azure Blob Sizes
If you want to find out which BLOBs in your environment are the largest, or consuming the most storage, the easiest and simplest method by far is to use Cloud Storage Manager.
Once you’ve allowed Cloud Storage Manager to scan your environment, you have a few options to get this information.
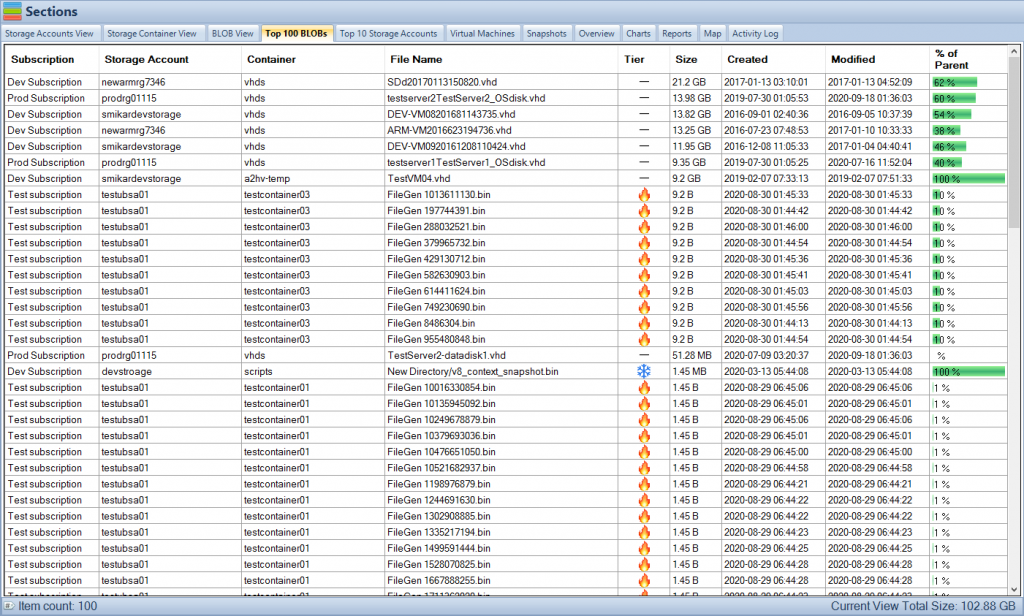
The Top 100 BLOBs tab will give you a list of the top 100 largest BLOBs in your environment. It will also show you which Subscription, Storage Account, Container the BLOB resides in and of course its name. Not only that but it will tell you the object tier, whether that is hot, cool or archive, the size of the Azure BLOB, when it was created and when it was last modified.
Have a look at the screenshot to get a clearer picture.
Your largest Azure Blob Sizes
In the bottom right corner you will also see how much overall storage your largest 100 BLOBs are consuming. In our example, we can see that our largest 100 BLOBs are consuming 102GB. Of course, this is just our lab environment so in a real production environment this could be hundreds of TB or PB!
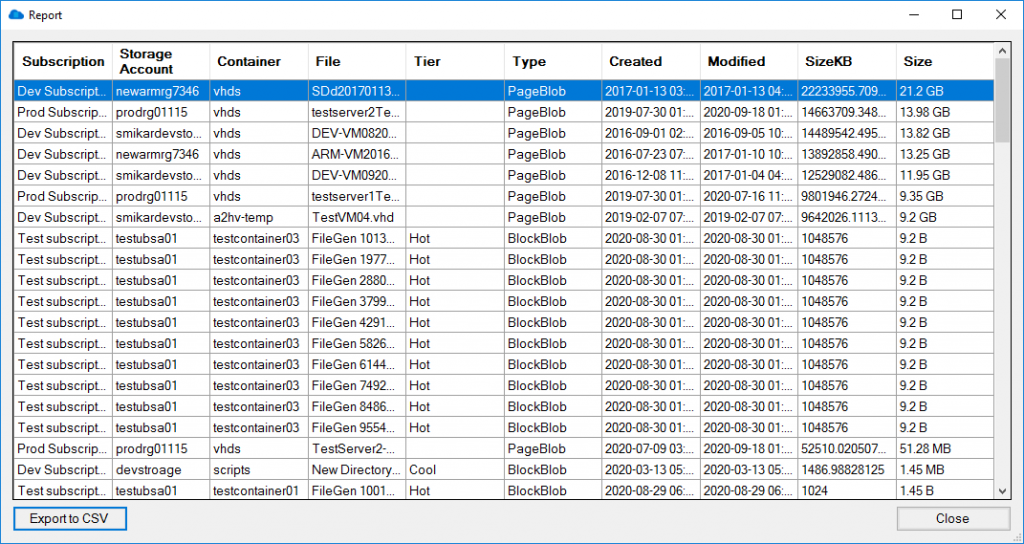
You may also export this data into a spreadsheet by selecting the Reports tab and selecting the “List the top 100 BLOBs” report.

Azure Blob Storage Size Report
Right click on the report and select “Run Report” to view the data in an exportable table format that you can see in Microsoft Excel.
The export includes all relevant information including the Azure Subscription, Azure Storage Account, the Container the Blob resides in, the name of the Azure Blob itself, what storage tiering the Blob is in, the date created, last modified and finally it’s size.
Free

Maximum Azure Storage limited to 30TB.
Typically for small or personal environments usually consisting of 3 or less Azure Subscriptions and consuming under 30TB of Azure Blob Storage.
Free Forever (until over 30TB)
Advanced

Maximum Azure Storage limited to 1PB
For medium sized environments typically consisting of less than 5 Azure Subscriptions.
12 Month License
Enterprise

Unlimited Azure Storage.
For use in large environments typically consisting of more than 10 Subscriptions and consuming more than 1PB of Azure Blob Storage.
12 Month License
Cloud Storage Manager is licensed based on the size of your Azure Subscriptions, Azure Storage Accounts, Containers and finally each Blob.
Each version has the same great functions including scheduled scans of your Azure Blob Storage and reporting.
FAQs
What is Azure Blob storage?
Azure Blob storage is a cloud-based storage solution offered by Microsoft Azure. It allows users to store and access large amounts of unstructured data, such as text or binary data, through REST-based object storage.
Why is it important to find the largest Azure Blobs?
Identifying the largest Azure Blobs is important for optimizing storage costs. By understanding which Blobs are taking up the most storage, users can take steps to delete unnecessary data or move data to a more cost-effective storage tier.
How can Cloud Storage Manager help me find the largest Azure Blobs?
Cloud Storage Manager provides a step-by-step process to find the largest Azure Blobs in your environment. It offers a Top 100 BLOBs tab that gives users a list of the top 100 largest BLOBs in their environment, along with information on the Subscription, Storage Account, Container, object tier, size, and more. Users can also export this data into a spreadsheet.
How is Cloud Storage Manager licensed?
Cloud Storage Manager is licensed based on the size of your Azure Subscription. There are three versions of Cloud Storage Manager: Free, Advanced, and Enterprise, each with different limits on database size. All versions offer scheduled scans of Azure Blob Storage and reporting.
Who can benefit from using Cloud Storage Manager?
Cloud Storage Manager is useful for anyone who uses Azure Blob storage and wants to optimize their storage costs. It can be helpful for both new and experienced users of Azure Blob storage.

by Mark | Oct 14, 2020 | Azure, How To
We were recently asked for help by one of our clients that needed to separate a number of users from their existing domain by moving them into their own Active Directory forest. This can happen for all sorts of reasons, including divestments, security, geographical or division separation.
Whatever the reason, they needed to move these users across into an entirely new AD domain.
Now, although they were going to be moved into this new AD domain, they were still part of the same parent company and were going to remain within the same Azure AD tenant.
OK, doesn’t seem too hard, what’s the catch? Build the new domain, create a trust, move the users and resync them, job done.
Well, that was the plan until we looked into the configuration of AD Connect and discovered that the source anchor was set to the OBJECTGUID.
If you aren’t familiar with this, AD Connect uses the source anchor as a mechanism to “match” on-premises users with Azure AD users. In the newer versions of AD Connect the source anchor is usually set to the mS-DS-ConsistencyGuid which makes life easier.
However, older versions of AD Connect used the OBJECTGUID.
Now comes the problem. When a user is moved from domain1 to domain2, a new OBJECTGUID is created so when you try and sync them up again AD Connect will not recognise them as the same user and will create a new user account for that user. Even though technically it’s the same user, AD Connect does not see it that way because the ImmutableID is different.
The ImmutableID is the OBJECTGUID converted to Base64.
OK, so how do we get these users moved from domain1 into domain2 and have them sync with their existing Azure AD user?
You have to delete them…kind of.
Before we begin, I am assuming you have:
AD Trust in place between the original domain and the new domain
AD Connect has been configured to sync across both domains (if you don’t know how to do this, check out our other post explaining the process: https://www.smikar.com/second-domain-using-ad-connect)
Step 1.
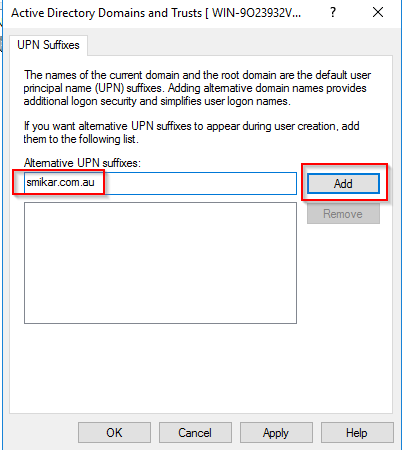
As these users need to retain the same UPN, the first thing we need to do is to add the UPN suffix to the new domain. If you have already done this, you can skip this step.
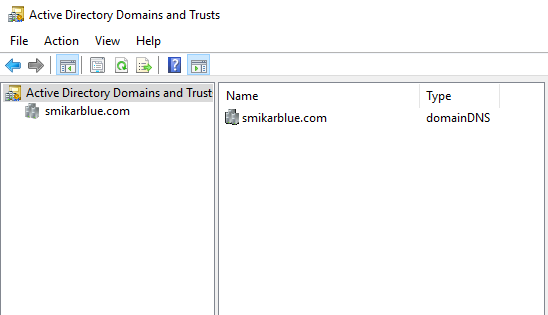
Log into the new domain and launch the Active Directory Domains and Trusts console
Step 2.
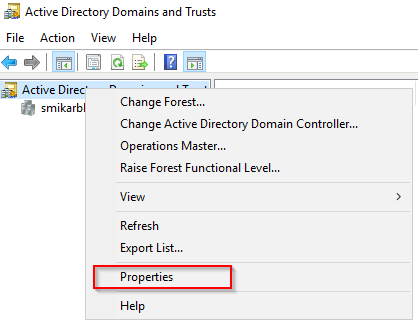
Right click on the AD Domains and trusts and select properties
Step 3.
Enter the name of the UPN you need to add.
Click Add and then OK.
Step 4.
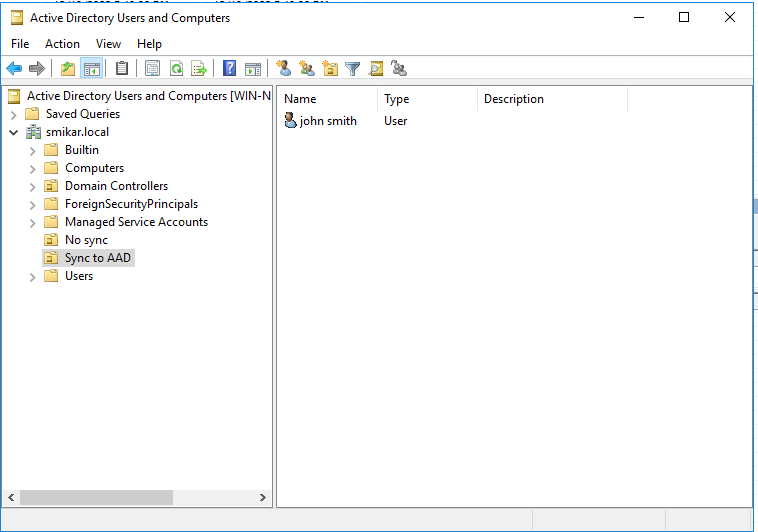
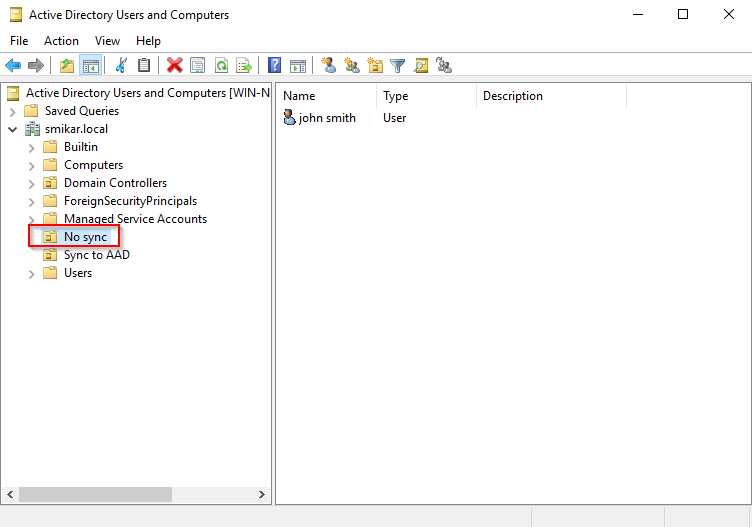
Now what we need to do, is remove the users from the sync cycle. The easiest way to do this is to move them into an OU that is not being synced. Below is our test user in AD.
Step 5.
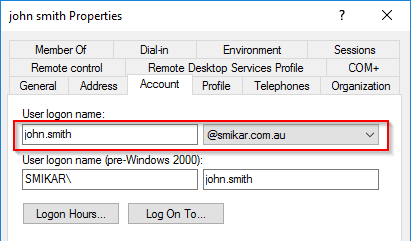
Here is the user in Azure AD

Step 6.
Now let’s move him into an OU that is not being synced.
Step 7.
If you are syncing the entire domain then you will need to change some settings in AD Connect so you have at least one OU that is not being synced.
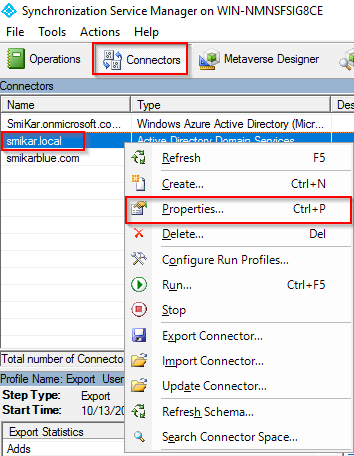
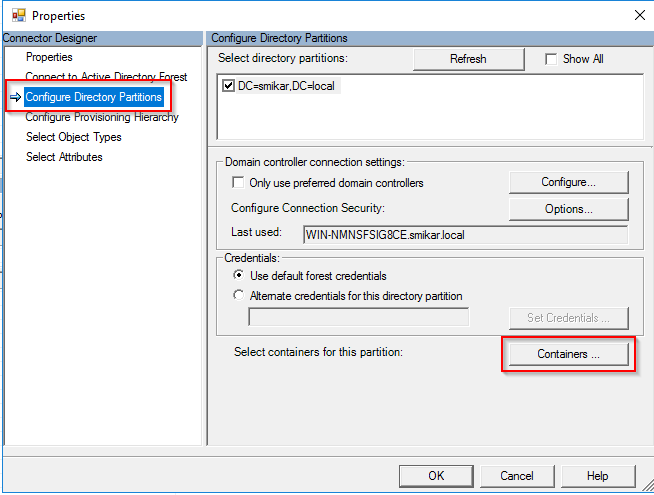
If you don’t know how to do that, open up AD Connect, click on Connectors, right click on the domain and select properties. Under the Configure Directory Partitions you will find a Containers button. That is where you can select which OUs to sync.
Step 8.
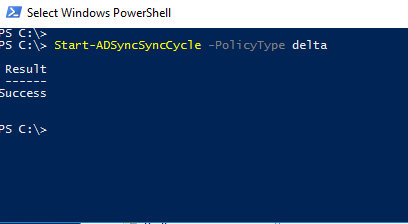
Open a PowerShell console and enter: Start-ADSyncSyncCycle -PolicyType delta
This will initiate a delta sync to Azure AD
Step 9.
Log into the Azure portal and open the Active Directory panel
Select the Deleted Users option on the left hand blade
In here we should find our “deleted” user
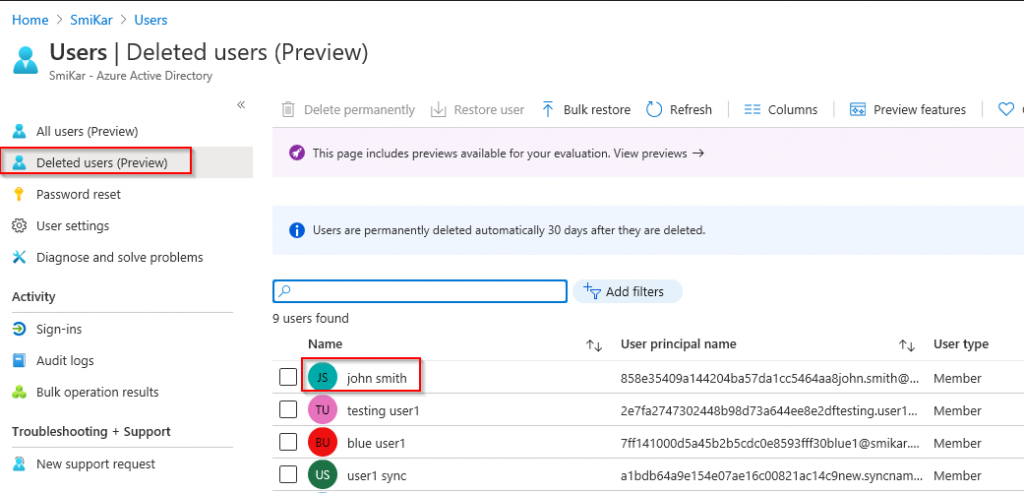
Step 10.
Select the tick box next to the user and click on Restore User
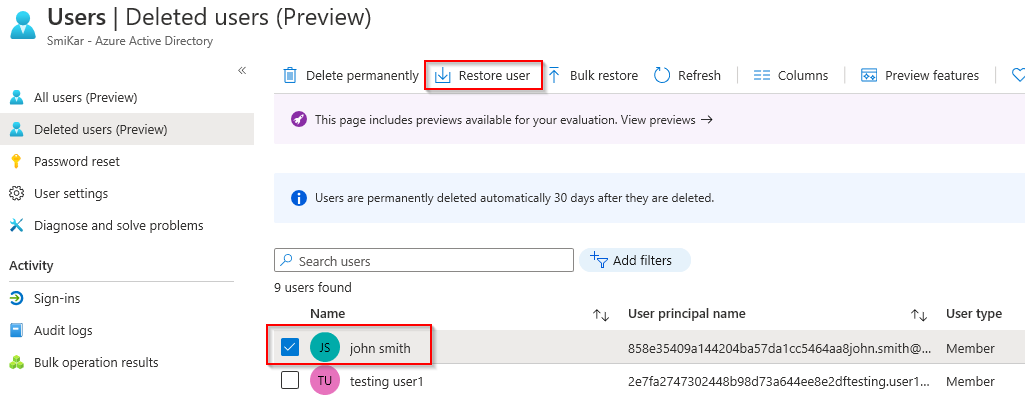
Step 11.
Once the user is restored, click on the All Users blade on the left and search for the restored user.

Step 12.
Migrate the user from the original domain to the new domain.
We used ADMT to perform this task but I won’t go into detail on this. If you need help on how to set this up and use it, here is a good guide.
https://www.pelegit.co.il/admt-active-directory-migration-tool/
Here is the user we migrated into the new domain.
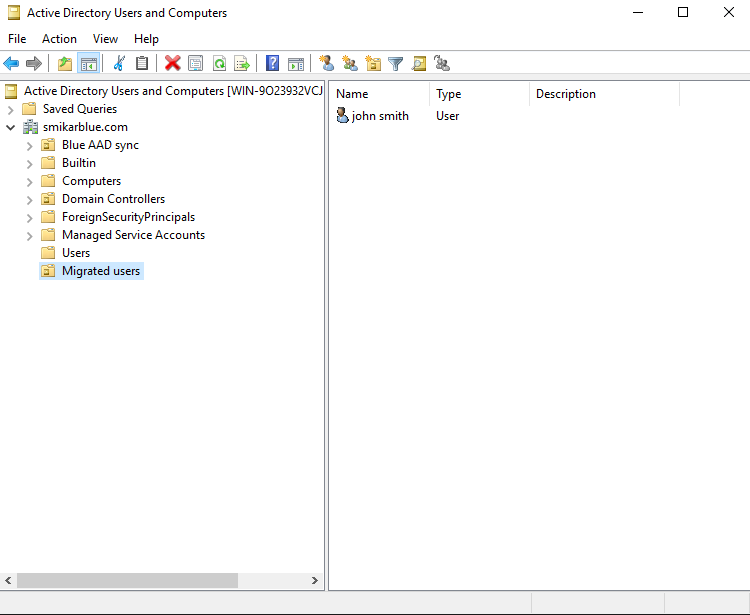
Step 13.
Now we need get the OBJECTUID of the migrated user, convert it to an ImmutableID and apply that to the restored user in Azure AD.
The below command will get the OBJECTGUID and convert it to an ImmutableID for a single user but can be converted to run against multiple users (you will need the ActiveDirectory and MSonline modules installed).
$ImmID = Get-ADUser -identity john.smith -Properties ObjectGUID | select ObjectGUID | foreach {[system.convert]::ToBase64String(([GUID]($_.ObjectGUID)).tobytearray())}
Now let’s set that ImmutableID to the restored user.
set-msoluser -UserPrincipalName “[email protected]” -ImmutableId $ImmID
Step 14.
Move the user into an OU that is flagged to sync
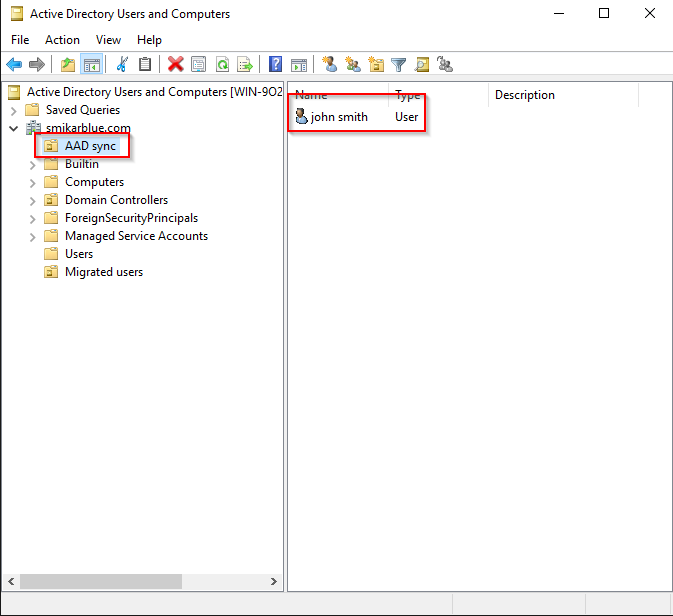
Step 15.
Now let’s kick off another sync
Start-ADSyncSyncCycle -PolicyType delta
Job done
The user will now be matched with the restored user account as the ImmutableID will match the migrated user.

by Mark | Oct 13, 2020 | Azure, Cloud Computing, How To
Overview
Are you looking to integrate a new company into your existing Azure AD tenant? Or perhaps you need to share your tenancy and Office 365 services with more than one company? If you find yourself in a position where you need to sync users from another domain and have already configured AD Connect, then there is a way to add the second domain to your current Azure tenancy, so you can sync those users from the second domain.
Before proceeding, make sure you review the supported topology when it comes to AD Connect and multiple domains/tenants. You can find the information in this Microsoft article: https://docs.microsoft.com/en-us/azure/active-directory/hybrid/plan-connect-topologies
However, there is one limitation that will most likely cause you the most grief, and is probably why you landed here in the first place. You can only have one AD Connect instance per tenant. So, if you need to sync users from a second domain, you will have to follow the process outlined below.
Establish Domain Trust Before proceeding, you need to establish an AD trust between the two domains. If you have not done this yet, you will need to perform this step first. If you are not sure how to do this, you can refer to this guide: https://www.azure365pro.com/how-to-create-two-way-transitive-trust-windows-server-2008-r2/
OK, now that we have our domain trust established, let’s step into the process.
Step by step guide how to synchronise users from a second domain in to Azure Active Directory.
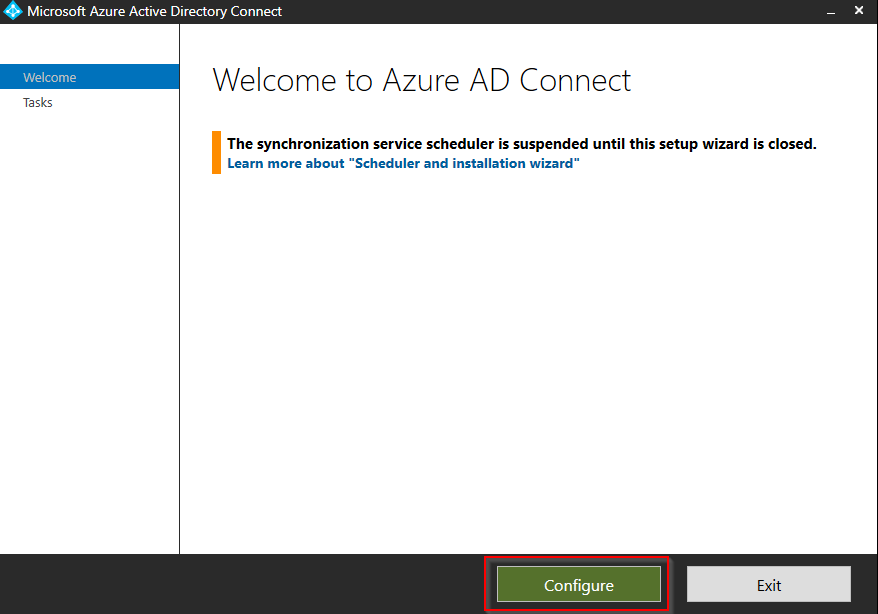
Launch AD Connect and click on Configure
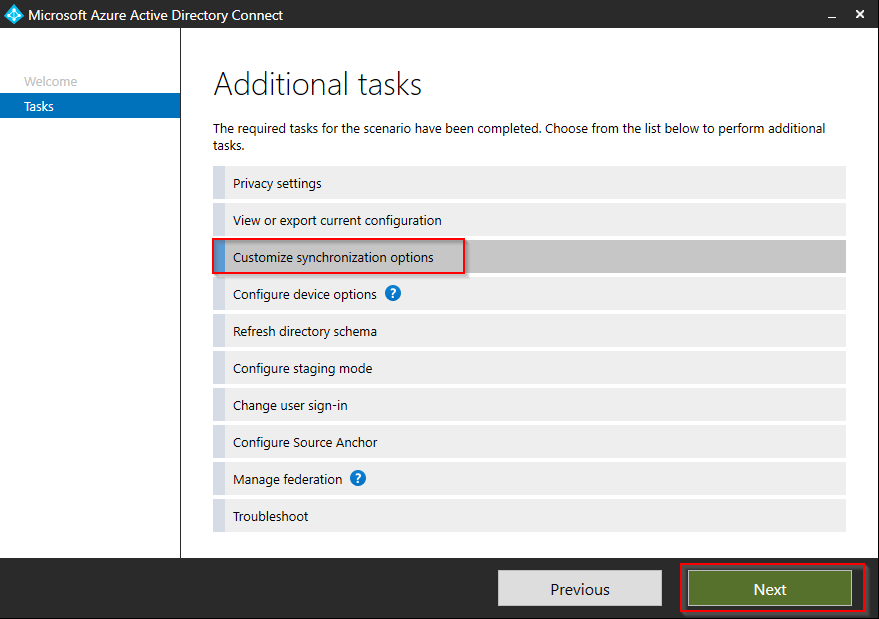
Click on Customize synchronization options and click Next
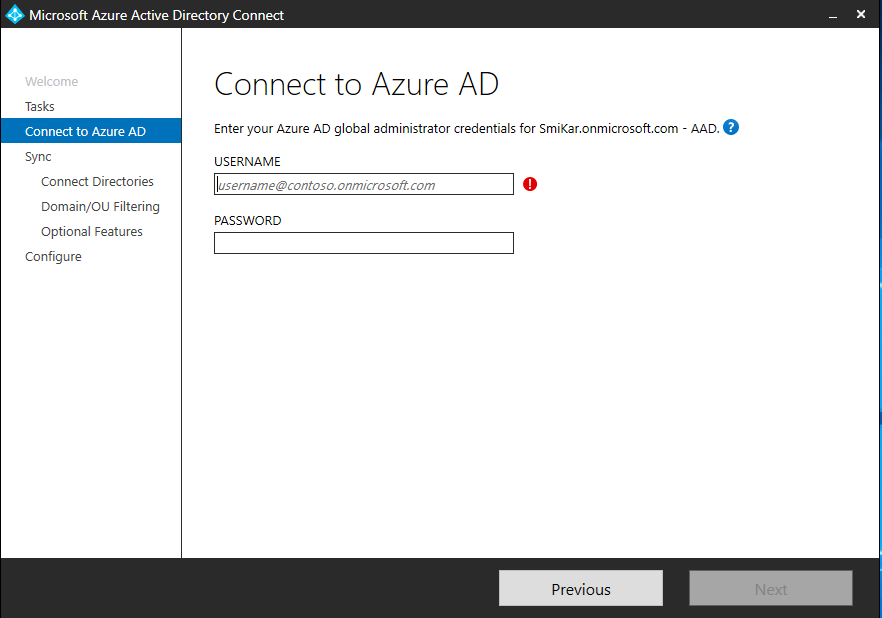
Enter the credentials to connect to Azure AD and ensure the account is a global administrator.
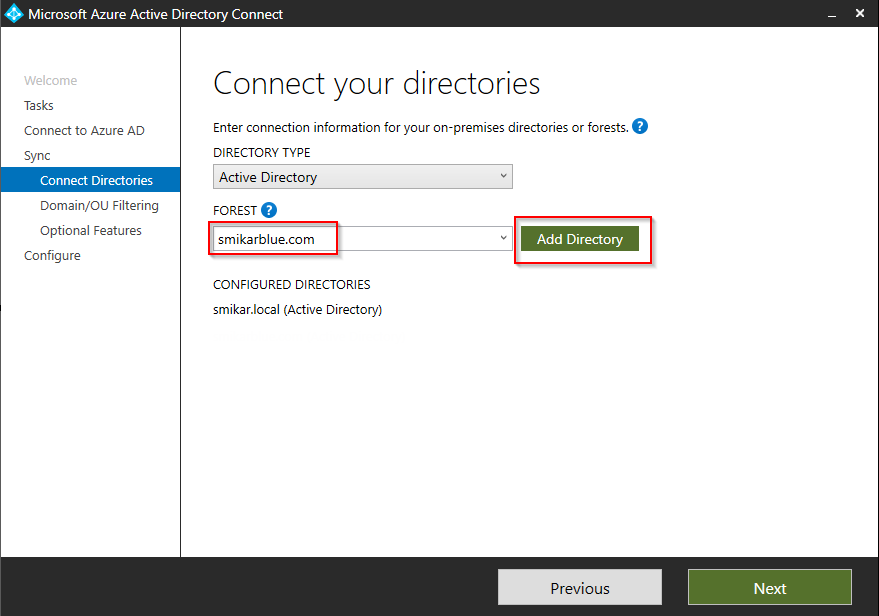
Enter the name of the second domain and click Add Directory
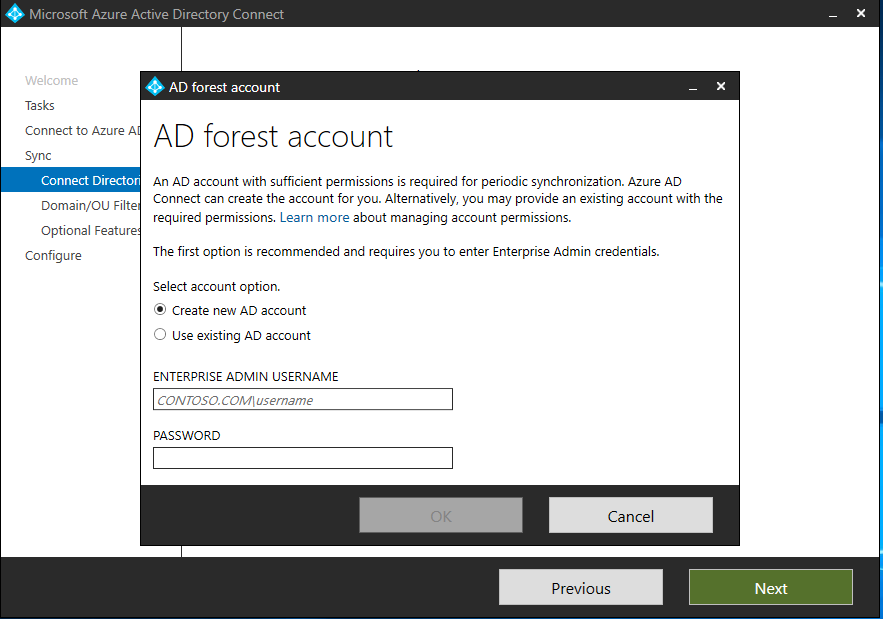
Enter the details of a user account in the domain that is a member of the enterprise administrators group.
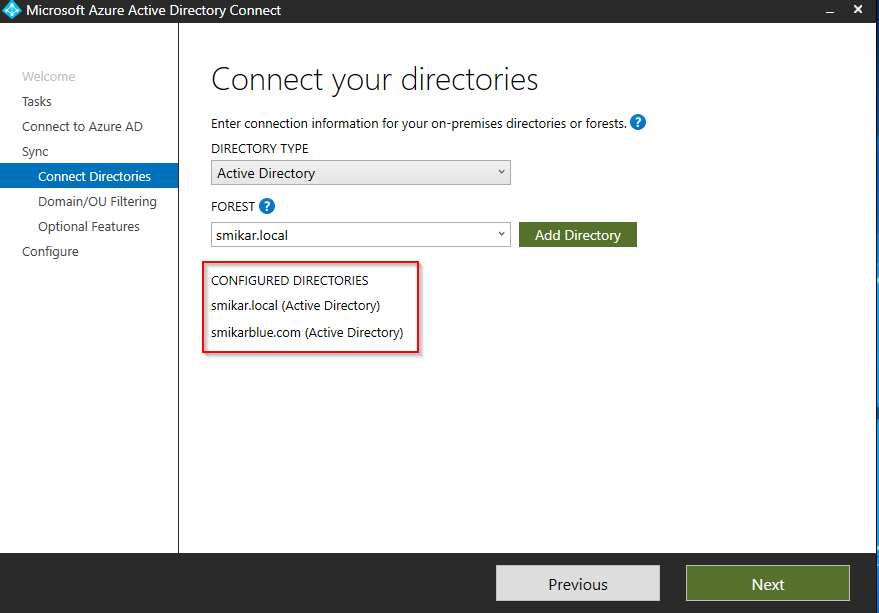
You will now see the second domain added to the configured directories list.
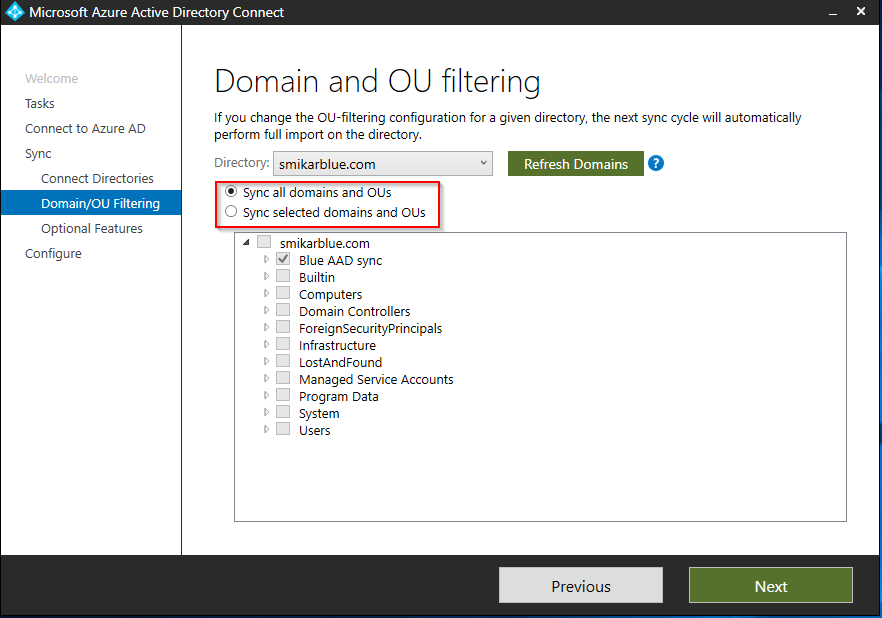
Select whether to sync all the objects in the domain, or to sync only objects in specific OUs.
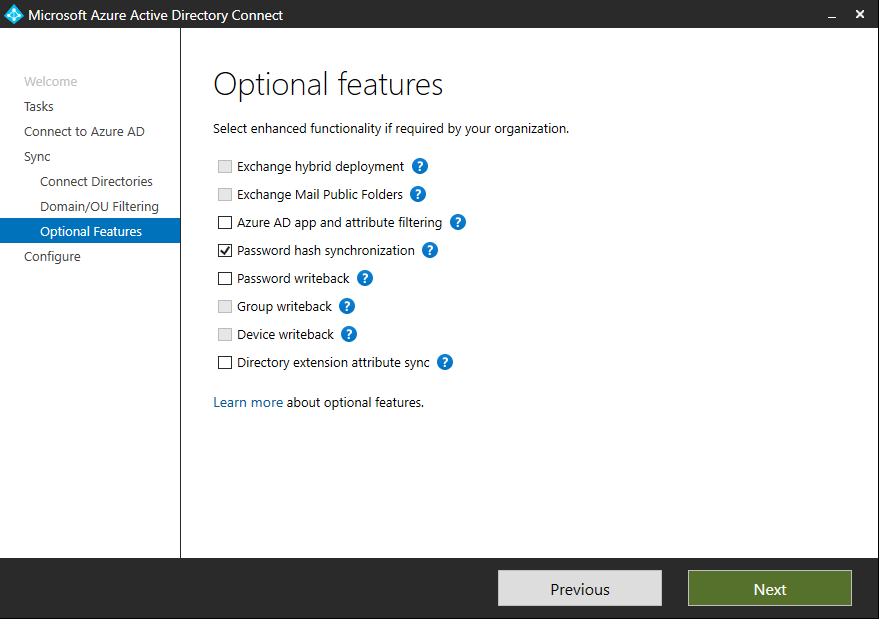
Select any optional feature you require and click Next
Tick the box if you want to start the synchronisation process once the configuration completes, or you may untick it and place AD Connect into a “disabled” mode (will require PowerShell commands to activate it).
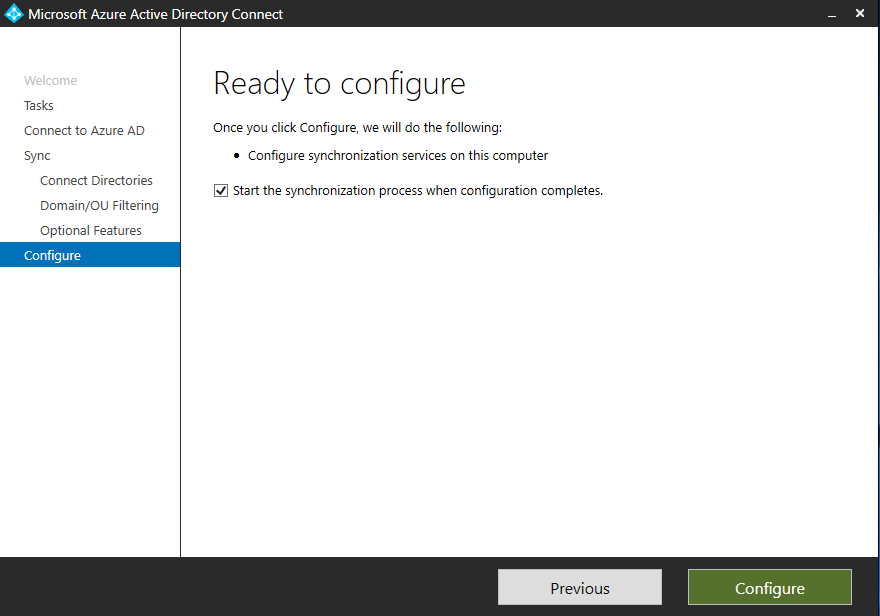
Click Configure when ready to finish the process.
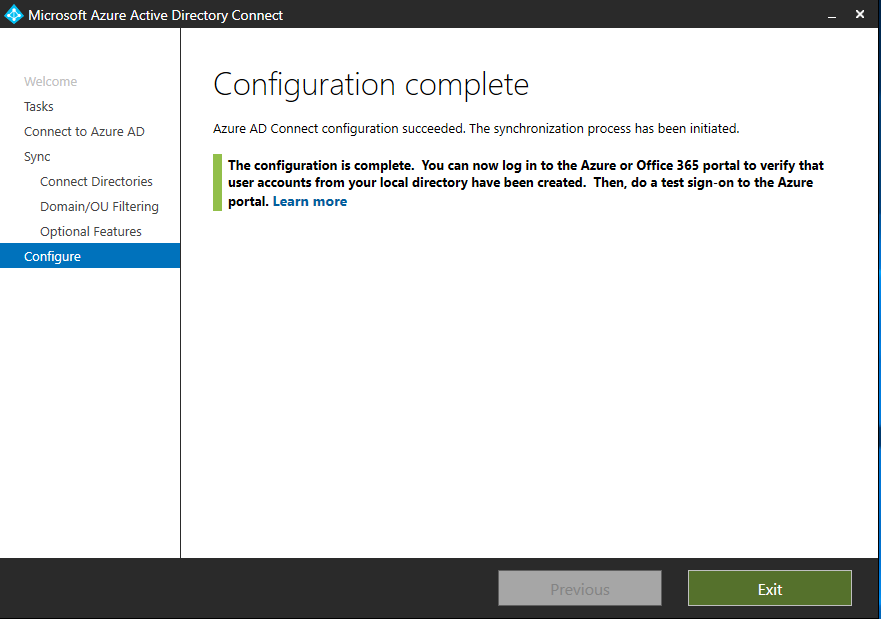
AD Connect will now synchronise objects from both domains into your Azure AD tenant.
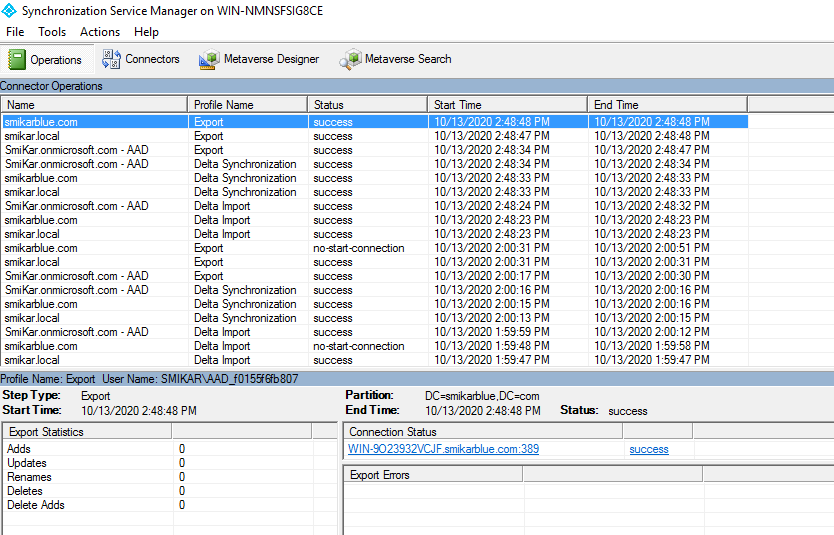
You can monitor the process by launching the AD Connect Synchronization Service Manager.
