by Mark | Mar 10, 2023 | Azure, Azure Blobs, Storage Accounts
As businesses grow, they need more storage space for their data. Azure Geo-Redundant Storage (GRS) is a powerful tool that helps organizations store their data in a secure and efficient way. In this article, we will explore the concept of Azure GRS, its benefits, and how it works.
What is Azure Geo-Redundant Storage (GRS)?
Azure Geo-Redundant Storage (GRS) is a data replication solution that is offered by Microsoft Azure. It is designed to provide high availability and durability for your data by replicating it across two separate locations. GRS provides automatic, asynchronous replication of data between two Azure data centers that are located in different geographic regions.
How does Azure GRS work?
Azure GRS works by replicating your data asynchronously to a secondary region that is hundreds of miles away from the primary region. This ensures that your data is always available, even if a disaster occurs in the primary region. In the event of an outage or disaster in the primary region, the secondary region will take over and provide access to your data.
Azure GRS also provides read access to your data in the secondary region. This means that you can access your data from either region, giving you the ability to create a disaster recovery plan for your data.
What are the benefits of using Azure GRS?
Azure GRS provides several benefits for businesses, including:
High Availability
Azure GRS provides high availability for your data by replicating it to a secondary region. This ensures that your data is always available, even if a disaster occurs in the primary region.
Durability
Azure GRS provides high durability for your data by replicating it across two separate locations. This ensures that your data is safe from any disasters or failures that may occur in a single location.
Read Access
Azure GRS provides read access to your data in the secondary region. This means that you can access your data from either region, giving you the ability to create a disaster recovery plan for your data.
Cost-Effective
Azure GRS is a cost-effective solution for businesses that need to store their data securely. It provides a highly durable and available solution at a reasonable cost.
Azure GRS vs. Azure Read-Access Geo-Redundant Storage (RA-GRS)
Azure Read-Access Geo-Redundant Storage (RA-GRS) is another data replication solution that is offered by Microsoft Azure. It provides the same benefits as Azure GRS, but with the added benefit of read access to your data in the secondary region.
The difference between Azure GRS and RA-GRS is that RA-GRS provides read access to your data in the secondary region, while Azure GRS provides read access only in the primary region. This means that if a disaster occurs in the primary region, you will not be able to access your data until the secondary region takes over.
How to Set Up Azure GRS
Setting up Azure GRS is a straightforward process. You can follow these simple steps to set up Azure GRS for your data:
- Create a new storage account in Azure.
- Choose the GRS replication option when creating the storage account.
- Configure your data to be replicated to the secondary region.
- Set up your disaster recovery plan by configuring your applications to access the secondary region in case of a disaster.
Best Practices for Using Azure GRS
Here are some best practices for using Azure GRS:
| Best Practice |
Description |
Use GRS for mission-critical data
|
Geo-Redundant Storage (GRS) should be used for data that is critical to business operations and cannot be lost under any circumstances. |
Design for resilience
|
Design your storage architecture with resiliency in mind, using multiple redundant copies of data across multiple regions. |
Use replication policies
|
Use replication policies to control how your data is replicated, including the frequency of replication and the regions where data is stored. |
Test disaster recovery procedures
|
Regularly test your disaster recovery procedures to ensure that they work as intended and that your data can be restored in the event of a disaster. |
Monitor your storage infrastructure
|
Monitor your storage infrastructure to detect and address issues before they become critical. Use Cloud Storage Manager to monitor performance, availability, and usage. |
Use encryption
|
Encrypt your data both in transit and at rest to protect against data breaches and unauthorized access. |
Follow security best practices
|
Follow security best practices, including role-based access control, network security, and regular security audits. |
Plan for data growth
|
Plan for data growth and ensure that your storage architecture can scale to accommodate growing data volumes. |
Implement a data retention policy
|
Implement a data retention policy to ensure that data is retained only as long as necessary and is deleted when no longer needed. |
Regularly backup data
|
Regularly backup your data to a secondary location to protect against data loss and ensure that data can be restored in the event of a disaster. |
What are the benefits of Azure GRS?
- High Availability: Azure GRS ensures that your data is always available, even in the event of a disaster. This is because your data is automatically replicated across two separate locations, providing redundancy and failover capabilities.
- Durability: Azure GRS provides high durability for your data. Your data is replicated asynchronously to a secondary region, ensuring that your data is safe in case of any disruptions in the primary region.
- Cost-effective: Azure GRS is a cost-effective solution for businesses that need to store their data securely. With GRS, you only pay for the storage capacity that you use, and there are no upfront costs or termination fees.
- Read Access: Azure GRS provides read access to your data in the secondary region, allowing you to access your data even if the primary region is down.
Azure GRS FAQs
What is the difference between Azure GRS and Azure RA-GRS?
Azure GRS provides automatic, asynchronous replication of data between two Azure data centers that are located in different geographic regions, while Azure RA-GRS provides the same benefits with the added benefit of read access to your data in the secondary region.
Can I use Azure GRS for my backups?
Yes, Azure GRS is a suitable option for backing up your data in case of accidental deletion or data corruption.
How does Azure GRS ensure high availability for my data?
Azure GRS replicates your data across two separate locations, ensuring that your data is always available even if there is a disruption in the primary region.
Can I choose which secondary region my data is replicated to?
No, Azure automatically chooses the secondary region that is at least 400 miles away from the primary region.
What happens if there is a disaster in both the primary and secondary regions?
In the unlikely event that both the primary and secondary regions are affected by a disaster, Azure offers a third option called Azure Read-Access Geo-Redundant Storage (RA-GZRS), which replicates your data to another region that is even farther away from the primary and secondary regions.
How can I find how much data I have in my Storage Accounts?
Use Cloud Storage Manager to understand how much Azure Storage you are using, and where you can save money.
Overall, Azure GRS is a powerful solution that offers high availability, durability, and cost-effectiveness for businesses that need to store their data securely. By following best practices and setting up a disaster recovery plan, businesses can ensure that their data is always available, even in the event of a disaster.
Azure GRS Conclusion
Azure Geo-Redundant Storage is a powerful solution for businesses that need to store their data securely and ensure high availability and durability. By following best practices for using Azure GRS and setting up a disaster recovery plan, businesses can ensure that their data is always available, even in the event of a disaster.
Azure Storage Unlocked
Please fill out the form below to get our free Ebook "Azure Storage Unlocked" emailed to you
FREE DOWNLOAD

by Mark | Mar 9, 2023 | Azure, Azure Blobs, Storage Accounts
Azure Archive Storage
If you’re looking for a cost-effective way to store your rarely accessed data, Azure Storage Archive might be the perfect solution for you. This cloud-based storage service offered by Microsoft Azure provides an affordable and secure option for archiving data that is not frequently used, yet still requires retention for compliance reasons.
In this article, we’ll dive deep into Azure Storage Archive, discussing its features, benefits, and how it compares to other Azure storage options. We’ll also look at how to create an Azure Storage Archive, how to access and manage the archived data, and the costs associated with using this service.
How Azure Storage Archive Works
Azure Archive Storage uses a tiered storage architecture where data is automatically moved to a lower cost tier based on its access patterns. When you store data in Azure Archive Storage, it’s initially stored in a hot or cool storage tier for a specific period before it’s moved to the archive tier. This helps to optimize the cost of storage, as data that’s accessed frequently remains in the hot or cool tier, while less frequently accessed data is moved to the archive tier.
To access data stored in Azure Archive Storage, you need to initiate a retrieval request. The retrieval process may take several hours, depending on the amount of data you’re retrieving and the retrieval option you choose. Azure Archive Storage provides two retrieval options: standard and expedited. Standard retrieval is the default option and takes several hours to complete, while expedited retrieval takes minutes but is more expensive.
Benefits of Azure Storage Archive
Azure Storage Archive offers several benefits that make it an attractive option for organizations that need to retain large amounts of data for long periods of time. Some of the key benefits include:
Cost-effective:
One of the main benefits of using Azure Archive Storage is its cost-effectiveness. It’s a low-cost storage option compared to other storage tiers, making it ideal for storing rarely accessed data that doesn’t need to be immediately available. You can save up to 80% on storage costs compared to other tiers, which can be significant if you’re storing large amounts of data.
Security:
Azure Archive Storage provides several security features to protect your data. It uses server-side encryption to encrypt your data at rest, and SSL/TLS to encrypt data in transit. You can also configure network security groups to restrict access to your data, and use role-based access control (RBAC) to control who can access your data.
Compliant:
Azure Storage Archive helps organizations meet compliance requirements by providing a read-only storage option for archived data that cannot be modified.
Scalablility:
Azure Archive Storage is highly scalable, allowing you to store petabytes of data without worrying about capacity constraints. It’s built on Azure’s global infrastructure, which provides high availability and reliability. You can easily scale up or down based on your storage needs, and pay only for what you use.
Accessible:
Archived data can be accessed through the Azure portal, REST API, Azure Storage Explorer or Cloud Storage Manager, making it easy for organizations to retrieve data when needed.
Use Cases for Azure Storage Archive
Azure Storage Archive is an ideal solution for organizations that need to store large amounts of data for long periods of time, but do not need to access that data frequently. Some common use cases include:
Azure Archive Storage is an ideal solution for meeting regulatory compliance requirements. Many regulations require businesses to retain data for a specified period, and Azure Archive Storage makes it easy to store data for long periods without incurring high costs. You can also set retention policies to ensure that data is not deleted before the required retention period.
Azure Archive Storage can be used for long-term backup and disaster recovery purposes. You can store backups of your data in the archive tier, and retrieve them when needed. In case of a disaster, you can restore your data from the archive tier, which provides an additional layer of protection for your data.
Historical Data:
Organizations that need to retain historical data, such as financial records or customer information, can use Azure Storage Archive to store this data cost-effectively.
Media and Entertainment:
Digital media assets such as photos, videos, and audio files are often stored for long periods and rarely accessed. Azure Archive Storage provides a cost-effective way to store and manage these assets, allowing you to keep them for years while keeping them accessible when needed.
Healthcare data archiving
Healthcare organizations are required to retain patient data for long periods, which can be expensive if stored in higher storage tiers. Azure Archive Storage provides a cost-effective solution for healthcare organizations to store patient data for long periods without incurring high costs.
Azure Storage Price Comparison
Azure Archive Storage is priced based on storage, data retrieval, and early deletion costs.
Storage costs
The storage cost for Azure Archive Storage is $0.00099 per GB per month, which is significantly lower than other storage tiers.
Data retrieval costs
Data retrieval costs depend on the retrieval option you choose. Standard retrieval costs $0.01 per GB, while expedited retrieval costs $0.03 per GB.
Early deletion costs
If you delete data before the minimum retention period, you may incur early deletion costs. Early deletion costs for Azure Archive Storage are $0.01 per GB.
| Azure Storage Tier |
Price per GB/month |
Hot
|
$0.0184 |
Cool
|
$0.0102 |
Archive
|
$0.001 |
As you can see, Azure Archive Storage is significantly cheaper than the other storage tiers, making it an attractive option for storing rarely accessed data for long periods. However, it’s important to keep in mind the access and retrieval costs associated with using Azure Archive Storage.
You can use our Azure Storage Estimator below to give you an estimate of your Azure Costs.
The Azure Storage costs provided are for illustration purposes and may not be accurate or up-to-date. Azure Storage pricing can change over time, and actual prices may vary depending on factors like region, redundancy options, and other configurations.
To get the most accurate and up-to-date Azure Storage costs, you should refer to the official Azure Storage pricing page: https://azure.microsoft.com/en-us/pricing/details/storage/
How to get started with Azure Archive Storage
To get started with Azure Archive Storage, you need to create a storage account and enable the archive tier. You can then upload your data to the archive tier using Azure Storage Explorer, Azure portal, or Azure CLI. Once your data is uploaded, you can retrieve it when needed by initiating a retrieval request.
To move Azure blobs to archive storage, you can follow these steps:
- Log in to your Azure portal and navigate to your Storage account where the blobs are stored.
- Select the container that contains the blobs you want to move to archive storage.
- Click on the “Blob” tab and select the blobs you want to move.
- Click on the “Upload” button and choose “Upload as Archive” option from the dropdown list.
- Specify the destination container for your archive blobs and click “Upload” to start the transfer.
- Wait for the transfer to complete. This process may take some time depending on the size of your blobs and your internet speed.
- Once the transfer is complete, your blobs will now be stored in archive storage.
Note that when blobs are moved to archive storage, they become read-only, meaning you cannot modify or delete them until they are moved back to hot or cool storage. Also, archive storage has a lower access cost compared to hot or cool storage, but a higher data retrieval cost.
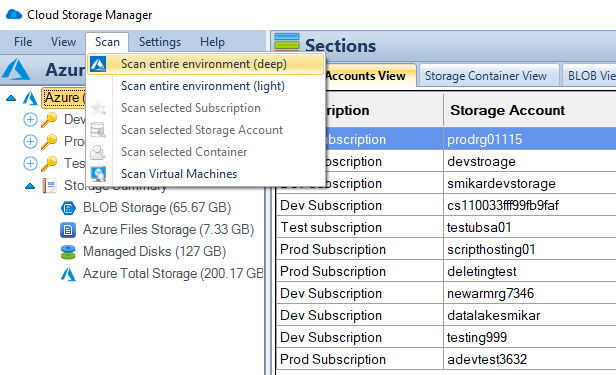
Deep Scan your Azure Storage
Open Cloud Storage Manager and perform a Deep Scan of your environment.
The deep scan interogates every subscription, storage account, container and of course blob file for information.
This information besides the size and metadata will also include what storage tier your blobs reside in.
How to move blobs to archive
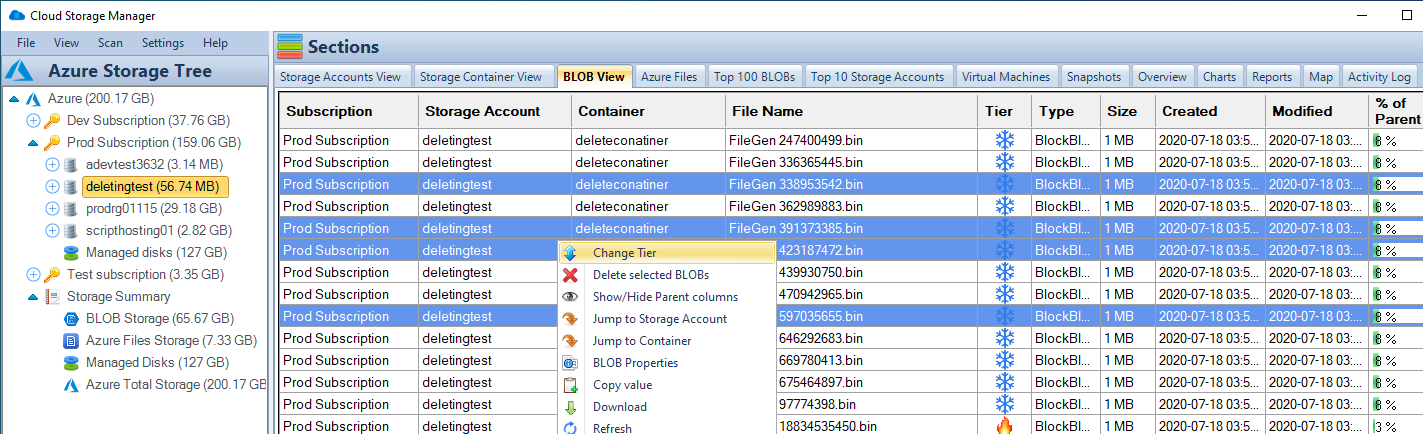
Now that Cloud Storage Manager has completed a Deep Scan of your environment, browse through the Subscription, then storage account and choose the Blob View TAB.
This will show you all the blobs within the selected Storage Account or Container.
To move the blobs to the archive tier, highlight the blobs you need and then right click. (you can highlight multiple ones by holding down the Control or Shift keys)

Select the blobs to archive
Now that Cloud Storage Manager has completed a Deep Scan of your environment, browse through the Subscription, then storage account and choose the Blob View TAB.
This will show you all the blobs within the selected Storage Account or Container.
To move the blobs to the archive tier, highlight the blobs you need and then right click. (you can highlight multiple ones by holding down the Control or Shift keys)

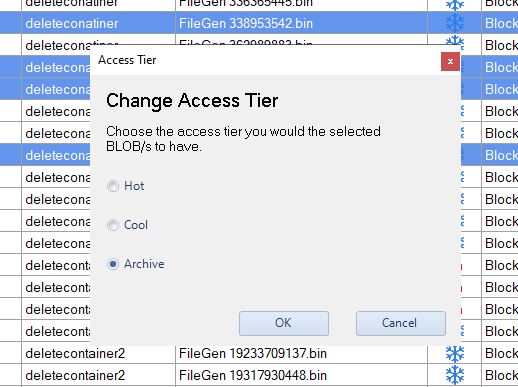
Move blobs to archive
You can now choose what storage tier you want those blobs to go to.
Since we are talking about the Archive Tier, I chose that and clicked on OK.
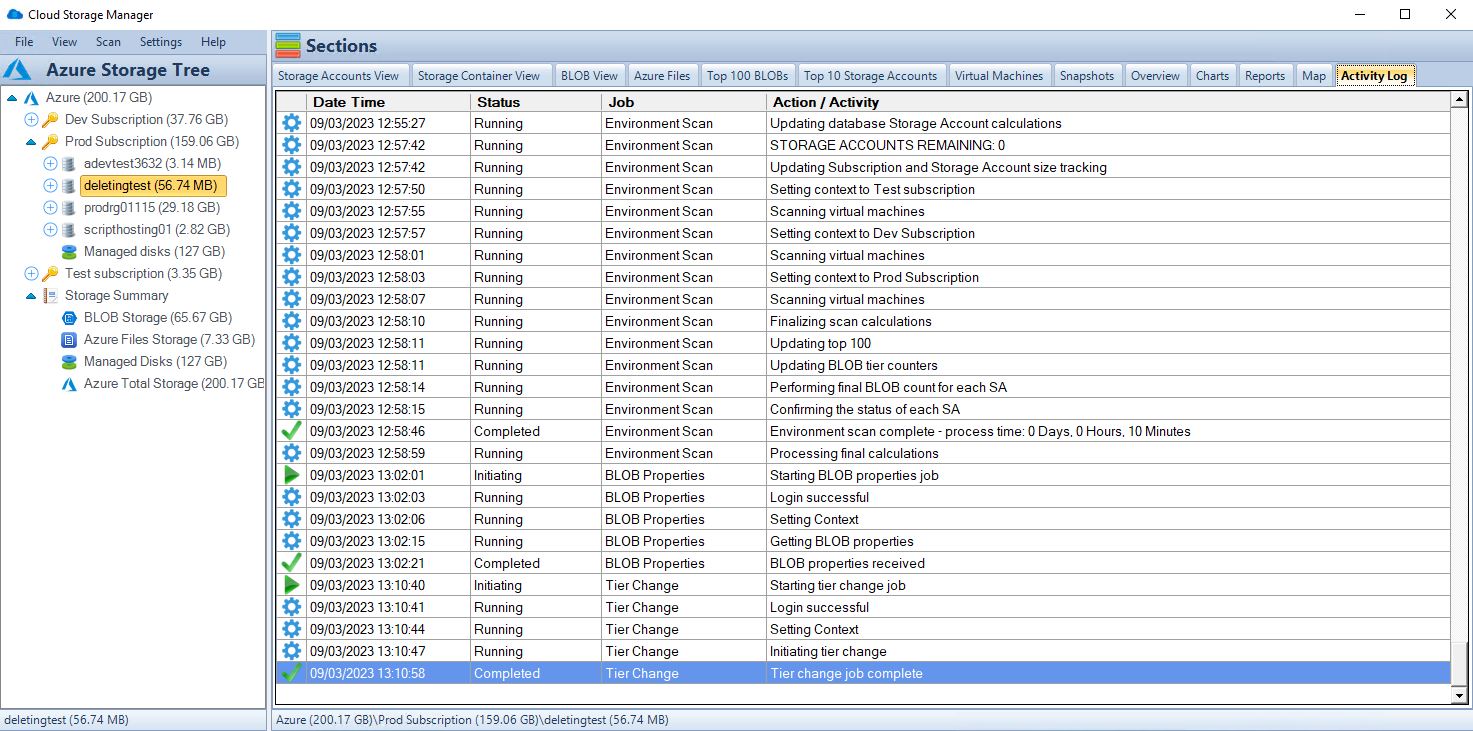
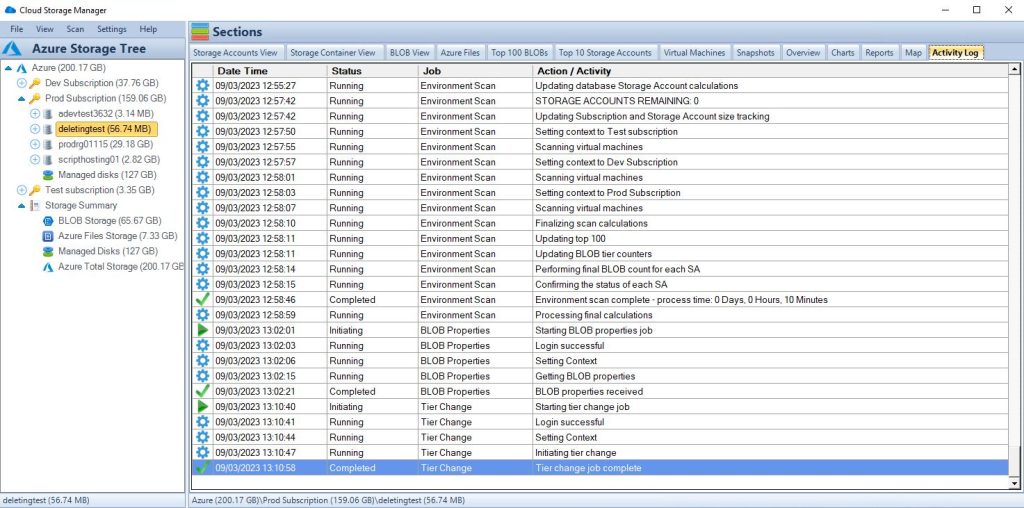
Blobs are now migrating to Azure Archive Storage
Within the ACTIVITY TAB of Cloud Storage Manager, we can see that those blobs are now moving down to the Archive Storage Tier.
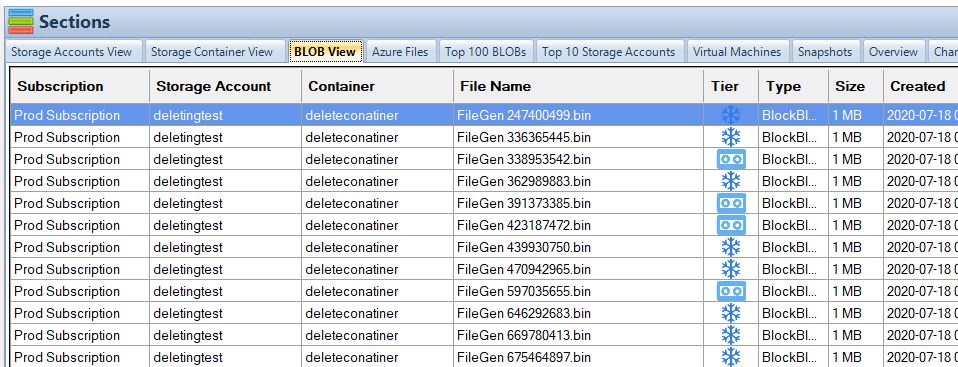
See the Tiering of your Azure Blobs
Now I went back to the Blob View of the selected storage account, and you can see that the blobs that I asked Cloud Storage Manager to move to Archive are now indeed in the Archive Storage Tier.
Accessing and Managing Archived Data
Accessing and managing archived data is also straightforward, with several options available depending on your needs. You can access archived data through the Azure portal, REST API, Azure Storage Explorer or Cloud Storage Manager, and can restore data to the cool or hot tier for faster access if needed. You can also set up lifecycle policies to automatically move data between tiers based on your organization’s retention policies.
Azure Storage Archive FAQs
| FAQ |
Answer |
How does Azure Archive Storage differ from other Azure storage tiers?
|
Azure Archive Storage is designed for storing rarely accessed data for long periods at a lower cost than other storage tiers. However, it has longer retrieval times and higher retrieval costs. |
What is the durability of data stored in Azure Archive Storage?
|
Azure Archive Storage provides eleven 9’s (99.999999999%) durability for data stored in the archive tier. |
Is Azure Archive Storage suitable for compliance purposes?
|
Yes, Azure Archive Storage is an ideal solution for meeting regulatory compliance requirements, as it provides a cost-effective way to store data for long periods while complying with regulatory requirements. |
Can I use Azure Archive Storage for frequently accessed data?
|
No, Azure Archive Storage is designed for storing rarely accessed data for long periods and has longer retrieval times and higher retrieval costs compared to other storage tiers. |
What are the limitations of using Azure Archive Storage?
|
Azure Archive Storage has limitations on the number of transactions, data retrieval rate, and data retention policies. Please refer to the Azure Archive Storage documentation for more information. |
Azure Storage Archive References
Azure Storage Archive Conclusion
Azure Archive Storage is a cost-effective, secure, and reliable solution for storing rarely accessed data for long periods. It provides a low-cost alternative to other storage tiers, making it ideal for compliance purposes, backup and disaster recovery, digital media archiving, and healthcare data archiving. However, it’s important to note that Azure Archive Storage has some limitations and is not suitable for frequently accessed data. If you’re looking for a cost-effective way to store rarely accessed data for long periods, Azure Archive Storage is a great option.
Azure Storage Unlocked
Please fill out the form below to get our free Ebook "Azure Storage Unlocked" emailed to you
FREE DOWNLOAD

by Mark | Mar 8, 2023 | Azure, Azure Blobs, Azure FIles, Azure Queues, Azure Tables, Blob Storage, Storage Accounts
90 things you may not know about Azure Storage
Azure Storage is a cloud-based storage solution that provides secure, scalable, and highly available storage for your data. It is a crucial component of Microsoft’s Azure cloud platform, providing various storage services, including Blob Storage, File Storage, Queue Storage, Table Storage, and Archive Storage. In this article, we’ll take a deep dive into Azure Storage and discuss 90 things you may not know about it.
Azure Storage Overview
Azure Storage is a cloud-based storage solution that provides secure, scalable, and highly available storage for your data. It is a crucial component of Microsoft’s Azure cloud platform, providing various storage services, including Blob Storage, File Storage, Queue Storage, Table Storage, and Archive Storage. In this article, we’ll take a deep dive into Azure Storage and discuss 90 things you may not know about it.
First 10 things about Azure Storage
| Azure Storage Feature |
Azure Storage Type |
| Offers a free tier with limited storage and transaction capacity |
Blob, Table, File, Queue |
| Supports server-side encryption for data-at-rest using customer-managed keys |
Blob, Table, File, Queue |
| Provides different tiers of storage for different use cases and cost-effectiveness |
Blob, Table, File, Queue |
| Supports various types of data, including blobs, tables, files, and queues |
Blob, Table, File, Queue |
| Provides a scalable and reliable platform for storing and retrieving large amounts of unstructured data |
Blob, Table, File, Queue |
| Offers a feature called Azure Import/Export, which enables data transfer using physical media |
Blob |
| Provides a REST API and SDKs for various programming languages |
Blob, Table, File, Queue |
| Allows creating and managing shared access signatures (SAS) for secure access control |
Blob, Table, File, Queue |
| Provides a feature called Azure Data Lake Storage for big data analytics workloads |
Data Lake Storage |
| Supports cross-region replication for disaster recovery and high availability scenarios |
Blob, Table, File, Queue |
20 things about Azure Storage
| Azure Storage Feature |
Azure Storage Type |
| Offers a feature called Azure Blob Storage lifecycle management for automating blob retention and deletion |
Blob |
| Supports virtual network service endpoints for secure access from a virtual network |
Blob, Table, File, Queue |
| Allows setting up Azure Private Link for secure access from an Azure Virtual Network |
Blob, Table, File, Queue |
| Provides a feature called Azure Disk Encryption for encrypting virtual machine disks using customer-managed keys |
Blob, Table, File, Queue |
| Supports soft delete for recovering deleted data within a retention period |
Blob |
| Provides a feature called Azure StorSimple for hybrid storage and backup solutions |
Blob |
| Offers a feature called Azure Queue Storage for reliable message queuing between applications |
Queue |
| Supports automatic tiering between different storage tiers based on access patterns and cost-effectiveness |
Blob |
| Allows setting up custom domain names for storage accounts |
Blob, Table, File, Queue |
| Provides a feature called Azure Backup for backup and recovery of virtual machines, databases, and files |
Blob, Table, File, Queue |
| Supports file shares for NFS 3.0 and SMB 3.0 protocols |
File |
30 things about Azure Storage
| Azure Storage Feature |
Azure Storage Type |
| Provides a feature called Azure File Sync for synchronizing on-premises file servers with Azure Files |
File |
| Offers a feature called Azure Archive Storage for long-term retention of infrequently accessed data |
Blob |
| Provides a feature called Azure Premium Files for high-performance file shares |
File |
| Allows setting up alerts and metrics for monitoring and troubleshooting |
Blob, Table, File, Queue |
| Supports geo-redundant storage for data replication across regions |
Blob, Table, File, Queue |
| Allows setting up lifecycle management policies for automatic data tiering and deletion |
Blob, Table |
| Provides a feature called Azure Data Box for offline data transfer using ruggedized appliances |
Blob |
| Allows setting up read-only access to blob containers and file shares using shared access signatures (SAS) |
Blob, File |
| Provides a feature called Azure AD Authentication for authenticating access to storage accounts using Azure Active Directory |
Blob, Table, File, Queue |
| Supports versioning for blobs, allowing retrieval of previous versions of objects |
Blob |
40 things about Azure Storage
| Azure Storage Feature |
Azure Storage Type |
| Provides a feature called Azure Monitor for centralized monitoring and management of storage accounts |
Blob, Table, File, Queue |
| Allows setting up firewall and virtual network rules for secure access control |
Blob, Table, File, Queue |
| Supports append blobs for efficient and atomic appends to blobs |
Blob |
| Provides a feature called Azure Blob Storage inventory for tracking blob metadata and properties |
Blob |
| Allows setting up bandwidth throttling for limiting data transfer rates |
Blob, Table, File |
| Supports object replication within a region for high availability scenarios |
Blob |
| Provides a feature called Azure AD Domain Services for joining storage accounts to an Azure AD domain |
Blob, Table, File, Queue |
| Allows setting up access tiers for hot, cool, and archive data |
Blob |
| Supports page blobs for efficient random read and write access to data, which makes them ideal for storing VHD files and providing persistent disks for Azure Virtual Machines |
Blob |
| Provides a feature called Azure File Sync cloud tiering for optimizing storage usage on file servers |
File |
50 things about Azure Storage
| Azure Storage Feature |
Azure Storage Type |
| Setting up blob versioning |
Blob Storage |
| Blob tiering |
Blob Storage |
| Azure Blob Storage immutable storage |
Blob Storage |
| Soft delete for blob containers and file shares |
Blob Storage |
| Managed disks for virtual machines |
Blob Storage |
| Azure Blob Storage object replication |
Blob Storage |
| Custom metadata for blobs and files |
Blob Storage |
| Block blobs |
Blob Storage |
| Azure File Sync file locking |
File Storage |
| Setting up access policies for blob containers and file shares |
Blob Storage, File Storage |
60 things about Azure Storage
| Azure Storage Feature |
Azure Storage Type |
| Parallel data transfer |
All |
| Change feed |
Azure Blob Storage |
| Geo-disaster recovery |
All |
| Snapshots |
All |
| Backup Center |
All |
| Blob leasing |
Azure Blob Storage |
| Blob versioning (append blobs) |
Azure Blob Storage |
| Static website hosting |
Azure Blob Storage |
| Access tiers for individual blobs |
Azure Blob Storage |
| Blob properties for metadata and caching |
Azure Blob Storage |
70 things about Azure Storage
| Azure Storage Feature |
Azure Storage Type |
| Azure Blob Storage soft delete |
Blob Storage |
| Shared access policies |
Blob Storage and File Storage |
| Page blob snapshots |
Blob Storage |
| Azure Disk Encryption |
Blob Storage and Managed Disks |
| Blob-level tiering |
Blob Storage |
| Client-side encryption |
Blob Storage |
| Azure Storage Explorer |
Blob Storage |
| Blob versioning for block blobs |
Blob Storage |
| Blob properties |
Blob Storage |
| Azure Import/Export Service |
Blob Storage |
80 things about Azure Storage
| Azure Storage Feature |
Azure Storage Type |
| Setting up access tiers for individual files |
File Storage |
| File properties for specifying file metadata and content encoding |
File Storage |
| Azure Blob Storage lifecycle management for automating blob deletion and tiering |
Blob Storage |
| Setting up file share snapshot policies |
File Storage |
| File lease for exclusive write access to a file |
File Storage |
| Azure Data Box Gateway for accessing Azure Storage from on-premises file servers |
File Storage |
| File-level tiering for optimizing storage usage and cost |
File Storage |
| Client-side encryption for data-in-transit using HTTPS |
File Storage and Blob Storage |
| Azure Blob Storage event grid for triggering events based on blob storage activities |
Blob Storage |
| Setting up file auditing for tracking file share activity |
File Storage |
90 things about Azure Storage
| Azure Storage Feature |
Azure Storage Type |
| File shares for SMB and NFS access |
File Storage |
| Azure Blob Storage metadata indexing for searching blobs using metadata |
Blob Storage |
| Setting up file share quota for limiting file share usage |
File Storage |
| File share properties for specifying file share metadata and caching options |
File Storage |
| Azure Blob Storage blob indexing for searching blobs using content |
Blob Storage |
| Setting up file share snapshots for recovering deleted or modified files within a retention period |
File Storage |
| File lease for exclusive write access to a file share |
File Storage |
| Azure File Sync cloud endpoint for syncing file servers to Azure file shares |
File Storage |
| Setting up file share level tiering for optimizing storage usage and cost |
File Storage |
Azure Storage is a cloud-based storage solution offered by Microsoft Azure that provides various features for storing and managing data in the cloud. These features include blob storage, file storage, and disk storage, as well as other capabilities such as tiering, replication, versioning, and encryption.
By using Azure Storage, businesses can scale up or down their storage requirements as needed, and only pay for what they use. They can also take advantage of features such as geo-replication and disaster recovery, as well as integrate with other Azure services such as Virtual Machines, Azure Data Factory, and Azure Functions.
Overall, Azure Storage offers a flexible and scalable storage solution that can meet the needs of a wide range of applications and workloads.
Azure Storage Unlocked
Please fill out the form below to get our free Ebook "Azure Storage Unlocked" emailed to you
FREE DOWNLOAD

by Mark | Mar 7, 2023 | Azure, Azure Blobs, Azure FIles, Storage Accounts
Key Takeaways
| Topic |
Insight |
| Storage Visibility |
Use Cloud Storage Manager to get a complete view of storage usage across all accounts. |
| Tiered Storage |
Move data to Hot, Cool, or Archive tiers based on how often it’s accessed. |
| Auto-Tiering |
Automate data movement between tiers to save on long-term storage costs. |
| Retention Policies |
Set automatic deletion timelines for stale data to prevent waste. |
| Compression |
Compress data to save space and reduce transfer costs. |
| Monitoring |
Regularly monitor usage to avoid unexpected overages. |
| Excel Exports |
Export reports to Excel for detailed offline analysis or audits. |
| Subscription Breakdown |
See which subscription each storage account belongs to for chargeback clarity. |
| Azure Advisor |
Use recommendations to optimize costs, security, and performance. |
| Security |
Apply access policies and encryption to protect stored data. |
How big are your Storage Accounts?
In today’s digital age, managing data storage has become increasingly important, especially with the growth of cloud-based solutions. Azure Storage Accounts, a cloud-based storage solution provided by Microsoft, offer users a scalable and cost-effective way to store large amounts of data. However, as the amount of data stored in a storage account grows, it becomes crucial to manage the size of the account to optimize cost and performance.
Considering Performance Tiers: When managing Azure Storage Accounts, it’s not just about the size of the storage but also the performance tier. Standard storage is perfect for general-purpose workloads and cost savings, but for applications requiring high-speed data access, Premium storage may be necessary. Understanding the balance between storage size and performance needs can help optimize both cost and efficiency in your Azure environment.
In this article, we will explore how to view the sizes of all Azure Storage Accounts and provide best practices for managing them.
What are the benefits to knowing the size of your Azure Storage Accounts?
- Cost optimization: By understanding how to manage Azure Storage Account sizes, users can optimize their storage environment and reduce storage costs.
- Performance optimization: Users can optimize the performance of their storage environment by understanding how to select the appropriate storage tier and monitoring usage metrics.
- Compliance: Understanding how to view and manage Azure Storage Account sizes can help users ensure they are meeting compliance requirements for data retention and deletion.
- Capacity planning: By monitoring usage metrics and understanding how to manage Azure Storage Account sizes, users can better plan for future storage needs and avoid unexpected storage overages.
- Security: Implementing security best practices, such as configuring access policies and using encryption, can help users protect their data stored in Azure Storage Accounts.
Overall, understanding how to view and manage Azure Storage Account sizes is essential for users who want to optimize their storage environment for cost, performance, compliance, capacity planning, and security purposes.
How to view Azure Storage Account sizes
To view the sizes of your Azure Storage Accounts, you can use Cloud Storage Manager, a powerful tool that enables you to manage all aspects of your Azure Storage environment from a single interface. Here’s how to use Cloud Storage Manager to view Azure Storage Account sizes:
Launch Cloud Storage Manager
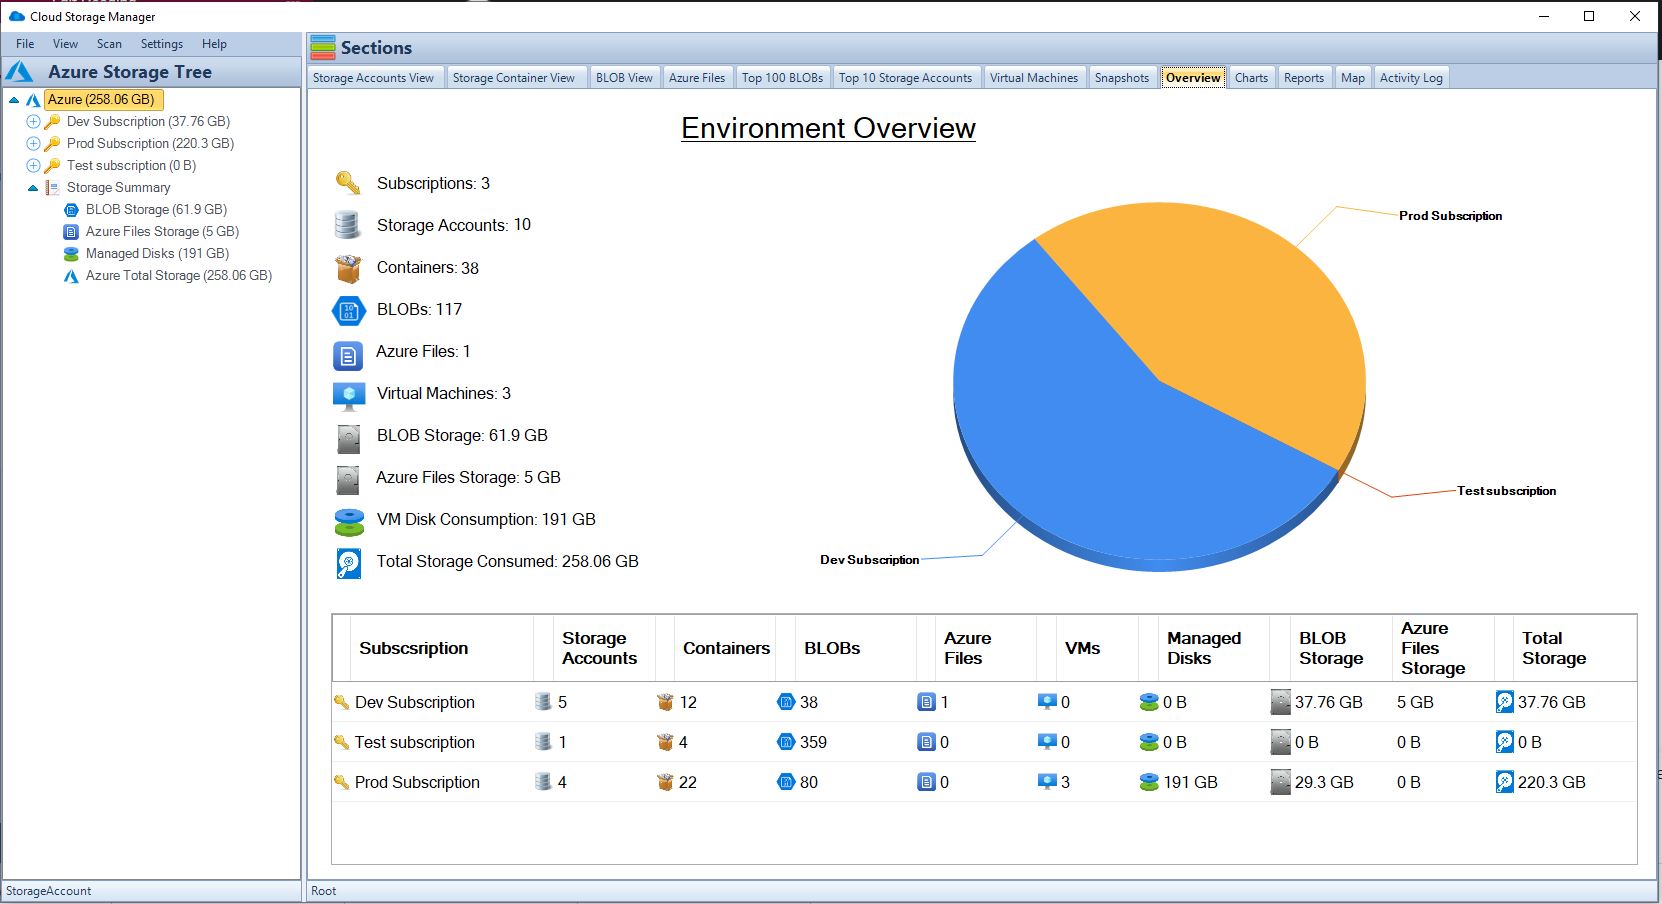
Launch Cloud Storage Manager. From the Overview Tab, you can quickly see how much Azure Storage you are consuming, including the number of Azure Subscriptions, Storage Accounts, Containers, Blobs, Azure Files, your Azure Virtual Machines, and more.

Cloud Storage Manager Reports TAB
Now, since we are trying to find out just how much Azure storage we are consuming across our complete Azure Tenancy, we need to go to the Reports TAB.
Cloud Storage Manager Reporting
Highlight the report named “All Storage Accounts listed by size”
Right click this report and choose Run Report
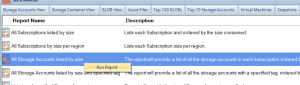
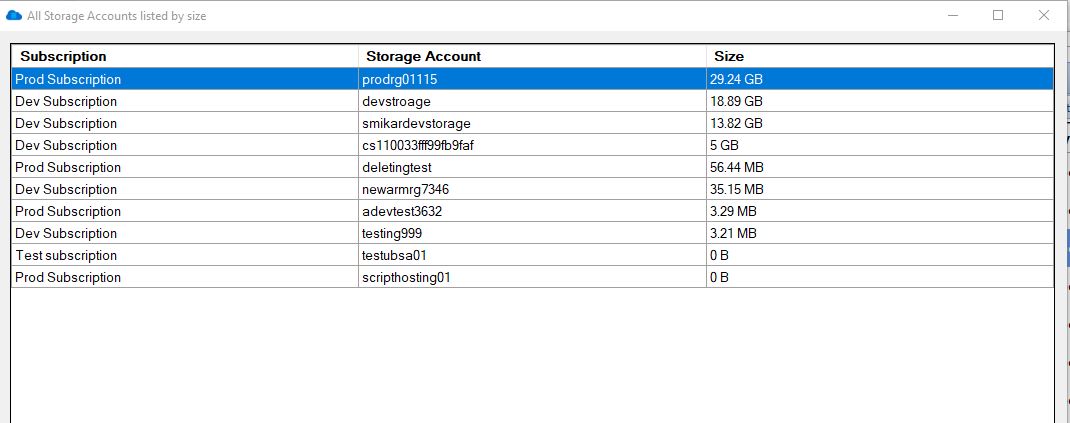
All Storage Accounts listed by Size Report
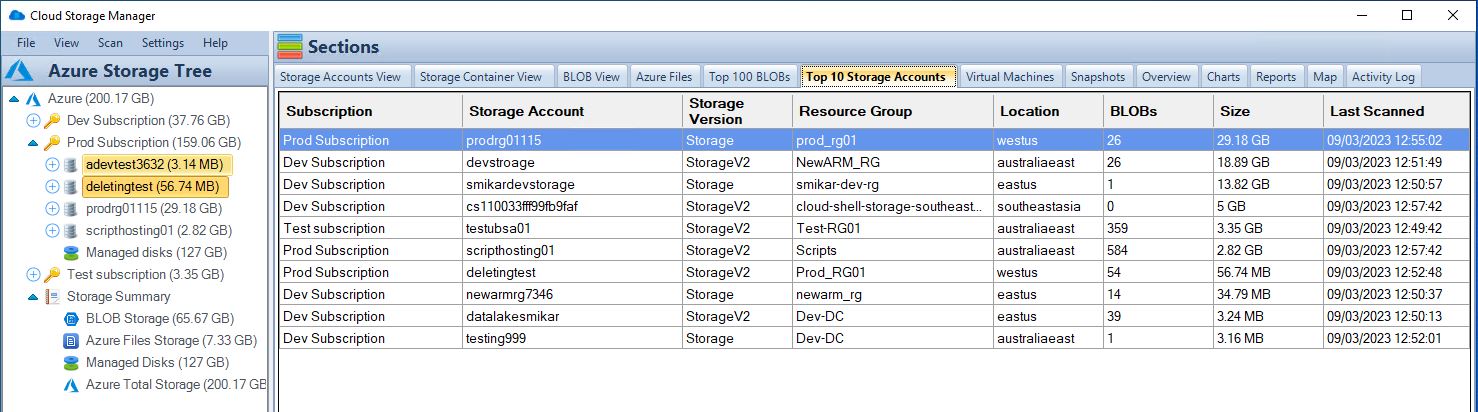
Cloud Storage Manager will now detail all the Storage Accounts you have in Azure, including which subscription they are in, the Storage Account name and most importantly the size.

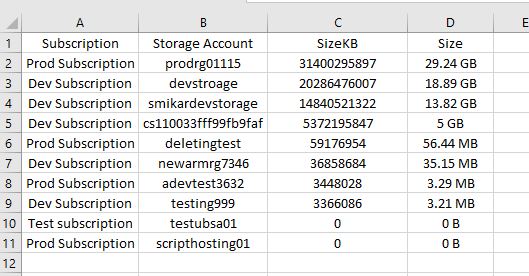
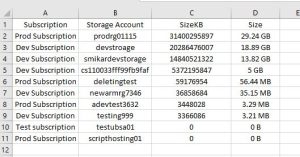
All Storage Accounts listed by Size in Microsoft Excel
As with all our Cloud Storage Manager reports on Azure Storage, you can choose to export this data to Microsoft Excel.
Storage Account Sizes Best Practices
| Best Practice |
Description |
Use tiered storage
|
Azure Storage offers hot, cool, and archive tiers for Blob storage. The hot tier is designed for frequently accessed data, the cool tier for infrequently accessed data, and the archive tier for data that is rarely accessed. By using the appropriate tier for your data based on access patterns and retention requirements, you can save costs by only paying for the storage you need. |
Implement retention policies
|
Setting retention policies for data that is no longer needed ensures that it is deleted automatically after a specified time period. This can help you to avoid incurring unnecessary storage costs for data that is no longer needed. |
Use auto-tiering
|
Azure Blob Storage’s automatic tiering feature automatically moves data to the appropriate tier based on access patterns. This means that frequently accessed data is moved to the hot tier, while infrequently accessed data is moved to the cool or archive tier, depending on the access patterns. This helps to optimize performance and cost. |
Compress data
|
Compressing data before storing it in Azure Storage can save space and reduce costs. Compressed data takes up less storage space and requires less bandwidth to transfer, which can reduce storage and data transfer costs. |
Monitor usage
|
Monitor the usage of your Azure Storage Account with Cloud Storage Manager to ensure you are not exceeding storage limits or incurring unexpected costs. |
Use Azure Advisor
|
Azure Advisor provides personalized recommendations for optimizing your Azure Storage Account. It can provide recommendations on cost savings, security, and performance. By following these recommendations, you can optimize your storage account for your specific use case. |
Follow security best practices
|
Implementing security best practices is important to ensure that your data is protected. This includes configuring access policies, using encryption, and implementing other security measures to protect against unauthorized access. |
Conclusion
Managing Azure Storage Account sizes is essential for optimizing cost, performance, and scalability. By using Cloud Storage Manager and following best practices, you can ensure that your Azure Storage environment is optimized for your specific use case. With Cloud Storage Manager, you can easily view and manage the size of your Storage Accounts, making it simple to optimize storage usage and reduce costs. Start managing your Azure Storage Account sizes today and enjoy a more efficient and cost-effective storage environment.
Azure Storage Unlocked
Please fill out the form below to get our free Ebook "Azure Storage Unlocked" emailed to you
FREE DOWNLOAD
Frequently Asked Questions (FAQs)
1. Why is it important to track Azure Storage Account sizes?
Storage costs can grow quickly in Azure. Tracking account sizes helps avoid bill surprises, identify unused storage, and improve overall efficiency.
2. How do I find out which storage accounts are using the most space?
Use Cloud Storage Manager’s “All Storage Accounts Listed by Size” report to see usage by account, subscription, and container.
3. What types of Azure storage are included in this report?
The tool reports on Blob storage, Azure Files, and associated container usage across all subscriptions you connect.
4. Can I export Azure storage size data for reporting?
Yes. Cloud Storage Manager allows exporting any report—including storage size breakdowns—to Microsoft Excel.
5. Does Azure provide native reports like this?
Not with the same depth or usability. Azure Portal provides limited views, but Cloud Storage Manager gives detailed, actionable insights.
6. What is Azure’s tiered storage model?
Azure offers Hot, Cool, and Archive tiers for Blob storage. The Hot tier is for frequent access, while Cool and Archive are for less frequent access at lower costs.
7. How does auto-tiering work in Azure?
Auto-tiering automatically moves blobs between tiers based on access patterns—ensuring you only pay for what you need.
8. Are there security considerations when managing storage?
Yes. Always configure access controls, enable encryption at rest and in transit, and audit storage regularly for unusual access patterns.
9. How can I reduce my Azure storage bill?
Use tiered storage, delete old data using retention policies, compress files, and use tools like Cloud Storage Manager to spot inefficiencies.
10. Is Cloud Storage Manager a Microsoft tool?
No. It’s a SmiKar Software tool designed to give deeper insights and control over your Azure storage than native Microsoft solutions. It is also completely FREE to use.

by Mark | Mar 7, 2023 | Azure, Storage Accounts
Deleted Azure Storage Account Recovery
As a cloud administrator or developer, you may have accidentally deleted a storage account containing critical data. Losing important information can be a frustrating and costly experience. Fortunately, Azure provides several ways to recover a deleted storage account. In this article, we will discuss the steps involved in recovering a deleted storage account in Azure.
Azure Storage Accounts provide a reliable and scalable solution for storing unstructured data in the cloud. A storage account is a logical container for data objects such as blobs, files, tables, and queues. Accidental deletion of a storage account can result in the loss of critical data, which can have severe consequences for businesses. In this article, we will explore the steps involved in recovering a deleted storage account in Azure.
Understanding Azure Storage Accounts
Azure Storage Accounts are the basic building blocks for storing data in Azure. There are four types of storage accounts in Azure: General-purpose v2 storage accounts, General-purpose v1 storage accounts, Blob storage accounts, and Premium performance v2 storage accounts. Each storage account has a unique name that is used to access its data objects. Azure storage accounts provide several features, such as data replication, scalability, and security.
- General-purpose v2 storage accounts
- General-purpose v1 storage accounts
- Blob storage accounts
- Premium performance v2 storage accounts
Each storage account has a unique name that is used to access its data objects. Azure storage accounts provide several features, such as data replication, scalability, and security.
Reasons for Deleting a Storage Account
There can be various reasons for deleting a storage account in Azure, such as:
- The storage account is no longer required.
- The storage account is not compliant with organizational policies.
- The storage account contains sensitive data that needs to be deleted.
- Accidental deletion by a user.
Regardless of the reason, it is important to have a plan in place for recovering a deleted storage account in case of accidental deletion.
Steps to Recover a Deleted Storage Account
Azure provides a mechanism to recover a deleted storage account within a specified time frame. The recovery period for a storage account is determined by the type of storage account and the subscription type. Here are the steps to recover a deleted storage account:
Step 1: Check the Recovery Period
The first step in recovering a deleted storage account is to check if the recovery period has not expired. Azure provides a default recovery period of 14 days for all types of storage accounts. The recovery period can be extended up to 90 days for general-purpose v2 storage accounts and up to 365 days for blob storage accounts. To check the recovery period for a storage account, follow these steps:
- Log in to the Azure portal.
- Click on the Storage accounts menu item in the left-hand pane.
- Click on the Deleted accounts tab to view the list of deleted storage accounts.
- Check the status of the deleted storage account. If the status is “deleted,” the storage account can be recovered.
- Check the recovery period for the storage account. If the recovery period has not expired, the storage account can be recovered.
Step 2: Restore the Storage Account
The second step in recovering a deleted storage account is to restore the account. To restore a deleted storage account, follow these steps:
- Select the deleted storage account from the list of deleted accounts.
- Click on the Restore button at the top of the page.
- In the Restore Account pane, review the details of the storage account, such as the account name, type, and location.
- Click on the Restore button to start the recovery process.
- The restored storage account will appear in the list of storage accounts once the recovery process is complete.
Alternative Method to Recover a Deleted Storage Account
If the recovery period has expired, or if the storage account cannot be recovered using the previous method, there is an alternative method to recover the account. This method involves contacting Azure support to recover the account. To recover a deleted storage account using Azure support, follow these steps:
- Log in to the Azure portal.
- Click on the Help + support menu item in the left-hand pane.
- Click on the New support request button at the top of the page.
- In the Basics tab, select the subscription that contains the deleted storage account.
- In the Issue type tab, select “Storage accounts” and “Recover deleted storage account.”
- Fill out the details of the support request, such as the deleted storage account name and the reason for the recovery request.
- Submit the support request.
Azure support will review the support request and initiate the recovery process. The recovery process may take several hours to complete.
Best Practices to Avoid Accidental Deletion of Storage Accounts
Accidental deletion of a storage account can be avoided by following these best practices:
- Use role-based access control (RBAC) to restrict access to storage accounts.
- Use resource locks to prevent accidental deletion of storage accounts.
- Use Azure Backup to create regular backups of storage accounts.
- Use Azure Resource Manager templates to deploy storage accounts with predefined configurations.
Azure Storage Account Deletion RABC
To prevent accidental deletion of storage accounts using Role Based Access Controls, here are some guiding principles;
| Prevention Method |
Description |
Example |
Role-based access control (RBAC)
|
Assign appropriate access roles to users and groups to limit their permissions on the storage account. |
Assign a user with the “Contributor” role instead of “Owner” to restrict their ability to delete the storage account. |
Resource locks
|
Use locks to block users from deleting a resource, even if they have the necessary permissions. |
Apply a “CanNotDelete” lock on the storage account to prevent accidental deletion. |
It’s important to note that RBAC can be used not only to prevent accidental deletion, but also to restrict other types of operations on the storage account, such as reading or modifying data. Resource locks are specifically designed to prevent deletion and can be applied at the resource group or resource level.
Here’s a table that of the different RBAC roles and their permissions in Azure:
| RBAC Role |
Description |
Permissions |
Owner
|
Has full access to all resources and can manage access to resources |
Can create, read, update, and delete all resources and assign access to others |
Contributor
|
Can create and manage all types of resources but cannot grant access to others |
Can create, read, update, and delete all resources, but cannot assign access to others |
Reader
|
Can view existing resources but cannot make any changes |
Can only read existing resources |
User Access Administrator
|
Can manage user access to Azure resources |
Can assign roles to users and groups to control access to resources |
Security Administrator
|
Can manage security-related operations |
Can manage security-related resources like security center, key vaults, and Azure AD security solutions |
Network Contributor
|
Can manage network-related resources like virtual networks, network security groups, and IP addresses |
Can create and manage network-related resources |
And here’s a table that explains the different types of resource locks in Azure:
| Resource Lock Type |
Description |
CanNotDelete
|
Prevents the deletion of a resource or resource group |
ReadOnly
|
Prevents any modification of a resource, but allows for reading |
DoNotDelete
|
Similar to CanNotDelete, but also prevents the deletion of any child resources |
ReadOnlyWithCanNotDelete
|
Combination of ReadOnly and CanNotDelete |
Azure Storage Account Deletion FAQs
| Question |
Answer |
|
|
A storage account in Azure is a secure and scalable cloud storage solution for data objects, such as blobs, files, queues, tables, and disks. |
|
|
To create a storage account in Azure, log in to the Azure portal, select “Create a resource,” search for “Storage account,” and follow the prompts to configure the storage account. |
|
|
You can access your storage account in Azure using the Azure portal, Azure Storage Explorer, Azure PowerShell, or Azure CLI. |
What is the recovery period for a deleted storage account in Azure?
|
The recovery period for a deleted storage account in Azure is between 0 and 14 days, depending on the type of storage account. |
How do I recover a deleted storage account?
|
You can recover a deleted storage account in Azure by using the recovery period or by contacting Azure support. To use the recovery period, go to the deleted storage account and select “Recover.” To recover a storage account using Azure support, log in to the Azure portal and submit a support request. |
How do I recover a deleted container in Azure storage?
|
You can recover a deleted container in Azure storage by using the Azure portal or the Azure Storage Explorer. To recover a container in the Azure portal, go to the deleted container and select “Undelete.” To recover a container in the Azure Storage Explorer, right-click on the deleted container and select “Undelete.” |
What is soft delete in storage account?
|
Soft delete is a feature in Azure storage accounts that allows deleted data to be retained for a specific period of time. During this time, the data can be recovered in case of accidental deletion. Soft delete can be enabled for blob storage accounts and file storage accounts. |
What is the purpose of soft delete?
|
The purpose of soft delete is to prevent accidental data loss and to provide an option for data recovery in case of accidental deletion. Soft delete also allows users to comply with retention policies and legal requirements for data retention. |
Azure Storage Account Recovery Periods
| Storage Account Type |
Default Recovery Period |
Maximum Recovery Period |
General-purpose v2
|
14 days |
90 days |
General-purpose v1
|
14 days |
Not applicable |
Blob storage
|
14 days |
365 days |
Premium performance v2
|
14 days |
Not applicable |
Note that the maximum recovery period can only be extended for certain types of storage accounts. It’s important to check the recovery period for a deleted storage account before attempting to recover it.
Azure Storage Account Deletion Further Reading
If you would like to know more about Storage Accounts, visit these sites.
Azure Storage Account Deletion Conclusion
Recovering a deleted storage account in Azure can be a challenging and time-consuming task, but it is essential to avoid data loss. Azure provides several mechanisms to recover a deleted storage account, such as the recovery period and Azure support. It is important to follow best practices to avoid accidental deletion of storage accounts and ensure the safety and security of data stored in Azure.
Azure Storage Unlocked
Please fill out the form below to get our free Ebook "Azure Storage Unlocked" emailed to you
FREE DOWNLOAD