In the modern digital age, the allure of cloud computing has been nothing short of mesmerizing. From startups to global enterprises, businesses have been swiftly drawn to the promise of scalability, flexibility, and the potential for reduced capital expenditure that cloud platforms like Azure offer. Considering the diverse Azure VM types and the attractive Azure VMs sizes, it’s easy to understand the appeal. It’s been a digital siren song, echoing the future of enterprise IT infrastructure.
However, as the famous saying goes, “There’s no such thing as a free lunch.” As many businesses have delved deeper into the Azure ecosystem, comparing its offerings to platforms like VMware and Hyper-V, they’ve encountered a series of challenges and realizations. Some enterprises, after evaluating the difference between Hyper-V and VMware, find that the cloud may not always be the silver bullet solution for every IT problem, leading to an emerging trend: Cloud Decommissioning or, more popularly, Cloud Repatriation.
Cloud repatriation is not about dismissing the cloud’s potential but rather reassessing and realigning its role in the broader IT strategy. It’s about understanding that while the cloud offers many advantages, there’s also significant merit in decentralizing cloud resources, migrating Azure VMs back to platforms like VMware, or even simply understanding how to download an Azure VM. And when we talk about data and sustainability, some businesses are even looking towards solutions like Carbon to drive their decisions.
As IT professionals and business leaders, equipped with the best Hyper-V practices, it’s crucial to recognize and weigh the benefits of both worlds. This article aims to shed light on the reasons behind the growing wave of businesses considering an exit from Azure and the broader implications of such a decision.
Carbon Hypervisor Screen
Understanding the ‘Why’ Behind Cloud Repatriation
At its inception, cloud computing was heralded as the future, the next evolution of IT infrastructure. Azure, with its extensive range of services from databases to machine learning tools, captured a significant chunk of the market share. Businesses, entranced by the vast array of Azure VM types, were quick to move their on-premises data to Azure cloud platforms. Yet, as the cloud landscape matured and the nuances of cloud integration became apparent, there emerged a subtle shift in perspective. This has culminated in the increasing prominence of cloud repatriation.
But what factors have influenced this shift?
Cost Considerations
One of the primary attractions of cloud services was potential cost savings. However, a deeper dive reveals a more nuanced picture. Over time, the operational costs of running services on Azure, especially when looking at specific Azure VMs sizes, might exceed that of running similar services in an optimized on-premises environment. While upfront costs are lower, businesses often find that they end up paying more in the long run, especially when they don’t fully utilize reserved resources or inadvertently opt for cost-inefficient services.
Performance and Latency
Azure’s global infrastructure promises low-latency access to its services. Yet, for certain applications, particularly those with heavy data-processing needs, a round-trip to the cloud and back can introduce performance lags. This becomes especially pertinent when comparing Azure with local solutions like VMware and Hyper-V. An on-prem solution, particularly when optimized with Hyper-V best practices, might provide businesses with the edge they need in performance-sensitive scenarios.
Security and Compliance
Azure offers robust security features. However, for industries with stringent regulatory requirements, sometimes, having data closer to home in a data center they control is more reassuring. While Azure provides tools to ensure compliance, the dynamic and shared nature of the cloud environment can sometimes make it more challenging to guarantee that all regulatory nuances are consistently addressed.
Data Sovereignty and Control
In a world where data is king, maintaining control over it is paramount. Moving to the cloud means relinquishing some level of control. And for organizations that prioritize data sovereignty, this can be a significant drawback. The ability to download an Azure VM or migrate Azure VMs to platforms like VMware offers a means to ensure that control remains firmly in hand.
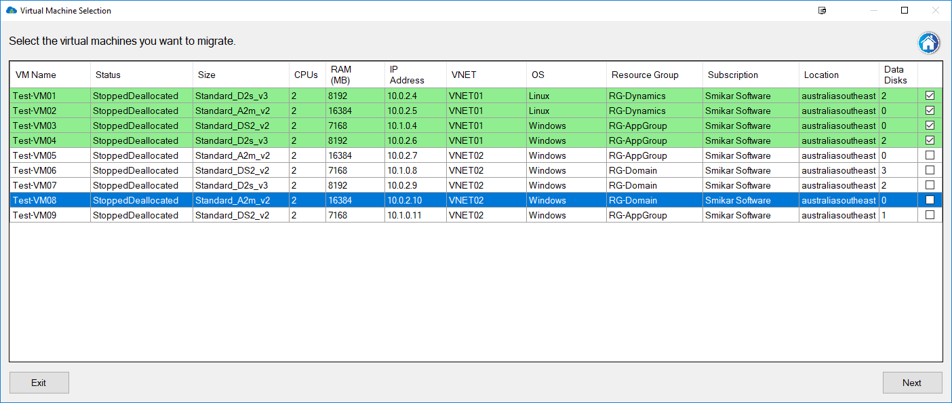
Carbon Azure VM Selection Screen
Navigating the Cloud Exit Strategy
Embarking on a journey away from the cloud isn’t a simple reversal of the initial migration. It requires an intricate, well-thought-out strategy, lest businesses face disruptions, data loss, or financial pitfalls.
The Importance of a Robust Cloud Exit Strategy
Just as you wouldn’t venture into a business deal without an exit plan, diving into cloud services without a cloud exit strategy can be risky. Such a strategy is a safeguard. It ensures businesses can transition smoothly without compromising on data integrity or facing extended downtimes. This approach is even more critical when considering the various intricacies involved in migrating Azure VMs back to platforms like VMware.
Key Components of a Successful Strategy
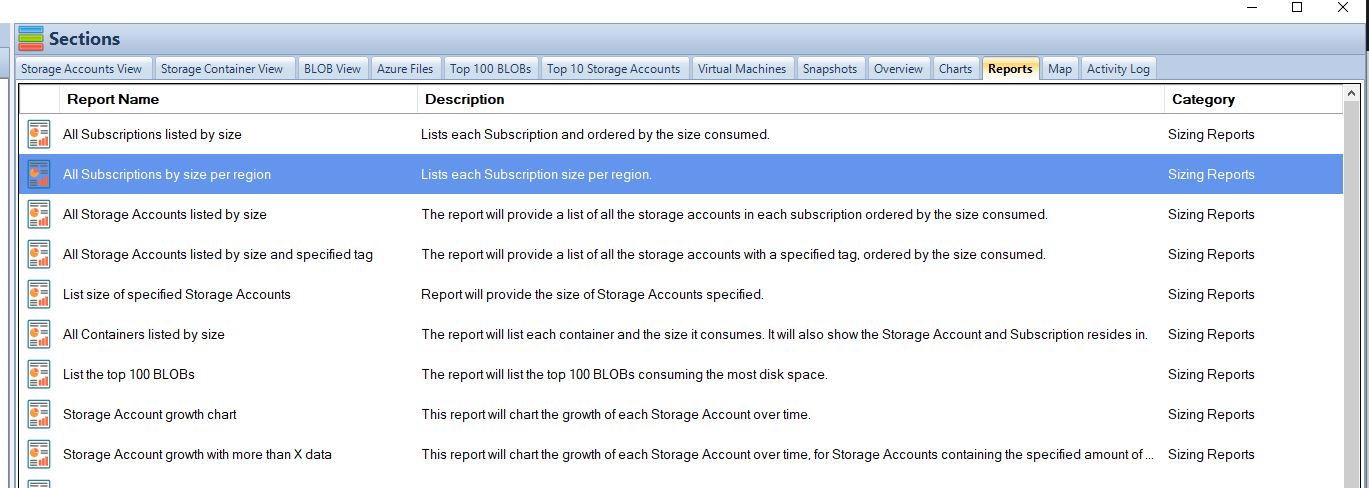
Data Backup and Integrity: Before initiating the transition, ensure all data is backed up. Tools like Carbon can assist in ensuring data sustainability and integrity throughout the process.
Resource Mapping: Understand the resources currently used in Azure, from the specific Azure VM types to other services. This will guide the selection of appropriate equivalents in the on-prem environment.
Stakeholder Communication: All relevant departments should be looped into the transition plan. This ensures minimal disruption to business processes and allows departments to prepare and adapt accordingly.
Training and Upskilling: Transitioning might require the IT team to familiarize themselves with platforms like Hyper-V. Leveraging best practices for Hyper-V can expedite this learning curve.
Continuous Monitoring: The decommissioning process should be closely monitored to quickly address any issues that arise, ensuring a smooth transition.
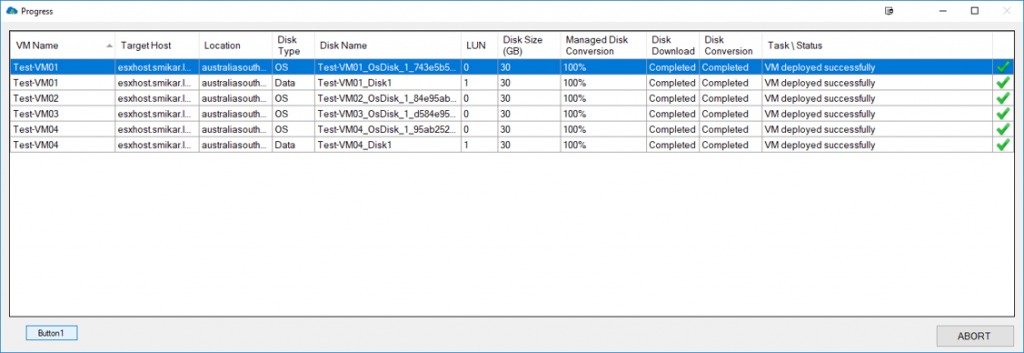
Carbon Azure VM Details
The Practicalities of Cloud-to-Data Center Migration
Moving away from Azure to an on-prem solution isn’t just about the strategy; it’s about the hands-on, practical steps that make the strategy come to life.
Key Stages in Migration
Assessment: Gauge the current Azure infrastructure. Utilize tools that detail how to download an Azure VM or understand specific Azure VM sizes to ascertain what’s required in the on-prem setup.
Planning: Based on the assessment, draft a clear, step-by-step migration plan. This will involve selecting the right on-prem hardware, setting up data storage, and ensuring network readiness.
Execution: With tools and guidelines, such as migrating Azure VMs to VMware, execute the migration, making sure to continuously back up data to prevent any loss.
Testing: Before going live with the new system, thorough testing is essential. This ensures all applications function correctly, and data is accessible and intact.
Go Live: Once satisfied with the test results, transition fully to the on-prem system.
Potential Pitfalls and Overcoming Them
Downtime: One of the most significant concerns is downtime during migration. This can be mitigated by scheduling migrations during off-peak hours or maintaining a parallel run of essential services until the on-prem system is fully operational.
Data Loss: As mentioned earlier, continuous backups and tools like Carbon can be instrumental in preventing data loss.
Incompatibility Issues: When transitioning from Azure, some services or applications may not have direct on-prem equivalents. Thorough testing and perhaps the use of middleware can help bridge any compatibility gaps.
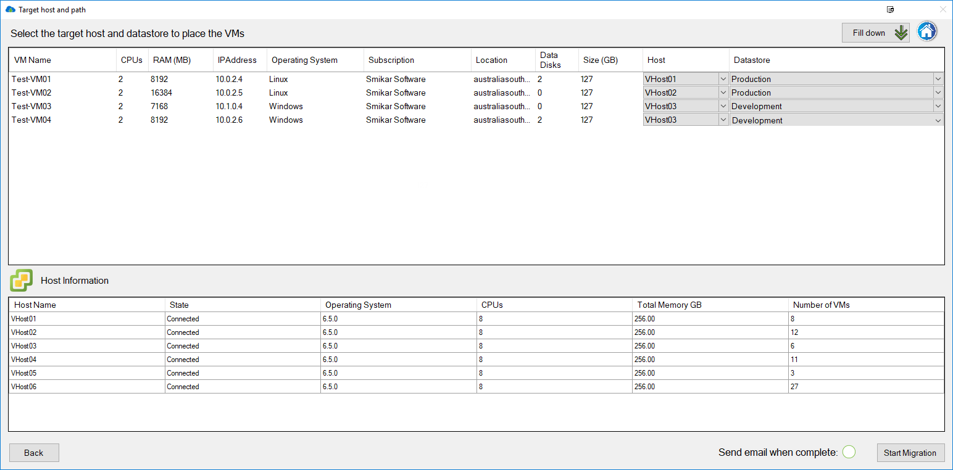
Exiting the cloud isn’t a sign of stepping back but rather a strategic move towards optimization and enhanced control. As we’ve explored so far, while Azure and other cloud services have their undeniable merits, there are compelling reasons and practical methods to transition back to on-prem solutions, ensuring businesses maintain agility, control, and efficiency in their operations.
Carbon Azure Migration Progress Screen
The Impetus Behind Decentralizing Cloud Resources
The wave of decentralization isn’t just a mere reactionary trend against the cloud’s perceived limitations. It is an affirmation of the need for greater control, flexibility, and strategic diversification in IT infrastructures.
The Power of Decentralization
Localized Control: Decentralizing resources means companies can have hands-on control over their data and applications. This control often translates into more robust security, quicker access, and more tailored optimizations, especially for businesses bound by stringent regulations or those operating in niche sectors.
Resource Optimization: With on-prem solutions, companies can customize their resource allocation based on their unique needs rather than being bound by pre-determined Azure VM sizes or types. This flexibility often leads to better resource utilization and cost savings.
Enhanced Resilience: Decentralization, particularly when combined with cloud solutions in a hybrid model, can offer better resilience against failures. If one part of the infrastructure encounters issues, the rest can continue operating without major disruptions.
The Evolution from Cloud Backhauling
Cloud Backhauling refers to the practice of routing data traffic from branch offices or remote sites through a central data center (often cloud-based) before it reaches its final destination. This approach can introduce latency, especially if the final destination is, in fact, back at the branch or another remote location. By decentralizing resources, companies can circumvent unnecessary backhauls, ensuring efficient data routing and faster access times.
The Art of De-clouding: A Forward-Thinking Strategy
While the term “De-clouding” might sound regressive, it is, in many ways, a progressive strategy, particularly in a world where IT landscapes are becoming increasingly diverse and hybridized.
Reverting from Cloud: This isn’t about going backward but rather about moving forward with more autonomy and precision. Companies are not just reverting from the cloud; they are strategically choosing which components to house on-prem and which to retain in the cloud, achieving the best of both worlds.
Business-Centric Approach: De-clouding allows businesses to align their IT strategies more closely with their core business objectives. Instead of adapting business goals to fit within the constraints or costs of cloud solutions, companies can mold their IT infrastructure to support their primary business goals directly.
Preparation for Future Innovations: By not being wholly reliant on external cloud providers, businesses can nimbly adapt to new technological innovations. Whether it’s integrating cutting-edge hardware or pioneering software solutions, an on-prem or hybrid environment can often be more accommodating of rapid, groundbreaking changes.
Conclusion
The shift towards cloud computing, led by giants like Azure, marked a significant milestone in IT history. The scalability, flexibility, and cost-saving promises of the cloud have revolutionized how businesses perceive and manage their IT infrastructures. Yet, as with all technologies, the cloud isn’t a one-size-fits-all solution. As businesses grow and evolve, so do their needs and priorities.
Cloud-to-Local Transition, or more commonly known as Cloud Repatriation, is a testament to this evolution. It’s a recognition that while the cloud offers myriad advantages, there’s also significant merit in on-prem solutions or a blend of both. As we’ve explored in this deep dive, the reasons for this transition are multifaceted – from cost considerations to performance requirements, from regulatory compliance to data sovereignty concerns.
In the dynamic world of IT, the key to success is adaptability. Whether it’s migrating to the cloud, reverting from it, or adopting a hybrid approach, the end goal remains the same: to support and propel business objectives effectively and efficiently. And in this ever-evolving landscape, the only constant is change.
What is Azure Key Vault?
Azure Key Vault is Microsoft’s dedicated cloud service for securely storing and managing sensitive information like cryptographic keys, secrets, and certificates. It functions as a central vault, safeguarding data through encryption and providing fine-grained access control. Think of it as a digital safe in the cloud, keeping your most sensitive business secrets secure and accessible only by those with the right permissions.
Why Use Azure Key Vault?
In today’s threat-heavy environment, protecting sensitive digital assets is non-negotiable. Key Vault offers peace of mind with built-in security, compliance certifications, and integrations across the Microsoft ecosystem. It’s used by developers, security engineers, and IT admins to manage credentials and keys without hardcoding them into applications, reducing the risk of accidental exposure or attack.
Features, Benefits, and Integration
Key Features and Components
Keys: Encrypt and decrypt data securely with RSA and elliptic curve keys, backed by hardware security modules (HSMs).
Secrets: Store passwords, connection strings, and API tokens with tight access control and audit logging.
Certificates: Manage SSL/TLS certificates for websites and apps with built-in renewal automation.
Integration and Use Cases
Seamlessly integrates with Azure App Service, Azure Kubernetes Service (AKS), Azure Functions, and more.
Compatible with CI/CD pipelines (Azure DevOps, GitHub Actions) for secret injection without storing them in code.
Supports RBAC and managed identities to eliminate the need for manual credential management.
Security & Compliance
FIPS 140-2 Level 2 certified HSMs for key protection.
Supports regulatory compliance such as GDPR, HIPAA, and ISO/IEC 27001.
Provides audit logs through Azure Monitor and integration with Microsoft Sentinel.
Cost-Effective & Scalable
Azure Key Vault pricing is based on operations and storage, making it affordable even for small businesses. It scales automatically with your infrastructure, and you only pay for what you use.
Why It Matters
Key Vault isn’t just about encryption—it’s about enabling secure DevOps, reducing risk, and simplifying compliance in a multi-cloud world.
Looking to tighten your cloud security posture? Use Azure Key Vault to protect secrets across all stages of development—from dev environments to production workloads.
Azure Key Vault Comparison Table
Component
Purpose
Managed By
Common Uses
Keys
Encrypt/Decrypt sensitive data
HSM or Software
Data protection, digital signatures
Secrets
Securely store values
Azure Key Vault
Passwords, API keys, tokens
Certificates
Authentication and trust
Azure Key Vault or external issuer
TLS/SSL, app identity
Best Practices for Using Azure Key Vault
Use managed identities to authenticate without storing credentials in code.
Enable soft-delete and purge protection to prevent accidental data loss.
Set up access policies and role-based access control (RBAC) for granular permissions.
Monitor access and operations with diagnostic logs and alerts.
Ever had a migraine thinking about how to ensure compliance for your Azure Storage Accounts? You’re not alone. Companies worldwide struggle to maintain consistency, especially when it comes to cloud storage. That’s where Azure Policy comes into play. This article is a comprehensive guide that will walk you through everything you need to know about using Azure Policy to enforce compliance on your Azure Storage Accounts.
What is Azure Policy?
Azure Policy is a service in Azure that you use to create, assign, and manage policies. These policies enforce different rules over your resources, ensuring they comply with corporate standards and service level agreements (SLAs). But what exactly does that mean? It means you can prevent users from making mistakes that could lead to security vulnerabilities. For instance, you can enforce rules like geo-redundancy to prevent data loss. This ensures that your data is duplicated in more than one geographical location Learn more about Azure Geo-redundancy.
What is Azure Storage Account?
An Azure Storage Account provides a unique namespace to store and manage Azure Storage data objects. Whether you’re dealing with blob storage, file storage, queues, or tables, everything resides in an Azure Storage Account. To understand how Azure Policy can enforce rules over these storage accounts, it’s essential to comprehend the various types of Azure Storage Accounts and their functionalities.
Types of Azure Storage Accounts
Azure offers several types of storage accounts, each with different features and pricing. Standard storage accounts are ideal for most scenarios, but there are also premium accounts that offer high-performance tiers suitable for specific workloads Learn more about Premium Block Blob Accounts.
Why is Compliance Important?
In a world where data breaches and compliance failures can cost millions, ensuring the integrity and security of your Azure Storage Account is not something to be taken lightly. Utilizing encryption methods and setting up private endpoints are crucial aspects that can’t be ignored. Find out more about Azure Storage Data Encryption.
How Azure Policy Works
Before you dive into setting up an Azure Policy, understanding its core components is crucial. Essentially, Azure Policy works on evaluation logic and enforcement actions.
Evaluation Logic
The evaluation logic of Azure Policy scrutinizes your resources under specific conditions. These conditions are defined in the policy definition, making it easier to categorize and identify non-compliant resources.
Enforcement Actions
The enforcement actions are the steps that Azure Policy takes when a non-compliant resource is detected. These actions can range from simple alerts to automatically modifying resources to become compliant.
Setting Up Azure Policy
Prerequisites
Azure Account Setup
Before embarking on this policy-making journey, it’s crucial to set up your Azure account. If you’re a newcomer to Azure, you’re in luck! Azure offers a generous free trial with a credit line, providing you ample room to experiment. For businesses and seasoned cloud engineers, ensure that your existing Azure account has appropriate permissions to modify or assign policies. Don’t overlook this; you wouldn’t want to realize halfway through that you’re stuck due to insufficient permissions.
The Essentials: Azure CLI and PowerShell
Depending on your preference for graphical interfaces or command lines, you might choose between Azure Portal, Azure CLI, or PowerShell for your activities. Azure CLI and PowerShell are essential tools that offer robust features for users who prefer scripting or want to automate tasks. Installation is straightforward: CLI is a simple download and install operation, and PowerShell modules can be installed directly from the PowerShell console. But remember, these are not just add-ons. These tools are your gateway to Azure’s powerful suite of services, enabling you to execute complex operations with simple commands.
Navigating Azure Policy: Where Do You Start?
The Azure Portal Route
So you’re all set with your Azure account and your toolkit of CLI and PowerShell. What’s the next step? Well, if you’re someone who loves the convenience of a graphical interface, Azure Portal should be your starting point. Once logged in, simply navigate to “Policies” in the left-hand side menu. This is your control center for all things related to Azure Policy. You’ll find options to create, assign, and monitor policies here. Is it beginner-friendly? Absolutely. Is it less powerful than command-line options? Not at all. The Azure Portal is an all-in-one package for both newbies and seasoned cloud engineers.
The Command-Line Aficionados: Azure CLI
For those who lean more towards command-line interfaces, Azure CLI is your playground. Why choose CLI over the Portal? Automation, scripting capabilities, and because nothing beats the granularity of control offered by a good old command-line interface. To get started, launch your terminal and simply type az policy definition list to get a list of all available policy definitions. You’ll be surprised at how much you can do with just a few key commands.
The ABCs of Policy Definitions
Anatomy of a Policy Definition
Here’s where the rubber meets the road. A policy definition describes what your policy is going to do. It’s the DNA, the essential genetic code that specifies what resources will be affected and what actions will be taken. Intricately designed in JSON format, it comprises several key fields: “if,” “then,” and “parameters” to name a few. The “if” field specifies the conditions under which the policy is triggered, and the “then” field lays down the law, outlining what happens when those conditions are met. Understanding these fields is fundamental in crafting effective policies.
The Fields That Make Up a Definition
Confused by the JSON jargon? Don’t be. A policy definition essentially has four major parts:
Mode: Determines what resources are targeted by the policy.
Parameters: Allows for policy customization.
Policy Rule: The crux of your policy, contains “if-then” conditions.
Description and Metadata: Optional but highly recommended for clarity.
Think of these fields like the components of a car engine; each plays a unique role, but together, they power your policy.
Crafting Your Custom Policy: The Art and Science
The Language of JSON
JSON isn’t just a format; it’s the language your policy speaks. The better you are at JSON, the more articulate your policies will be. Imagine JSON as the paintbrush you use to create your policy masterpiece. Don’t fret if you’re not a JSON pro. Azure has tons of templates and examples to guide you. The key to mastering JSON lies in understanding its structure and syntax—objects, arrays, key-value pairs, and so on. The power of JSON comes from its flexibility; you can create intricate conditions and detailed rules that govern your resources just the way you want.
Parameters: The Building Blocks of Flexibility
Parameters in Azure Policy are akin to variables in programming. Why are they so great? Because they make your policies flexible and reusable. Instead of hardcoding values, you can use parameters to make your policy applicable in different contexts. Consider them as the user-defined options in the software of Azure governance. Parameters can range from simple values like strings or integers to complex objects and arrays. Their inclusion makes a policy versatile and dynamic, capable of serving varied operational needs.
The Act of Assigning: Where Policies Meet Resources
Understanding Scope: The When and Where
So, you’ve got your policy defined and ready to go. The next logical step is assigning it, but don’t rush this phase. Understanding the scope of a policy is like knowing where to cast your fishing net; you want to target the right resources without causing collateral damage. In Azure, scope can range from a management group to a single resource. It’s not just about what you’re targeting, but also where in the hierarchy these resources reside. Get the scope wrong, and you might end up applying policies to resources you didn’t intend to affect. In other words, setting the correct scope is like setting the stage before the play begins.
The How-To of Policy Assignment
If you’re a Portal person, go to the “Assignments” tab under “Policies,” select your defined policy, choose the scope, and hit assign. For CLI wizards, the az policy assignment create command will be your best friend. It takes in several parameters like --policy, --name, and --scope to precisely craft your assignment. Whatever route you choose, remember that a policy without an assignment is like a car without fuel; it’s not going anywhere.
Monitoring: The Eyes and Ears of Compliance
Setting Up Alerts: Be in the Know
In the grand theatre of Azure governance, monitoring is like the stage manager who keeps tabs on everything. Once your policies are up and running, you’ll want to know how effective they are. Azure provides built-in compliance data under the “Compliance” tab in the Policy service. If you’re keen on real-time monitoring, consider setting up alerts. Alerts function as your notifications, chiming in whenever there’s a compliance issue. It’s like having a watchdog that barks only when needed, saving you from sifting through endless logs.
Dive Deeper with Azure Monitor
For those who want a more in-depth understanding of their policy landscape, Azure Monitor is a powerful tool. It’s not just about looking at compliance data but diving deep into resource logs to understand the ‘why’ behind the ‘what’. Imagine it like an investigative reporter who digs up the hidden stories in your Azure environment. With Azure Monitor, you get granular data, which can be extremely useful for debugging and auditing.
The ABCs of Policy Definitions
Anatomy of a Policy Definition
Here’s where the rubber meets the road. A policy definition describes what your policy is going to do. It’s the DNA, the essential genetic code that specifies what resources will be affected and what actions will be taken. Intricately designed in JSON format, it comprises several key fields: “if,” “then,” and “parameters” to name a few. The “if” field specifies the conditions under which the policy is triggered, and the “then” field lays down the law, outlining what happens when those conditions are met. Understanding these fields is fundamental in crafting effective policies.
The Fields That Make Up a Definition
Confused by the JSON jargon? Don’t be. A policy definition essentially has four major parts:
Mode: Determines what resources are targeted by the policy.
Parameters: Allows for policy customization.
Policy Rule: The crux of your policy, contains “if-then” conditions.
Description and Metadata: Optional but highly recommended for clarity.
Think of these fields like the components of a car engine; each plays a unique role, but together, they power your policy.
Best Practices: The Dos and Don’ts
Documentation: The Unsung Hero
If you’ve followed through this far, give yourself a pat on the back! However, one last but crucial step remains—documentation. Always document what each policy does, its scope, and any parameters it uses. This is like writing a user manual for someone else who might be navigating your Azure governance landscape. Remember, well-documented policies are as vital as well-crafted ones.
Conclusion
Setting up Azure Policy for storage is not just a one-off task; it’s an ongoing process of fine-tuning your governance strategies. Whether you’re a beginner or a seasoned Azure user, understanding the intricacies of policy definitions, assignments, and monitoring will set you on a path toward a more secure, efficient, and compliant Azure environment. Happy governing!
FAQs
What is Azure Policy?
Azure Policy is a service in Azure that allows you to manage and enforce your organization’s specific requirements, from naming conventions to resource locations.
How do I create a custom policy?
You can create a custom policy by defining it in JSON format and then assigning it to the appropriate scope.
What is scope in Azure Policy?
Scope is the range within your Azure environment where the policy will be applied, ranging from management groups to individual resources.
How can I monitor policy compliance?
You can monitor compliance via the Azure Portal under the “Compliance” tab in the Policy service. For more detailed analysis, Azure Monitor is recommended.
Can I undo a policy assignment?
Yes, you can remove or modify a policy assignment through the Azure Portal or via CLI commands.
Is there anything else you’d like to know? Feel free to ask!
Have you ever wondered how to keep your digital assets truly secure in a world where cyber threats seem to evolve quicker than cybersecurity measures? If so, you might want to consider adopting a Zero Trust security model. Far from being a buzzword, Zero Trust has emerged as a holistic approach to cybersecurity that operates on a straightforward principle: “Never Trust, Always Verify”. It’s a model that doesn’t assume that internal origins of network traffic are any more trustworthy than external ones.
Importance of Zero Trust in Today’s World
Think about the world we live in. From mega-corporations to individual users, everyone is connected. But as Spiderman’s Uncle Ben said, “With great power comes great responsibility.” Connectivity brings along with it an increased risk of security breaches, data leaks, and a whole host of other digital woes. This is why Zero Trust is no longer a luxury or an ‘additional feature’; it’s a necessity. But what exactly does Zero Trust entail, and how did it come to be? Let’s dive in.
The Evolution of Zero Trust
The Traditional Security Model
Picture this: A castle surrounded by a massive wall, complete with watchtowers and a moat. Anything inside the wall is considered safe, while anything outside is potentially harmful. This is how traditional security models operated, treating the internal network as a safe zone. It was as if the security infrastructure said to you, “Don’t worry, you’re inside the castle now. You’re safe here.” But as any historian would tell you, castles have been breached, walls have been scaled, and internal threats exist. Treating the internal network as an entirely safe zone is naive in today’s cyber landscape.
Birth of Zero Trust
Around 2010, the cybersecurity industry started experiencing paradigm-shifting ideas. Among these, Zero Trust emerged as a revolutionary model. Zero Trust does not believe in the concept of a safe zone. To put it simply, in the Zero Trust model, there is no inside or outside the castle. Everyone and everything is considered a potential threat until verified. Now you might be thinking, “That sounds overly cautious!” Well, in the world of cybersecurity, it’s better to be safe than sorry.
Why Zero Trust?
But why the sudden need for such a dramatic change in thinking? One word: Evolution. Just like how animals adapt and evolve to survive better in their environments, cyber threats have evolved to become smarter, sneakier, and more damaging. Traditional security measures, which were once thought to be impenetrable, have shown vulnerabilities. Zero Trust aims to stay ahead of the evolving threats by assuming that the threat is already inside, rather than trying to stop it at the perimeter.
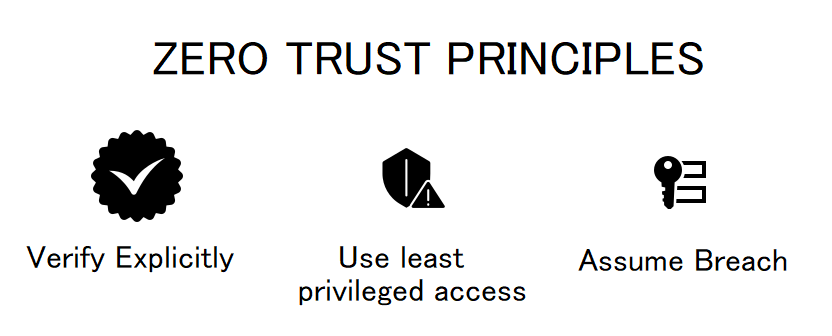
Core Principles of Zero Trust
Never Trust, Always Verify
This phrase isn’t just a catchy slogan; it’s the crux of Zero Trust. The model operates on the premise that every access request, regardless of where it originates from, must be verified. Imagine your network as a high-security vault. Each time someone wants to enter, their identity is thoroughly checked, similar to the layers of security in a vault. Simply put, trust is never assumed; it’s continuously earned and validated.
Least Privilege Access
In a Zero Trust environment, users (or systems) only have the minimum level of access—or permissions—needed to accomplish their tasks. Imagine a museum where each employee has access only to the specific areas they need to do their job. The janitor doesn’t have access to the artifact storage room, and the curator doesn’t have access to the payroll system. The same principle applies in Zero Trust—restricting access to only what is necessary reduces the potential attack surface.
Micro-Segmentation
If you picture your network as a city, would you have just one big wall around it? Probably not. A smarter approach would be to divide your city into smaller sections, each with its own set of walls and watchtowers. This is what micro-segmentation does for your network. It divides the network into smaller, more manageable segments, each with its own set of security controls. This means if an intruder does manage to breach one section, they still can’t access the entire network.
Multi-Factor Authentication (MFA)
Imagine you had a super-secret room in your home. Would you secure it with just a single lock and key? Most likely, you would add several layers of security like a fingerprint scanner, retina display, or even a voice-activated lock. Multi-Factor Authentication (MFA) acts as these additional layers of security in a Zero Trust model. With MFA, simply entering a password isn’t enough. Users are required to provide two or more verification factors to gain access, making it that much more difficult for unauthorized entities to gain access.
Zero Trust Model in Action
How it Works
So you’ve got the core principles down, but how does Zero Trust actually work in a real-world scenario? Imagine a highly sensitive scientific lab. No one gets in or out without multiple levels of verification, and even once inside, access to different areas is restricted based on necessity and role. Your network, in a Zero Trust model, is that lab. Every request to access data is treated as a potential threat until proven otherwise. Verification isn’t a one-time event but a continuous process.
For instance, even if a user successfully logs in, the system continuously monitors their behavior. Do they usually access these types of files? Is this the regular device they use? Is the access request coming from an unusual geographic location? If anything seems out of the ordinary, additional verification is required or access is simply denied. Think of it as a vigilant security guard who not only checks your ID at the door but keeps an eye on you the entire time you’re inside the facility.
The Role of AI and Machine Learning
Zero Trust can sound daunting from an implementation standpoint. That’s where Artificial Intelligence (AI) and Machine Learning come into play. AI algorithms can handle the enormous task of analyzing every data request across complex networks in real-time, flagging inconsistencies, and tightening security measures as needed. It’s like having a team of experts tirelessly working around the clock but condensed into smart, adaptive algorithms. Imagine a security expert who not only knows every individual in the building but also understands their usual behavior, and you’ve got an idea of what AI brings to Zero Trust. This not only boosts security but also streamlines operations by reducing false positives and allowing human teams to focus on more complex tasks.
Real-world Case Studies
Let’s step away from the analogies and look at real success stories. Google’s BeyondCorp is a prime example of Zero Trust architecture. It moves access controls from the network perimeter to individual users and devices, thus making its security more adaptive and perimeter-less. Microsoft’s Azure also uses Zero Trust principles, utilizing Azure Active Directory to verify and secure access to its cloud resources. These tech giants adopting Zero Trust isn’t just a trend; it’s a testimony to the model’s efficacy.
Benefits of Zero Trust
Improved Security Posture
The most glaring and significant advantage of Zero Trust is, of course, a fortified security posture. By operating on a “verify, then trust” model, Zero Trust architecture reduces the risk of both internal and external data breaches. It’s like having a series of complex locks on every door in your house, rather than just the front door. The idea is that even if a cybercriminal or malicious insider gains access to one part of the network, the architecture’s design prevents them from freely moving around.
Business Flexibility and Scalability
In the fast-paced business world, an organization’s agility is its most treasured asset. Zero Trust allows for this flexibility. Need to onboard 50 new remote employees? Zero Trust ensures they can only access what they need to get their job done. Expanding to new regions? Your network scales while keeping each segmented part secure. It’s like a puzzle that expands seamlessly, each piece falling neatly into place.
Compliance and Regulatory Benefits
Let’s not forget the ever-tightening noose of regulations and compliance standards. Standards like GDPR, HIPAA, and PCI-DSS demand stringent security measures, failure to comply with which can result in hefty fines. Zero Trust assists in meeting these standards by its very nature. Because it verifies and encrypts all data, compliance with data protection regulations becomes a less daunting task. Imagine an auditor smiling as they breeze through your security setup; that’s the dream, right?
Challenges and Solutions
Implementation Hurdles
Shifting to a Zero Trust model isn’t a walk in the park. It requires a complete overhaul of your existing security infrastructure, and for large organizations, this can be an enormous task. However, the implementation can be phased, focusing initially on the most sensitive data and progressively extending the architecture across the network. Think of it as renovating a house; you don’t have to tear down the entire thing at once. You can start room by room.
Costs
No sugar-coating here: Implementing Zero Trust can be expensive upfront. However, weigh this against the potential cost of a data breach, and it starts looking like a wise investment. Also, the increasing availability of Zero Trust as a Service (ZTaaS) solutions is making it more affordable and accessible for small to medium-sized businesses.
User Experience
Let’s face it; no one likes extra steps for authentication. However, as people become more aware of the risks involved with lax security, a slightly longer login process is a small price to pay for peace of mind.
Steps to Implement Zero Trust
Assessment
Before diving headfirst into the Zero Trust pool, organizations must assess their existing security architecture. This involves identifying data, assets, and traffic flows. It’s essentially like taking stock before you rearrange the warehouse.
Planning
Next, it’s time to draft a detailed implementation plan. This will act as a roadmap, outlining the steps and phases involved in moving to a Zero Trust architecture.
Execution
With the plan in hand, it’s time to roll up those sleeves and get to work. Execution involves configuring security solutions, setting up new policies, and rolling out network changes.
Monitoring
After the execution phase, your job isn’t done. Monitoring becomes an ongoing process to ensure that the Zero Trust architecture is working as intended and adapting to new threats. Think of it as a self-improving system; the more it learns, the better it gets at keeping threats at bay. With the help of AI and machine learning, you can even set it up to automatically adjust its security protocols based on real-time threat analysis. It’s like having a security guard who not only learns from his experiences but also trains himself to be better every day.
Future of Zero Trust
How it Works
So you’ve got the core principles down, but how does Zero Trust actually work in a real-world scenario? Imagine a highly sensitive scientific lab. No one gets in or out without multiple levels of verification, and even once inside, access to different areas is restricted based on necessity and role. Your network, in a Zero Trust model, is that lab. Every request to access data is treated as a potential threat until proven otherwise. Verification isn’t a one-time event but a continuous process.
For instance, even if a user successfully logs in, the system continuously monitors their behavior. Do they usually access these types of files? Is this the regular device they use? Is the access request coming from an unusual geographic location? If anything seems out of the ordinary, additional verification is required or access is simply denied. Think of it as a vigilant security guard who not only checks your ID at the door but keeps an eye on you the entire time you’re inside the facility.
The Role of AI and Machine Learning
Zero Trust can sound daunting from an implementation standpoint. That’s where Artificial Intelligence (AI) and Machine Learning come into play. AI algorithms can handle the enormous task of analyzing every data request across complex networks in real-time, flagging inconsistencies, and tightening security measures as needed. It’s like having a team of experts tirelessly working around the clock but condensed into smart, adaptive algorithms. Imagine a security expert who not only knows every individual in the building but also understands their usual behavior, and you’ve got an idea of what AI brings to Zero Trust. This not only boosts security but also streamlines operations by reducing false positives and allowing human teams to focus on more complex tasks.
Real-world Case Studies
Let’s step away from the analogies and look at real success stories. Google’s BeyondCorp is a prime example of Zero Trust architecture. It moves access controls from the network perimeter to individual users and devices, thus making its security more adaptive and perimeter-less. Microsoft’s Azure also uses Zero Trust principles, utilizing Azure Active Directory to verify and secure access to its cloud resources. These tech giants adopting Zero Trust isn’t just a trend; it’s a testimony to the model’s efficacy.
Benefits of Zero Trust
Improved Security Posture
The most glaring and significant advantage of Zero Trust is, of course, a fortified security posture. By operating on a “verify, then trust” model, Zero Trust architecture reduces the risk of both internal and external data breaches. It’s like having a series of complex locks on every door in your house, rather than just the front door. The idea is that even if a cybercriminal or malicious insider gains access to one part of the network, the architecture’s design prevents them from freely moving around.
Business Flexibility and Scalability
In the fast-paced business world, an organization’s agility is its most treasured asset. Zero Trust allows for this flexibility. Need to onboard 50 new remote employees? Zero Trust ensures they can only access what they need to get their job done. Expanding to new regions? Your network scales while keeping each segmented part secure. It’s like a puzzle that expands seamlessly, each piece falling neatly into place.
Compliance and Regulatory Benefits
Let’s not forget the ever-tightening noose of regulations and compliance standards. Standards like GDPR, HIPAA, and PCI-DSS demand stringent security measures, failure to comply with which can result in hefty fines. Zero Trust assists in meeting these standards by its very nature. Because it verifies and encrypts all data, compliance with data protection regulations becomes a less daunting task. Imagine an auditor smiling as they breeze through your security setup; that’s the dream, right?
Challenges and Solutions
Implementation Hurdles
Shifting to a Zero Trust model isn’t a walk in the park. It requires a complete overhaul of your existing security infrastructure, and for large organizations, this can be an enormous task. However, the implementation can be phased, focusing initially on the most sensitive data and progressively extending the architecture across the network. Think of it as renovating a house; you don’t have to tear down the entire thing at once. You can start room by room.
Costs
No sugar-coating here: Implementing Zero Trust can be expensive upfront. However, weigh this against the potential cost of a data breach, and it starts looking like a wise investment. Also, the increasing availability of Zero Trust as a Service (ZTaaS) solutions is making it more affordable and accessible for small to medium-sized businesses.
User Experience
Let’s face it; no one likes extra steps for authentication. However, as people become more aware of the risks involved with lax security, a slightly longer login process is a small price to pay for peace of mind.
Steps to Implement Zero Trust
Assessment
Before diving headfirst into the Zero Trust pool, organizations must assess their existing security architecture. This involves identifying data, assets, and traffic flows. It’s essentially like taking stock before you rearrange the warehouse.
Planning
Next, it’s time to draft a detailed implementation plan. This will act as a roadmap, outlining the steps and phases involved in moving to a Zero Trust architecture.
Execution
With the plan in hand, it’s time to roll up those sleeves and get to work. Execution involves configuring security solutions, setting up new policies, and rolling out network changes.
Monitoring
After the execution phase, your job isn’t done. Monitoring becomes an ongoing process to ensure that the Zero Trust architecture is working as intended and adapting to new threats. Think of it as a self-improving system; the more it learns, the better it gets at keeping threats at bay. With the help of AI and machine learning, you can even set it up to automatically adjust its security protocols based on real-time threat analysis. It’s like having a security guard who not only learns from his experiences but also trains himself to be better every day.
Zero Trust Model in Action
Upcoming Trends
As cyber threats continue to evolve, so does Zero Trust. One emerging trend is the integration of Zero Trust with blockchain technology for even more secure verification processes. Also, the rise of the Internet of Things (IoT) has brought about discussions of “Zero Trust for Things” or ZT4T, extending the model to a multitude of devices beyond just computers and servers. Imagine a world where even your smart refrigerator operates on Zero Trust principles; it’s not as far-fetched as it sounds!
Expert Predictions
Experts foresee Zero Trust becoming the norm rather than the exception. As organizations recognize its efficacy, more sectors are expected to adopt this model. Moreover, we can anticipate a broader range of Zero Trust solutions, tailored to the specific needs of different industries. In other words, get ready for Zero Trust to be as commonplace as firewalls are today.
Conclusion
Adopting a Zero Trust model can seem like a daunting task, especially given the initial costs and the level of detail that goes into its implementation. However, the benefits far outweigh the risks. Enhanced security, flexibility, scalability, and regulatory compliance are just a few of the advantages that make Zero Trust an investment worth considering. After all, in a world where digital threats are increasingly sophisticated, isn’t it wise to stay one step ahead?
FAQs
What is Zero Trust?
Zero Trust is a cybersecurity model that operates on the principle of “Never Trust, Always Verify,” meaning that all access requests are treated as threats until proven otherwise.
Is Zero Trust expensive to implement?
Initial implementation costs can be high, but they should be weighed against the potential costs of a data breach. Zero Trust as a Service (ZTaaS) is also making it more affordable for smaller businesses.
Can Zero Trust slow down my network?
While the model involves multiple verification processes, advancements in technology like AI and machine learning help to minimize any impact on network speed.
How does Zero Trust improve compliance?
By encrypting and verifying all data, Zero Trust makes it easier for organizations to comply with regulations like GDPR, HIPAA, and PCI-DSS.
Is Zero Trust suitable for small businesses?
Absolutely. Zero Trust can scale to fit organizations of all sizes and is a smart investment for any business that values its data and network integrity.
And there you have it, a comprehensive guide to understanding the principles of Zero Trust. From its core tenets to its future outlook, adopting a Zero Trust model could be the key to unlocking a new level of cybersecurity for your organization. Stay safe
In the ever-evolving landscape of IT, virtualization has established itself as an irreplaceable cornerstone. While various platforms offer virtualization services, Microsoft’s Hyper-V stands out as a robust, scalable, and user-friendly option. If you’re an IT professional, chances are you’ve come across Hyper-V at some point in your career. With its intricate features and multi-faceted architecture, Hyper-V serves as the backbone for many virtualized environments.
However, just like any piece of complex software, Hyper-V is not immune to errors and glitches. These can disrupt the virtual environment, impact productivity, and ultimately cost both time and resources to fix.
Understanding Hyper-V Architecture
Components
At the heart of Hyper-V lies its architecture—a complex system of interlocking components designed to deliver virtualization services seamlessly. Understanding these parts can be crucial when you’re trying to solve any glitches. The main components are:
Hypervisor: This is the core of Hyper-V. It manages the distribution of system resources to each virtual machine (VM).
Virtual Machines: These are the simulated systems running on your host machine.
Virtual Hard Drives (VHDs): These files act like physical hard drives but are flexible and can be easily moved and resized.
Virtual Network: This includes all networking components, such as switches, adapters, and configurations that tie your virtual world together.
Workflow
Hyper-V operates using a straightforward but effective workflow. It begins with the Hypervisor that sits directly on the hardware and oversees all system resources. Above the Hypervisor, there’s a parent partition running a version of Windows, Linux, or other compatible OS, which in turn hosts multiple child partitions where the VMs reside.
Understanding this architecture is not just academic curiosity; it’s practical knowledge that can help you pinpoint the root cause of issues more effectively. For instance, knowing the difference between Gen 1 and Gen 2 VMs could be crucial in troubleshooting. To dig deeper into the intricacies of Hyper-V architecture, check out this comprehensive guide.
Common Errors and Their Symptoms
Understanding common errors and their symptoms is the first line of defense in effective troubleshooting. By recognizing the signs early, you can nip issues in the bud before they escalate into full-blown problems.
Configuration Errors
These types of errors often occur during the initial setup or during major changes in the Hyper-V environment. They can involve network settings, storage configurations, and even Hyper-V Manager settings. If you notice connectivity issues or unexpected VM behavior, it might be worth taking a closer look at your configuration settings.
Performance Issues
Performance problems can manifest in various ways, such as slow VM boot-up, laggy applications, or even complete system hang-ups. Several factors could be at play here, from CPU overload to memory deficits. These issues may require in-depth analysis to solve but identifying them early can save you a lot of trouble down the line.
Network Errors
Network-related errors can be among the most frustrating to troubleshoot. Symptoms can range from disconnected VMs, latency issues, to DNS resolution failures. The root cause is often elusive but could include everything from misconfigured Virtual NICs to VLAN tagging errors.
Virtual Machine Failures
When a VM fails to start, or experiences data corruption, it’s usually a sign of a deeper problem within your Hyper-V environment. Boot failures and data corruption are telltale signs of virtual machine problems. It’s crucial to identify the cause quickly to minimize downtime.
Recognizing common errors and their symptoms is the cornerstone of effective troubleshooting. A detailed understanding can not only help in solving current issues but can also assist in the prevention of future problems. For more tips on Hyper-V best practices that can help prevent common issues, check out this article.
Identifying Errors: Where to Look
Finding the root of a problem is half the battle won. Knowing where to look can drastically reduce your troubleshooting time. Here are some quick pointers on where you can spot these common errors:
Event Viewer
This built-in Windows tool is often the first stop for any IT professional. For Hyper-V related issues, the Hyper-V-VMMS and Hyper-V-Worker admin logs can be particularly useful. Here you’ll find error codes and descriptions that can guide you to the problem’s origin.
Hyper-V Manager
Hyper-V Manager not only allows you to configure and manage your virtual machines but also provides feedback in the form of statuses and error messages. For example, if a VM fails to start, Hyper-V Manager will display an error message that can clue you in on what went wrong.
Performance Monitor
For performance-related issues, the Performance Monitor tool can be invaluable. You can set up specific counters for CPU, Disk I/O, and network usage to monitor the performance of your Hyper-V host and the VMs running on it.
PowerShell Scripts
PowerShell is a powerful tool for automating tasks and retrieving information. Numerous Hyper-V related PowerShell cmdlets can be used to gather detailed information about your virtual machines and their current state, offering another route to identify issues.
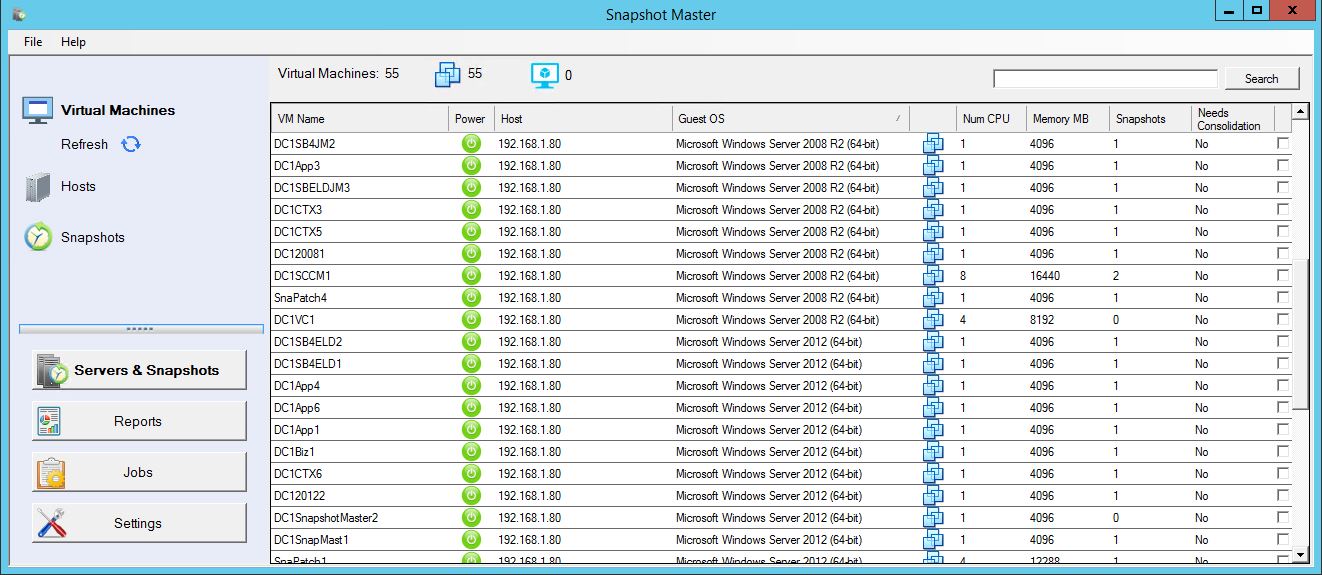
Third-Party Tools
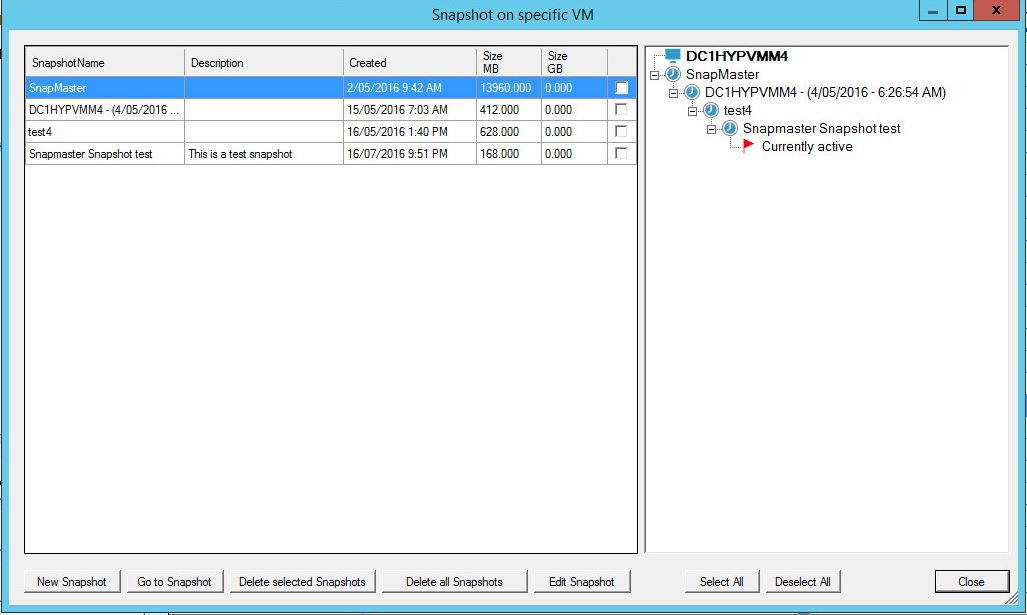
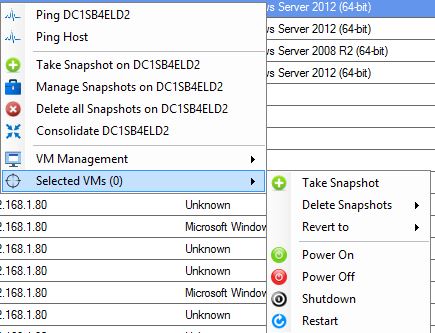
There are specialized third-party tools designed to manage and monitor Hyper-V environments. For instance, Snapshot Master offers comprehensive reports on all your VM snapshots, allowing you to spot issues that may not be immediately apparent through native tools.
By knowing where to look, you’re well-equipped to start the troubleshooting process effectively. Armed with this information, diagnosing issues can become a less daunting task.
Diagnosing and Fixing Common Errors
Now that you know the types of errors you might encounter and where to look for them, let’s dive into the nitty-gritty of diagnosing and fixing these common glitches.
How to Diagnose Configuration Errors
Check Network Settings: In the Hyper-V Manager, ensure that your virtual switches are correctly set up. Verify IP addresses and subnet masks to ensure they’re in the correct range.
Verify Storage Paths: Make sure that the paths to your VHDs are correct. Inaccessible or incorrect paths can lead to VM start-up failures.
User Permissions: Ensure that the users have the necessary permissions to access the resources they need.
Fixing Performance Issues
Optimize Resource Allocation: Use Performance Monitor to check if the system resources are being overutilized. If so, consider redistributing resources or adding more to the Hyper-V host.
Update Drivers and Software: Outdated software can often be the culprit. Make sure you’re running the latest versions of all drivers and software.
Check for Malware: Performance issues can also be caused by malware affecting your system. Run a complete malware scan to rule out this possibility.
Resolving Network Errors
Examine Virtual Network Configuration: Incorrect settings here can lead to various network issues. Make sure VLAN IDs and subnet configurations are accurate.
Reset Winsock Configuration: Sometimes, resetting the Winsock catalogue can resolve network issues. Use the command netsh int ip reset in the Command Prompt.
Check Firewall Rules: Sometimes, firewall configurations can interfere with Hyper-V’s network communication. Make sure the necessary ports are open.
Rectifying Virtual Machine Failures
Check Event Logs: As mentioned earlier, the Event Viewer can offer valuable insights into what went wrong. Look for any Critical or Error events that might point to the issue.
Repair VHDs: Corrupt VHD files can cause a VM to fail. Use Hyper-V’s native tools or third-party software to repair these files.
Snapshot Management: Sometimes, lingering snapshots can cause VM failures. Managing these effectively can often resolve the issue. For detailed insights into how to manage VM snapshots, here is a complete guide.
Now that we’ve covered some of the most frequent Hyper-V errors and how to fix them, you’re better equipped to manage your virtual environment efficiently.
Enhancing Your Troubleshooting Game
While native Hyper-V tools are robust and offer a plethora of features for troubleshooting, sometimes, a third-party tool can offer that extra edge in managing your virtual environment. These tools often come with specialized functionalities that can make your life a lot easier.
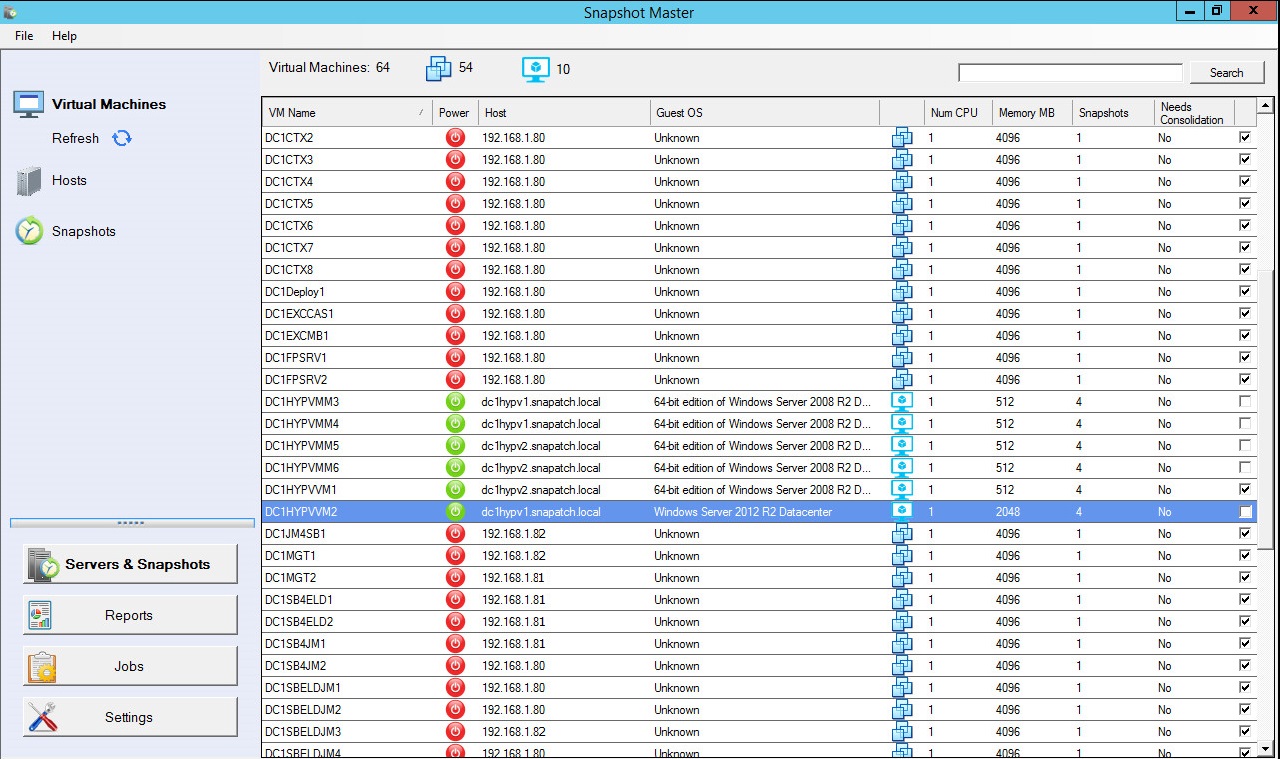
Snapshot Master: An All-in-One Solution
You’ve probably been through the painstaking process of manually managing snapshots or scripting out automated jobs. What if you could simplify this into a few clicks? Meet Snapshot Master by SmiKar, an all-encompassing tool designed to make snapshot management a breeze.
Features of Snapshot Master
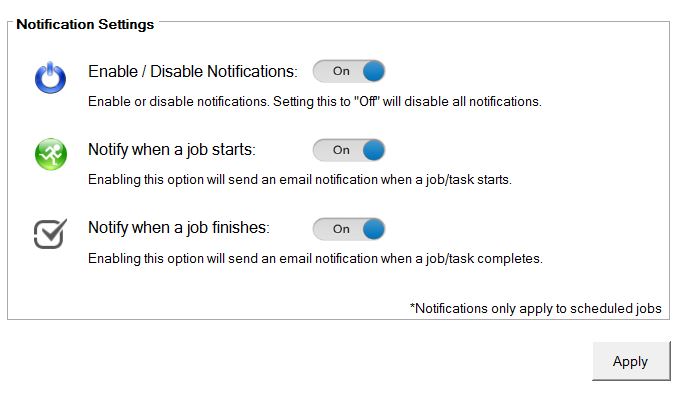
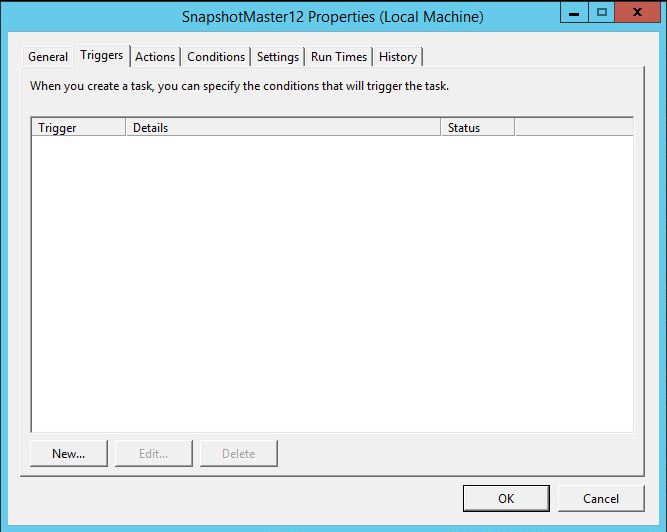
Automated Snapshot Creation: No more late nights or weekends spent creating snapshots. Automate the process and sleep easy.
Comprehensive Management Dashboard: Keep track of all your snapshots across VMware, Hyper-V, and Azure platforms from a single pane.
Scheduled Snapshot Deletion: Keep your storage optimized by setting up rules for snapshot deletion.
Benefits
Saves Time and Resources: Automation means you can allocate your precious IT resources elsewhere.
Enhanced Reliability: With set-and-forget automation, human error is significantly reduced, thereby improving your system’s reliability.
Not only does it offer a robust snapshot management solution, but Snapshot Master also serves as a reliable tool for backup and disaster recovery. Here is how to use Snapshot Master effectively.
Preventive Measures: Best Practices for Hyper-V
An ounce of prevention is worth a pound of cure. While it’s crucial to know how to troubleshoot issues, implementing some best practices can help avoid many problems from arising in the first place.
Regular Updates and Patches
Ensure that your Hyper-V environment is always updated with the latest patches and updates. This can improve performance and fix known bugs, reducing the likelihood of encountering issues.
Resource Allocation
Ensure that your Hyper-V host has enough resources to manage all the VMs adequately. Overloading your host can lead to performance issues for all the VMs it hosts.
Keep an eye on CPU, memory, disk, and network metrics. Use Performance Monitor or third-party tools to set up alerts for abnormal behavior.
Network Configuration
Ensure that your network configurations, including VLAN settings and virtual switches, are set up correctly. This will reduce the risk of network-related issues.
Even if there’s no immediate issue, regularly checking the Event Viewer can help you spot potential problems before they turn into actual issues.
Limit Administrative Access
The fewer people who have admin access to your Hyper-V setup, the lower the risk of human errors that could lead to problems. Only grant access to trusted and trained personnel.
Compliance Checks
Regularly check your system for compliance with internal policies and regulatory standards. This can often prevent issues that may arise due to non-compliance.
Implementing these best practices can make your Hyper-V management experience much smoother and reduce the frequency and impact of issues.
Conclusion
Troubleshooting in Hyper-V doesn’t have to be a daunting task. Armed with the right knowledge, tools, and best practices, you can efficiently manage your virtual environment. From understanding common errors and their symptoms to using third-party tools like Snapshot Master, there’s a lot you can do to simplify this process. So, are you ready to take control of your Hyper-V setup? Why not give Snapshot Master a try and simplify your Hyper-V management today!
Frequently Asked Questions
Q1: Where can I find Hyper-V logs for troubleshooting?
Answer: The Event Viewer under Hyper-V-VMMS and Hyper-V-Worker admin logs is a good place to start.
Q2: What are some common Hyper-V performance issues?
Answer: CPU overutilization, disk I/O bottlenecks, and network latency are some common performance issues.
Q3: Can third-party tools integrate with Hyper-V?
Answer: Yes, many third-party tools like Snapshot Master are designed to integrate seamlessly with Hyper-V.
Q4: Are snapshots a good backup strategy for Hyper-V?
Answer: Snapshots are useful but should not replace a comprehensive backup strategy. Learn more about it here.
Q5: How can I update Hyper-V?
Answer: You can update Hyper-V through Windows Update or download specific patches from Microsoft’s website.
I hope this article serves as a comprehensive guide for all your Hyper-V troubleshooting needs. Feel free to try out Snapshot Master to see how it can make your life easier!