by Mark | Jul 11, 2016 | How To, VMWare
How to Create a VMWare Template for Deployment
So you are deploying Servers regularly and ask becoming sick of completing this the manual way. Well to create a template for quick deployment is relatively easy, just follow the steps in this blog post and you will be deploying VMs in no time.
There are two methods to create a VMWare template, Clone to Template or Convert to Template.
Clone to Template
Clone to Template does exactly that. It creates an exact copy of the VM and leaves the original VM you choose intact. Choosing this option allows you to change the format of the Virtual Disk to either Thick or Thin Provisioning. Thin Provisioning the disk will allow the VM to use only the disk space it requires, and grow with time. Thick Provisioning the VM will use the amount of Disk Space you specify. Creating a Clone to Template VMWare duplicates the Virtual Disks and the .VMX file that holds all the configuration settings for that Virtual Machine.
Convert to Template is the other possible method available to you. (This is what I use in this example). It is much faster than using Clone to Template as it is not required to duplicate the source Virtual Machine disks. What it does is changes this VM to a Template format.
Once you have finished creating a VMWare Template following this post, Click this link to see how to make a VM automatically join a Windows Domain.
Convert to Template
Convert to Template is the other possible method available to you. (This is what I use in this example). It is much faster than using Clone to Template as it is not required to duplicate the source Virtual Machine disks. What it does is changes this VM to a Template format.
Once you have finished creating a VMWare Template following this post, Click this link to see how to make a VM automatically join a Windows Domain.
VMWare Template FAQs
What is a VMWare template?
VMWare template is a pre-configured virtual machine that can be easily duplicated and deployed.
Why should I create a VMWare template?
Creating a VMWare template can save you time and effort when deploying multiple virtual machines with the same configuration.
What are the two methods for creating a VMWare template?
The two methods are Clone to Template and Convert to Template.
What is the difference between Clone to Template and Convert to Template?
Clone to Template creates an exact copy of the virtual machine, while Convert to Template changes the virtual machine to a template format.
Which method is faster, Clone to Template or Convert to Template?
Convert to Template is generally faster as it doesn’t require duplicating the source virtual machine disks.
What are the steps to create a VMWare template?
The steps are: log in to your VMWare console, create a new virtual machine, specify the name, host/cluster, storage, operating system, network, and disk settings, install the operating system, shut down the virtual machine, and finally convert it to a template.
How can I customize the hardware settings of my VMWare template?
You can customize the hardware settings by selecting “Edit Settings” on the virtual machine and changing the appropriate settings.
How can I deploy a virtual machine using my VMWare template?
To deploy a virtual machine using your VMWare template, right-click the template, choose “New Virtual Machine,” and follow the prompts.
Can I change the configuration of a VMWare template after it has been created?
Yes, you can edit the settings of a VMWare template by converting it back to a virtual machine, making the necessary changes, and then converting it back to a template.
Are there any considerations to keep in mind when creating a VMWare template?
Yes, it’s important to ensure that the operating system is properly licensed and that any necessary updates and patches are applied before creating the template. It’s also important to follow best practices for securing virtual machines.
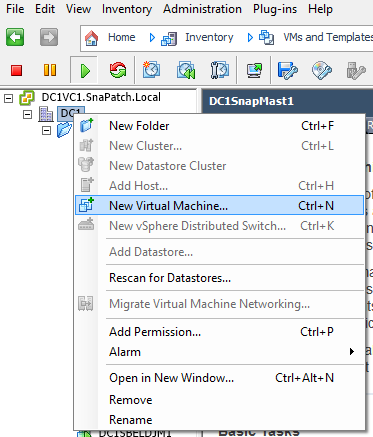
Create a VMware Template in the VMware Console
Login to your VMWare Console
Log in to your VMWare console and then Right Click your datacentre and choose New Virtual Machine.

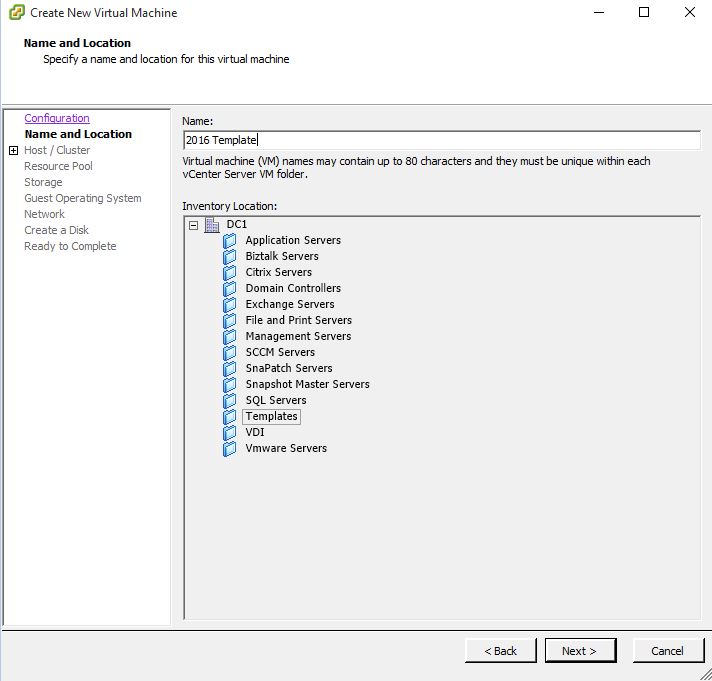
VMware Templation Creation
Now give the VM a name. As this is going to be a template for future deployment of Windows Server 2016, I have chosen 2016 Template to make it easier to see which Operating System this template will install.
VMware Host / Cluster Tab
Chose the Host or Cluster you want the VM to be deployed to then click on Next.
VMware Host / Cluster Tab
Chose the Host or Cluster you want the VM to be deployed to then click on Next.
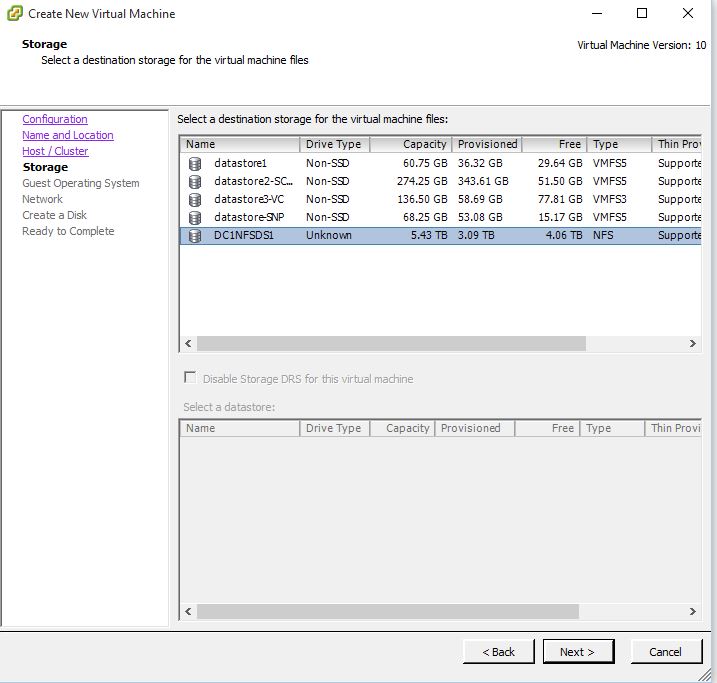
VMware Storage Tab
Next you specify the storage location for the VM to reside on. Select the appropriate VM datastore and then click on Next.
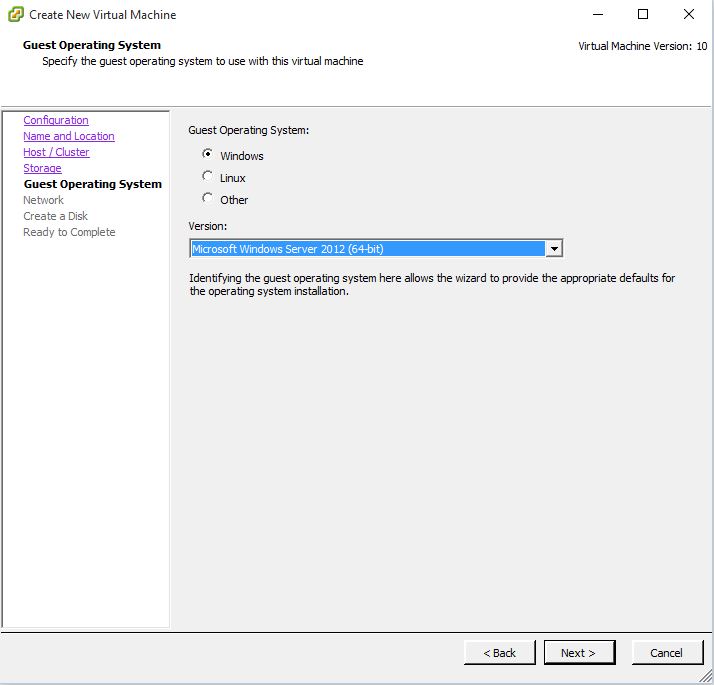
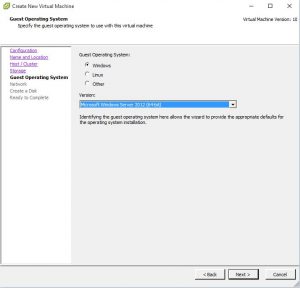
VMware Guest Operating System Tab
Choose the Operating System you want to install on the VM and click Next.
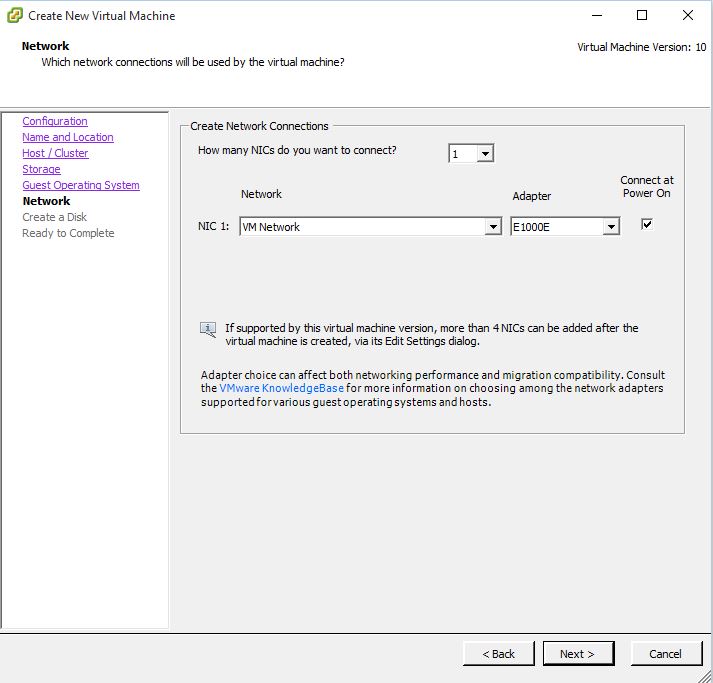
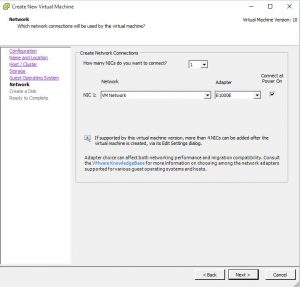
VMware Template Creation Network TAB
Select the VMware network you want this VM to communicate on and click Next.
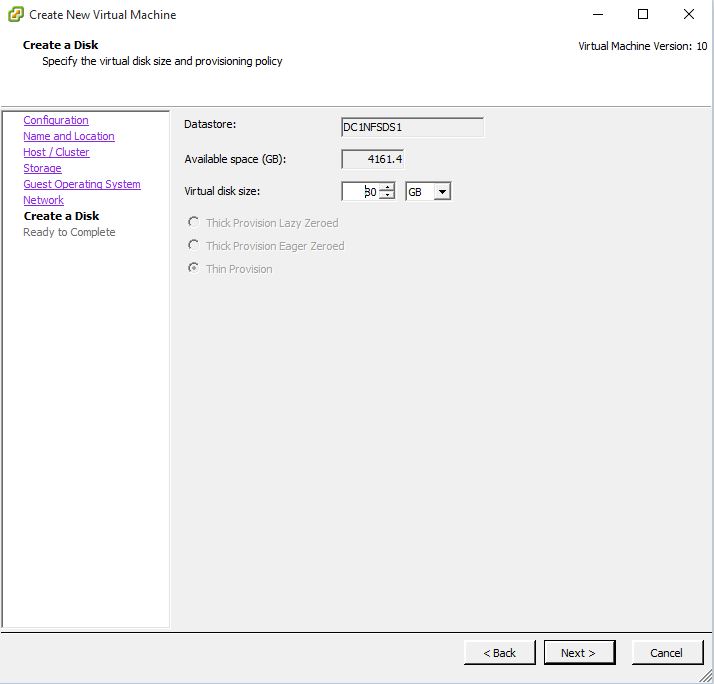
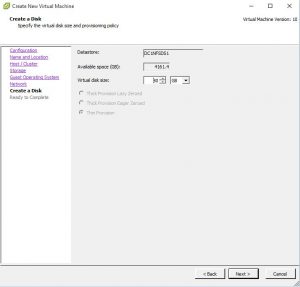
VMware Template Disk Creation
Specify the size of the Operating System Disk then click Next.
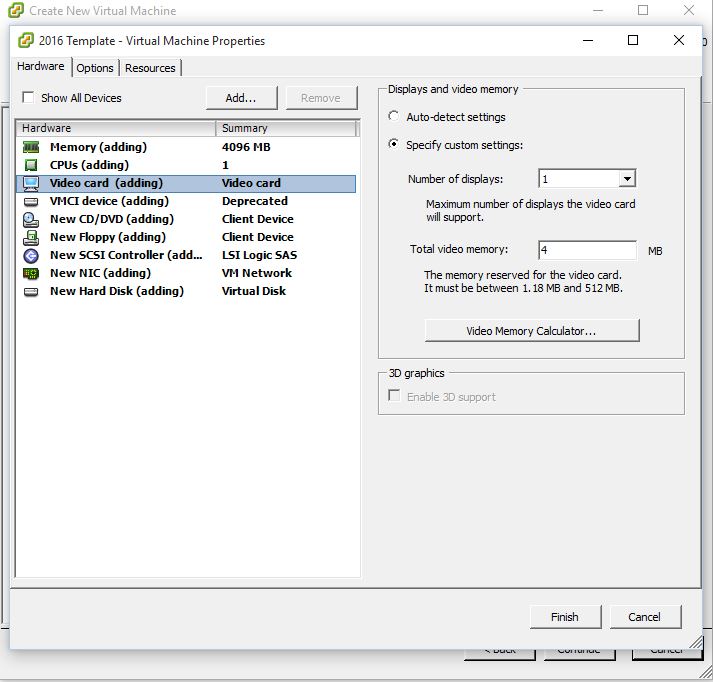
VMware Template Completion
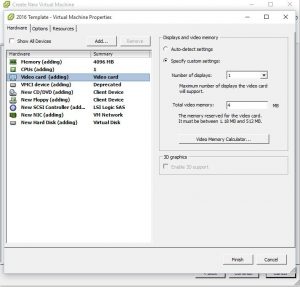
Confirm the settings are correct and click on Finish. In this example I checked the checkbox for Edit the virtual machine settings before completion to show you what hardware settings you can change. Click Finish when ready.
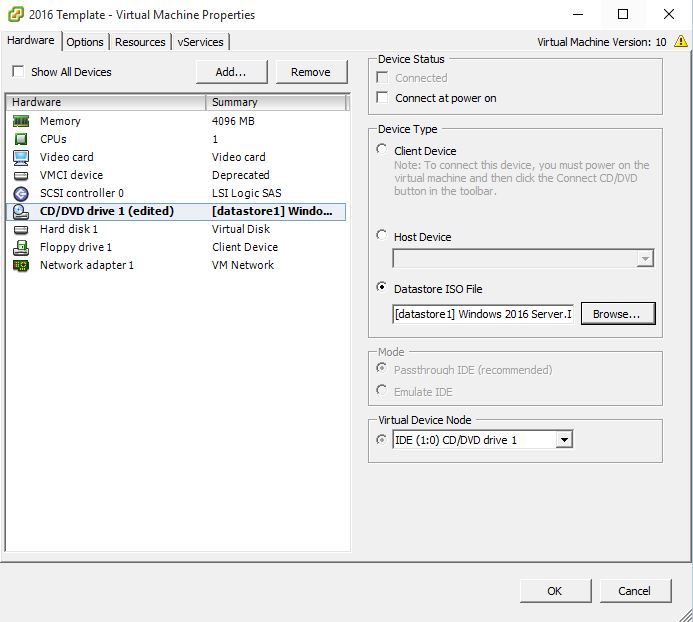
VMware Template Settings
Now the VM is ready to install the operating system, you will have to attach an ISO file for the installation. Find the VM then Right Click the Virtual Machine and select Edit Settings.
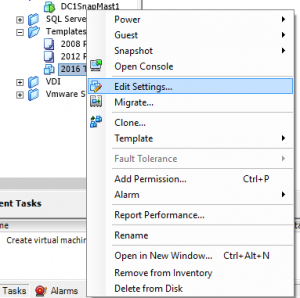
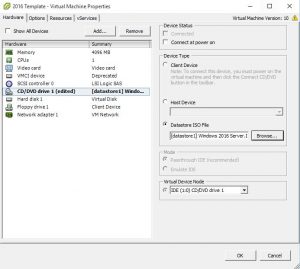
Edit VMware VM Settings
Select CD/DVD drive then Datastore ISO file. Browse to the datastore location of your Operating System installation media and select the appropriate media then click on OK. You can also change other hardware settings for this template.
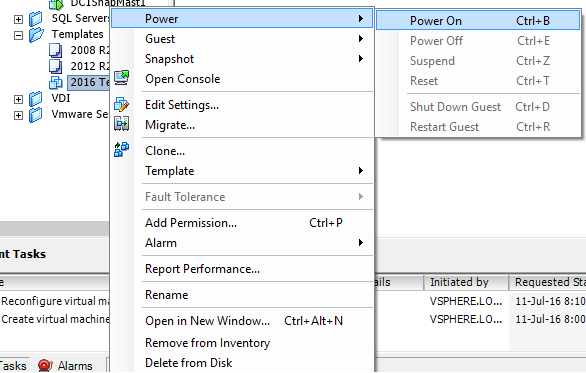
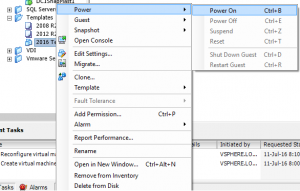
VMware Template – Power On
Now we need to install the Operating System so that we can easily redeploy this VM as a template. Right Click the VM and choose Power On.
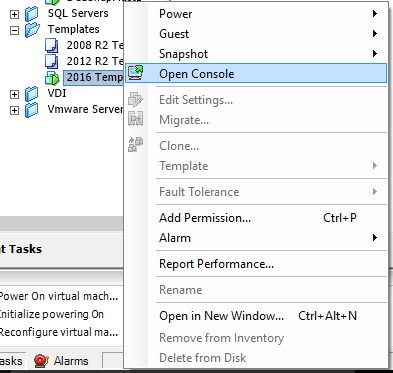
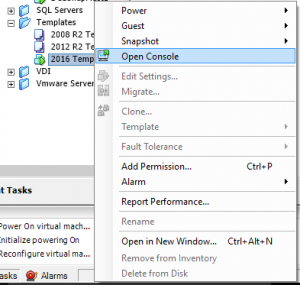
VMware Template – Open the VM Console
Right Click the VM again and choose Open Console so that you can install the Operating System.
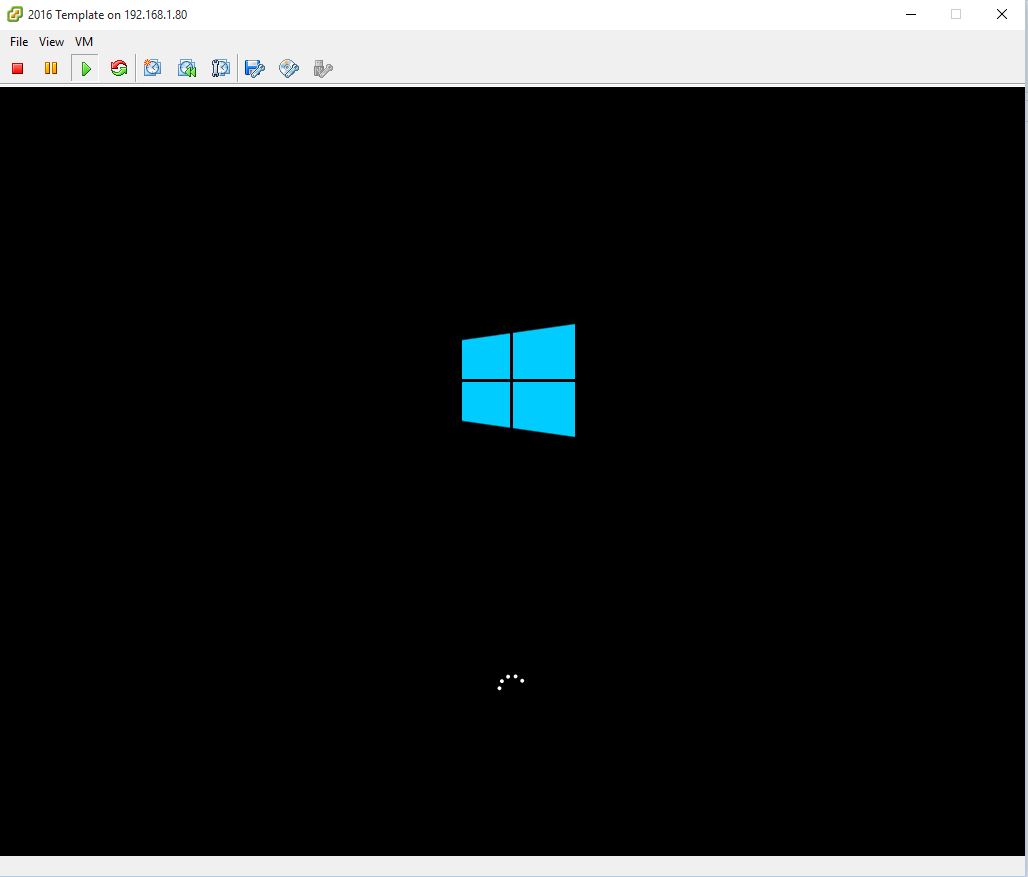
Install the VM Operating System
Next will require you to install the Operating System. Please note that if you are going to change this to a VM Template, do not join your Windows Domain.

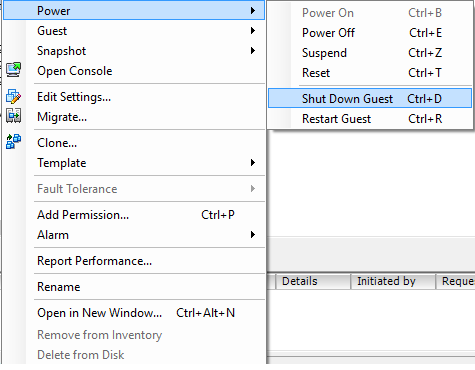
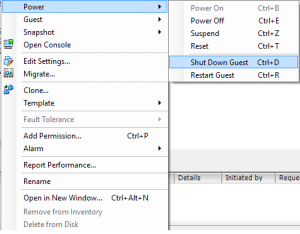
Shutdown the VM
Once the machine has logged in to Windows for the first time, shut the machine down.
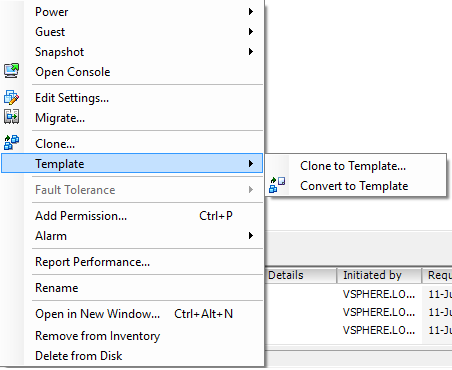
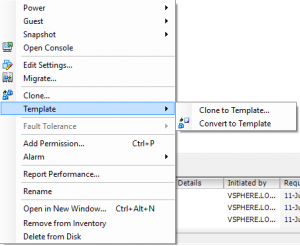
Create a VMWare Template
Once the installation of the Operating System has completed and the Virtual Machine is powered off we can now create a VMWare Template. Right Click the Virtual Machine, go to Template, then Convert to Template. This will now change the Virtual Machine and convert it to a ready to deploy Template for quick and easy future deployment.
Creating a VMWare template can save you time and effort when deploying servers regularly. By following the steps in this post, you can create a VMWare template using the Convert to Template method. Remember to shut down the VM after the first Windows login and then convert it to a template. With a VMWare template, you can deploy VMs in no time and focus on other tasks that need your attention.

by Mark | Jul 11, 2016 | How To, VMWare
Virtual machines have become an essential part of modern IT infrastructure, as they allow administrators to create and manage multiple computing environments on a single physical machine. This can be incredibly useful for tasks such as testing, development, and training. When deploying a virtual machine, it is often necessary to perform customizations, such as joining the machine to a domain, setting network configurations, and specifying local administrator password, among others. This article provides a step-by-step guide to deploying a virtual machine and joining it to a domain automatically using VMWare Customization script. The article covers each step of the customisation process, including how to specify domain information, set the computer name, configure the Windows license, set the time zone, and much more. This guide is intended for administrators who want to automate the process of deploying virtual machines and joining them to a domain, and it provides detailed, actionable instructions for achieving this goal.
How to Deploy a VM and join a Domain Automatically
If you ever have the need to deploy a Virtual Machine and have some customisations for deployment (i.e. Network Settings or have the automatically join a domain), this post will show you how to.
The VMWare Customistation script will allow you to specify;
- Domain to join automatically
- Network settings
- Registration Settings
- Computer Name
- Windows License
- Time Zone
- Local Administrator Password
- Operating System Settings.
Assuming here (I know, never assume anything) that you have already created a VM template to deploy (If you havent already created one, click the link to see a blog post on How to Create a VMWare Template) follow these steps to create your very own VMWare Customisation Script.
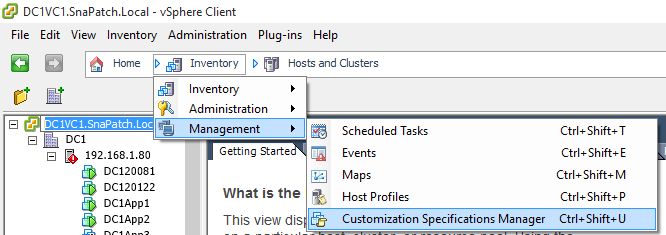
VMWare vCentre Console
1. Log in to your Vmware vCentre Console. Choose Home, then Inventory, Management and finally Customistation Specifications Manager.

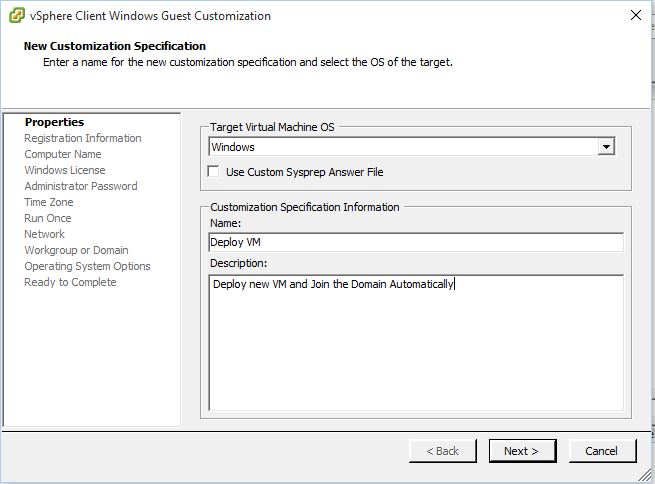
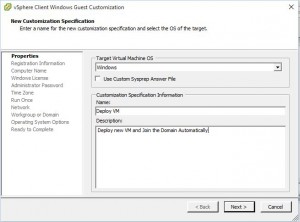
VM Properties Tab
2. The VMware Customisation Wizard starts. Choose the Operating System and provide a Name and Description then click Next.
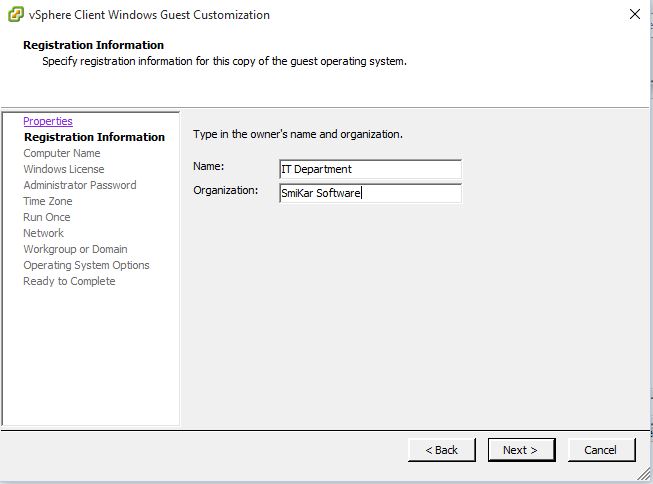
Registration Information Tab
3. Provide the Name and Organisation that the server will belong to then click Next.

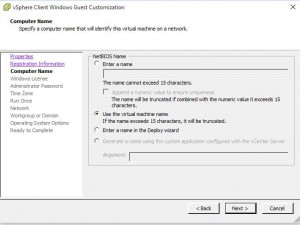
Virtual Machine Computer Name Tab
4. Next we need to configure the name of the VM. In this example, I am choosing to use the Virtual Machine name as this will match against Vmware and Active Directory making it easier to identify. Click Next when ready to proceed.
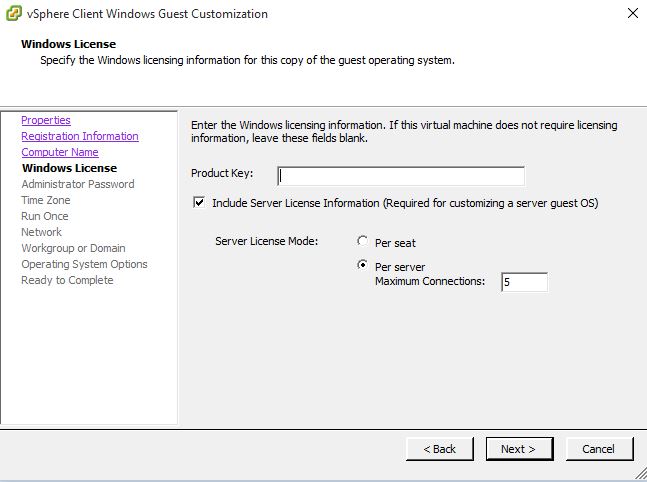
Windows License Tab
5. If you have a product key you can enter it here. As I am using KMS in my domain for Windows Licensing, I chose to leave this blank. Again, click Next when ready.

Administrator Password Tab
6. Add the Administrator password and how many times you wish for the Administrator account to login. This is used for the Local Administrator account not a Domain Administrator. Click Next.

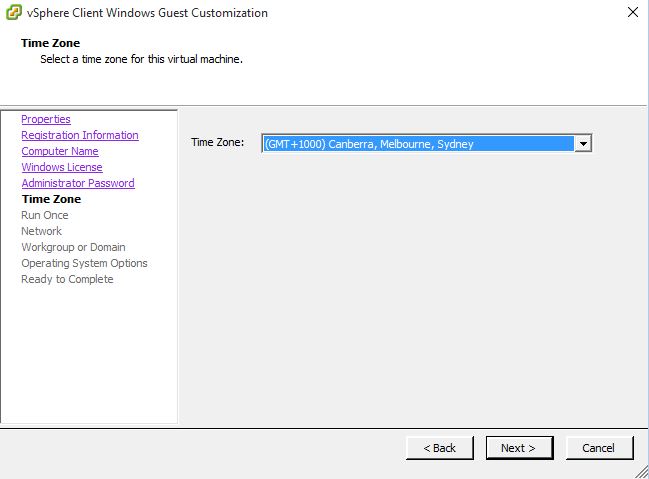
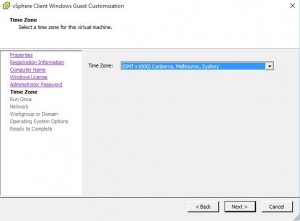
Time Zone Tab
7. Choose the Time Zone relevant to your environment then click Next.
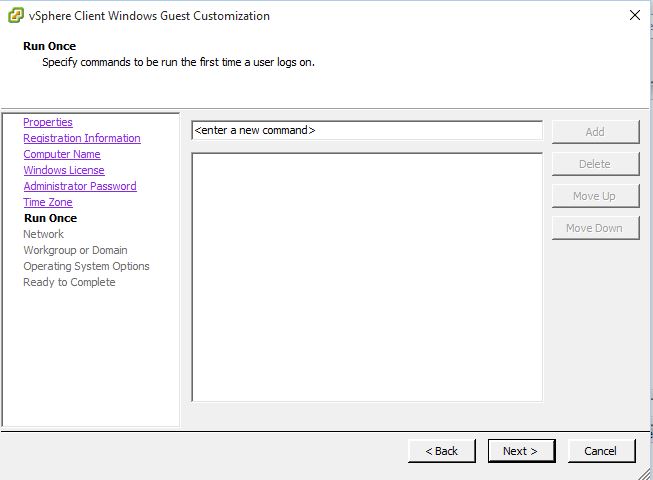
Run Once Tab
8. If you wish for any commands to run (ie scripts to customise your server further) you can enter them here. I havent any for this Customisation so have left this as black. Click Next.

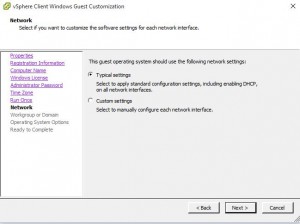
Network Tab
9. For the Network portion of the wizard, you can choose custom settings if required (i.e DNS server and IP address settings). Im using the typical settings (i.e. DHCP). Click Next when you have chosen the settings you require.
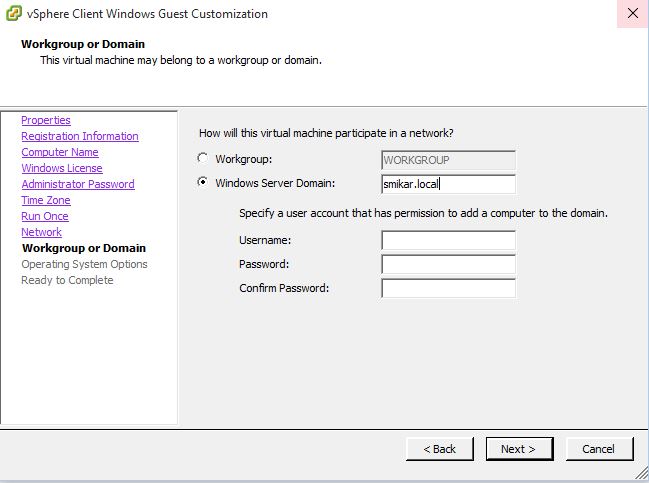
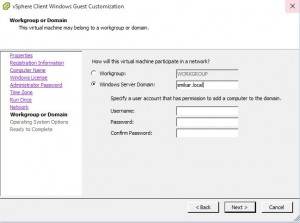
Workgroup or Domain Options Tab
10. Now the important part. If you want the VM to deploy and then to automatically join your Windows domain you will need to add the Domain Name, Administrator Account and Password. Click Next when ready.
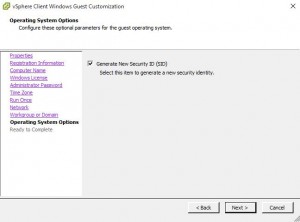
Operating System Options Tab
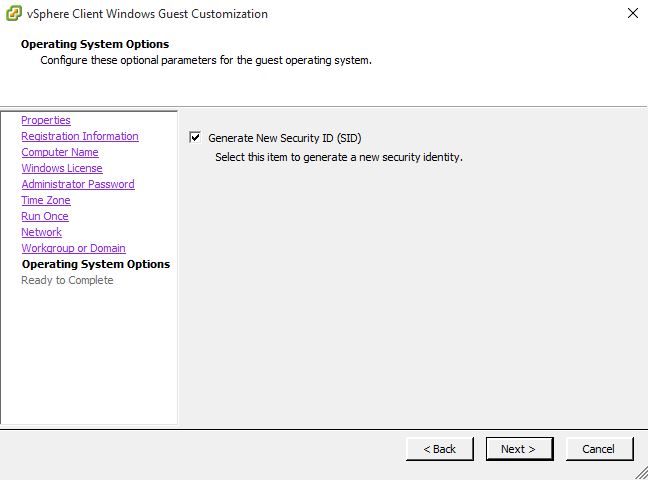
11. Allow the VMWare customisation script to Generate New Security ID (SID) then click Next.
Ready to Complete Tab
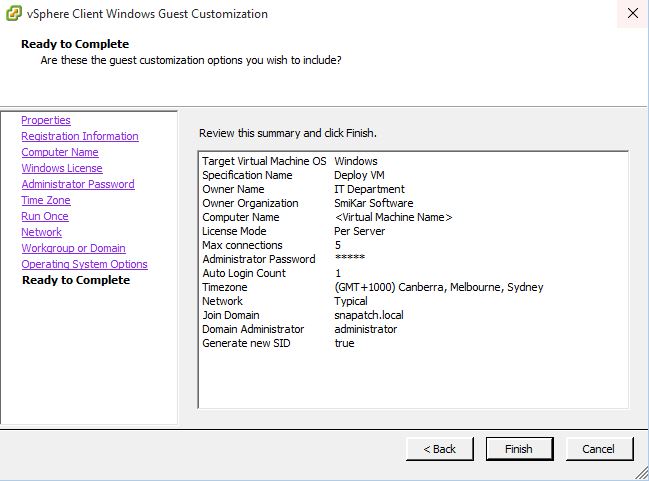
12. Finally, check the settings are correct then click Finish to proceed.

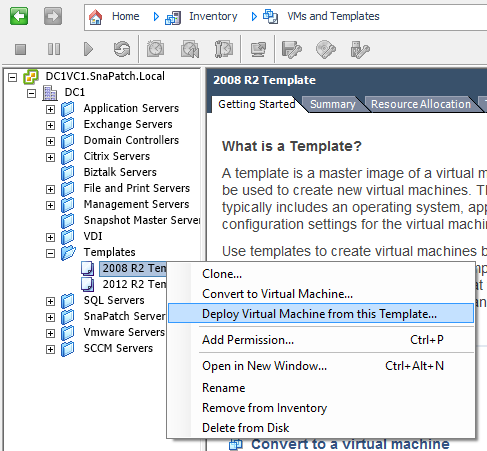
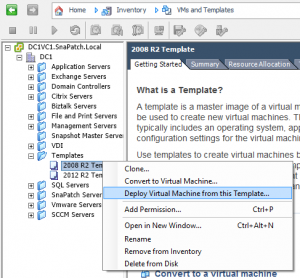
Deploy Virtual Machine from this Template.
13. Now hopefully everything went well and you are ready to start using the VMWare Customisation Script you created and deploy your first VM with these settings. Choose the template you wish to apply this customisation to, Right Click and choose Deploy Virtual Machine from this Template.
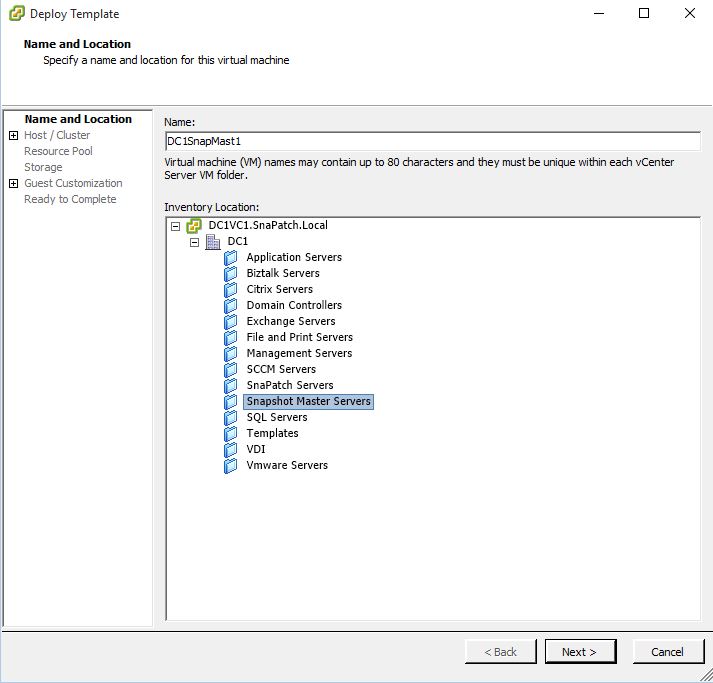
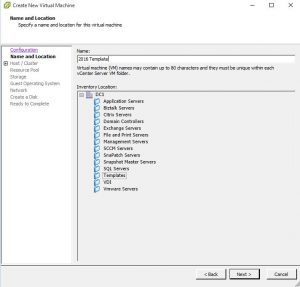
Name and Location Tab
14.Give the VM a name and then the Inventory Location the machine will reside in and then click Next.

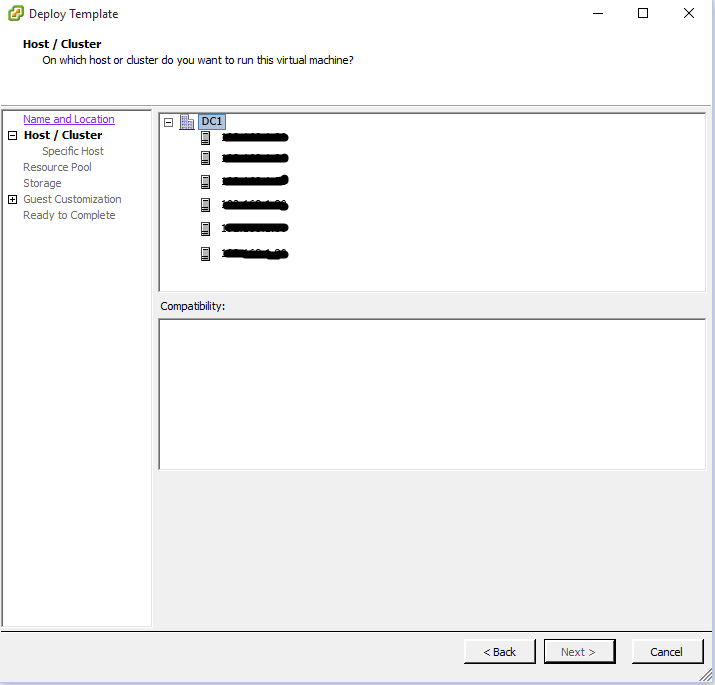
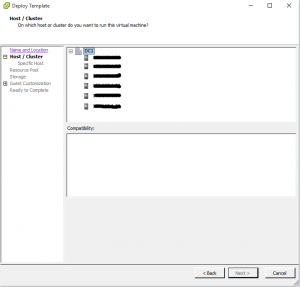
Host and Cluster Tab
15. Choose a Host or Cluster for the VM to run on then click Next.

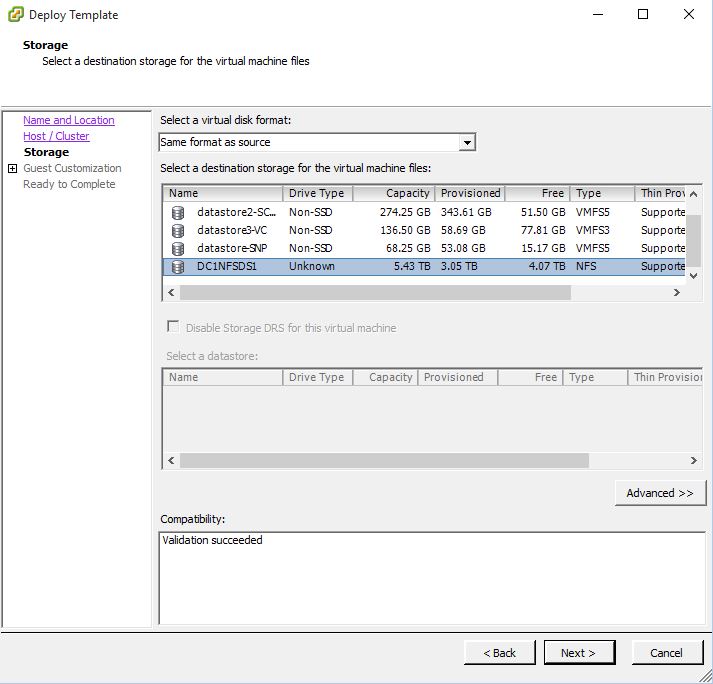
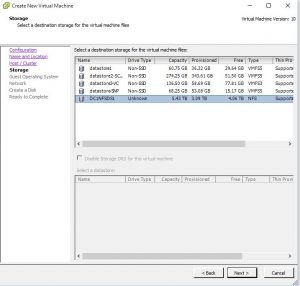
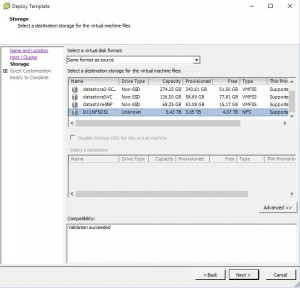
Storage Tab
16. Next you choose the storage location that the VM will use to store its files (VMDK). Select the storage destination then click Next.
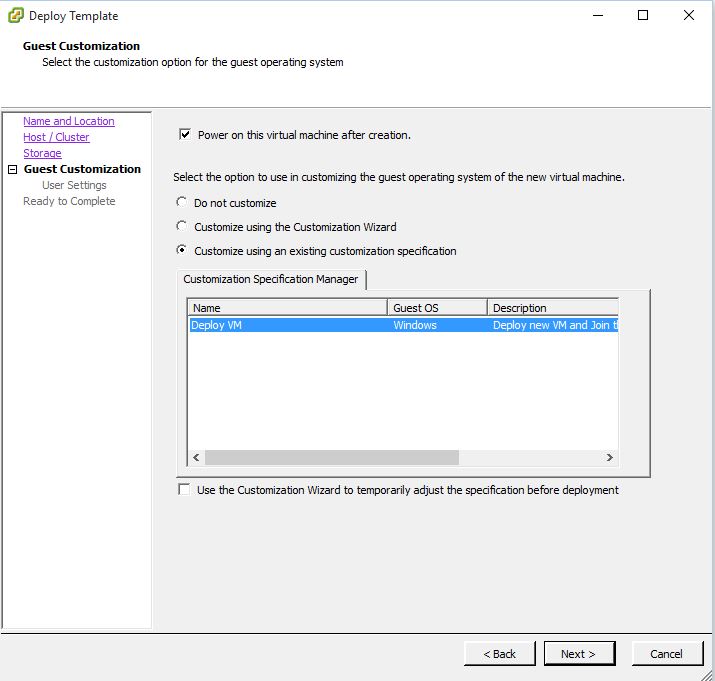
Guest Customisation Tab
17. This is another important part of the VM deployment process. You can choose not to customise but since this blog post is about using the customisation we created earlier, choose Customise using an existing customisation specification. Select the VMWare customisation you created then click Next.

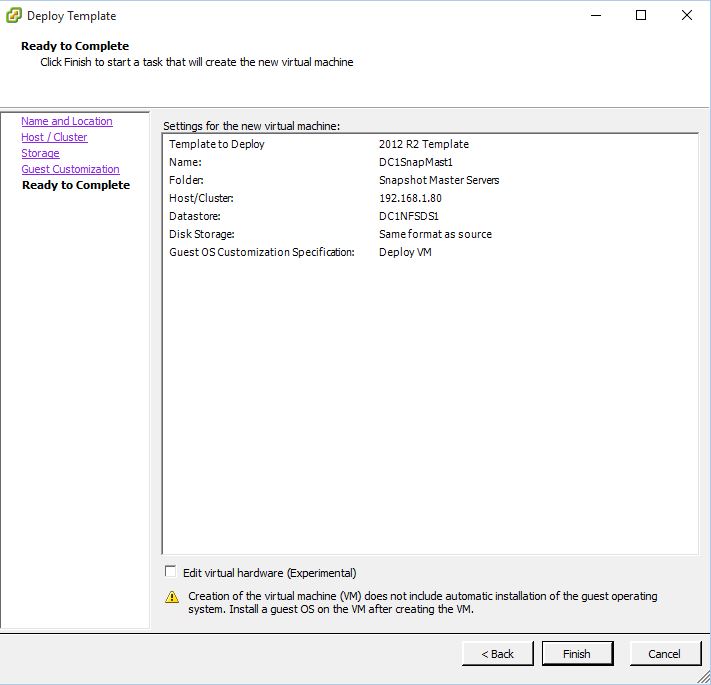
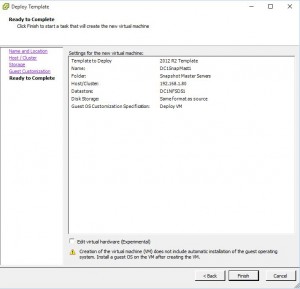
Ready to Complete Tab
18. Check the settings that are specified in this screen are what you have selected and when confirmed click Next. You can also edit the Virtual Machines hardware if you wish to do so (i.e. set CPU, Ram, Disk Space etc)
Finished 🙂
19. You should now be able to see that your new Virtual Machine is deploying using the VMWare Customisation Script you created. It will now automatically join the Windows Domain and be ready to use once the installation has completed.


by Mark | Feb 27, 2016 | How To
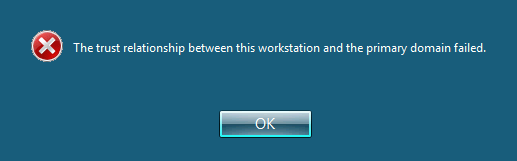
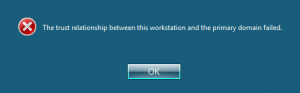
The trust relationship between this workstation and the primary domain failed.
Have you ever encountered the error message, “The trust relationship between this workstation and the primary domain failed”? This can be a frustrating issue for IT administrators and end-users alike. But don’t worry! In this article, we’ll dive deep into the reasons behind this error and provide actionable solutions to fix it. Along the way, we’ll discuss domain environments, trust relationships, and how to prevent this problem from occurring in the future.
Understanding Trust Relationships in a Domain Environment
The trust relationship between this workstation and the primary domain failed error occurs when there’s a disruption in the trust relationship between the computer and the domain controller. Here are some common causes of this error:
- Password synchronization issues: If the computer’s password doesn’t match the password stored in the domain controller, it can cause trust relationship issues.
- Time synchronization issues: If the time on the computer and the domain controller is out of sync, it can cause trust relationship issues.
- Computer account deletion: If the computer account is deleted from the Active Directory, it can cause trust relationship issues.
- The computer account password in Active Directory (AD) is not in sync with the password stored on the local machine.
- Corruption of the local security database on the workstation.
- Issues with DNS configuration or connectivity.
Symptoms caused by this Error
Symptoms of “The trust relationship between this workstation and the primary domain failed”:
Here are some symptoms that indicate that you’re facing “The trust relationship between this workstation and the primary domain failed” error:
- Unable to log in to the computer with domain credentials.
- Unable to access network resources.
- Unable to access shared folders.
- Error message: “The trust relationship between this workstation and the primary domain failed.”
- Applications that rely on domain authentication fail to function properly.
- Event logs display error messages related to trust relationship failures.
How to Fix “The trust relationship between this workstation and the primary domain failed”
There are several solutions to resolve the “The trust relationship between this workstation and the primary domain failed” error. Here are some of them:
Solution 1: Reset computer account password:
- Log in to the computer with local administrator credentials.
- Open Command Prompt as an administrator.
- Type the following command and press Enter: netdom resetpwd /s:domaincontroller /ud:domainadmin /pd:*
Note: Replace “domaincontroller” with the name of your domain controller and “domainadmin” with the domain administrator account.
Solution 2: Rejoin the computer to the domain:
- Log in to the computer with local administrator credentials.
- Open Control Panel and navigate to System.
- Click on “Change settings” next to “Computer name, domain, and workgroup settings.”
- Click on “Change” next to “To rename this computer or change its domain or workgroup, click Change.”
- Select “Domain” and enter the domain name.
- Enter the domain administrator credentials.
- Restart the computer.
Solution 3: Restore the computer account:
- Log in to the domain controller with domain administrator credentials.
- Open Active Directory Users and Computers.
- Navigate to the “Computers” container.
- Right-click on the computer account and select “Restore.”
Solution 4: Increase the Time out period of the computer account:
- Increase the computer account password age or even disable password changes altogether to prevent this error from occurring in the future. To do so, you’ll need to set the following registry key:
- KEY: HKEY_LOCAL_MACHINE – SYSTEM – CurrentControlSet – Services – Netlogon – Parameters Property: DisablePasswordChange Value: 1
This will disable password changes for the computer account, ensuring that the machine’s account password remains the same even if you restore an older snapshot.
Preventing Trust Relationship Failures
Preventing trust relationship failures is crucial to maintaining a smooth domain environment. Here are some best practices to help you avoid these issues:
Regularly Updating Passwords
Ensure that computer account passwords are regularly updated in both Active Directory and on the local workstations. By default, this happens every 30 days, but you can modify the password update interval if necessary.
Monitoring Active Directory Health
Keep an eye on the overall health of your Active Directory environment. Regularly monitor domain controllers, replication, and system logs to catch potential issues before they escalate into trust relationship failures.
Ensuring Proper DNS Configuration
Proper DNS configuration is vital for the smooth functioning of a domain environment. Make sure that workstations are using the correct DNS servers and that domain controllers have properly configured DNS settings.
FAQs
What is a trust relationship between a computer and a domain?
A trust relationship is established between a computer and a domain when the computer joins the domain. This trust allows the computer to access network resources and authenticate users.
Can I prevent “The trust relationship between this workstation and the primary domain failed” error?
Yes, you can prevent this error by ensuring that the computer’s time and password are synchronized with the domain controller.
How can I avoid trust relationship issues in the future?
You can avoid trust relationship issues by regularly resetting computer account passwords, synchronizing time between the computer and domain controller, and ensuring that the computer is not deleted from the Active Directory.
Can a non-administrator account resolve the “The trust relationship between this workstation and the primary domain failed” error?
No, a non-administrator account cannot resolve this error. You need to have local administrator or domain administrator credentials to resolve this error.
What causes a trust relationship to fail?
Trust relationship failures can occur due to reasons such as password synchronization issues, disabled or deleted computer accounts, DNS configuration problems, or corruption of the local security database.
How can I reset a computer account in Active Directory?
You can reset a computer account in Active Directory using the Active Directory Users and Computers console or PowerShell.
What is the Test-ComputerSecureChannel cmdlet in PowerShell?
The Test-ComputerSecureChannel cmdlet is a PowerShell command that allows you to test and repair the trust relationship between a workstation and the primary domain.
How can I prevent trust relationship failures?
To prevent trust relationship failures, ensure regular computer account password updates, monitor Active Directory health, and maintain proper DNS configuration.
Conclusion:
“The trust relationship between this workstation and the primary domain failed” error can be frustrating, but it’s a common issue faced by many computer users. This error occurs when there’s a disruption in the trust relationship between the computer and the domain controller. You can resolve this error by resetting the computer account password, rejoining the computer to the domain, or restoring the computer account. By following these solutions, you can prevent this error from occurring in the future. Remember to ensure that the computer’s time and password are synchronized with the domain controller to avoid trust relationship issues.

by Mark | Feb 27, 2016 | How To, VMWare
As a system administrator, you might face situations where a Domain Controller (DC) in your network fails due to hardware issues or software corruption. In such cases, restoring the DC from a snapshot can be a lifesaver. A snapshot is an image of the system’s state at a particular point in time, and restoring from it can bring back the system to that state. In this article, we will discuss how to restore a Domain Controller from a snapshot, step by step.
Understanding the Importance of Domain Controllers
Before we jump into the process of restoring a Domain Controller from a snapshot, let’s first understand why DCs are crucial for a network. In simple words, a Domain Controller is a server that manages network security and enables users to access shared resources, such as printers and files, on the network. It is the backbone of the Active Directory (AD) infrastructure, which is responsible for authentication and authorization in a Windows environment.
Reverting a snapshot of an active Domain Controller can be a risky and problematic issue.
If you are considering using this procedure it should be your very LAST option. This is not a supported Microsoft procedure and use of it could cause fatal issues to Active Directory.
Reassess your environment and take the proper steps to ensure this recovery model doesn’t have to be used again.
Use at your own risk!
What are the risks with doing this?
The risks of reverting a snapshot of a Domain Controller are significant and can have severe consequences for an organization’s Active Directory infrastructure. Some of the potential risks include:
-
Data loss: Reverting a snapshot of an Active Domain Controller can result in data loss, as the snapshot may not contain all of the latest changes to the Active Directory.
-
Active Directory corruption: The Active Directory database may become corrupted during the snapshot revert process, leading to issues with authentication, authorization, and other critical services.
-
Replication problems: The snapshot revert process can cause problems with replication between Domain Controllers, leading to inconsistencies in the Active Directory data across different servers.
-
Service disruptions: The snapshot revert process can result in disruptions to critical services, such as DNS, that depend on the Active Directory.
-
Security risks: The snapshot revert process can result in security risks, as it may expose sensitive data or compromise the security of the Active Directory infrastructure.
It is important to carefully consider the potential risks and consequences before attempting to revert a snapshot of an Active Domain Controller. It is recommended to only use this procedure as a last resort, and to thoroughly research and understand the potential risks before proceeding.
Preparing for the Restoration
Before you start the restoration process, you need to ensure that you have a snapshot of the Domain Controller that you want to restore. It is essential to note that restoring a DC from a snapshot is a risky process and should be performed only when no other options are available. Moreover, you must have a proper backup and recovery plan in place to avoid any data loss during the restoration.
Steps to revert a Domain Controller Snapshot
1) Revert to your last known good snapshot
2) Disable your network card so that it is unable to talk to the network
3) Note the value of your Invocation Id
- From a command prompt run the following command
- Repadmin /showrepl
4) Reboot your Domain Controller and make sure you boot into Directory Services Restore Mode
5) Stop the NTFRS service
6) From a command prompt start Regedit
- Drill down to HKLM – System – CurrentControlSet – Services – NTDS – Parameters
- Modify the RegKey “Database restored from backup” = 1
- If this RegKey doesn’t exist create one as a DWORD and set to a 1
- If the RegKey DSA Previous Restore Count exists in the same path, note its value. Upon reboot it should increment by one. If it didn’t exist it should be created and it should be set to a value of 1.
- Drill down to HKLM – SYSTEM – CurrentControlSet – Services – NtFrs – Parameters – Backup – Restore – Process
- Modify the RegKey BurFlags to D2
7) Reboot the server
8) Log back in to the Domain Controller
- Verify that the Invocation Id has changed
- In the Event Log look for the Event Id 1109 (AD restored from backup)
9) If both events have occurred in bullet point 8 then, enable the network card again
Best Practices for Restoring a Domain Controller from a Snapshot
Here are some best practices that you should follow while restoring a Domain Controller from a snapshot:
Best Practice 1: Ensure the Snapshot is Consistent
Make sure that the snapshot is consistent and the system is shut down gracefully before taking the snapshot.
Best Practice 2: Test the Snapshot
Before performing the actual restoration, test the snapshot on a test environment to ensure that the restoration process goes smoothly.
Best Practice 3: Have a Backup Plan in Place
Always have a backup plan in place and test it regularly to ensure that it is effective.
Best Practice 4: Monitor the DC after Restoration
Monitor the Domain Controller closely after the restoration to ensure that it is functioning correctly.
Conclusion
Restoring a Domain Controller from a snapshot can be a lifesaver in critical situations. However, it is a risky process and should be performed only when no other options are available. It is essential to have a proper backup and recovery plan in place and follow the best practices while restoring a Domain Controller