So you are deploying Servers regularly and ask becoming sick of completing this the manual way. Well to create a template for quick deployment is relatively easy, just follow the steps in this blog post and you will be deploying VMs in no time.
There are two methods to create a VMWare template, Clone to Template or Convert to Template.
Clone to Template
Clone to Template does exactly that. It creates an exact copy of the VM and leaves the original VM you choose intact. Choosing this option allows you to change the format of the Virtual Disk to either Thick or Thin Provisioning. Thin Provisioning the disk will allow the VM to use only the disk space it requires, and grow with time. Thick Provisioning the VM will use the amount of Disk Space you specify. Creating a Clone to Template VMWare duplicates the Virtual Disks and the .VMX file that holds all the configuration settings for that Virtual Machine.
Convert to Template is the other possible method available to you. (This is what I use in this example). It is much faster than using Clone to Template as it is not required to duplicate the source Virtual Machine disks. What it does is changes this VM to a Template format.
Once you have finished creating a VMWare Template following this post, Click this link to see how to make a VM automatically join a Windows Domain.
Convert to Template
Convert to Template is the other possible method available to you. (This is what I use in this example). It is much faster than using Clone to Template as it is not required to duplicate the source Virtual Machine disks. What it does is changes this VM to a Template format.
Once you have finished creating a VMWare Template following this post, Click this link to see how to make a VM automatically join a Windows Domain.
VMWare Template FAQs
What is a VMWare template?
VMWare template is a pre-configured virtual machine that can be easily duplicated and deployed.
Why should I create a VMWare template?
Creating a VMWare template can save you time and effort when deploying multiple virtual machines with the same configuration.
What are the two methods for creating a VMWare template?
The two methods are Clone to Template and Convert to Template.
What is the difference between Clone to Template and Convert to Template?
Clone to Template creates an exact copy of the virtual machine, while Convert to Template changes the virtual machine to a template format.
Which method is faster, Clone to Template or Convert to Template?
Convert to Template is generally faster as it doesn’t require duplicating the source virtual machine disks.
What are the steps to create a VMWare template?
The steps are: log in to your VMWare console, create a new virtual machine, specify the name, host/cluster, storage, operating system, network, and disk settings, install the operating system, shut down the virtual machine, and finally convert it to a template.
How can I customize the hardware settings of my VMWare template?
You can customize the hardware settings by selecting “Edit Settings” on the virtual machine and changing the appropriate settings.
How can I deploy a virtual machine using my VMWare template?
To deploy a virtual machine using your VMWare template, right-click the template, choose “New Virtual Machine,” and follow the prompts.
Can I change the configuration of a VMWare template after it has been created?
Yes, you can edit the settings of a VMWare template by converting it back to a virtual machine, making the necessary changes, and then converting it back to a template.
Are there any considerations to keep in mind when creating a VMWare template?
Yes, it’s important to ensure that the operating system is properly licensed and that any necessary updates and patches are applied before creating the template. It’s also important to follow best practices for securing virtual machines.
Create a VMware Template in the VMware Console
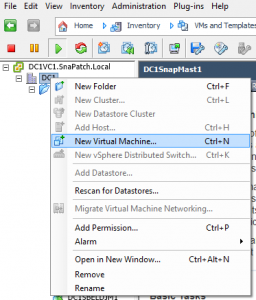
Login to your VMWare Console
Log in to your VMWare console and then Right Click your datacentre and choose New Virtual Machine.
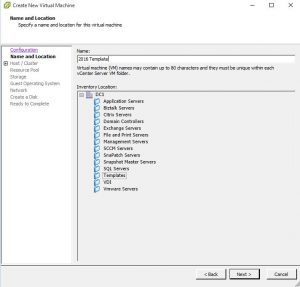
VMware Templation Creation
Now give the VM a name. As this is going to be a template for future deployment of Windows Server 2016, I have chosen 2016 Template to make it easier to see which Operating System this template will install.
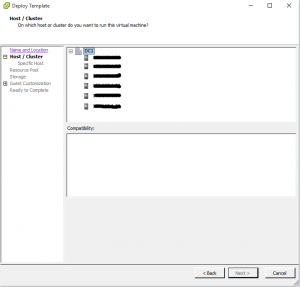
VMware Host / Cluster Tab
Chose the Host or Cluster you want the VM to be deployed to then click on Next.
VMware Host / Cluster Tab
Chose the Host or Cluster you want the VM to be deployed to then click on Next.
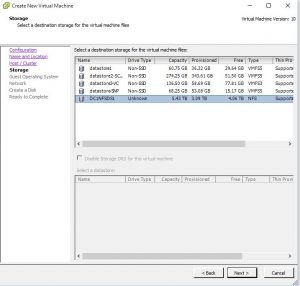
VMware Storage Tab
Next you specify the storage location for the VM to reside on. Select the appropriate VM datastore and then click on Next.
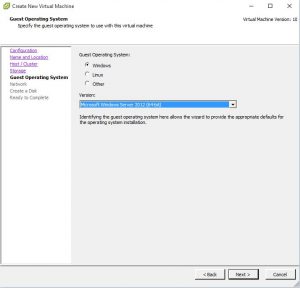
VMware Guest Operating System Tab
Choose the Operating System you want to install on the VM and click Next.
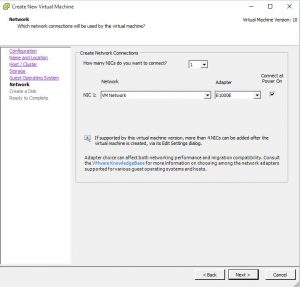
VMware Template Creation Network TAB
Select the VMware network you want this VM to communicate on and click Next.
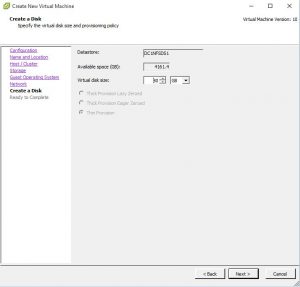
VMware Template Disk Creation
Specify the size of the Operating System Disk then click Next.
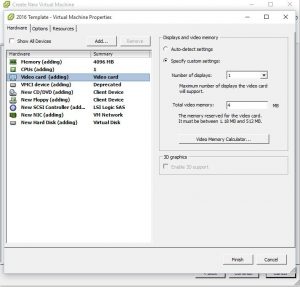
VMware Template Completion
Confirm the settings are correct and click on Finish. In this example I checked the checkbox for Edit the virtual machine settings before completion to show you what hardware settings you can change. Click Finish when ready.
VMware Template Settings
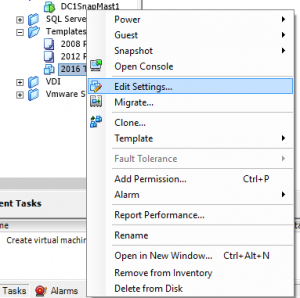
Now the VM is ready to install the operating system, you will have to attach an ISO file for the installation. Find the VM then Right Click the Virtual Machine and select Edit Settings.
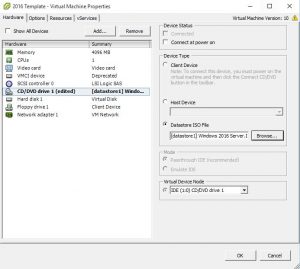
Edit VMware VM Settings
Select CD/DVD drive then Datastore ISO file. Browse to the datastore location of your Operating System installation media and select the appropriate media then click on OK. You can also change other hardware settings for this template.
VMware Template – Power On
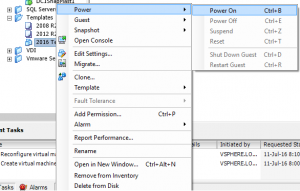
Now we need to install the Operating System so that we can easily redeploy this VM as a template. Right Click the VM and choose Power On.
VMware Template – Open the VM Console
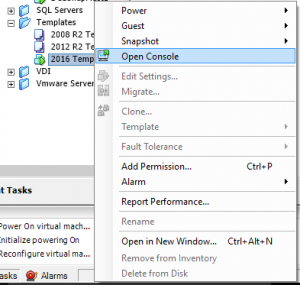
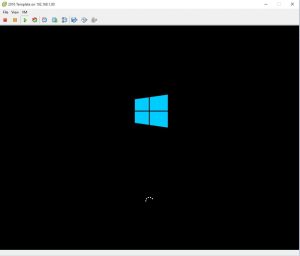
Right Click the VM again and choose Open Console so that you can install the Operating System.
Install the VM Operating System
Next will require you to install the Operating System. Please note that if you are going to change this to a VM Template, do not join your Windows Domain.
Shutdown the VM
Once the machine has logged in to Windows for the first time, shut the machine down.
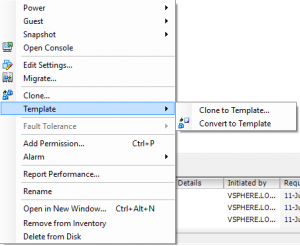
Create a VMWare Template
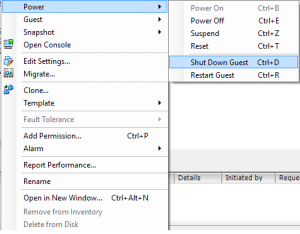
Once the installation of the Operating System has completed and the Virtual Machine is powered off we can now create a VMWare Template. Right Click the Virtual Machine, go to Template, then Convert to Template. This will now change the Virtual Machine and convert it to a ready to deploy Template for quick and easy future deployment.
Creating a VMWare template can save you time and effort when deploying servers regularly. By following the steps in this post, you can create a VMWare template using the Convert to Template method. Remember to shut down the VM after the first Windows login and then convert it to a template. With a VMWare template, you can deploy VMs in no time and focus on other tasks that need your attention.
Mark Smith co-founded SmiKar Software in 2015 and has spent the past decade helping organisations solve Microsoft 365 data management challenges. He works with the SmiKar team to build solutions for SharePoint archiving, storage optimisation, governance and compliance, supporting customers from growing businesses through to Fortune 500 enterprises.
More about SmiKar