by Mark | Oct 26, 2020 | Azure, Azure Blobs, How To, Storage Accounts
Azure Blob storage has provided companies with a way to store almost limitless amount of data. But just like kids in a candy store this can get out of hand, and expensive. Being able to store as much data as you want is great, however it is something that can grow to a point where you are spending more on storage than you actually need.
Azure does provide a nice method of automatically shifting old or unused files to a lower access tier to save on cost, but this still means you are potentially holding onto files you don’t really need. I mean do you really need files you haven’t accessed in over 12 months? Sure there are certain industries that require files that are kept for 7+ years, but they are a special case.
If you don’t know how to create an Azure lifecycle policy to automatically move unused files to a lower access tier, check out our other post here: https://www.smikar.com/create-azure-storage-lifecycle-policy/
OK, so do I go about finding these files that haven’t been accessed in the last 3, 6, 12 or 36 months (3 years) without having to browse through each and every Azure Storage Account and Container?
So how do you find your Azure Blobs that havent been accessed in 3 months or more?
Azure Blob Storage Consumption Reports
Simple, use Cloud Storage Manager, and run one of the many usage reports.
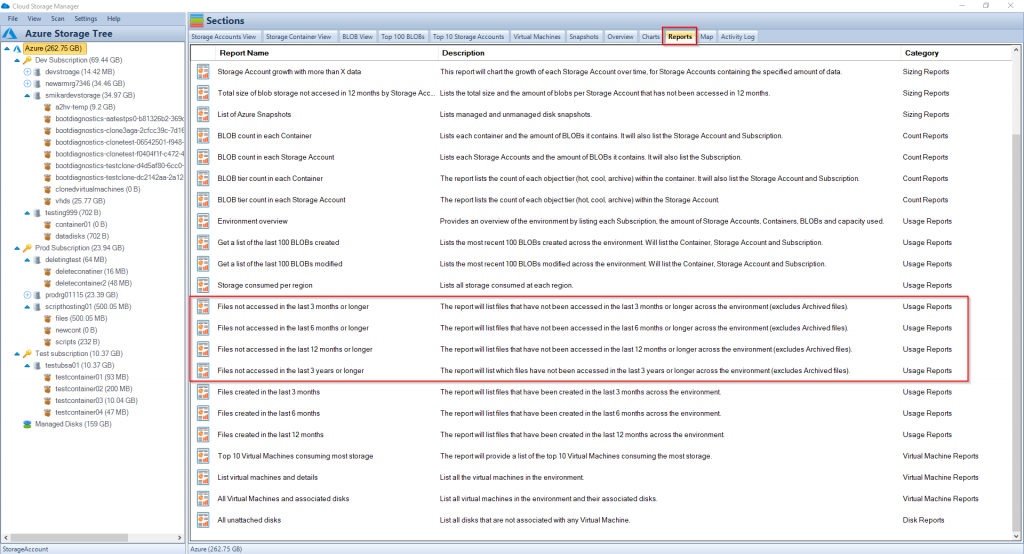
Cloud Storage Manager has a number of reports you can run to get a better insight into exactly where all your Azure Blob Storage is being consumed, but let’s focus on the specific 4 reports that will tell us which Azure BLOB files haven’t been accessed in the last 3, 6, 12 or 36 months (3 years).
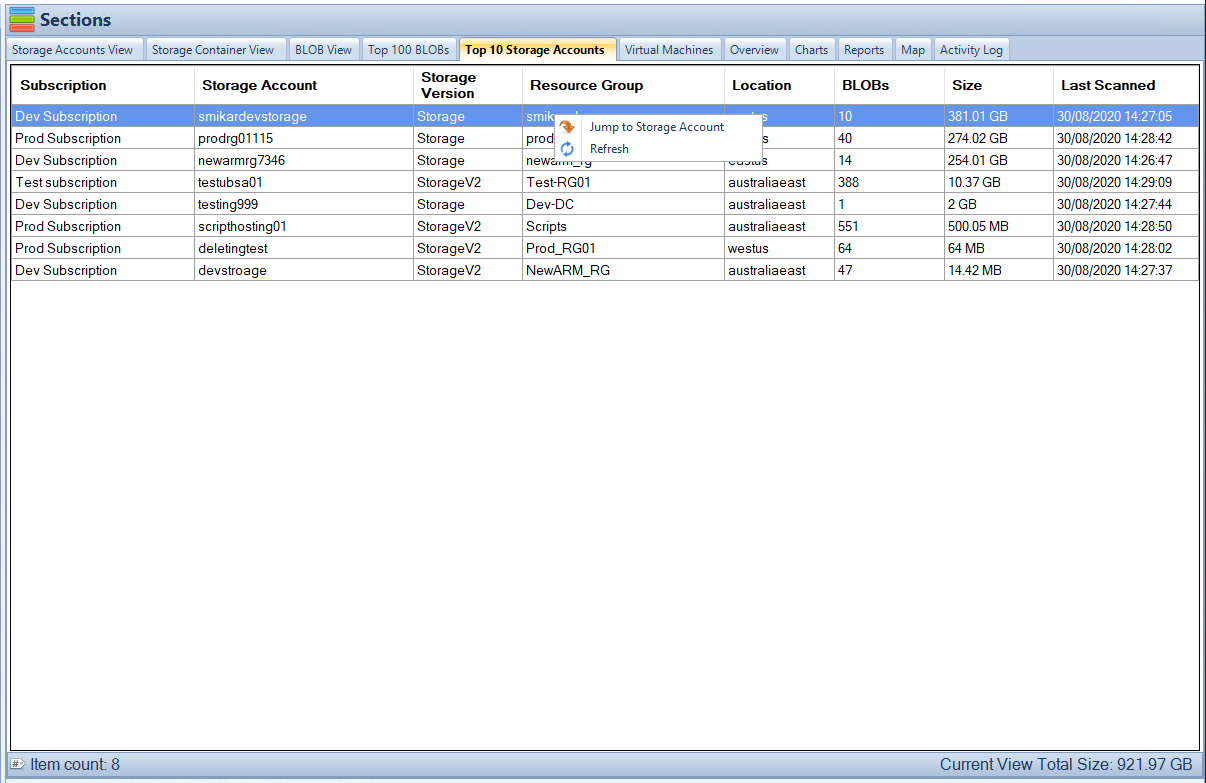
Once you’ve installed Cloud Storage Manager and allowed it some time to scan your Azure environment, browse to the Reports tab as shown here.
Azure Blobs not accessed within
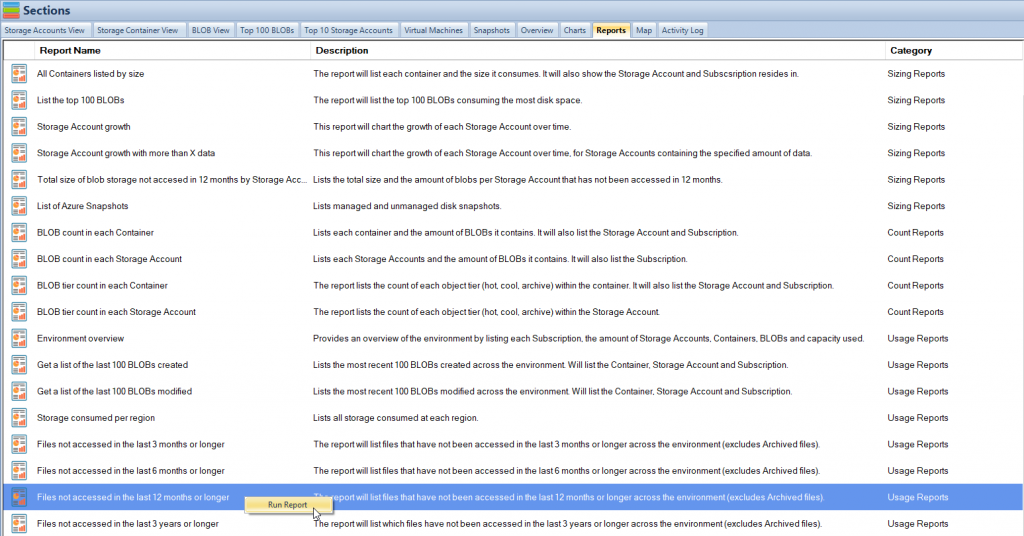
First let’s run the Files not access in the last 12 months or longer report.
Right click on the report and select Run Report.
Azure Blobs not used Report
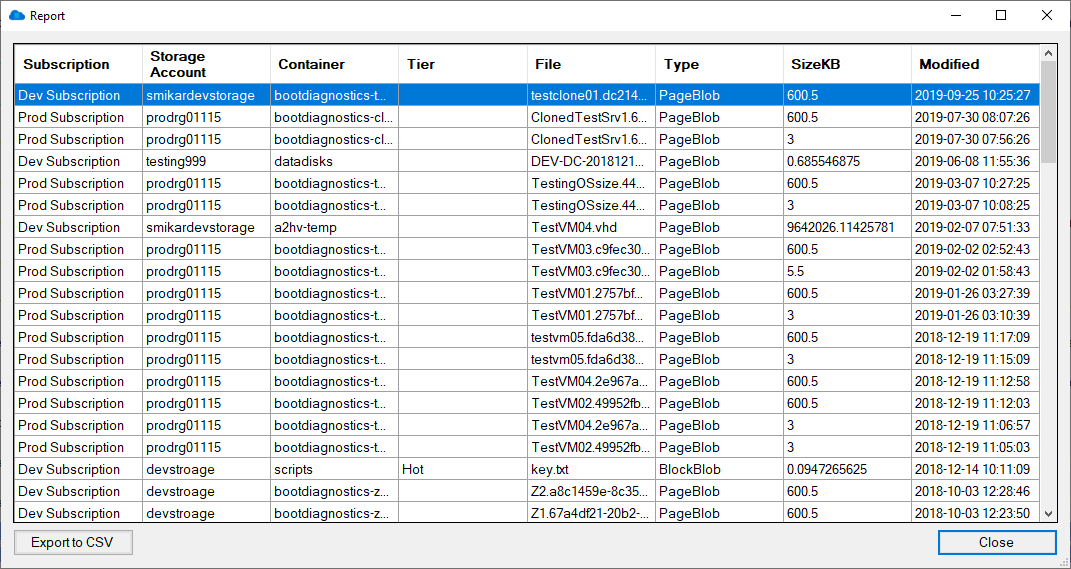
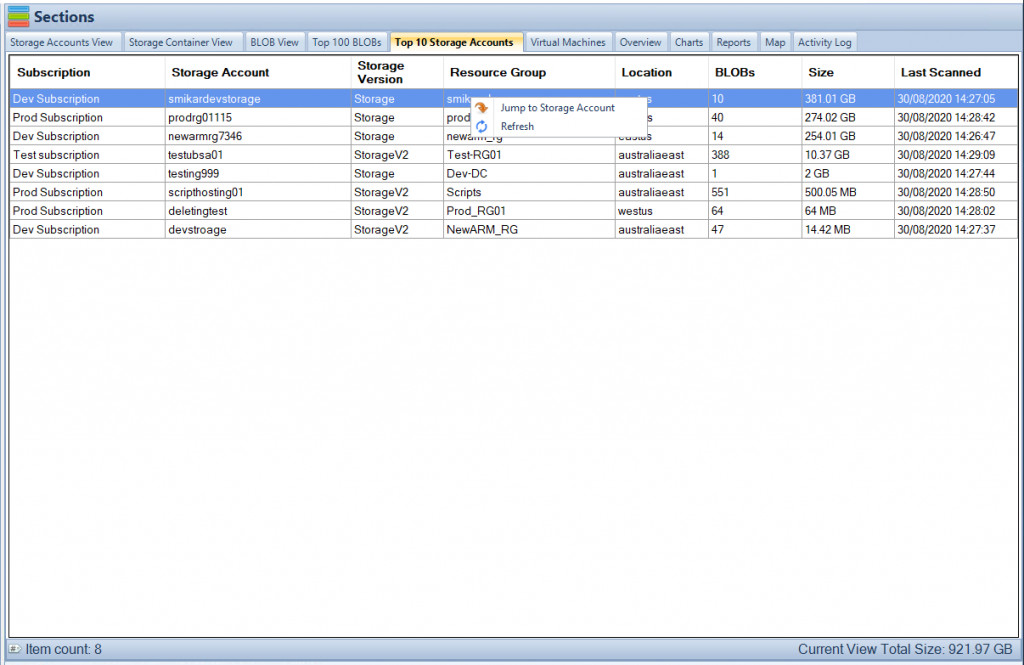
Once the report finishes, you will be shown a list of files that have not been accessed in the last 3 months or longer.
The report will show you which Subscription, Storage Account and Container the Azure BLOB file resides in. Not only that, but it will also tell you the object tier of the blob, whether that be hot or cool (archive files are excluded), the size of the file, the last time it was modified and of course the name of the file.
Here is an example of the report.
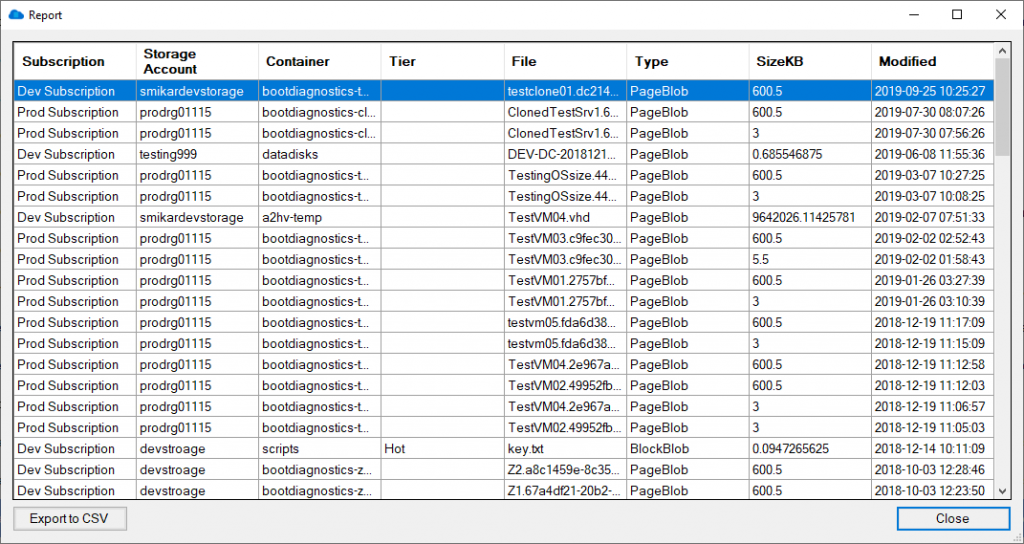
You can also export the report to Excel in order to adjust the report or present the information to others.
The same report may be executed to provide similar results but extending the criteria further out to search for files that haven’t been accessed in a longer timeframe, such as 6 months, 12 months or 3 years.
Using these reports, you can decide whether or not these files need to be retained, in which case you would move them to a lower access tier, either Cool or Archive for long-term retention, or even delete them if they are deemed unnecessary.
These reports are a great way to find files that haven’t been accessed in a long time and could provide an immediate cost saving associated with your Azure Storage consumption.
Cloud Storage Manager has free to trial. Start seeing insights in to your Azure Blob Storage consumption today.
Download a Free Trial and test it for yourself.
Free

Database size is limited to a maximum of 5MB.
Typically for small or personal environments usually consisting of 3 or less Azure Subscriptions and consuming under 30TB of Azure Blob Storage.
Advanced
Database size is limited to a maximum of 1GB.
For medium sized environments typically consisting of less than 10 Azure Subscriptions and consuming under 500TB of Azure Blob Storage.
Enterprise
Unlimited database size.
For use in large environments typically consisting of more than 10 Subscriptions and consuming more than 1PB of Azure Blob Storage.
Cloud Storage Manager is licensed based on the size of it’s database which includes information of each of your Azure Subscriptions, Azure Storage Accounts, Containers and finally each Blob.
Each version has the same great functions including scheduled scans of your Azure Blob Storage and reporting.
Azure Storage Cost Saving FAQs
What is Azure Blob storage?
Azure Blob storage is a cloud-based storage solution provided by Microsoft Azure that allows users to store large amounts of unstructured data such as text or binary data.
Why is it important to manage Azure Blob storage?
While Azure Blob storage can store almost limitless amounts of data, it can also become expensive to maintain as data accumulates over time. Proper management of Azure Blob storage can help reduce storage costs and improve overall efficiency.
How can Cloud Storage Manager help manage Azure Blob storage?
Cloud Storage Manager provides a number of usage reports that can be used to identify which Azure Blob files haven’t been accessed in a certain period of time, such as 3, 6, 12 or 36 months. These reports allow users to make informed decisions about whether to retain, move to a lower access tier, or delete unnecessary files, which can help reduce storage costs.
What are the benefits of using Cloud Storage Manager?
By using Cloud Storage Manager, users can gain insights into their Azure Blob storage consumption and identify areas where they can optimize storage costs. The usage reports provided by Cloud Storage Manager are easy to use and allow users to quickly identify which files haven’t been accessed in a certain period of time, which can save time and effort compared to manually browsing through each Azure Storage Account and Container.
How can I try Cloud Storage Manager for myself?
Cloud Storage Manager offers a free trial that can be downloaded and installed. This allows users to see the insights provided by the software and determine if it is a good fit for their needs.
Azure Blob Storage Consumption Reports are an excellent way to find Azure BLOB files that haven’t been accessed in a long time, and they can provide immediate cost savings associated with your Azure Storage consumption. By using Cloud Storage Manager, you can run reports and gain insights into your Azure Blob Storage consumption, allowing you to make informed decisions on how to optimize your Azure storage.
In summary, using Azure Blob Storage Consumption Reports can help you find unused Azure BLOB files and reduce storage costs, providing a cost-effective solution for storing your data in Azure. Start using Cloud Storage Manager today to see insights into your Azure Blob Storage consumption and start saving costs.

by Mark | Oct 14, 2020 | Azure, How To
We were recently asked for help by one of our clients that needed to separate a number of users from their existing domain by moving them into their own Active Directory forest. This can happen for all sorts of reasons, including divestments, security, geographical or division separation.
Whatever the reason, they needed to move these users across into an entirely new AD domain.
Now, although they were going to be moved into this new AD domain, they were still part of the same parent company and were going to remain within the same Azure AD tenant.
OK, doesn’t seem too hard, what’s the catch? Build the new domain, create a trust, move the users and resync them, job done.
Well, that was the plan until we looked into the configuration of AD Connect and discovered that the source anchor was set to the OBJECTGUID.
If you aren’t familiar with this, AD Connect uses the source anchor as a mechanism to “match” on-premises users with Azure AD users. In the newer versions of AD Connect the source anchor is usually set to the mS-DS-ConsistencyGuid which makes life easier.
However, older versions of AD Connect used the OBJECTGUID.
Now comes the problem. When a user is moved from domain1 to domain2, a new OBJECTGUID is created so when you try and sync them up again AD Connect will not recognise them as the same user and will create a new user account for that user. Even though technically it’s the same user, AD Connect does not see it that way because the ImmutableID is different.
The ImmutableID is the OBJECTGUID converted to Base64.
OK, so how do we get these users moved from domain1 into domain2 and have them sync with their existing Azure AD user?
You have to delete them…kind of.
Before we begin, I am assuming you have:
AD Trust in place between the original domain and the new domain
AD Connect has been configured to sync across both domains (if you don’t know how to do this, check out our other post explaining the process: https://www.smikar.com/second-domain-using-ad-connect)
Step 1.
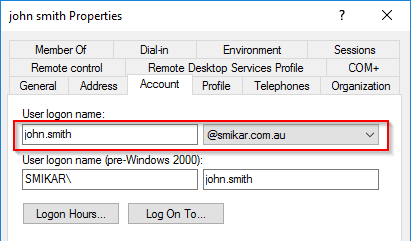
As these users need to retain the same UPN, the first thing we need to do is to add the UPN suffix to the new domain. If you have already done this, you can skip this step.
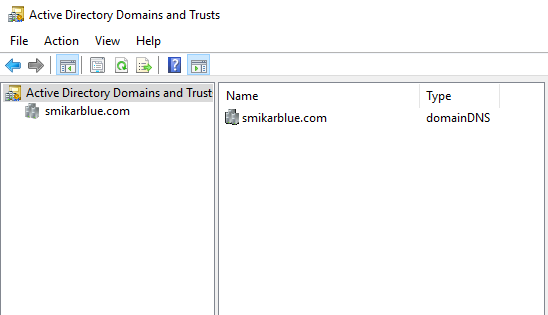
Log into the new domain and launch the Active Directory Domains and Trusts console
Step 2.
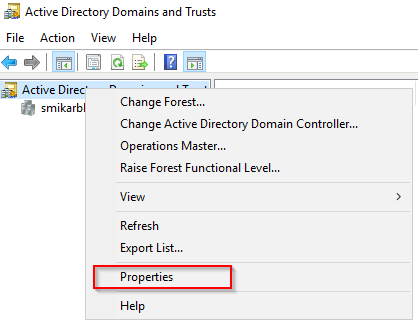
Right click on the AD Domains and trusts and select properties
Step 3.
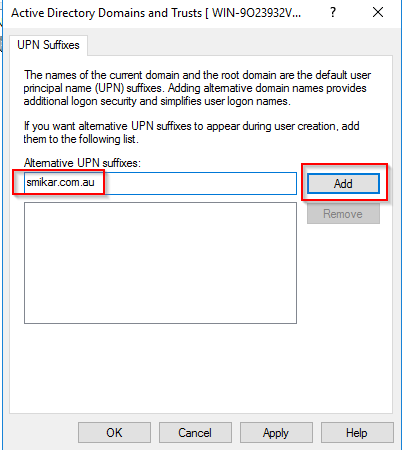
Enter the name of the UPN you need to add.
Click Add and then OK.
Step 4.
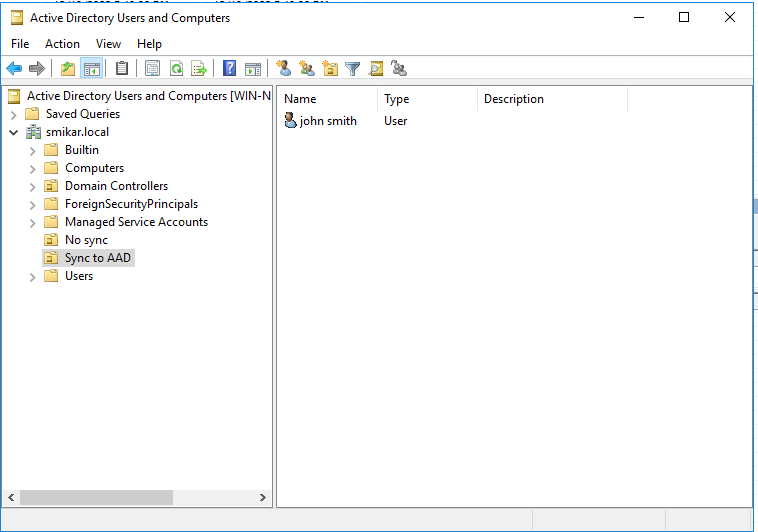
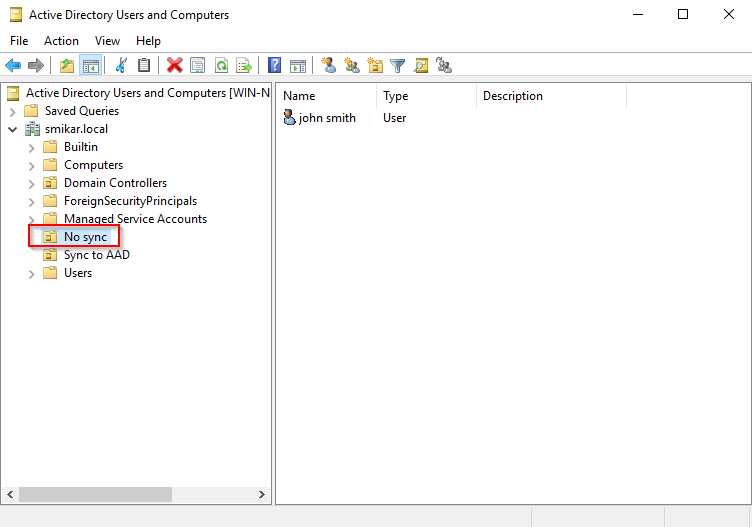
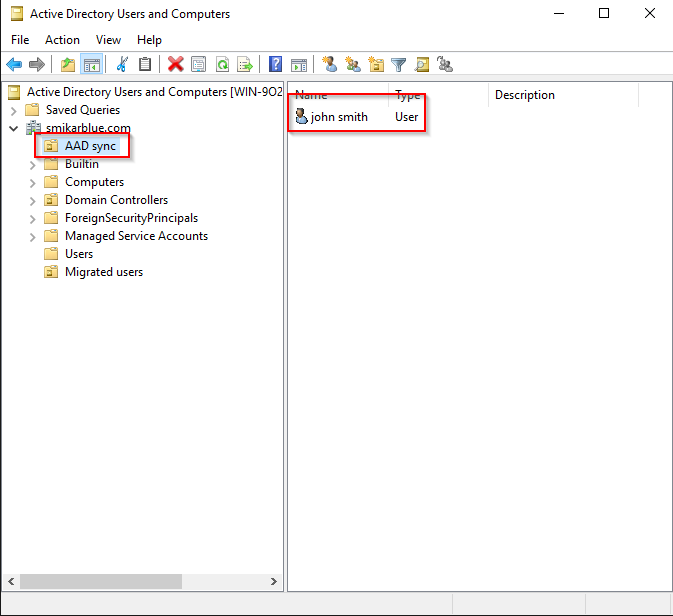
Now what we need to do, is remove the users from the sync cycle. The easiest way to do this is to move them into an OU that is not being synced. Below is our test user in AD.
Step 5.
Here is the user in Azure AD

Step 6.
Now let’s move him into an OU that is not being synced.
Step 7.
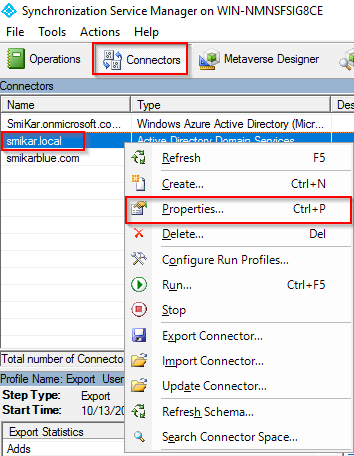
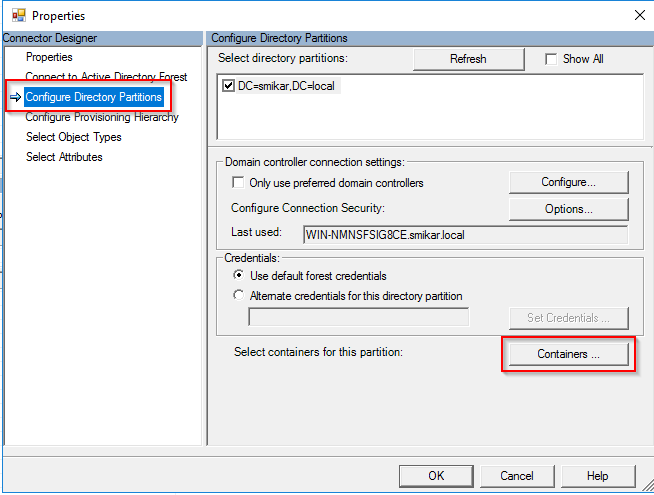
If you are syncing the entire domain then you will need to change some settings in AD Connect so you have at least one OU that is not being synced.
If you don’t know how to do that, open up AD Connect, click on Connectors, right click on the domain and select properties. Under the Configure Directory Partitions you will find a Containers button. That is where you can select which OUs to sync.
Step 8.
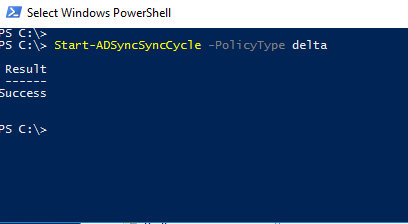
Open a PowerShell console and enter: Start-ADSyncSyncCycle -PolicyType delta
This will initiate a delta sync to Azure AD
Step 9.
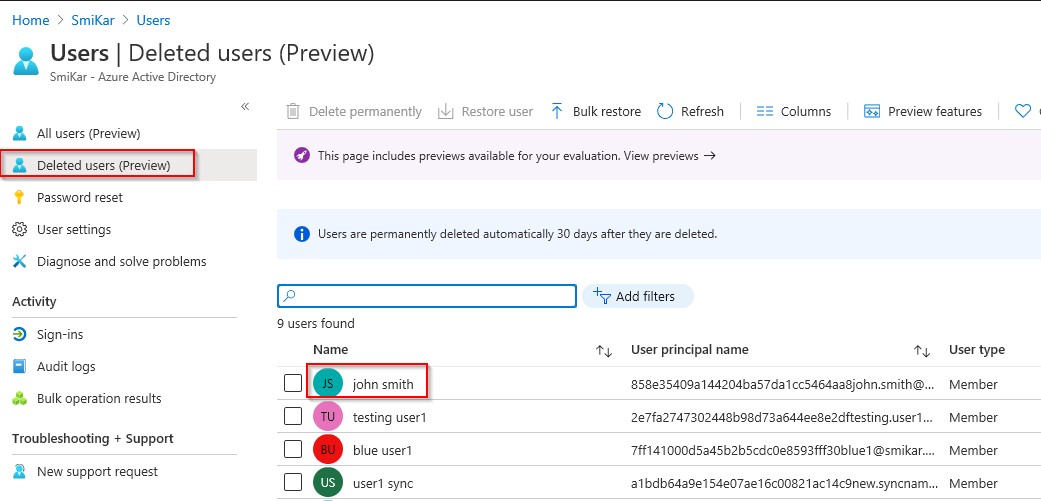
Log into the Azure portal and open the Active Directory panel
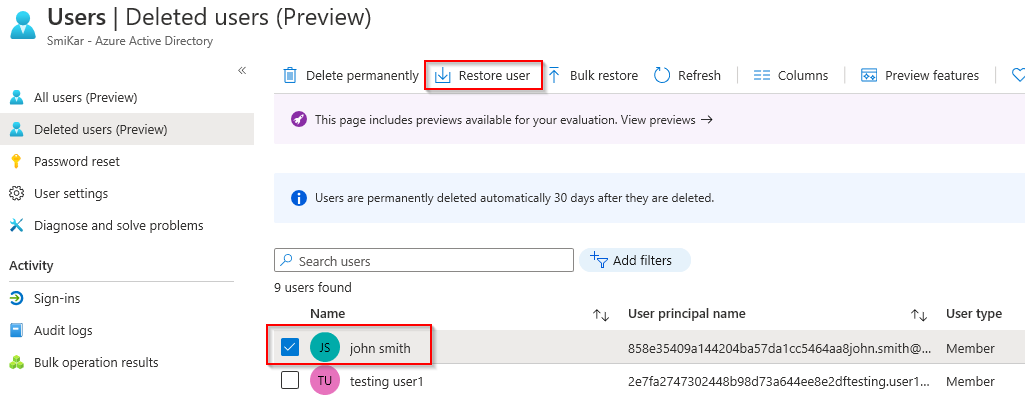
Select the Deleted Users option on the left hand blade
In here we should find our “deleted” user

Step 10.
Select the tick box next to the user and click on Restore User
Step 11.
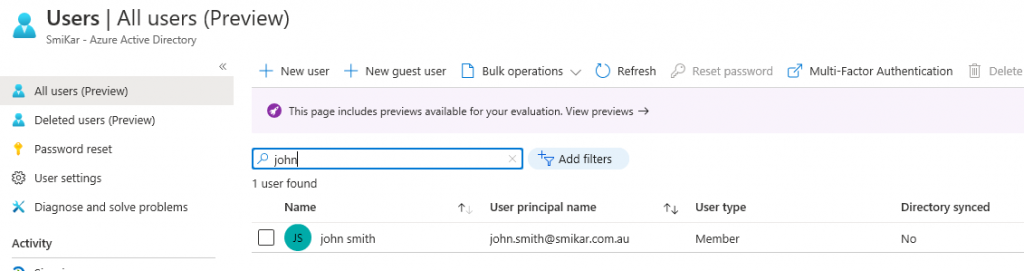
Once the user is restored, click on the All Users blade on the left and search for the restored user.
Step 12.
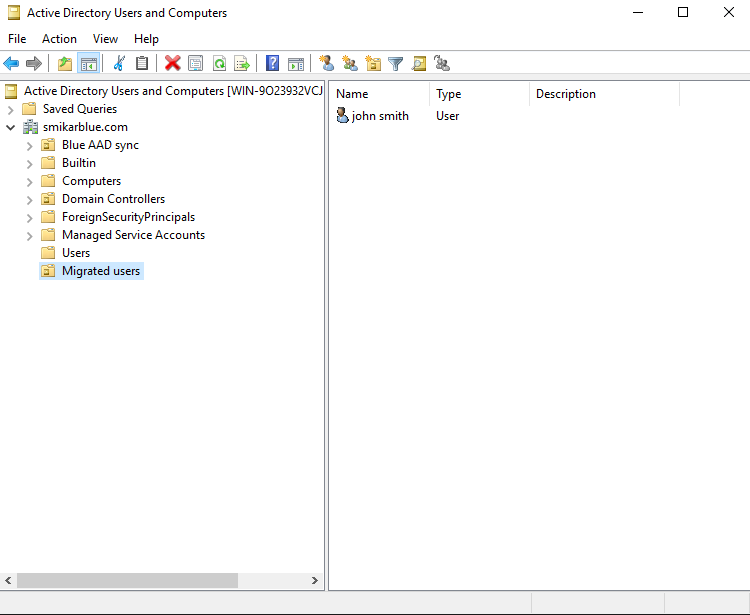
Migrate the user from the original domain to the new domain.
We used ADMT to perform this task but I won’t go into detail on this. If you need help on how to set this up and use it, here is a good guide.
https://www.pelegit.co.il/admt-active-directory-migration-tool/
Here is the user we migrated into the new domain.
Step 13.
Now we need get the OBJECTUID of the migrated user, convert it to an ImmutableID and apply that to the restored user in Azure AD.
The below command will get the OBJECTGUID and convert it to an ImmutableID for a single user but can be converted to run against multiple users (you will need the ActiveDirectory and MSonline modules installed).
$ImmID = Get-ADUser -identity john.smith -Properties ObjectGUID | select ObjectGUID | foreach {[system.convert]::ToBase64String(([GUID]($_.ObjectGUID)).tobytearray())}
Now let’s set that ImmutableID to the restored user.
set-msoluser -UserPrincipalName “[email protected]” -ImmutableId $ImmID
Step 14.
Move the user into an OU that is flagged to sync
Step 15.
Now let’s kick off another sync
Start-ADSyncSyncCycle -PolicyType delta
Job done
The user will now be matched with the restored user account as the ImmutableID will match the migrated user.

by Mark | Oct 13, 2020 | Azure, Cloud Computing, How To
Overview
Are you looking to integrate a new company into your existing Azure AD tenant? Or perhaps you need to share your tenancy and Office 365 services with more than one company? If you find yourself in a position where you need to sync users from another domain and have already configured AD Connect, then there is a way to add the second domain to your current Azure tenancy, so you can sync those users from the second domain.
Before proceeding, make sure you review the supported topology when it comes to AD Connect and multiple domains/tenants. You can find the information in this Microsoft article: https://docs.microsoft.com/en-us/azure/active-directory/hybrid/plan-connect-topologies
However, there is one limitation that will most likely cause you the most grief, and is probably why you landed here in the first place. You can only have one AD Connect instance per tenant. So, if you need to sync users from a second domain, you will have to follow the process outlined below.
Establish Domain Trust Before proceeding, you need to establish an AD trust between the two domains. If you have not done this yet, you will need to perform this step first. If you are not sure how to do this, you can refer to this guide: https://www.azure365pro.com/how-to-create-two-way-transitive-trust-windows-server-2008-r2/
OK, now that we have our domain trust established, let’s step into the process.
Step by step guide how to synchronise users from a second domain in to Azure Active Directory.
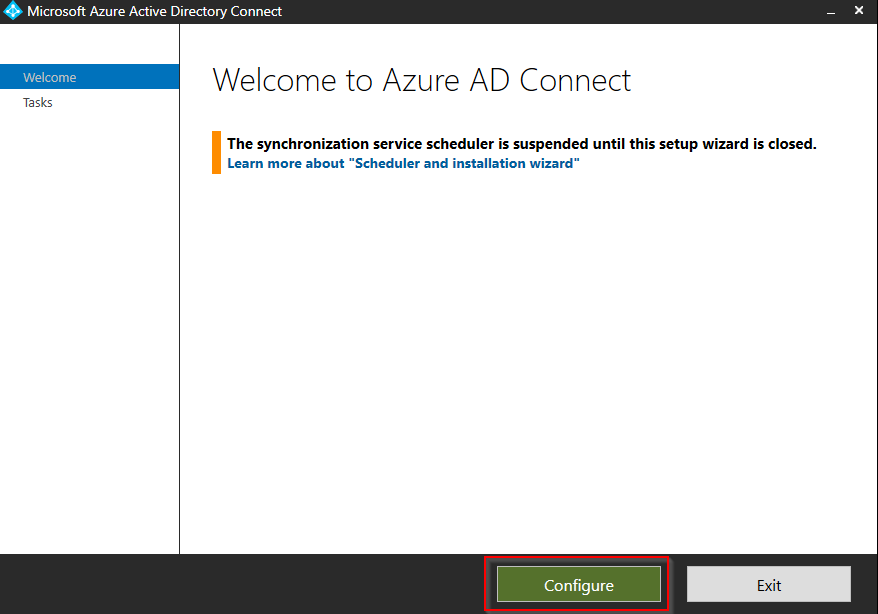
Launch AD Connect and click on Configure
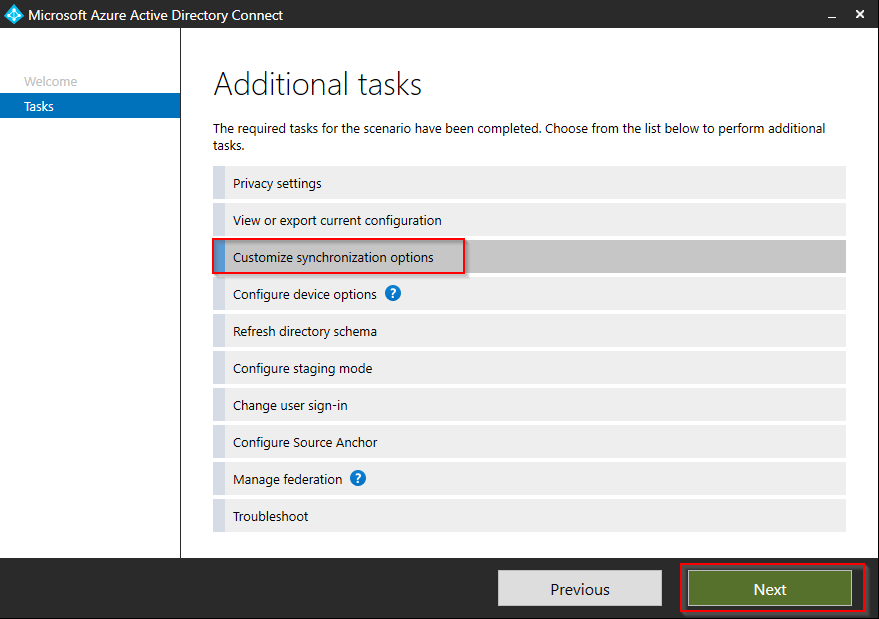
Click on Customize synchronization options and click Next
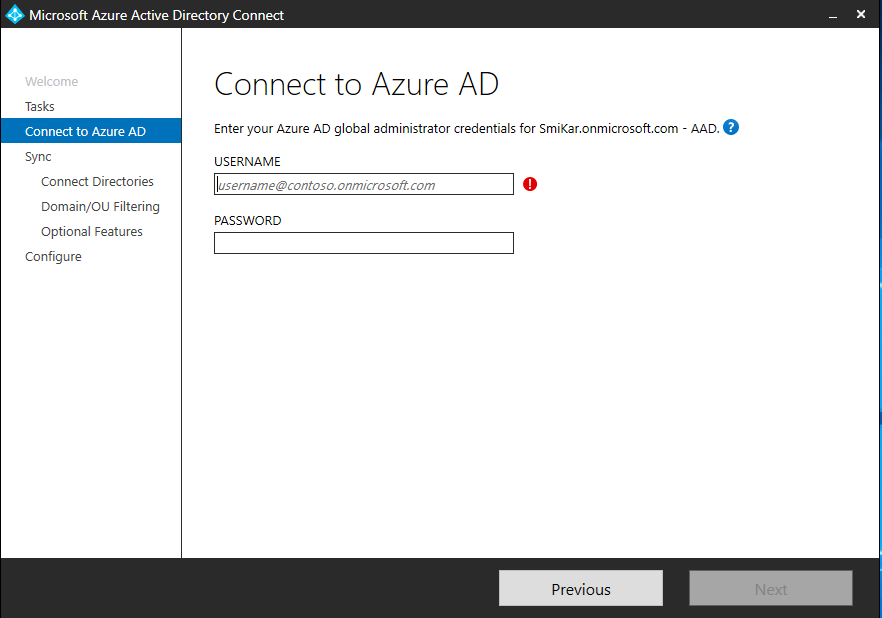
Enter the credentials to connect to Azure AD and ensure the account is a global administrator.
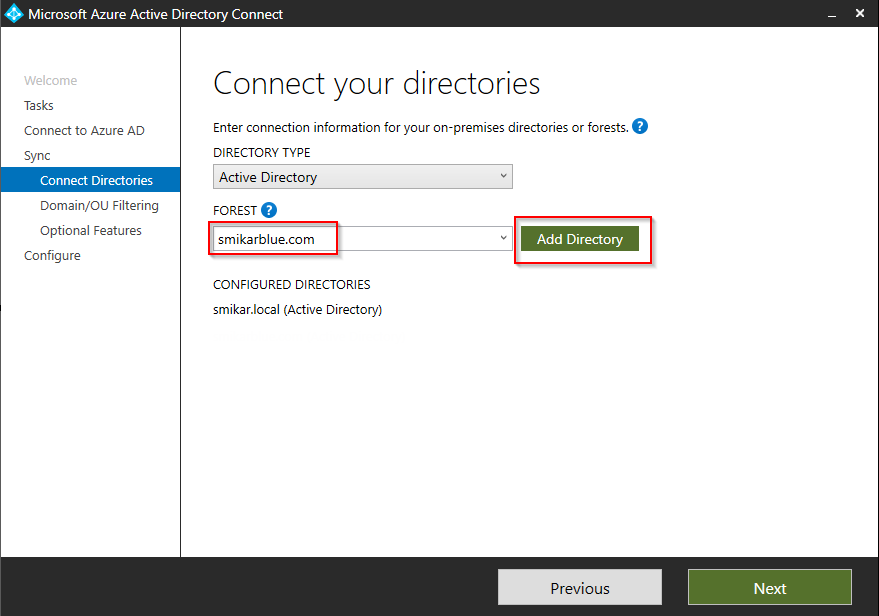
Enter the name of the second domain and click Add Directory
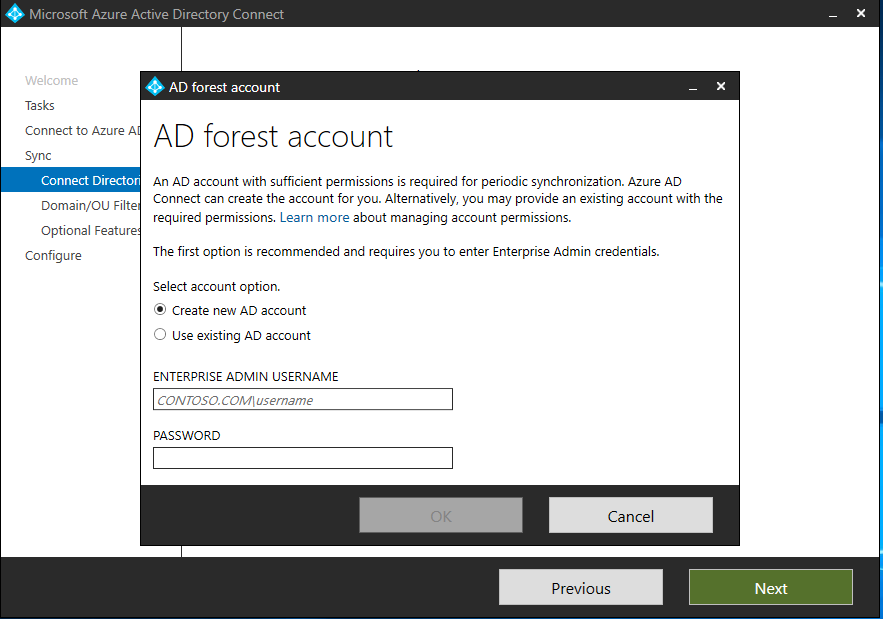
Enter the details of a user account in the domain that is a member of the enterprise administrators group.
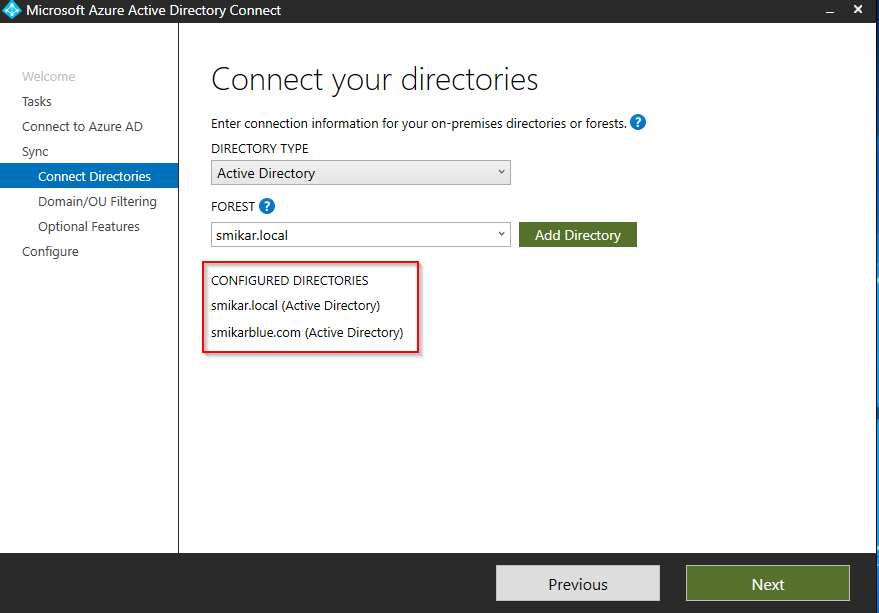
You will now see the second domain added to the configured directories list.
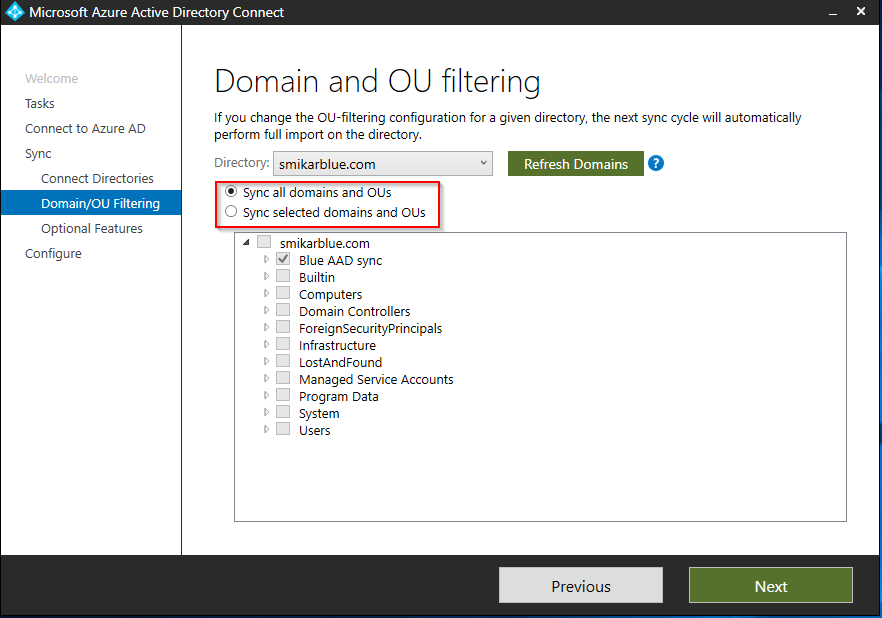
Select whether to sync all the objects in the domain, or to sync only objects in specific OUs.
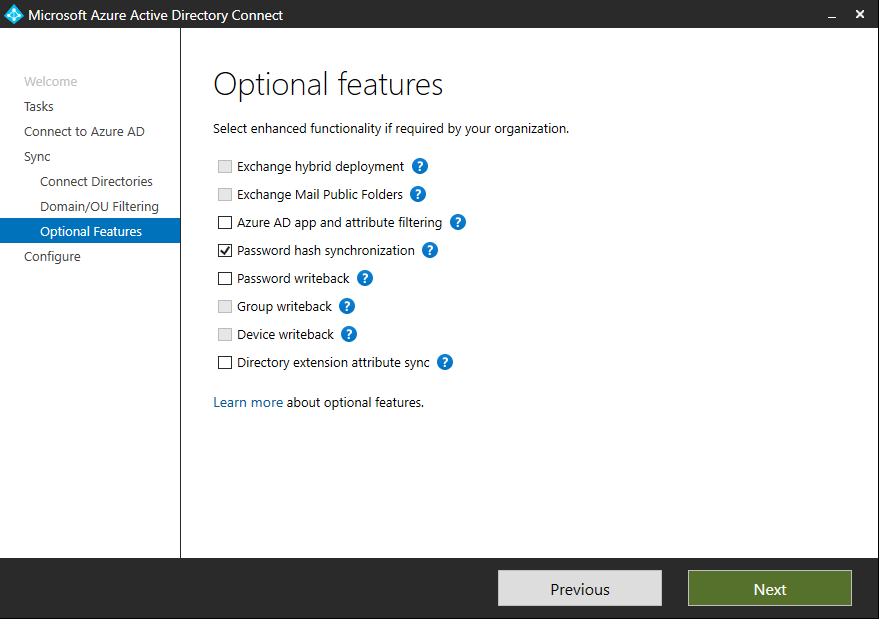
Select any optional feature you require and click Next
Tick the box if you want to start the synchronisation process once the configuration completes, or you may untick it and place AD Connect into a “disabled” mode (will require PowerShell commands to activate it).
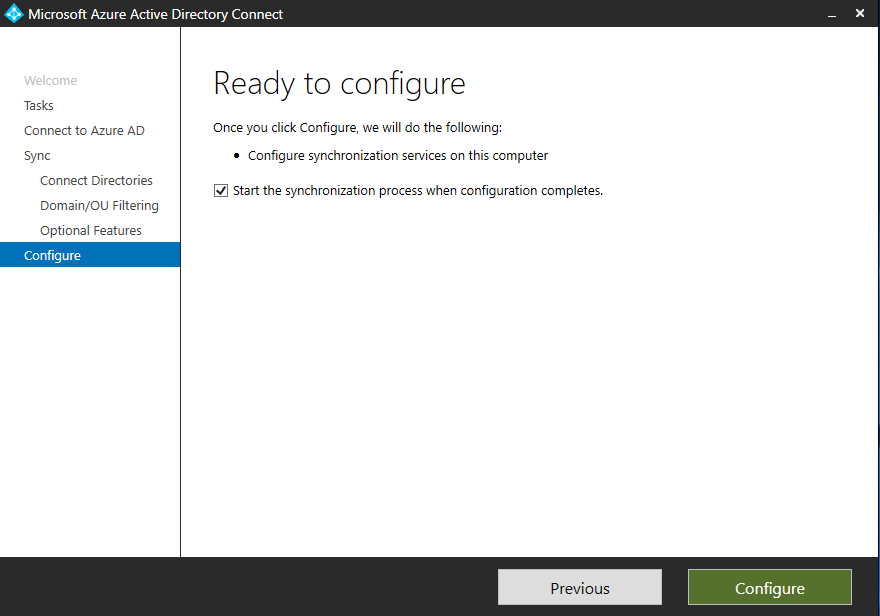
Click Configure when ready to finish the process.

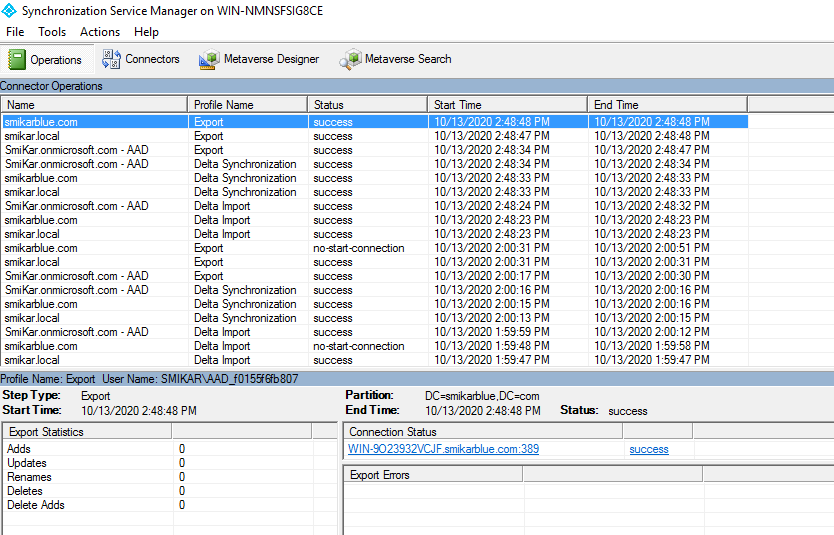
AD Connect will now synchronise objects from both domains into your Azure AD tenant.
You can monitor the process by launching the AD Connect Synchronization Service Manager.

by Mark | Oct 2, 2020 | Azure, Azure Blobs, How To, Storage Accounts
How to get the Size of your Azure Blob Containers
Something we get asked quite often is, how can I see the size of my Containers in each Storage Account? We know that Azure storage is one of the fastest growing aspects of Azure because it offers almost a limitless supply of storage, so companies are consuming more and more storage at an explosive rate. The question of being able to track this consumption is becoming more and more relevant.
OK, so how can I get the size of my containers in a Storage Account? Azure offers a few ways to do this, but each of the methods available are quite time consuming unless you only want to see the size of one or two containers, otherwise you’re in for some effort.
One way of course is good old PowerShell. We love PowerShell but a lot of people don’t want to be using scripts and code, either because they don’t feel comfortable with it or don’t have the time to be changing scripts to suit their specific environment and requirements, so I’m going to skip this aspect.
Why is it’s important to track the size of containers in Azure?
Tracking the size of containers in Azure is important for a number of reasons:
- Cost control: Knowing the size of containers helps to control the costs associated with using Azure storage. Azure storage is a pay-as-you-go service and the costs depend on the amount of data stored. By monitoring the size of containers, organizations can ensure they are only paying for the storage they need.
- Resource management: By monitoring the size of containers, organizations can determine which containers are growing quickly and need additional resources, such as increased storage capacity, to accommodate the growth.
- Compliance: In certain industries, regulations require organizations to keep track of the data they store. Knowing the size of containers helps organizations ensure they are in compliance with these regulations.
- Data analysis: The size of containers can provide valuable insights into the growth and usage patterns of the data stored in Azure. This information can be used to make informed decisions about future data storage requirements.
Overall, tracking the size of containers in Azure is important for ensuring the efficient and effective use of storage resources, staying in compliance with regulations, and making informed data management decisions.
No Powershell Required
OK, if we skip PowerShell what other options do I have?
First I’ll show you how to get the size of the Containers using the Azure Portal and then I’ll show you how much easier, quicker and better it is to use our FREE TOOL, Cloud Storage Manager.
*Note: Before we start, when using the Azure Portal to find the size of a Container, you need to know which Storage Account the Container resides in.
How to get the size of a Container in a Storage Account using the Azure portal
1. Log into the Azure portal
2. Select Storage Accounts from the panel or use the search bar at the top
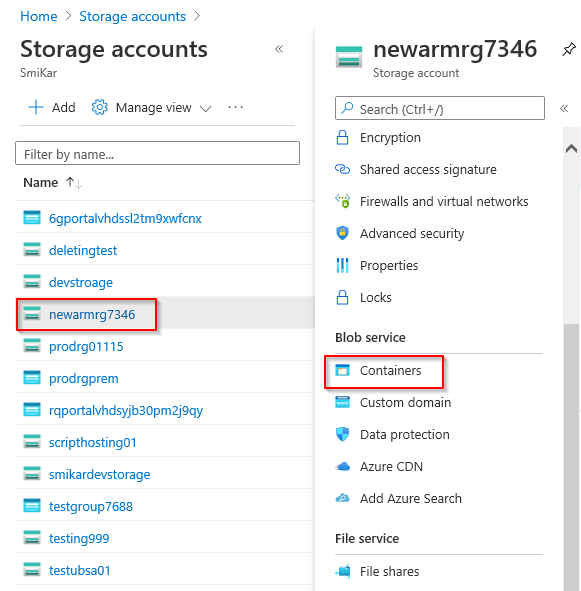
3. Here you will see all your Blob Storage Accounts. Select the Storage Account you want to view.
Blob Container View
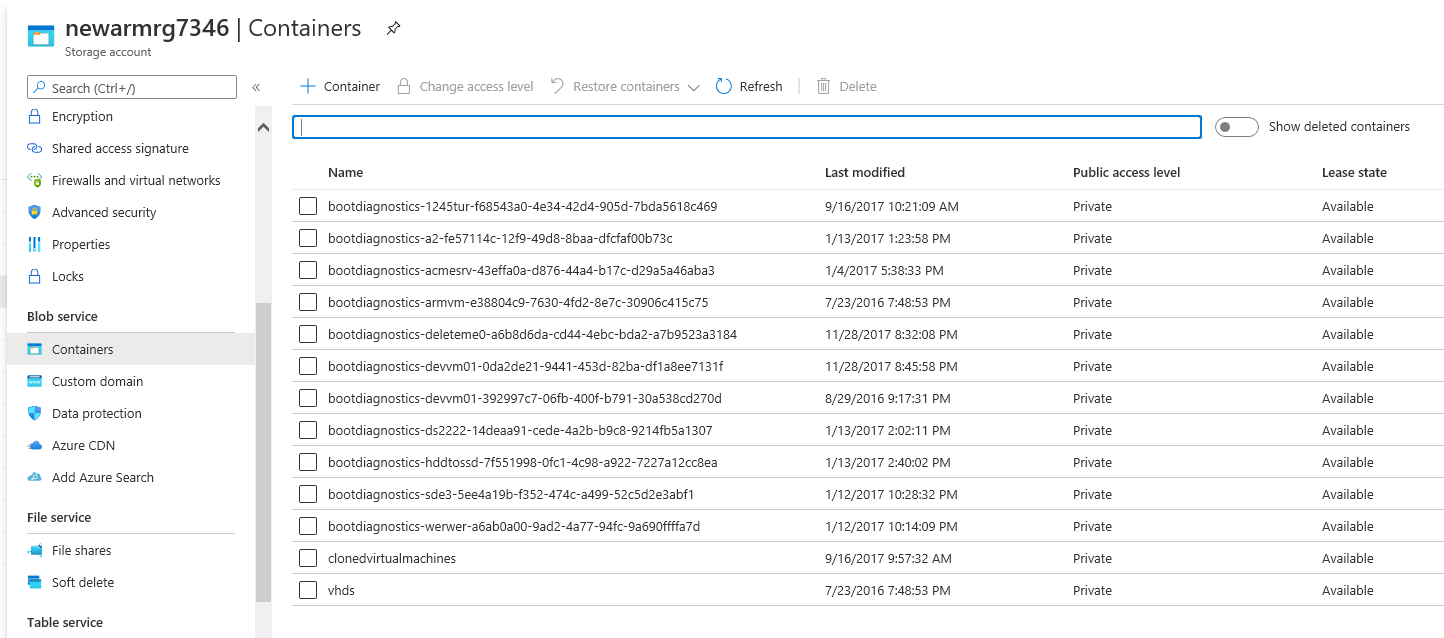
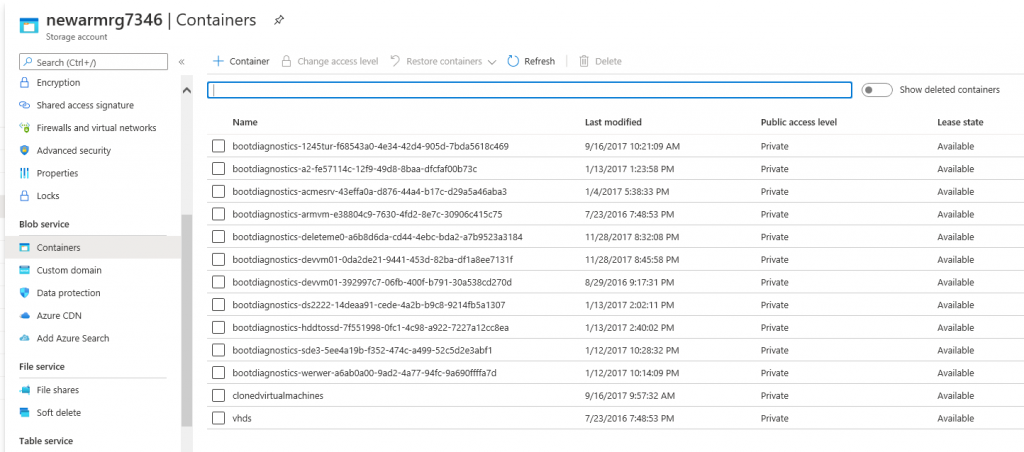
4. Select Containers on the left pane next under the Blob Service section.
This will take you to the Storage Container view of that Storage Account you have selected, showing all the containers within.
List all Blob Containers
5. Here you will see a list of all the Containers in that Storage Account.
Select the Container you are interested in.
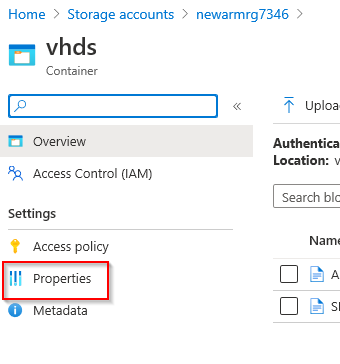
Blob Container Properties
6. Once inside the Container, select Properties on the left hand side.
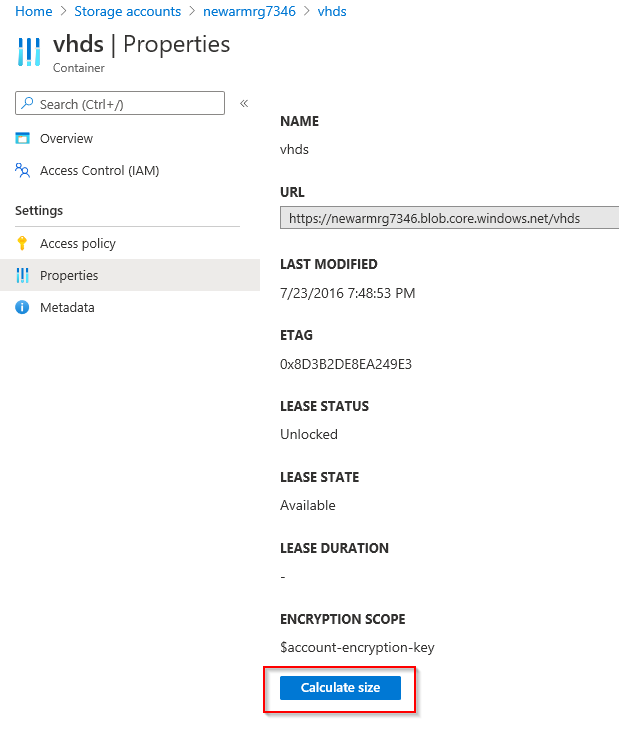
Azure Blob Container Size
7. Inside the Properties view you will have a button at the bottom to “Calculate Size”. Click on this button to get the size of the Container.
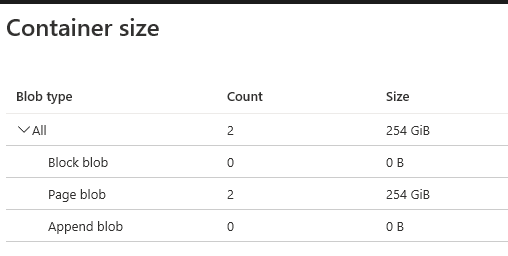
Azure Blob Container Total Size
8. Now you are presented with the Blob Container Size.
What if you want to see the Consumption of all your Storage Accounts?
So that is how you can get the size of a Container in a Storage Account using the Azure portal. Not too bad if you have one or two Containers you want to see. But what if you have 50 or 5,000? That method is not realistic.
The Azure portal method for determining the size of a container is limited when it comes to multiple containers as it becomes time-consuming and unrealistic. For example, if you have 50 or 5,000 containers, using the Azure portal to manually calculate the size of each container is not a feasible solution. Additionally, if you don’t know which storage account a container is in, it becomes difficult to find the size of that container using the Azure portal method.
Also, what if you don’t know which Storage Account the Container is in? Good luck!
So what is the solution? Glad you asked.
Get your Azure Blob Storage Consumption
All you have to do, is launch Cloud Storage Manager. No, seriously that’s it. Once it’s finished scanning your environment, all you have to do is launch it.

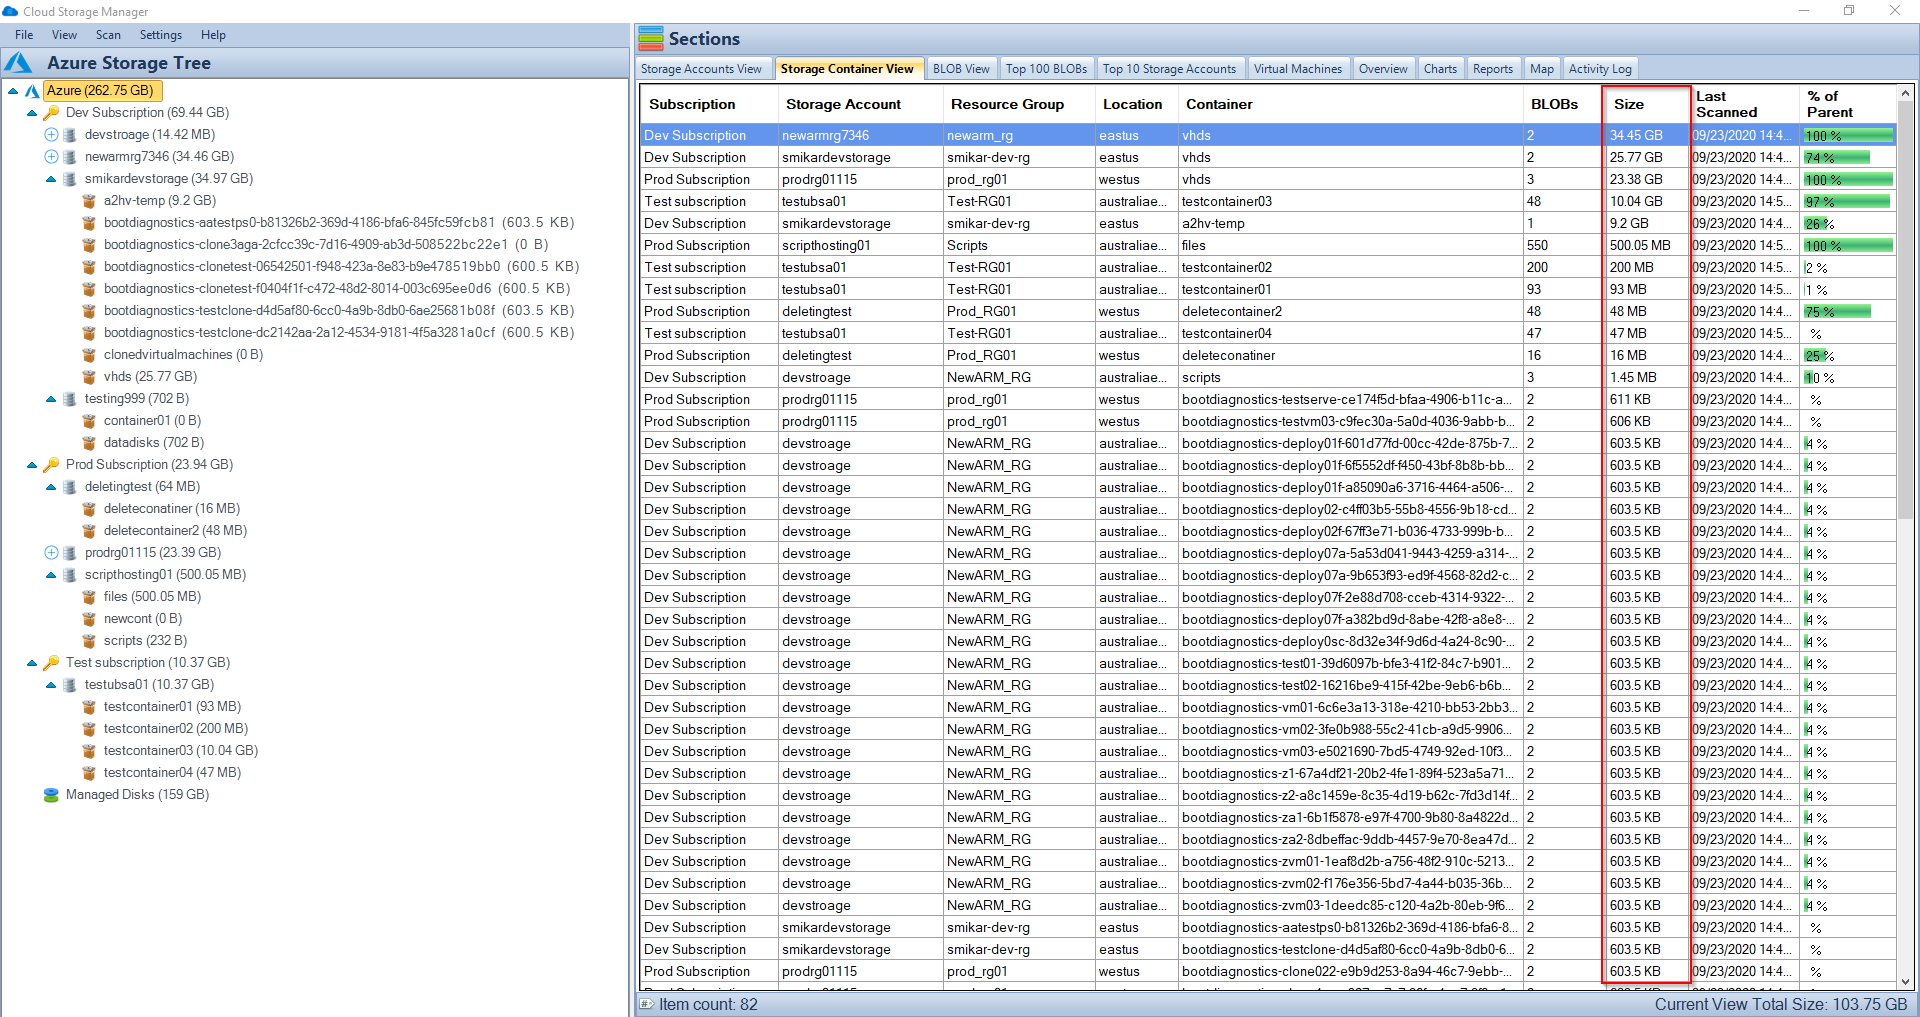
Azure Blob Storage Usage Information
On the left side you’ll see a list of all your Subscriptions (with total size), Storage Accounts (with total size) and Azure Storage Containers (with total size).
And if you want even more information, the right hand panel shows you how many Blobs in each Container in Azure, the Container size and what the percentage of total size it’s consuming relative to the Storage Account.
Furthermore you can get historical growth reports on your Azure Blob consumption providing you with great insights in to your Azure Storage growth.
As you can see, Cloud Storage Manager is by far the easier and simpler way of finding out how much storage a Container is consuming in Azure.
Download it for FREE and use it today.

by Mark | Oct 1, 2020 | Azure, How To
The Top Azure blogs we follow
As Microsoft is forever releasing new functionality within Azure and all its offerings its often hard to keep abreast of the latest changes in technology.
To do so, we here at SmiKar Software often follow influential and knowledgeable people that are experts in the their fields, to keep up to date ourselves. In no particular order, here are some of the noteworthy Azure Blogs that we follow.
They all help us understand and keep up to date with Azure and technology in general, hopefully they can do the same for you too.
Where to get the best Microsoft Azure News
Founded by Chris Pietschmann in 2015 (originally as BuildAzure.com) with a focus on Microsoft Azure, Hyper-V, VMware and Citrix content. Articles are written by both Chris and Dan Patrick which are both Microsoft Most Valued Professionals (MVP) and their blog provides great weekly content with over 11,000 subscribers.
Robert Smit’s has over 20 years experience and is another Microsoft Most Valued Professional (MVP) in both Clusterings and Cloud and Datacentre. His blog provides great insight in to Azure with lots of relevant how to guides.
Dishan Francis’s provides a comprehensive blog that is over 7 years old. His blog is not just about Microsoft Azure but also on Azure Active Directory. His blogs are very informative and often go quite in to technical detail.
Aavisek Choudhury works for Unisys as a Lead Azure Cloud Platform Architect. He has been working with Microsoft technologies since 2000 and his blog provides his knowledge and insights in to Azure.
Now any blog list for Azure cant be complete without Microsoft’s own blog on Azure. Great site to quickly find information on Azure new services and updates.
Christiaan has a great blog primarily focused on Virtual Desktop technology where he gives his views and knowledge on everything Microsoft, VMware and Citrix.
Sarah Lean works for Microsoft and while her blog is fairly new, she provides a great blog to follow on Azure and Microsoft Teams. Her expertise inst just in those but also her career has been focused on Microsoft Exchange, SCCM and Patch Management.
Ryan Mangan is the Chief Technology Officer at Systech IT Solutions and is passionate about End User Computing. His blogs are a great guide for Azure and Virtual Desktop information.
Michael Coutanche’s blog is focuesd on Azure, Hyper-V, System Centre Virtual Machine Manager (SCVMM) and Remote Desktop Services with great informative articles and how to guides.
Practical 365 is a joint effort from Steve Goodman and Paul Robichaux, who both happen to be Microsoft Most Valued Professionals.Their blog provides information on Azure, Office 365, Exchange, Sharepoint and more.
Kenneth van Surksum is a senior consultant at Insight24 (and yet another Microsoft Most Valued Professional) and his blog provides information on Azure and Office 365 solutions as well as System Centre Configuration Manager (SCCM) and Intune.
Tao Yang is another great blogger and also yet again another Microsoft Most Valued Professional who in his blogs shares his thoughts about Azure and Office 365 technologies.
Thomas Janet’s check has over 15 years experience in both on premises and cloud infrastructure solutions. His great blog provides his thoughts on Azure and cloud based technologies. He is also another Microsoft Most Valued Professional.
Shabaz Darr writes a great blog called I am IT Geek (Aren’t we all at heart). His blog delves in to his experiences with technology, especially Microsoft Azure and Teams.
Daniel Neumann is a mutli time Microsoft Most Valued Professional. His blogs are a great source of information on Azure, with a good focus on Kubernetes.
Jamie has been in the software industry for years and worked mainly with Microsoft .Net. We find his blogs a great source for coding and Azure in general. Jamie is another Microsoft Most Valuable Professional.
Another Microsoft Most Valuable Professional, Marcos Nogueira’s blog Azure Centric is just that. A great informative blog that provides you with great how to guides on the setup of various Azure Services.
Thomas Thorton is highly accredited in Microsfot Azure technologies. His blog has a heavy devops focus and has insightful information on deploying services in Microsoft Azure.
Sam Smith is also hold accreditation as an Azure Architect and Azure Developer / Devops. His blogs go in to great detail around his coding passion and of course Azure.
Richard Hooper (yes, another Microsoft Most Valuable Professional) provides a blog on Azure as well as great study guides to help you get certified.
These are the Top Cloud Blogs that we follow
Hopefully you agree. If you know of any Azure blogs or even Microsoft Blogs that we should know of or even if you are new Azure Blogger yourself, please contact us and we would be happy to review the site, and add it to the list.

by Mark | Aug 25, 2020 | Azure, Azure Blobs, Blob Storage, Cloud Computing, How To, Storage Accounts
How to create an Azure storage lifecycle management policy
Whether you are using our Cloud Storage Management software to gain insights into your Azure storage environment, or are just trying to work out how to save costs within Azure, creating a lifecycle management policy is a great idea to help you save in your Azure storage costs.
Why is an Azure Lifecycle Management Policy important?
Azure Storage Lifecycle Management is a feature provided by Microsoft Azure that helps users manage the lifecycle of their data stored in Azure Blob storage. It allows users to transition their data to different storage tiers (Hot, Cool, Archive) based on their data access patterns and save costs in their Azure storage environment. The storage tiers have different costs per gigabyte of data, with the Hot tier being the most expensive and the Archive tier having the most cost savings. It is important because it enables users to save costs on their storage and manage their data effectively based on their business needs. Additionally, it helps ensure that the data is stored in the appropriate tier for its intended usage, improving performance and reducing costs.
Azure Storage Tiering Overview
Azure has three different tiers for your blob storage. These storage tiers are;
Hot – Used for frequently accessed data. Best suited for data that your user base accesses daily, think files and photos etc
Cool – Used for infrequently accessed data. Well suited for data that maybe accessed, but not that often.
Archive – Used for rarely accessed data, like backups or data that you need to keep for historical reasons.
Each of these Storage Tiers has a cost associated that Microsoft will charge you per gigabyte of data. The Hot Tier obviously being the most expensive, the Cool Tier is a little cheaper and the Archive Tier having considerable cost savings.
As an example at the time of writing this page, the cost per gigabyte in US dollars for each Tier is as below. (this may vary depending on your agreement with Microsoft)
Azure Blob Storage Costs
|
PREMIUM |
HOT |
COOL |
ARCHIVE |
| First 50 terabyte (TB) / month |
$0.15 per GB |
$0.0184 per GB |
$0.01 per GB |
$0.00099 per GB |
| Next 450 TB/month |
$0.15 per GB |
$0.0177 per GB |
$0.01 per GB |
$0.00099 per GB |
| Over 500 TB/month |
$0.15 per GB |
$0.0170 per GB |
$0.01 per GB |
$0.00099 per GB |
As the table above shows, there are considerable savings when you move your blobs down to the lower tiers and creating an Azure Storage Lifecycle Management Policy.
Azure Blob Storage Tiering
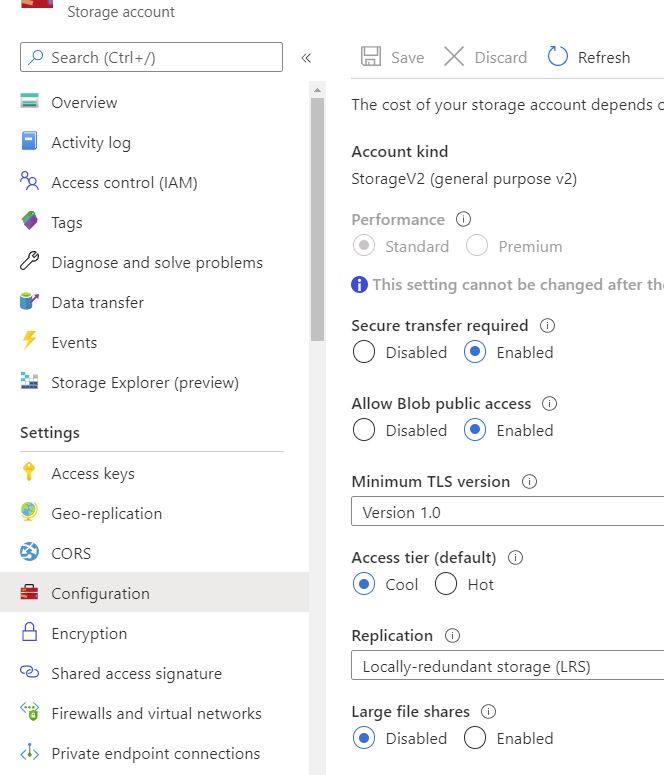
Change your Storage Tier
Microsoft Azure provides tiering for your blob data, that you can set as the default level. (either upon creation of the storage account or at a later date). To check the default storage tiering of your storage account go to the Azure Portal, choose configuration, and then the access tier that the blobs default to in that storage account is shown.
It must be noted that only the Hot and Cool tiers can be set as the default and not the Archive tier.
What are some of the benefits of creating an Azure Storage Lifecycle Management Policy?
OK, so now that you see there are some real benefits in changing the tiering of your blob storage, how do I create one you ask?
Well first off let’s look at what you will need to make sure is in place first.
Tiering of blob object storage is only available in Blob Storage and General Purpose v2 (or GPv2) accounts. If you have GPv1 storage you will need to convert that first to GPv2.
Premium storage does not provide any tiering, as this tier is for fast access using SSD based drives. (this maybe coming at a later date)
Changing tiers of storage may incur increased costs. Be very careful when applying the change to your data, as rehydrating blobs from the archive tier can be costly.
How to create your first Azure Storage Lifecycle Management Policy.
Open the Azure Portal
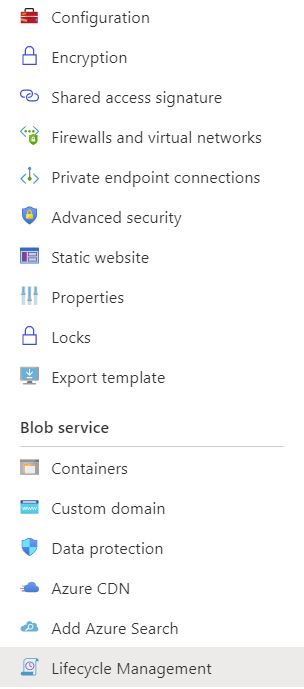
In your Azure portal, go to your storage account that you want the lifecycle policy to apply to and then choose Lifecycle Management.
Create a Azure Storage Lifecycle Policy Rule
Once the right hand side of your browser has populated, choose Add Rule to start the wizard

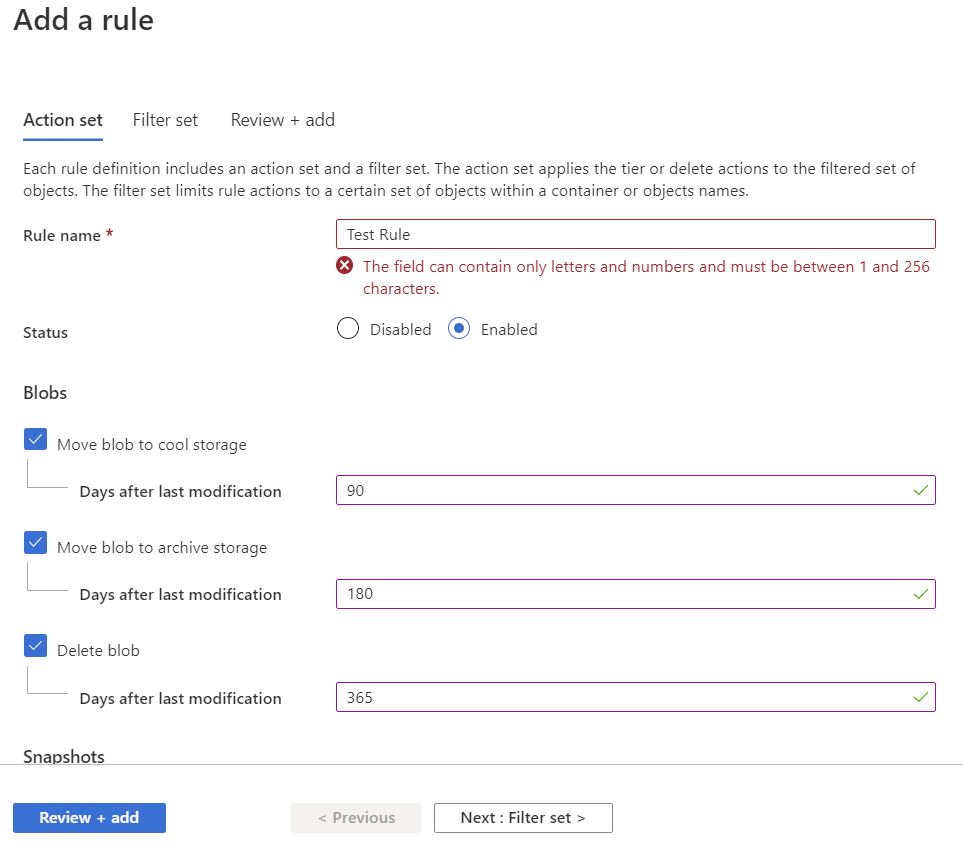
Add Lifecycle Policy Rule
Now that the new rule has shown up we need to fill in a few details. You will need to give the rule a Name and then choose what you want to happen with your object data.
As an example I have shown in the below rule that the blobs will move to cool storage after not being accessed in 90 days, then to archive storage in 180 days, then finally being deleted in 365 days.
If you are happy with what you have set, just click Review + add and Azure will go on to apply those settings to your storage account, or if you want to be granular and exclude some containers / paths then click on Next: Filter Set.
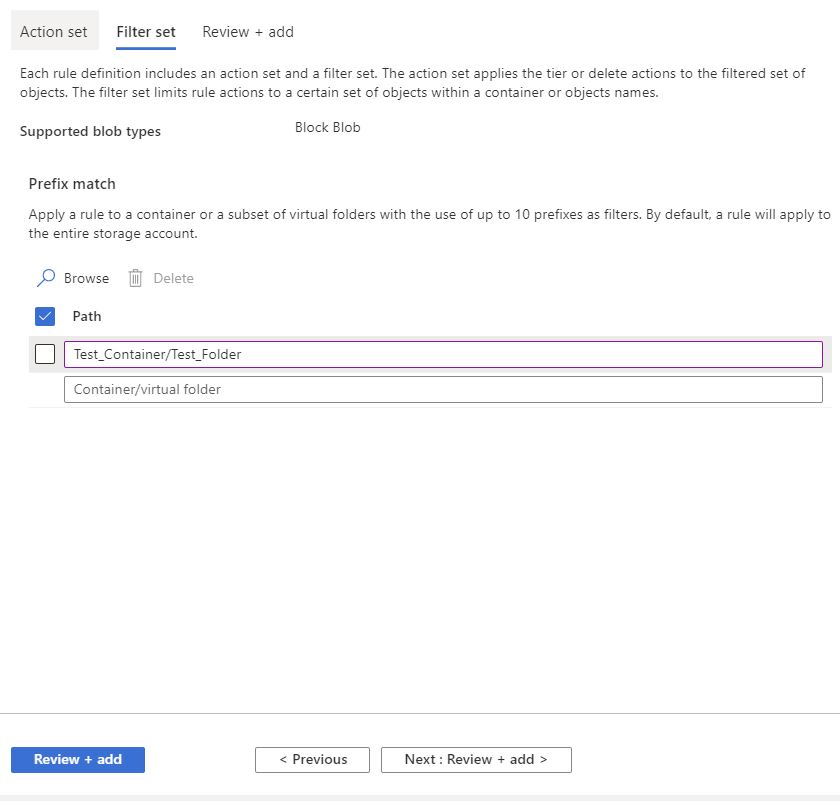
Azure Storage Lifecycle Policy Exclusions
On this page you can now exclude any containers or paths that you do not want this policy to apply to. Click Next: Review + add.
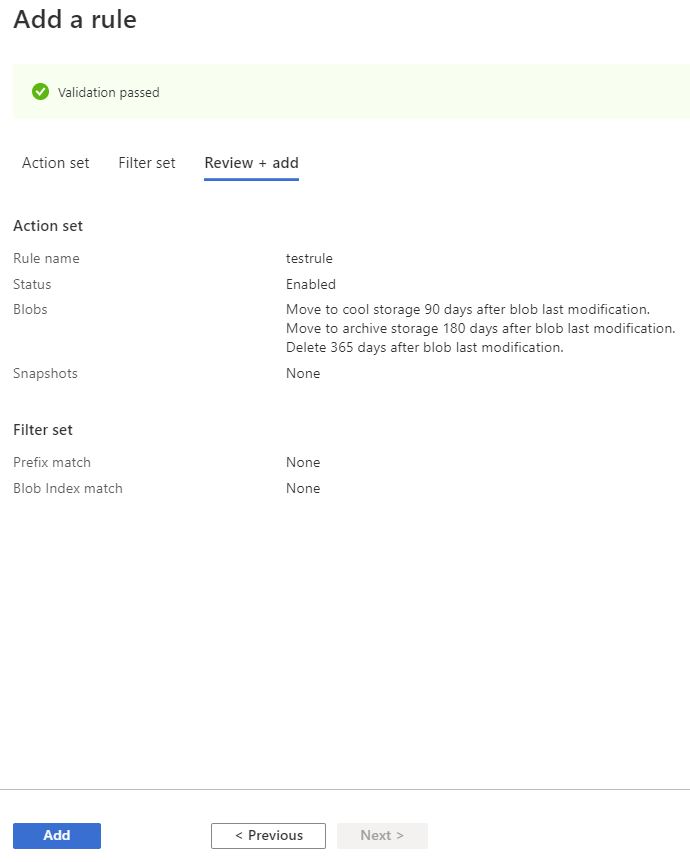
Azure Storage Lifecycle Validation
If all goes well you should be presented with a screen as below, saying that your Validation Passed.
Click on Add and Azure will now apply those settings to your storage account.
Azure will now go through all your Blobs and set them to the tiering and settings you have specified.
You have successfully created an Azure Storage Lifecycle Management Policy
Reduce your Azure Blob Storage Costs
Now you may ask, how do I know how much storage I’ve consumed or when were my blob files last accessed?
Easy. First run and install our Cloud Storage Manager software, then let it run a scan against your Azure Storage environments. Once the Scan has completed you can then run one of the many reports to understand and optimise your Azure Blob Storage.
Download a Free Trial and test it for yourself.
Free
Maximum Azure Storage limited to 30TB.
Typically for small or personal environments usually consisting of 3 or less Azure Subscriptions and consuming under 30TB of Azure Blob Storage.
Free Forever (until your Azure storage goes over 30TB).
Advanced
Maximum Azure Storage limited to 1PB
For medium sized environments typically consisting of less than 5 Azure Subscriptions.
Yearly license subscription of $500 USD per year which includes updates and support.
Enterprise
Unlimited Azure Storage.
For use in large environments typically consisting of more than 10 Subscriptions and consuming more than 1PB of Azure Blob Storage.
Yearly license subscription of $1000 USD per year which includes updates and support.
Cloud Storage Manager is licensed based on the size of your Azure Subscriptions, Azure Storage Accounts, Containers and finally each Blob.
Each version has the same great functions including scheduled scans of your Azure Blob Storage and reporting.
FAQ for Azure Lifecycle Management
What is Azure Storage Lifecycle Management?
Azure Storage Lifecycle Management is a feature that allows users to automate the transition of their data to different storage tiers or classes based on the data’s age or access patterns.
How does Azure Storage Lifecycle Management help in reducing costs?
By automatically moving data to the appropriate storage tier based on its age or access patterns, Azure Storage Lifecycle Management helps to reduce storage costs by ensuring that you are only paying for the most expensive storage tier that you actually need.
Can I still access my data after it has been transitioned to a different storage tier?
Yes, you can still access your data even after it has been transitioned to a different storage tier. The only difference is the retrieval time, which may be slower for data stored in the Archive tier compared to the Hot and Cool tiers.
Can I revert a transition made by Azure Storage Lifecycle Management?
Yes, you can revert a transition made by Azure Storage Lifecycle Management, but you may incur additional charges for moving the data back to a more expensive storage tier.
Is Azure Storage Lifecycle Management available for all Azure storage services?
Currently, Azure Storage Lifecycle Management is available for Azure Blob storage.
What are the different storage tiers that can be managed by Azure Storage Lifecycle Management?
Azure Storage Lifecycle Management allows you to manage data across four storage tiers: hot, cool, archive, and deleted. The hot tier is for frequently accessed data, the cool tier is for infrequently accessed data, the archive tier is for rarely accessed data, and the deleted tier is for data that has been marked for deletion.
How does Azure Storage Lifecycle Management work with data protection?
Azure Storage Lifecycle Management integrates with Azure data protection features such as Azure Backup and Azure Site Recovery, to ensure that your data is protected even as it transitions between storage tiers.
Can I customize the transition policies for my data in Azure Storage Lifecycle Management?
Yes, you can create custom transition policies in Azure Storage Lifecycle Management that are specific to your data and your business requirements. You can specify the time-based or usage-based triggers for data transitions, and you can also set rules for data retention.
Can I track the data movement and monitor the performance of my storage infrastructure with Azure Storage Lifecycle Management?
Yes, you can use Azure Storage Lifecycle Management to monitor and track the data movement in your storage infrastructure, as well as to measure the performance of your storage tiers. You can also use Azure Monitor to set up alerts and notifications for specific events, such as data movement or storage tier changes.
Is Azure Storage Lifecycle Management supported for all types of data in Azure Storage?
Azure Storage Lifecycle Management is supported for all types of data in Azure Blob Storage, including block blobs, append blobs, and page blobs. It is not currently supported for other types of data in Azure Storage, such as files and queues.
Which storage account or storage accounts can you use lifecycle management?
The Storage Accounts that support Lifecycle Management Policies are Blob Storage Accounts that have block blobs and append blobs in general-purpose v2 and premium block blobs.