How to view the size of all your Azure Storage Accounts

How to view the size of all your Azure Storage Accounts

Why you should monitor your Azure Storage

Monitoring Azure storage usage is important for businesses because of the cost implications and the impact it can have on operations.

  1. Cost implications: Azure storage is a pay-as-you-go service, meaning businesses are charged based on their usage of storage, data transfer, and the number of storage transactions. Unmonitored storage usage can quickly lead to unexpected and unnecessarily high charges. Monitoring Azure storage usage helps businesses stay aware of their storage consumption and avoid overspending on storage costs.
  2. Impact on operations: Azure storage is a critical component of many business operations and applications. If storage usage is not properly monitored, it can result in a shortage of storage capacity, slow performance, and disruptions to operations. Monitoring storage usage can help prevent these issues by alerting businesses when their storage capacity is reaching its limit and allowing them to take action to prevent outages.

In summary, monitoring Azure storage usage is important for businesses to control costs, ensure adequate storage capacity, and avoid disruptions to operations. By monitoring storage usage, businesses can make informed decisions about their storage requirements and take proactive steps to manage costs and maintain optimal performance.

Do you really know how much Azure Storage you are using?

As more and more organisations dive into Azure, storage consumption continues to grow and so does the cost to businesses. Azure offers almost a limitless supply of storage, but this comes at a cost so it’s important to know exactly where that storage is going.

There are a few ways to get this information, either via the Azure portal, Azure Storage Explorer or even PowerShell. However, all these tools have limitations and to be honest, rather lacking and not that straightforward.

So first I’ll show you how to get this information using the Azure portal and Azure Storage Explorer and then show you how you can get a better picture and experience using our FREE TOOLCloud Storage Manager.

How to get the size of all Storage Accounts using the Azure portal

  1. Log into the Azure portal
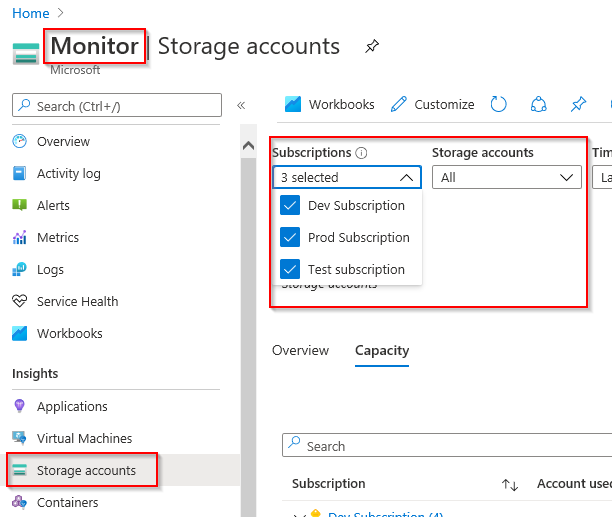
  2. Select Monitor from the left hand panel or use the search bar at the top
  3. Select Storage Accounts from the left hand pane under the Insights section
  4. Use the Subscriptions drop down list and select which Subscriptions you want to view
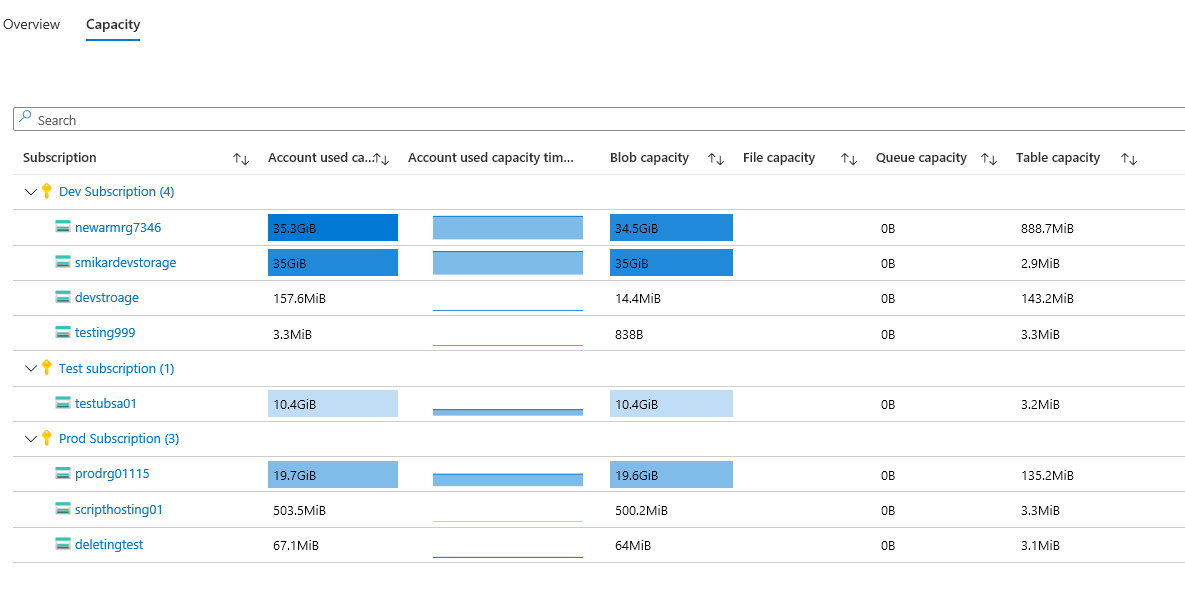
  5. Select Capacity on the right pane next to Overview
  6. Use the Storage Accounts drop down list to select which storage accounts you are interested in viewing, or select All.

Here you will see the consumed storage for each of your selected subscriptions and storage accounts.


Azure Storage Accounts

Azure Storage Capacity View

This view will provide you with a quick overview of the capacity used for each storage account. Although this will tell you how much storage is being consumed, you cannot drill down to see what is consuming the storage. To go any further you need to jump into the Storage Account view, select Containers and then blindly browse each container looking for blobs and in particular the size of each blob to find out where this storage is actually going.


Browsing your Azure Blobs using Azure Storage Explorer.

Another option is to use Azure Storage Explorer which is now built into the Azure portal (preview).

  1. Log into the Azure portal
  2. Select or search for Storage Accounts
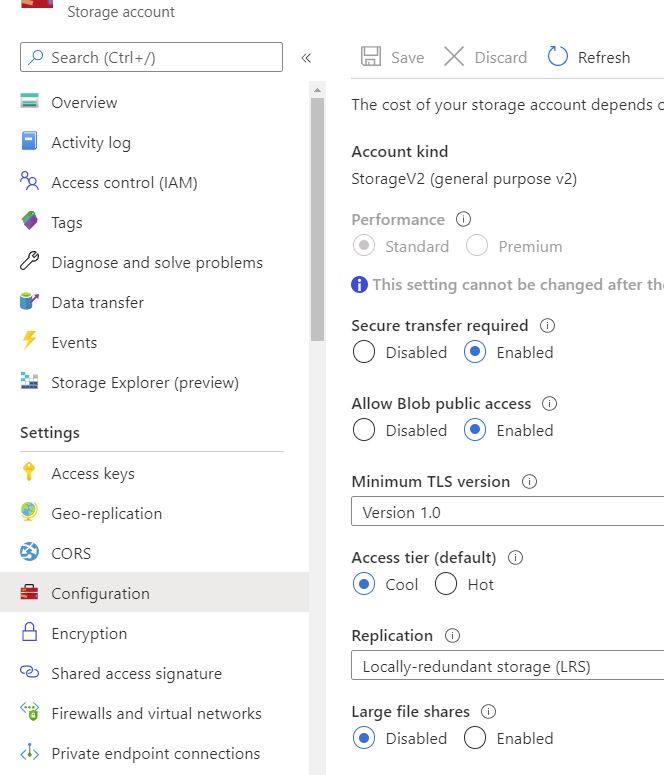
  3. Select the Storage Account you are interested in
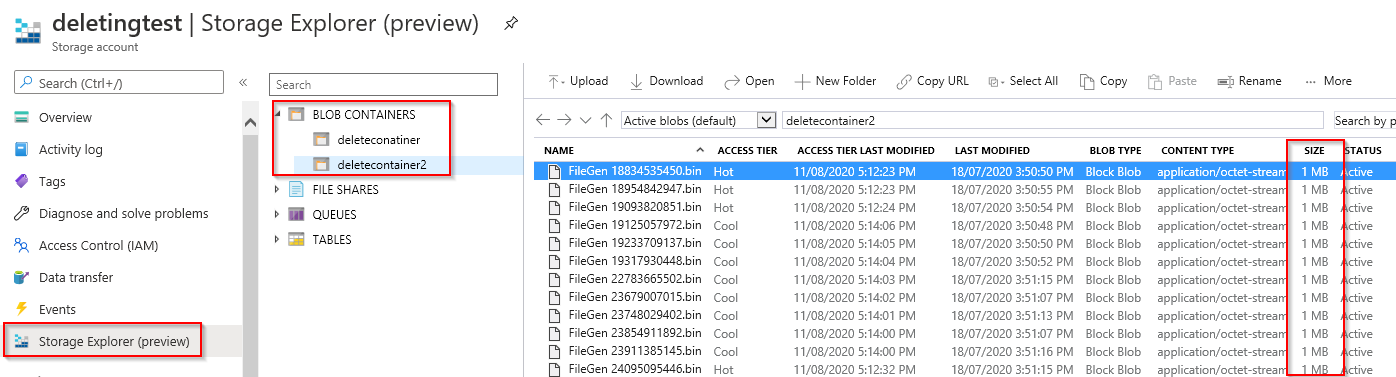
  4. Select Storage Explorer on the blade on the right

From with the Azure Storage Explorer Application,  you can browse the containers of that storage account and view the size of each blob inside each container.


Azure Storage Explorer

Finding more indepth information on your Azure Blob Usage

However, you are in the same boat as before, blindly searching through Containers looking for the size of blobs not knowing where they are. This may not be an issue if you only have 2 or 3 containers with 10 or less blobs in each. But what if you have 10, 50 or more Containers and hundreds or thousands of blobs?

How would you know which Container or blob is consuming the space? In short, you can’t, at least not easily.

Even with the full blown Azure Storage Explorer, the task is quite tedious because you have to browse each individual Container in each Storage Account and get the statistics to calculate the storage consumed. That is not a fun job.

Azure Storage Consumption Overview

This is where Cloud Storage Manager gives you the easiest, quickest and best experience by far.

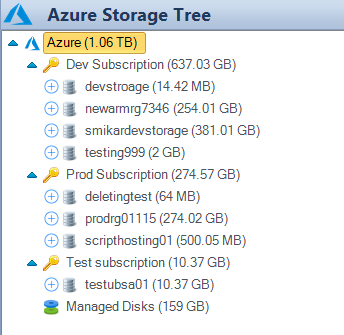
With Cloud Storage Manager you can instantly see how much storage each Subscription, Azure Storage Account, Container and blob is consuming. It provides you with a simple explorer like view to browse through each level.

Here you can immediately see how much storage is being consumed at every level.


Azure Storage Tree View

Azure Container Sizes

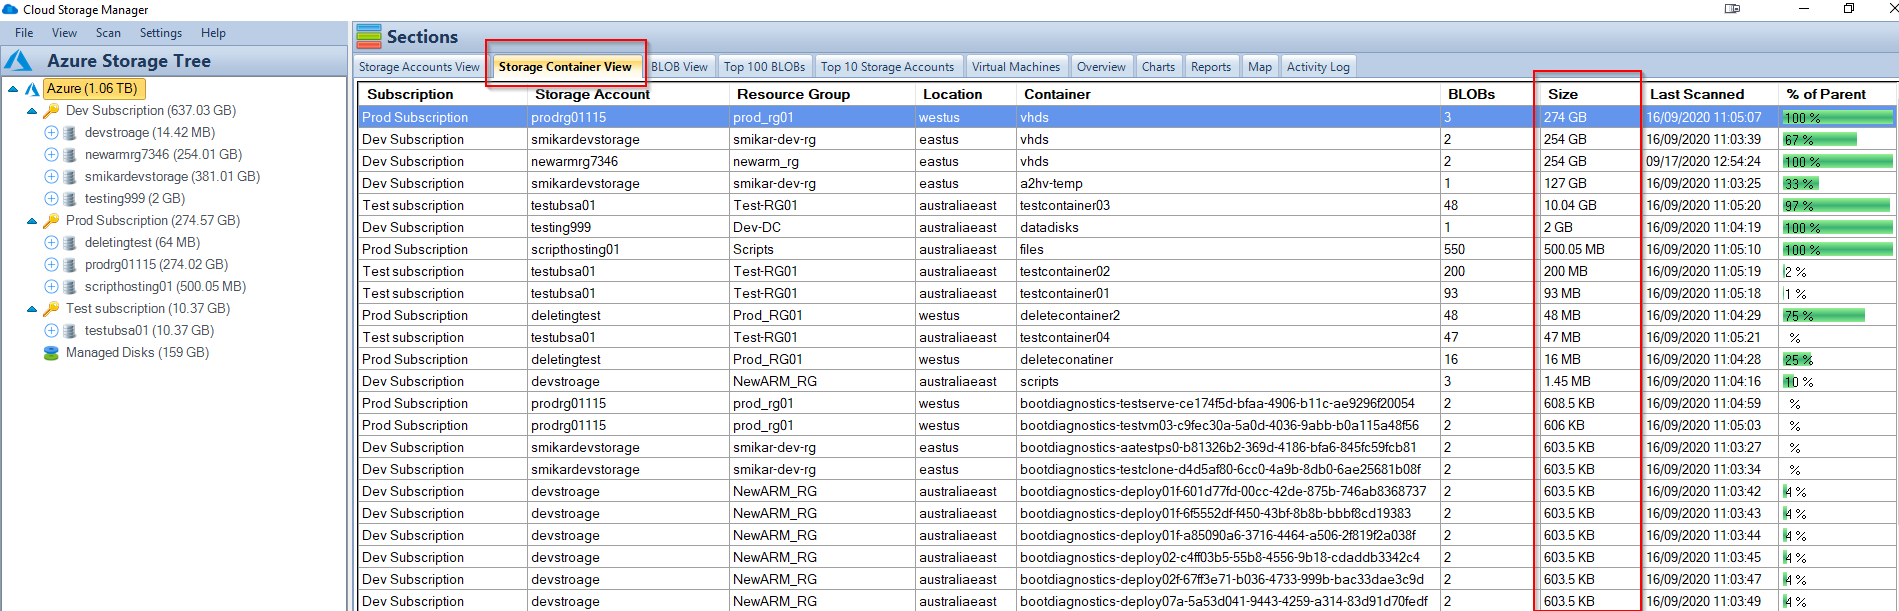
And by selecting the Container View tab on the right hand pane also gives you an instant view to see how much storage each Container in Azure is consuming.

A percentage column outlines the overall size of that container relative to its parent Storage Account.


Azure Container Contents

You can also right click on the Container you are interested in and select Jump to Container to expand and select that Azure Container on the tree pane.


Azure Blob Sizes

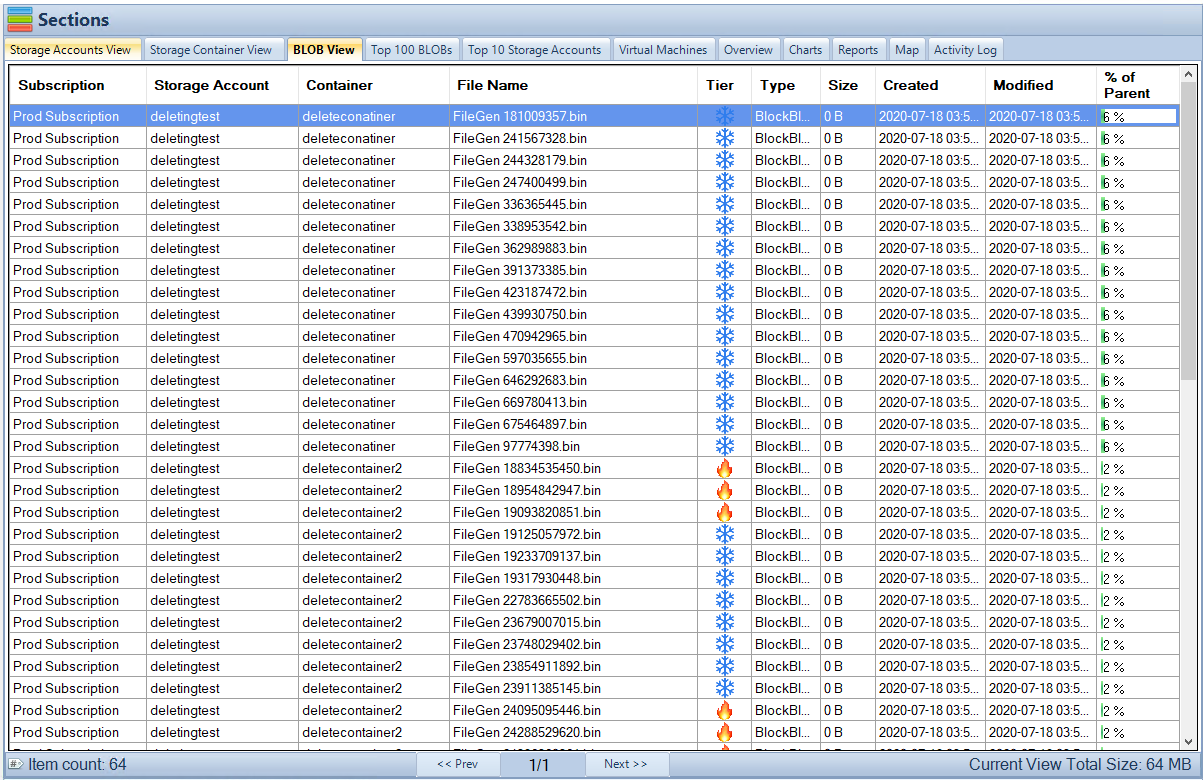
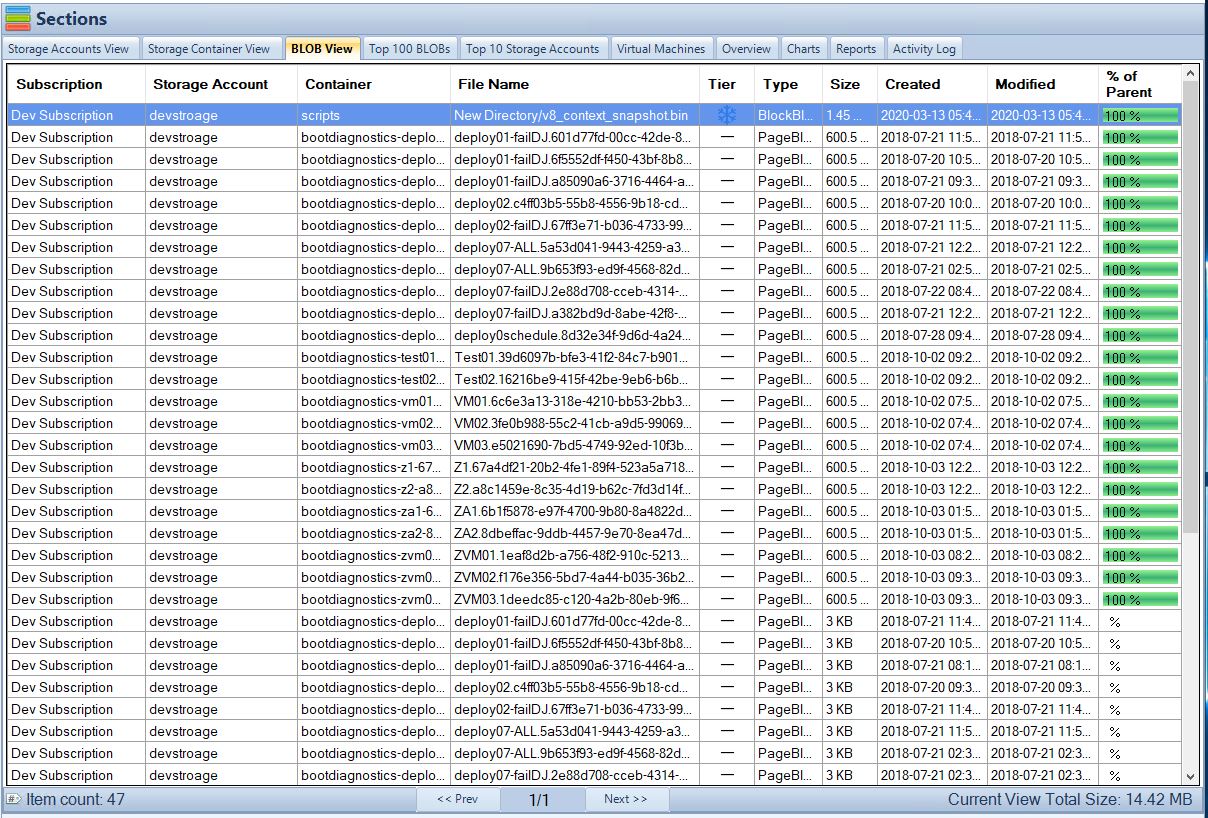
As you can see, the Container has been selected on the Storage Tree pane on the left. And on the right you can select the BLOB view tab to see the blobs in that container and of course the size of each blob. The Blob view is sorted based on size, so if even if you have hundreds or thousands of blobs, you will see which ones are taking up the most space first.


Cloud Storage Manager Blobs Tab

Azure Blob Information

You can also right click on the Blob to get additional options, such as delete the blob, change the object tier or view the blob properties.


Cloud Storage Manager Azure Storage Blobs Tab

As you can see, Cloud Storage Manager is easily the quickest and simplest way to know where your Azure storage is being consumed, and its all for FREE.

Cloud Storage Manager

Gain insights into your Azure Storage with our FREE to use Tool.
FREE DOWNLOAD

Send download link to:

I confirm that I have read and agree to the End User License Agreement.

Download the FREE TOOL and test it for yourself.

Conclusion. Which tool is right for you?

Azure portal is a web-based interface provided by Microsoft Azure to manage cloud resources and services. Although it provides a user-friendly interface for managing storage accounts, it has some limitations. The Azure portal may not provide an intuitive way to manage large amounts of data, as it requires multiple clicks and navigation to access information, and can be slow when working with a large amount of data. Additionally, the Azure portal does not provide the ability to compare data across storage accounts or view data usage trends over time.

Azure Storage Explorer is a standalone app that enables users to manage their Azure storage accounts. While it provides a more comprehensive view of storage accounts compared to the Azure portal, it still has limitations. For example, it does not provide the ability to monitor data usage in real-time, or set alerts for when storage thresholds are reached. Additionally, it does not provide the ability to automate data management tasks such as moving data to lower-cost storage tiers, which can result in higher storage costs for users.

Cloud Storage Manager is a FREE tool that provides a unified view of all cloud storage resources and enables users to manage, monitor, and optimize their cloud storage usage. It provides monitoring of data usage, and also provides a cost-optimization reports that allows users to identify and eliminate unnecessary data, reducing overall storage costs. Additionally, it provides a unified view of data across multiple storage accounts, enabling users to make informed decisions about storage utilization and cost optimization.

In conclusion, while both the Azure portal and Azure Storage Explorer have their uses, Cloud Storage Manager provides a more comprehensive and cost-effective solution for managing cloud storage resources. With its real-time monitoring, alerts, and automation features, it can help users reduce storage costs and improve the overall efficiency of their cloud storage operations.

How to create an Azure storage lifecycle management policy

How to create an Azure storage lifecycle management policy

How to create an Azure storage lifecycle management policy​

Whether you are using our Cloud Storage Management software to gain insights into your Azure storage environment, or are just trying to work out how to save costs within Azure, creating a lifecycle management policy is a great idea to help you save in your Azure storage costs.

Why is an Azure Lifecycle Management Policy important?

Azure Storage Lifecycle Management is a feature provided by Microsoft Azure that helps users manage the lifecycle of their data stored in Azure Blob storage. It allows users to transition their data to different storage tiers (Hot, Cool, Archive) based on their data access patterns and save costs in their Azure storage environment. The storage tiers have different costs per gigabyte of data, with the Hot tier being the most expensive and the Archive tier having the most cost savings. It is important because it enables users to save costs on their storage and manage their data effectively based on their business needs. Additionally, it helps ensure that the data is stored in the appropriate tier for its intended usage, improving performance and reducing costs.

Azure Storage Tiering Overview

Azure has three different tiers for your blob storage. These storage tiers are;

Hot – Used for frequently accessed data. Best suited for data that your user base accesses daily, think files and photos etc

Cool – Used for infrequently accessed data. Well suited for data that maybe accessed, but not that often.

Archive – Used for rarely accessed data, like backups or data that you need to keep for historical reasons.

Each of these Storage Tiers has a cost associated that Microsoft will charge you per gigabyte of data. The Hot Tier obviously being the most expensive, the Cool Tier is a little cheaper and the Archive Tier having considerable cost savings.

As an example at the time of writing this page, the cost per gigabyte in US dollars for each Tier is as below. (this may vary depending on your agreement with Microsoft)

Azure Blob Storage Costs

PREMIUM HOT COOL ARCHIVE
First 50 terabyte (TB) / month $0.15 per GB $0.0184 per GB $0.01 per GB $0.00099 per GB
Next 450 TB/month $0.15 per GB $0.0177 per GB $0.01 per GB $0.00099 per GB
Over 500 TB/month $0.15 per GB $0.0170 per GB $0.01 per GB $0.00099 per GB

As the table above shows, there are considerable savings when you move your blobs down to the lower tiers and creating an Azure Storage Lifecycle Management Policy.

Azure Blob Storage Tiering

Change your Storage Tier

Microsoft Azure provides tiering for your blob data, that you can set as the default level. (either upon creation of the storage account or at a later date). To check the default storage tiering of your storage account go to the Azure Portal, choose configuration, and then the access tier that the blobs default to in that storage account is shown.

It must be noted that only the Hot and Cool tiers can be set as the default and not the Archive tier.


Azure Storage Tiering

What are some of the benefits of creating an Azure Storage Lifecycle Management Policy?

OK, so now that you see there are some real benefits in changing the tiering of your blob storage, how do I create one you ask?

Well first off let’s look at what you will need to make sure is in place first.

Tiering of blob object storage is only available in Blob Storage and General Purpose v2 (or GPv2) accounts. If you have GPv1 storage you will need to convert that first to GPv2.

Premium storage does not provide any tiering, as this tier is for fast access using SSD based drives. (this maybe coming at a later date)

Changing tiers of storage may incur increased costs. Be very careful when applying the change to your data, as rehydrating blobs from the archive tier can be costly.

How to create your first Azure Storage Lifecycle Management Policy.

Open the Azure Portal

In your Azure portal, go to your storage account that you want the lifecycle policy to apply to and then choose Lifecycle Management.


Azure Lifecycle Management

Create a Azure Storage Lifecycle Policy Rule

 Once the right hand side of your browser has populated, choose Add Rule to start the wizard


Azure Lifecycle Management Rule

Add Lifecycle Policy Rule

Now that the new rule has shown up we need to fill in a few details. You will need to give the rule a Name and then choose what you want to happen with your object data.

As an example I have shown in the below rule that the blobs will move to cool storage after not being accessed in 90 days, then to archive storage in 180 days, then finally being deleted in 365 days.

If you are happy with what you have set, just click Review + add and Azure will go on to apply those settings to your storage accountor if you want to be granular and exclude some containers / paths then click on Next: Filter Set.


Azure Lifecycle Management New Rule

Azure Storage Lifecycle Policy Exclusions

On this page you can now exclude any containers or paths that you do not want this policy to apply to. Click Next: Review + add. 

Azure Lifecycle Management Filter

Azure Storage Lifecycle Validation

 If all goes well you should be presented with a screen as below, saying that your Validation Passed. 

Click on Add and Azure will now apply those settings to your storage account.

Azure will now go through all your Blobs and set them to the tiering and settings you have specified. 

You have successfully created an Azure Storage Lifecycle Management Policy

Azure Lifecycle Management Validation

Reduce your Azure Blob Storage Costs

Now you may ask, how do I know how much storage I’ve consumed or when were my blob files last accessed?

Easy. First run and install our Cloud Storage Manager software, then let it run a scan against your Azure Storage environments. Once the Scan has completed you can then run one of the many reports to understand and optimise your Azure Blob Storage.

Download a Free Trial and test it for yourself.

Free

Cloud Storage Manager Icon

Maximum Azure Storage limited to 30TB.

Typically for small or personal environments usually consisting of 3 or less Azure Subscriptions and consuming under 30TB of Azure Blob Storage.

Free Forever (until your Azure storage goes over 30TB).

Advanced

Cloud Storage Manager Icon

Maximum Azure Storage limited to 1PB

For medium sized environments typically consisting of less than 5 Azure Subscriptions.

Yearly license subscription of $500 USD per year which includes updates and support.

Enterprise

Cloud Storage Manager Icon

Unlimited Azure Storage.

For use in large environments typically consisting of more than 10 Subscriptions and consuming more than 1PB of Azure Blob Storage.

Yearly license subscription of $1000 USD per year which includes updates and support.

Cloud Storage Manager is licensed based on the size of your Azure Subscriptions, Azure Storage Accounts, Containers and finally each Blob.

Each version has the same great functions including scheduled scans of your Azure Blob Storage and reporting.

FREE DOWNLOAD

Send download link to:

I confirm that I have read and agree to the End User License Agreement.

FAQ for Azure Lifecycle Management

What is Azure Storage Lifecycle Management?

Azure Storage Lifecycle Management is a feature that allows users to automate the transition of their data to different storage tiers or classes based on the data’s age or access patterns.

How does Azure Storage Lifecycle Management help in reducing costs?

By automatically moving data to the appropriate storage tier based on its age or access patterns, Azure Storage Lifecycle Management helps to reduce storage costs by ensuring that you are only paying for the most expensive storage tier that you actually need.

Can I still access my data after it has been transitioned to a different storage tier?

Yes, you can still access your data even after it has been transitioned to a different storage tier. The only difference is the retrieval time, which may be slower for data stored in the Archive tier compared to the Hot and Cool tiers.

Can I revert a transition made by Azure Storage Lifecycle Management?

Yes, you can revert a transition made by Azure Storage Lifecycle Management, but you may incur additional charges for moving the data back to a more expensive storage tier.

Is Azure Storage Lifecycle Management available for all Azure storage services?

Currently, Azure Storage Lifecycle Management is available for Azure Blob storage.

What are the different storage tiers that can be managed by Azure Storage Lifecycle Management?

Azure Storage Lifecycle Management allows you to manage data across four storage tiers: hot, cool, archive, and deleted. The hot tier is for frequently accessed data, the cool tier is for infrequently accessed data, the archive tier is for rarely accessed data, and the deleted tier is for data that has been marked for deletion.

How does Azure Storage Lifecycle Management work with data protection?

Azure Storage Lifecycle Management integrates with Azure data protection features such as Azure Backup and Azure Site Recovery, to ensure that your data is protected even as it transitions between storage tiers.

Can I customize the transition policies for my data in Azure Storage Lifecycle Management?

Yes, you can create custom transition policies in Azure Storage Lifecycle Management that are specific to your data and your business requirements. You can specify the time-based or usage-based triggers for data transitions, and you can also set rules for data retention.

Can I track the data movement and monitor the performance of my storage infrastructure with Azure Storage Lifecycle Management?

Yes, you can use Azure Storage Lifecycle Management to monitor and track the data movement in your storage infrastructure, as well as to measure the performance of your storage tiers. You can also use Azure Monitor to set up alerts and notifications for specific events, such as data movement or storage tier changes.

Is Azure Storage Lifecycle Management supported for all types of data in Azure Storage?

Azure Storage Lifecycle Management is supported for all types of data in Azure Blob Storage, including block blobs, append blobs, and page blobs. It is not currently supported for other types of data in Azure Storage, such as files and queues.

Which storage account or storage accounts can you use lifecycle management?

The Storage Accounts that support Lifecycle Management Policies are Blob Storage Accounts that have block blobs and append blobs in general-purpose v2 and premium block blobs.