by Mark | Jul 5, 2021 | Azure, How To
How Cloud Technology Can Help Your Business
Between 2019 and 2020, more Australian businesses have turned to cloud computing technologies. A recent survey from the Australian Bureau of Statistics found that businesses using paid cloud computing — IT services used over the internet to access software, computing power, and storage capacity — jumped to 55% from 42% in 2017 to 2018.
Indeed, cloud hosting technology is more popular now than ever before. It’s incredibly useful for storing and organising hundreds of TB and PB in unstructured data, as mentioned in a blog post on Microsoft Azure BLOBs. Beyond storage capabilities, cloud technology can help you run your business through:
Remote file sharing and collaboration
Since the coronavirus pandemic started, collaborative tools on the cloud have helped businesses move forward, even as most employees have been working remotely. Instead of storing information, files, and apps on a work computer or an office server, cloud technology enables you to store data over the internet. With the proper access credentials, a compatible device, and an internet connection, all the information you need to work on is available from anywhere in the world.
Cloud-based services also enable you to share and work on files together with your colleagues; Microsoft Azure Boards is especially useful, as it connects your Microsoft Teams account so you can smoothly plan, track, and discuss work across your teams on customisable Kanban boards and team dashboards.
Improved website ranking
These days, it’s impossible to gain a wider audience online if your business doesn’t rank well on search engines. In a competitive environment, a high ranking on search engines gives you increased visibility and a better reputation. Cloud hosting can improve search engine optimization (SEO) efforts to boost the rankings of business websites online. Leading global SEO agency Ayima highlights that rankings and digital performance are determined by factors such as performance SEO, analytics, and user experience.
These factors can aid in driving organic traffic to your website and increase your presence on Google. For one, cloud technology vastly boosts the user experience by allowing pages to load faster and more smoothly; faster loading times keep users satisfied as they interact with your site, leading to lower bounce rates. Robust cloud hosting programs also offer strong security against bots and malware, which protects your content and provides visitors an optimal experience.
Enhanced security
Cloud technology offers better levels of security, especially if you compare it to physical data storage. You can automate settings to constantly back up your data so you won’t have to worry about losing it to data theft, viruses, natural disasters, or malicious actors. By default, Azure Storage services are equipped with Storage-side Encryption, where data is encrypted by Microsoft-managed keys before getting stored.
Whether it’s an on-site system failure, fire, or flood, cloud technology also allows users to retrieve the latest version of data from a safe, online location. Some providers even have geo-redundant back-ups, where data is saved across multiple locations, and in case something happens, everything will continue running on your end.
Cost-efficient scaling
Buying or building a bespoke server involves a great deal of time, expertise, money, and maintenance, so it may not be the most ideal choice if you’re trying to scale up and expand your business. On the other hand, cloud computing allows you to expand at will for a predictable, monthly expense.
Cloud technologies are elastic and flexible, so they can handle busy periods or react accordingly when things slow down — preventing you from overspending. Recently, hybrid cloud infrastructure solution Microsoft Azure Stack HCI was integrated into Hewlett Packard’s HPE GreenLake platform for additional control over both on-premise workloads and cloud environments, enabling businesses to determine what setup works best for their needs.
For the latest on Microsoft Azure and cloud computing, be sure to follow the SmiKar Software blog.
This article was specially written for www.smikar.com as a guest post by Aileen Conner

by Mark | Jun 21, 2021 | Azure, Azure Blobs, How To
How do you search for an Azure Blob, Storage Account or even a Container?
While Azure provides massive storage capabilities, often users and IT Departments alike use Azure Storage for dumping large amounts of files to remove reliance on on-premise storage devices. This has massive benefits to the business by providing agile deployments in line with business data storage needs, by not having to wait for disk expansions or procurement of additional local storage.
What happens though is that the amount of storage you have within Azure never really is managed properly, and should you need to search for a particular file (Azure Blob) or folder (Azure Blob Storage Container) you may not even know which storage account it resides in.
In this blog post I will show you how to search through all your Azure Subscriptions, Storage Accounts to find a particular Azure Blob.
Why Use Cloud Storage Manager for Azure Blob Search?
Using Cloud Storage Manager makes searching for an Azure Blob easy and efficient. You can search through all your Azure Subscriptions and Storage Accounts to find a particular Azure Blob. Additionally, Cloud Storage Manager offers a variety of search criteria to help you find exactly what you’re looking for.
Find an Azure Blob
Search all your Azure Subscriptions.
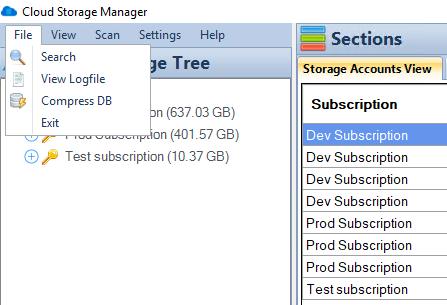
To search all your Azure Storage Accounts and find an Azure Blob, simply open up Cloud Storage Manager, then go to the FILE and then SEARCH.
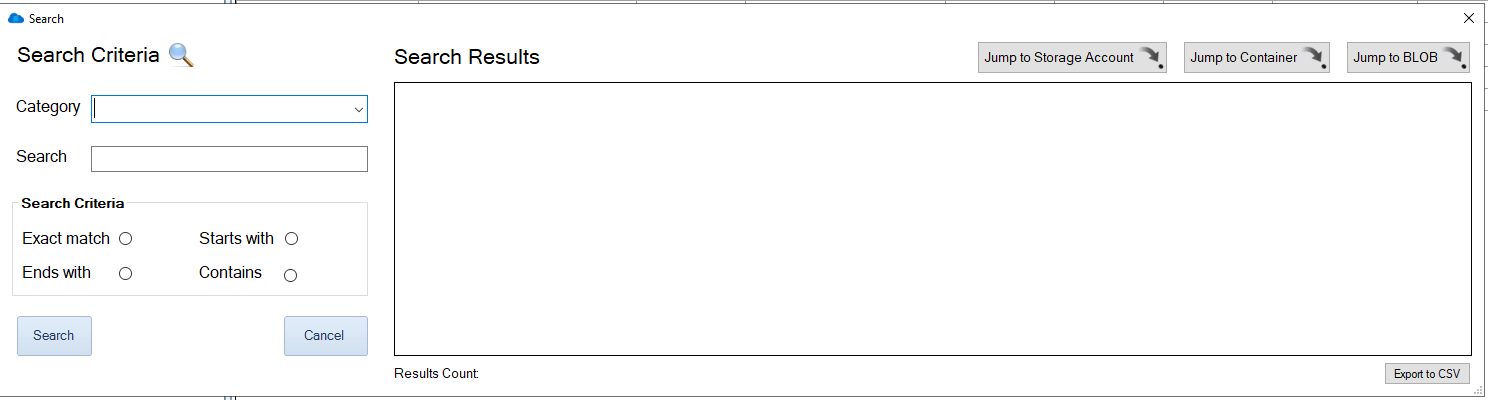
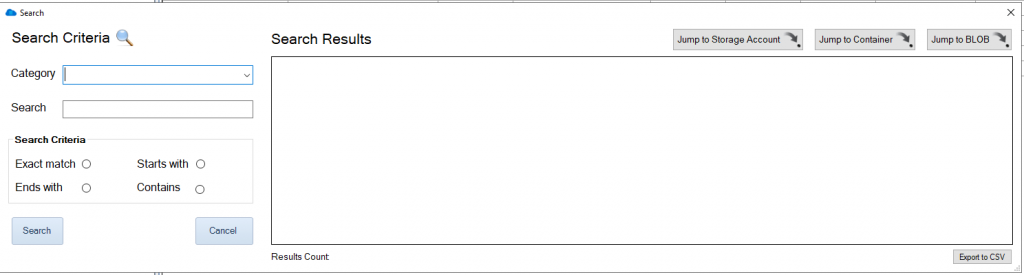
Choose your Azure Storage Search criteria.
Now the Search window will open up in Cloud Storage Manager.
Choose the category of the item you want searched for, either an Azure Storage Account, Container, or a Blob can be searched.
Type in the name of what you want to search for in the SEARCH box and then finally choose if you want an Exact Match, Starts with, Ends with or Contains, then press Search.
Cloud Storage Manager will then query all your Azure Storage Accounts looking for the item you want found.
Search for an Azure Blob / Container or Storage Account
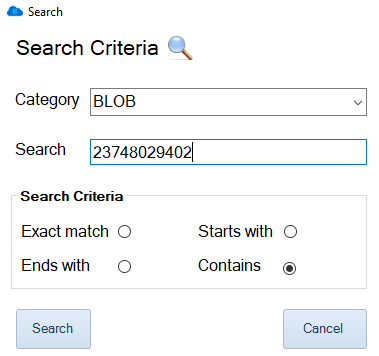
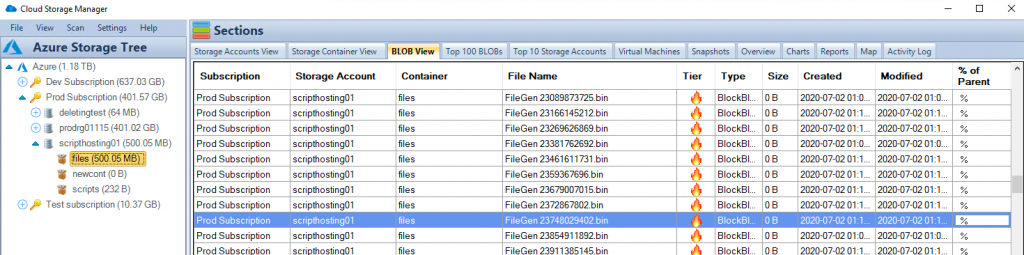
In this example I am going to search for a Blob that contains the following characters, 23748029402. (Alphanumeric, Numeric or a combination of these can be searched)
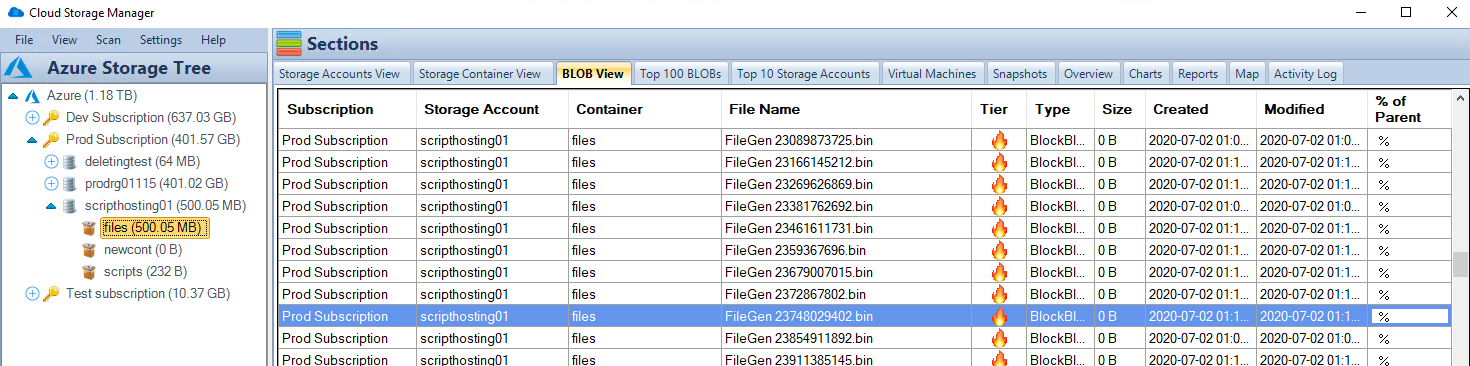
Azure Blob Search Results
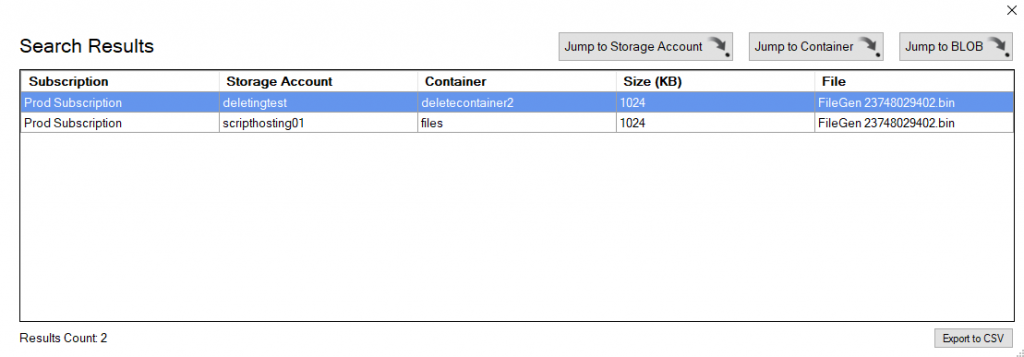
Cloud Storage Manager has queried through its own internal database to find the Blobs that contain the text I typed in the search box.
We can see here that there are two Azure Blobs that we searched for that contain that text.
You also have the option to export the search results directly to CSV.
Azure Blob Search Options
Now that Cloud Storage Manager has returned the search results, you can see the locations where that Blob resides.
Simply highlight the Blob you searched for and you have the option to either Jump to the Storage Account, the Container or directly to the Blob itself.

Azure Blob Search Details
As I had chosen the option to Jump directly to the Azure Blob, you can see that the Blob highlighted does in fact contain the text I searched for.
If you right click the blob you searched for, these are some of the options you can perform;
- Change Tier of the Azure Blob
- Delete selected Blobs
- Jump back to the Storage Account or Container
- View the Blob Properties
- Download the Azure Blob to your computer
Thats all there is to it, quickly and easily Search for an Azure Blob through your complete Tenancy, Subscription, Storage Account or just a lone Azure Storage Container with Cloud Storage Manager.
Azure Blob search can be a daunting task if you don’t know where to look. By using Cloud Storage Manager, you can quickly and easily search for an Azure Blob through your complete Tenancy, Subscription, Storage Account, or just a lone Azure Storage Container. With its variety of search criteria and easy-to-use interface, Cloud Storage Manager is a must-have tool for anyone who wants to efficiently manage their Azure Blob storage. Download a FREE TRIAL of Cloud Storage Manager today and start organizing your Azure Blob storage more effectively.
Cloud Storage Manager
Gain insights into your Azure Storage with our FREE to use Tool.
FREE DOWNLOAD

by Mark | Mar 15, 2021 | Azure, Azure Blobs, How To
Reduce your Azure Storage Costs
Azure Storage is like an all you can eat buffet, except the more you eat, the more you pay! This has provided organisations an almost limitless supply of storage, and as we all know, the more that’s available, the more we’ll use.
Azure Storage has changed the way many organisations operate both in terms of availability and service. No longer do organisations have to concern themselves with capacity planning or worry about the SAN running out of disk space, or even how to make that storage available in terms of disaster and across regions. Azure Storage has effectively resolved many of the issues traditional on-premises storage services faced.
However, because of this unlimited supply of storage in Azure, storage growth, cost and duplication has exploded. Managing and controlling the data across all the Storage Accounts has become increasingly difficult as users keep piling on more and more data.
OK, so how can we gain some control back, by finding and reducing the number of duplicate BLOBs and therefore reduce cost?
We have been asked that exact same question by many of our customers, and the short answer was, you couldn’t. There is no way in Azure to find out which BLOBs are duplicates, how many of them are duplicate BLOBs, which Azure Storage Account and container do they reside in, or how much data duplicate BLOBs in Azure Storage are consuming…until now.
Cloud Storage Manager to the rescue.
Cloud Storage Manager allows you to scan your entire Azure environment in order to review and manage your Azure Storage consumption.
Cloud Storage Manager has so many features in helping you control and manage your Azure Storage, but I won’t go into them here as the list is too long – however, click here to get more information and even download a free trial for yourself.
One of the many features of Cloud Storage Manager is the reporting option, which offers a number of reports you could run to get a better understanding of your Azure Storage and overall environment.
How many Duplicate Blobs are in your Azure Storage
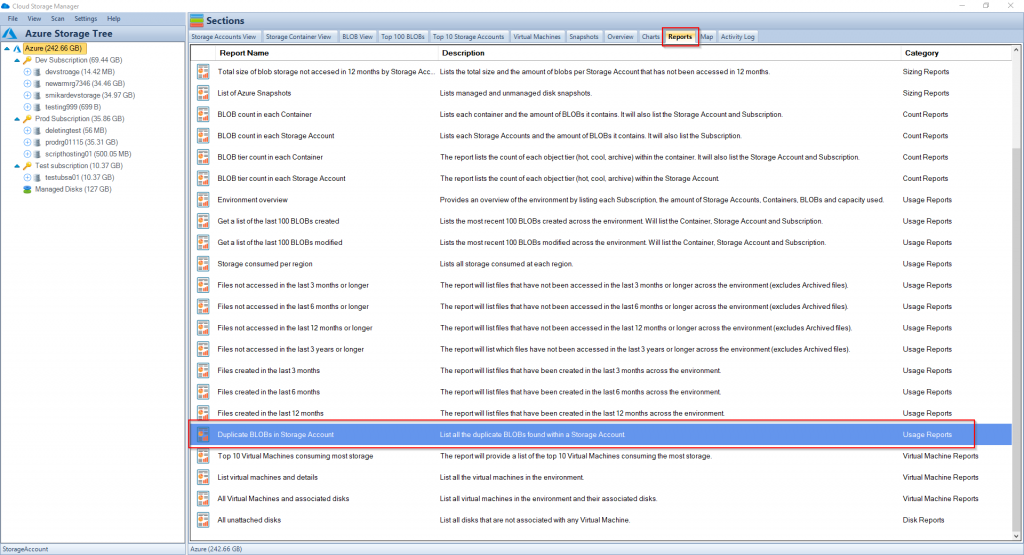
However, the one we will be looking at today, is the “Duplicate BLOBs in Storage Account” report.
Once you’ve installed Cloud Storage Manager and allowed it to scan your environment, click on the
“Reports” tab.
Scroll down and find the “Duplicate BLOBs in Storage Account” report.
Duplicate Blob Report
Right click on the report and select to “Run Report”.
The result will be displayed showing you all the duplicate BLOBs in your Azure Storage Accounts, along with information such has which Subscription, Storage Account, Container, tier, filename, type, size, created date and modified date.
From here you can now open the report in Excel, and work out which duplicate blobs you need to keep, or perhaps even delete to reduce your Azure Storage and costs.
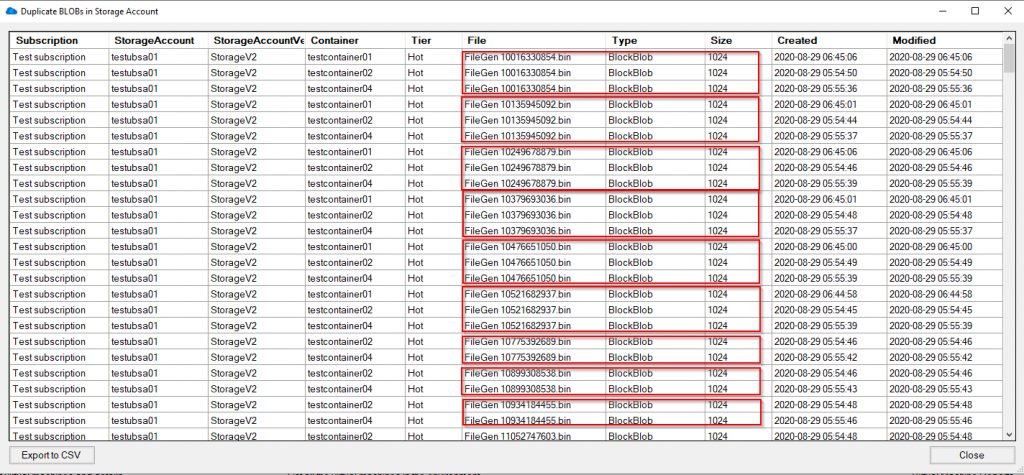
Duplicate Blob Analysis
You also have the option to export the report to a CSV file for further assessment.
If you want to get a better handle of your Azure Storage consumption and reduce your overall cost, give Cloud Storage Manager a try.
What are the consuquences of having Duplicate Blobs?
Duplicate BLOBs in Azure Storage can be a result of a lack of proper management and control of data in the storage accounts. Azure Storage has become increasingly popular due to its unlimited supply of storage, which has led to an explosion of storage growth, cost, and duplication. This can be due to various reasons such as multiple copies of data being created, incorrect data management procedures, or even data being inadvertently duplicated.
The consequences of having duplicate BLOBs in Azure Storage can lead to increased storage costs, difficulty in managing and controlling data across all the storage accounts, and loss of visibility into the actual data usage. This can also result in data redundancy, which can negatively impact the performance and reliability of the storage environment. In addition, it can also lead to data versioning issues and make it difficult to determine which version of the data is the most recent and accurate.
Therefore, it is important to implement proper data management procedures and use tools such as Cloud Storage Manager to scan and manage your Azure Storage environment to help reduce the number of duplicate BLOBs, thus reducing costs and increasing overall control of the data.

by Mark | Mar 1, 2021 | Azure, Azure Blobs, Snapshot / Checkpoint, Storage Accounts
Snapshot an Azure VM
Snapshots in Azure is a nice feature that allows you to take a read-only, “point in time” snapshot of a Virtual Machine’s disk. You can take a snapshot of a VM’s OS or data disk. You can use this snapshot to revert the VM to a point in time before an event occurred, or you installed something that didn’t go quite right.
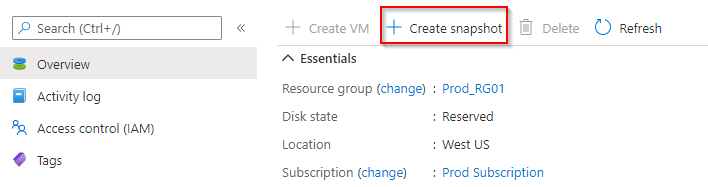
Azure VM Disk Snapshot
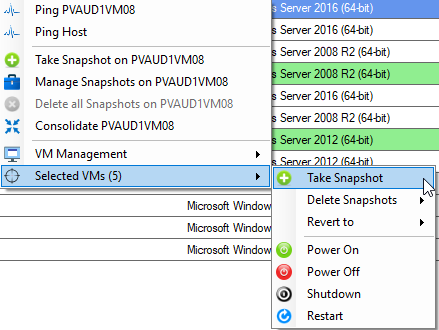
The process to take a snapshot of a VM that is using Managed Disks is quite simple, all you have to do is browse to the Disk of the VM and select “Create Snapshot”.
Azure VM Snapshot
Now that we’ve created these Snapshots, where do we find them?
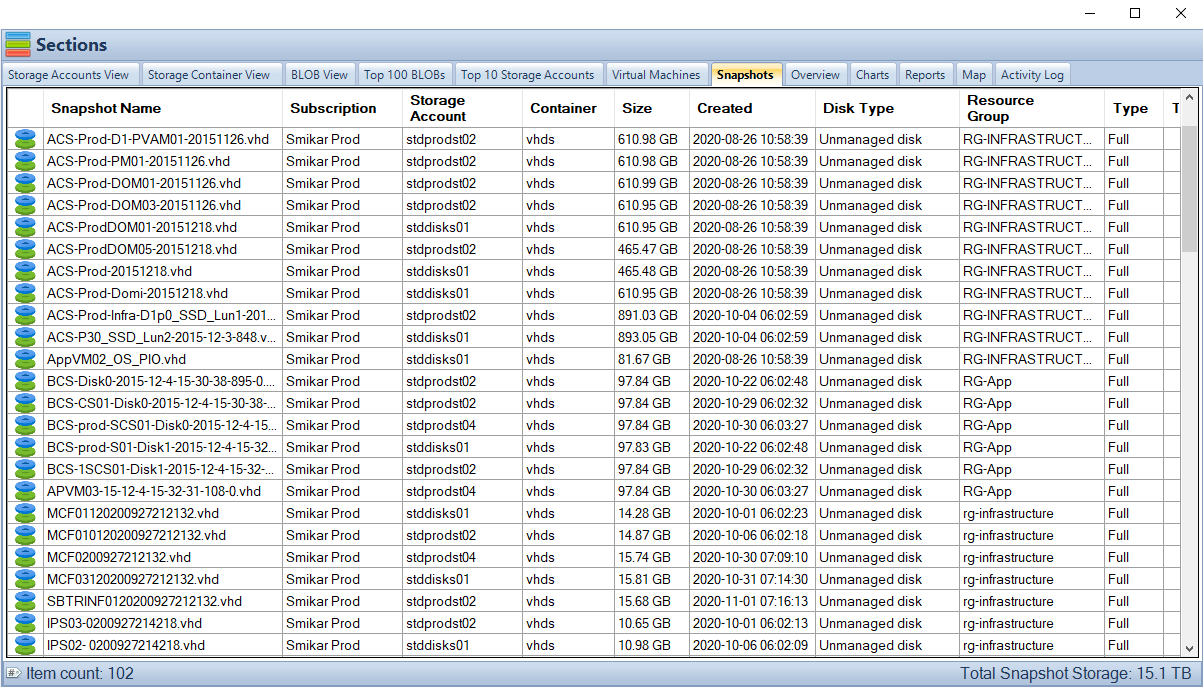
That is where things get a little tricky. If you’ve taken Snapshots of VMs using Managed Disks, all you need to do is search for “Snapshots” and you will see all the Azure snapshots along with information such as the snapshot type, source disk, date and time it was created, the size and a few other items.
OK, great, what’s the problem?
Where are all your Azure VM Managed / Unmanaged Disks?
Well, this view will only show you snapshots of Managed Disks. If you are using unmanaged disks there is no one portal or view where you can see all your snapshots.
Much like everything else in Azure, Snapshots are not free! And if you have numerous VMs using unmanaged disks, you will need to check them one by one through the Storage Account view, locate their VHD and click on the Snapshots menu to see if there is a snapshot associated with the VM.
You could be paying for storage that Snapshots are consuming that were taken months or even years ago that have been forgotten.
OK, so how do you get this information without having to go through each and every VM disk?
Why are leaving Snapshots in Azure a bad thing?
The cost of storing snapshots in Azure depends on several factors, such as the size of the snapshots, the number of snapshots, and the type of storage you use. In Azure, snapshots are stored as page blobs in a storage account, and you are charged for the amount of storage used by the snapshots, as well as any additional features or services you may use, such as data transfer, data management, and data retrieval.
Snapshots stored in Azure are billed based on the size of the snapshots, so the larger the snapshots, the more storage you will be charged for. Additionally, snapshots are billed for the time they are stored, so the longer the snapshots are stored, the more you will be charged for storage.
In addition to storage, you may also incur charges for data retrieval and data transfer. Data retrieval charges apply when you access data stored in a snapshot, and data transfer charges apply when you move data to and from a snapshot.
To reduce the cost of storing snapshots in Azure, it is important to manage your snapshots carefully and only store the snapshots that you need. You can also use features such as automatic snapshot deletion or snapshots compression to reduce the size of your snapshots and reduce the cost of storage.
Overall, the cost of storing snapshots in Azure can be significant, so it is important to plan and manage your snapshots carefully to ensure that you are only paying for the storage that you actually need.
Azure Snapshot Sizes
Easy, just use Cloud Storage Manager and run the report to tell you.
Once you’ve installed Cloud Storage Manager, it will scan your Azure environment and collect a heap of information. Then all you have to do is launch it, and select the “Snapshot” tab to see all your VM snapshots across your Azure environment, including both managed and unmanaged disks.
Of course Cloud Storage Manager doesnt only show how much storage your Snapshots are consuming, it also shows you the capacity of your Storage Accounts, and historical storage growth patterns, and loads more insights in to your Blob Storage within Azure.
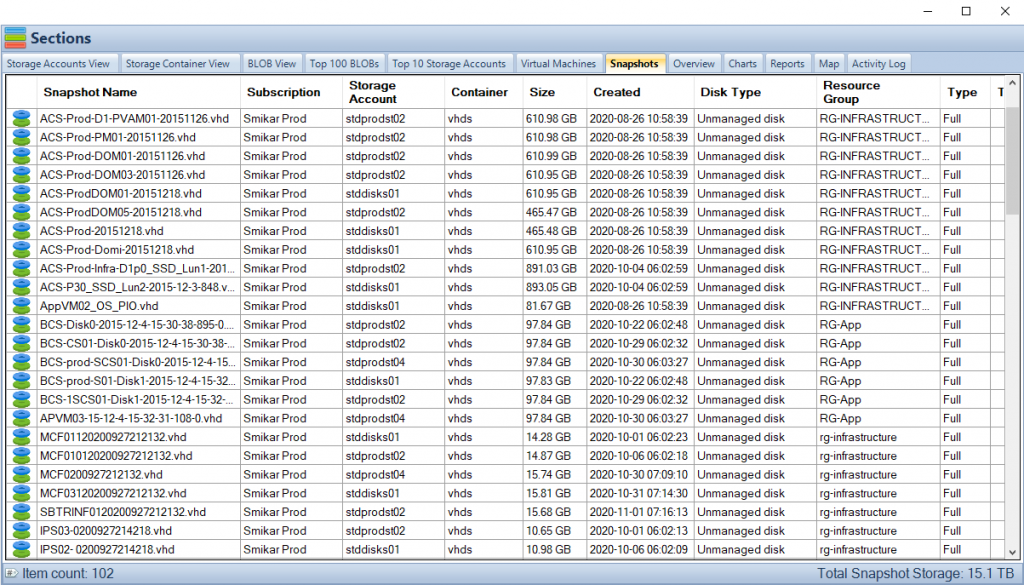
Where are all my Azure VM Snapshots?
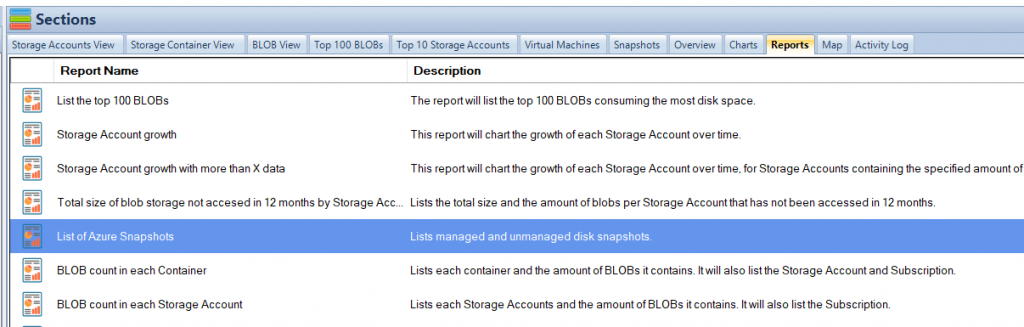
You may also export these results to a report using the Reports tab.
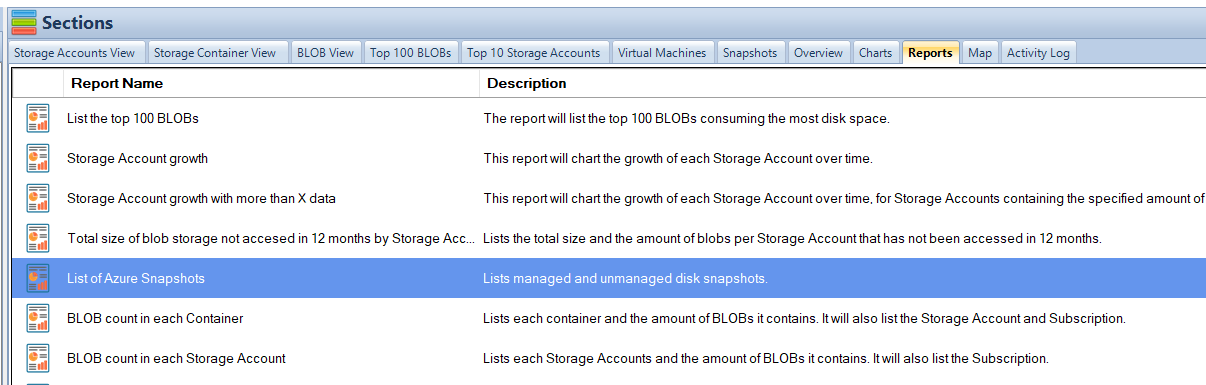
Select the Reports tab and click on the “List of Azure Snapshots”. You will also have the option to export the report to a CSV file.
Automate Azure VM Snapshot Creation
Now you may want to schedule the creation and deletion of Azure Virtual Machines automatically.
SnapShot Master can do this for you with just a few clicks.
SnapShot Master also shows you all your Azure Cloud and even your VMware or Hyper-V snapshot / checkpoint information and more.

by Mark | Dec 17, 2020 | Azure, Azure Blobs, How To, Storage Accounts
Are you using Azure Blob Storage for storing your data? Do you want to keep track of how much Azure Storage you are consuming, the number of Blobs per storage account, the number of containers, and the Azure Blob Storage capacity used?
If so, you need a reliable tool to monitor and control your Azure Blob Storage usage. In this article, we will show you how to use both the Azure Portal and Cloud Storage Manager to gather insights into your Azure Storage consumption.
Before we dive into how to use Cloud Storage Manager, let’s briefly discuss Azure Blob Storage. It is an online cloud service that provides fast access to large amounts of data at a low cost. However, it’s crucial to monitor and control your Azure Blob Storage usage to optimize costs.
Investigate Your Azure Storage Accounts
Before we dive into how to use Cloud Storage Manager, let’s briefly discuss Azure Blob Storage. It is an online cloud service that provides fast access to large amounts of data at a low cost.
If you are using Azure Blob Storage for storing your data, you need a reliable tool to monitor and control your Azure Blob Storage usage. With Cloud Storage Manager, you can gather insights into your Azure Storage consumption.
What are the benefits?
| Benefit |
Description |
Cost Optimization
|
Understanding your Azure Blob storage usage is crucial for cost optimization, as it helps you monitor and control your usage. By keeping track of the number of Blobs, Containers, and the Azure Blob Storage capacity used, you can ensure that you are not overpaying for storage that you are not using. |
Performance Optimization
|
Monitoring your Azure Blob storage usage can help you optimize the performance of your applications. By analyzing the data usage patterns, you can make informed decisions about how to optimize your storage for faster access times and better performance. |
Improved Security
|
By monitoring your Azure Blob storage usage, you can identify any potential security threats or breaches. You can set up alerts to notify you when unusual activity is detected, enabling you to take action to prevent or mitigate any damage. |
Compliance
|
Monitoring your Azure Blob storage usage can help you ensure that you are meeting any regulatory or compliance requirements. By keeping track of your usage, you can demonstrate compliance and avoid potential penalties or legal issues. |
Resource Planning
|
Understanding your Azure Blob storage usage can help you plan for future resource needs. By analyzing your usage patterns, you can make informed decisions about how much storage you will need in the future and plan accordingly. |
So how do I gather all this information about my Azure Storage?
Scan all your Azure Storage Accounts
Hopefully you have installed and run a full environment scan of all your Azure Subscriptions with Cloud Storage Manager.
(If you havent, download and test it for yourself with a free trial)
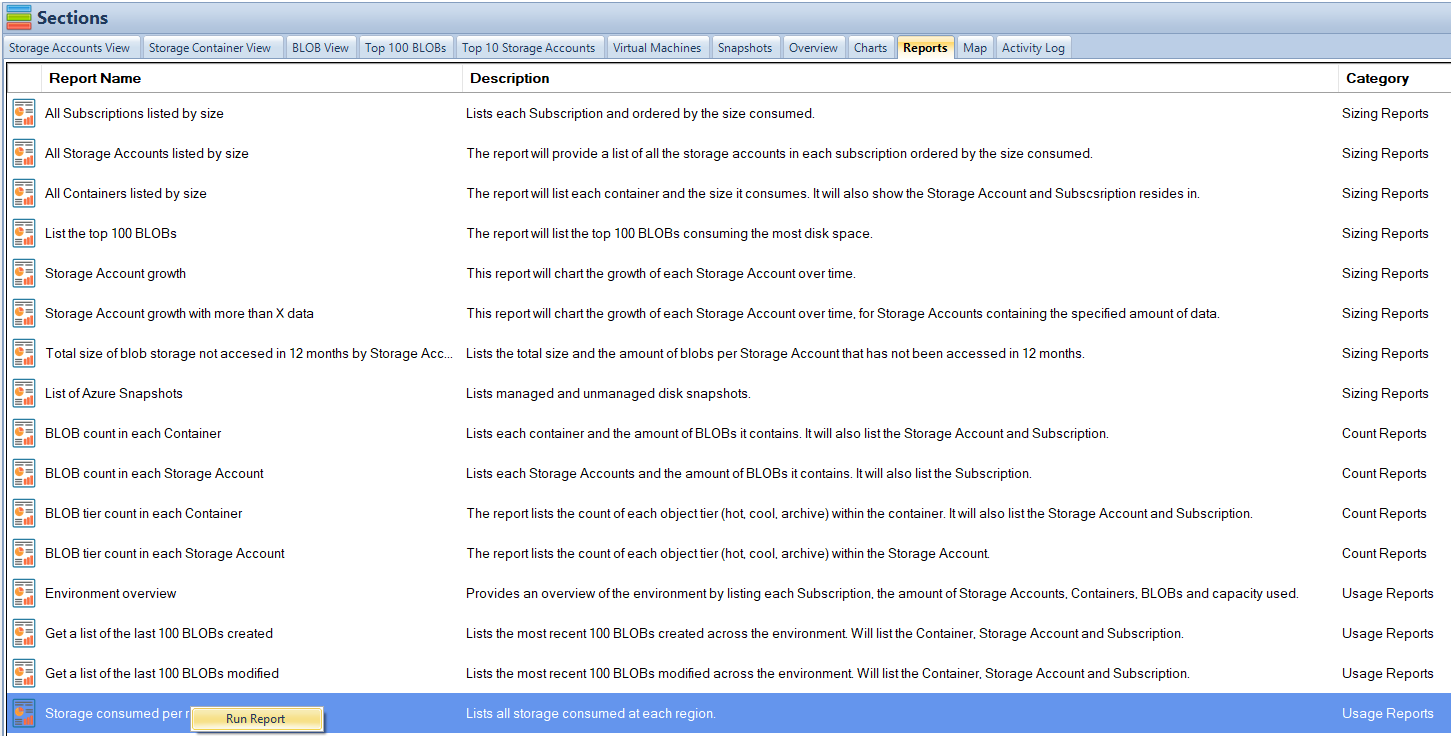
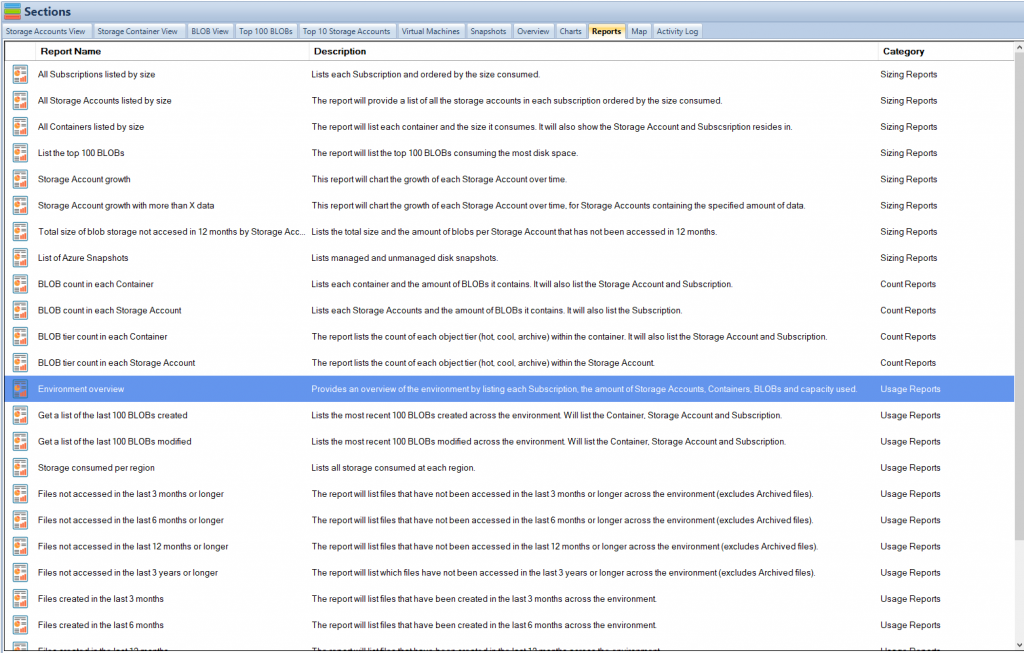
Once you have run an environment scan, go to the Reports Tab in Cloud Storage Manager.

Azure Storage Usage Reports
Now that you are in the Reports Tab, you can see all the various reports you can run to gather information and insights in to your Azure Storage Consumption.
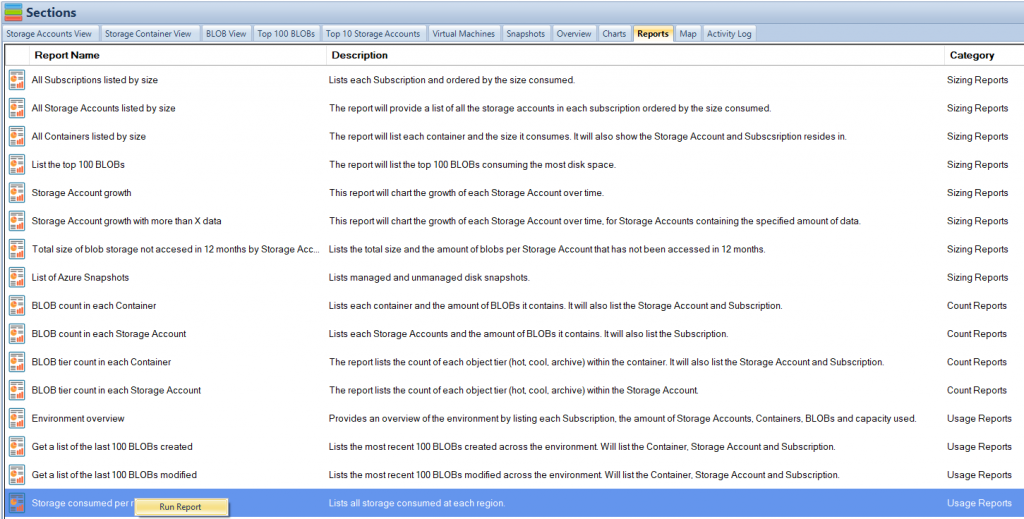
For this Blog post, we are focusing on the size of all of your Azure Subscriptions, Storage Accounts, the number of containers, Blobs and their capacity.
Azure Storage Consumption Reports
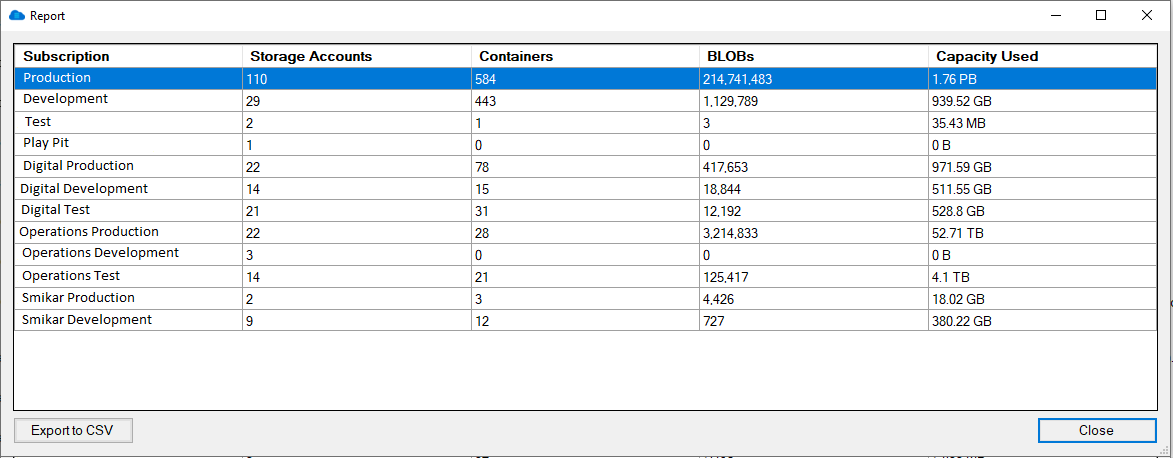
The fastest way to get an Overview of your Azure Storage Consumption is to run the Environment Overview report.
Simply highlight the report, then right click and choose Run Report.

Azure Storage Usage Overview
When you run the Azure Reports, you are presented with a screen showing the details about your Azure Storage.
As can bee seen in the adjacent screenshot, this report provides you with high level details about your Azure Storage Usage by Subscription, including the number of Containers, the number of Blobs and finally the Azure Storage Capacity used in each subscription.
You can export this information to CSV if you wish and perform further analysis in Excel.

Now what if you require further analysis of your Azure Blob Storage consumption?
Azure Storage Analysis
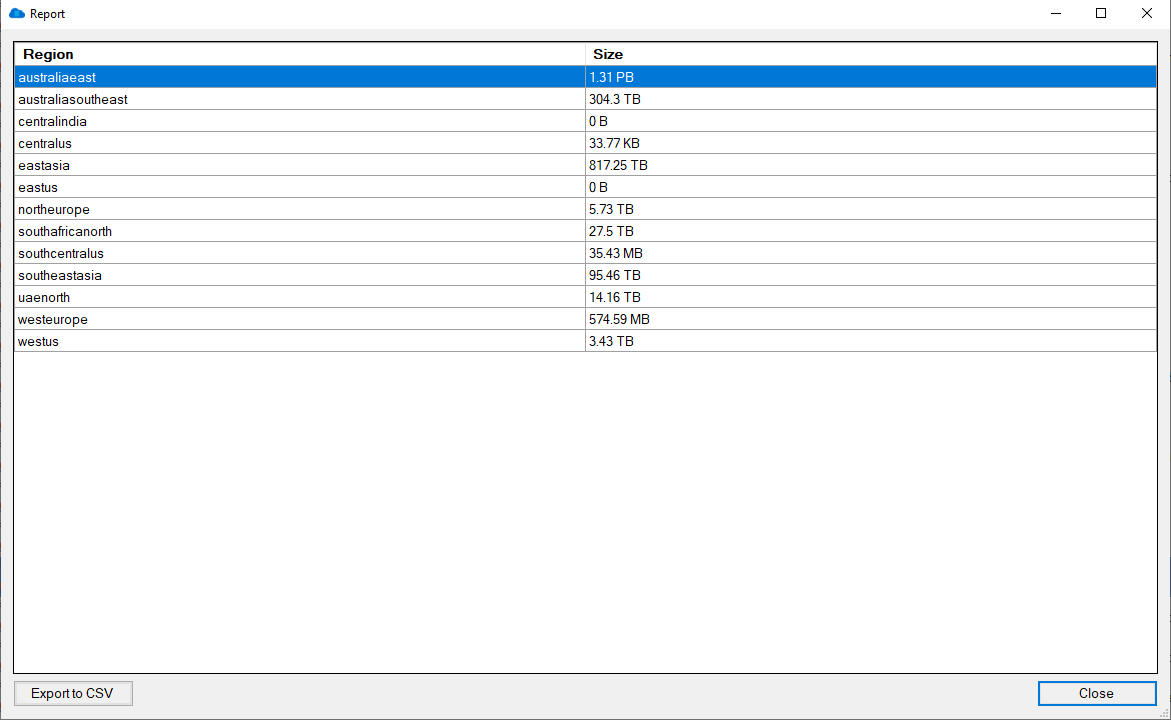
Now that you have a good overview of the amount of Azure Storage you are consuming, another good report to run for further insights is Storage Consumed per Region.
This report will show you the total amount of storage consumed per Azure Region.
Highlight that report in Cloud Storage Manager and choose Run Report.
Azure Storage Regions
As you can see in the screen shown, here is a list of each Azure Regions and the amount of Azure Blob Storage you are consuming there.
As usual, you can export this to Excel for further analysis.

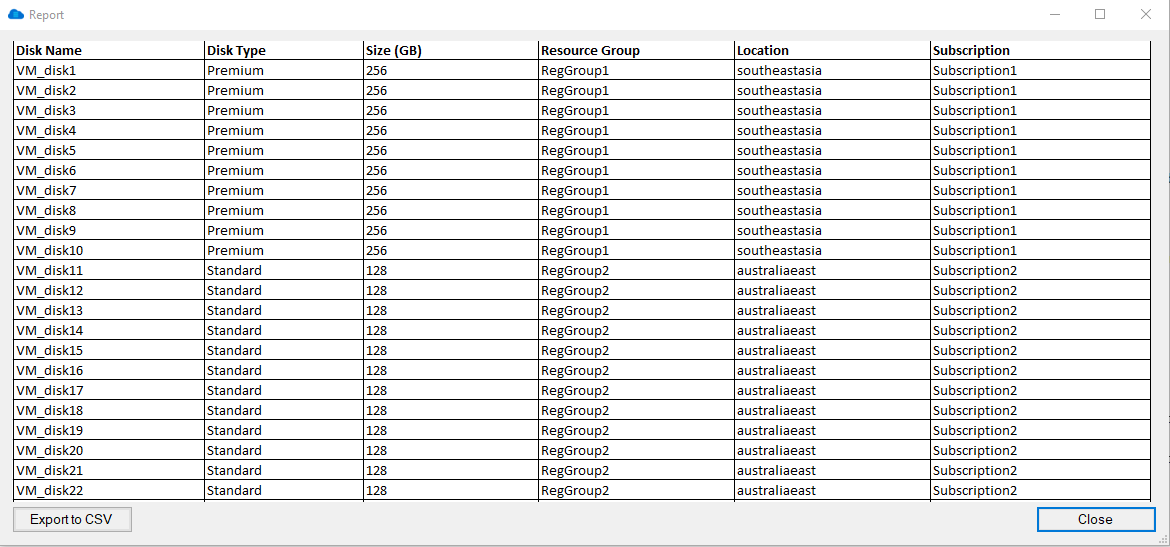
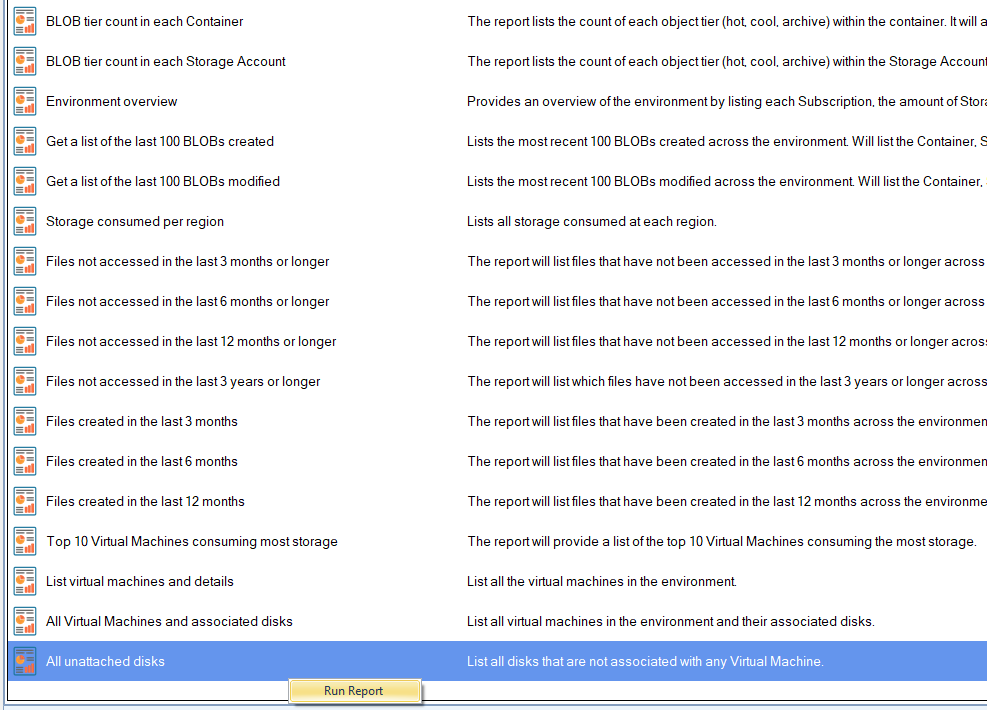
Unattached Azure Virtual Machines disks.
Another great report to run is All Unattached Disks.
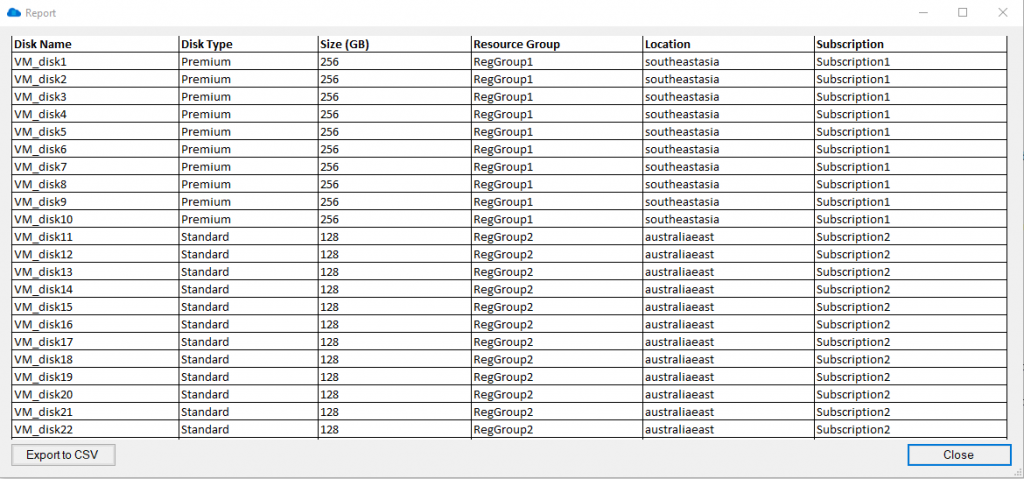
This report will find and show you all the Azure Virtual Machine disks that are not associated with any Azure VM. These disks are costing you money as they arent being used by any Virtual Machines, sitting there dormant and not being used.
Again, Highlight that report and choose Run Report.
See Azure VM disks that are not associated.
As seen in the screenshot here, all these Azure Disks are not associated with any Azure Virtual Machine.
Yet again you can export this information to excel so that you can investigate further.
Download a FREE trial of Cloud Storage Manager today and start saving money, and understanding your Azure Storage Growth and Consumption.
Dont overspend on your Azure Storage
Knowing the size of your Azure Blob storage is crucial for cost optimization as it helps you monitor and control your usage. By keeping track of the number of Blobs, Containers, and the Azure Blob Storage capacity used, you can ensure that you are not overpaying for storage that you are not using. Additionally, by using a report like “All Unattached Disks,” you can identify any dormant disks that are not associated with any virtual machine and cut costs by deleting or resizing them. By regularly monitoring your Azure Blob storage with the help of tools like Cloud Storage Manager, you can make informed decisions about your usage and reduce unnecessary spending on storage.
Free

Database size is limited to a maximum of 5MB.
Typically for small or personal environments usually consisting of 3 or less Azure Subscriptions and consuming under 30TB of Azure Blob Storage.
Advanced
Database size is limited to a maximum of 1GB.
For medium sized environments typically consisting of less than 10 Azure Subscriptions and consuming under 500TB of Azure Blob Storage.
Enterprise
Unlimited database size.
For use in large environments typically consisting of more than 10 Subscriptions and consuming more than 1PB of Azure Blob Storage.
Azure Storage Consumption FAQ
| Question |
Answer |
What is Azure Storage?
|
Azure Storage is a cloud-based storage solution provided by Microsoft Azure that enables users to store and manage data in various forms such as blobs, files, queues, tables, and disks. |
Why is it important to understand how much Azure Storage I consume?
|
Understanding how much Azure Storage you consume is crucial because it helps you optimize your storage usage, control costs, and avoid unexpected charges. |
What are the benefits of optimizing Azure Storage consumption?
|
Optimizing Azure Storage consumption helps reduce costs, improve performance, and enhance security by ensuring that you only pay for the storage you need, and that your data is stored and managed efficiently. |
How can I monitor my Azure Storage consumption?
|
Use Cloud Storage Manager to deep dive in to your Azure Storage, find out how much you are consuming and where you can start saving money |
What are some best practices for optimizing Azure Storage consumption?
|
Some best practices for optimizing Azure Storage consumption include cleaning up unused data, compressing data before storing it, using tiered storage options, and using automation to manage and optimize your storage resources. |
How can I estimate my Azure Storage costs?
|
You can estimate your Azure Storage costs using the Azure Pricing Calculator, which provides an estimated cost based on your storage requirements and usage patterns. |
How can I reduce my Azure Storage costs?
|
You can reduce your Azure Storage costs by optimizing your storage usage, deleting unused data, using tiered storage options, compressing data, and leveraging Cloud Storage Manager manage your costs. |