by Mark | Feb 3, 2023 | Azure, Azure Blobs, Blob Storage, Comparison
Introduction
Azure Data Lake Storage Gen2 and Blob storage are two cloud storage solutions offered by Microsoft Azure. While both solutions are designed to store and manage large amounts of data, there are several key differences between them. This article will explain the differences and help you choose the right solution for your cloud data management needs.

Understanding Azure Data Lake Storage Gen2
Azure Data Lake Storage Gen2 is an enterprise-level, hyper-scale data lake solution. It is designed to handle massive amounts of data for big data analytics and machine learning scenarios. It combines the scalability of Azure Blob Storage with the file system capabilities of Hadoop Distributed File System (HDFS). It’s a fully managed service that supports HDFS, Apache Spark, Hive, and other big data frameworks. Data Lake Storage Gen2 offers the following features:
- Hierarchical namespace: Allows for a more organized and efficient data structure.
- High scalability: Can handle petabytes of data and millions of transactions per second.
- Advanced analytics: Provides integrations with big data frameworks, making it easier to perform advanced analytics.
- Tiered storage: Enables the use of hot, cool, and archive storage tiers, providing flexibility in storage options and cost savings.
Understanding Blob storage
Azure Blob Storage is a cloud-based object storage solution. It’s designed for storing and retrieving unstructured data, such as images, videos, audio files, and documents. Blob Storage is a scalable and cost-effective solution for businesses of all sizes. Blob Storage offers the following features:
- Multiple access tiers: Offers hot, cool, and archive storage tiers, allowing businesses to choose the right storage tier for their needs.
- High scalability: Can handle petabytes of data and millions of transactions per second.
- Data redundancy: Provides data redundancy across multiple data centers, ensuring data availability and durability.
- Integration with Azure services: Integrates with other Azure services, such as Azure Functions and Azure Stream Analytics.
Differences between Azure Data Lake Storage Gen2 and Blob storage
Now that we have explored the features and benefits of both Azure Data Lake Storage Gen2 and Azure Blob Storage, let’s compare the two.
Data Structure
Azure Data Lake Storage Gen2 has a hierarchical namespace, which allows for a more organized and efficient data structure. It means that data can be stored in a more structured manner, and files can be easily accessed and managed. On the other hand, Azure Blob Storage does not have a hierarchical namespace, and data is stored in a flat structure. It can make data management more challenging, but it’s a simpler approach for businesses that don’t require complex data structures.
Data Analytics
Azure Data Lake Storage Gen2 is designed specifically for big data analytics and machine learning scenarios. It supports integrations with big data frameworks, such as Apache Spark, Hadoop, and Hive. On the other hand, Azure Blob Storage is designed for storing unstructured data, and it doesn’t have built-in analytics capabilities. However, businesses can use other Azure services, such as Azure Databricks, to perform advanced analytics.
Cost
Both Azure Data Lake Storage Gen2 and Azure Blob Storage offer tiered storage, providing flexibility in storage options and cost savings. However, the storage costs for Data Lake Storage Gen2 are slightly higher than Blob Storage.
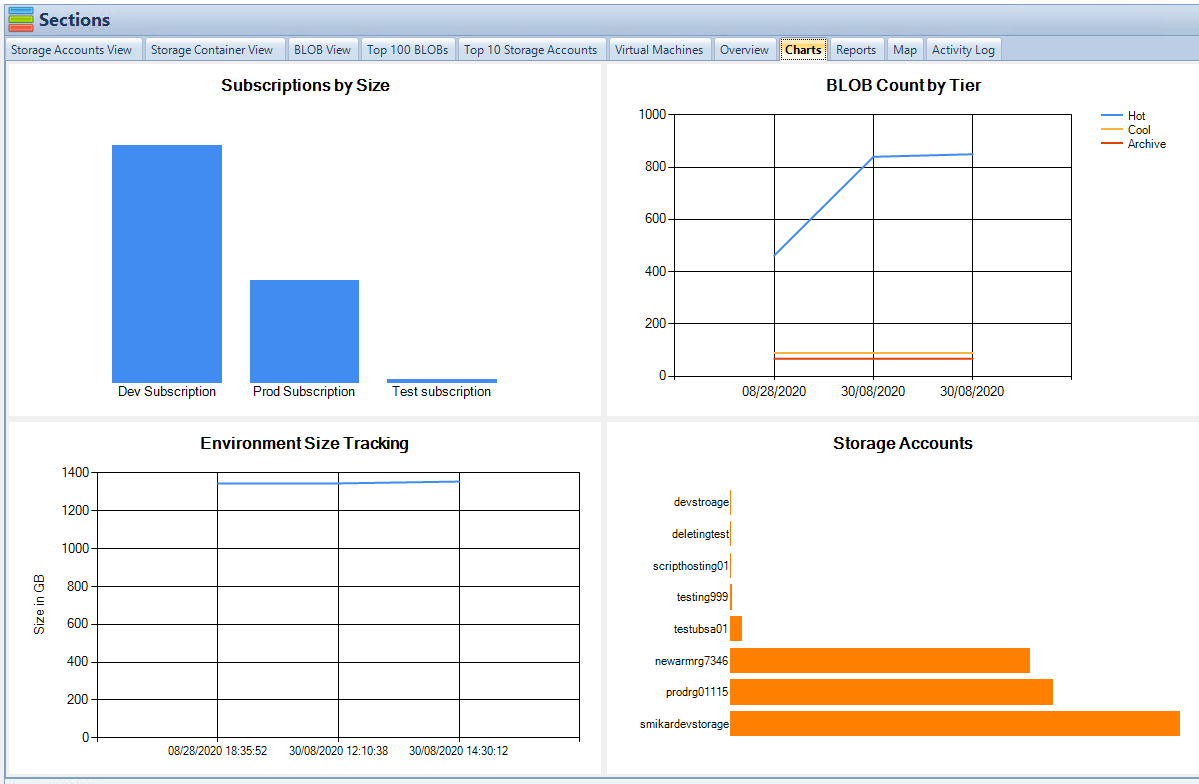
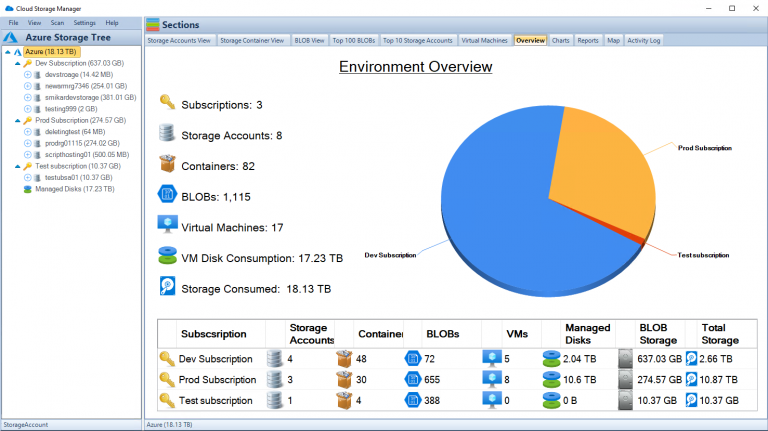
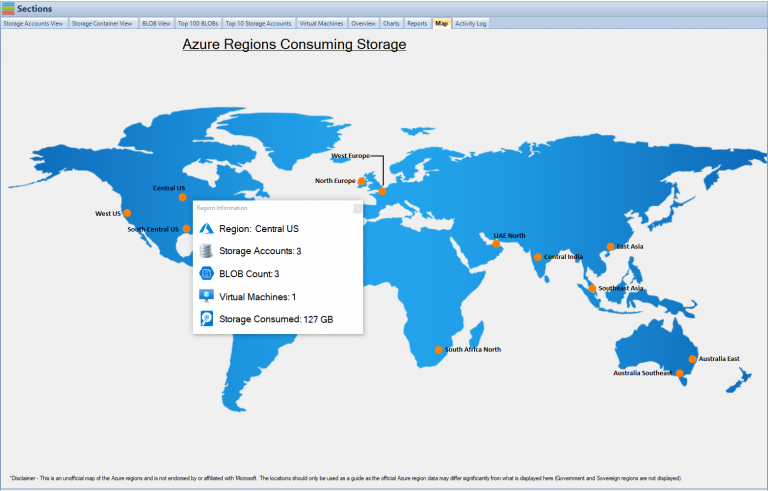
To minimise costs of both Azure Datalake and Azure Blob Storage, you can use Cloud Storage Manager to understand exactly what data is being accessed, or more importantly not being accessed, and where you can possibly save money.
Performance
Azure Data Lake Storage Gen2 offers faster data access and improved query performance compared to Azure Blob Storage. This is because Data Lake Storage Gen2 is optimized for big data analytics and can handle complex queries more efficiently. However, if your business doesn’t require advanced analytics, Blob Storage may be a more cost-effective option.
Use Cases
Azure Data Lake Storage Gen2 is an ideal choice for businesses that require big data analytics and machine learning capabilities. It’s a suitable option for data scientists, analysts, and developers who work with large datasets. On the other hand, Azure Blob Storage is best suited for storing and retrieving unstructured data, such as media files and documents. It’s an ideal option for businesses that need to store and share data with their clients or partners.
Conclusion
In conclusion, Azure Data Lake Storage Gen2 and Blob storage are both cloud storage solutions offered by Microsoft Azure. While both solutions are designed to store and manage data, there are several key differences between them, including scalability, cost, performance, security, and use cases. When choosing between Azure Data Lake Storage Gen2 and Blob storage, consider your data storage needs and choose the solution that best meets those needs.
In summary, Azure Data Lake Storage Gen2 is ideal for big data analytics workloads, while Blob storage is ideal for storing and accessing unstructured data. Both solutions offer strong security features and are cost-effective compared to traditional data storage solutions.
FAQs
Can I use Azure Blob Storage for big data analytics?
Yes, you can use other Azure services, such as Azure Databricks, to perform advanced analytics on data stored in Azure Blob Storage.
Can I use Azure Data Lake Storage Gen2 for storing unstructured data?
Yes, you can use Data Lake Storage Gen2 to store unstructured data, but it’s optimized for structured and semi-structured data.
How does the cost of Data Lake Storage Gen2 compare to Blob Storage?
The storage costs for Data Lake Storage Gen2 are slightly higher than Blob Storage due to its advanced analytics capabilities.
Can I integrate Azure Blob Storage with other Azure services?
Yes, Azure Blob Storage integrates with other Azure services, such as Azure Functions and Azure Stream Analytics.
Is Azure Storage suitable for businesses of all sizes?
Yes, Azure Storage is a scalable and cost-effective solution suitable for businesses of all sizes.
Can you reduce the costs of Azure Blob Storage and Azure Datalake?
Yes, simply using Cloud Storage Manager to understand growth trends, data that is redundant, and what can be moved to a lower storage tier.
by Mark | Feb 1, 2023 | AWS, Azure, Cloud Computing, Comparison, Storage Accounts
When it comes to cloud storage, two of the most popular options are Azure Blob Storage and Amazon S3. Both are highly scalable, secure, and widely used by businesses of all sizes. However, there are significant differences between the two that make them better suited for different use cases. In this article, we will take a detailed look at the features, capabilities, and pricing of Azure Blob Storage and Amazon S3 to help you decide which one is the best fit for your organization.
Azure Blob Storage versus AWS S3 Overview
Azure Blob Storage is a fully managed object storage service provided by Microsoft Azure. It is designed for unstructured data, such as images, videos, audio, and documents. Azure Blob Storage supports various data access tiers, including Hot, Cool, and Archive, which allows you to store data at different levels of accessibility and cost.
Amazon S3 (Simple Storage Service) is also a fully managed object storage service provided by Amazon Web Services (AWS). Like Azure Blob Storage, it is designed for unstructured data and supports different data access tiers, such as Standard, Intelligent-Tiering, and Glacier.
Storage Features
One of the key features of Azure Blob Storage is its support for Azure Data Lake Storage Gen2. This allows you to store and analyze large amounts of data in its native format, such as Parquet, Avro, and JSON, and perform big data analytics using Azure Data Lake Analytics and Azure HDInsight. Azure Blob Storage also supports Azure Blob Storage lifecycle policies, which allows you to automatically transition data to lower-cost storage tiers as it ages.
Amazon S3, on the other hand, supports Amazon S3 Select, which allows you to retrieve only the data you need from an object, rather than the entire object. This can greatly reduce the time and cost of data retrieval, especially for large objects. Amazon S3 also supports Amazon S3 Lifecycle policies, which allow you to automatically transition data to lower-cost storage tiers as it ages.
Scalability
Both Azure Blob Storage and Amazon S3 are highly scalable, meaning that you can easily increase or decrease the amount of storage you need as your data grows or shrinks. However, there are some key differences between the two when it comes to scalability.
Azure Blob Storage supports a maximum capacity of 100 PB per storage account and a maximum file size of 4.77 TB. This makes it well-suited for large-scale data storage and analytics.
Amazon S3, on the other hand, supports a maximum capacity of 100 PB per bucket and a maximum file size of 5 TB. While this is also well-suited for large-scale data storage, it may not be as well-suited for large-scale data analytics as Azure Blob Storage.
| Features |
AWS |
Azure |
| Scalability |
AWS provides elastic scalability for most of its services, which means you can quickly scale up or down your resources as per your business needs. This allows you to handle sudden spikes in traffic or increased workload with ease. |
Azure also provides elastic scalability, allowing you to scale resources up or down as needed. It also offers auto-scaling, which automatically adjusts resource allocation based on traffic or usage patterns. |
| Performance |
AWS has a reputation for high performance and low latency, thanks to its global infrastructure and use of cutting-edge technologies. It also provides a range of performance-optimized instances for compute, storage, and database workloads. |
Azure also provides high-performance computing capabilities, with a range of performance-optimized virtual machines and specialized services such as Azure Cosmos DB for fast NoSQL data storage and processing. Azure also leverages Microsoft’s global network of data centers to provide low-latency access to resources. |
It’s important to note that the actual scalability and performance you experience will depend on a range of factors, including your specific workload, the resources you allocate, and the network conditions. It’s always a good idea to test and benchmark your applications on both AWS and Azure before making a final decision.
Security
Security is of the utmost importance when it comes to cloud storage. Both Azure Blob Storage and Amazon S3 provide robust security features to protect your data.
Azure Blob Storage supports Azure Active Directory (AAD) authentication, which allows you to control access to your data using Azure AD identities. It also supports Azure Storage encryption, which allows you to encrypt data at rest and in transit.
Amazon S3 also supports security features such as Amazon S3 Access Control Lists (ACLs) and Amazon S3 bucket policies, which allow you to control access to your data using AWS identities. It also supports Amazon S3 encryption, which allows you to encrypt data at rest and in transit.
Pricing
Pricing is another important consideration when choosing a cloud storage solution. Both Azure Blob Storage and Amazon S3 offer pay-as-you-go pricing models, meaning you only pay for the storage and data transfer you use. However, there are some key differences in how they are priced.
Azure Blob Storage is priced based on the amount of data stored, the number of operations performed, and the data transfer out of Azure. It also charges for data retrieval from the Cool and Archive tiers, as well as for data egress from certain regions.
Amazon S3 is also priced based on the amount of data stored, the number of requests made, and the data transfer out of AWS. It also charges for data retrieval from the Intelligent-Tiering and Glacier tiers, as well as for data egress from certain regions.
It is important to note that the pricing for Azure Blob Storage and Amazon S3 can vary greatly depending on the specific use case and the amount of data stored. Therefore, it is recommended to use the pricing calculators provided by each provider to determine the cost of using their service for your specific needs.
Azure Blob Storage and Amazon S3 Capabilities Comparison
| Capability |
Azure Blob Storage |
Amazon S3 |
| Storage type |
Object storage |
Object storage |
| Supported data access tiers |
Hot, Cool, Archive |
Standard, Intelligent-Tiering, Glacier |
| Maximum capacity per storage account/bucket |
100 PB |
100 PB |
| Maximum file size |
4.77 TB |
5 TB |
| Support for big data analytics |
Yes (supports Azure Data Lake Storage Gen2) |
No |
| Support for selective data retrieval |
No (does not support S3 Select) |
Yes (supports S3 Select) |
| Support for automatic data tiering |
Yes (supports lifecycle policies) |
Yes (supports lifecycle policies) |
| Security features |
Azure AD authentication, Azure Storage encryption |
ACLs, bucket policies, S3 encryption |
| Pricing model |
Pay-as-you-go |
Pay-as-you-go |
Azure Blob Storage vs AWS S3 Pros and Cons
| Pros |
– The market leader with the widest range of services and features. |
– Seamless integration with Microsoft software and services. |
|
– Strong ecosystem of third-party tools and integrations. |
– More flexible hybrid cloud solutions, including Azure Stack. |
|
– Extensive documentation and community support. |
– Strong focus on security and compliance, with more certifications than any other cloud provider. |
|
– Mature and battle-tested infrastructure. |
– Powerful machine learning and AI capabilities, with pre-built models and integrations with popular frameworks. |
|
– Strong developer tools and support for multiple programming languages. |
– Competitive pricing and a range of purchasing options, including pay-as-you-go, reserved instances, and hybrid use benefits. |
| Cons |
– Can be complex and overwhelming for beginners. |
– Smaller ecosystem of third-party tools and integrations. |
|
– Less flexible in terms of hybrid cloud solutions, with a stronger emphasis on public cloud. |
– Documentation can be less comprehensive than AWS. |
|
– Less focus on enterprise applications and services. |
– Can be more expensive for certain workloads and purchasing options. |
|
– Can be more expensive for certain workloads and purchasing options. |
– Some services and features may not be as mature or fully-featured as AWS counterparts. |
Azure Blob Storage vs AWS S3 Conclusion
In conclusion, both Azure Blob Storage and Amazon S3 are highly scalable, secure, and widely used cloud storage solutions. However, they are better suited for different use cases. Azure Blob Storage is best for large-scale data storage and analytics, while Amazon S3 is best for general unstructured data storage. Both services offer similar features and security, but the pricing can vary greatly depending on the specific use case. Therefore, it is important to carefully evaluate your specific needs and use case before deciding which service is the best fit for your organization.