by Mark | Jun 19, 2016 | How To, SCCM
How to Resolve “Configuration Manager Did Not Find a Site to Manage This Client” Error
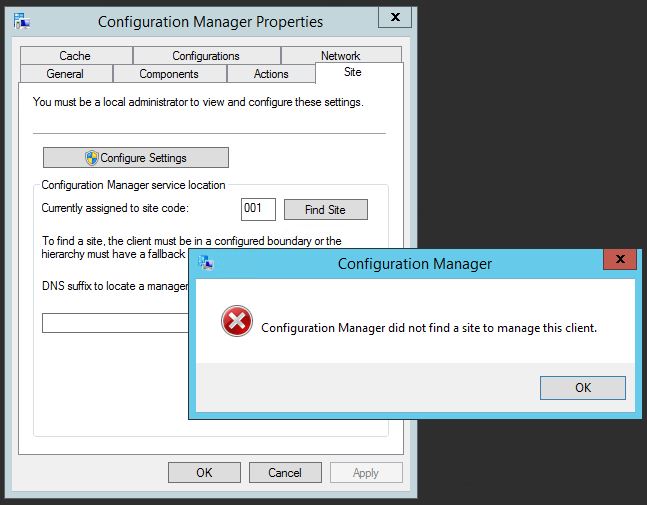
If you’re an IT professional, you may have encountered an error message that says “Configuration Manager did not find a site to manage this client” when trying to deploy Windows updates to your client machines. This error can be frustrating, especially when you’re not sure what’s causing it. In this article, we’ll discuss how to troubleshoot and fix this error.
Checking the SCCM Client Site
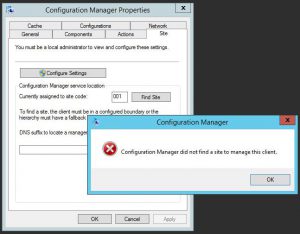
The first step in troubleshooting this error is to check the Configuration Manager applet on each of the affected clients to see if they belong to a client site. If they don’t, this could be the root cause of the error.
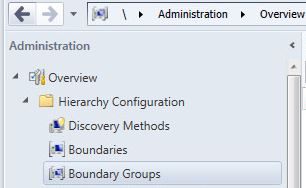
Checking the SCCM Boundary Groups
One possible reason why the clients don’t belong to a site is that there is an issue with the boundary groups. To check if this is the case, go to Administration, Hierarchy Configuration, then Boundary Groups on the Configuration Manager server. If you don’t see any boundary group set up, then you need to create one.
Creating a Boundary Group in SCCM
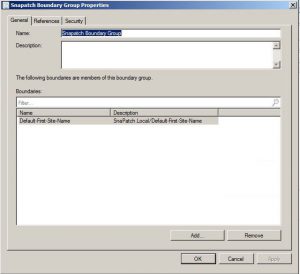
To create a boundary group, right-click on the blank area of the console and choose Create Boundary Group. You’ll then need to fill in the details of your boundaries and assign them the corresponding distribution point and site code. Give the boundary group a name and assign the appropriate boundary.
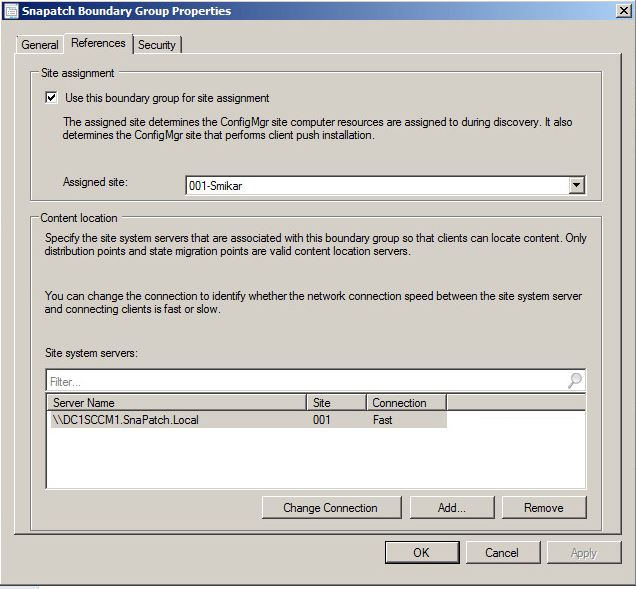
Assigning Site System Server and Choosing the Assigned Site
Once you’ve set up the boundary group, go to the References tab and assign the correct Site System Server for this boundary. Choose the assigned site and repeat these steps for each boundary and distribution point that you require.
Site Discovery
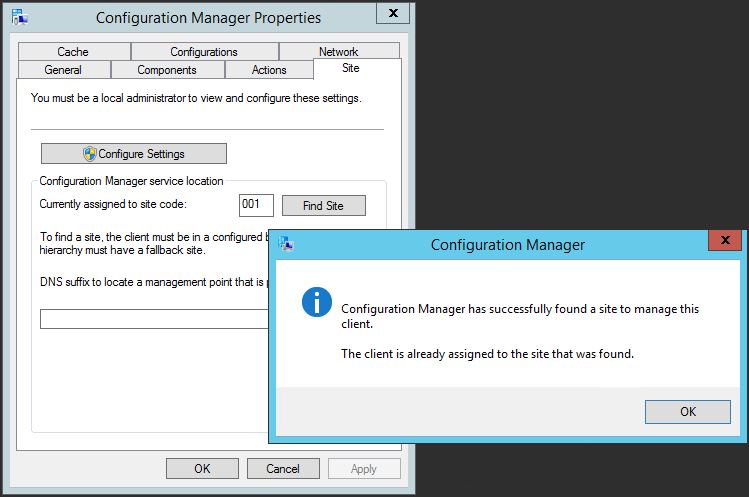
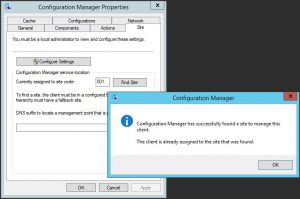
After setting up the boundary group, go back to your client machines and try another site discovery.
So how did we fix this SCCM Error?
In our Lab we had an issue where during Windows Update deployments as it seemed some clients were not getting their updates. Looking through various logs, we eventually checked the Configuration Manager applet on each of the clients and found they didnt belong to a client site.
First thing that came to mind, was that there is an issue with a boundary. As this was a recently new implementation of SCCM 2012 in the lab, I logged on to the Configuration Manager server, and opened the SCCM Console.
Go to Administration, Hierarchy Configuration, then Boundary Groups.

Looking at the Boundary Groups, there was never one setup. A slight mistake if we must say! 🙂
To set up a Boundary Group, right click in the blank area of the console and choose Create Boundary Group

From here, you will need to fill in the appropriate details of your Boundaries, and assign them the correlating distribution point and site code.
Give the Boundary Group a Name, and assign the appropriate Boundary.
Go to the References tab.
Now assign the correct Site System Server for this boundary and choose the Assigned Site.
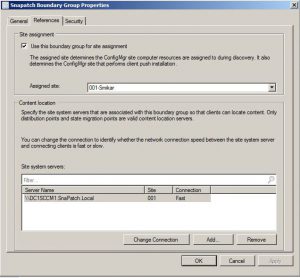
Repeat theses steps for each boundary and DP that you require.
You should now be able to go back to your client machines, and try another site discovery. If all is well you should get the following prompt.
Manually download updates with SCCM
The “Configuration Manager did not find a site to manage this client” error can be caused by several factors, but a missing or improperly configured boundary group is often the culprit. By following the steps above, you should be able to resolve this error and successfully deploy updates to your client machines. Remember to regularly check the Configuration Manager applet and the boundary groups to ensure that everything is functioning as expected.

by Mark | Jun 19, 2016 | How To, SCCM
Streamlining SCCM Installation with Microsoft’s Prerequisite Tool
Microsoft has recently launched a valuable tool that simplifies the installation process of System Center Configuration Manager (SCCM). The SCCM Installation Prerequisites tool helps administrators ensure that the necessary prerequisites are in place before the installation process begins. This tool also automatically installs the required prerequisites, saving you time and effort.
Checking and Installing Prerequisites Made Easy
With the SCCM Installation Prerequisites tool, you can easily verify that all the required prerequisites are already in place. It checks for prerequisites for a Central Primary site, Primary or Secondary Sites, and other site system roles, such as Management Point, Application Catalog, Distribution Point, Enrollment Point, among others.
Additionally, the tool installs any missing prerequisites automatically. This reduces the risk of errors and makes the installation process smoother and quicker.
Installing SCCM Made More Efficient
Installing SCCM can be a challenging task, particularly when it comes to the setup process. However, the SCCM Installation Prerequisites tool streamlines the installation process and makes it more efficient. The tool is designed to run before the SCCM installation process begins, which ensures that all prerequisites are in place and ready to go.
To use the SCCM Installation Prerequisites tool, simply download it from the Microsoft website and run it before you begin the SCCM installation. It’s that simple!
Overall, Microsoft’s SCCM Installation Prerequisites tool is a valuable tool that simplifies the SCCM installation process. It ensures that all prerequisites are in place and automatically installs any missing ones, making the installation process more efficient and streamlined. So, if you’re an administrator who regularly installs SCCM, this tool is a must-have in your toolkit.

by Mark | Mar 7, 2016 | SCCM
System Centre Configuration Manager (SCCM) Auto Deployment Rule Error 0x87d20415
Are you experiencing Auto Deployment Rule Error 0x87d20415 in SCCM? Don’t worry, it’s a common issue related to SCCM’s hard-coded limit on the number of updates that can be downloaded by an Automatic Deployment Rule. To fix it, check your Auto Deployment Rules in SCCM’s Software Library and investigate the issue by examining the ruleengine.log file. Once you’ve identified the problem, set the Date Revised or Released to the last month, go to your Automatic Deployment Rule, and choose Run Now. After completing this process, check the ruleengine.log file again to ensure that updates download without any issues. By following these steps, you can easily overcome Auto Deployment Rule Error 0x87d20415 in SCCM and ensure that your Automatic Deployment Rules run smoothly. For more helpful solutions to SCCM deployment issues, be sure to check out our other articles.
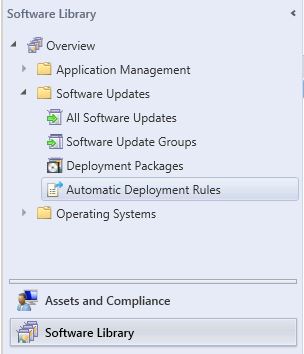
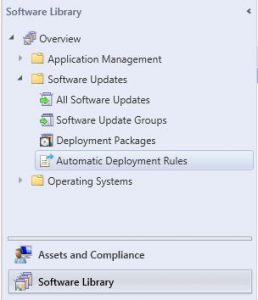
Check your Auto Deployment Rules
When you notice that updates haven’t been downloading as intended, one of the first things to check is your Auto Deployment Rules. Go to the Software Library in SCCM and select Automatic Deployment Rules. In the main window, you should be able to see the error code and why your Auto Deployment Rule hasn’t run. The error in this case is 0x87d20415.
Go to Software Library and choose Automatic Deployment Rules
I
In the main window you should be able to see the error code and why your Auto Deployment Rule hasnt run. The error in this example is 0x87d20415, as per the below image.

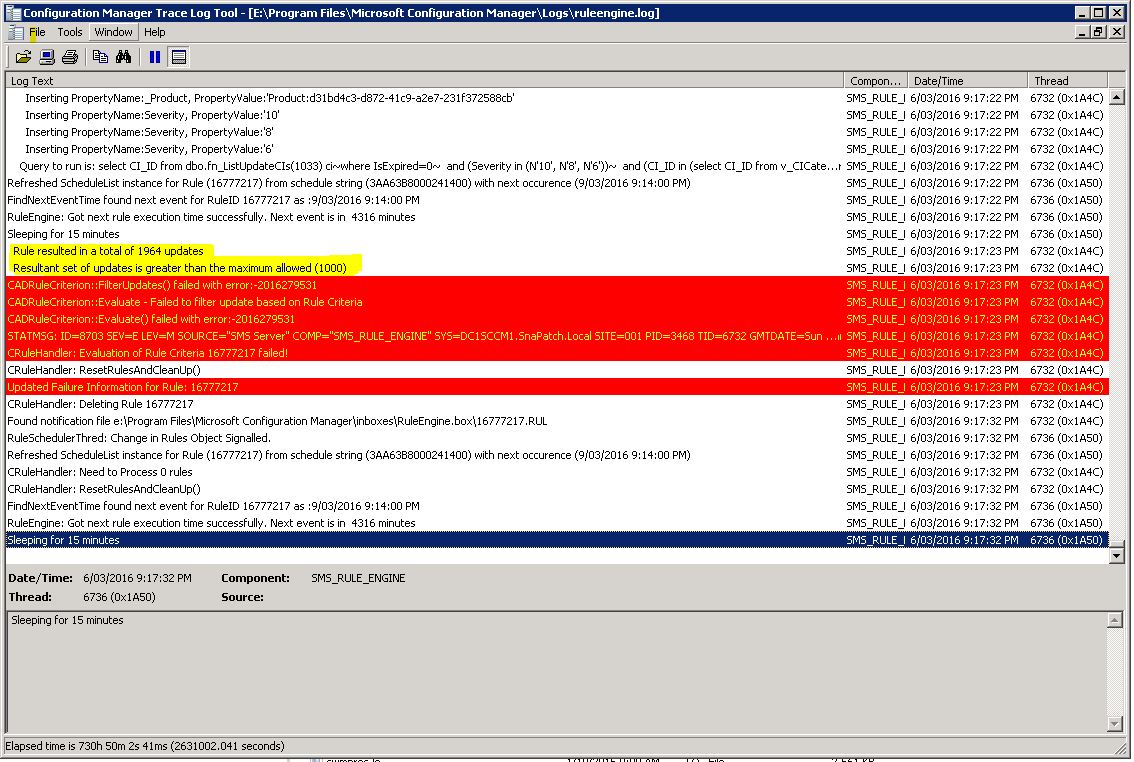
The issue is that SCCM has a hard coded limit on the number of updates (1000) that can be downloaded by an Automatic Deployment Rule. The best place to start to investigate that this is the case, is to check the ruleengine.log, located install directory – Microsoft Configuration Manager – Logs – ruleengine.log.
Looking at the file with cmtrace, you should be able to easily identify that this is in fact the issue. (Issue highlighted in yellow)
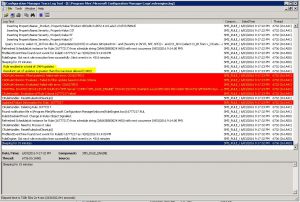
You can see that the ADR has hit the 1000 update limits as highlighted in yellow above.
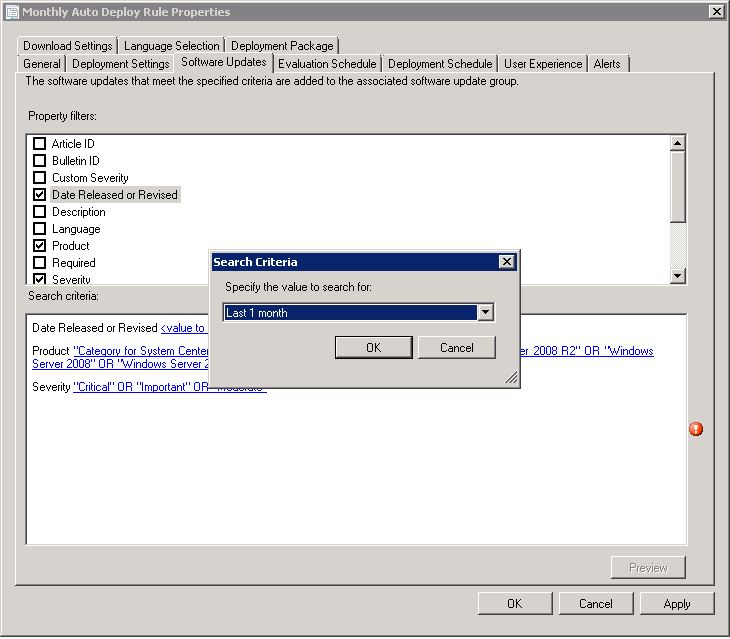
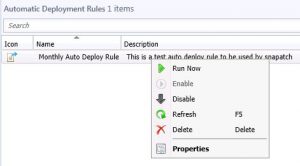
To overcome this issue, you need to set the date revised or released to the last month. This way, SCCM will only check for updates released in this period. To do this, right click on your Automatic Deployment Rule and click properties. Go to the Software Updates tab, and choose Date Released or Revised, and set this for a more suitable time frame (1 month should suffice, but this does depend on your Update deployment schedule)

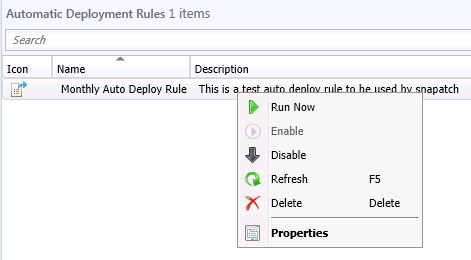
Once you have changed this range, go to your Automatic Deployment Rule, and choose Run Now.
Once this has been completed, check the Ruleengine.log once again, and you should hopefully see that the updates are now in fact downloading and the dreaded error, Auto Deployment Rule Error 0x87d20415 has disappeared.
In conclusion, fixing Auto Deployment Rule Error 0x87d20415 in SCCM can be quite simple. By following the steps outlined above, you can resolve this issue and ensure that your Automatic Deployment Rules run smoothly without encountering this error. If you encounter any other SCCM deployment issues, be sure to check out our other articles for solutions.