by Mark | Feb 15, 2023 | Azure, Azure Blobs, Blob Storage
Azure Storage for Backup
Data is the lifeline of modern businesses, and losing it can have serious consequences. That’s why backup and recovery strategies are crucial for any organization. Azure Storage is one of the most reliable and secure cloud storage solutions available, making it an excellent option for storing backups. In this article, we will explore the benefits and challenges of using Azure Storage as a backup location and provide you with a step-by-step guide to set up and manage your backups.
Benefits of Using Azure Storage as a Backup Location:
- Cost-Effective: Azure Storage offers a cost-effective solution for backup storage, as you only pay for what you use. Additionally, you can reduce costs by leveraging features such as data compression, deduplication, and tiered storage.
- Reliable: Azure Storage is designed for high durability, meaning your data is safe and available even in the event of hardware failures or other issues. Additionally, Azure Storage provides multiple redundancies, so you can rest assured that your data is safe.
- Scalable: Azure Storage can scale to meet your changing storage needs, from small backups to large enterprise backups. You can easily add or remove storage as needed, without any disruption to your backup processes.
- Secure: Azure Storage provides a variety of security features, including encryption, access controls, and network isolation. Additionally, Azure Storage is compliant with a variety of industry standards, such as HIPAA, PCI DSS, and ISO 27001.
Challenges of Using Azure Storage as a Backup Location:
- Bandwidth limitations: The amount of data you can transfer to Azure Storage is limited by your available bandwidth. If you have a slow internet connection, it may take a long time to upload large backups to Azure Storage.
- Data retrieval time: Retrieving data from Azure Storage can take longer than retrieving data from local backups. This is because data must be transferred over the internet, which can be slower than transferring data over a local network.
- Data transfer costs: If you have a limited internet connection, transferring data to and from Azure Storage can be expensive. Additionally, data transfer costs can add up if you need to retrieve large backups frequently.
Setting up and Managing Backups with Azure Storage:
- Create a storage account: The first step in using Azure Storage as a backup location is to create a storage account. This can be done through the Azure portal or using Azure PowerShell.
- Create a backup policy: Next, you will need to create a backup policy that defines the backup schedule, retention policy, and other settings. You can create a backup policy through the Azure portal or using Azure PowerShell.
- Configure backup settings: Once you have a backup policy in place, you can configure the backup settings for each resource you want to backup. This can be done through the Azure portal or using Azure PowerShell.
- Monitor backups: It’s important to monitor your backups to ensure they are running smoothly and that your data is protected. You can monitor backups through the Azure portal or using Azure PowerShell.
How to create a backup policy for an Azure VM
- Navigate to the Azure portal and select the Virtual Machines service.
- Select the VM you want to backup and navigate to its Settings.
- Select the Backup option from the menu.
- Click on the “Backup” button to create a new backup policy.
- In the Backup Policy window, enter a name for the policy.
- Select the backup frequency, retention period, and the time when the backup should be taken.
- Under the Backup Configuration section, select the type of backup you want to take, such as full or incremental backup.
- In the Encryption Settings section, you can choose to encrypt your backups if desired.
- Review your backup policy settings and click on the “Create” button to save the policy.
Once you have created a backup policy, you can configure backup settings for your VM, including what data should be backed up, which storage account to use, and any custom settings you may require. With the backup policy and settings in place, your VM’s data will be regularly backed up to Azure Storage, ensuring that your data is protected and available when you need it.
Why would you use Azure Storage as a backup location?
There are several reasons why using Azure Storage as a backup location can be a good choice:
- Cost-effective: Azure Storage is a cost-effective solution for storing backups. You only pay for the amount of storage you use, and there are no upfront costs or long-term commitments required.
- Scalability: Azure Storage can scale up or down to meet your backup storage needs. You can start with a small storage account and expand as needed, without having to worry about running out of storage space.
- Reliability: Azure Storage is designed for high availability, durability, and performance. Your backups will be stored in multiple copies across different data centers, ensuring that your data is always available when you need it.
- Security: Azure Storage provides several security features to protect your backups, including encryption, access control, and auditing. You can also choose to store your backups in a specific region or replication type to meet your compliance requirements.
- Integration: Azure Storage integrates with other Azure services, such as Azure Backup, Azure Site Recovery, and Azure File Sync, making it easy to set up and manage your backups.
By using Azure Storage as a backup location, you can have peace of mind knowing that your data is stored securely and is always available when you need it. Additionally, it can save you money and provide flexibility in terms of scaling up or down as your backup storage needs change over time.
FAQs:
Can I use Azure Storage as a backup location for on-premises data?
Yes, you can use Azure Backup to backup on-premises data to Azure Storage.
Can I backup Azure VMs to Azure Storage?
Yes, you can use Azure Backup to backup Azure VMs
Can I backup other cloud services to Azure Storage?
Yes, you can back up a variety of cloud services, such as Azure SQL Database, Azure Files, and Azure Virtual Machines, to Azure Storage.
Can I encrypt my backups stored in Azure Storage?
Yes, Azure Storage provides several encryption options, including client-side encryption and server-side encryption.
What types of data can I backup to Azure Storage?
Azure Storage supports the backup of various types of data, including files, databases, virtual machines, and other types of workloads.
Can I access my backups stored in Azure Storage from anywhere?
Yes, you can access your backups from anywhere with an internet connection. Azure Storage supports REST APIs, PowerShell, and other tools that make it easy to access your data from various locations.
How long does it take to restore a backup stored in Azure Storage?
The time it takes to restore a backup depends on several factors, such as the size of the backup, the speed of the internet connection, and the type of data being restored. In general, larger backups and data-intensive workloads may take longer to restore.
Can I automate the backup process in Azure Storage?
Yes, you can use Azure Automation or PowerShell scripts to automate the backup process in Azure Storage. This can help you save time and ensure that your backups are taken regularly without manual intervention.
Can I monitor the backup status and health of my Azure Storage account?
Yes, Azure Storage provides several monitoring and reporting features that allow you to track the health and performance of your storage account. You can also set up alerts to receive notifications when backup jobs fail or when storage usage exceeds certain thresholds.
How do I ensure my backups are secure in Azure Storage?
Azure Storage provides several security features, such as encryption, access control, and auditing, to help ensure your backups are secure. You can also take additional measures, such as using a virtual private network (VPN) or multi-factor authentication (MFA) to protect your backups.
How can I see how much Azure Storage my backups are consuming?
Use Cloud Storage Manager to view the size of your Azure Storage Accounts. See all the storage you are consuming across your whole Azure Tenancy in one easy to use Window.

by Mark | Feb 14, 2023 | AWS, Azure
Best Practices for Ensuring Uptime and Reliability of Virtual Machines in AWS and Azure
Cloud computing has become an essential tool for businesses looking to increase efficiency, reduce costs, and improve reliability. Among the most popular cloud providers, Amazon Web Services (AWS) and Microsoft Azure are two of the leading players in the industry. Both AWS and Azure offer Infrastructure as a Service (IaaS) solutions that allow businesses to host and manage virtual machines in the cloud. However, as with any technology, there are best practices to follow to ensure that your virtual machines are running optimally and with minimal downtime. In this article, we will explore the best practices for ensuring uptime and reliability in both AWS and Azure.
AWS Best Practices for Virtual Machine Uptime
-
Plan for redundancy and high availability: In AWS, you can use various tools such as Amazon Elastic Compute Cloud (EC2) Auto Scaling, Amazon EC2 Placement Groups, and Amazon Elastic Load Balancer to ensure high availability and automatic failover in the event of a failure. By using these tools, you can ensure that your applications are always available and running smoothly, even in the event of a failure or outage.
-
Use Amazon Elastic Block Store (EBS) for storage: EBS is a reliable, highly available, and scalable block storage service that is designed to be used with EC2 instances. EBS volumes are automatically replicated within an availability zone to protect your data from failures. To ensure that your data is safe, it’s best to store your data on EBS volumes and regularly backup your data to Amazon S3.
-
Implement security best practices: AWS provides a variety of security features to help protect your virtual machines and data. It’s important to implement these security best practices, including setting up firewalls, using encryption, and monitoring logs for unusual activity. Additionally, you should use Amazon Virtual Private Cloud (VPC) to create a secure and isolated network environment for your virtual machines.
Azure Best Practices for Virtual Machine Uptime
- Use Azure Availability Sets: Azure Availability Sets ensure that virtual machines are distributed across multiple physical servers to provide high availability and fault tolerance. By using Availability Sets, you can ensure that your virtual machines are always available, even in the event of a hardware failure or maintenance event.
- Implement load balancing: Load balancing is an important aspect of ensuring the availability and reliability of virtual machines in Azure. Azure Load Balancer provides network load balancing capabilities to distribute incoming traffic across multiple virtual machines. This helps ensure that your applications are always available, even during periods of high traffic.
- Use Azure Backup for data protection: Azure Backup is a reliable and cost-effective solution for backing up data in the cloud. By using Azure Backup, you can easily protect your virtual machines and data, and quickly recover in the event of a failure or disaster.
Benefits of AWS and Azure
Infrastructure as a Service (IaaS) provides a cost-effective and scalable solution for organizations looking to move their IT infrastructure to the cloud. Both AWS and Azure offer several benefits for businesses, including:
AWS Benefits
- Flexibility: AWS provides a wide range of services and tools, making it easy to build and run applications in the cloud. It also allows businesses to scale resources up or down as needed, making it a flexible solution for organizations of all sizes.
- Reliability: AWS has a proven track record of reliability, with a global network of data centers that provide high availability and low latency. It also offers disaster recovery solutions to help ensure business continuity.
- Security: AWS offers robust security features and tools, including encryption, access controls, and security auditing capabilities.
- Cost Savings: With a pay-as-you-go pricing model, AWS allows businesses to only pay for the resources they use, helping to reduce costs compared to traditional IT infrastructures.
Azure Benefits
- Scalability: Azure provides a highly scalable platform, allowing businesses to quickly add or remove resources as needed.
- Hybrid Capabilities: Azure allows organizations to seamlessly integrate their existing IT infrastructure with the cloud, making it a great option for organizations looking to modernize their IT systems.
- Global Reach: Azure has a global network of data centers, allowing businesses to deploy applications and services in multiple regions for increased performance and resiliency.
- Integration: Azure offers a range of integrated tools and services, making it easy for businesses to build and manage applications and services in the cloud.

Azure and AWS FAQ
Here are some of the most common questions and answers related to AWS and Azure:
Which is better, AWS or Azure?
There is no clear winner as both AWS and Azure have their own strengths and weaknesses. The best solution for your organization will depend on your specific needs, including the types of applications you want to run, your budget, and your preferred development platform.
How much does it cost to use AWS or Azure?
The cost of using AWS or Azure will depend on the specific services you use and the amount of resources you need. Both platforms offer a pay-as-you-go pricing model, allowing you to only pay for the resources you use.
Can I run Windows applications on AWS or Azure?
Yes, both AWS and Azure support the deployment of Windows-based applications and services.
Can I integrate my existing IT infrastructure with AWS or Azure?
Yes, both AWS and Azure provide tools and services for integrating your existing IT infrastructure with the cloud, including hybrid cloud solutions.
Are AWS and Azure secure?
Both AWS and Azure have a strong focus on security and provide a range of security features and tools, including encryption, access controls, and security auditing capabilities.
What are the main differences between AWS and Azure?
Both AWS and Azure are leading cloud service providers, but they differ in terms of pricing, available services, and their target audiences. AWS has a more extensive range of services and is known for its cost-effectiveness and scalability, making it popular among small and large businesses alike. On the other hand, Azure focuses more on enterprise-level customers and has a more comprehensive suite of DevOps and development tools.
What are the main benefits of using AWS or Azure?
Both AWS and Azure offer a range of benefits to businesses looking to move to the cloud. These include cost savings, increased agility and flexibility, improved scalability and reliability, and access to a wider range of tools and services. Additionally, both AWS and Azure provide robust security measures and are compliant with various industry standards, making them ideal for businesses looking to keep their data safe and secure.
Can I run Windows applications on AWS or Azure?
Yes, you can run Windows applications on both AWS and Azure. Both cloud service providers offer virtual machines (VMs) that can run Windows, allowing you to host and run Windows applications in the cloud. AWS provides EC2 instances that can run Windows Server, while Azure provides VMs that run Windows Server and Windows Desktop operating systems.
How can I migrate my existing applications to AWS or Azure?
Both AWS and Azure offer a range of tools and services to help businesses migrate their existing applications to the cloud. This can include using migration tools, such as AWS Database Migration Service and Azure Site Recovery, or using cloud-based solutions to build new applications from scratch. Additionally, both AWS and Azure offer professional services to help businesses with their migration journey, including consulting, training, and support.
What is the pricing model for AWS and Azure?
AWS and Azure both use a pay-as-you-go pricing model, where you only pay for the services you use. This includes charges for compute, storage, and data transfer, as well as additional charges for premium services and features. Both AWS and Azure offer a range of pricing options to meet the needs of different businesses, including reserved instances, spot instances, and on-demand pricing. To determine the most cost-effective pricing option for your business, it’s important to evaluate your specific needs and requirements. Both Cloud Providers have pricing calculators, Microsoft Azure Pricing Calculator and AWS Pricing Calculator.
Conclusion
Infrastructure as a Service (IaaS) provides a cost-effective and scalable solution for organizations looking to move their IT infrastructure to the cloud. Both AWS and Azure offer a range of benefits and services, making them a great option for businesses of all sizes. When choosing between the two, it is important to consider your specific needs, including the types of applications you want

by Mark | Feb 13, 2023 | Azure, Azure Blobs, Storage Accounts
What are the Limits of Azure Storage?
As businesses increasingly rely on cloud storage solutions to store and manage their data, it’s essential to understand the limits of the storage options available to them. One popular cloud storage platform is Azure Storage, which offers a range of storage options including Blob storage, Queue storage, Table storage, and Virtual Machine disk storage. Understanding the limits of these storage options is key to ensuring the performance and stability of your data storage, and avoiding potential issues that can arise from exceeding these limits.
This comprehensive guide will provide an overview of the limits of Azure Storage, including Azure Blob storage limits, Azure Queue storage limits, Azure Table storage limits, and Virtual machine disk limits. Whether you’re a new or experienced user of Azure Storage, this guide will provide the information you need to make informed decisions about your data storage. Additionally, this guide will answer frequently asked questions about the limits of Azure Storage, so you can have a clear understanding of the restrictions and limitations of this cloud storage platform.
Types of Azure Storage
Azure Storage offers several types of storage to meet different storage needs:
Blob storage is optimized for storing unstructured data such as text and binary data, including images, videos, and audio files. Blob storage can be accessed via HTTP or HTTPS.
File storage offers a fully managed file share in the cloud, enabling organizations to migrate their applications that require file system semantics to Azure. File storage supports the Server Message Block (SMB) protocol, making it easy to mount file shares from Windows and Linux-based virtual machines.
Queue storage is a messaging service that enables communication between application components. It allows messages to be sent between different application components asynchronously.
Table storage is a NoSQL key-value store that can store large amounts of structured data. It is designed to support low latency and high availability for applications that need to store large amounts of data.
Limits of Azure Storage
While Azure Storage provides many benefits, it also has its limits. Here are some of the common limits of Azure Storage:
Account and Subscription Limits
Each Azure Storage account and subscription has a set of limits that govern the amount of data that can be stored, the number of requests that can be made, and the performance of the storage service.
Performance Limits
Azure Storage imposes performance limits on the amount of data that can be read or written to the storage service. This limit is determined by the size and number of disks attached to the virtual machine that is accessing the storage service.
Capacity Limits
Azure Storage has a limit on the amount of data that can be stored in a single storage account. This limit depends on the type of storage account and the redundancy options selected.
Scalability Limits
Azure Storage is designed to scale horizontally, allowing you to add additional storage resources as your data grows. However, there are limits to how much you can scale, and adding more storage resources may not always result in better performance.
Azure Storage Limits Overview
In order to ensure the performance and stability of Azure Storage, Microsoft has set certain limits on various aspects of storage, such as the number of requests per second, the size of data, and the number of operations per second. These limits are subject to change, and Microsoft may increase or decrease them based on the current usage and demand.
Azure Blob storage limits
Azure Blob storage is a highly scalable and cost-effective option for storing unstructured data, such as images, videos, audio, and documents. However, it’s important to be aware of the following limits when using Blob storage:
- Maximum Blob size: The maximum size for a single Blob in Azure Blob storage is 4 TB.
- Maximum number of Blobs per container: There is no hard limit to the number of Blobs that can be stored in a container, but there are performance implications for storing large numbers of Blobs in a single container.
- Maximum number of containers per storage account: A single storage account can contain up to 500 Tb of data, spread across an unlimited number of containers.
Azure Queue storage limits
Azure Queue storage is a scalable and reliable option for storing large amounts of messages that can be read and processed by multiple applications. However, it’s important to be aware of the following limits when using Queue storage:
- Maximum size of a message: A single message in a queue can be up to 64 KB in size.
- Maximum number of messages in a queue: There is no hard limit to the number of messages that can be stored in a queue, but there are performance implications for storing large numbers of messages.
- Maximum number of queues per storage account: A single storage account can contain an unlimited number of queues.
Azure Table storage limits
Azure Table storage is a scalable and flexible option for storing structured NoSQL data. However, it’s important to be aware of the following limits when using Table storage:
- Maximum size of an entity: An individual entity in a table can be up to 1 MB in size.
- Maximum number of entities per table: There is no hard limit to the number of entities that can be stored in a table, but there are performance implications for storing large numbers of entities in a single table.
- Maximum number of tables per storage account: A single storage account can contain an unlimited number of tables.
Virtual machine disk limits
Virtual Machine disk storage is used to store data for virtual machines in Azure. It’s important to be aware of the following limits when using virtual machine disk storage:
- Maximum disk size: The maximum size of a disk in Azure depends on the disk type, with the maximum size being up to 4 TB for premium SSDs and up to 512 GB for standard disks.
- Maximum number of disks per virtual machine: The maximum number of disks that can be attached to a virtual machine depends on the virtual machine size, with the maximum number being 64 disks for some of the largest virtual machine sizes.
- Maximum number of disks per storage account: A single storage account can contain an unlimited number of disks.
Overcoming Azure Storage Limits
To overcome the limits of Azure Storage, here are some best practices to follow:
Monitoring and Alerting
It is essential to monitor your Azure Storage accounts regularly and set up alerts to notify you when you are approaching your storage limits. This will enable you to take corrective action before you reach your storage limits. Use Cloud Storage Manager to see how much Azure Storage you are using. Use the inbuilt reports to see where you can optimise usage and reduce costs.
Optimizing Storage Utilization
You can optimize storage utilization by removing unused data, compressing data, and using appropriate storage tiers for different types of data. Using Cloud Storage Manager, to help reduce storage costs and ensure that your storage resources are being used efficiently.
Scaling Storage Resources
If you need to overcome the scalability limits of Azure Storage, you can scale your storage resources horizontally by adding more storage accounts, using sharding techniques, or using Azure Storage Data Box. By scaling your storage resources, you can accommodate more data and ensure that your storage system can handle the load.
Azure Storage Limits FAQs
Can I increase the limits of Azure Storage?
Yes, in some cases, you can increase the limits of Azure Storage by submitting a request to Microsoft. However, not all limits are adjustable, and the process of increasing limits can take time.
What happens if I exceed the limits of Azure Storage?
If you exceed the limits of Azure Storage, you may experience reduced performance, timeouts, or errors. To avoid these issues, it’s important to monitor your storage usage and plan accordingly.
Are the limits of Azure Storage different for different regions?
Yes, the limits of Azure Storage may vary between different regions due to differences in infrastructure and available resources. It’s important to check the limits for your specific region in the Azure documentation.
Can I increase the limits of Azure Storage?
Yes, in some cases, you can request an increase in the limits of Azure Storage. However, this may not be possible for all limits and depends on the specific limit and your usage scenario.
Is there a limit to the number of storage accounts I can have in Azure?
Yes, there is a limit to the number of storage accounts you can have in Azure, and it depends on the Azure subscription and the region you are using. It is recommended to check the Azure documentation for the most up-to-date information on storage account limits.
Can I store data in Azure Storage if I don’t have an Azure subscription?
No, you need an Azure subscription to store data in Azure Storage.
Are there any restrictions on the type of data I can store in Azure Storage?
Yes, there are restrictions on the type of data that can be stored in Azure Storage. Azure enforces strict compliance policies and regulations for storing certain types of data, such as personal data and sensitive information.
Can I store files larger than 4 TB in Azure Blob storage?
No, the maximum size for a single Blob in Azure Blob storage is 4 TB. If you need to store larger files, you may need to use multiple Blobs or consider other storage solutions.
How do I know I am at my Azure Storage Limits?
Use Cloud Storage Manager to scan all your Azure storage and provide you with just how much Azure Storage you are using. You can also run reports like what are my biggest Storage Accounts, How many blobs do I have in each Storage Account, plus loads more reports.
Final Thoughts
In conclusion, understanding the limits of Azure Storage is essential for ensuring the performance and stability of your data storage. By familiarizing yourself with the limits of Azure Blob storage, Queue storage, Table storage, and Virtual Machine disk limits, you can plan your storage usage accordingly and avoid potential issues. Whether you’re a new or experienced user of Azure Storage, this comprehensive guide is an excellent resource for staying ahead of storage limitations.
Azure Storage Unlocked
Please fill out the form below to get our free Ebook "Azure Storage Unlocked" emailed to you
FREE DOWNLOAD

by Mark | Feb 13, 2023 | Azure, Azure Blobs, Azure FIles, Blob Storage
An Overview of Azure Regions
Azure Storage is a cloud-based storage solution that provides highly available, secure, scalable, and durable storage for your data. Azure Storage provides multiple types of storage options, including Blob storage, File storage, Queue storage, and Table storage. One of the critical factors in selecting Azure Storage is choosing the right region for your data. In this article, we’ll discuss Azure Storage Regions in detail and provide a comprehensive guide to help you make an informed decision.
Types of Azure Storage Regions
When you sign up for Azure Storage, you can choose the region where you want to store your data. Azure Storage is available in over 60 regions worldwide, with more regions being added regularly. The following are the types of Azure Storage Regions:
Geo-Redundant Storage (GRS)
This type of Azure Storage Region provides automatic and synchronous data replication to a secondary region that is located hundreds of miles away from the primary region. In the event of a disaster or outage in the primary region, the secondary region can take over without any data loss. GRS provides high durability and availability for your data and is ideal for mission-critical applications.
Read-Access Geo-Redundant Storage (RA-GRS)
RA-GRS extends the GRS functionality by allowing read-only access to the data in the secondary region. This feature allows you to serve read-only requests from the secondary region in case of an outage in the primary region. This type of Azure Storage Region provides the highest level of durability and availability for your data and is ideal for applications that require both high durability and read access to data in the secondary region.
Locally Redundant Storage (LRS)
LRS provides synchronous data replication within a single region. In the event of an outage, your data is still available and retrievable. LRS provides high durability for your data and is ideal for non-critical applications that do not require replication to a secondary region.
Zone-Redundant Storage (ZRS)
ZRS provides data replication across multiple zones within a single region. In the event of a zone outage, your data is still available and retrievable from another zone in the same region. ZRS provides high durability and availability for your data and is ideal for applications that require low latency and high throughput.
Benefits of Azure Storage Regions
Azure Storage Regions provide several benefits, including:
- High availability and durability for your data.
- The ability to store your data closer to your users, reducing latency.
- Compliance with local data residency requirements.
- Cost savings by choosing the right region for your data.
Key Factors to Consider When Choosing an Azure Storage Regions
When choosing an Azure Storage Region, there are several key factors to consider, including:
Latency:
The time it takes for data to travel from your users to the Azure Storage region and back. Choosing a region closer to your users can reduce latency and improve the performance of your applications.
Data residency:
The physical location where your data is stored. Some countries have specific data residency requirements that you need to comply with. Choosing a region that meets your data residency requirements can help you avoid legal and regulatory issues.
Cost:
Azure Storage pricing varies by region, so it’s important to choose a region that provides cost savings for your business.
Compliance:
Some regions may have specific compliance requirements, such as GDPR or HIPAA. Choosing a region that meets your compliance requirements can help you avoid legal and regulatory issues.
Frequently Asked Questions (FAQs)
What is Azure Storage?
Azure Storage is a cloud-based storage solution that provides highly available, secure, scalable, and durable storage for your data.
What are the types of Azure Storage Regions?
The types of Azure Storage Regions include Geo-Redundant Storage (GRS), Read-Access Geo-Redundant Storage (RA-GRS), Locally Redundant Storage (LRS), and Zone-Redundant Storage (ZRS).
What are the benefits of Azure Storage Regions?
The benefits of Azure Storage Regions include high availability and durability, the ability to store data closer to users and reduce latency, compliance with local data residency requirements, and cost savings.
What factors should I consider when choosing an Azure Storage Region?
When choosing an Azure Storage Region, consider factors such as latency, data residency, cost, and compliance requirements.
What is the difference between GRS and RA-GRS?
GRS provides automatic and synchronous data replication to a secondary region that is located hundreds of miles away from the primary region, while RA-GRS extends the GRS functionality by allowing read-only access to the data in the secondary region.
Is there a limit to the amount of data I can store in Azure Storage?
No, there is no limit to the amount of data you can store in Azure Storage.
How does Azure ensure the security of my data in the cloud?
Azure implements various security measures to ensure the security of your data in the cloud, including encryption at rest and in transit, access control, and network security.
Can I access my data from any region?
Yes, you can access your data from any region using the Azure Storage API or the Azure portal.
How is the cost of Azure Storage calculated?
The cost of Azure Storage is based on the amount of data stored, the number of transactions performed, and the selected storage redundancy options.
Do I need to pay for data transfer between regions?
Yes, data transfer between regions is billed based on the amount of data transferred and the distance between the regions.
Do I need to pay for data transfer within a region?
No, data transfer within a region is free of charge.
Can I choose multiple regions for my Azure Storage?
Yes, you can choose multiple regions for your Azure Storage to provide additional resilience and disaster recovery options.
What is the difference between LRS and ZRS?
LRS provides synchronous data replication within a single region, while ZRS provides data replication across multiple zones within a single region.
Managing Your Azure Storage Regions with Cloud Storage Manager
One of the biggest challenges with managing data in the cloud is keeping track of where your data is stored and how much you’re using. This is especially true for businesses that are using multiple Azure Storage Regions to store their data. Fortunately, there is a solution to help manage your Azure Storage Regions: Cloud Storage Manager.
Cloud Storage Manager is a powerful software that allows you to see where all your blob and file storage is being utilized in each Azure Region. With Cloud Storage Manager, you can easily understand your storage consumption, from how much data your Azure tenancy is using, down to each subscription, resource group, storage account, storage container, and even each individual blob.
This level of detail allows you to make informed decisions about where to store your data, based on factors such as cost, compliance requirements, and performance. You can also see how much data you’re storing in each region, which can help you determine if you need to move data to a different region to meet your storage needs.
In conclusion, Azure Storage Regions provide a critical factor in choosing the right storage solution for your business. With Cloud Storage Manager, you can easily manage your Azure Storage Regions, understand your storage consumption, and make informed decisions about where to store your data. Whether you need high availability, low latency, compliance with local regulations, or cost savings, Cloud Storage Manager and Azure Storage Regions can help you achieve your goals.
In conclusion, Azure Storage Regions provide a critical factor in choosing the right storage solution for your business. Understanding the different types of regions, their benefits, and the key factors to consider before making a decision can help you choose the right Azure Storage Region for your needs. Whether you need high availability, low latency, compliance with local regulations, or cost savings, Azure Storage Regions can help you achieve your goals. With over 60 regions worldwide and more being added regularly, you’re sure to find the right region for your data.
Azure Storage Unlocked
Please fill out the form below to get our free Ebook "Azure Storage Unlocked" emailed to you
FREE DOWNLOAD

by Mark | Feb 11, 2023 | Azure, VMWare
Azure Virtual Machines to VMware Migration
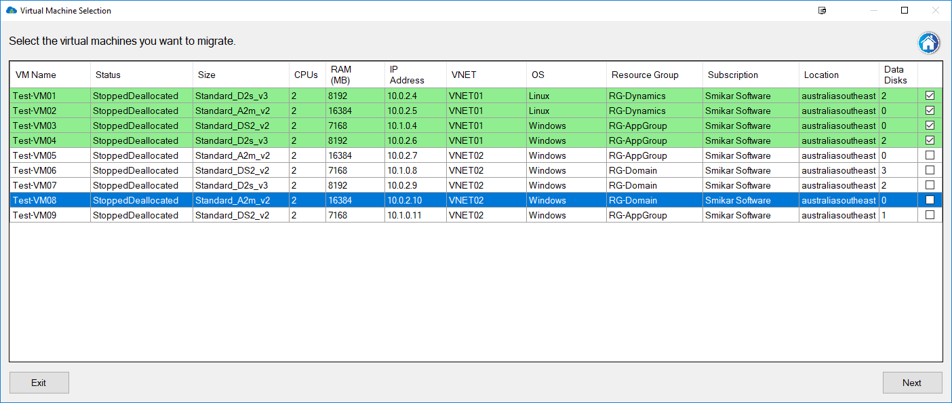
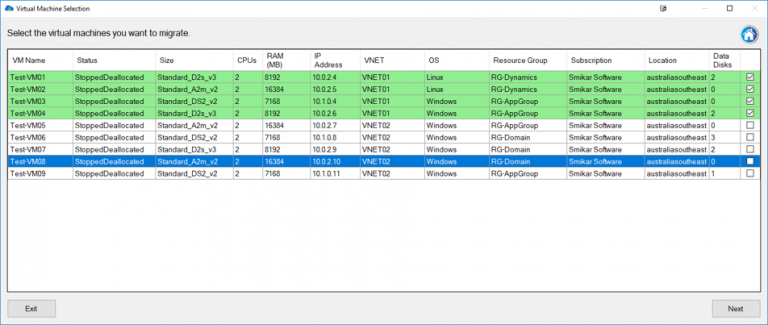
Migrating virtual machines from Microsoft Azure to VMware can be a complex and time-consuming process. But with the right planning and preparation, it can be a smooth and stress-free transition. In this blog post, we will be providing you with a comprehensive planning checklist to help guide you through the process of migrating Azure VMs to VMware. And with Carbon – the automated migration software – you can simplify and streamline the process even further.
Understanding the Migration Process
The process of migrating Azure VMs to VMware involves several steps. These steps include:
- Preparing the environment
- Configuring the migration settings
- Performing the actual migration
- Post-migration verification and cleanup
To help you successfully complete these steps, we have put together a comprehensive planning checklist. This checklist will help you gather all the necessary information, tools and resources, and ensure that you have a clear understanding of the migration process.
The Azure VM Migration Planning Checklist
Preparation
- Identify the VMs you need to migrate
- Gather information about the source environment (Azure)
- Gather information about the target environment (VMware)
- Plan the network infrastructure for the target environment
- Plan the storage infrastructure for the target environment
Configuration
- Download and install Carbon software
- Set up a migration project in Carbon
- Configure the migration settings in Carbon
- Plan and configure the network settings in the target environment
- Plan and configure the storage settings in the target environment
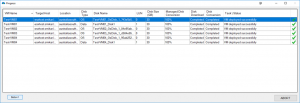
Migration
- Perform a test migration to ensure that everything is configured correctly
- Start the actual migration process
- Monitor the migration process to ensure that everything is running smoothly
- Resolve any issues that may arise during the migration process
Post-Migration
- Verify that the VMs have been successfully migrated to the target environment
- Clean up any unnecessary resources from the source environment
- Update the network and storage settings in the target environment if necessary
- Update any necessary DNS settings in the target environment
Common Migration FAQs
- What is Carbon? Carbon is an automated migration software that simplifies and streamlines the process of migrating Azure VMs to VMware. With Carbon, you can easily migrate your VMs with just a few clicks.
- What are the requirements for using Carbon? You will need to have an Azure account and a VMware environment to use Carbon. Carbon is compatible with both vSphere and vCenter.
- Can Carbon migrate multiple VMs at once? Yes, Carbon supports the migration of multiple VMs at once, making it a highly efficient and convenient tool for large-scale migrations.
- How long does it take to migrate VMs with Carbon? The time it takes to migrate VMs with Carbon depends on several factors, including the size and number of VMs, network speed, and storage capacity. In general, Carbon can complete a migration in a matter of hours, saving you time and effort compared to manual migration methods.
Azure VM to VMware Migration Conclusion
Migrating Azure VMs to VMware can be a complex process, but with the right planning and preparation, it can be a smooth and stress-free transition. By following the planning checklist outlined in this blog post, you can ensure that you have all the information, tools, and resources you need to complete the migration successfully. And with Carbon – the automated migration software – you
can simplify and streamline the process even further. With its user-friendly interface and support for multiple VMs, Carbon is the perfect tool to help you with your migration. So, why not try it out today and experience the ultimate solution for migrating Azure VMs to VMware.
In conclusion, The title of the blog post is “The Ultimate Planning Checklist for Migrating Azure VMs to VMware” is designed to provide you with a comprehensive guide to migrating Azure VMs to VMware. Whether you’re a seasoned IT professional or new to the world of virtualization, this checklist will help you successfully plan and execute your migration. And with the added benefits of using Carbon, you can simplify and automate the process, saving you time and effort in the process. So, start your migration today and see the benefits of migrating Azure VMs to VMware with Carbon!