Step by step how to upgrade SCCM to version 1810
What’s new in SCCM 1810?
Here is a quick run down of the exciting new features that Microsoft has added to SCCM for release 1810. You can see more information around this update on the Microsoft blog site.
Specify the drive for offline OS image servicing
Now you can specify the drive that Configuration Manager uses when adding software updates to OS images and OS upgrade packages.
Task sequence support for boundary groups
When a device runs a task sequence and needs to acquire content, it now uses boundary group behaviors similar to the Configuration Manager client.
Improvements to driver maintenance
Driver packages now have additional metadata fields for Manufacturer and Model which can be used to tag driver packages for general housekeeping.
Phased deployment of software updates
You can now create phased deployments for software updates. Phased deployments allow you to orchestrate a coordinated, sequenced rollout of software based on customizable criteria and groups.
Management insights dashboard
The Management Insights node now includes a graphical dashboard. This dashboard displays an overview of the rule states, which makes it easier for you to show your progress.
Management insights rule for peer cache source client version
The Management Insights node has a new rule to identify clients that serve as a peer cache source but haven’t upgraded from a pre-1806 client version.
Improvement to lifecycle dashboard
The product lifecycle dashboard now includes information for System Center 2012 Configuration Manager and later.
Windows Autopilot for existing devices task sequence template
This new native Configuration Manager task sequence allows you to reimage and re-provision an existing Windows 7 device into an AAD joined, co-managed Windows 10 using Windows Autopilot user-driven mode.
Improvements to co-management dashboard
The co-management dashboard is enhanced with more detailed information about enrollment status.
Required app compliance policy for co-managed devices
You can now define compliance policy rules in Configuration Manager for required applications. This app assessment is part of the overall compliance state sent to Microsoft Intune for co-managed devices.
SMS Provider API
The SMS Provider now provides read-only API interoperability access to WMI over HTTPS.
Site system on Windows cluster node
The Configuration Manager setup process no longer blocks installation of the site server role on a computer with the Windows role for Failover Clustering. With this change, you can create a highly available site with fewer servers by using SQL Always On and a site server in passive mode.
Configuration Manager administrator authentication
You can now specify the minimum authentication level for administrators to access Configuration Manager sites.
Improvements to CMPivot
CMPivot now allows you to save your favorite queries and create collections from the query summary tab. Over 100 new queryable entities added, including for extended hardware inventory properties. Additional improvements to performance.
New client notification action to wake up device
You can now wake up clients from the Configuration Manager console, even if the client isn’t on the same subnet as the site server.
New boundary group options
Boundary groups now include two new settings to give you more control over content distribution in your environment.
Improvements to collection evaluation
There are two changes to collection evaluation scheduling behavior that can improve site performance.
Approve application requests via email
you can now configure email notifications for application approval requests.
Repair applications
You can now specify a repair command line for Windows Installer and Script Installer deployment types.
Convert applications to MSIX
Now you can convert your existing Windows Installer (.msi) applications to the MSIX format.
Improvement to data warehouse
You can now synchronize more tables from the site database to the data warehouse.
Support Center
Use Support Center for client troubleshooting, real-time log viewing, or capturing the state of a Configuration Manager client computer for later analysis. Find the Support Center installer on the site server in the cd.latestSMSSETUPToolsSupportCenter folder.
Support for Windows Server 2019
Configuration Manager now supports Windows Server 2019 and Windows Server, version 1809, as site systems.
SCCM 1810 prerequisites
As with any update, you should make sure that you have all the prerequisites to install this update to Configuration Manager, prior to starting the upgrade process.
These prerequisites to SCCM 1810 are;
- Every site server within your existing Configuration Manager environment should be at the same version
- To install the update, the minimum SCCM version you can currently be on is version 1710. 1802 and 1806 are also accepted
- SQL 2017 CU2 Standard and Enterprise
- SQL 2016 SP2 Standard and Enterprise
- SQL 2016 SP1 Standard and Enterprise
- SQL 2016 Standard and Enterprise
- SQL 2014 SP3 Standard and Enterprise
- SQL 2014 SP2 Standard and Enterprise
- SQL 2014 SP1 Standard and Enterprise
- SQL 2012 SP4 Standard and Enterprise
- SQL 2012 SP4 Standard and Enterprise
- SQL 2012 SP3 Standard and Enterprise
- Windows Server x64
- Windows Server 2012 R2 x64
- Windows Server 2016
- Windows Server 2019 version 1809
How to upgrade SCCM to release 1810.
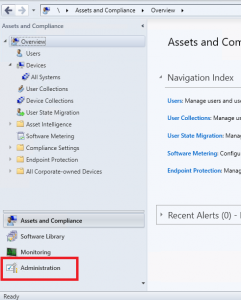
Step 1 – Administration Tab
Open you System Centre Configuration Manager Console and navigate to Administration
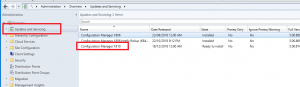
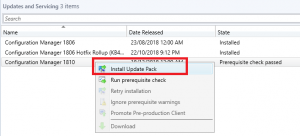
Step 2 – Updates and Servicing
Now click on Updates and Servicing and hopefully you should see the Configuration Manager 1810 update as highlighted in the attached picture.
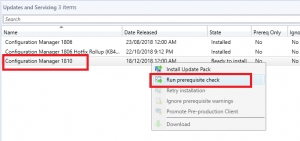
Step 3 – Check SCCM 1810 Prerequisites
Next, right click on the Configuration Manager 1810 update and choose Run Prerequisite Check
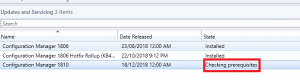
Step 4 – Checking Prerequisites
Now the SCCM 1810 prerequisites will run and check that the Configuration Manager 1810 update is compatible with your current system. This will take some time, so perhaps go make a coffee while you wait.
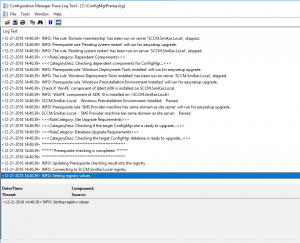
Step 5 – ConfigMgrPrereq.log
You can check the status of the prerequisite check by looking at the ConfigMgrPrereq.log located in the C: drive of your configuration management server.
As you can see in my logs, the prequisite check has passed.
Step 6 – Install Update Pack
Now the fun stuff begins. We are ready to start the upgrade process for SCCM.
Right click the Configuration Manger 1810 update and choose Install Update Pack
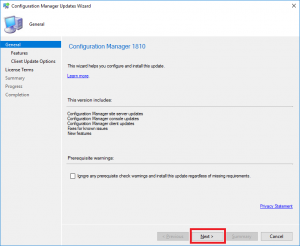
Step 7 – Start the installation process for SCCM 1810
On the Configuration Manager Updates Wizard, you can choose to Ignore any prerequisite check warnings and install this update regardless of missing requirements if you so wish.
As with any production environment, it’s always best case to never ignore any warnings, but we have had none in the previous check, so do not need to click this checkbox.
When you are ready to start the update process, click next.
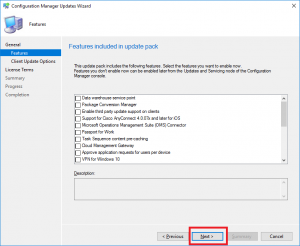
Step 8 – Features included in update pack
The next page on the wizard are various features you can install as part of this update.
Check if any of the features you will need and when ready click on next.
Step 9 – Review and accept the terms
You can review the license terms that Microsoft has for this update. Accept these by checking the checkbox and click Next

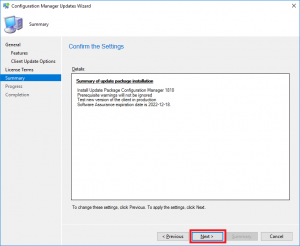
Step 10 – Summary
Review this page to confirm that all the settings and features you have chosen previously are correct, and again when ready click Next.
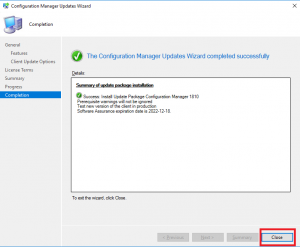
Step 11 – Installation Completed
Finally, the last screen of the Configuration Manager 1810 upgrade wizard is the completed screen. Review the summary and then click on Close.
SCCM will upgrade in the background. This can take sometime dependent on your infrastructure setup.
Step 12 – Check Installation Status
To check the status of your SCCM upgrade, you need to go to Overview, then Updates and Servicing Status.
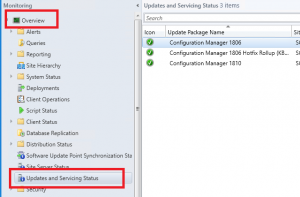
Step 13 – Show Upgrade Status
Select the Configuration Manager 1810, then right click and choose Show Status.

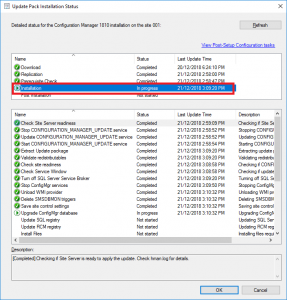
Step 14 – Update Pack Installation Status
Highlight Installation and you will see the status of all the components that are upgrading.
Keep on clicking Refresh until you see all the tasks with a green tick. Be mindful, this does take sometime.
Click on Close when they are all green.
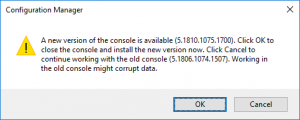
Step 15 – Update the Configuration Manager Console
Once all the ticks have gone green, click refresh within the SCCM console and you should be prompted with the Console Update.
Click on OK to proceed.
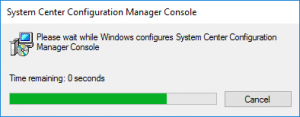
Step 16 – Update the Configuration Manager Console
The SCCM console update will download the required files and update your configuration manager console to the latest version
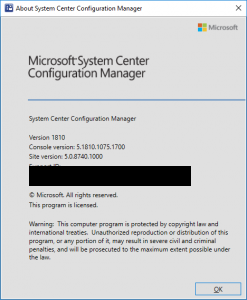
Step 17 – SCCM 1810 Upgrade Finished
Finally, SCCM has updated your Config Manager environment to release 1810
How to Snapshot your VMs before patching with SCCM and SnaPatch
Now that you have upgraded SCCM to the current branch 1810, here is a quick run down on how to use SnaPatch with SCCM to quickly and easily snapshot your VMs prior patching.
Mark Smith co-founded SmiKar Software in 2015 and has spent the past decade helping organisations solve Microsoft 365 data management challenges. He works with the SmiKar team to build solutions for SharePoint archiving, storage optimisation, governance and compliance, supporting customers from growing businesses through to Fortune 500 enterprises.
More about SmiKar